
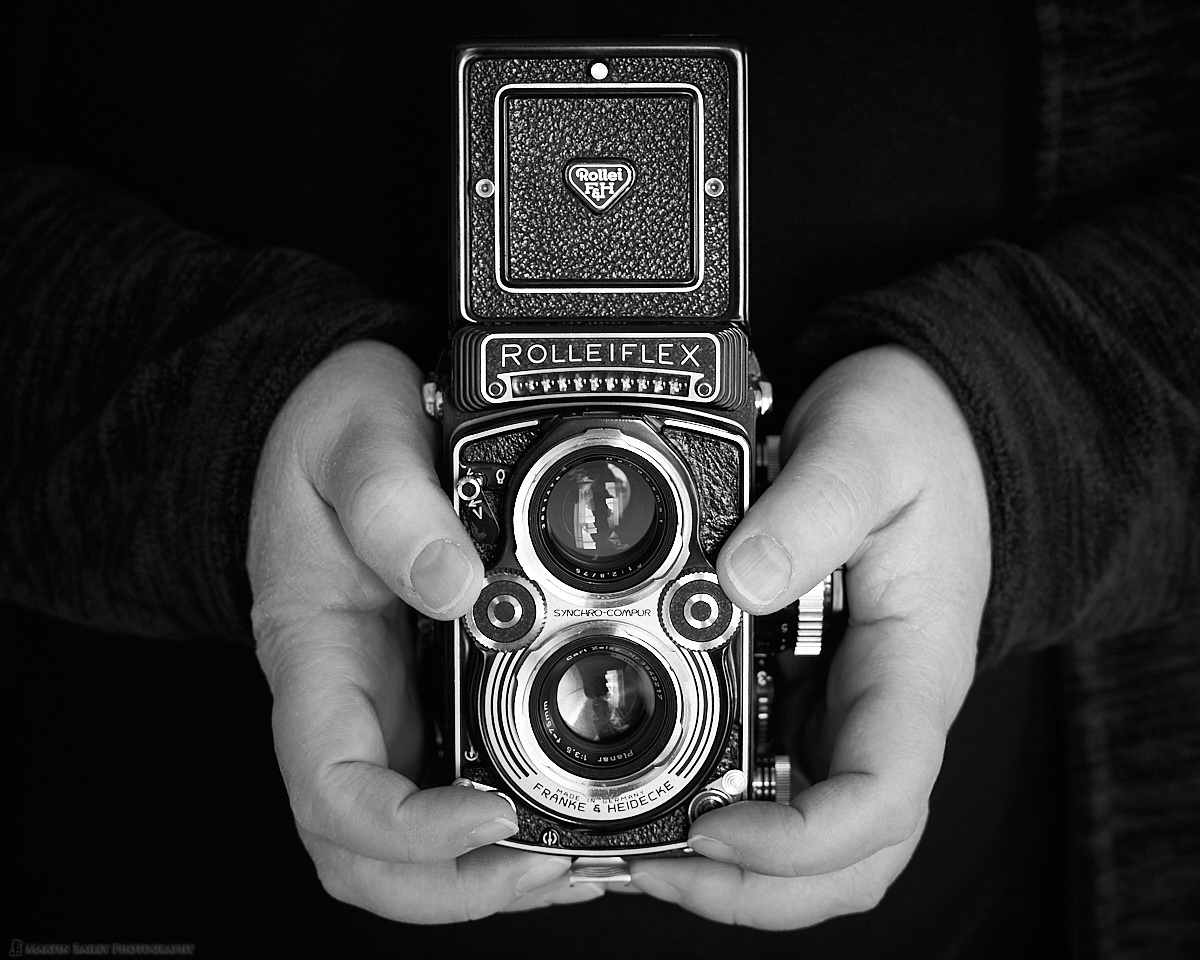
I recently picked up a Rolleiflex 3.5F TLR camera made two years before I was born, and have had a lot of fun researching and acquiring the accessories that I wanted for it, and, of course, actually shooting with this new camera, so today I'm going to share my findings with you.
If you are firmly in the digital camp, then this episode may not be of much interest to you, but keep a mental note of it and come back when the time is right. Unlike the rapid-paced update cycles of our digital camera, the camera I'm going to talk about is at this point 54 years old, making it two years older than me, so the technology isn't exactly going to be outdated if you come across this post a few years or even a few decades from now.
I've actually been hankering after a Rolleiflex camera for many years. Before I bought the Yashica-D twin-lens reflex camera that I showed you in my recent video about developing film with the Lab-Box, I had spent time in Map Camera, my favorite camera store here in Tokyo, dreaming of picking up one of these wonderful pieces of historic German engineering. Well, with the Lab-Box having reignited the fire in my passion for film, and having checked out my friend Brian Wood-Koiwa Rolleiflex during his recent visit, I figured it was time to jump down from the fence I'd been sitting on.
The Rolleiflex 3.5F with Original Box
I had also been periodically checking the Map Camera website for a good condition used Rolleiflex camera, and noticed one recently that I couldn't resist. For the same price as two other Rolleis the one I bought still had its case, a strap, the original diffuser, and the original box and user manual, whereas the others had just a strap, which is relatively common. Although I wasn't able to see the actual quality of the camera beforehand, I bought it online, as Map Camera gives you a month to return or exchange the camera if there is anything wrong with it, and when buying from them, even used cameras come with a one year warranty, which is comforting when buying camera gear.
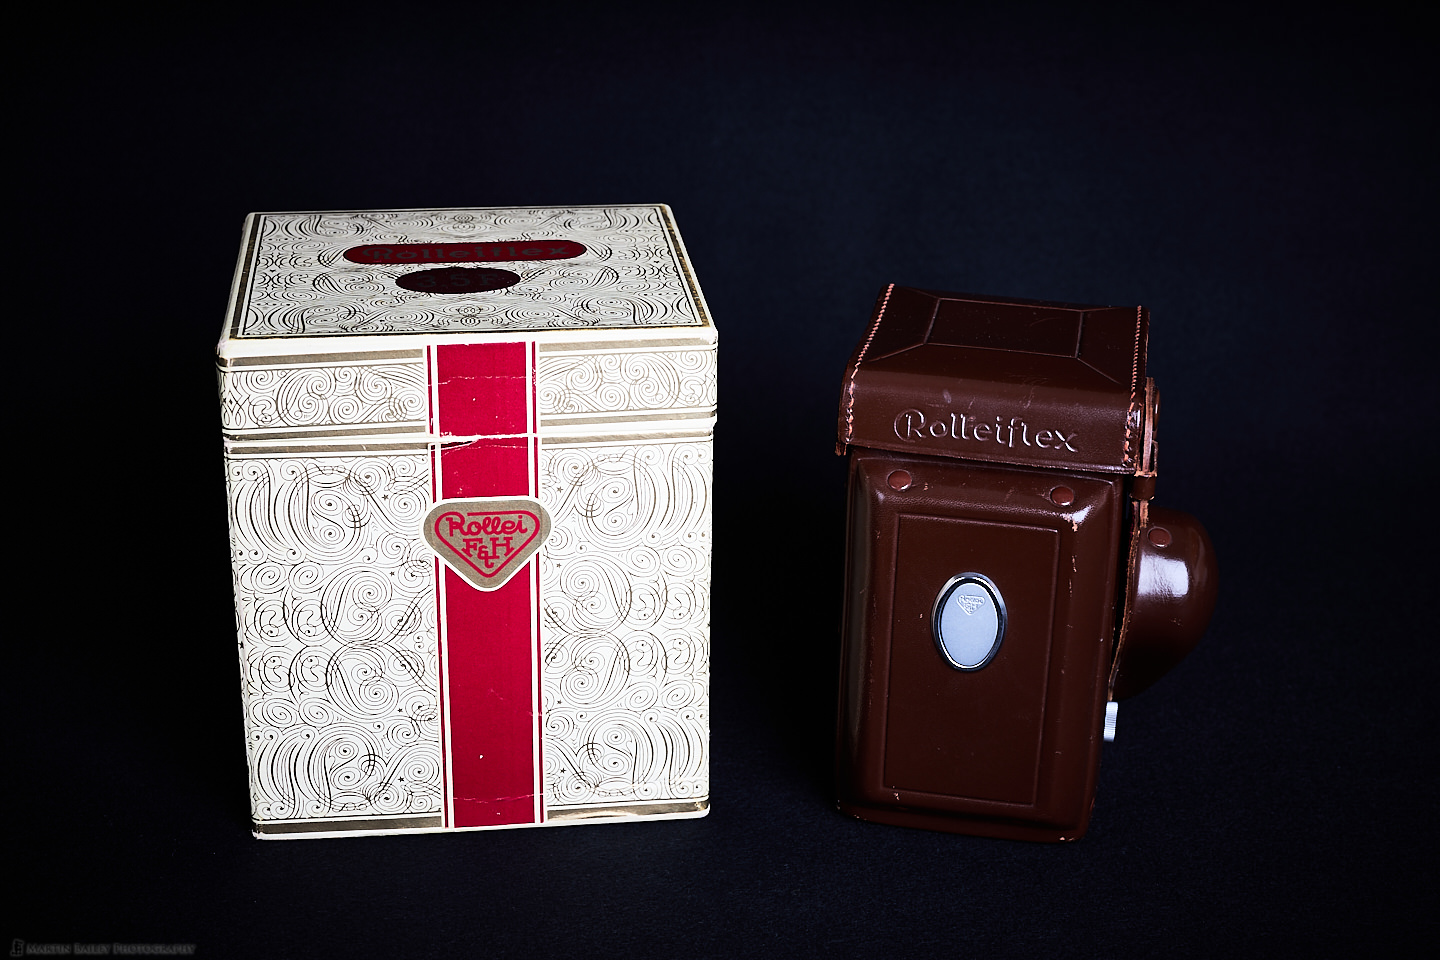
I probably paid more than you might expect to pay for a similar camera in the US, having dropped the equivalent of around $1,880 at the current exchange rate, but with all the accessories and warranty I'm happy enough with the price. I only paid around $200 for my Yashica-D on a flea market mind, so this was a difficult conversation to have with my wife, despite this being essentially a business expense for me, as I'm using this camera in my work.
Leather Case
As you can see, the camera comes with its own protective leather case that is extremely well-made. The front section just clips on to the main case and can be removed when shooting, leaving just the case around the camera, and the strap attaches to the case when it's on the camera, or directly to the camera when you take the case off. The manufacturers really seem to have left nothing out when it comes to details.
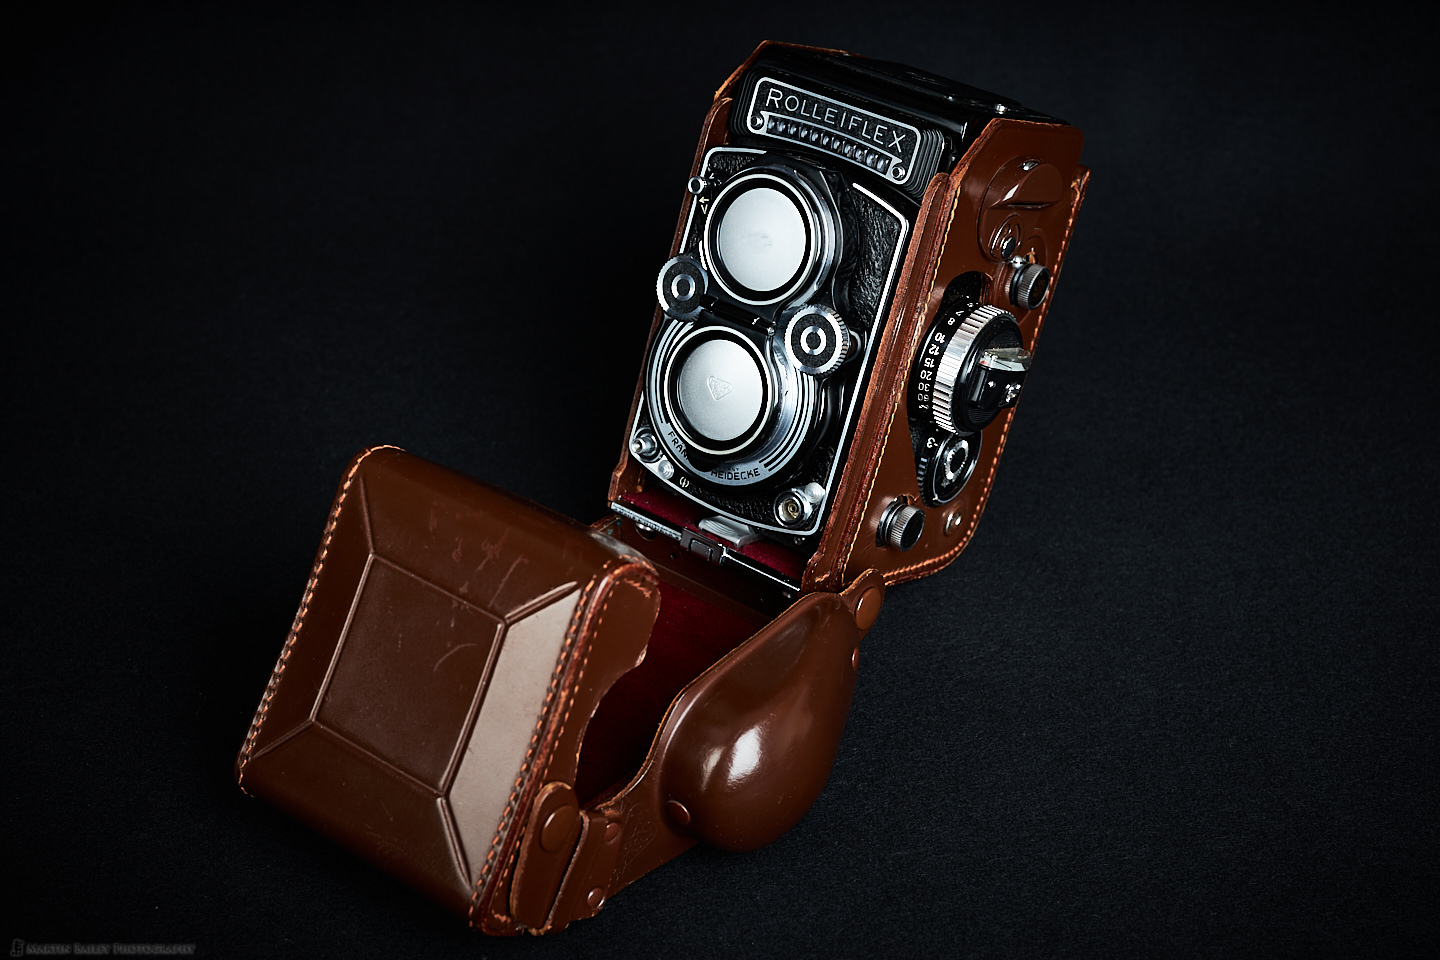
You can also see the lens cap in this photo when attaches to the top viewing lens via the same bayonet that you attach filters to, and then as you rotate it into place, it clips into the taking lens at the bottom. When you take it off, it folds into the size of one of the disks, so it can be stored easily.
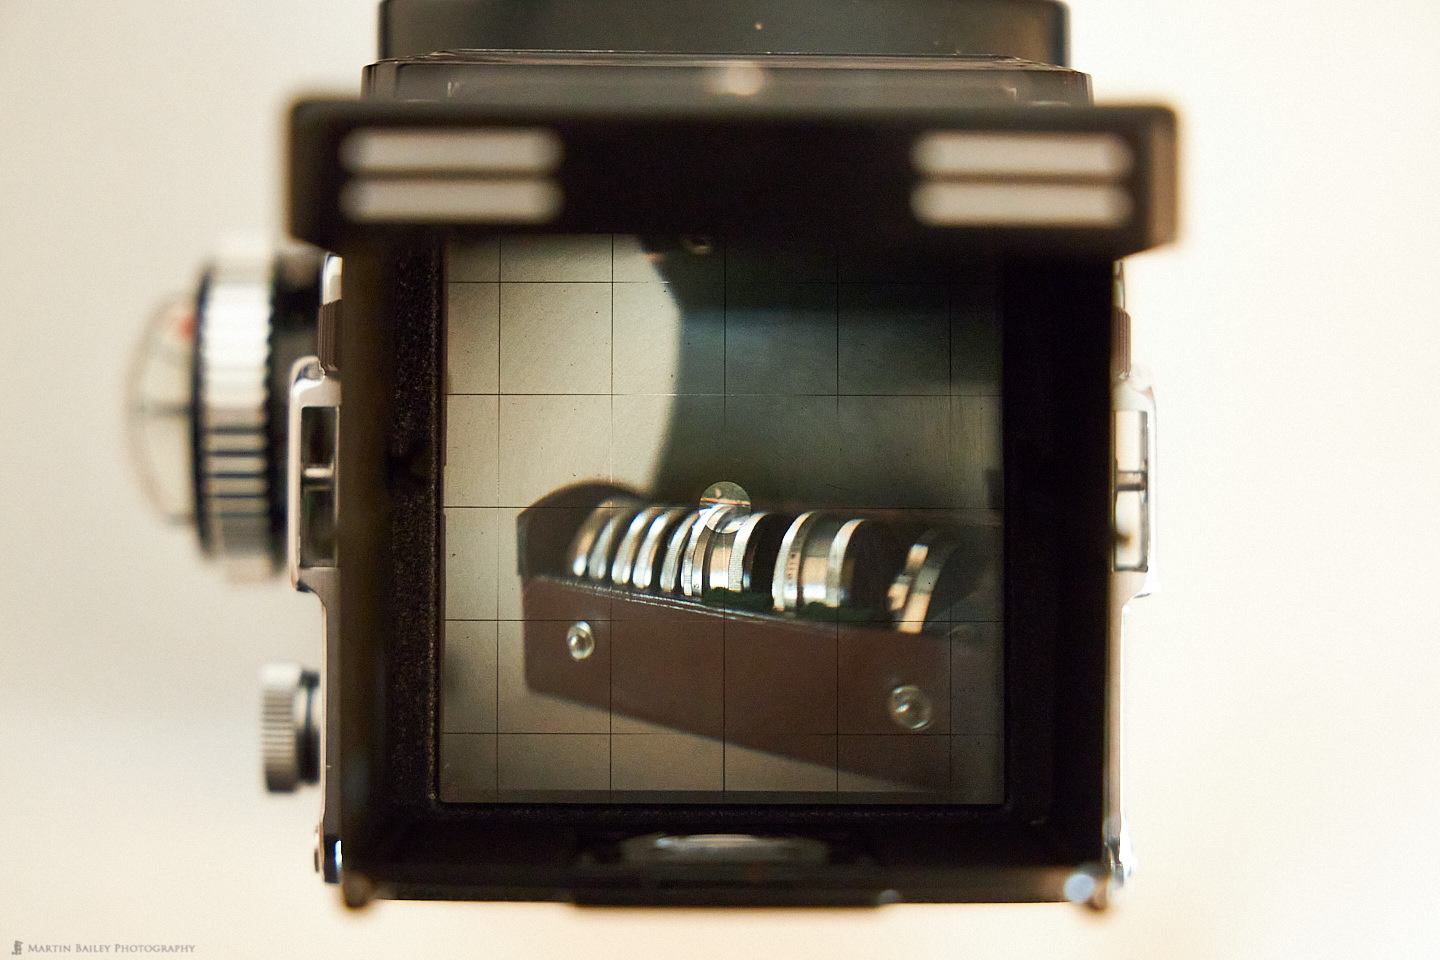
To focus and compose with the Rollei you flip the top viewfinder enclosure up, to expose the ground glass screen that you can see in this next image. There is a split circle in the middle of the screen that aligns when the subject is in focus and gradually shifts apart as the subject moves away from the focus plane. To enable you to see this there is a magnifier built into the cover which drops down parallel to the screen and I actually find it easier to both focus and compose using that magnifier, but being able to work at a distance as you see in this photo also has its benefits.
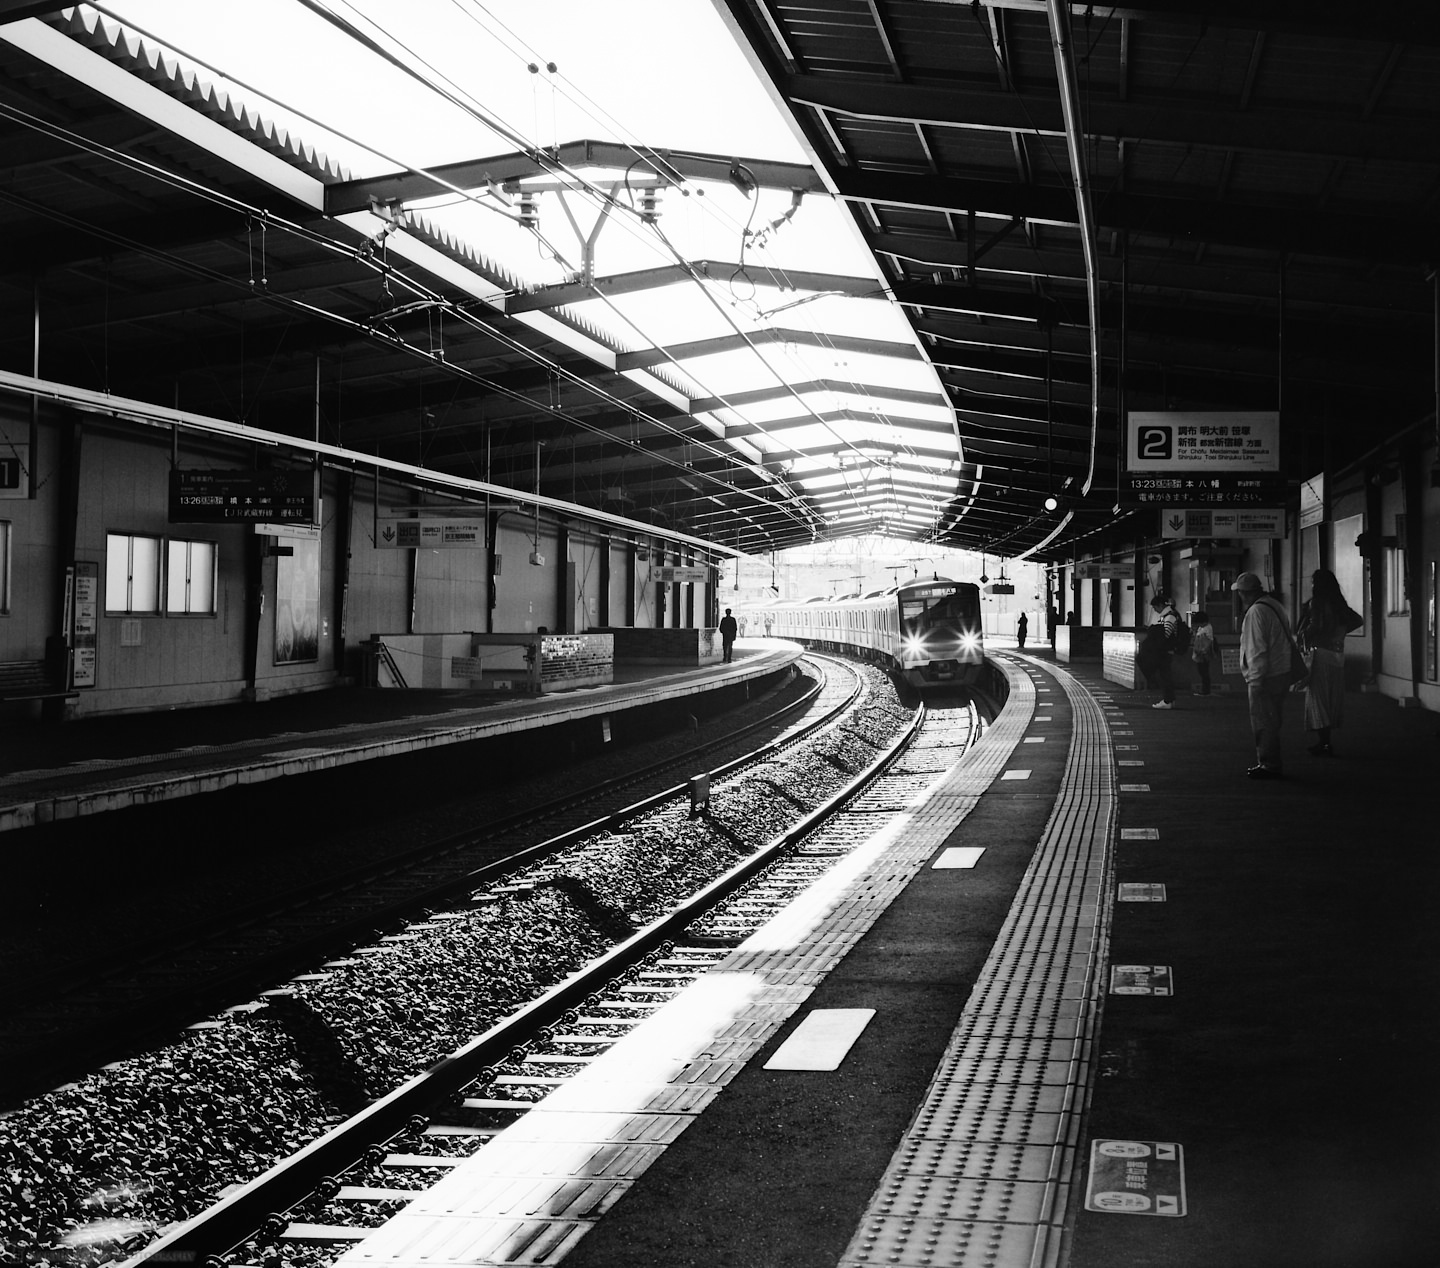
For example, I was able to make this shot in Shinjuku recently by holding the camera out at arm's length, pointing downwards, and although the slow shutter speed of a 1/15 of a second rendered the moving people blurry, the photo is pretty sharp still. In general though, because of the way you hold the camera a 1/15 of a second shutter speed doesn't seem to be a problem. I've been loading ISO 100 film mostly, so my shutter speed in the shade has been on average only around a 1/30 of a second.
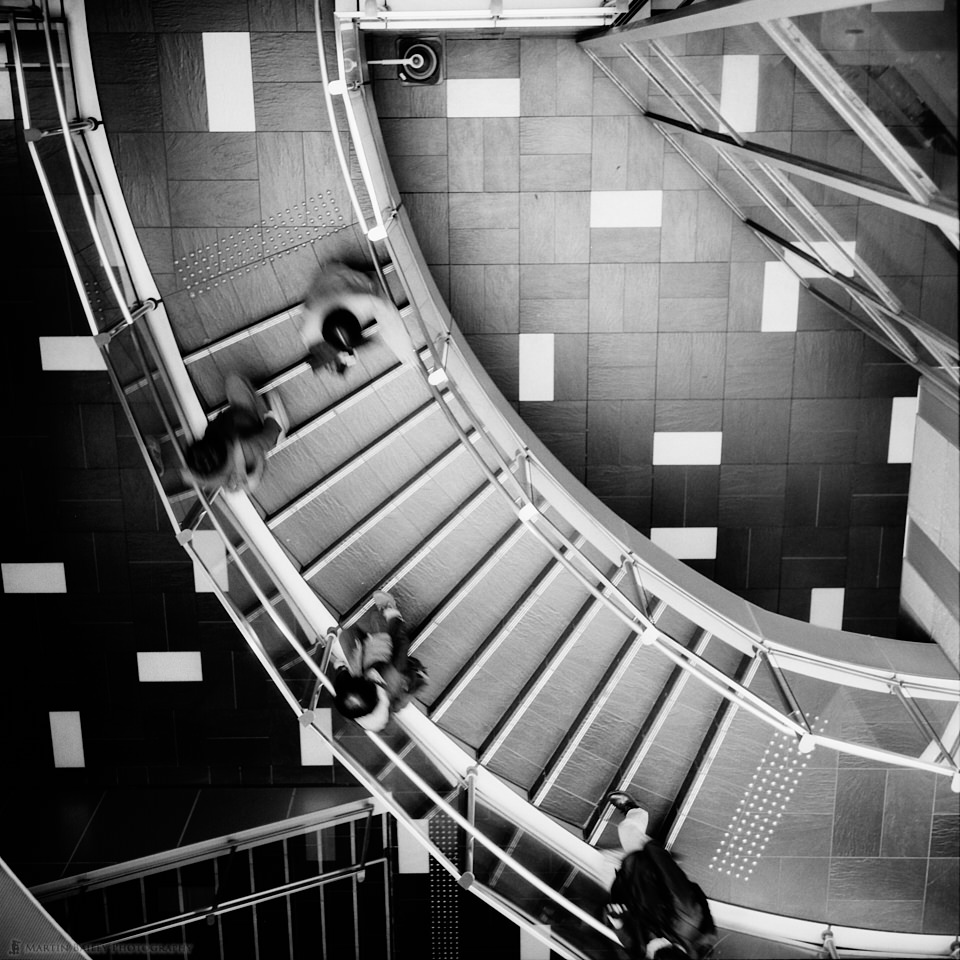
The downside of shooting at arm's length though, as well as the fact that you are viewing a relatively dark screen, is that it's difficult to really grasp what's in the frame, so I missed the person entering the frame at the bottom here. It'd have preferred it if they were not there, but I'm learning to accept the imperfection that film and this kind of photography brings, and I am actually really enjoying that aspect.
54 Year Old Light Meter
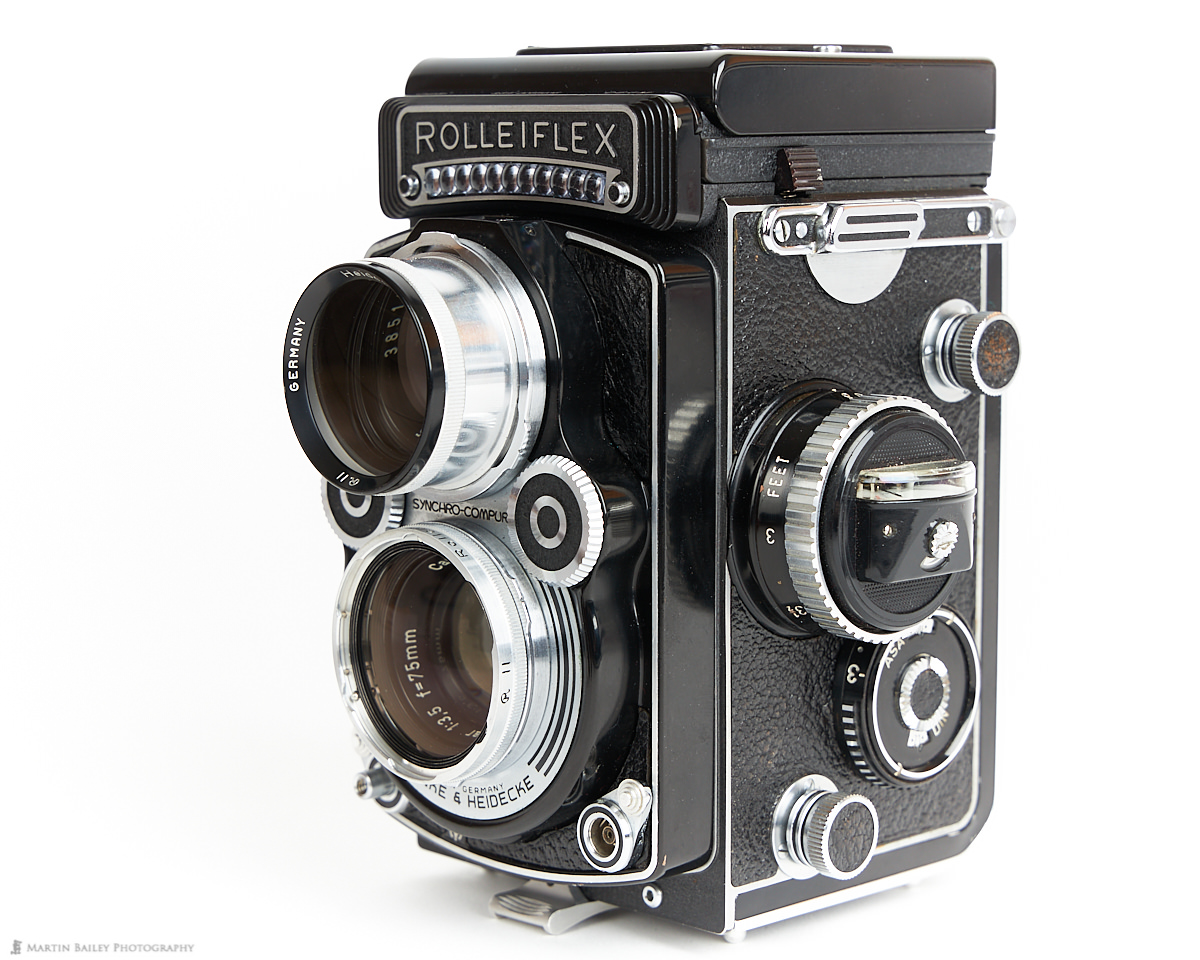
I also wanted to show you how the light meter on the Rolleiflex works. If you look at this photo, you'll see two needles and a red zone. The straight needle, near the red zone in this photo, represents the meter reading of the light in front of the camera. If that falls into the red zone, it means that the available light is too low for accurate metering. To set the camera to an appropriate combination of shutter speed and aperture, you simply need to adjust both settings until the straight needle aligns with the circle in the top needle.
The light meter is responsible for moving the straight needle, and changes to both the aperture and shutter speed move the top needle with the circle on the end. Unless you need to compensate for back-lighting or for a snow scene etc. there really isn't a lot to think about or mess up. The manual states that once the meter reading is so low that the needle is in the red, the meter becomes somewhat unreliable. Relatively little light will get you out of that red zone though, and so far having shot and processed three films almost completely with the built-in meter, I have found it to be very accurate.
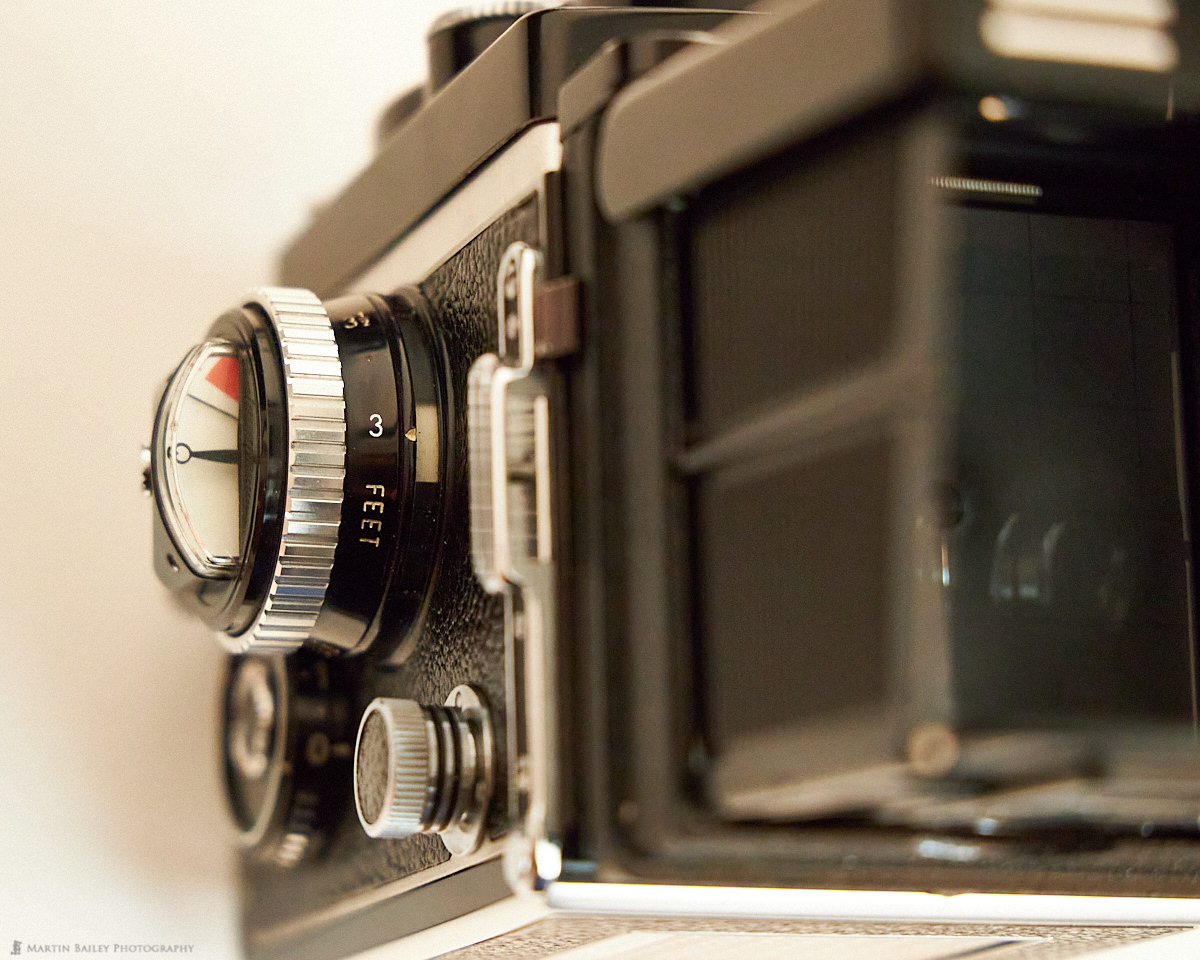
Depth of Field Scale
Another ingenious feature of this camera is the depth of field scale. If you look at the above image again, you'll see a white area to the right of the number 3, just above where it says FEET. That is the amount of the image that will be in focus at that focus distance. As you focus further out, that white area expands to represent the actual depth of the focus at any given distance. Having developed my own Depth of Field calculator for our Photographer's Friend app I realize that this isn't difficult to calculate but the fact that they were able to build that mechanically into the focus dial of a camera 54 years ago is astonishing to me.
ISO and Exposure Compensation Settings

Of course, the other parameter that affects exposure is the ISO of the film in use, and the Rolleiflex takes that into account when calculating exposure. Here you see the ASA and DIN dial, and ASA is basically the same as our current ISO standard, so you can see here that I have the dial set to 100, as I have an ISO 100 film loaded right now.
You can set the ISO from 12 to 1600, and I actually have some ISO 25 Rollei RPX film that I'm going to be trying next week. Apparently it has beautiful shadow detail, and the low ISO will help me to get some long exposures for some seascapes that I'm planning. I have also found a place here in Japan that makes filters that can be attached to this camera, so I've ordered an ND8 and ND400 filter, as well as a polarizer filter.
You may think the polarizer is redundant on black and white film, but it will still quite naturally darken the sky and remove reflections from water and metallic surfaces, so I figured it wouldn't hurt to get one as I was having some made. Unfortunately, they will not arrive in time for my upcoming seascapes trip, so I'll be taping some NDs to the lens hood for long exposures then.
Also, note the dial above where it says ASA 100 in this photo, that I have set to 1.5. That is essentially the Exposure Compensation dial. If you use a filter, for example, a medium yellow filter to bring out the contrast between clouds and the sky, you have to dial in around 2/3 of a stop compensation. You can also use this to calculate the shutter speeds of up to a 3 stop neutral density filter.
The light meter itself is the line of small lenses that you can see below the large ROLLEIFLEX title on the top of the front panel. The camera came with a white diffuser strip that covers these lenses and enables you to take an incident light meter reading by pointing the camera towards the light source. I haven't shot like this so far, but I will be trying this in Hokkaido in January for my landscape tour, and I'll report back if there are any idiosyncrasies to note.
Aperture and Shutter Speed Settings
You change the aperture with the left dial on the front, between the two lenses, and change the shutter speed with the right dial. This position puts the main controls right at your fingertips, or rather I should say thumb tips when holding the camera. The shutter button in the bottom right corner is perfectly positioned below your index finger, and there is a safety switch, to lock the shutter button when you aren't shooting, to prevent you from accidentally pressing it.
In the bottom left corner, which is the right side of the above photo, there is a flash-sync socket, and this actually works to fire my Profoto studio lights, so I can shoot with strobes if necessary too. The read-out for the aperture and shutter speed settings is in a small window on top of the top lens. The aperture for this model ranges from f/3.5 to f/22, and the shutter speed ranges from 60 seconds to 1/500 of a second. You can only automatically release the shutter down to 1 second though. If you set the camera lower than 1 second you have to use a cable release and time the amount of time the shutter is kept open yourself. The 2 to 60-second scale is really just for metering purposes, but it's pretty amazing that the camera does that.
The switch with the V and the left-pointing arrow in the top left of this photo is the flash synchronization and self-timer switch. If you pull that lever down before releasing the shutter, you get an approximately 10-second timer before the shutter releases, so you can use this camera for selfies as well!
Close-up Filters
The minimum focus distance of the Rolleiflex 3.5F is relatively long at around 1 meter or just over three feet. To overcome this Rollei made three close-up filters called simply Rolleinar 1, 2 and 3. The number 1 filter gives you a focusing range of 39 1/2 to 17 3/4 inches or 100 to 44 cm. The number 2 filters enable focusing from 19 3/4 to12 1/8 inches, or 50 to 30 cm, and the number 3 filter is from 12 1/2 to 9 1/2 inches or 32 to 24 cm.
A rough guide for the usage of these filters is, if you want to shoot just a head and shoulders shot of a person, the Rolleinar 1 will get you close enough. For just a face or head-shot, the Rolleinar 2 will work, and to just about fill the frame with a single large flower head, you'd need the Rolleinar 3. I have managed to find a good quality copy of each of these close-up lenses and used them now in the field too, but I have not yet developed the two films with shots made with them on, although from what I've seen so far, the image quality looks absolutely fine, if not very good with these filters fitted.
As you can see from this photo of the Rollei sporting the Rolleinar 3 filters, the filter itself on the bottom taking lens is not that big. The filter on the top viewing lens is larger and pointing down slightly to help correct the parallax shift that occurs as you focus close to the camera. I'm still not sure how accurate this is, but looking at the line of sight when shooting, I imagine they're doing a pretty good job. Again, I'll know more once I've developed my recent two rolls of film having done some close-up work over the last few days.
Color Filters
I managed to find an old leather case with the Rolleinar 1 and 2 close-up filters at a local camera store in Ginza, here in Tokyo, as well as a number of colored filters, and I got a Rolleinar 3 online, which was in excellent condition, so I'm pretty much set now. The color filters that were included, as you can see in the photo below, are light green, a light red, a light yellow and orange. The light red filter renders reds lighter and blues and greens darker. The Orange filter does the same but not to quite a large degree. The green filter renders yellows and greens lighter and reds and blues darker so it's great for darkening skies and lightening grass and foliage in black and white landscape shots. The yellow filter is also good for increasing the contrast between clouds and a blue sky.
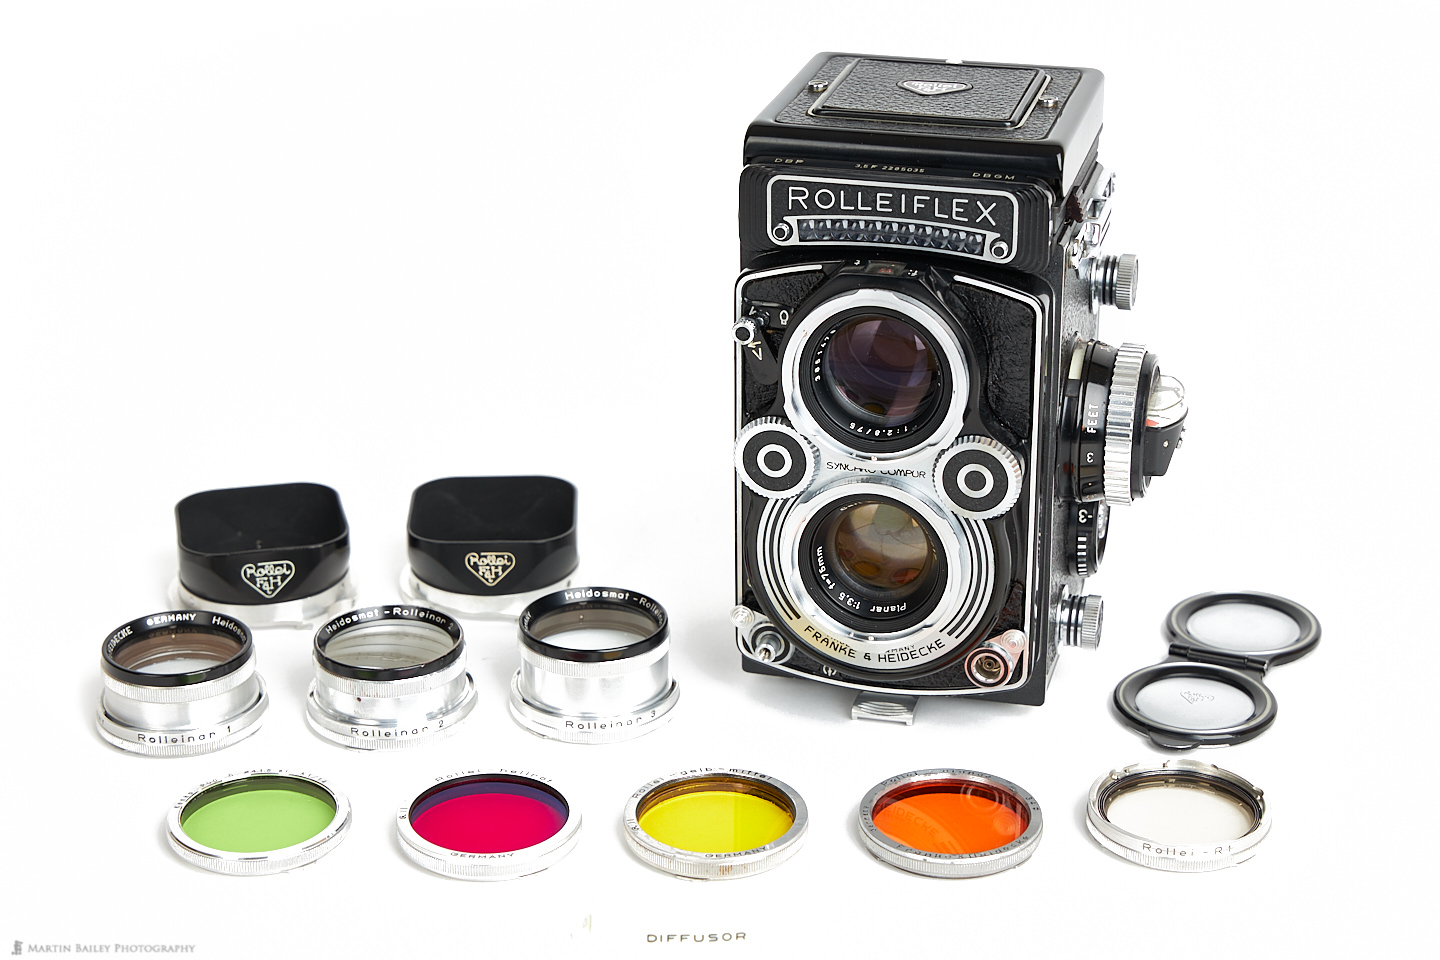
You'll also see the R1 filter in that photo, which is apparently a UV filter, but it doesn't really do anything on the Planar lens version of this camera which I have, so it's really nothing more than a protector for me, should I ever need one. I wasn't able to split up the set though, and the price I paid was reasonable just to get the two close-up filters and the color filters, so that's no big deal. The set also contained a metal hood, so I wished that I'd found that first, as I bought the first of the two along with the camera and paid a pretty penny for it.
Saving the First Frame
I also wanted to mention that I figured out how to stop losing the first frame when processing my film in the Lab-Box that I shared with you in episode 682. I had been following the instructions by the manufacturers, both in their manual and videos they've created, but the amount of film that they pull out of the light-tight chamber with the film in it, to attach the metal clip, will always result in losing a frame.
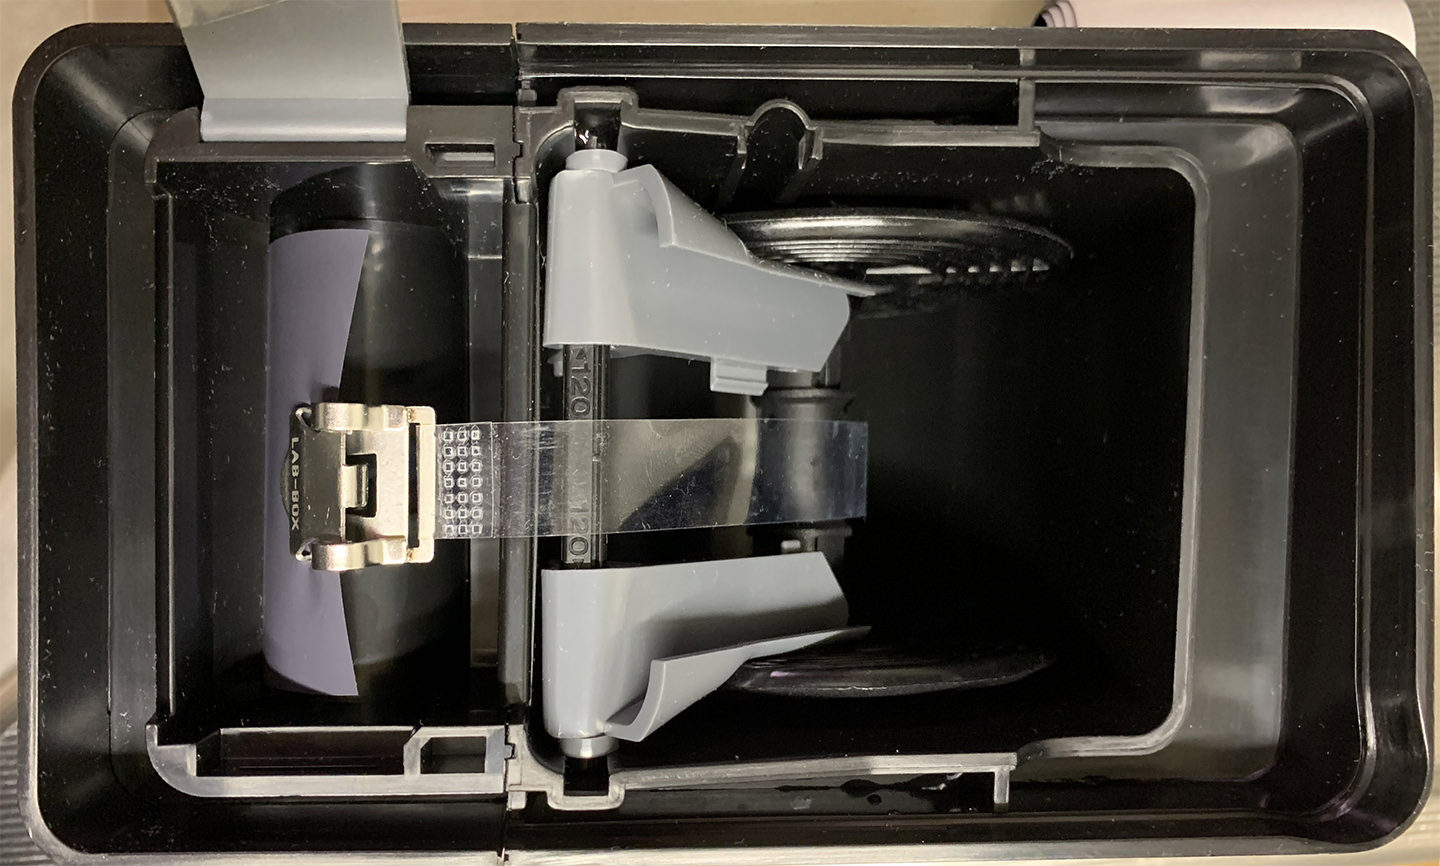
I thought I could avoid it by changing how I load the film, to gain some leeway at the end, but that isn't possible, so I tried simply removing the tape and backing paper from the film without advancing it at all and attached the clip to the short tab of film before closing the Lab-Box lid and winding the film onto the spool, and that worked. If you use a Lab-Box and want to keep all twelve frames of a roll of 120 medium format film, you can't pull the film out of the chamber any more than you see in the above photo, regardless of what you'll see in videos, etc, including my own from a few weeks ago.
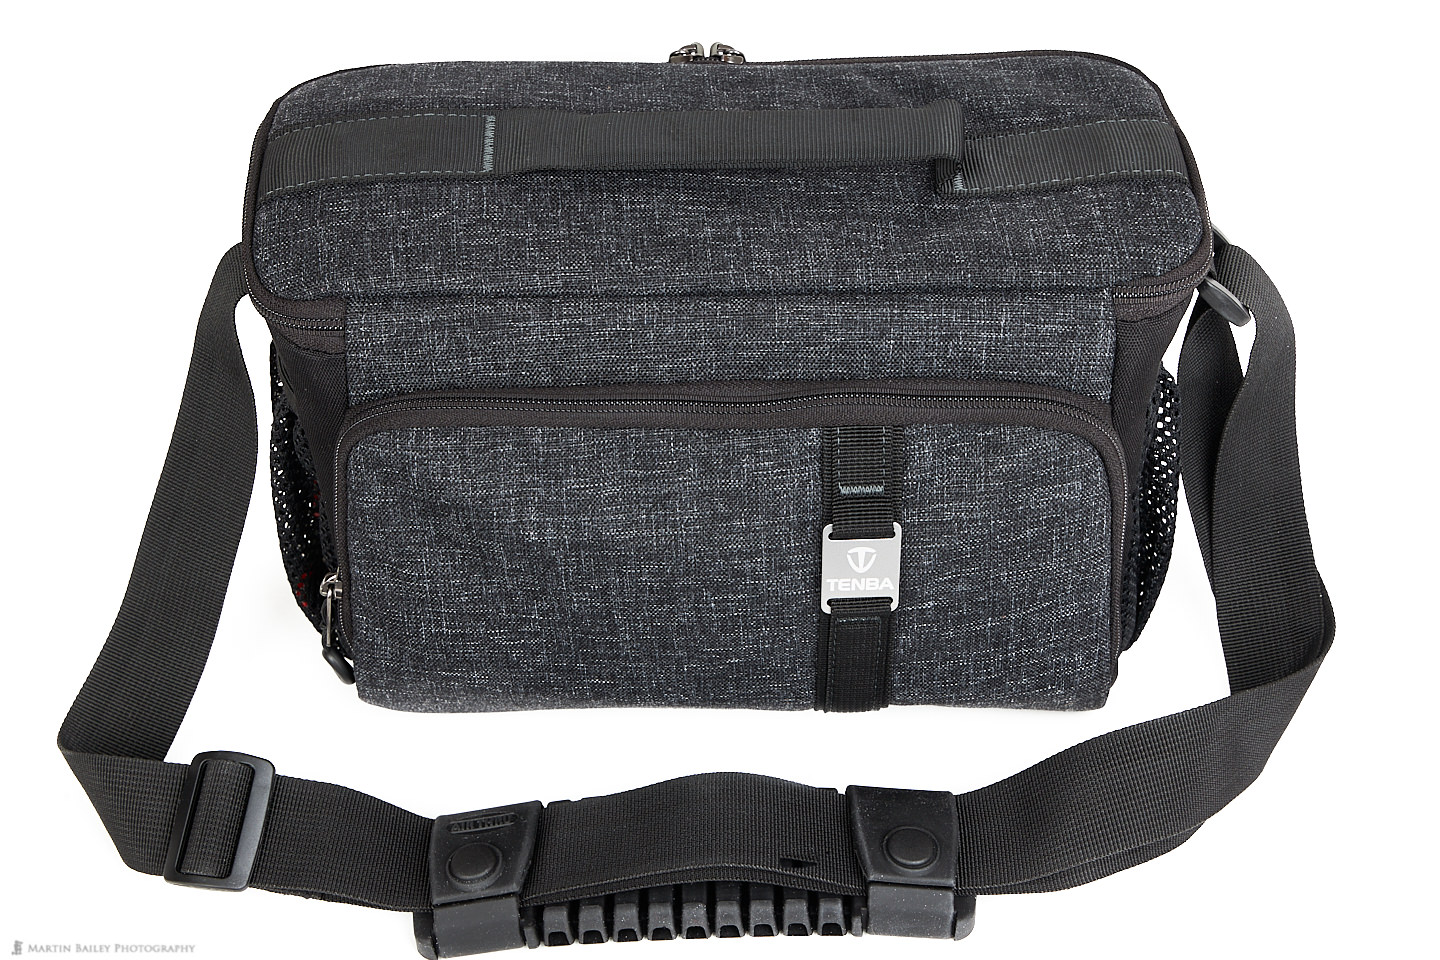
Tenba Skyline 12 Bag
I'd like to mention one last thing, and that is how difficult it was to find what I consider a good bag for this equipment. I must have spent a total of three hours online and a good hour in each of two separate shops, totaling five hours until I found a bag that I felt worked well for this gear. My goal was to find something simple that I could fit the Rollei in with its case on, and the accessories that I've picked up, as well as some additional film and some space, to put in my wallet if necessary.
Most of the bags I found were adequate but had things like space for an iPad at the back, or they were a little too big, or too heavy. Others had really gaudy inner linings or were simply way too expensive. I don't mind paying for a quality product, but I saw some bags in this class as high as $700 for a camera bag, and that, even to me, is way over the top. It's a personal decision of course, but I personally cannot warrant that kind of money for a bag, and I actually still didn't think the ones I saw were a good match.
I finally decided on this Tenba Skyline 12 bag, that cost me around $70 here in Japan, and I see that it's around $55 on B&H Photo. I can't say I'm overly in love with the bright blue lining, but I can live with it, and the design is exactly what I wanted otherwise. It's simple, with just the right amount of space and number of pockets and pouches. When I go out just with this camera this is all I want to carry, and with this bag being as light as it is, even with my Rollei and accessories inside it weighs very little. I can easily carry this around all day without getting tired.
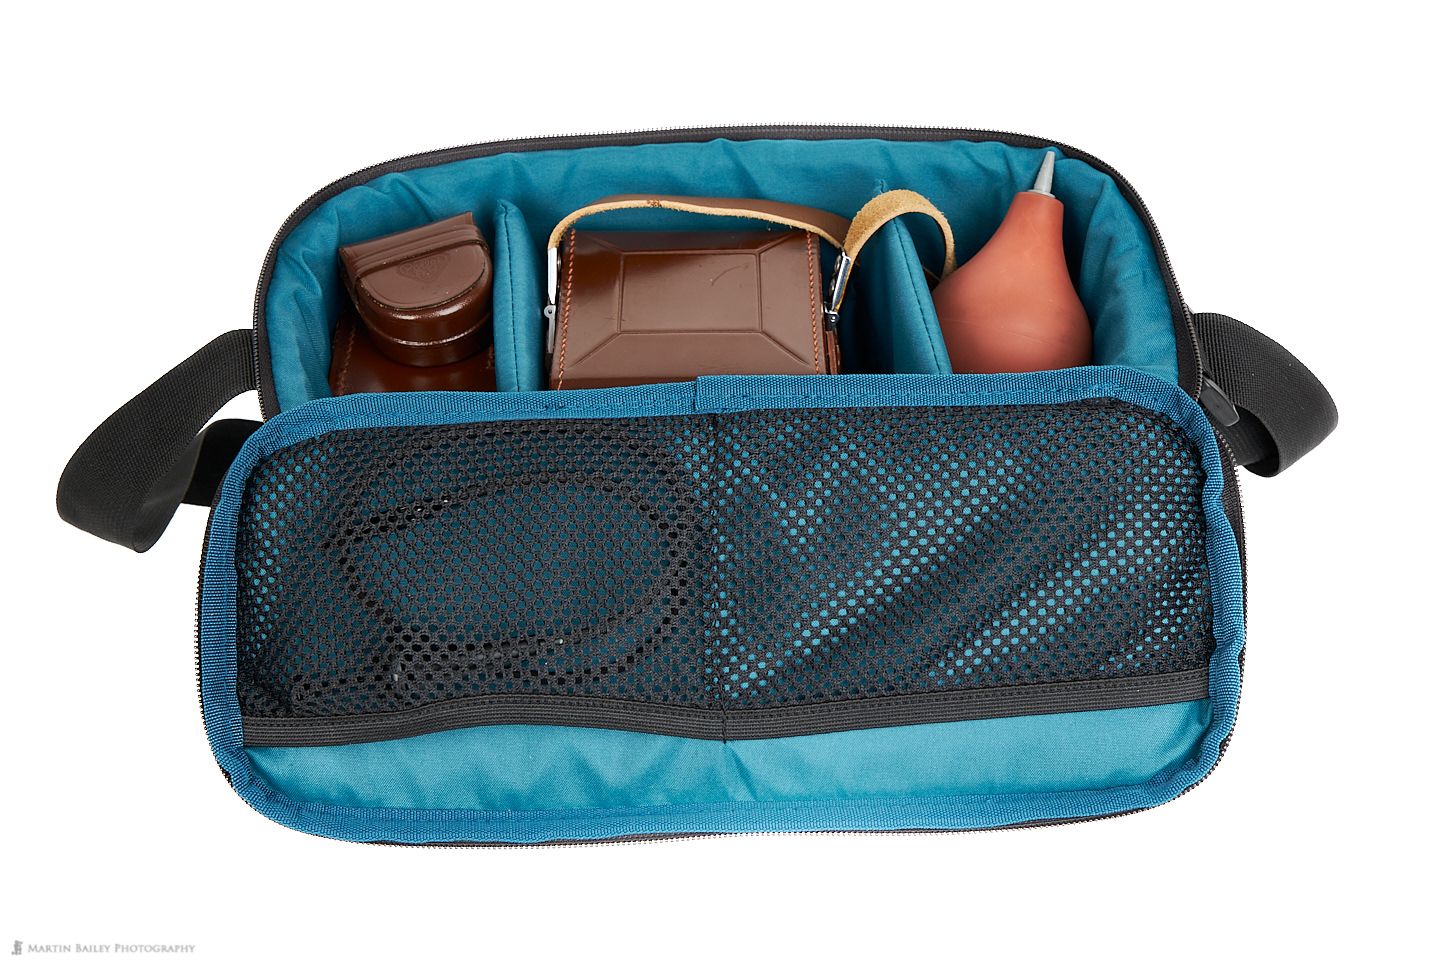
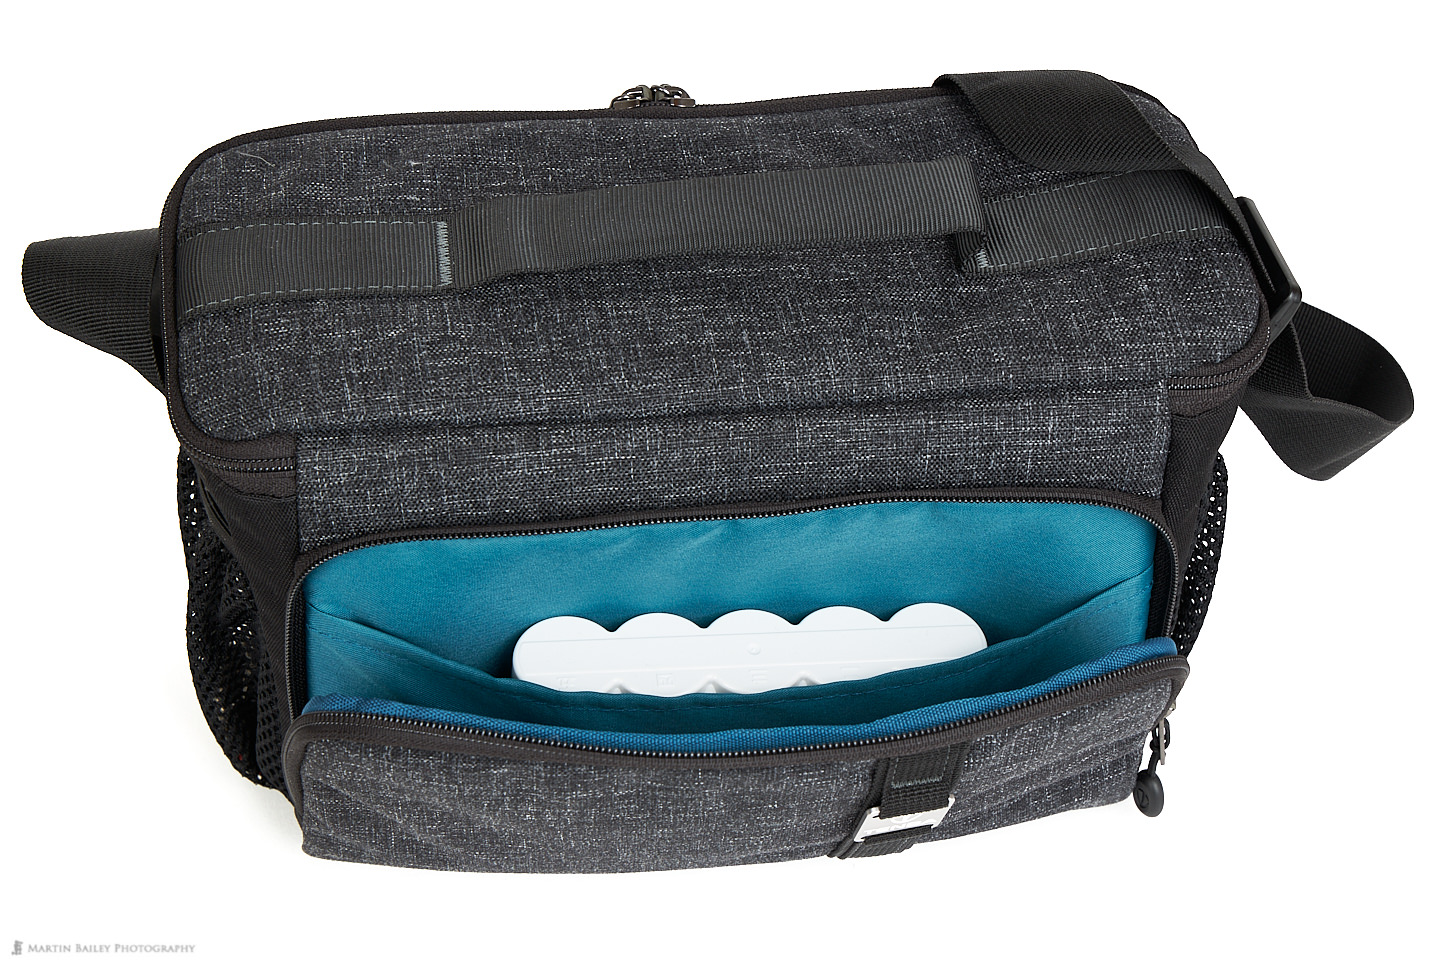
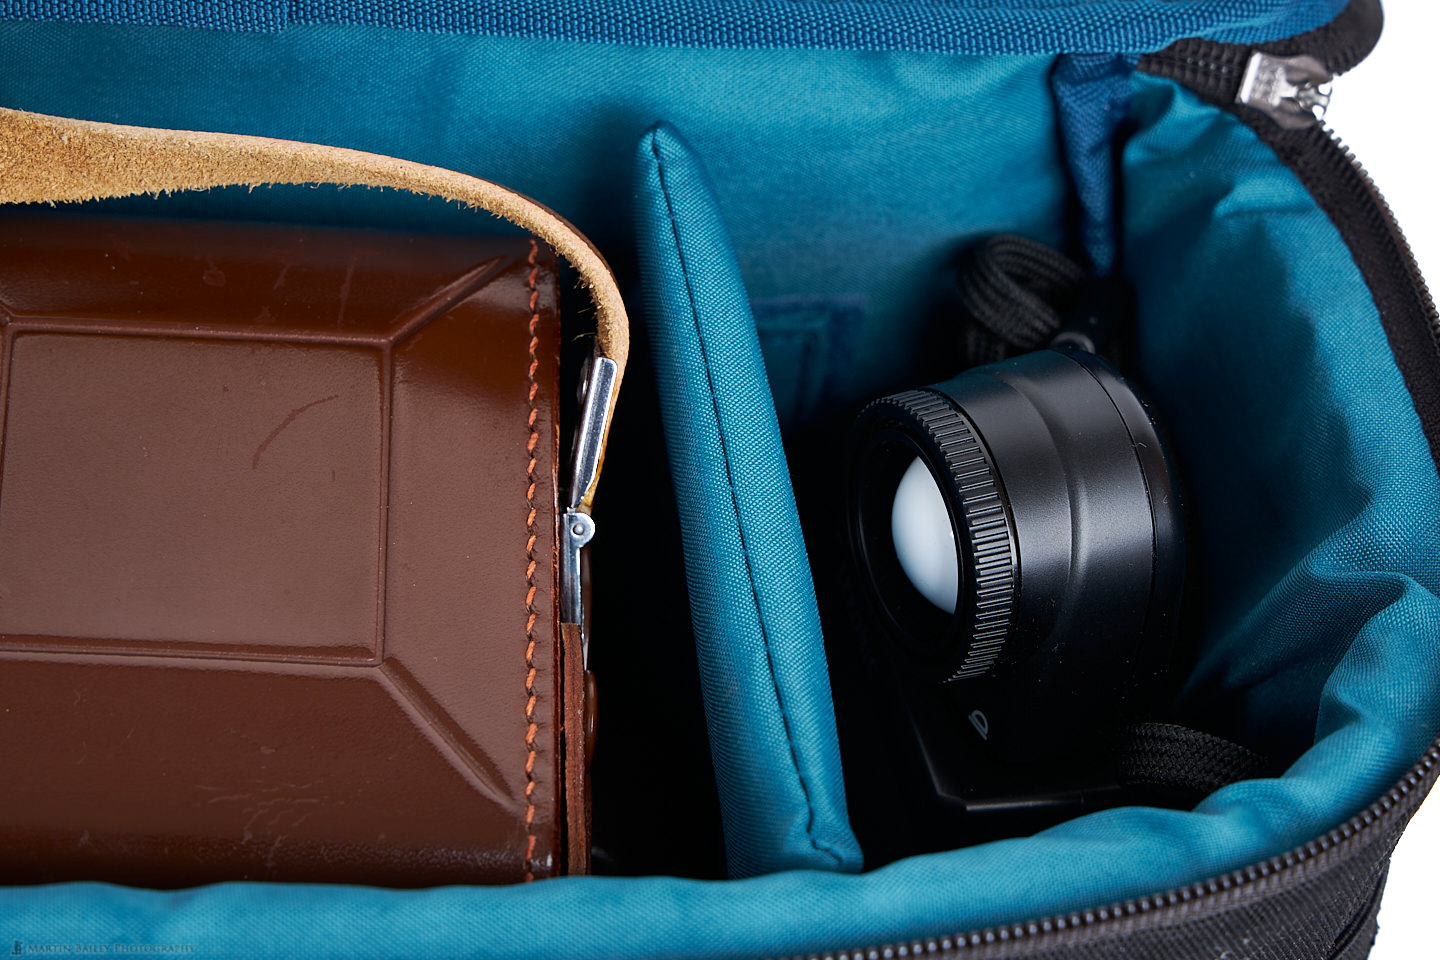
I've included a number of photos here to illustrate how I'm using the bag, including dropping in my light meter sometimes to help with exposure. As the Rollei incorporates a light meter, I am referencing that most of the time, but occasionally I'm finding that I need to get a spot meter reading from something like a bright object against a dark background, and it just helps to have the separate meter.
The only thing that I wish was different is that the strap is fixed to the bag and cannot be removed, so I had to buy a rubber attachment for the strap to stop it sliding off my shoulder. Just the nylon strap alone would not stay put, so I had to pay extra for the attachment. I am very happy with this bag and think it's a great match for the Rollei. If I come across something better I'll update you later, but I'm happy enough with this combination that I don't intend to actively look anymore.
Gallery of Images
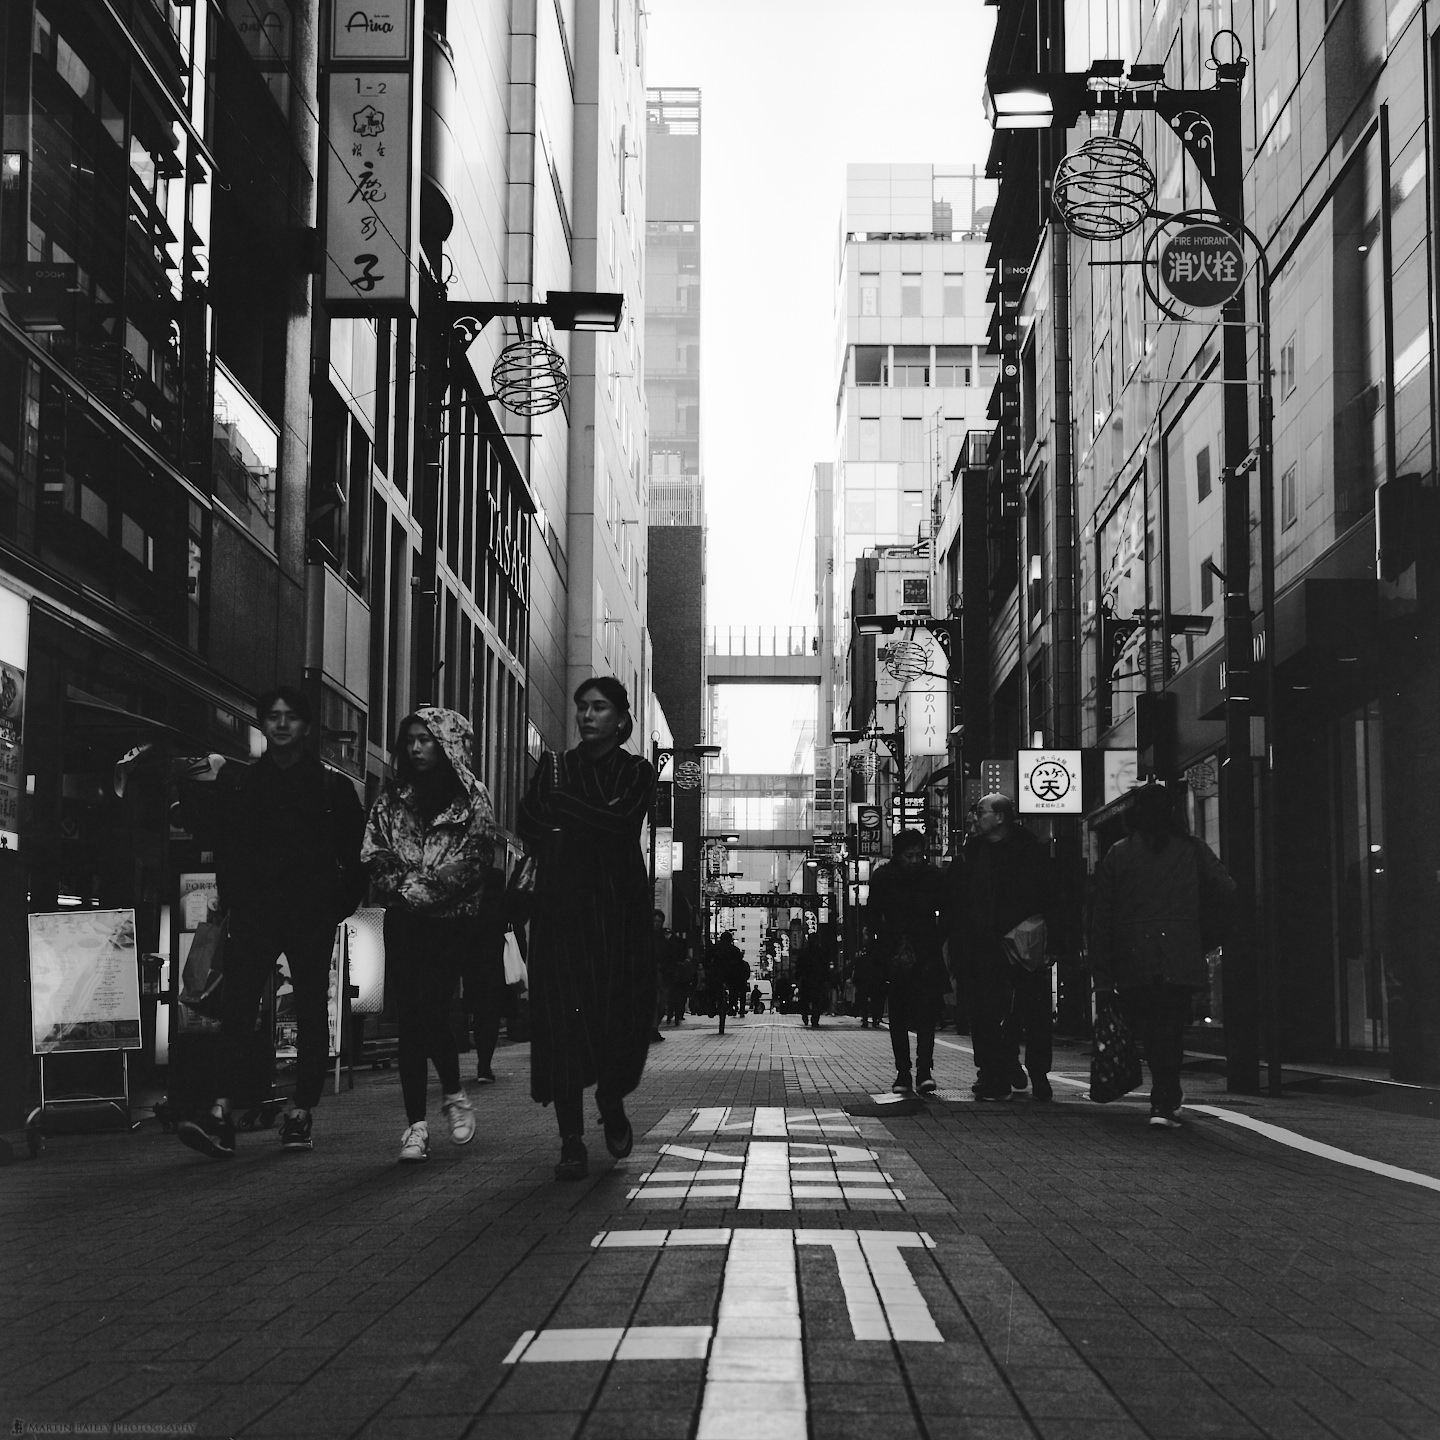
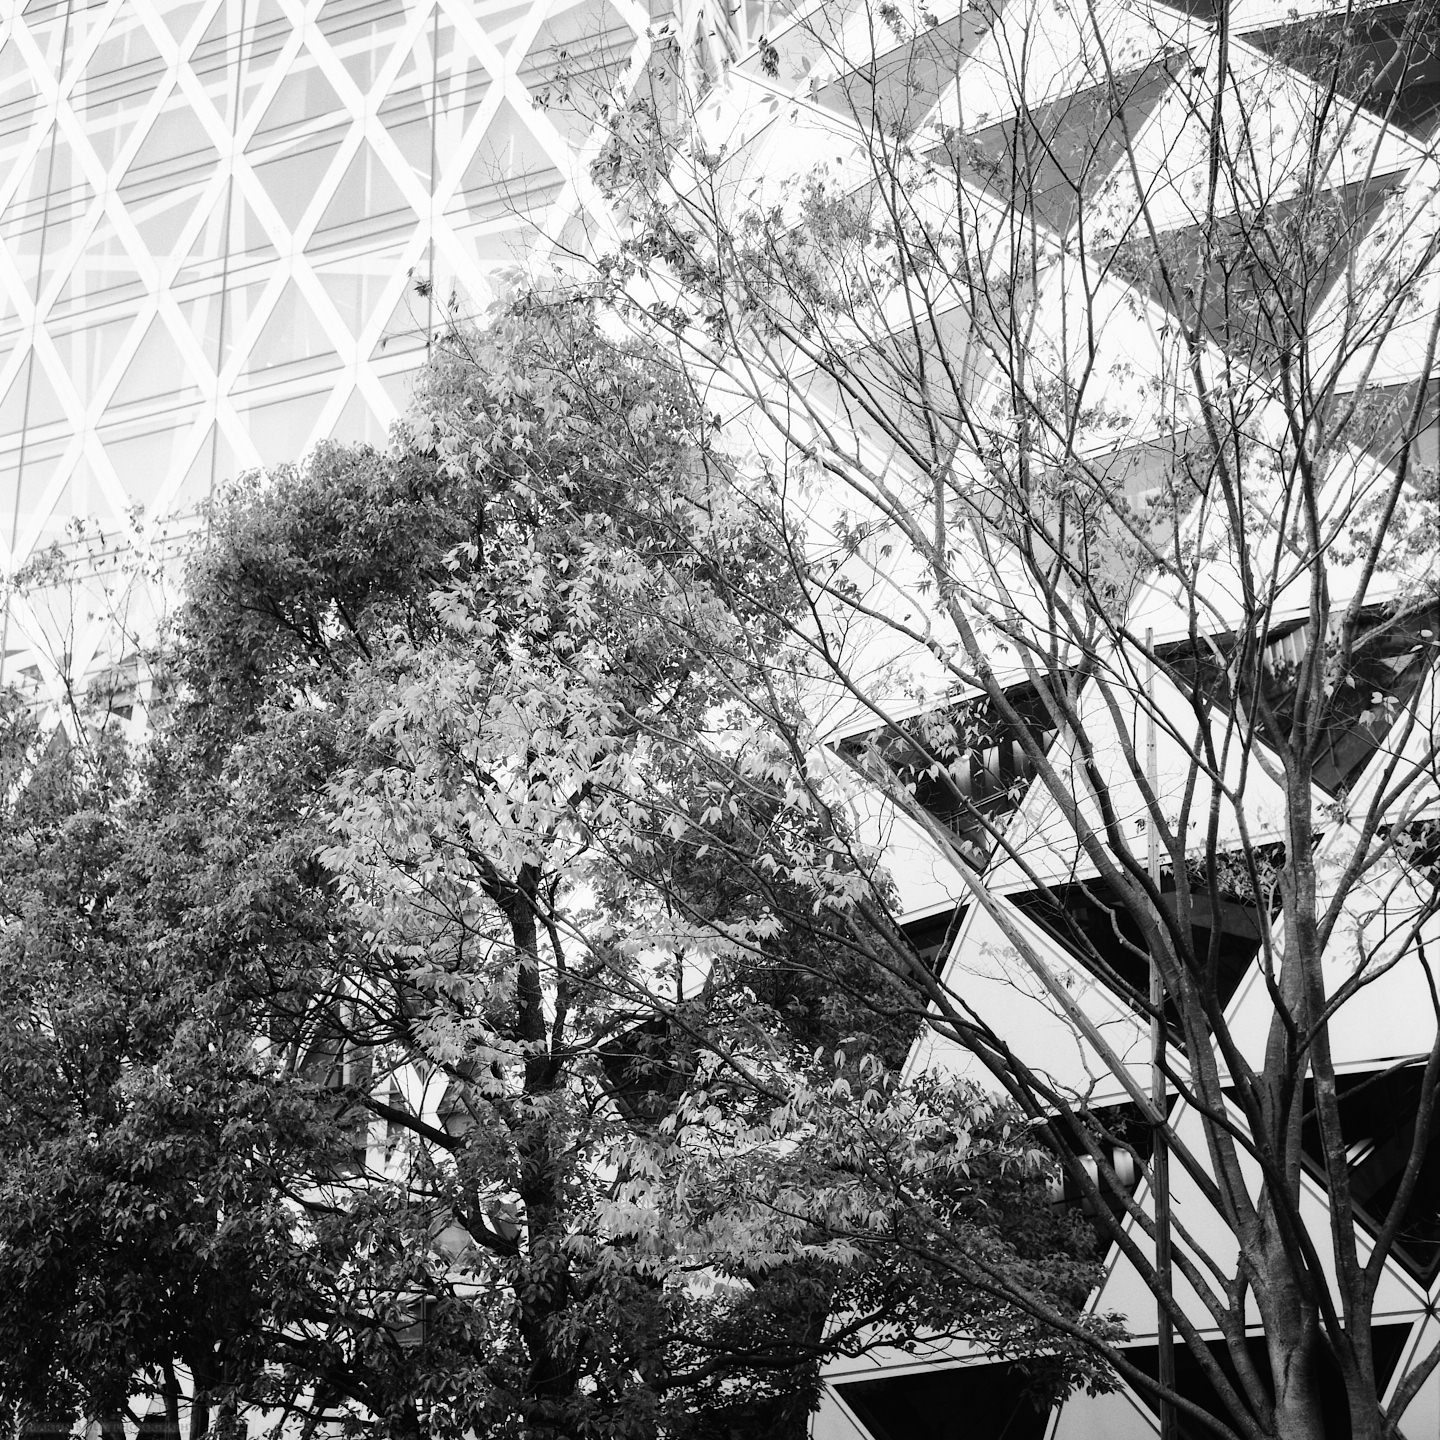
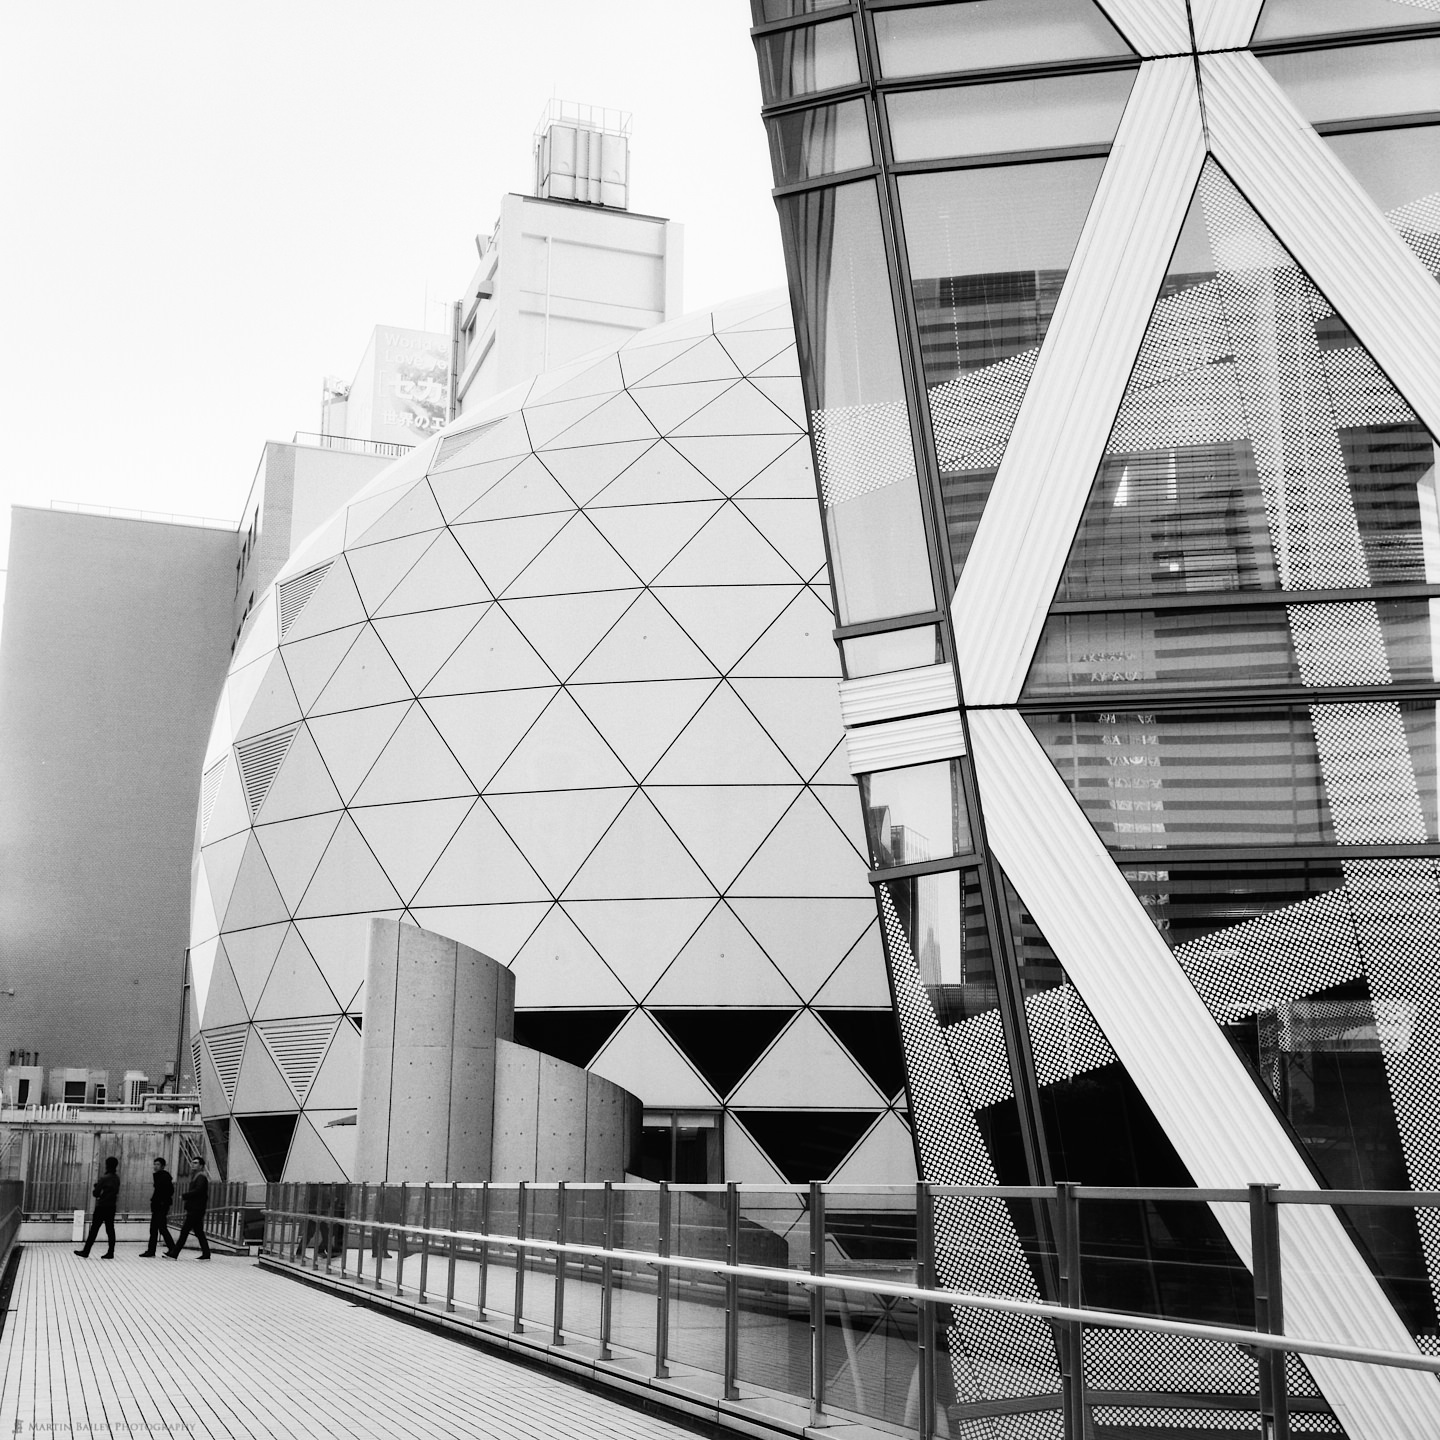
Here to finish is a selection of images that I've shot on November 29 and 30, 2019, to give you a feel for the sort of work I'm doing with this camera. It's a little different than my digital work, but I would like to think that there is still plenty of Martin in these, and I definitely don't want to be the sort of photographer that falls in love with the process, and shoots film purely for the experience and totally ignoring the need to actually think about what I'm shooting. Just being recorded on film doesn't make the image special, and I want to keep that in mind as I do more of this work.


Capture One Pro 20 Released!
Before we finish, I'd actually like to point out that my photo editing software of choice, Capture One Pro, just received a major update and has been released this week as version 20 with some exciting new features. I'll be creating a video to walk you through the new features soon, but check it out for yourself at www.captureone.com and download the trial version if you don't already use Capture One Pro. Your photography will thank you for it.
OK, so we'll finish up there for now. Let me know if you are enjoying these film-related episodes, as I do plan to bring you a few more film-related topics from time to time.
Film Related Posts
[ess_grid alias="film-posts-grid"]
Show Notes
Get Capture One Pro 20 here: www.captureone.com
Check out other film-related episodes: https://mbp.ac/film
Audio
Subscribe in iTunes to get Podcasts delivered automatically to your computer.
Download this Podcast as an MP3 with Chapters.
Visit this page for help on how to view the images in MP3 files.

Ha,
Couldn’t let this go by without a comment.
Thanks for sharing the memory. The first working studio job I had used the 3.5 Rollies. Shot them till my fingers went numb. 🙂
Often thought of looking for one just to relive those wonderful learning days, when I was niave enough to think I knew everything about the medium
Hope you enjoy your time with the precious piece of history.
Wow! What a wonderful story about your experience David. Thank you for sharing that!
I already am enjoying this, but I will continue to, thanks!
Regards,
Martin.
Martin – I think you found a real gem. It looks near mint for a camera that old. Congratulations!
A suggestion for another podcast… How are you archiving your negatives and keeping a record of subjects shot and where the photos you feel are keepers are logged and identified.
It will be fun to follow your re-evolution as a film photographer.
Hi Rich,
It was rated as in good condition by Map Camera, but there are two grades above that, so it could have been better, but then the price goes up considerably, so I figured this level was plenty for my needs. I also heard that the shutter action is heavier on f/2.8 versions, which means it’s going to shake more when you release the shutter hand-held, so all in all the camera I got seems to be a good match for my needs.
That’s exactly what I intend to talk about next. I am using a binder with sleeves for the 120 film, and just bought ten additional sleaves for it as it’s almost full now. I intended to also go through my scanning process again, as I’m now working with a newer scanner and getting higher resolution scans than before that are actually cleaner, but that’s also partly due to the better quality film I’m using.
I will also be trying some Perceptol developer in a few weeks, as that’s said to be better for the ISO 25 film that I’m hoping to shoot next week. I’ll keep providing updates as time allows and as topics come up. I also want to talk about my thoughts on film in general. I’m really happy that I’m getting back into it at this point in time having seen how digital has completely transformed photography, but now looking at the details and the analog beauty of these large negatives is giving me a new perspective that I honestly didn’t expect to have at this point in time, although I am pleased this is happening.
BTW, I’m using an iOS app called Analog to record notes as I shoot. I’m not sure it’s the best option, but it does what I need at this point. The other thing I would like to do if this can be at least semi-automated is to figure out how to get the shooting information into the EXIF data of the digitized files.
Regarding the keepers, I’m actually at this point following my digital shooting process of saving all negatives in my Photo Originals folders, and then copying the ones that I feel are keepers to my Finals archive. Each scanned file is around 280 megabytes, so it’s a bit wasteful to keep all of them, but if they are not technically flawed I might as well, as the negatives are quite possibly going to degrade over time. I’m keeping them in a humidity-controlled cabinet, but the heat here in the summer is also a problem.
As you can see, I’m working on lots of little tasks here, and that also is part of the attraction. I like having something to study, so this little excursion is a lot of fun. I hope you enjoy the future episodes I create on this too Rich. Thanks for taking the time to comment.
Regards,
Martin.
Martin – Do you have a more complete name for the “Analog” IOS app? I’m having trouble finding it in the App Store. I need to start keeping a little better track of what I am doing. I’m dabbling with too many formats and cameras right now. To no useful result as of yet.
With respect to shutter shake – It should be virtually non-existent with a leaf shutter. Also in the end the extra two thirds of a stop one gains with a f 2.8 lens is probably not worth the expense.
With respect to developers I have been using Adox Rodinal. I find it to be economical and easy to mix as needed. A 500 ml bottle costs around $16 and with only 20ml required for a 1:25 dilution for a roll of 120 it is inexpensive. If I want to be really frugal I could go to 1:50 or 1:100 dilutions.
It seems like one could do lower resolution scans and create a digital proof sheet of a roll to pick out the photos that further effort is desired.
Hi Rich,
Search for Analog – Film Roll Notebook. That should do it.
The point about shake wasn’t related to the shutter action. It’s more about the pressue required to press the shutter button. The harder you have to press the more you move the camera. At least that was the point the reviewer was making in the post I read. Either way though, my decision was more related to the fact that f/3.5 was still plenty wide enough for what I want to do with this camera.
They don’t stock Rodinal at the store I usually buy my chemicals, but I just did a search and there is a store here in Japan that stocks it, so I’ll probably give it a try when my other Ilford chemicals have run down a little. For now, I’m going to stick with DD-X and Perceptol as it’s a better match for my Stop and Fixer, which are both Ilford.
The DD-X I have has enough for around three rolls left, and the sachets of Perceptol I have are good for three to four rolls, and I have three packets. I like the idea of mixing the Perceptol from powder only when it’s required. The DD-X that I have now contains a few clumps of crystals as it’s way past it’s shelf-life. The Perceptol packaging doesn’t even have a best-by date on it, so I’m assuming it’s nothing to worry about until I actually mix it with water.
The other thing about Perceptol is it’s supposed to be very fine grain, and that matches the Rollei RPX 25 pretty well, but I see that Rodinal is also compatible, so I will keep it in mind. I seem to remember Brooks Jensen (of the Lens Work Magazine/Podcast) talking about Rodinal almost synonymously with developing chemicals many years ago. Something like when he was getting nostalgic, reminiscing about “the smell of Rodinal”. 🙂
The film holder for 120 film on my scanner only holds three frames at a time, and I cannot scan film by simply laying it on the flatbed, so a contact sheet wouldn’t be easy. But, the software actually shows me a very large preview of each frame before I commit to the scan, so when there is something wrong, I can opt out after just a few seconds, rather than waiting the three minutes for the actual scan to complete. This process is really not tedious, so not something that I’m looking to optimize any further. Plus, I want a high quality digitized copy just for my archives, even if I never use it.
Regards,
Martin.
have the same camera, so it was a fun read. Thanks for it, Martin.
I would love to see your blog or podcast on using Capture One Pro for scanned images. I have the software, Sony version, but only use on digital captures. Didn’t think it is good for scans. Would love to see your take on it. Have you done the podcast yet?
Hi Avi,
I have been using Capture One Pro for my scanned images too. It works fine for me. Can you be more specific about what you think it was not good for with relation to scanned images?
Regards,
Martin.