
The MBP Fine Art Border Tools plugin for Adobe Photoshop!
With this set of tools, you will be able to easily frame, resize and watermark your artwork in style. A key goal of FAB Tools in addition to resizing and framing your art is to shift your image up within its frame to provide visual balance as well as create space to add text-based and graphical Watermarks with ultimate positioning freedom.
Autopilot enables fully automated image processing and round-robin from most content management applications for one-click framing for Web or Print, now with 30 media sizes and ten customizable format slots. Automatic Text can be used to get shooting information or Descriptions embedded in your images to dynamically create boilerplates specific to each image, even during Autopilot processing. All settings can also be saved in Presets and recalled per module at any time, saving you from having to keep detailed notes on settings used for various projects.
We apologise to all who may have experienced issues in the previous release. Things should be back to normal from release 1.7.1. Please drop us a line if you notice anything not right.
Click the MBP Fine Art Border Tools logo to jump to the Adobe Marketplace to pick up your FAB Tools

※ Please ensure that you login and purchase the plugin with the same email address that is linked to your Adobe ID. Also, note that the plugin requires Adobe Photoshop version 22.0 or higher. It does not work with Photoshop Elements.
Need Help?
Below you'll find a number of videos to help you get the most out of the MBP Fine Art Border Tools plugin, and we'll continue on with written details too. Should you have any questions or need any help using the MBP Fine Art Border Tools plugin, please drop us a line with the Support Contact Form. We are also in the process of building a full User Manual which you can find here.
If you have bought the plugin but having problems finding it, please check the bottom of this page...
View Online User Manual
Contact Technical Support
Video Tutorials
Overview
Let's take a closer look at the MBP Fine Art Border Tools, or FAB Tools as they appear in the Photoshop interface. Our original Fine Art Border scripts were text-based scripts that had to be manually edited to change the vertical offset, and there were only 12 media sizes included. They sold well, and I continued to use them myself for the eight years since I created them, but the times, they are a-changing.
Adobe has released a new coding platform to create highly integrated plugins, so although it's still considerably wet behind the ears, having the ability to add fine art borders, changing the vertical offset on the fly, was something that I found very appealing.
As with most things I do, as I dug deeper into the architecture, I soon realized that there was scope to widen the feature set and therefore the appeal of my new FAB Tools. The result was a version 1.0 release with three panels, which I have replaced with version 1.1.0 which adds two more modules.
The first two modules, Web Frame and Print Frame, are designed to resize your image or artwork, and then add a border of the specified width. The border offset is used to move the image vertically within the frame, generally to raise the image, improving the visual balance while leaving space for watermarks.
The third Watermark module is to add graphic-based watermarks, which has been joined in version 1.1.0 with a fourth module to add text-based watermarks. You can store multiple text strings and each keeps its own settings, including scale and opacity, font, font style and text color. These settings all change when you select a different string.
The new Autopilot module enables fully automated image processing and round-robin from most content management applications for one-click framing for Web or Print, now with 30 media sizes and ten customizable format slots. We also included an adjustable inactivity timer, so Autopilot turns itself off to avoid inadvertently processing images by mistake.
Should anything get out of whack, there are reset buttons for each module and a master reset button to completely reset the plugin on the Tools page, along with a few other options that you can see in the screenshot to the right.
Web Frame and Resize
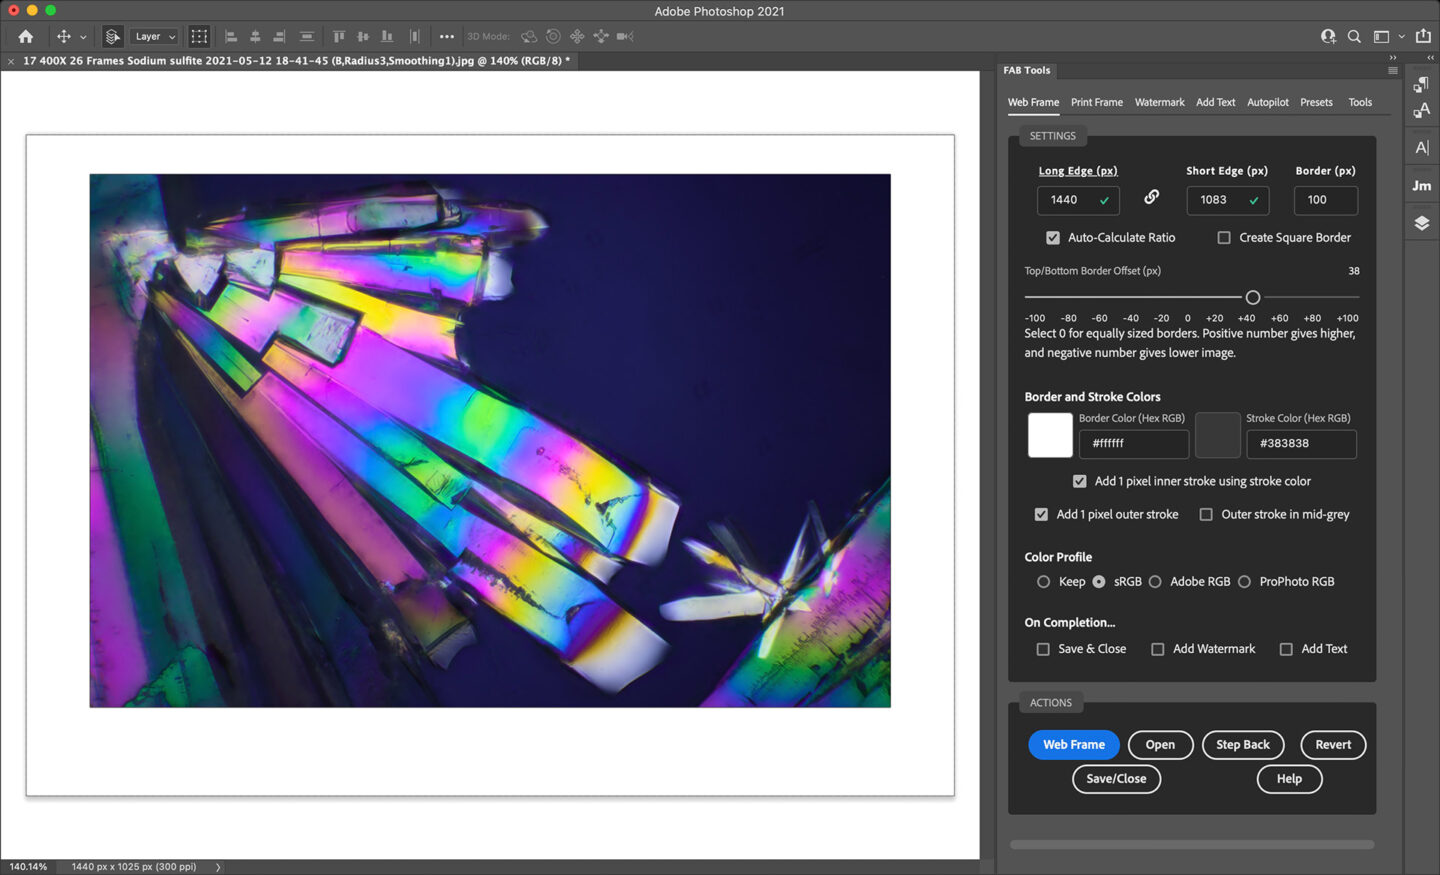
OK, so allow me to walk you through the finer details of the new plugin. As you can see in the screenshot, the Web Frame module is relatively simple on the front end, with a few nice tweaks to help your workflow. The idea is to add a border, the width of which you specify with the Border (px) field.
If, for example, you know that you just want your images to be a specific length, just add that to the Long Edge field and turn on the Auto-Calculate Ratio checkbox. We will then calculate the short edge for you while including the border or frame of the size you specified. If you have a specific height and width that you would like to resize your image to, enter both of these values in the Long Edge and Short Edge fields.
If you prefer to specify the Short Edge and have us calculate the rest from that, just enter the Short Edge. You'll notice the Short Edge heading then becomes underlined, indicating that it has priority. To go back to Long Edge priority, simply enter the long edge value.
If you'd like to frame your images inside a square, simply enter the Long Edge value to resize to, and turn on the Create Square Border checkbox. We'll then create square borders and position your images inside, perfectly resized according to your border thickness, regardless of their orientation.
The Top/Bottom Border Offset slider is where you move the image up or down in the frame. For centuries, fine artists have positioned their work slightly higher in a matte or frame to provide more pleasing visual balance. Moving your image up slightly also gives you room to sign or add a watermark to your work.
Color Your Frame!
You can now also change the color of the frame that you apply to both Web and Print Frames. Say, for example, you want to frame an image and move away from the standard white frame that we’ve had so far, all you have to do is open your image and click on the colored square on the left of the two which is the Border color, and you can select a color using the regular Photoshop color patches and sliders, but your mouse pointer will change to a picker so you can also sample any color your want from your image, as you see in this screenshot.

Here is a Web Frame with different colors sampled to illustrate a different point. If you look to the right of the Border color picker in the previous screenshot, you’ll also see a second color picker for the Stroke color. Until now, the outer stroke which is added to images has used the secondary or background color in Photoshop, but some people found this confusing, and even I forgot to change the color a few times, so I took this opportunity to take control of that, in two further steps. To begin with, you can now select the Stroke color using this color picker, but because we can now change the color of the main border, I figured we might need a way to separate the border from the image, and so there is now a checkbox below the new color pickers that enables a 1-pixel stroke between the resized image and its border, which uses the color you selected.

The second checkbox is to decide whether or not you want to add an outer stroke, and there is a third checkbox to simply use a mid-grey for the outer stroke, as you may not need it to be the same color as your inner stroke. In this example image, I selected the bright orange as a highlight color, and you can see it more distinctly along the bottom and left edges, where the darker areas of the image are. It’s very subtle, and I toyed with the idea of enabling the user to select a larger border, but it looked very tacky, so I used my own design sense to keep this simple. You can also see that I selected the grey stroke color for the outer stroke, although a second bright orange stroke didn’t look too bad either
Text-Based Watermarks
The Add Text module provides the ability to store multiple text strings that can be applied to any location on the image, anchored to your resized image or the canvas. The Inside and Outside image options are displayed in red until you perform a resize, but they can be configured and will be used accordingly when you perform your resize.
To save space when not in use, most of the text options are hidden by default, and are opened with a button next to the Scale and Opacity fields, which remain visible for ease of access. When you unhide the text options you have the option to modify the currently selected text or add a new string. Regardless of which you select, your changes are automatically saved, and the font and color options are all saved on a per string basis, so they are recalled with each string as you select it.
Unless you want to confirm or change the settings, you can apply and switch between saved text strings without unhiding the text options, simply by selecting a different string in the Text pulldown. To delete any string, just select the string and hit the Delete Selected button.
Automatic Text
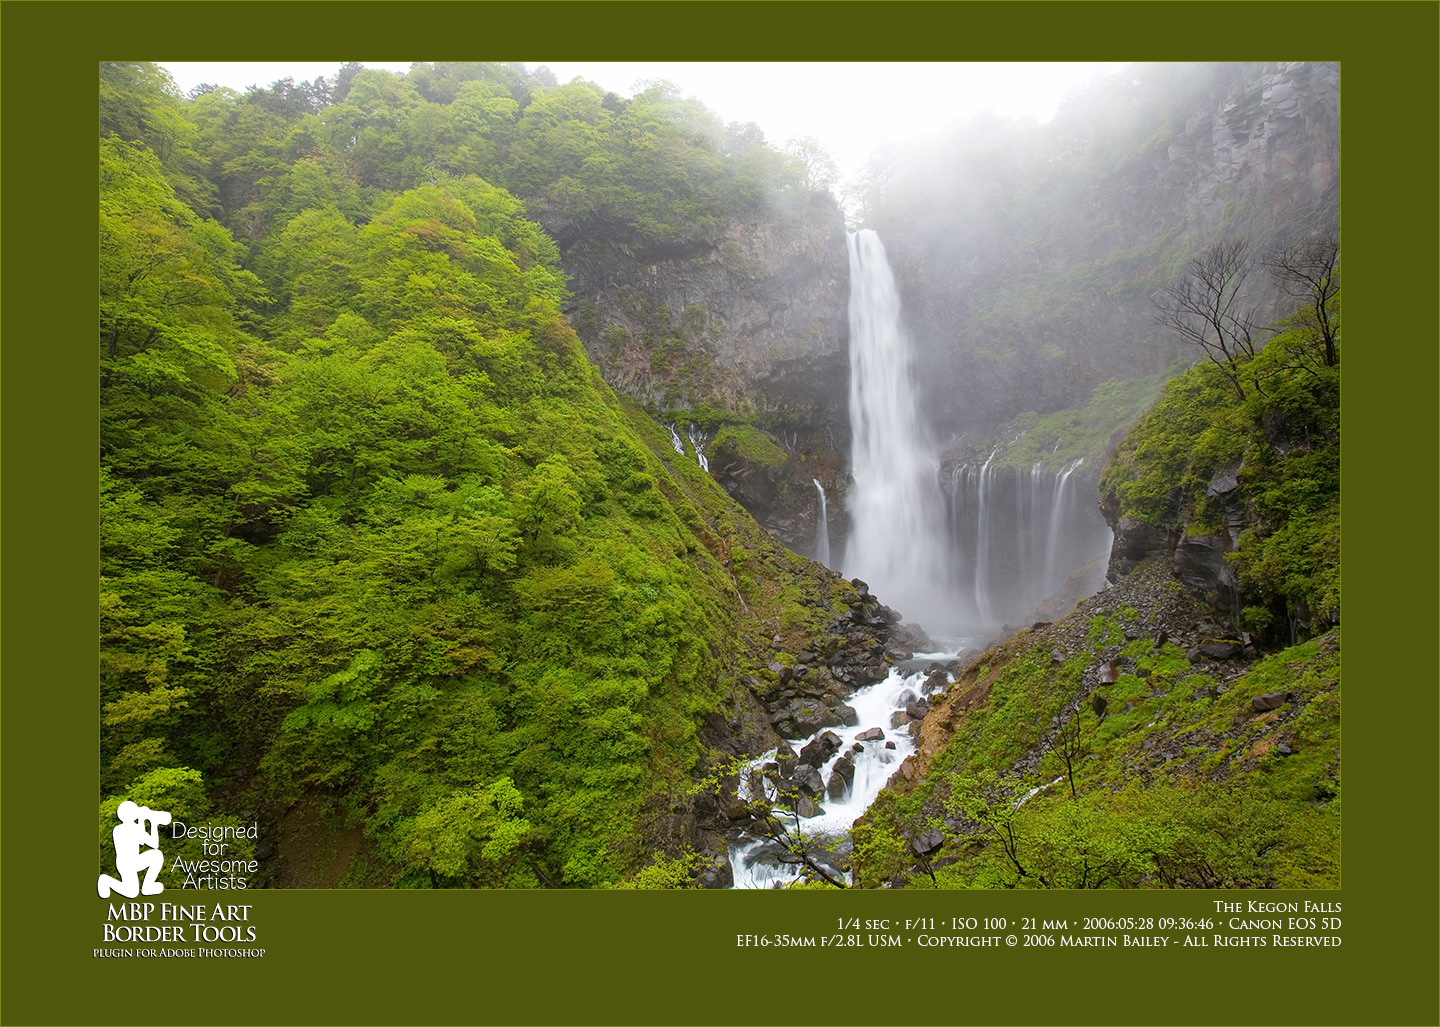
From version 1.3 of FAB Tools we now have Automatic Text! As an example, let’s throw everything we’ve got at my photo of the beautiful Kegon Falls in the Nikko area of Japan. I love the early summer fresh greens in this photo, so let’s play with them a little. To start with, I’ve selected a darker green, sampled from the photo, as the main border color. This, I feel, helps to give the final piece some added depth, as we look through the deeper green at the lighter greens in the actual image. To compliment that though, I selected a fresher light green for the inner stroke, and I’ve left that green active for the outer stroke too, rather than making that a mid-grey.
In the Watermark module, I selected an adapted version of the logo I’m using to market FAB Tools and opted to add it to the bottom left corner, and nudged it up by 8.8% and to the left by 0.5%. Without any nudging, the logo would sit perfectly aligned to the bottom of the inner frame, but I wanted to adjust it so that the top half of the logo overlaps with the image, and moving it to the left just a half a percent makes the foot of my kneeling man overlap with the bottom of the left side stroke.
In the Add Text module, I first added a watermark and selected a font from the pulldown. Note that currently, it is not possible to use just any font installed in Photoshop or on your computer. The fonts in the pulldown list need to present on your computer, but unfortunately, at this point, you are limited to the 17 fonts I’ve registered for use. If there are any other fonts that you believe are available by default that you would like me to add, please let me know. Here’s a screenshot to illustrate this process.

Note that we’ve made it possible to drag the plugin panel out very wide now so that you can make the most of the new Preview that I’ve included for the new Automatic Text. I’ve left the font options visible here too so that you can see that, but generally, once you’ve added your text string and selected your font and styling, you can click Done and then the Hide Options button to reduce those options down to just the text pulldown list.
Below the font settings are the new Automatic Text settings. There is a lot in here, especially when the window isn’t so wide, because the various data checkboxes are wrapped to two or three lines. Still, I’ve tried to be inventive and keep the options to a minimum while still providing adequate usability. For example, in addition to simply turning the Automatic Text on and off, there is a third option to leave the Text active but hide all of the options. The same goes for the preview box. If you don’t need that, there is a Hide this preview checkbox, so you can collapse all of this down to just two lines when you are not using it.
We are using most of it right now though, so take a look at the options we have, continuing with the Replace and Append options. The Replace option simply replaces the text that you entered when you created this particular text watermark. These options are not tied to the saved watermark text as such, but they use the font that is saved with the text, so if you intend to override the text with the Replace or Replace Split options, you can simply use the text as a label remember your font settings by. The difference between Replace and Replace Split is that the Split option puts a carriage return after the manually entered text and will also intelligently split the automatic text into two lines at a suitable location.
The Append and Append Split options work in exactly the same way, but the text is appended to your watermark text, so in this example, the first line would be Martin Bailey Photography K.K. because that’s what I added as my watermark text. That though, along with the options you select, is all that is saved in the plugin. The rest of the text is all information that is embedded in the image and placed here automatically when you open an image. Then there are the Spacer options. This is the character or characters used between each item in the list of shooting information. If you do not choose one of the Split options and simply Replace or Append, all information will be in one or two long lines with the Separator between every element.
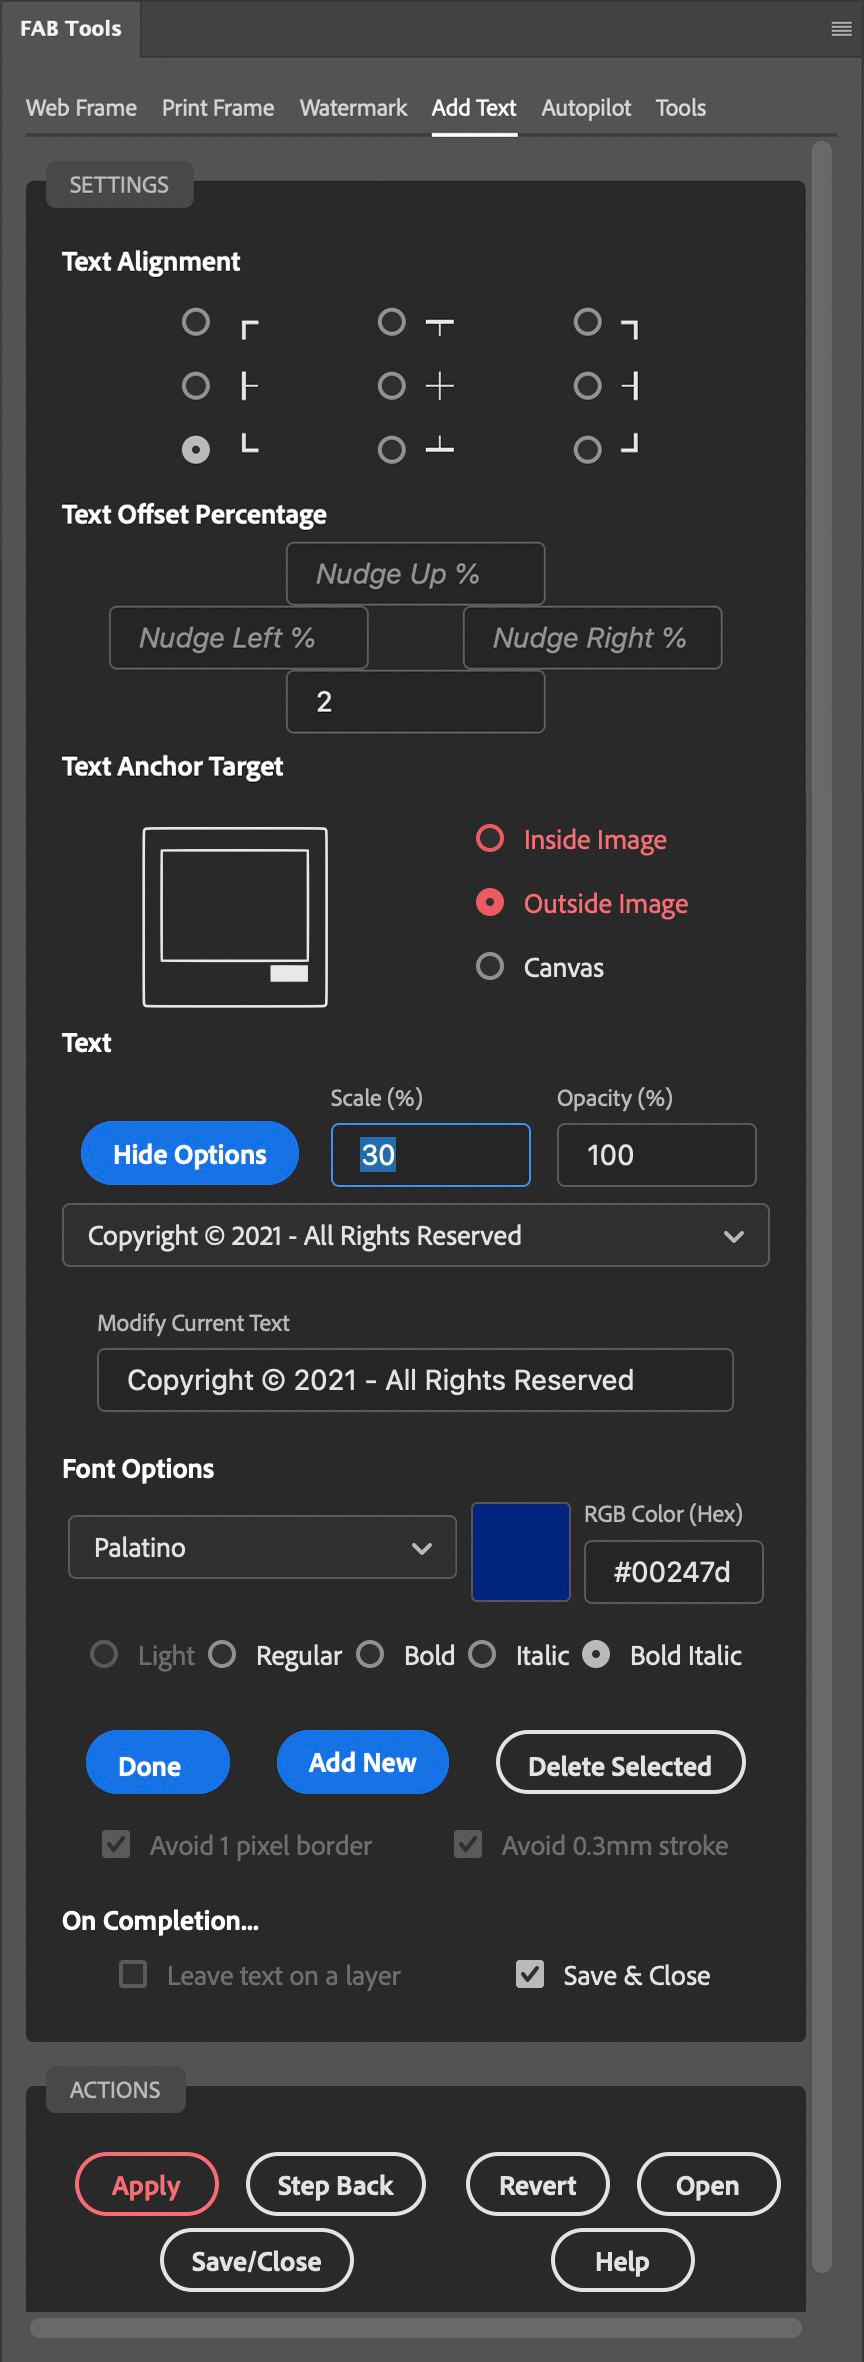
Second Text Line (from V1.5)
From version 1.5 released in December 2021, there are now more text customization options than ever! We've covered this in the version 1.5 update video in the tutorials that you can view above, but to explain, you can now add a second line of text that you manually enter for your Text Watermark.
All you have to do to use the second line of text is to select the Second Line Text field (inside the green box in this screenshot) and type in your text. When you tab away from the text field your text is automatically saved with your first line and other options, such as font, font style, and font color.
If you don't need to embed your second line in your watermark, you can either delete the text or uncheck the Activate check box to the right of the Second Line Text field. If you want to change your text regularly, leave the Auto-hide button unchecked, and the field will remain on the screen when the other options are hidden.
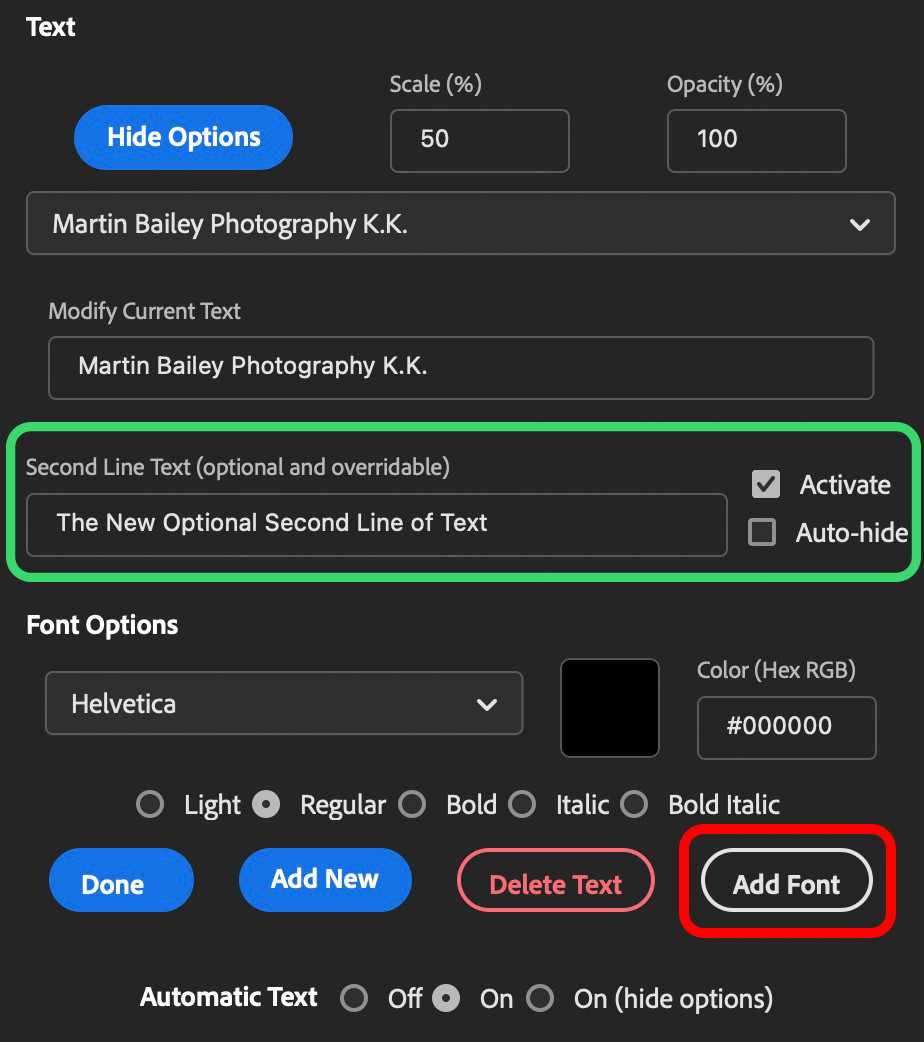
Add Custom Fonts
Another new feature in version 1.5 is the ability to add any font that you have installed on your system to the Font pulldown for use in the Text Watermarks. To get started just click on the Add Font button that can be seen after clicking on Show Options in the Add Text module. If you haven't added a Text Watermark yet, you need to add something before these options are visible.
After clicking the Add Font button, you will see six text fields. The first is for the font Name, and the following five fields are for the various styles that you commonly find in a font. The name can be anything you want, but so that you can recognize the font, using the Font Name is recommended. For the remaining Postscript name fields, you can use the font file name without the extension, or get the font style name from the Font Book under Applications on a Mac or from the System Font Viewer on Windows. These names have to match the actual font names or your custom font will not work. After entering the style names, click the Store Font button, and check the preview to see that the font is working. If you have added more than one font style, also check that the style changes in the preview when selected.
You can add different styles to the five provided, for example, you might add an Extra Light font style instead of Light, or Extra Bold instead of bold, but note that the style will only be displayed by the available style radio button with the default names. Once you have added a custom font, you can press the Edit Font button that will be displayed when a Custom Font is selected and reopen the font text fields to check or change what you added. There is no limit to the number of fonts that you add.
Note too that the fonts are added to the MBPCustomFonts.txt file that you can find along with the other preference files that are stored. To see your Custom Fonts file and potentially make a backup, go to the Tools module and click on the Show Settings Folder Path button, then copy the path to the clipboard, and paste that path into the dialog that appears when you select the Finder > Go > Go to Folder option on a Mac, or paste the path into the Explorer path field in Windows.
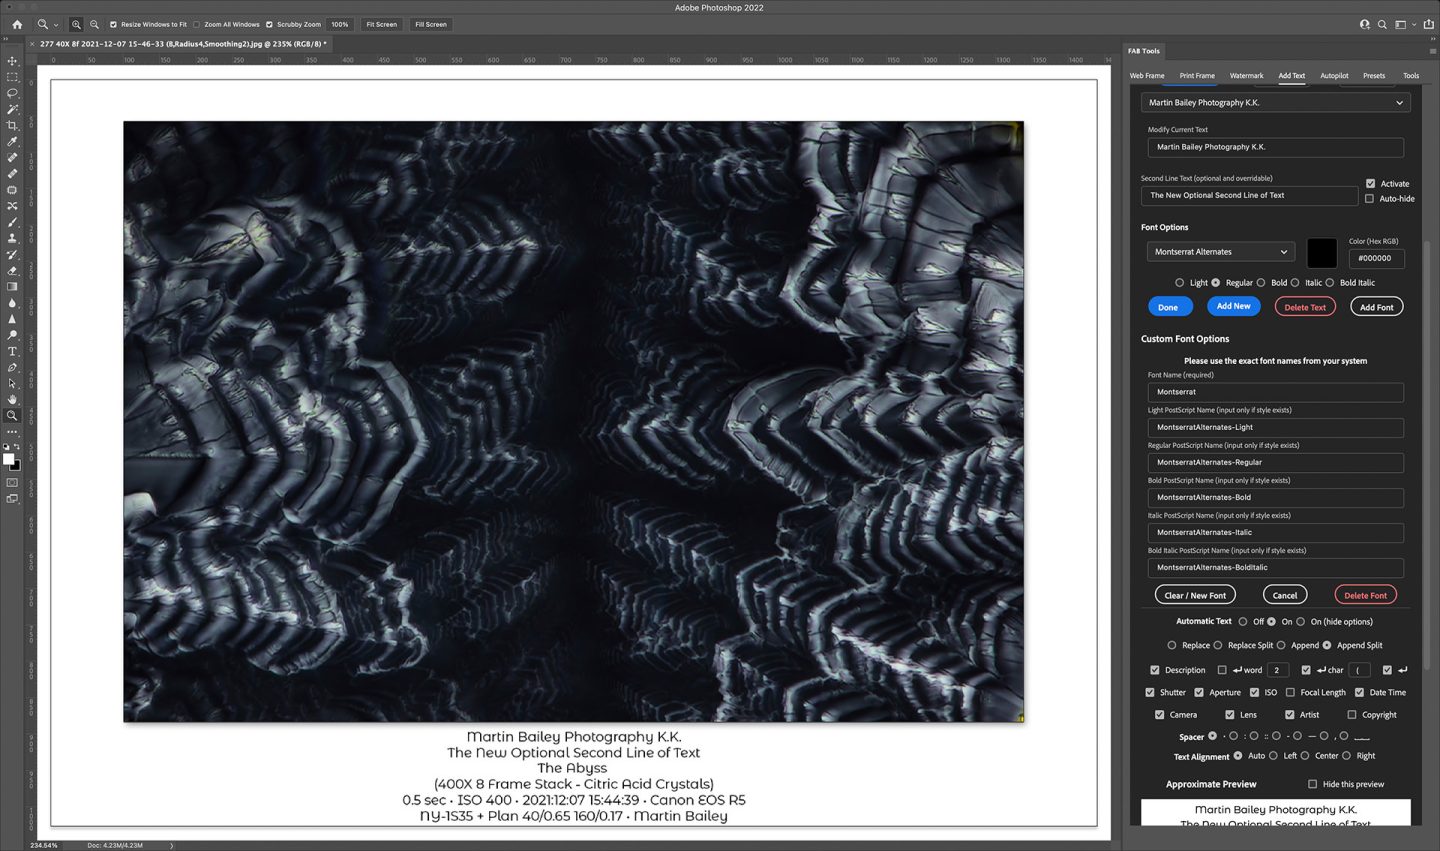
Description Text Wrapping Options
Version 1.5 also introduced two new Description Text wrapping options. The Description text is automatically extracted from your image if you added a description, either in the File Information > Description field in Photoshop, or in another application, like Capture One Pro or Lightroom. If you add a Description in Photoshop, note that you must save and close then reopen the file before MBP FAB Tools will be able to read the Description from the image file.
The first of the two new wrapping options is to return after the number of words entered into the first of the two optional fields. Your description will automatically be wrapped after the number of words entered. The second new wrapping option is to wrap when FAB Tools finds a specific character or character string in your Description. By default, this is an opening parenthesis bracket. As you can see in the example screenshot above, I wrapped the description after the two words "The Abyss" by including the remaining Description inside parenthesis.
Safe Text Scaling
The last major update in this release is the Safe Text Scaling option. As it is now possible to build text watermarks that can potentially overflow the space provided in the border surrounding your resized image, I've added the Safe Text Scaling option and turned it on by default, and this will essentially prevent your text from overflowing the border and being cut off.
The cool thing about this is if you do work with multi-line text watermarks, and are happy for them to fill the border space vertically, you can now just set a larger Scale percentage than necessary, and allow the Safe Text Scaling option to resize your text to fit the border automatically. So, for example, instead of trying to find the percentage required to fill the border, which might be say 32%, you can now just specify a 50% border, and leave the rest to FAB Tools. Needless to say, it works with landscape or portrait orientation images, as well as square and panorama images.
If you want to know whether Safe Text Scaling is kicking in, look below the three options under the Text Anchor Target section in the Add Text module while adding a text-based watermark. You'll see a green message quickly flash onto the screen saying "Text Auto-Scaled!" To actually be on the Add Text screen if you are adding a Watermark during the resizing process, select Apply Web Border from the hamburger menu in the top right of the FAB Tools plugin panel.
The final option at the bottom of the Automatic Text area is the option to select either the Web Frame border color or the Print Frame border color for use in your preview. This preview and its related options are actually also now used for the regular Text Watermark so you can make use of this even if you are not using Automatic Text, to check what your text will look like before applying it to your image. So that you can see what this all looks like in a resized and framed image though, here is the output photo using the settings that we just covered.
Print Frame and Resize
The next module is for framing for Fine Art Prints. This is closest to my 2013 Border Scripts release, but now highly customizable right here in the user interface.
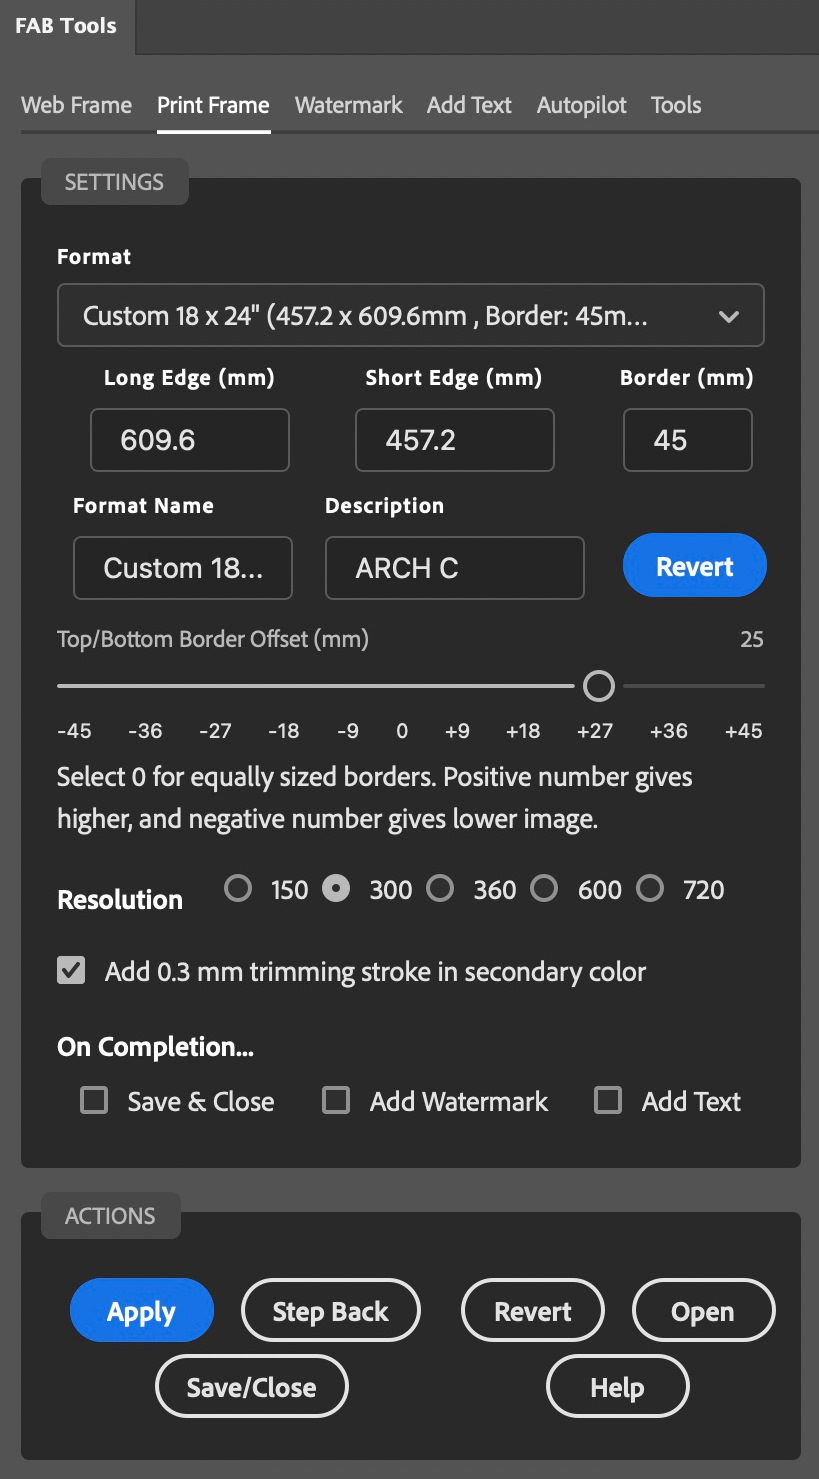
There are 30 presets (two more were added in version 1.1.0) which, to protect the integrity of the media formats, cannot be modified, other than the border size and vertical offset. If you change the border size it will automatically be saved for future use, and a Revert button will appear, to remind you that you've modified the preset and to revert to the preset 10% border if necessary.
In addition to the 30 media presets, there are ten customizable formats, based on popular media size and a few square frames. You can take these and make whatever you want. You can enter the Long Edge, Short Edge, Border width, all in millimeters, as well as a custom name for your format and a short description. Each of these fields is saved as you move away from the field, but if you want to reset this and start again, just select a saved custom format and hit the Revert button.
You can also select your resized image resolution. We are not actually able to set the resolution on your images during the resize, but with this number we can ensure that your images are the correct size. So far FAB Tools has used the resolution of the base file, but when printing, this could lead to problems.
For example, if your base image is only 72 ppi (pixels per inch) and you resize to an 8 x 10 inch print size, leaving the resolution at 72 ppi would result in an image that is 576 x 720 pixels. If you then printed this at 300 ppi, your image would only be 1.92 x 2.4 inches. By specifying your print resolution, FAB Tools will resize your image to 2400 x 3000 pixels, so printing at 300 ppi would accurately give you an 8 x 10 inch print, even though the actual file resolution would remain at 72 ppi, and the reported size would be 33.3 x 41.6 inches.
To check this, check the resolution of a size before resizing for print using a different resolution, then open the Image Resize dialog in Photoshop and turn of Recalculate, then enter your target Resolution. You'll see that the size is that which you specified to resize the document to.
The Magic Formula
After a lot of research around 10 years ago, I came to the conclusion that a good balance for fine art prints was to calculate 10% of the height of the image and use that for all four borders while moving the image up by 3%. This gives 10% side borders, a 7% top border, and a 13% bottom border.
Until now, in the Web Frame module, we always converted these percentages to pixels, as you had to specify the border width in pixels. From version 1.3.6 though, you can now select to adjust the border and offset as a percentage, so selecting 10% will give you a border which is 10% of the width of the image, and the offset changes to use percent as well, so you can now just move it up by 3% to get this golden ratio.
Strokes and Shadows
In version 1.3.6 we also added the ability to add a drop-shadow to the inner image to lift it off the background. To save space the option is hidden to begin with, but if you click on the Drop Shadow header it will display all the options you need to add a great looking drop shadow, including the color, angle, distance, spread, size and opacity. Here is an example of an image with a drop shadow applied. Note also the use of percentage to add an 8% border offset upwards by 3%.

Watermarks
A completely new addition is the ability to add graphical watermarks with precision to pretty much any location on your image. Start by selecting one of the nine anchor points, including the four corners, center sides, and the center of the image. From there, you can nudge the watermark up to 100% of the image away from the anchor point.
You can load multiple images and change or delete images easily from a pulldown. You can scale the image to a percentage of the width of your resized image, and change the opacity, which is useful if you are placing a watermark over the image area. Scale and Opacity values are stored separately for each image that you load to your list.
Once you've specified your settings, you are ready to apply your watermark. When you are happy with the placement, you can also turn on the checkbox in either of the resize modules to automatically apply the watermark after resizing. There's no need to worry about the image orientation. We calculate the position based on your image size and orientation, so unless something goes wrong, the watermark will be placed perfectly each time.
From version 1.1.0 you can select to anchor your watermark Inside your resized image or Outside the resized image in the border. Until the image is resized, these options will be displayed in red, as you see in the screenshot to the left, but your settings will be used as configured. You can apply a watermark anchored to the canvas edge at any time, even without performing a prior resize with frame.
If you are working on multiple images, for faster processing, there is also an option to Save and Close the image once processing is complete, but wait! The new Autopilot takes processing and efficiency to a whole new level! Please check that out below.
Introducing Autopilot!
Also introduced in version 1.1.0, FAB Tools now includes a robust Autopilot module. With Autopilot you can now turn on the Add Watermark and Add Text checkboxes on either of the resizing and framing modules, and apply your frames in batch. This helps as you try various settings, as you can simply leave Autopilot on, allow it to process your open images, and walk through your images to check how the frames look.
We remember which images have been processed, so your frames won't be reapplied during that session. However, if you want to apply some changes made, you can simply hit the Revert button to undo your changes, and Autopilot will instantly apply your updated frame and watermarks.
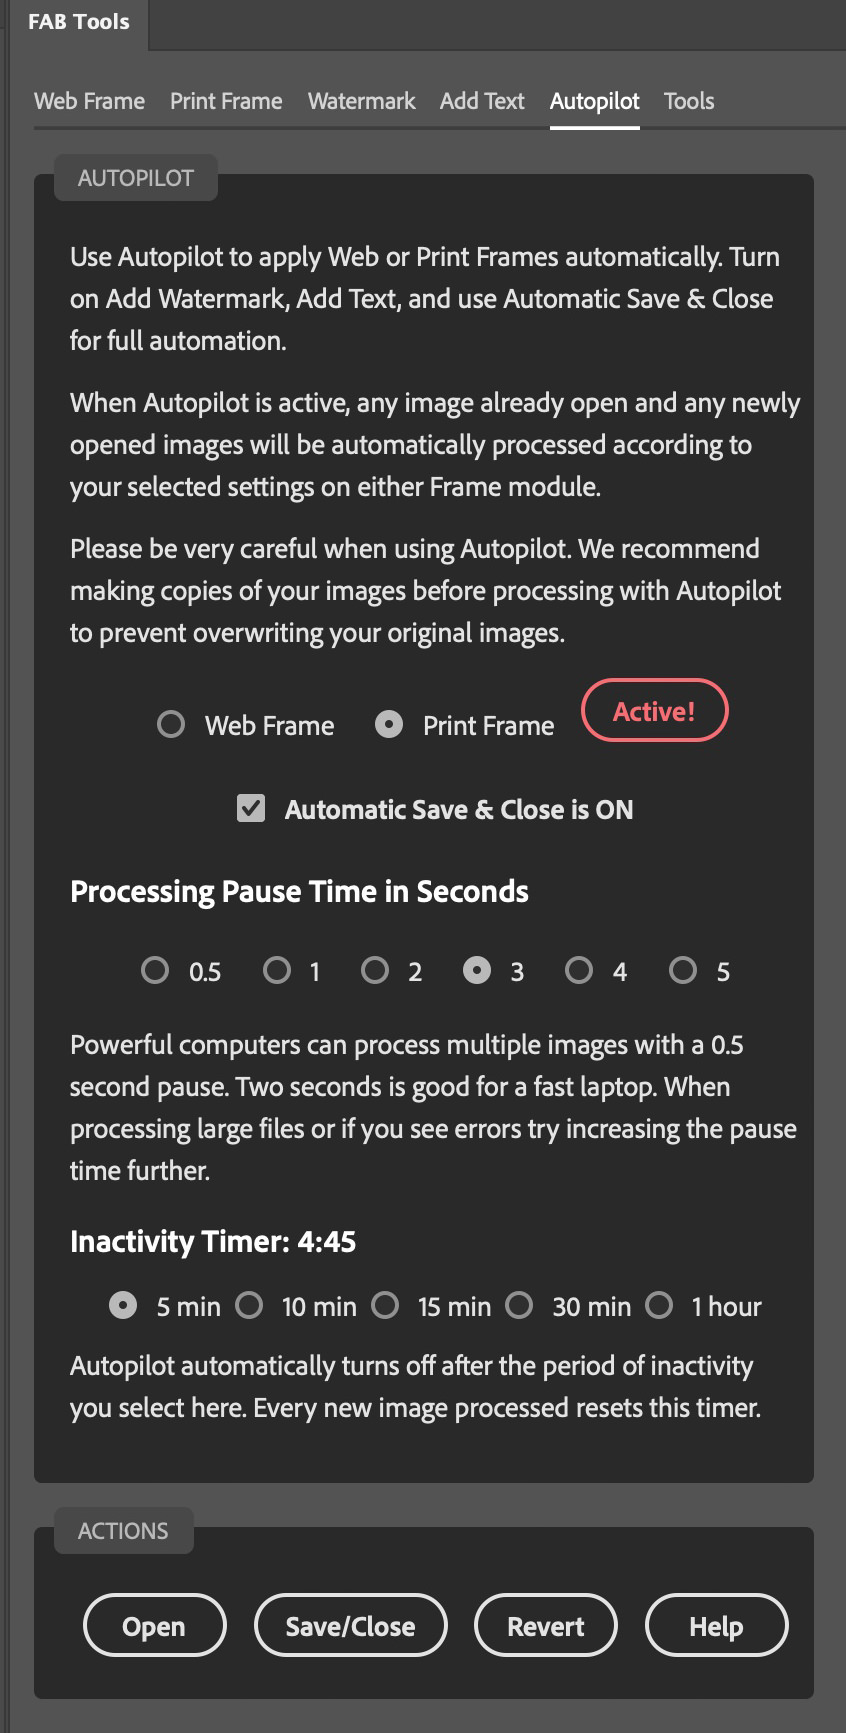
If Autopilot runs too fast for your computer to keep up with, you may see errors that will cause Autopilot to deactivate. If this happens, increase the number of seconds pause between actions with the radio buttons provided. For example, on my iMac Pro with an 8-core CPU, I can select 0.5 seconds pause and batch process twenty or so 50 megapixel TIFF files without any issues. On my 13" Mac Book Pro though, with a 2-core CPU, I have to select 2 seconds for web resizing JPEGs, and 3 seconds for 50 megapixel TIFF files.
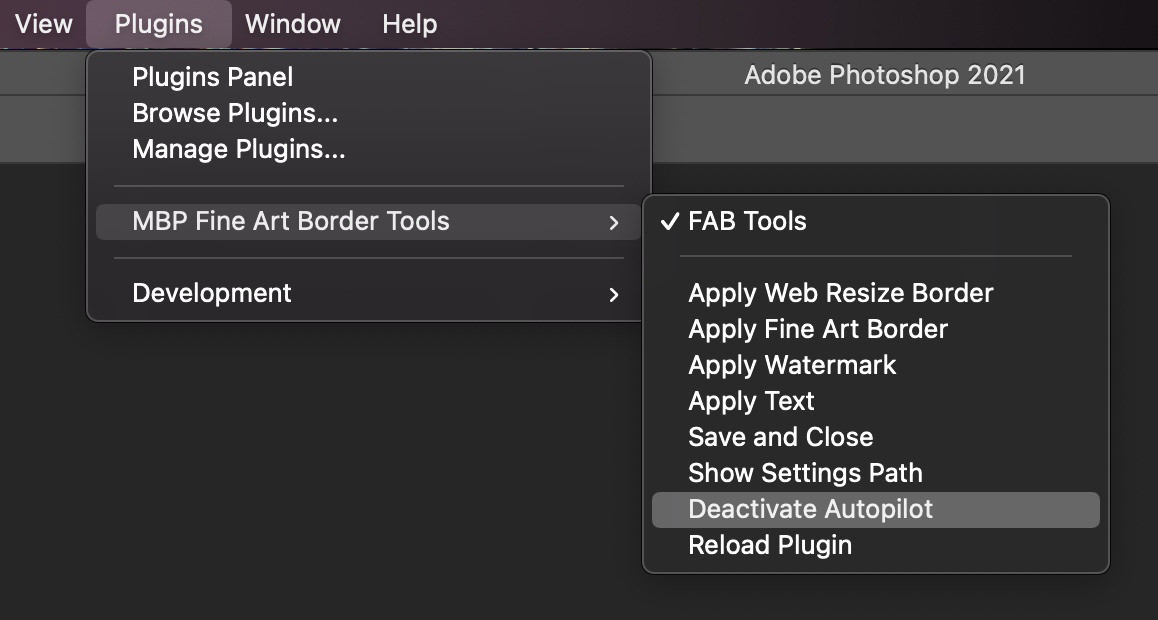
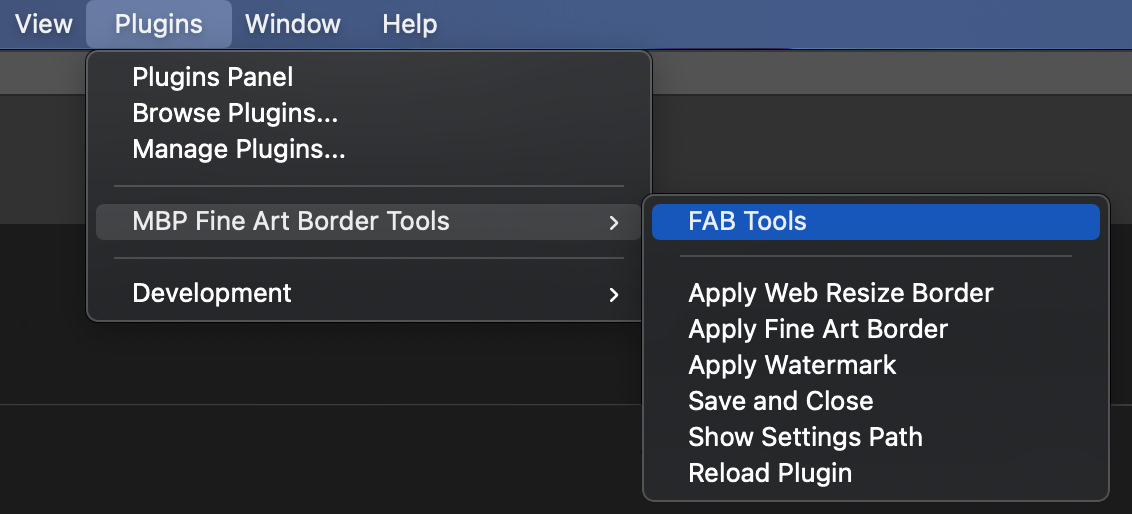
If you should need to deactivate the Autopilot, note that you can select FAB Tools from the Plugin menu as seen in this screenshot. There is also an option to Deactivate Autopilot in the Shortcut menu, so you don't have to open the plugin to turn it off. If you do select FAB Tools while the Photoshop welcome screen is displayed, Photoshop will open and the plugin will be displayed, enabling you to change the settings or deactivate Autopilot.
We strongly recommend working on copies of your images when working in Autopilot mode. We've tried very hard to make it as robust as possible, but occasionally errors may occur, especially if you are using a short pause, and if you have Automatic Save & Close turned on, you may end up saving errors and need to rerun a file or two. Ideally, run through a few batches without Save & Close turned on first to get a feel for how Autopilot works, and find a good place for the pause radio buttons. Then, once you strike a good balance, you can turn on Save & Close and blast through large batches of images relatively quickly.
Inactivity Timer
Because Photoshop will revert to its welcome screen when all files are processed, there is an inactivity timer built in to Autopilot to help you avoid forgetting that the Pilot is on, and inadvertently framing and saving a file that you open in Photoshop. The default timer is five minutes, but you can change this to up to one hour with the available radio buttons. Note too that the inactivity timer resets every time you process an image, so five minutes is generally fine.
Round-Robin Processing
A longer inactivity timer may be useful if you are working on images in another program, and want to round-robin to Photoshop. For example, you can leave Autopilot turned on in Photoshop, and even minimize the FAB Tools plugin window to an icon, and then send your images to Photoshop, and they will be automatically processed and saved back into your base application.
New Preset Module!
We are pleased to introduce Presets! You can now save any and all settings in presets and recall them any time. When you save a Preset you can select which of the four main modules to include, and even if you save them all, you can deselect any module when restoring, giving you full control of what you include and restore. You can even restore deleted watermarks!
Color Your Frames! *
You can now color your frame by selecting a color in the color picker or sampling a color from your image. If you know the RGB Hex code for a specific color, you can add that too. In addition, you can now change the stroke color around your frame and add a stroke around the inner resized image as well!
Welcome to Auto-Text! *
FAB Tools can now fetch information from your embedded image data for inclusion in your text watermark! Select information such as the Title, Shutter Speed, Aperture, ISO, Focal Length, Date & Time, Camera, Lens, Artist, and Copyright! You can either replace your watermark text or append your automatic text to it, and there's an option to split the text over multiple lines if you prefer. There is a new preview feature, so you can see how your text will look before you apply it, including your font and styling.
* Note that colored frames and Auto-Text are currently in review. It will take a few days for these features to be publically available.
Printing Examples
The reason that I created my original Fine Art Border scripts back in 2013 was to prepare images for print with the Fine Art Border vertical offset already in place. If you print directly to the media size that you want as your final result, the border can generally be created by adjusting the border widths in your printing software, but getting the ratios the same each time you print can be challenging. I always used a spreadsheet with my calculated border sizes in it, and managed a large number of printing templates, and that can be avoided by running your image through this new plugin. If you are printing to the media size of your final print though, it’s best to uncheck the checkbox to add a 0.3mm stroke border around the outside edge of the image.
If however, you want to use the plugin to help you to save money carrying various media sizes, leave that border on, so that you can see where to trim after you’ve printed. The idea is that say, for example, you create prints for sale in A4, 8 x 10 inches, A3, and 11 x 17 inches, but you don’t want to stock all of these sizes as sheet media in various finishes. The second half of this video explains the printing aspect, after walking you through the main features as of version 1.0.7. Text-Based Watermarks and Autopilot will be covered in a new video shortly.
If you prefer to read, let’s imagine that you need an A4 and an 8 x 10 print and you have a 24-inch wide roll media printer. It takes just a few seconds to resize your images using my new plugin, then click on the Padlock of the background layer of one of the images in Photoshop to unlock it, then specify a canvas size small enough to print on your roll width. 24-inch rolls are 609.7 mm wide, so you can either specify say 600 mm and print without any scaling, or if you know like I do that your printer requires a 3mm border on each edge, you could simply resize your first image to 603.7mm, so that it will fit perfectly after deducting your printers minimum edge gap. Make the height something taller than the tallest print you need, say 220 mm in this example.
Because we unlocked the first image before resizing the canvas, the we can easily move the image in slightly, and then drop our 8 x 10-inch resized image onto the newly resized image, and position it to the side of the first image, as you see in this screenshot. If you print this at 220 mm high on 24-inch roll media, you’d have minimum waste and once trimmed, two perfectly sized prints.

Even if you don’t have a roll media printer, you can save on sheet media varieties in a similar way. Say you received an order for a print on A4 media, but you don’t have any A4 sheets available. You could resize and add the trimming stroke border, then print on something larger, like A3 media. Here is a screenshot of the Photoshop Print screen with a print resized to A4, about to be printed on A3 media. There’s a waste of media that we’d be trimming away, but it does save stocking lots of different sizes of sheet media. And of course, similarly, you could simply lay out two prints on the A3 page to minimize waste.
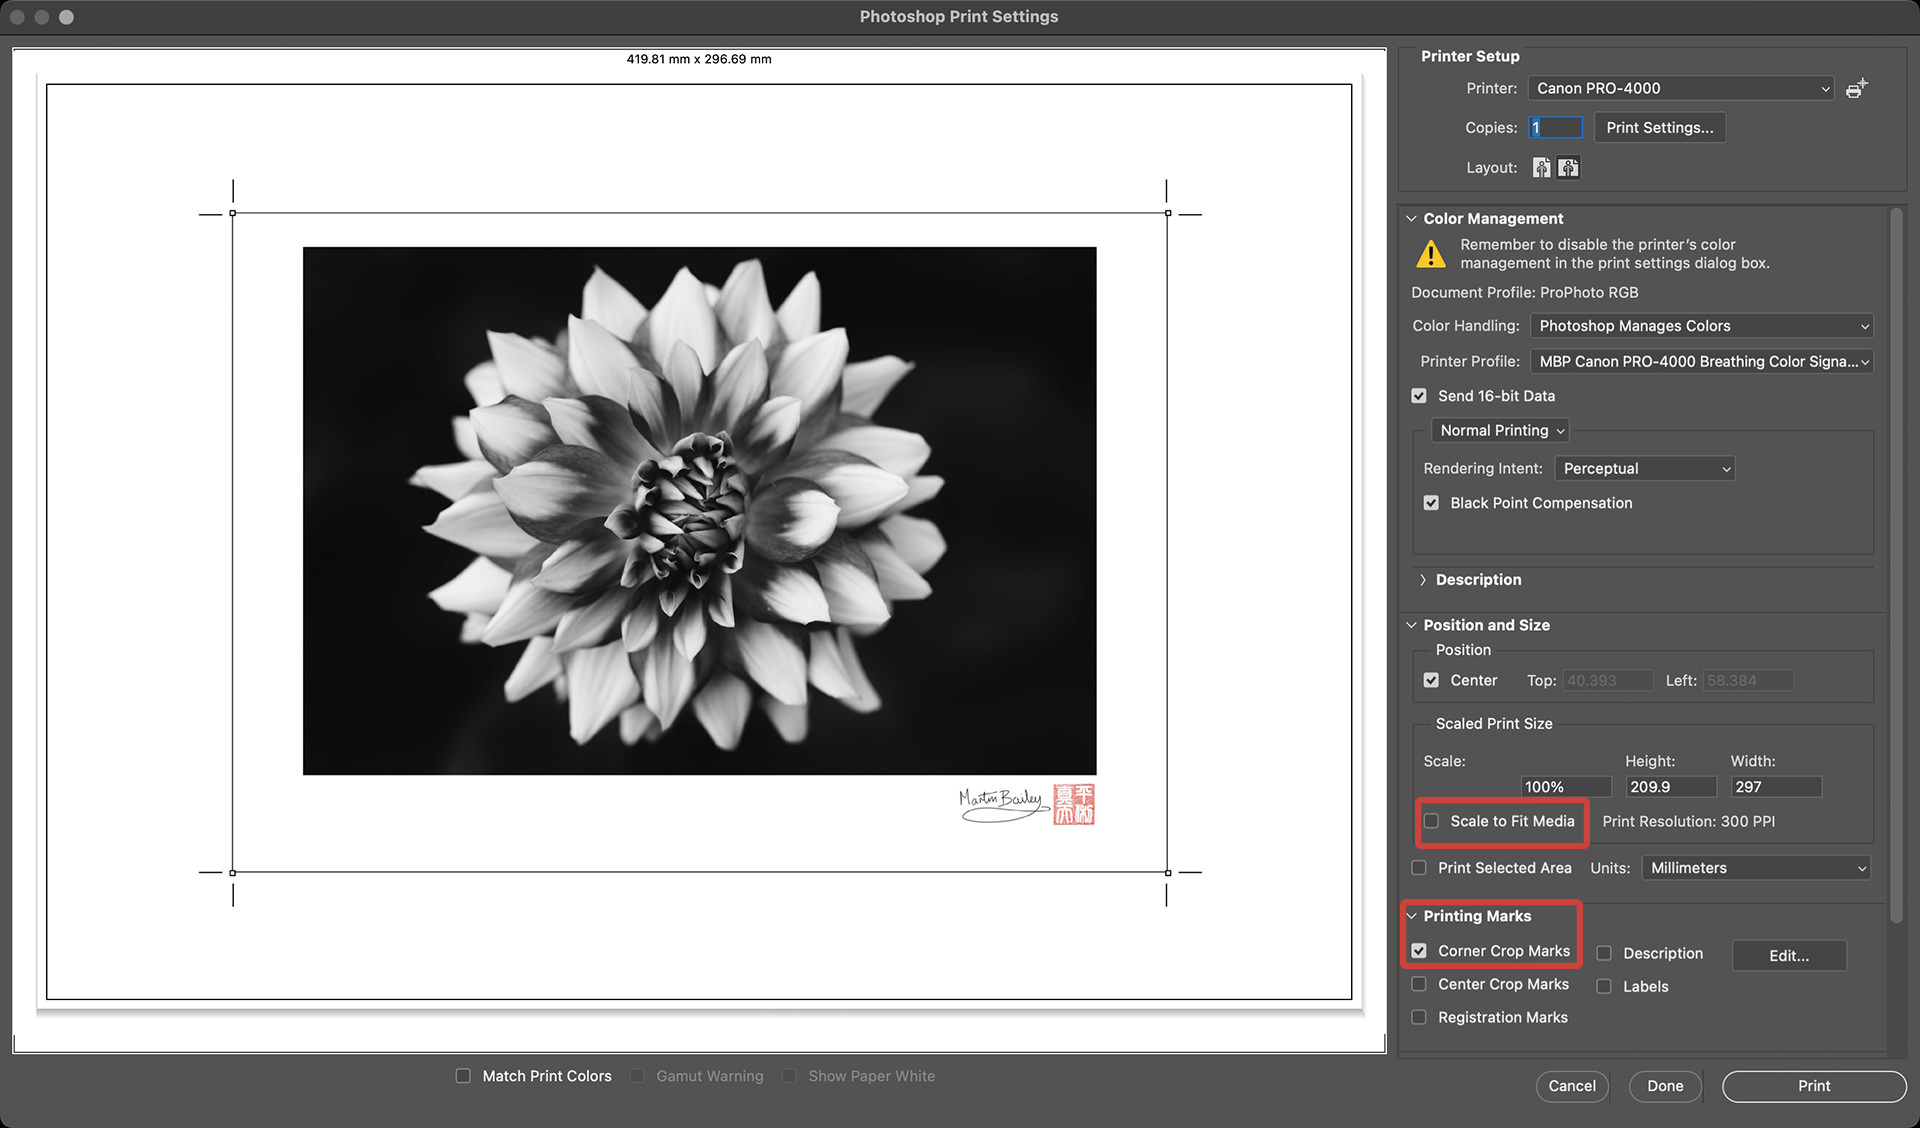
Note too that some programs have the ability to add additional trimming guides, as as the Corner Crop Marks that I turned on in Photoshop in the above screenshot. Also note that to ensure you print at the correct size, you’d need to turn off any scaling to fit the media. The images are currently saved in the original resolution, or set to 300 ppi if the resolution isn't set for any reason, but either way, it will be set so your resized images will be displayed at exactly the size you need if you print without any scaling turned on.
Get Fine Art Border Tools
Click the MBP Fine Art Border Tools logo to jump to the Adobe Marketplace to pick up your FAB Tools!
※ Please ensure that you login and purchase the plugin with the same email address that is linked to your Adobe ID. Also, note that the plugin requires Adobe Photoshop version 22.0 or higher. It does not work with Photoshop Elements.
Problems Finding Your New Plugin?
If you have bought the plugin but cannot find it, please open Photoshop then first check to see if there is an MBP Fine Art Border Tools menu under the Plugins menu. If it’s there select FAB Tools from the menu item.
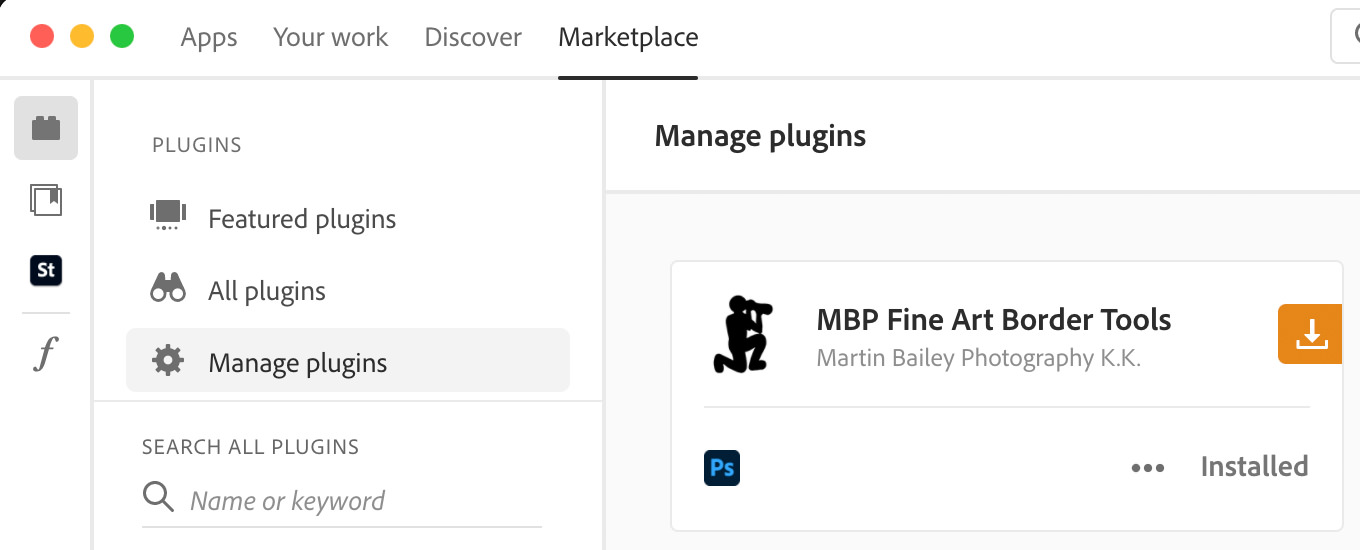
If it is not there, check that your Adobe Creative Cloud desktop app is at version 5.3 or higher. If it is not, please update, then select Manage Plugins from the Plugin menu. The plugin should be listed as seen in the attached screenshot. You may need to select Install to actually install it, and then it should be visible as a floating window when you go back to Photoshop. If it is not visible, please check the Plugins menu again. You should also be able to see the plugin in your account here.
If you still cannot find the MBP Fine Art Border Tools plugin, please drop us a line with the Contact Form button to the right.
If you'd like to be kept up to date on plugin updates and new features, please subscribe to our Plugin Notifications newsletter.
Contact Technical Support
Subscribe to Plugin Notifications
※ Adobe, the Adobe logo, and Photoshop are either registered trademarks or trademarks of Adobe in the United States and/or other countries.
