
Last week a friend and fellow traveler on my workshops Ulana Switucha asked me a question about good techniques for using long telephoto lenses to photograph moving subjects. Although I have talked about much of what I will cover in other posts over the years, today we’re going to bring all of this into one post, and I’ll update you with my latest settings etc.
[smart_track_player url=”https://www.podtrac.com/pts/redirect.mp3/traffic.libsyn.com/mbppodcast/mbpp_ep584″ src=”https://app.fusebox.fm/embed/player.js” class=”mbp-ignore”>
Using a long telephoto lens, such as my 100-400mm Mark II lens, or even longer telephoto zoom and prime lenses, adds a few new concepts that we are required to keep in mind in order to use them successfully. These can be split broadly into two areas, the need to avoid camera movement during the exposure and the need to focus and track a moving subject.
Camera Movement
One of the things that people tend to overlook when initially starting to use a long telephoto lens, or even the long end of a zoom lens such as my 24-105mm, is that as you zoom in and frame a subject with a narrower field of view, you increase the risk of moving the camera and lens during the exposure.
Although shorter lenses are generally lighter, it isn’t just that long lenses can be heavier and more difficult to hand-hold that causes this problem. To cause an image to appear blurred, we basically have to move the camera far enough for the details in the scene to move into the adjacent pixel on our sensor. With a telephoto lens, the field of view is much narrower, so even the same amount of movement from our hands effectively moves the image more than when using a wide angle lens. Just as the images we create with telephoto lenses are magnified, our movement is also amplified.
This is also why you’ll hear people complaining about the sharpness of telephoto lenses more than wide angle lenses. Although wide zoom range lenses can have lower image quality, it’s sometimes just a case of it being much easier to snaffle your shot with a long lens, and people often just don’t get that.
Shutter Speed as Focal Length Rule of Thumb
If you consider that the problem is details captured moving over to the adjacent pixels during the exposure, one way to overcome this is to make the exposure faster. If the exposure finishes before the details we are photographing move to the next pixel or further, the image will be sharp. There is a simple rule of thumb to use that helps to avoid this problem.
Basically, you use the focal length that you’ll shoot at as the denominator in the shutter speed fraction. So, if you are shooting at 400mm, without considering any other factors such as subject movement, you will need a shutter speed of 1/400 of a second to avoid camera shake. If you are shooting at 100mm a shutter speed of 1/100 or faster is advisable.
This is also the case for wider focal lengths, such as 24mm. It depends on how steady your posture and hand-holding techniques are, but with good technique, you could probably hand-hold at 24mm with a shutter speed of 1/25 of a second.
Compensating for Subject Movement
Of course, it’s possible if not likely that if there is anything moving in your scene, as you slow down your shutter speed, it will probably move during the exposure. Just like camera movement, if any part of the scene moves far enough to traverse multiple pixels in your photograph, it will start to appear blurry. The more pixels traversed, the more blurry that subject will become.
So, unless our intention is to use the subject movement artistically, we need to compensate for subject movement, by increasing our shutter speed, and how much depending on how fast and the direction in which the subject is moving, and also to a degree, how close they are to the camera.
If I am photographing a street with people walking around, I’d probably try to get at least a 1/125 of a second shutter speed if I wanted to freeze that motion. For someone running, I’d use at least 1/500 of a second, or faster if I need a really sharp photo. For a bird in flight, I try to get at least 1/800 of a second, though generally, I’m looking at between 1/1000 and 1/2000 of a second.
These are just general guidelines of course. I’ve photographed birds in flight much slower, and if you are photographing a humming bird, even an 1/8000 of a second shutter speed may not freeze the movement of its wings. Also, a subject moving towards you won’t require as fast a shutter speed as one moving across the frame.
Limitations of Image Stabilization
Let’s keep in mind too that although a very useful feature, Image Stabilization or Vibration Reduction in our lenses is only effective for slow moving or stationary subjects. For a moving subject, we still need to use these shutter speed guidelines to freeze that movement of the subject, if indeed that is our goal.
IS Modes
I didn’t mention this in the audio, because I forgot, but I would like to just add that I generally use Image Stabilization Mode 2 when photographing birds in flight, when I might be panning around with them. For station subjects, I use Mode 1, and I’m not a huge fan of the new Mode 3.
The Trade-Off
I say that I “try” to get these shutter speeds because there is often a trade-off. As we’ll talk about shortly, for larger birds, or multiple subjects that require a deeper depth of field, we often have to use a small aperture, and as we make the aperture smaller, less light enters the camera, so we need to use higher ISO settings and/or longer shutter speeds to maintain a good exposure.
On an overcast day for example, if necessary, you can get away with slower shutter speeds for large birds like swans and cranes, and large eagles in flight. For this photograph (below) of two Whooper Swans at dawn, when it was overcast and still pretty dark, I had to increase my ISO to 2500 to get a shutter speed of 1/500 of a second at f/10.
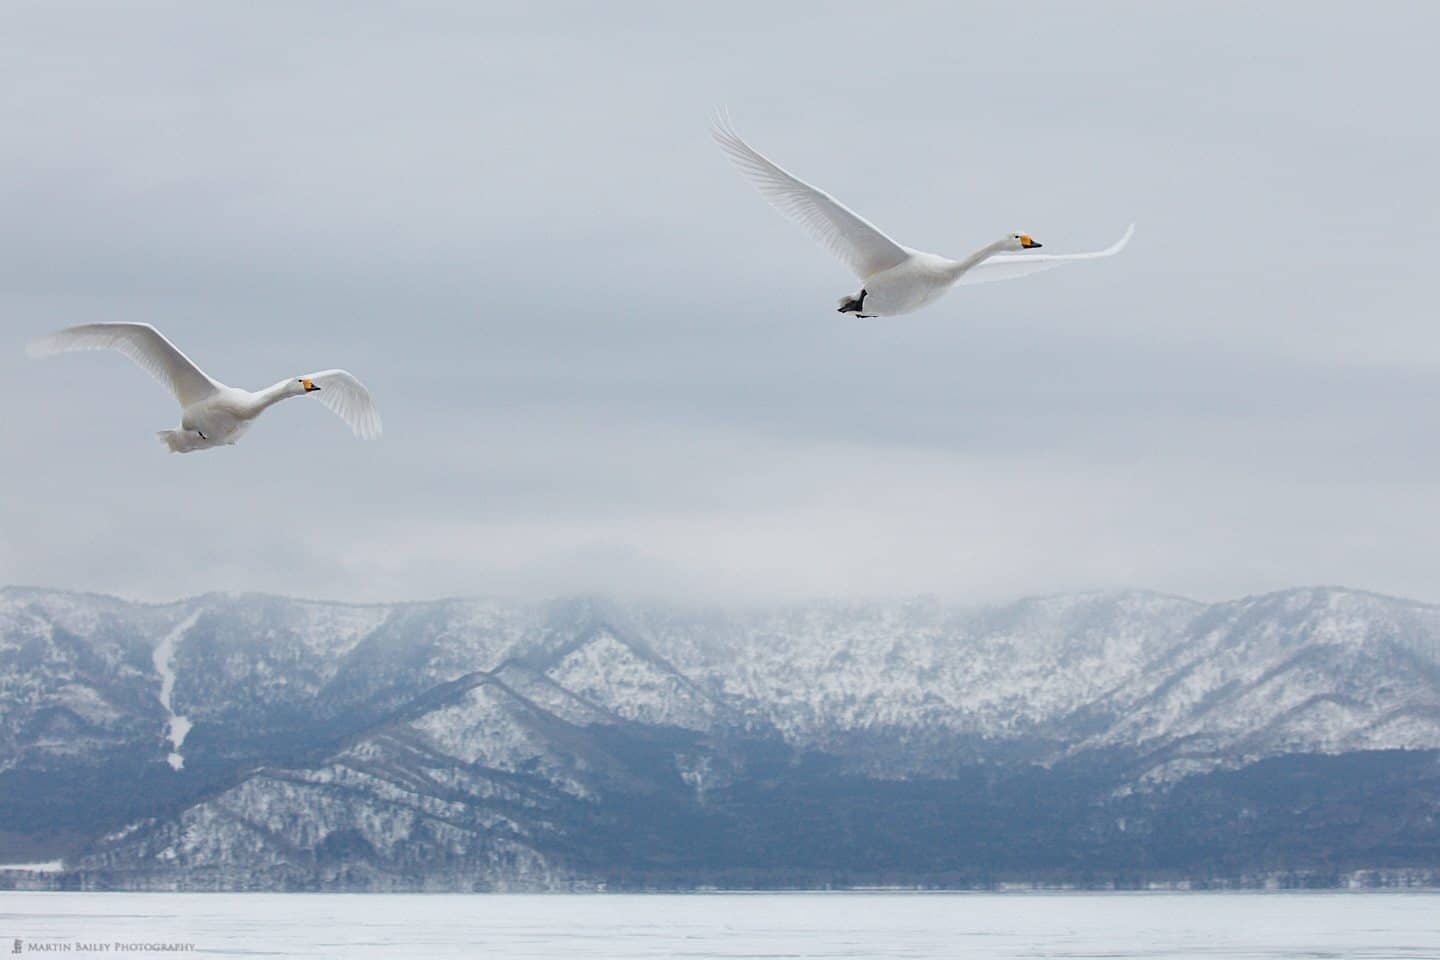
My focal length was only 114mm, so f/10 was enough to get both birds sharp in the instance, and because they are large birds 1/500 of a second will get me sharp wings until they are really flapping quickly. It will leave sometimes leave movement in the wing tips during a flap, but I’m fine with that.
Compressed Depth of Field
So, I’ve mentioned the depth of field in our images, and this is something that we must keep in mind, especially when working at longer focal lengths because the depth of field in our images gets shallower as we increase the focal length. I often photograph wildlife at between f/8 and f/14, because even at these smaller apertures, I often still only have a very shallow depth of field in which to place my subject, and the background will often still be nice and blurred, how I like it.
Here (below) is a diagram that I created for my Sharp Shooter ebook from Craft & Vision, which shows the relationship between focal length and depth of field. At 24mm, a very wide focal length, with your aperture set to f/16 if you focus on something at 1.2 meters or 4 feet, the depth of field starts at 0.6 meters or 2 feet and stretches to infinity, so everything from 2 feet is in focus. At 50 mm, a slightly longer focal length, if you focus at 5 meters or 17 feet, everything from 2.6 meters or 8.6 feet to infinity will be in focus.
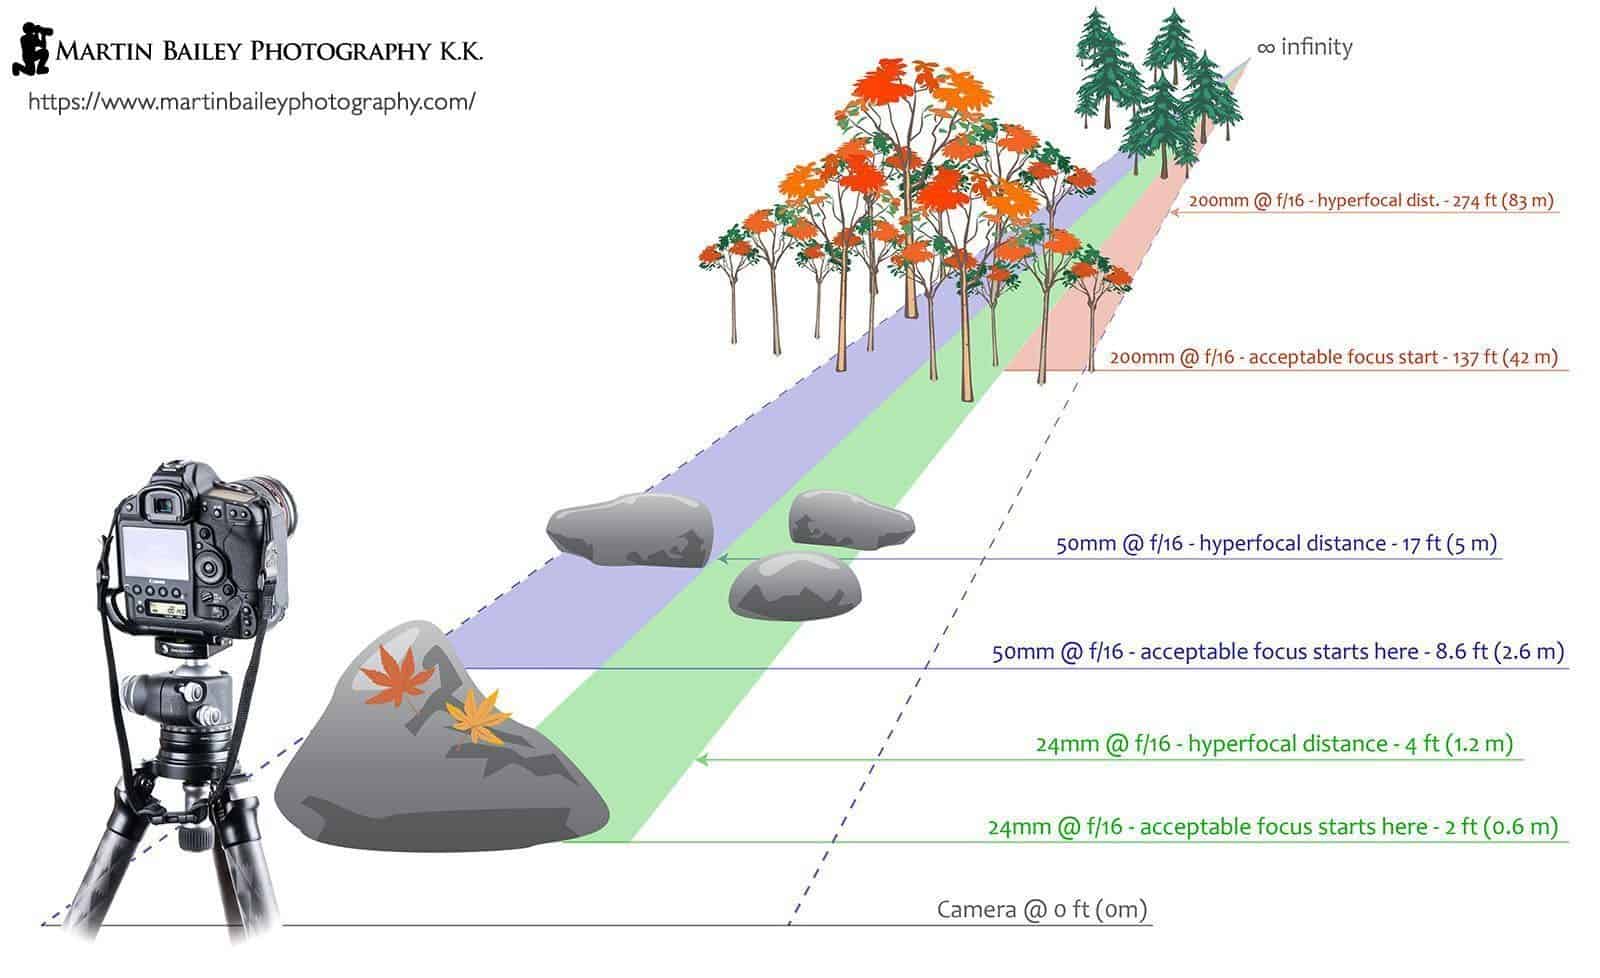
But, when you use a longer focal length, such as 200mm you have to focus right out at 83 meters or 274 feet before you can achieve pan-focus, where everything from 42 meters or 137 feet would be in focus. If we expand this explanation to talk about longer focal lengths, such as 400mm for example, to achieve pan-focus, you would need to be focusing the lens at 345 meters or 1,130 feet and this really is too far to get an impactful photograph of your subject, so using pan-focus or hyperfocal distance won’t really come into play with long telephotos lenses.
Of course, another aspect of depth of field, is that the closer you focus, the shallower the depth of field gets, but we won’t go into any more details on this today. I have an old post Depth of Field Explained from some nine years ago that goes into this in more detail, so please check that out if you are interseted.
Also, let’s keep in mind that depth of field calculations are based on what’s considered acceptable sharpness in an 8 x 10-inch print. If you need to print larger or require everything to be tack sharp, you won’t see that for everything inside this theoretical depth of field. We’ll talk more about critical focus in a moment.
Focusing with Telephoto Lenses
Let’s move on now and talk about focusing techniques for moving subjects, such as wildlife or sports. I’m a wildlife shooter rather than a sports shooter, but what we’ll cover will be equally useful for both.
Critical Focus
Although we have a larger area of depth of field in our images as we mentioned earlier, that entire area is not totally sharp. It’s what’s considered to be in “acceptible focus”. There is an area within the depth of field that is totally sharp, and this is called the area of “critical focus”. To nail critical focus, we need to focus on the subject of most interest, and when the subject is moving around, there are a number of techniques that we need to use to nail that critical focus, and we’ll cover that now.
Framing Your Subject
First of all, it can take a while to even get used to finding the subject in the viewfinder when you first lift your camera to your eye. With a telephoto zoom lens, you can try zooming out initially, and then once you have your subject in the viewfinder, zoom in while keeping the subject framed.
That takes time though, and if you are using a telephoto prime lens, it isn’t even possible, so you need to develop the ability to raise the camera to your eye and quickly find and frame the subject as the action unfolds. This is one of those things that really just comes with practice.
I think subconsciously I am aligning the lens with my subject as I either raise the camera, or I move my eye towards the viewfinder if using a camera support, so by the time I start to look through the viewfinder the subject isn’t hard to locate. I haven’t used a telephoto prime for a number of years now, but I do recall a few times when I had to move my eye away from the viewfinder and relocate a bird in flight, then try again to find it, when I used to shoot with a 600mm prime lens, but it did get easier with practice.
Now, I’m either using my 100-400mm or the 200-400mm with the built-in 1.4X Extender, and both give me the ability to zoom out a little if I need to locate my subject in the sky or scene.
Tracking Your Subject
One of the most challenging aspects of using a long telephoto lens to photograph a moving subject is accurately tracking the subject to enable you to photograph it. To do this, we need to use a continuous focus mode, such as AI Servo on a Canon camera, or Continuous Servo on a Nikon camera. These modes will enable you to continue to focus on your subject while you keep your auto-focus engaged.
Tracking Parameters
How well your camera does at actually sticking with your intended subjects depends on your tracking settings for any given situation. A tip here, especially for Canon users, is to add the main focus settings to your My Menu screen, as you can see in this photo (below).
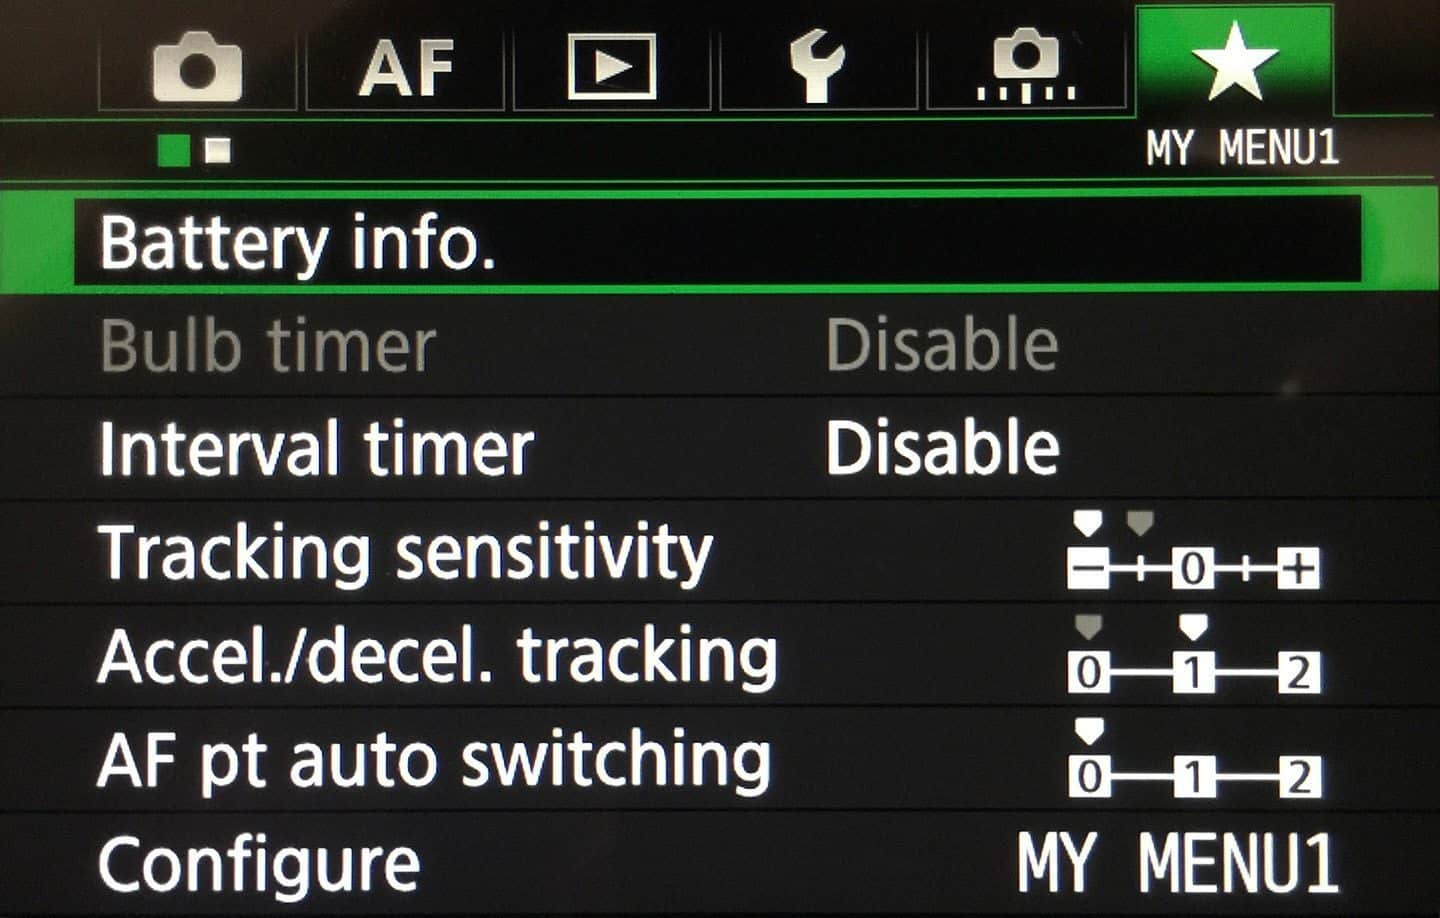
As you can see, I’ve added Tracking sensitivity, Acceleration/deceleration tracking and AF point auto switching to My Menu. This gives me the ability to quickly tweak these settings if I need to, but to be totally honest, I haven’t changed these settings since I reached what I believe to be the optimal settings for the subjects I shoot with my Canon EOS 5Ds R camera.
I should mention that my starting point in the Canon AF settings screens was Case 2, as this is the closest to what I wanted to achieve. The explanation text says “Continue to track subjects, ignoring possible obstacles”. If you press the Info button on the back of the camera while on the AF settings screen, you can see the text “Even if the subjects briefly move from the AF point, they will remain in focus. Effective when obstacles briefly come between the camera and subject, or with erratically moving subjects that are harder to track. Set [Tracking sensitivty] to -2 for even better tracking of subjects that may move from the selected AF point.” As you can see from the image (above) I did indeed move Tracking sensitivity to -2.
The Info button for Accel./decel. tracking states that you should increase this for better tracking of subjects that erratically accelerate or stop. I found that for eagles swooping down to catch fish, or for snow monkeys that move quite erratically as they run down a snow covered hill, having this set to +1 works very well. In fact, although it was tweaking these settings while photographing the snow monkeys that brought me to these settings, as I mentioned a moment ago, I pretty much leave these settings as they are for all of my wildlife work.

The AF point auto switching setting works best for me at zero. This setting only comes into effect when using all 61 AF points, which we’ll look at shortly, but I found that anything over zero for this setting makes the camera move to other obstacles or areas of strong contrast very easily.
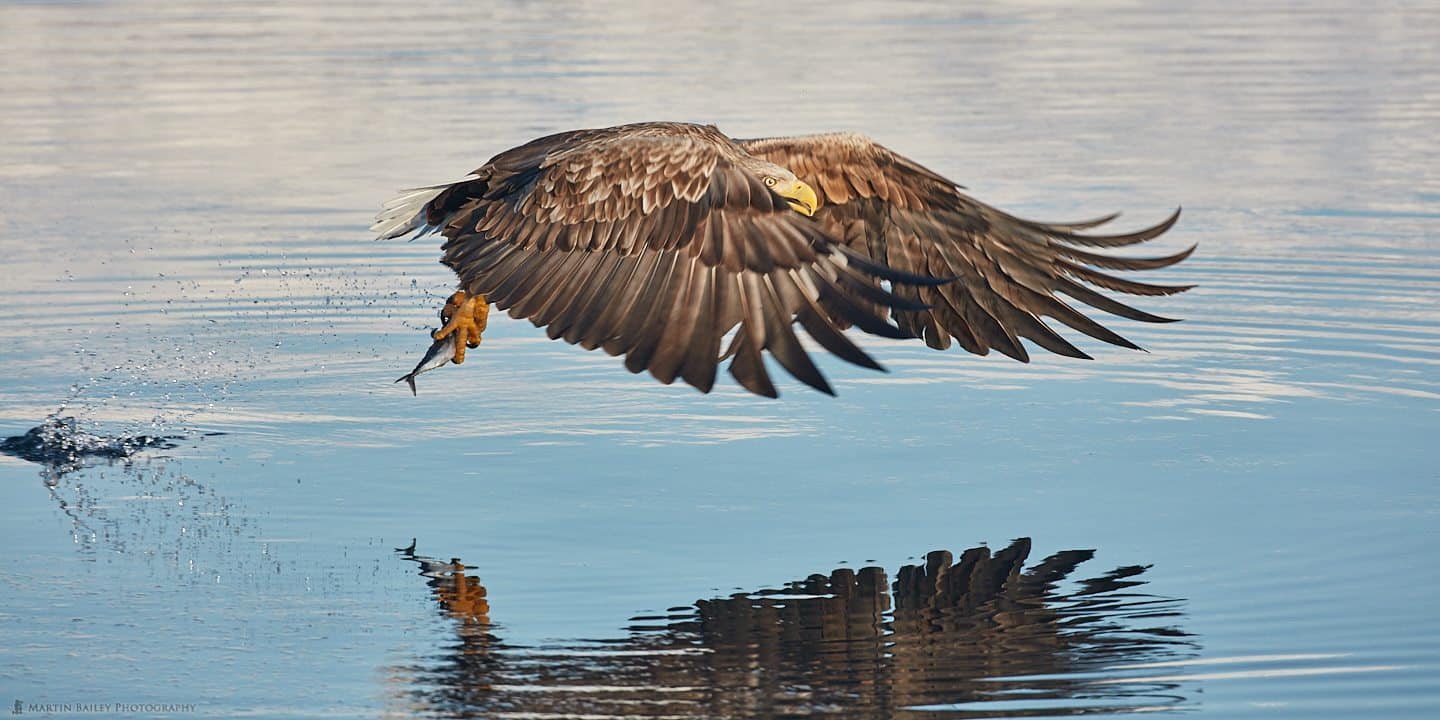
One example is when photographing the sea eagles in Hokkaido over the water, as in this photo (below). Water catches the light, especially on sunny days, and will often steal the focus from the eagle (or any other subject on or over water) very easily. With my current settings, that probably happens less than 3% of the time now, although it used to be a big problem for me before these features were added to our cameras, and I found my optimal settings from amongst these options.

Another instance when these settings that I’ve shared helps is when for example, I’m focussing on a bird coming in to land or flying amongst other birds. With the auto switching too sensitive, the moment another bird enters the frame and goes over an AF point, the focus will switch to the closer bird. With the sensitivity dialed down a little, as long as I stay with my original subject, other obstacles can move right across the frame over the other AF points, and the camera will usually not jump on to it while I continue to focus.
Back Button Focus
There are still times of course when the autofocus doesn’t work perfectly, though these times get fewer and farther between with each generation of camera. When it does happen, the best thing to do is to stop focussing momentarily, then try to regain focus. If the subject is moving relatively parallel to you, as in they aren’t getting any closer or further away, another option is to simply stop focussing, but you need to remove the focus mechanism from the shutter button to do that.
Because of this, I always change my cameras so that the shutter button only engages metering. As you can see from this photo of my Custom Controls menu, shutter button half-press only engages Metering start, and not autofocus as well, which is the default setting.
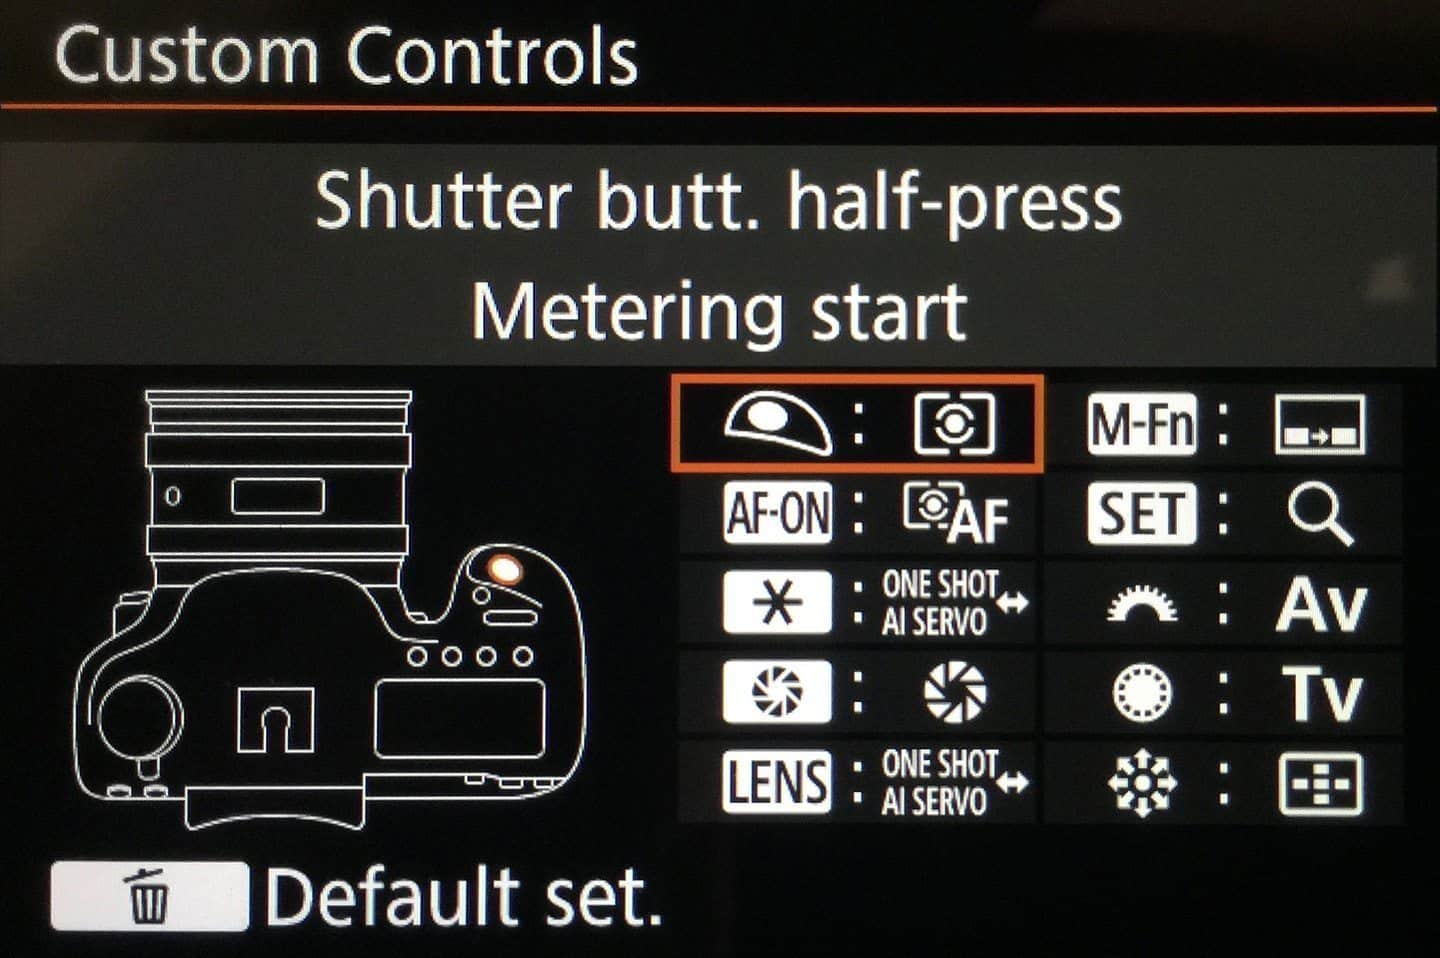
Once your shutter button no longer engages your autofocus, you need to press the AF-ON button on the top right of the back of the camera to engage autofocus. This takes some getting used to, and people often forget to focus occasionally after starting to use this “back button focus” technique, but generally, this is a better way to focus for wildlife and sports photographers, because it gives the following benefits.

Release the Shutter Without Refocusing
The main benefit is that you can release the shutter without forcing the camera to try to autofocus. This might seem unnecessary until you try it, but sometimes the fact that the shutter button engages the autofocus really gets in the way. For example, if you are photographing a subject that is in a heavily textured environment or with other things moving around in the foreground, being able to snap the focus on to the main subject quickly, then release your thumb from the AF-ON button, enables us to get our shot without the camera losing focus as it tries to lock on to something else.
One Shot/AI Servo Toggle
There are also times, say when photographing a bird in flight, when you don’t necessarily want the bird to be in the middle of the frame where the AF points are. At times like this, we can frame the subject with the focus points over the subject for a moment, press the back AF-ON button to gain focus, and then release the AF-ON button again. This makes the back AF-ON button act almost like the One Shot or Single Shot focusing mode, and then enables us to reframe the subject away from the AF points to release the shutter and get our photographs.
Of course, if the subject is moving towards us or further away, they might go out of our area of critical sharpness, so you have to be careful or very quick, but having this ability without actually switching to One Shot mode is invaluable and has enabled me to get many shots that would not have been possible otherwise.
Instant Manual Focus
Even for landscape photography, I use this method of focusing and it means that I can automatically switch to Manual focus without actually flicking the AF button on my lens to MF, simply by not pressing the AF-ON button on the back of the camera.
That means I can focus on what I want to focus on in a scene, and then frame up my shot, and because the shutter button doesn’t make the camera autofocus again, I don’t have to worry about where the focus points are, because the lens won’t try to refocus when I press the shutter button to start my exposure. If your shutter button engages autofocus, as soon as you press the shutter button to make your exposure, the lens will start to focus again, and depending on what focus point you have selected, it may well focus on the wrong part of the scene.
Selected Focus Point
Another important setting when photographing subjects that are moving around is setting up your camera to use multiple AF points in a specific way. Some photographers will recommend moving the focus point or a cluster of focus points around the viewfinder, but in my experience, that method is too clumsy and results in you losing shots as you try to align your focus points with your subject. At the very least, it results in you having your subject in the same part of the frame for too many shots, and I don’t like that.

To give you the greatest compositional freedom, I recommend turning on all focus points and then set up your camera to gain initial focus with a selected focus point or the center focus point, but then continue to track the subject with all focus points.

To turn on all focus points on my Canon 5Ds R, after switching to AI Servo mode, I press the AF point selection button (step 1 in the above photograph) which is the button in the top right-hand corner on the back of the camera, then while looking through the viewfinder or the top LCD display, I press the M-fn button next to the Main Dial behind the shutter button (step 2 above) to toggle through the AF modes and switch from the modes represented by SEL [ ] to the [ ] AF mode (step 3 above) which is 61-point automatic selection AF.
Another important setting here is in the AF4 Autofocus settings screen on the 5Ds R, for the “Initial AF Pt, AI Servo AF” where I chose “Initial AF pt selected”. This tells the camera to gain initial focus with the AF point that I have selected, but then as the subject moves, or I recompose, the camera will track the subject around the frame with the rest of the AF points.
If you get the settings right, you should see the AF points look like the bottom of these two diagrams (right) with all of the AF points represented, and the center one selected. If you see an empty AF frame like the top diagram, check your settings, and refer to your manual if necessary.
What to Focus On?
The settings we’ve walked through just now work very well for me, but we still need to decide what to focus on as we shoot, so here are a few pointers.
Get Eyes Sharp
When photographing a subject with eyes, in general, the eyes will need to be sharp. If you are close enough to focus directly on the eyes, do so. When you are a bit further away, get into the habit of focusing on the head when possible. If the animal is so far away or moving too fast or erratically that you can’t focus on the head, then focus on the base of the neck or body. When photographing a bird in flight from the side, the body will often be about the same distance from the camera as the head, so focussing on the body will be fine then too.
For photographs like this one (below) of an eagle catching a fish, I will wait until the eagle swoops down and then try to lock focus on the body. Note how the wings have completely covered the body at the time of this frame, but the settings I’ve selected prevent the camera from moving focus to the wings as they move.
Multiple Subjects
When focussing on two birds in flight, you’d generally try to get the bird that is closer to the camera critically focussed, and then try to use a small enough aperture to get the second bird in focus as well, as I did in my earlier Whooper Swan example. If however, the second bird is slightly out of focus, it might not be too much of an issue if the closer bird is sharp.
There are always exceptions to any guideline though, so if for example, the bird that is further away is doing something of interest, then try to focus on that instead. In a sports photograph with a field full of soccer players, for example, you’ll generally want the critical focus to be on the player that is creating the action, such as kicking the ball or saving a goal, rather than the other players.
Focus on Texture
Another important factor in focusing that sometimes isn’t obvious is that as good as the autofocus systems on our cameras are getting, they still require a bit of texture to achieve focus. If you are focusing on a subject with very little texture, the autofocus will often start searching, and you may find that you have to move the camera until the focus point or points are over the edge of the subject or some area with more texture. The autofocus systems available today still need something to get their teeth into.
A Gimbal Head Supertelephoto Lenses
I love the flexibility of the 100-400mm lens, as I can hand-hold this lens successfully, which gives me more flexibility for fast past wildlife shooting. When using longer, heavier super-telephoto lenses though, such as my 200-400mm lens with the built-in 1.4X Extender, or any of the super-telephoto prime lenses available, you really need to use a gimbal style tripod head. A gimbal gives you the ability to move the camera around effortlessly and smoothly because the weight is perfectly balanced.
In this photo (below) you can see the Really Right Stuff PG-02 Pano-Gimbal Head. This is what I’ve been using for the last three or four years, and I absolutely love it! The resistance provided as you pan around is just right for smooth tracking and panning with your subjects. Also, it breaks down into smaller components so it packs really well for traveling.
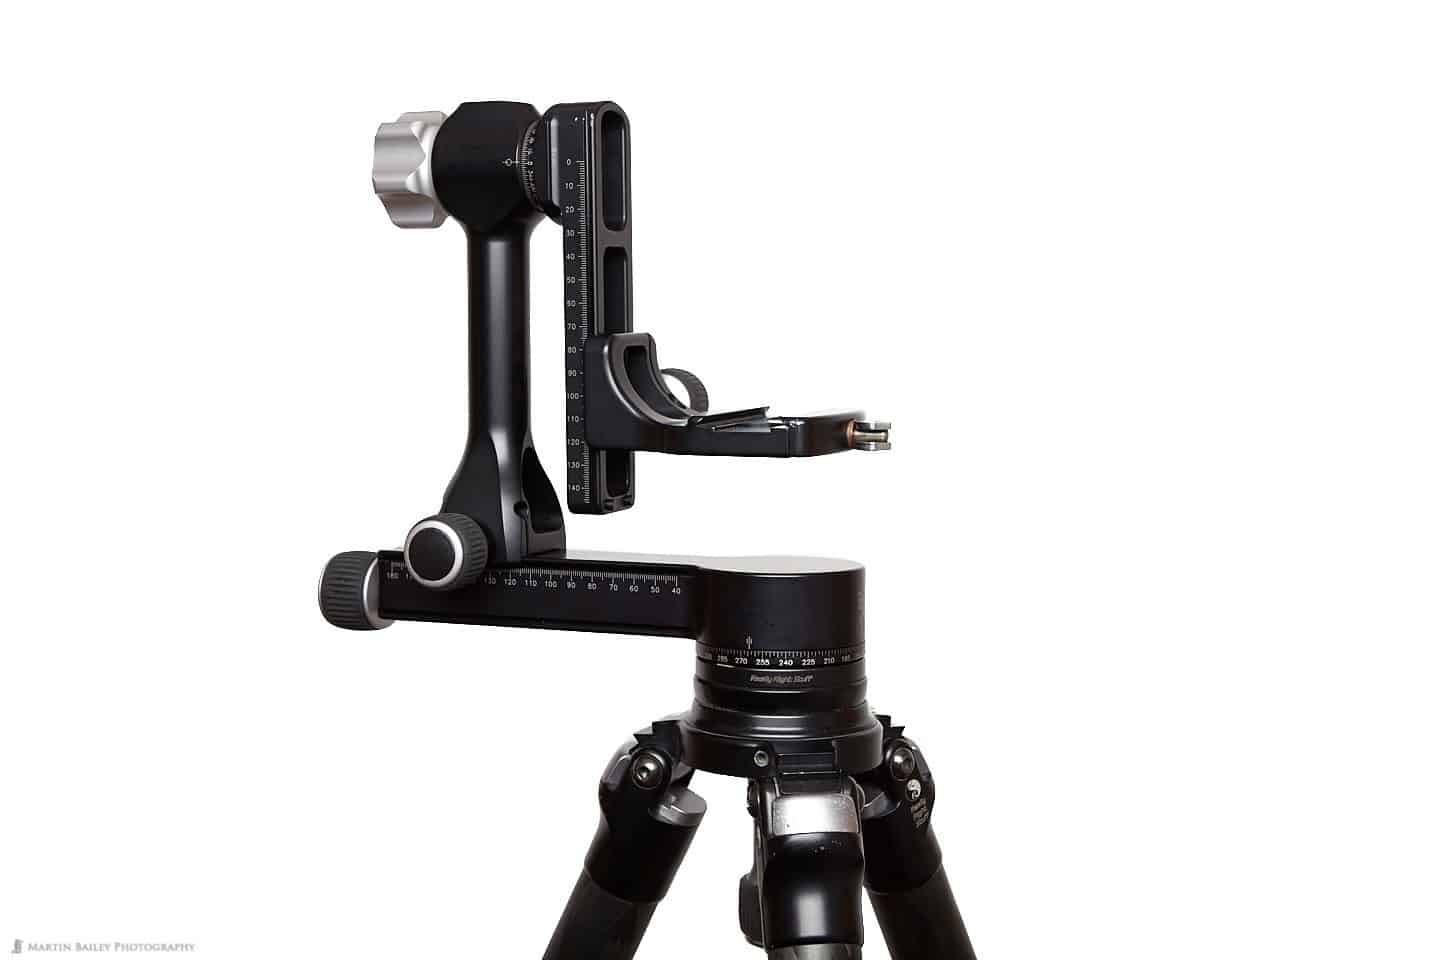
Here also is a photo of my Really Right Stuff PG-02 Pano-Gimbal with my Canon 200-400mm lens mounted on it. The important thing to note when using a Gimbal Head like this is that you need to adjust the position of the components of the head so that the lens is perfectly balanced. When you tilt the lens down or up then let go of it, it should stay where it is. If it flops up or down, it isn’t balanced.

Note that I usually set my camera up on a Gimbal with the gimbal arm on the right side of the camera. This enables me to reach out and manually adjust focus or adjust the settings of the lens without the gimbal arm getting in the way.
One other bit of advice is to try to avoid using a gimbal head for lenses like the 100-400mm lens, as you will generally get better results with the smaller lenses like this by shooting handheld. Of course, if you find the 100-400mm to heavy to handhold for long periods of time, a gimbal will help, but you will lose some freedom to move around etc.
Monopods
I shouldn’t really close today without mentioning monopods. I do own a monopod, but to be totally honest, I rarely use it. I’m not going to say that they are not worth using, but for the kind of work I do, they don’t seem to help. I prefer to either hand-hold, or go for the full gimbal head. Because of this, I’m not going to offer any advice about monopods. If or when I do start to use mine, I’ll be sure to give you a full run-down of my experiences.
In Closing
So, I hope this has been useful. I’ve tried to cover everything, but I know I’ve probably forgotten something. Also, if you aren’t a Canon shooter, I hope you were still able to gain something from this. Most systems have similar features, but the names are different, so you’ll need to reference your manual to figure out and translate this information to your own system. If there is something that you are still not sure about though, by all means, ask questions in the comments section below and I’ll try to help as best I can.
Show Notes
Really Right Stuff PG-02 Pano-Gimbal Head on B&H: https://mbp.ac/rrspg02
Subscribe in iTunes for Enhanced Podcasts delivered automatically to your computer.
Download this Podcast in MP3 format (Audio Only).
Download this Podcast in Enhanced Podcast M4A format. This requires Apple iTunes or Quicktime to view/listen.

Great episode Martin. My wife and I have been practicing bird photography and I’m going to try some of these settings. Thanks!
Glad to hear that Tim, and it’s great to hear from you! I hope you are both well.
Regards,
Martin.
I’m gratified to hear your description of these settings, Martin. I stumbled across some of them on my own with an earlier Canon camera and am happy to validate their use, now with a 5dMk4. I’ve found the back button focus technique to be much more natural in the field.
Hi Rick,
That’s great that you found this post useful.
I know what you mean. I figure most stuff out myself but it does always feel nice when someone else helps to validate what you’ve found. Good stuff.
Regards,
Martin.
Hi Martin,
This was a particularly useful episode and will help me set up my AF point selection for my next shoot.
Thank you.
Hi Philip,
That’s good to hear. Thanks for letting me know, and good luck adjusting your settings.
Let me know if you stumble across anything that doesn’t make sense.
Regards,
Martin.
What a master craftsman you are. I wish non photographers knew how much skill goes into each image. I love birds- always a challenge!
Aww, thanks Stewart! For sure, that’s something that isn’t really understood until you try. 🙂
Thanks for taking the time to comment.
I really enjoyed this post. I’ve struggled shooting birds in flight and after setting up my camera (7D II) with these updated settings I took my best birds in flight to date. I’ve never liked BBF but I decided to bite the bullet and stick with it. After about two weeks I’m hooked. Shot some grandkids sporting events and also found it helpful. I also used your auto focus setup, I normally use just one center focus point as I’ve alway experienced the problems with to many misses using all 64 points. With your settings I had almost no misses. I was shocked at my keeper (critical focus) rate.
I live on a small lake in Michigan. We had a pair of mature Bald Eagles this week and I’ve never been able to use my 1.4 III on my 100-400 II shooting birds in flight. Your setup and tip of zooming out a little really helped. I feel like I made a big stride at getting better shots. Thank You!
That’s great that this helped you to get some results, Mark. Well done!
Thanks for taking the time to let me know too. I hope you continue to have fun with this.
I really enjoy reading your blogs and podcasts, and truly appreciate the effort that you put into these.
One question that I have not seen addressed, but you may have mentioned is the issue of Image Stabilisation settings when the camera is on a tripod or monopod.
Do you switch off the IS on the lenses.. Canon literature seems unclear to me.
Tha.nks
Hi Colin,
I’m pleased you are enjoying the posts. Thanks for stopping by.
I generally leave IS on, even on a tripod, unless I’m going slower than around a 1/25 of a second. Once I get down to shutter speeds slower than that, I turn it off. A number of years ago I was doing around one-second exposures of a waterfall and some of them were blurred, as in, camera shake blurred. Then I figured out that it was the IS moving the lens elements during the exposure, trying to stabilize it, so now I turn it off when using a tripod for anything longer than around 1/25 of a second.
I hope that helps.
Regards,
Martin.
Hi Martin! Great post of yours. I really love shooting birds and I’ll be trying this settings you recommended for the next few weeks.
One question do I have is when shooting hand-held and the shutter speed remaining at least 1/focal_lenght, should we ever swich-off the IS? If so, in what kind of situations should we?
Best regards
Paulo
Hi Paulo,
I’m pleased you found this post useful.
For hand-held photography, I always leave IS on. The major thing to keep in mind is the IS mode. When photographing a stationary bird Mode 1 works best, as it tries to stabilize both vertical and horizontal movement. When tracking a bird in flight though, generally Mode 2 works better, as this only tries to stabilize on direction. For example, if you are panning horizontally (left to right or right to left) the lens will only try to stabilize vertical movement and leave the horizontal movement free. Conversely, if you are panning vertically, the lens will only try to stabilize horizontal movement.
I also leave IS on when shooting with a gimbal head, as the same applies. I do turn IS off for exposures of say 0.5 second or longer, as the IS can move during long exposures.
I’ve heard various opinions on this subject, but personally, I find that leaving IS on except for long exposures has always worked well for me, so I hope this helps.
Regards,
Martin.
Hi,
Just found this site! After forking out half my yearly state pension I really needed some help! I’ve just found it – thank you Martin.
Cheers
Hi David,
Thanks for the great comment! I’m really pleased that you’ve found my post helpful!
Regards,
Martin.
Martin,
I have never followed podcasts— so the first 2 I listened to were yours. They are both terrific. This one is the most comprehensive discussion I have ever seen on shooting birds in flight. (and probably small children, as well). The method of setting up the autofocus is simply superb. I don’t shoot birds all the time but when I do, I shoot a lot. There is. no doubt in my mind that your methodology is going to make a marked improvement in the numbers of sharply focused images I capture.
Your style is easy to follow and I like the fact that I can follow along in the text, as I listen to the podcast. The amount of work you put into your podcasts is obvious and the product is fantastic!
By the way, what do you think of the Wemberly gimbal? I have a lot of RRS equipment, but I have not been able to convince myself to make the change to RRS gimbal.
Best,
Steve.
Hi Steve,
Sorry for the late reply. I’m just catching up on comments.
I’m pleased you enjoyed the posts. Thanks for letting me know!
I replaced the Wimberley Gimbal with the RRS Gimbal, and I’ve been really happy with the RSS over the Wimberley. The Wimberley is OK, but the RSS breaks down nicely for transporting, and it has a much more fluid action with just the right amount of tension for a really smooth pan.
BTW, I mailed you earlier about something we need for the tour pretty urgently. Please check your email and spam folder if necessary.
Looking forward to travelling with you soon!
Regards,
Martin.
I think I will sell the Wemberly with RRS Gimbal. Breaking down for packing is a huge advantage.
Thanks for your reply. I am excited about your training options. And, I signed up for the only one available.
I also completed the form for the trip.
Best,
Steve
Hi Martin
Many thanks for sharing these insights. They are very useful. Will your inputs under the section “Selected Focus Point” in the post above also cater to canon EOS R camera? Or would we need to follow different steps as the features of EOS R may be different? I noted some of your experiences with EOS R and hence thought to ask you this question. Would appreciate your inputs. Thanks!!
Hi Rahul,
Thank you for the comment.
My setttings using the EOS R are very similar, but slightly tweaked. See the updated settings midway down this page: https://mbp.ac/650
Regards,
Martin.