
In this week’s post, I’m going to relay my thoughts on spending lots of time on lengthy post-processing techniques to “improve” our images, or more accurately, what I do to avoid spending this time, including some self-acceptance advice, based on communication with a listener.
This episode was spurred by a recent email exchange with listener Evan Stewart from Saint Louis, Missouri, so I want to start by thanking Evan for the mail, your questions, and providing some food for thought.
In the exchange, Evan asked how much I use Photoshop and mentioned that he is at the point in his photography where he can’t help being curious about trying more advanced techniques such as focus stacking, exposure blending, and luminosity masking, and was asking if I used some of these techniques in my own photography. My reply may well be useful to others, so I decided to share and expand on that reply here on the blog.
Personal Preference
To set the stage and relay a kind of disclaimer about what I’ll follow on to, I will start by saying what I said to Evan in a follow-up to my main reply, which is that some people feel as though they must spend hours on a photo to make it good, and I feel for them. Aimed at anyone that spends a lot of time on images, I do understand that some people simply enjoy working on images.
I personally do not, which is why I shoot and process the way I do, as I’ll explain shortly, but I can spend hours on my computer doing other things. It’s all personal preference, so please understand that what I’m going to talk about today is not condemning anyone for spending time on images if that’s what you like doing.
If however, you find yourself spending a lot of time working on images to recuse them, and the time spend is putting pressure on you, it may well be time wasted, so I hope that what I’ll relay today will help you to save some of that time, so that you can spend it doing something else more enjoyable.
How Often Do I Use Photoshop?
In reply to Evan’s question about how much I use Photoshop to process my images, I said that I do use Photoshop to work on my photos very rarely. Probably less than 0.1% of my images are edited outside of Capture One Pro, but when they are, I use Photoshop. I used to edit some of my images in the Nik Software suite, named Silver Efex Pro and Color Efex Pro, but I haven’t used these applications at all since switching to Capture One Pro just over two years ago now. Some of the effects that I was getting can be done in Photoshop, but I did like the results I was getting with Nik until Capture One Pro gave me an alternative that I liked.
Time Spent on Image Processing
Partly because of how I shoot, I actually spend less than 30 seconds on the vast majority of my images. Occasionally I shoot something that requires more work, say for example if there are power lines running through a scene, and I decide to shoot it anyway, this kind of photo would require more work, but even then I generally don’t spend more than five minutes or so.
I understand that how little I do may result in my images not being quite as impactful as some of the work of the other photographer’s but this is my style, and I personally enjoy my results. As I’ve mentioned before, I’m under no delusions that I’m some kind of amazing photographer, but I do make work that I am happy with, and for the vast majority of photographer’s out there, I think this is a good place to be in our work.
Content, Not Complacent
Having said that, I also think it’s important to make a distinction between being content with our work
Complacency, on the other hand, leaves no room for improvement, and this is a place that I never want to be. Even though I shoot some locations every year, there is always an opportunity to improve, and being self-critical is vitally important to that process, and for me, this self-criticality starts in the field, while I still have a chance to change my raw materials, literally my raw images.
Raw, Not RAW
That statement reminds me of a time when Jeffrey Friedl, who you may know for his amazing Lightroom Plugins, pulled me up for spelling raw in capitals, like an acronym. Jeffrey is probably one of the most knowledgeable people I know and realized I’d been getting this wrong when he told me that raw images literally are just raw, as in not cooked, rather than R.A.W. actually meaning something.
It doesn’t help that most camera manufacturers and many people in the industry use RAW, but I can say with my hand on my heart that since Jeffrey explained this to me, I have not only always used the lower case raw, but I think I’ve had a deeper appreciation for what raw images really are, and this also leads nicely to one of the main reasons that I work hard not to make copies of my images in a format that takes me away from my raw files.
Non-Destructive Editing
The moment you export and edit your images in a program like Photoshop, or the Nik plugins, you will eventually end up saving your image in a format other than your original raw image format, and once you do that, you lose the ability to easily update your photographs to the latest and greatest versions of the processing engines that come with your chosen image editing and management software. I use Capture One Pro, but this is the same with Lightroom and many other applications that are what we call “non-destructive”.
When I first started using Capture One Pro just over two years ago, it was at version 9, and since then, there have been two major releases taking us to version 11, and both of these releases have brought improved image processing with an updated processing engine. When I first processed the image that we’ll look at in a moment, I had some cloning to do that was not possible in Lightroom, so my only option at the time was to take my image into Photoshop to do my editing. This was one of the rare times when I round-tripped out of Lightroom and ended up with a PSD file with my changes baked in.
I resented the time I’d spent in Photoshop though within just a few weeks. I’d taken my original photo into Silver Efex Pro and converted it to black and white, but as I lived with the image I realized that I’d made the trunks of the trees in the foreground a little too dark. I had to go back into Silver Efex Pro and reprocess it, and that meant that I had to also go back into Photoshop and clone out the cable car lines a second time. This felt like such a waste of time to me.
Then, a few months later, in the summer of 2016 I switched to Capture One Pro, and during my initial tests of the product, I used the same image to see if I could both create black and white images that were as good if not better than Silver Efex Pro, and I checked to see if I could do cloning in Capture One Pro, so that I could avoid baking my changes into a destructive file format rather than keeping them in their original raw format.
It turned out that Capture One Pro passed both of these tests, so I now had a copy of my original raw file with all of the cloning done in Capture One and so when versions 10 and then 11 came out, I just clicked a button to update the processing engine, and the image grew incrementally better with more subtle detail and better handling of the shadows. I was able to improve my photo twice, with no more effort than a couple of mouse clicks, simply because I had been able to keep my image in its original raw format, so this is a major time-saver and benefit.
My “No See, No Edit” Policy
Let’s take a look at the image I’m referring to as we start to discuss more of the methods that I use to help improve my photography and save me time in post-processing. Since I started shooting digital back in 2000 I made a conscious decision to kill two birds with one stone. I’m not a purist in the sense that I will not clone anything out of my images, but I don’t like to make the decision to do so lightly. I want to modify the content of my images based a deliberate, conscious decision.
Couple with a desire to create images that require as little as possible work on the computer, I decided to train myself to be more observant in the field, by sticking to my personal policy not removing anything that I was not aware of when I exposed the photograph. If I didn’t see it in the field, I do not allow myself to change it later in postprocessing.
What this means is that if I see the cable car lines running through a scene, I am OK with removing them later, but if I do not see the cable car lines or anything else distracting in the image until I get it onto my computer, I do not allow myself to remove the distraction. I’m left with two options, live with the annoying element, or throw the image out, and 99% of the time I go with the latter option.
To illustrate this, here’s a photograph from Mount Asahi in Hokkaido, with the lines of the cable car running through the scene. I knew about these when I composed the photograph but liked this scene so much that I decided to spend the time to remove them later. There is actually also a large pillar to support the cables, but I positioned my camera so that I hid that behind the third foreground tree from the left. Another decision that I made to help save me time on the computer.
[twentytwenty]

[/twentytwenty]
To see the cable cars on the left side of the photo, grab the vertical line in the middle and drag it over to the left side of the image. You’ll see the cables behind the trees across most of the left side of the photograph. Another minor benefit of keeping my images in raw is that I could show you the processed black and white image today, and just turn off the cloning adjustments for the before/after images.
I have found though that my policy of not allowing myself to remove anything that I didn’t see when I initially made the photo has really helped me to be more deliberate in my compositions. There were times when I had to throw out images that I otherwise really liked, so I soon learned that I had to do better. It’s surprising how much a little self-kicking can do. I really recommend it to all photographers.
No Exposure Blending
Evan had asked if I had come to peace with not using any exposure blending techniques, but for me
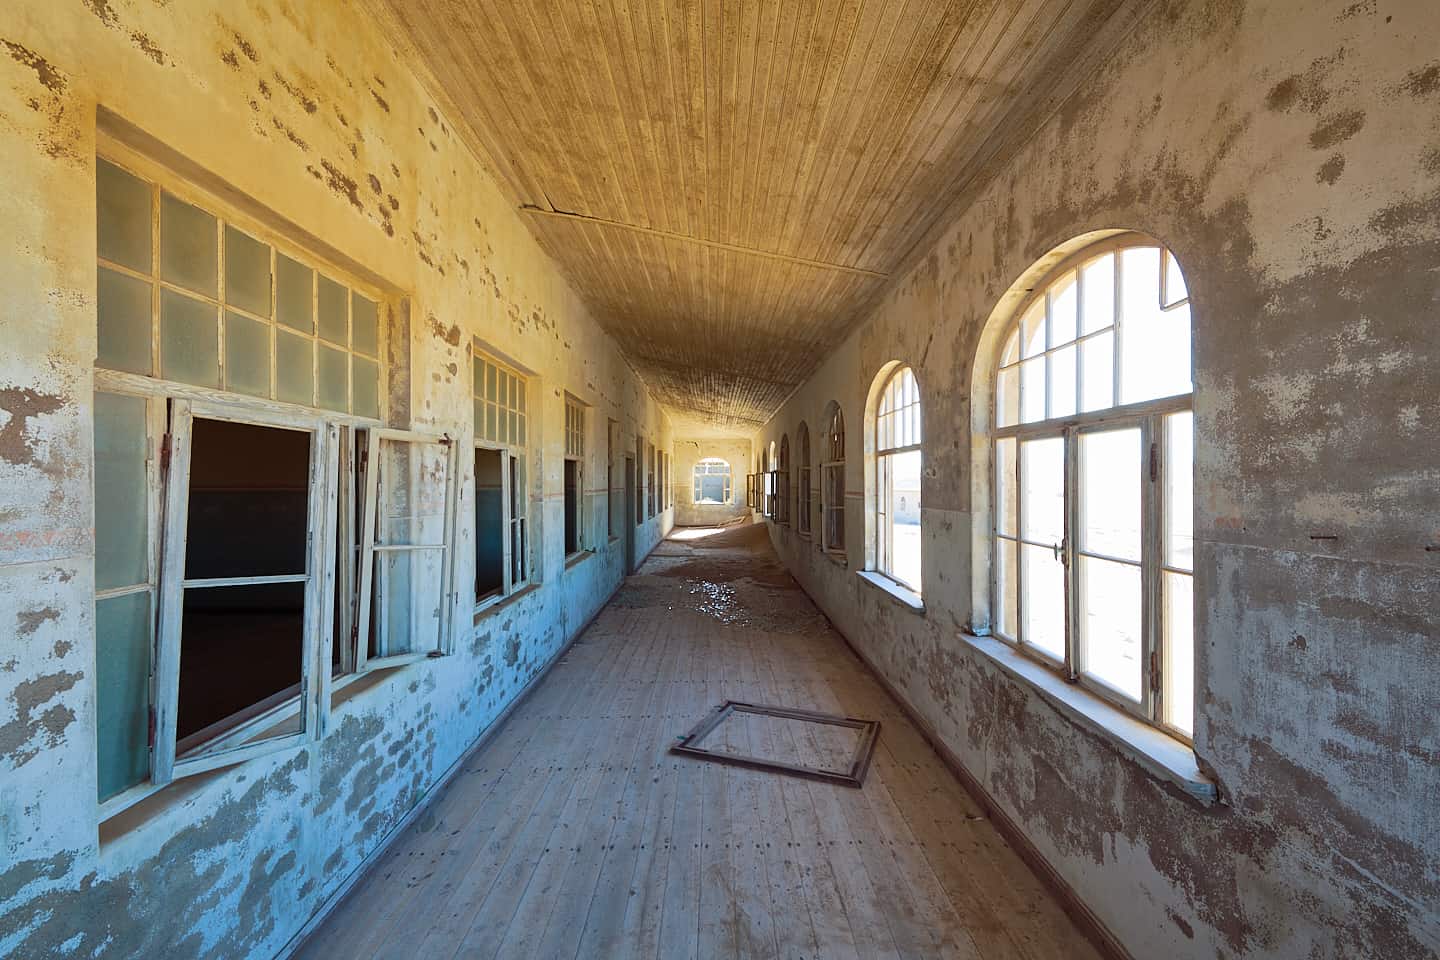
Part of this is also my own sense of the aesthetic. You might remember me talking about this photo (below) earlier this year about how I often let the windows go white in my Namibia work from Kolmanskop. This is not because I’m too lazy to take multiple shots and blend them together, but because I really just prefer to see the images that way. It leaves more to the imagination and to me, feels a little more surreal than a photo where we can see both the inside of the room and the exterior perfectly exposed.

Similarly, I don’t mind in this photograph that the walls are leaning outwards from the angle that I shot this. That is not to say that I never do any keystone adjustments mind. I do, but only when the effects that I a remove are a distraction for me. I think people sometimes feel that they have to remove any and all form of distortion, and again, that’s each individuals decision to make, but personally
Don’t Deliberate, Be Deliberate!
In complete contradiction to that sense of not caring for the above image though, I should note that I do quite often take the time to ensure that my camera is at just the right height to prevent my vertical lines from leaning in at least part of the time. This falls under my heading of being deliberate. I find it ironic that the same word pronounced differently has both ends of the spectrum covered for me in this respect.
I won’t “deliberate” over some issues, such as leaning walls, or spending hours on images in post, but I absolutely will be “deliberate” and take the time necessary to craft my compositions, so that everything is just as I want it, as I did for this photo (below) where I moved the frame on the floor to a more pleasing location and spent extra time ensuring that my camera was at the right height to get all of the vertical lines perfect straight.
I guess it’s also ironic that I completely don’t care that we can’t see everything outside the windows to the right in this shot as well. I think my point is, once again, that we have to develop a sense of what we are happy with, and in many respects, this takes time and confidence in our work.
Self-Acceptance
As I think about this for today’s post, I realize that Evan’s email to me that prompted this post had a more appropriate subject than I had initially thought. I started this post with a different title, but as I write, I’ve adopted the subject of Evan’s mail, which was “Developing your Style and Self-Acceptance”.
In some areas of my photography, I’m a stickler for getting it right and ensuring that everything is perfect, but in other areas, I simply decide to not give a hoot, and that really does come from reaching a point where you can not care what other people think. Having the confidence to say that it is simply not important to be able to see what’s outside, and deciding that the walls are leaning outwards doesn’t matter, comes from having a strong sense of self-acceptance.
The Roll of Your Trusted Critique
If you listen to everything that everyone will tell you it can be quite paralyzing, as you really will never be able to please everyone. This is where the
I’ve mentioned a number of times in the past that my wife is who I consider my main “Trusted Critique”, although there are a few others around the world whose advice I will head. Whenever I have a decision to make about my photography or any other creative pursuit for that matter, I don’t consider my work to be complete until I’ve run it past my wife. Her advice means everything to me, but I should note that I don’t take on board everything she says.
There are times when I like something that she doesn’t, and at the end of the day, it’s my art, and I have the final word, but for example, if I’m working on a set of images, say a portfolio, or a selection of work to send a client, nine times out of ten, if she says that something has to go, it goes. A lot of the time, I use her opinion to check my own suspicions, and over the years, I’ve learned to preempt her advice, and simply remove images that I know she will dislike.
Cooling Off Period
I also recall a story from my good friend Graham Morgan, an award-winning photographer from Australia, who was on his way home from Antarctica and showed his wife a photo that he was about to delete but she told him to keep it. The following year he won the Australia Nature Photographer of the Year with that photo! This is a powerful reminder of the need to seek advice from a trusted critique.
It’s also an important reminder that making the final decision on photos that we’ve shot straight after shooting them isn’t always a good idea. Giving yourself at least a few days, ideally a week or more after a shoot to make a more subjective decision about your work is very important.
When I return from a trip, I generally want to start talking about it within just a few days, so I force myself to complete at least a preliminary cull as soon as possible after getting home, but then I always continue to refine the selection for another week or two until I make my final selection. Invariably I find that as the memory of the shoot fades slightly, I am able to be more ruthless in my selection, and the more we can remove from a selection, the more condensed and rich the final set will be.
Controlling Exposure for Optimal Dynamic Range
As I mentioned earlier, in part of my reply to Evan, I had also stated that if you are careful with your exposure, you can generally get a better quality image from a single frame than from blending. Now, I realize that there are techniques that can help to blend images together without really being able to tell it was done, but the majority of the time they require more work than I personally am prepared to put
My advice to people has always been that if using exposure blending or any other HDR techniques feeds your creativity, then go for it. If however, you are doing it to overcome limitations on your camera, then first learn how to expose your photos to get
Exposing To The Right (ETTR)
Now, I’ve talked about ETTR or Exposing To The Right a number of times in the past, so I’m not going to go into great detail on this, but I want to summarise why I still do it, and a few other considerations that you might keep in mind if you are still formulating your own strategy.
First of all, I want to mention that thanks to the wisdom received from Graeme Nattress, who’s forgotten more about image processing than I’ll ever know, I’m no longer talking about the cause of noise in images based on the old Luminous Landscape article that used to be my primary reference. Graeme helped me to understand that the old explanation is not valid, but also that the benefits of Exposing to the Right are very real all the same.
I have though been Exposing to the Right instinctively for many years though, and experience has proved to me that my images are better quality for it, so I’m still using this technique for almost all of my work.
Basically, what I do exposure all of my images so that the lightest part of the histogram data falls just short if not slightly touching the right shoulder of the histogram. On the rare occasion when I find myself photographing a scene with the sun in the frame, I will allow it to become over-exposed slightly, to give myself some leeway in the shadows, but even then, one frame generally gives me enough dynamic range.
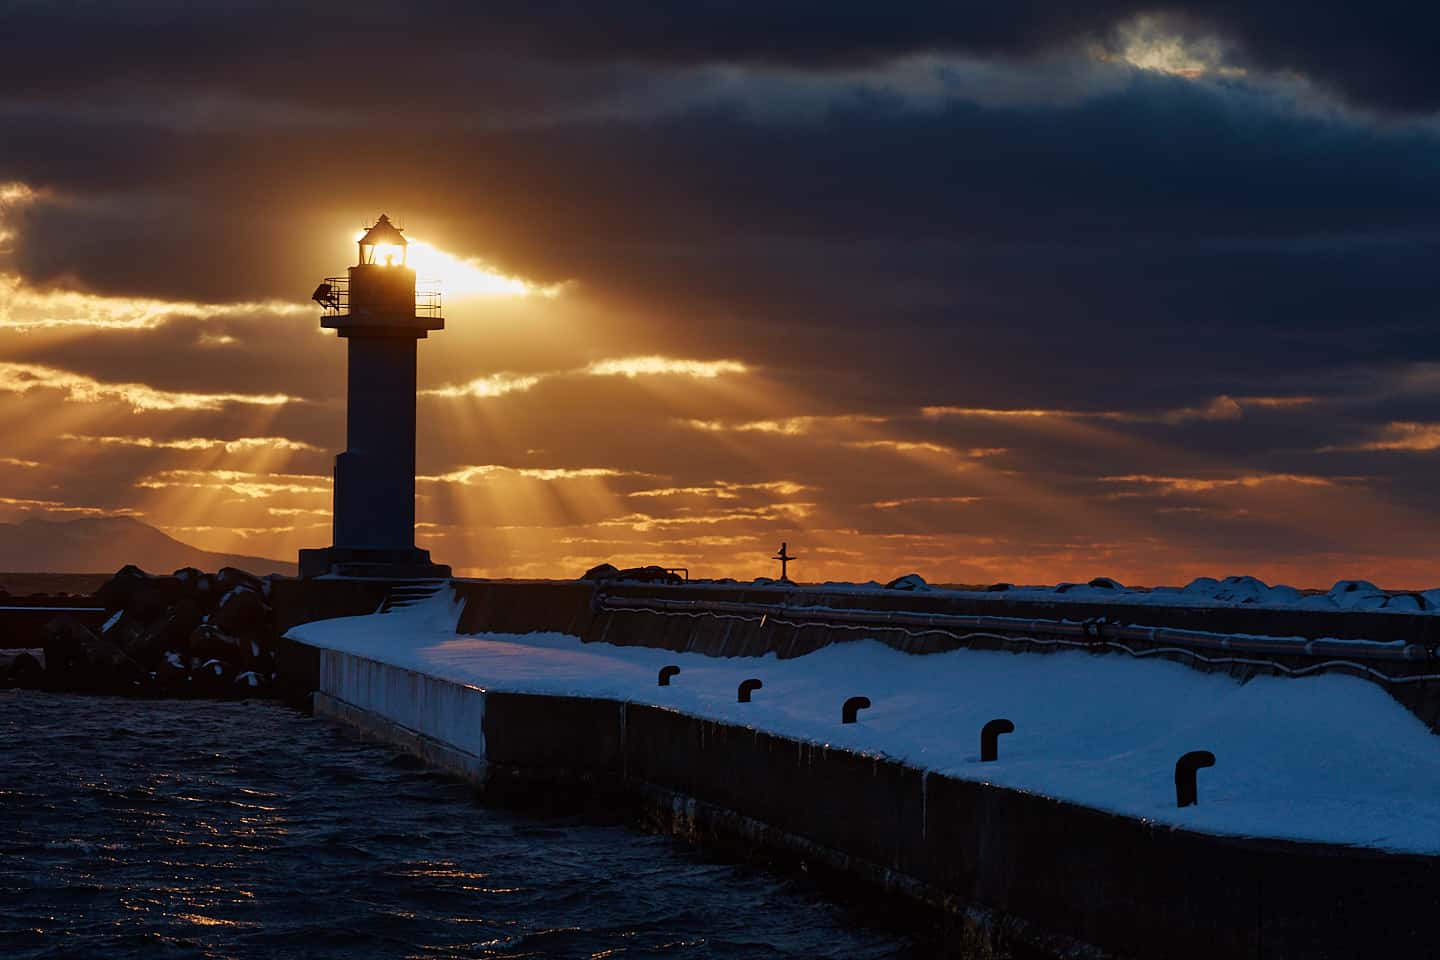
As an example, here’s a photo (below) of a lighthouse with the late afternoon sun shining through the windows of the lantern room, shot on this year’s Hokkaido Landscape Photography Tour. When looking through the viewfinder, as you might imagine, everything except the sun looked almost completely black. I could see from the histogram though, that if I set my exposure so that the sun is just starting to over-expose, the shadows were not spiking up the left shoulder.
[twentytwenty]
[/twentytwenty]
Again, this is a comparison image, so you can slide the vertical bar from left to right to reveal more of the final processed image on the left, to see how much detail I brought out in the bottom third of the photograph. All I did was ran a gradient mask over the bottom third and opened up the shadows slider to around
Reading the Histogram
Basically, expose so that the information on the right of the histogram is just about, or in this case, just touching the right shoulder, and check to see if you have a spike on the left side. If you do see a spike on the left side, it means that the shadows are going completely black, which, similar to highlights going completely white means that it might be difficult or even impossible, to recover any detail in these areas. As long as the shadows on the left side are not spiking though, there is detail in the shadows that can be used.
Do also be aware that the camera’s histogram is generally based on the JPEG preview, so it tells a somewhat harsher story than your image processing software probably will. Both Lightroom and Capture One Pro give you around a stop of light back, compared to how the images look on the camera.
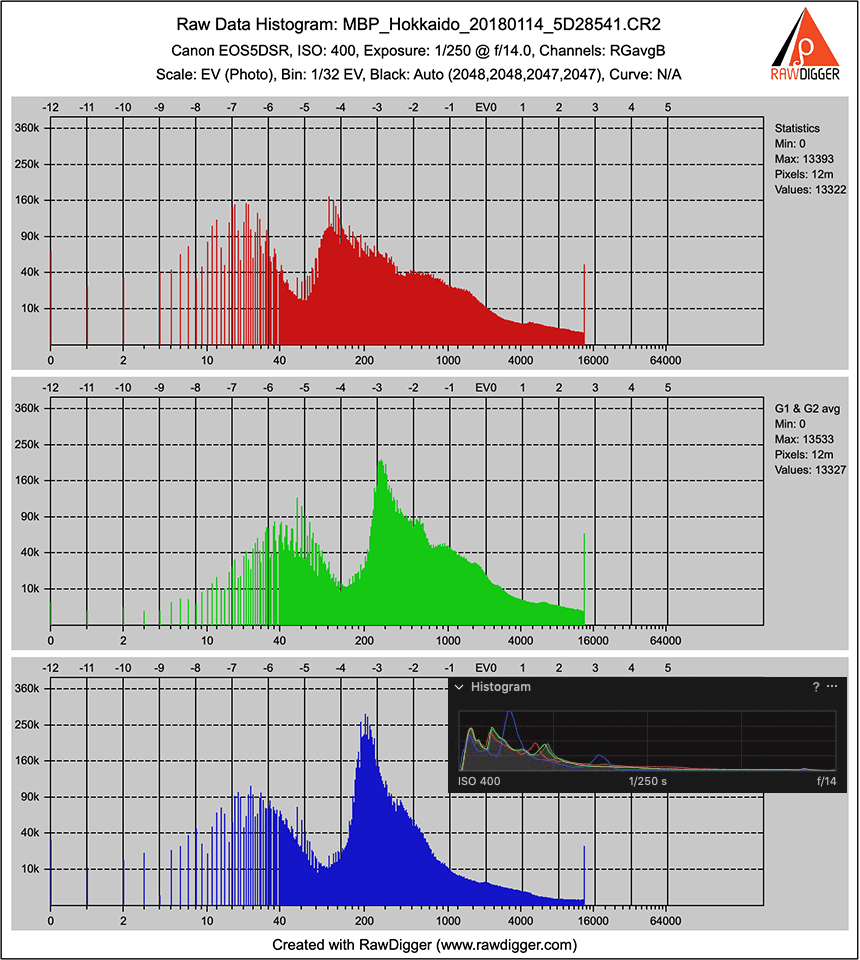
I also use a piece of software called RawDigger to check my images, especially ones like this, to see what the image really looks like, and I can also create a very details histogram, such as this one (right) that I got from the original raw file of the photo we just looked at.
In the RawDigger histogram, we can see a small spike on the right side of the histogram, which represents the bright sky around the sun that I overexposed slightly. On the
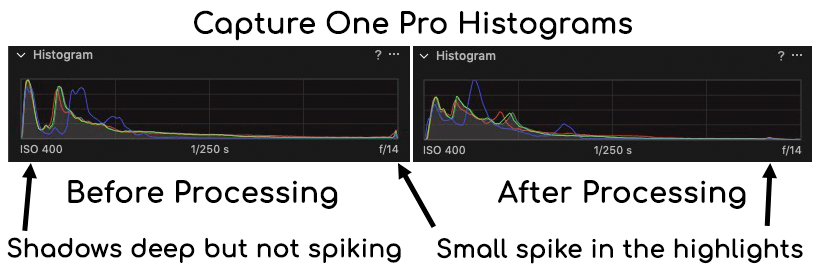
I don’t have a photo of the histogram on the camera, but here two are two histograms from Capture One Pro with the original raw file on the left and the processed raw file on the right. You can see how the shadows were steep and close to the left shoulder, but not spiking. Also
So, as you can see, using the histogram as a tool can really help to make educated decisions about your exposure. Based just on the image, or even just what you see through the viewfinder, you might think that a scene like the Lighthouse sunset would need multiple exposures merged together, or even HDR processing, but in my opinion it really isn’t necessary, unless, as I mentioned, you actually enjoy the process and that process feeds your creativity.
For me, there is nothing more off-putting than getting home from a shoot and having to spend hours working on images, and as fast as the process may have become, as far as I’m aware, there are still no applications that will allow you to keep a processed and tone-mapped HDR image in raw format, so you cannot benefit from future processing engine updates.
Don’t Fight Your ISO
That example was for a high contrast scene, but as I said, I Expose to the Right for all of my work, and I have received feedback from people that know, that the quality of my images is higher than most, and we attribute this to the way I shoot, taking control of my exposure.
Basically, the darker your images get, the more noise you’ll see in the shadows. I have talked about ISO Invariance in Episode 520, and I agree that if your base ISO could be ISO 100 you can increase the exposure in post for a number of stops, and really not see a lot of degradation in image quality. This means that especially when you are running and gunning and the light is changing so fast that manual exposure may cause you to miss shots, you can go to an automated mode and then brighten up the images in post if necessary.
This is only the case though if the scene is bright enough that ISO 100 would get you to within two or three stops of your required exposure. Once your scene is so dark that you ISO 100 does not get you to within two or three stops of your necessary exposure, the only option is to increase the ISO, and when you start to increase your ISO, you can’t benefit from ISO invariance. Your only option for darker scenes is to increase your ISO and if you are afraid to increase it high enough to essentially expose to the right, getting the histogram data as close to the right shoulder as possible, then your shadows are going to get noisy.
Use Highlight Warnings
Another thing that I want to add here, is that it’s also important to turn on and use the Highlight Warnings or “blinkies” in your camera so that you are made aware when small areas of the scene or subject start to become over-exposed.
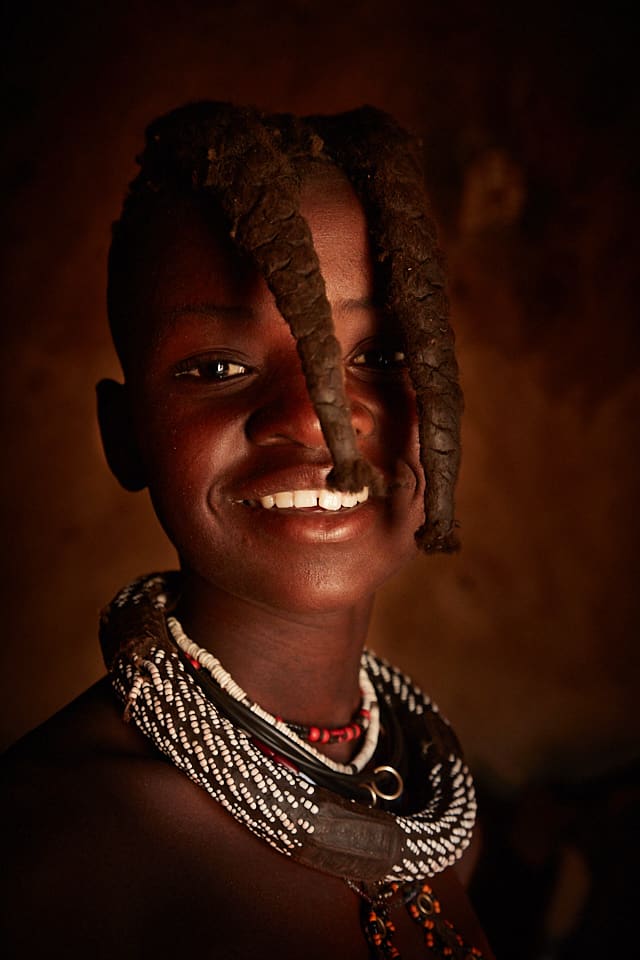
For example, when photographing the dark-skinned Himba people inside their huts in Namibia, their eyes, teeth, and shells around their neck start to overexpose as you increase the ISO, but it’s virtually impossible to see this on the histogram. You have to check for these areas blinking in the preview image, or if you are using a mirrorless camera, some of them have these warnings in the electronic viewfinder too.
Some people make the mistake of trying to get the peak or hump of the histogram over to the right side, but when shooting images like this one of the young Himba Girl (left), that will result in her eyes, teeth, and regalia all becoming overexposed, and although just a little is fine
To be clear though, the goal is to increase the exposure to the point where the brightest parts of the scene or subject are as close to the right as possible, but not overexposed, and sometimes, this requires us to increase the ISO so much that some people start to back off.
This image was shot at ISO 5000, and that scares some people, but because I was still essentially exposing to the right, until the bright areas started to overexpose, the shadows still have almost no grain to speak of, and this is with a 50 megapixel camera, which was supposed to be really bad in low light. The reality is that even with such high-resolution cameras, if you push the ISO to the point that you need it to be at to give you an ETTR image, then the shadow areas will still be clean enough to give you a useable image.
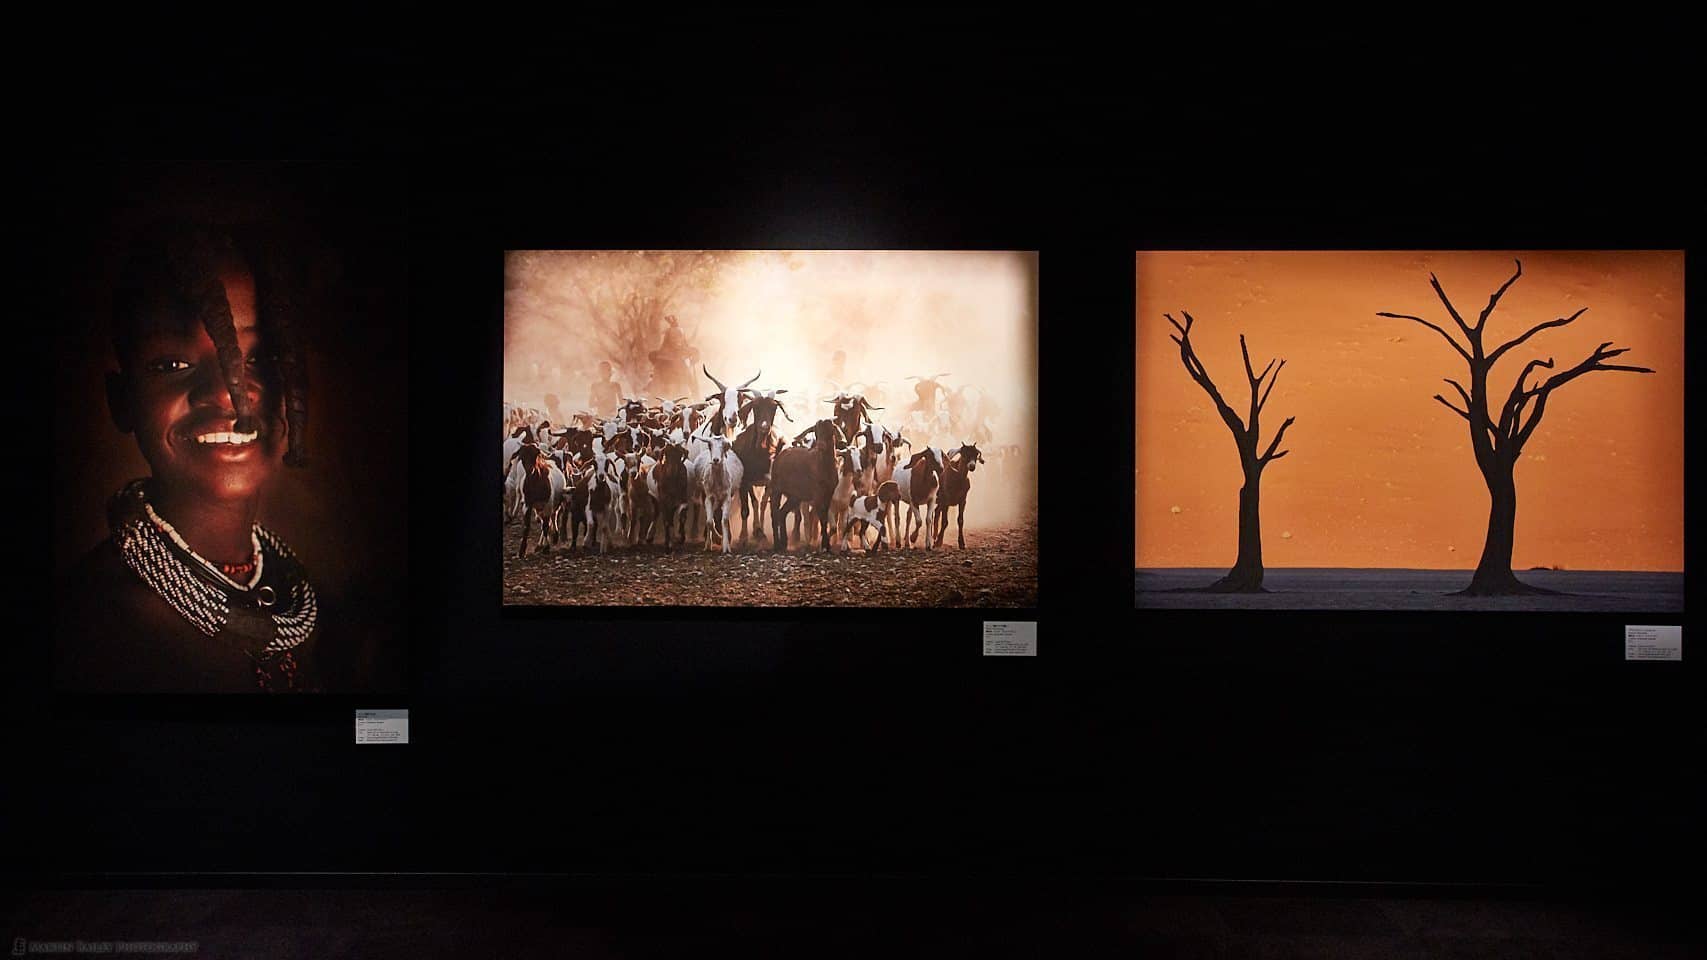
You might also recall that this is one of the ten images that I printed at 44 x 62 inches for display in an exhibition at Canon’s Headquarters here in Tokyo, and the feedback I’ve received is that people were very surprised that this image was shot at such a high ISO, and they were looking at a five foot tall print, so I think that’s proof enough that my technique has helped me to create images of a pretty high quality, often in somewhat challenging environments.
Manual Exposure
This may be obvious already, and I certainly mention this a lot, but just to be thorough, I should also mention that I shoot almost exclusively in Manual Exposure mode. I just find this easier, as it enables me to get my camera set up for a specific scene, exposing to the right, and then just shoot, without having to worry about exposure compensation, which I find completely annoying.
I know that some people like to just let the camera decide, and if your scene is bright enough that ISO Invariance will help you to brighten up your images as necessary without losing any image quality, you really won’t be negatively affected by shooting in an automated mode. For me though, I’ve been shooting Manual for so long, that it’s just more intuitive, and second nature.
The Manuals Were Wrong
Another thing that I wanted to talk about, with regards to using ETTR techniques to get better quality images, is that sometimes people quote the camera manuals, that often say that a good histogram has one large hump, and that should be in the middle of the histogram. Forget this if it’s something you tend to bear in mind, for two reasons. Firstly, having the data in the middle of the histogram may result in unnecessary noise in your images, especially in the shadow or dark areas.
The other reason is that the histogram represents a mapping of all the tones in the image. It is not uncommon for a histogram to have multiple spikes. This image, for example, has a spike on the right side, that represents all the white in the crane’s and the snow, and a spike of the left, for the dark background. And there is nothing in the middle, which is where the camera manuals will have you believe the data should be.

Of course, as a guideline, for an average scene, it’s not a complete failure as an example, but it’s important to understand what the histogram represents so that it can be used as a tool to work towards shooting images of higher quality, rather than allowing something you’ve been told to lead you to make mistakes.
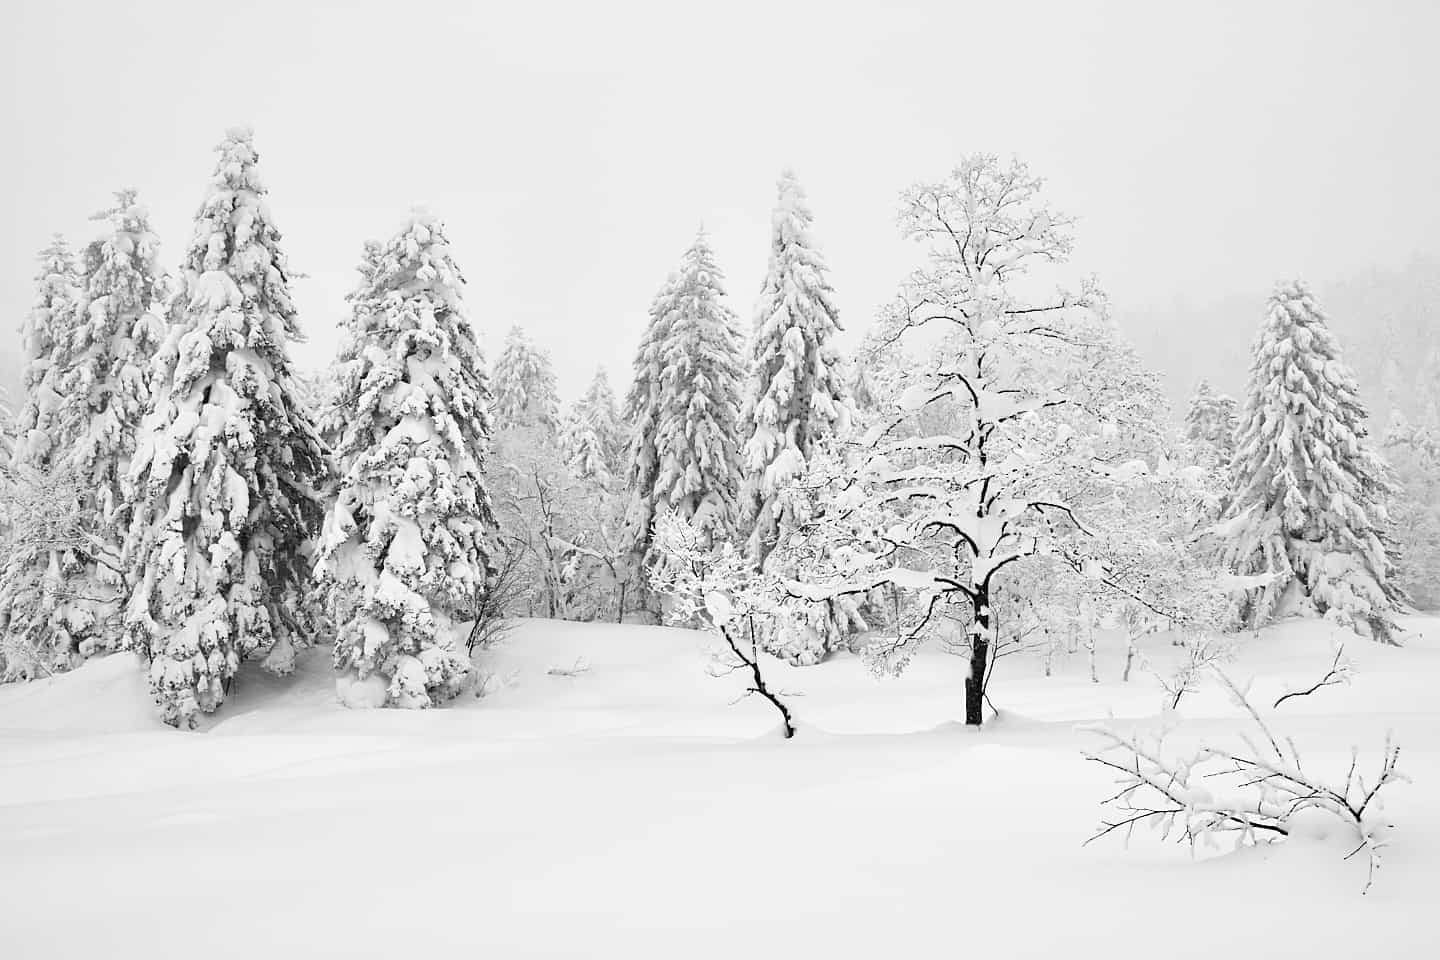
OK, so the last thing I want to relay is that it is also not necessary to try and have your image data fill the histogram. Some scenes do not contain a wide enough range of tones to create a full histogram from the left to right side. As an extreme example, and to make one last point, here (below) is another snow scene from Hokkaido.
[twentytwenty]


[/twentytwenty]
See if you can guess where the histogram spike will be for this image, then drag that vertical bar over to the left to reveal the embedded histogram and see how close you were.
Conclusion
Let’s start to wrap this up now, with a few last words on why I put this post together. I kept Evan’s part about developing a style in the title, even though we didn’t go into detail on this, because I think that the way I shoot plays a large part in the look of my work. I don’t I have a distinctive style that comes from a type of processing, because as I’ve said, most of the time it isn’t the processing that defines my work. That in itself is, to me, one of the most important things that I wanted to relay today.
I’ve been told that people can tell my work, because of the quality of the images, and I like to think that this is because of the care I take in setting my exposure, and how careful I am to compose my images in such a way that they contain as few distracting elements as possible. A lot of my work is somewhat if not straight on minimalist, but rarely cluttered, and I think these things all inform my style.
I’ll stop writing for now though, and get this out there. I’ve already been writing for a day and a half, but there is still so much more to say related to this topic. I’ll try to follow up next week with a discussion of some of the things that I consider as I decide on my compositions, as we didn’t really get into that today. If there is anything else that you’d like me to cover, just drop me a line or write a comment below. I always enjoy hearing from you.
Show Notes
My post on ISO Invariance is here: https://mbp.ac/520
Audio
Subscribe in iTunes for Enhanced Podcasts delivered automatically to your computer.
Download this Podcast in MP3 format (Audio Only).
Download this Podcast in Enhanced Podcast M4A format. This requires Apple iTunes or Quicktime to view/listen.

Martin,
This isn’t a post, it is a textbook! There is so much here to read and absorb. Thank you for taking time to share all of this. I have just started to use Capture One and I am going to go back and re-read this entire post. I didn’t have a lot of time today, but there is so much good information that I need to consider. I am particularly interested in your discussion about RAW/Raw/raw.
I listen to your podcasts as I am driving. Thanks for those too!
Sincere thanks and regards,
Jeff Ross
Hee hee, thanks Jeff!
I’m pleased you found this useful.
On the raw format, I always suspected that it was not an acronym, but the camera manuals pretty much all use RAW. Jeffrey Friedl put me straight once when I used RAW, and it has stuck. It really is raw image information for us to cook into the final image, even just with the default settings of our processing software.
Thanks for listening, and following along. I hope you continue to enjoy the podcasts and posts.
Cheers,
Martin.
Martin.
this is an excellent primer review of where we all should be looking to get the very best from our sensor.
i listened in bed this morning, but have hastened to my desktop to see the images and appreciate fully your pearls of wisdom.
Looking forward to the second part next week.
I have taken the liberty of posting the link to our camera club Facebook site as i feel so many people will gain from the 40 minutes instruction.
Keep up the excellent work
Regards
Andrew
Thanks Andrew! It’s great that you found this useful.
Thanks for sharing with your camera club too. Take as many of those liberties as you like. 🙂
Cheers,
Martin.
Hi Martin
Concerning statement. 1st Para of Non-Destructive Editing.
…once you do that, you lose the ability to easily update your photographs to the latest and greatest versions of the processing Engines…
I think you can for Photoshop. Place the RAW image in PS as a linked smart object (Place Linked) adjustments can be made to the original RAW file outside of PS. This will be flagged in the PS, choose “Update Modified Content”
Or Sent to PS as a smart object, which is a copy of your RAW data which can be readjusted with ACR.
This is not a destructive baked in workflow is it? To me this gives me the ability to use the power of PS for tonal & colour processing without loosing my ability to work with my original RAW file.
Best Regards
John Wilson
Hi John,
I see what you are saying, but in your scenario, aren’t you processing the raw file with Adobe Camera Raw? If for example, you were working in Capture One Pro, the only way you could send your changes to Photoshop in the first place would be to create a PSD file. If you just send the raw file, Photoshop doesn’t know about the changes you made.
Conversely, if you take the base raw file into Photoshop and do your changes, then go back to Capture One Pro, surely it wouldn’t know about any changes made in Photoshop unless you bake them into a file that Capture One Pro or any other software understands.
Of course, if you only ever intend to work on your images in Photoshop, then I can see that your method would work, but then you are basically making Photoshop your image management environment, right? That would require the use of Bridge or something to manage your images. If that’s your workflow, then yes, I agree you can benefit from updates to the processing engine. My statement is really about working in Photoshop as an editor from a third party application, not a Photoshop-based workflow.
If I’m missing your point, do let me know. I’d love to know if there is a way to do this that I’ve missed.
Cheers,
Martin.
Hello Martin,
This is one of the best photography podcast episodes I have listened lately: Not just informative but insightful. Informative in its covering technical subjects related to exposure, post-processing, etc. But insightful in anchoring those considerations in workflow decisions, even in lifestyle deliberations with an eye on self-improvement. Illustrative sample photographs and before-after pictures are icing on the cake. Very well done. Thank you.
Thanks so much for the comment and pat on the back Adnan!
I’m really pleased that you found this post useful.
Regards,
Martin.
Martin – as usual, a very useful post. Your point about each photographer having his/her own preferences for post-processing is well taken. There have been many other photographers that have made it their mantra to “get it right in camera,” and claim that spending more than 5 minutes in post processing means that the photograph isn’t worth showing.. Often that is followed by some claim that the photographer would rather be out shooting then working on an image on the computer, as if working your image in post is a sin of some sort. I find this to be complete nonsense. For those photographers it seems that it is not enough to espouse their preferred method of shooting/processing, but to denigrate photographers who prefer other methods of producing a final image. I understand your well-thought through preferences but also suggest that many of us enjoy the process of working on a photo in post.
I think it is equally valid to say that while I will try to get my exposure and composition as best as I can in the field, I may still feel comfortable substantially working the image in post. And that may include not only cropping, when necessary, but cloning out small image imperfections that distract from the image or using luminosity masks to better refine part of the image. It is often a significant series of very subtle modifications that turns an image into a striking work of art (IMO). . Sometimes we are fortunate to take a photograph that is so well done in the field that it requires minor edits to produce a final image. But just as often, at least for me, I find an image that I’m satisfied with from a compositional point of view, but because the camera does a less than perfect job of converting the scene before us into a faithful reproduction, I have no fear off working it to a point where it may not only be a better reproduction than the camera took, but also enhances the mood I felt when standing in that location.
I know you well enough Martin to know that you can be an absolute master in working with software, so I do not at all suggest that it is anything but a creative decision on your part to avoid taking many of your photos into Photoshop. While you have induced me to become a fan of Capture One, I still find that some of the things I can now do in Capture One 11, are easier for me to accomplish in PS. It may be that after many years, I’m just more comfortable in PS that C1 and perhaps that may change as my facility with C1 improves. But I suspect that even if I became more proficient in C1, there are certain things that, artistically, I can better accomplish in PS.
Thanks again for another terrific post.
Best,
David
Hi Dave,
Thanks for the great comment!
I’m pleased you understand and appreciate my perspective on this. I don’t necessarily want to get it right in camera, as sometimes my shooting methods require that I darken the images down a little for mood or effect, but I do generally want to be careful enough that I am not “rescuing” images. as such. Also cropping as necessary is something that I’m not aversed to. I’m pleased you brought that up. I’ll probably include that in my composition related post next week.
As for creating “striking works of art” I’d like to think that I do too, but my methods help me to get to them with less work, and generally for me, Capture One Pro gives me enough processing options to do this without jumping into a third party plugin or Photoshop. I have seen work that is taken to a much higher level from extensive Photoshop work though, and I applaud anyone that has that patience, but at the same time, think that some of that type of work can be “overcooked”. The trick in my opinion, for people that do a lot of post-processing, is to try to keep the image looking natural, while refining and raising it above what the raw image captured.
I fully agree with your point about taking the image to point that the camera alone can’t quite take it. Again, this is something that I do, but don’t require a lot of extra time, because of the methods I use, and my understanding of Capture One Pro. I can just generally do that work very quickly, even when a little masking and cloning etc. is required.
Thanks for the vote of confidence about my creative choices in your final paragraph. I know that you know where I’m m coming from with this stuff, and for sure, working in a program that you are comfortable with is important. The most important thing is creating images that we are happy with, regardless of how we get there..
Regards,
Martin.’
If it isn’t too much trouble I’d love to know what Graeme Nattress told you about the reason to ETTR that’s different from the Luminous Landscape article.
Hi Monica,
No trouble at all. You can see Graeme’s explanation in the comments of this post: https://mbp.ac/381#comments
Have fun!
Regards,
Martin.