A few weeks ago I picked up the new Canon GPS Receiver GP-E2, and have had a chance to use it a few times, and draw a few conclusions, so today, we’re going to take a look at this new device. Note too that this is really my first foray in the wonderful world of Geoencoding, so don’t get too hung up on how I say things. I’m just finding my feet here. My terminology may be clunky, but hopefully you’ll get the gist of what I’m trying to say.
The timing of this GPS Receiver GP-E2 from Canon is perfect in my opinion. You might remember that when Lightroom 4 came out, when talking about the Maps module, I said that this was one of the things that I’d been waiting for, to finally get me geoencoding my images. I’d dabbled with creating tracklogs with my iPhone, but didn’t like how much battery it sucked up, at least with my old phone without multitasking. I’d also toyed with the idea of buying a dedicated unit, but I didn’t like the idea of adding an extra step to my workflow, using separate pieces of software to tag the images etc.
You probably already know that I’m just not one for adding extraneous processes that I don’t believe to be fully necessary, and geoencoding unfortunately fell into that category, until the Maps module was added to Lightroom 4 that is. With the Maps module, it became easy, and almost acceptable, to the point that I started to drag images to the map to geoencode them with the GPS coordinates of that location. I know where most places I visit are on a map, but for places I might not find, if I took a few moments to shoot an iPhone photo which are automatically geoencoded, I could use those images as a reference, so I finally started to get excited about Geotagging my images.
Then though, just as that functionality was added to Lightroom 4, Canon announced the GP-E2 GPS Receiver, which although not the first Receiver from Canon, seemed to fit with my idea of how easy this should all be. I could just slide it into the flash hot-shoe on my camera, and it would tag all images I shot. As we’ll see later, there are still reasons to open an application that Canon provide for certain things, but basically, once I have my images tagged in camera, they just appear on the Map in Lightroom. This is the simplicity I was waiting for, so I ordered a GP-E2.
Initial Impression
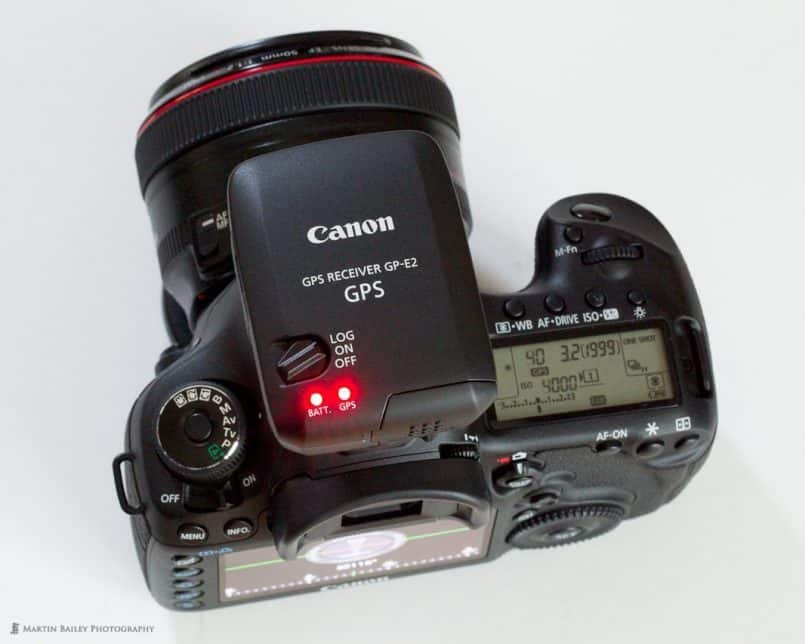
The first thing that struck me when I took the GP-E2 out of the box is its size. I’ve seen how small the Nikon GPS receivers are, and was expecting something similar in size, probably around a third the actual size of the Canon Receiver. The big difference with the Canon GPS Receiver though, is that it is totally self-contained, with its own AA battery, and you don’t need a cable to connect to the camera, unless you want to use a flash or something else in the hot-shoe that would require you to keep the GP-E2 off the camera.
The benefit of having the Receiver sitting right on top of the camera though, is that it will not only tag images with the GPS coordinates, it also knows which direction the camera is pointing, and embeds that information into the images as well. This information is only viewable with the Canon Map Utility that comes with the GP-E2 though, and isn’t yet available in Lightroom. Looking at the GPS data in the EXIF information in Lightroom, I don’t even see this direction information, so I’m not sure if this will magically appear in Lightroom later, if Adobe build this support into a later version, which I am seriously hoping they will do.
GPS Lock-on Speed and Accuracy
When you first turn the unit on, it can take a good minute to 90 seconds to get a GPS signal. I have noticed faster, but the majority of the time I’m finding that it takes well over a minute.
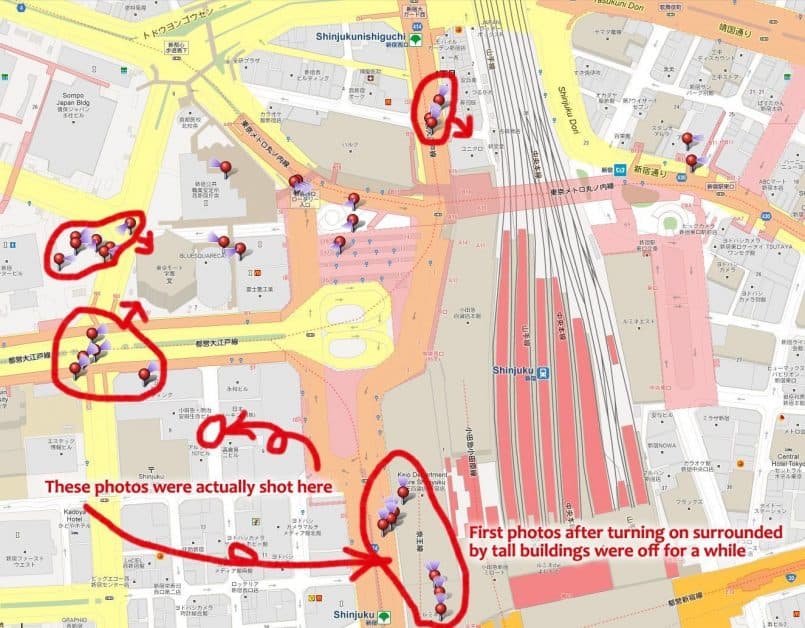
In the screen grab of the Canon Map Utility showing the first day I used the GP-E2, literally minutes after I bought it, you can see that for a while after I turned the unit on, it tagged my images as being on the other side of the Shinjuku station, in a totally different area to where I was. I drew some rough notes on the screen grab, and you can see how far out the first shots were. Note though, that the GPS unit was still not even showing that it had a signal, so I thought it was actually quite good that it tagged the images at all. (Click the image to view larger.)
The rest of the shots on this first screen grab also shows a little bit of drift from where I was actually shooting, and I think this is because I was among the tall buildings of Shinjuku, which were probably getting in the way to a degree, and once you’re in a less built up area, accuracy increases, as we’ll see in a moment.
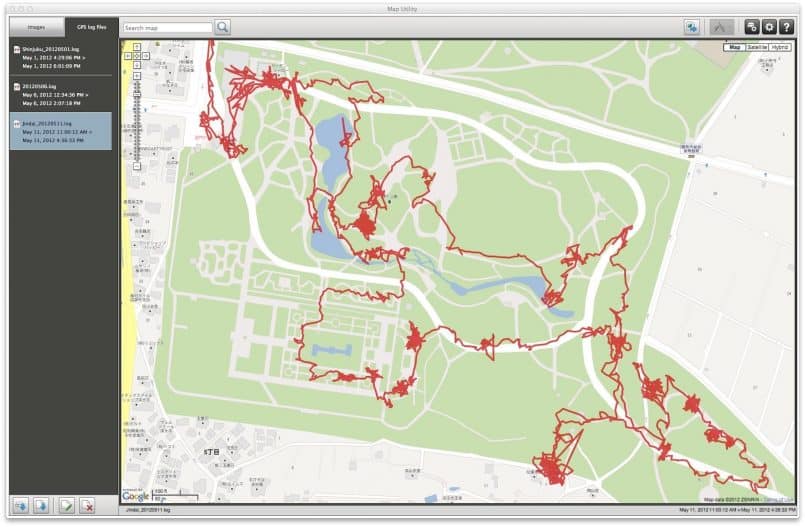
I had another day out with the Receiver last week, and this time, there were no tall buildings, although it was a park with lots of tall trees in some areas. You can see on this next map that in some areas the GP-E2 went a bit crazy. The spots where it looks like a kid has scribbled on the map with a red pen, are areas where I’d stopped to takes some photos under some tall trees and a thick canopy of leaves. The areas where the lines are less frantic, are the less wooded areas.
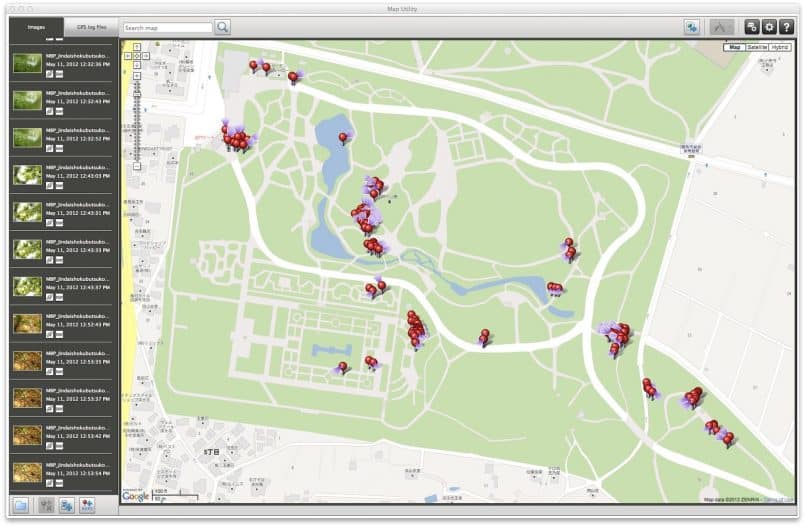
This next screen grab shows the Canon Map Utility with the images selected, so that you can see the camera direction information. Unfortunately, I can’t see a way to show both the image information and the tracklog in Map Utility, although that might be a pretty busy screen to look at even if I could. If you compare the last screen grab with this one though, you can see that most of the places where there is a concentration of photos being shot, there is a red scribble on the track. The one exception is the area close to the bottom about a third of the way into the map from the right, which is actually where we had lunch, so there are no coinciding photos shown.
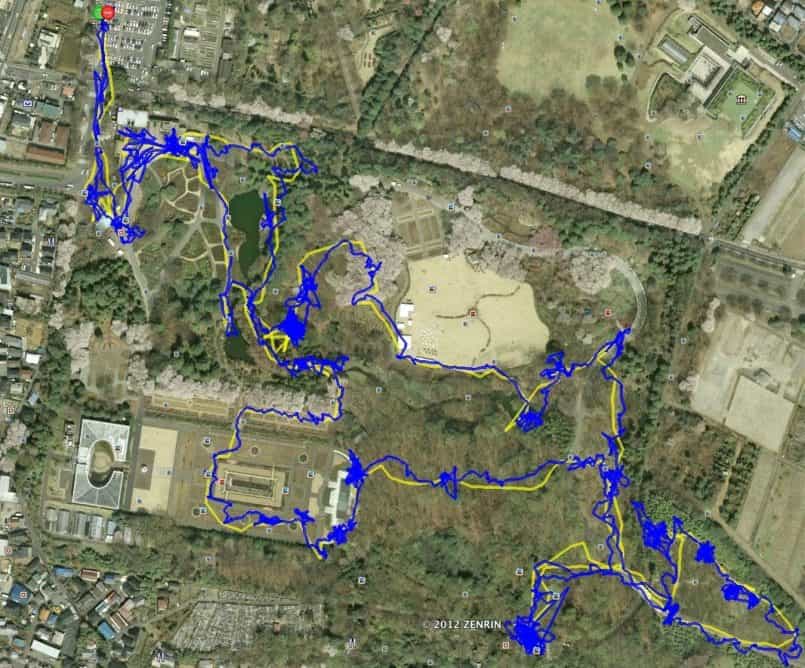
As a test, during this visit to a local park last week, in addition to the Canon GP-E2, I used MotionX-GPS on my iPhone 4 to record a second track log for comparison. The iPhone 4 is supposedly not as accurate as the iPhone 4S but it still does a reasonable job, and this is really just to give you a point of reference.
You can see from the following screen grab of Google Earth with both track logs loaded, that the iPhone, which is the yellow line, doesn’t wander anywhere near as much as the GP-E2, which is represented by the blue line here. Some times though the iPhone over simplified things, though I believe Motion X was logging at 10 second intervals, the same as I’ve set up my GP-E2.
So, on the accuracy, I’d say the GP-E2 does pretty well when it has a good view of the sky, and wanders a little when there are buildings or trees around to block or hinder the signal. For me, this level of accuracy is plenty, but you’ll need to make your own mind up based on these results for your own use. Of course, you can also tweak how the GP-E2 behaves, or creates the track log, and a more experienced Geotagger, would probably get better results with it than I currently am.
.log Files
Something else you might want to note is that the GP-E2 Receiver writes its track log files in what seem to be a proprietary format, which can’t be imported directly into Google Earth, or Lightroom 4. To get the track log into Google Earth you have to open the .log file in Canon’s Map Utility and export it as a .kmz file for Google Earth.
If you open the file, it’s just a text file, and I read somewhere that you can delete the first line and use it as another format, but that to me is even more trouble than exporting from Map Utility, so I haven’t really followed up on that.
As usual, I try to keep my workflow as simple as possible, using the least possible tools and steps to get to where I want to be. At the moment, with the exception of when I want to see camera direction, as long as I have the GP-E2 attached to the camera, I’m done. The images just appear on the Maps in Lightroom.
Syncing with Multiple Cameras
I will still have to use Canon’s Map Utility when shooting with more than one camera, to enable me to tag images that I shot without the GP-E2 attached. They won’t have direction information, but to their credit, Canon made it pretty easy to tag other images from the track log, with just a few mouse clicks, which I guess I’ll be able to live with, unless I spring for a second unit, which I don’t see me doing right now.
To sync multiple cameras though, you make sure you have imported the track log into Map Utility, by plugging in the GPS Receiver with a USB cable, and that is then copied to your local hard drive automatically. Then you select the images that you want to tag and hit a button to Automatically Add Location Information, and Map Utility adds the location from the log file based on the time the images were shot. This of course relies on you having both of your camera clocks set to the same time.
[UPDATE: I have now started using Jeffrey Freidl’s Geoencoding plugin for Lightroom to tag files from second cameras using coordinates in the GP-E2 tracklog. This removes the need to tag in MapUtility, but you still have to use MU to get the logs from the GP-E2 device. The good thing about doing this though, is that Canon merge all tracklogs from any one day into one log file, so you don’t have to search through various files when geoencoding. ]
Supported Cameras
As there is a setting to allow you to set the time on the camera from the satellites it locks in on, you know the camera with the GPS is going to be accurate, but so far, the only cameras that actually support this unit are the 5D Mark III and the 1D X, which isn’t on the streets yet, as on May 14, 2012. The 7D is also supported, but only when connected to the camera with one of the two supplied USB cables. Also, the 7D does not support the camera direction feature. It’s purely for geotagging or creating a track log.
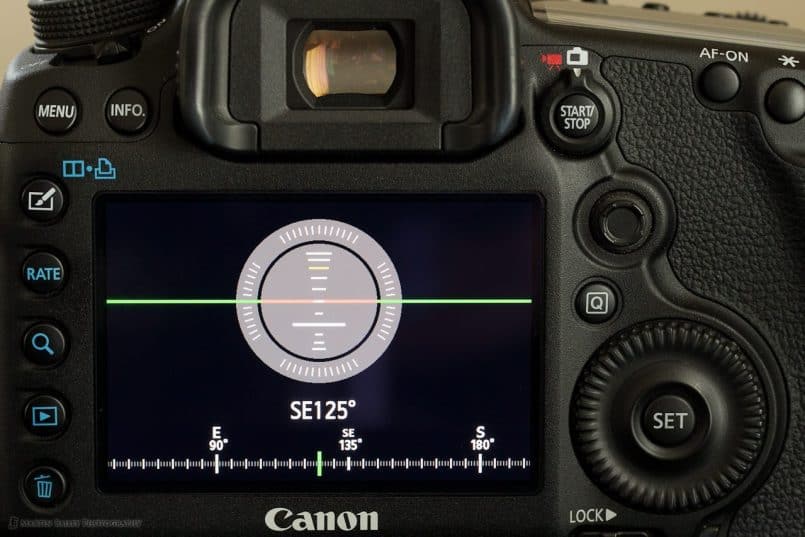
One thing I thought was very cool, is that you can see the direction that the camera is pointing on the back LCD, when you have the Electronic Level turned on. This means I’ll be able to use software like VelaClock or The Photographer’s Ephemeris to get the azimuth at which the sun or moon will rise or fall, and point the camera there ready, while I wait. Of course, I can use a compass, and there’s one in my phone too, but I still have to line my camera up with that. Now I can see it right there on the camera, removing some of the guess work.
GPS Signal Confirmation
There are a number of ways to see whether or not the unit has a GPS signal. The easiest is that when the unit has a signal the right of the two red lights on top of the GP-E2 turns on and stays for a second or so, then goes off for 3 or 6 seconds, before flashing again. If the unit doesn’t have a signal, it flashes three times in quick succession, then waits another 3 or 6 seconds before flashing rapidly again, until it gets a signal. The difference between a three or six second interval between flashes is apparently some kind of power saving, but I wasn’t able to find out when or why that kicks in. Mine’s been flashing at 6 second intervals pretty much since I got it, despite me putting a nice high powered Lithium battery in it.
Also to confirm that you have a GPS signal, when you half press the shutter button with the GP-E2 attached to camera, you get a GPS indicator on the top LCD panel or on the back LCD in LiveView, which turns on solid when there’s a signal, or flashes rapidly when there’s no signal.
The battery level indicator is similar, in that it flashes once for a second every 3 or 6 seconds when everything is OK, but it blinks rapidly for three times when the battery is starting to run low, then, it goes out when the battery is dead, not surprisingly. 🙂
Using GP-E2 Off Camera
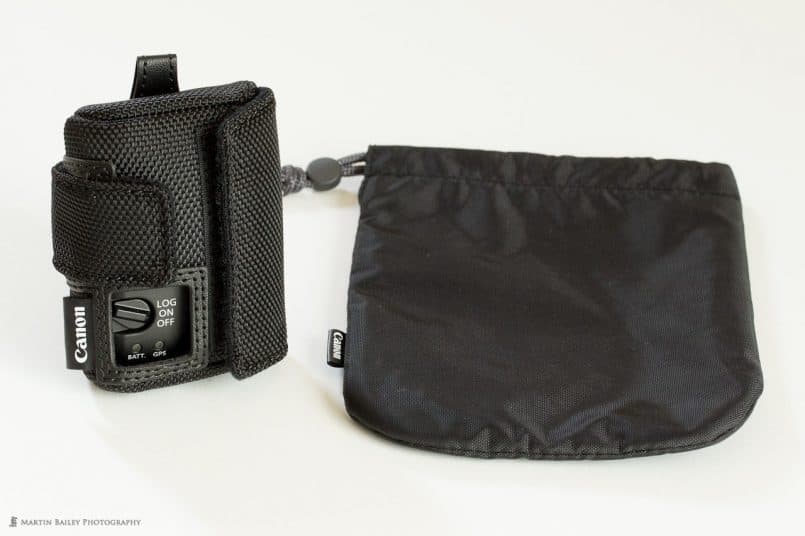
The unit comes with two covers. One is a tight cover to protect the unit when in use off camera. It has a window on the side to open the USB port so that you can plug it into the camera while for example attached to your belt, using the built in belt loop, or you can just attach it to your belt and literally use the unit just as a GPS Receiver, then geoencode images from any Canon DSLR later. There’s also a second window of course, to give you access to the switch to turn the unit on, and to enable you to see the battery and GPS signal indicators.
Note too that the power switch has two settings. ON only geotags your images, and doesn’t create a track log. Turn the switch another notch though, to LOG, and you’ll get your images tagged, and there’ll be a track log file saved to the device.
The second is a protective pouch to put the GP-E2 in while carrying it around. Because the first case is quite tight and takes a bit of putting on and taking off, and you have to take it off before you can attach the unit to the camera. I’ve been just using the pouch so far, as I’m generally using the unit attached to my camera. They both have their uses though, and I’m glad there is the pouch, as that suits my current workflow.
Slight Nit-Picks
Slightly disappointing was that there was no battery included. I had taken my camera with me when I went to pick up the GP-E2 as I planned to start using and testing it straight away, but I had to buy a battery before I could use it. If I’d known it wasn’t included, I’d have taken a charged Eneloop battery instead.
Also, there is no USB cable included to plug the unit into a computer, only a long and a short cable to plug the unit into the camera. Three cables might be a bit much, but in that case, I would like to have seen an adaptor from mini-B to a Type A USB connector so that I could plug the device straight into my computer to transfer the track logs.
Conclusion
Overall though, I’m very pleased with the GP-E2 GPS Receiver, and can finally now get into geoencoding my images. It’s accurate enough for my needs, though I’m not sure how it will fair when hard-core Geotaggers get their hands on it. I’m really pleased that I’m now able to tag my own images though, without having to jump through hoops, however easy those hoops might have been to jump through.
The next step of course, is to build this into the cameras. I know that there are already some compact digital cameras out there with amazing GPS units built right into them. I had a great conversation with Chris Miller on Google Plus about this, but it’s Chris’ theory, and I’m sure he’s right, that the manufacturers are concerned about battery life, buy just having the GPS build right into the camera.
They are probably also worried about people turning them on by mistake, then posting images online with directions to their homes embedded etc. which would not always be a good thing of course. I think it will be here soon though, and all the manufacturers have to do is make sure that they turn off GPS by default, and then flash a message up when the user turns it on, warning about battery life.
It’s also quite easy to Remove Location Info when exporting images from Lightroom and other workflow tools too, so hopefully it’s only a matter of time before we see this. Of course, that means my nice new little GP-E2 will then be obsolete, but I could handle that too, for the ease of having this all just build in and working.
Announcing Pixels 2 Pigment!
OK, so I hope that was of some use – let’s move on to that important announcement that I mentioned in the introduction. Because of a bit of a reshuffle in my schedule for August, September and October this year, I’ve decided to try and plan a series of weekend workshops in Japan, the US, Canada, the UK and Australia. These are basically building on both my Color Managed Digital Workflow seminars and the success of my Craft & Vision ebook, Making the Print.
I’ve been blown away by people’s reaction to Making the Print, and many have asked if I can do a face to face workshop, to build on some of the techniques discussed, so that’s exactly what I’m going to do. The two day workshop seminar is called Pixels 2 Pigment, and I’ve put together a new Web site to gauge interest as I plan this.
Without overcomplicating things, we’ll work through an entire digital photography workflow, starting from capture right through to printing. We’ll be calibrating every step, from capture to output, and including practical exercises and demonstrations, to give you the tools to streamline your own workflow and get you making professional quality prints every time, without tearing your hair out in the process.
For details and currently tentative dates, see my www.pixels2pigment.com web site, and more importantly, if you think you’ll attend one of these seminars, sign up for the newsletter using the form on the page. This will give me an idea of how big, or small, a venue we need, and also help me to work with sponsors on the possibility of them helping with some of the overheads, to reduce the cost to you.
My current plans have us starting in Tokyo and maybe also Okinawa, as I’ve already had a request to run this workshop there, and then move on to California, then up to Vancouver, across to Toronto, then down to New York, before flying across the Pond to do a weekend in London, all currently scheduled for the five weekends in September. Then, if there is enough interest, I’m hoping to go to Australia and do Sydney, Melbourne and Perth in October.
In addition to the weekend seminars, I’ll also be arranging some short excursions on some of the days in between, depending on what’s available nearby, but the most important thing right now is for you to let me know that you are interested. There’s no obligation at this point, but please only fill out the form at www.pixels2pigment.com if you are seriously considering joining me for what I think will be an incredibly useful and fun weekend.
Show Notes
Canon GPS Receiver GP-E2: https://mbp.ac/gpe2
The Pixels to Pigment Web site: http://www.pixels2pigment.com/
Music by UniqueTracks
Subscribe in iTunes for Enhanced Podcasts delivered automatically to your computer.
Download this Podcast in MP3 format (Audio Only).
Download this Podcast in Enhanced Podcast M4A format. This requires Apple iTunes or Quicktime to view/listen.




That’s interesting review. Too bad that Nikon GPS unit needs a cord (and sometimes takes >5 minutes to find its place), because with an L-plate it’s too much of a hassle. Way to go Canon!
Great review, waiting for mine to arrive. I’m in the same boat, new to geotagging.
I was told by a Canon rep. in Hong Kong that current consumer GPS technologies, the kind that could fit into a Pro-Level DSLR’s, are not powerful enough to consistently and accurately penetrate the materials used in the construction of DSLR bodies, such as magnesium alloy etc.
Seems plausible. DSLR’s are quite thick compared to iPhone’s and stand-alone taggers.
Thanks for the comment Sam. That does seem plausible. The point and shoots with GPS aren’t built with these materials.
I’ve been told this as well.
Well… you could always put gps-antenna on top of your camera and still have all other electronic of what GPS needs inside of the camera body… So I can’t see magnesium alloy body to be reason why there is not gps inside.
Another great review, Martin! Thanks for your efforts.
Or you can use your smartphone to log your GPS record track, export it in GPX and put the information together with Lightroom 4. Of course, you need to synchronize the camera clock with the cellphone first.
For sure Peter, but as I said above, I simply never did that. I wanted Geotagging to be as simple as it now is.
Narry a mention of whether this unit will work on any other Canon DSLR ?
For the price you pay I would have expected Canon engineers to have had an extra menu item which would have shown the condition and status of the GPS receiver.
A clever engineer / device firmware programer ( and are not ALL Canon engineers clever ) could fit this functionality into a couple of lines of assembler.
I expected more from Canon
Such an expensive unit with so much intelligence which becomes simply a dumb block !
Maybe Canon is like so many other international companies — run by the bean counters who only understand the “bottom line”
Wow! There’s a fair amount of pent up frustration there Chris.
There is a screen on the camera showing the status of the GPS Unit, and you can use the device to create a track log that can be applied to other Canon DSLRs. When compared to some other standalone GPS units, I’d say this is quite reasonably priced.
Martin.
Hi Martin ,
From my reading it appears that this unit will not work on older DSLR’s ( not even the 5D MarkII ? )
In essence this unit then becomes a dumb logger. One could get one of those for maybe US$ 30 or less ? and then follow the same procedure of a track log using time sync and geo-code that way ( As people have been doing for a couple of years now , and which you found “clunky” )
The screen indication is one simple icon which merely registers whether the GPSr has received an almanac and is now receiving NMEA strings. When I mentioned a menu item I meant something like I see on my Trimble using Terrasync.
I am not expecting Canon to produce a survey grade GPSr for a DSLR — although I am sure they could if they wanted to.
All that I am saying is that there is a lot more functionality locked up in the hardware that just needs some clever programming to free.
One also wonders why Canon could not have produced a GPSr unit that would work on older cameras ( The 5D Mark II is now an “older” unit )
To pass ( parse ) an NMEA string such that it registers in an image EXIF is hardly rocket science !
I would really like to know what Canon’s thinking was on this implementation ?
Hi Chris,
That is correct, that it only works directly with the 5D Mark III and 1D X currently, and kind of works with the 7D, but with limited functionality.
All other DSLRs are supported by applying the coordinates to the files later, but like you say, this is nothing different to what we can already do with other loggers.
There is a full screen on the GPS menu on the 5D Mark III that let’s you know a lot of information on how the GPS is performing. I just didn’t include a photo of this, because it would have had my home location displayed, which I obviously don’t want to plaster all over the Web. It’s there though, not just an indicator on the top LCD.
If you don’t own a 5D Mark III or 1D X though, I agree that this is probably not the way to go.
It’s certainly not perfect either, even on the supported cameras. The only way I can get my tracklogs off this thing for example is to use Canon’s Map Utility. If that restriction was not in place, I would be able to just grab the tracklog files and geoencode photos from other cameras right there in Lightroom (once Jeffrey Friedl changes his plug to fix a Canon bug), and this would save me from using Map Utility altogether.
Martin.
Hi Martin ,
I believe that one can use a GPS file format conversion program
GPSbabel to do what you want.
http://www.gpsbabel.org
Not sure if that would fit into your work flow — but perhaps worth a try ?
Best wishes
Hi Chris,
GPSBabel will work with the GP-E2, once an update has been added to over-ride a bug in the GP-E2 which basically writes in the log file that the device has no satellite lock, despite it having one. This is what Jeffrey Friedl found anyway. He’s going to fix it his end, and release an update.
The problem with that though is that I still need to go into Canon’s Map Utility to actually transfer the log to my computer. So far I’ve found no way to access the device without Map Utility. If I could easily grab the log files, it would be great to be able to do all tagging for second cameras in Lightroom with Jeffrey’s plugin, but if I still have to crank up Map Utility, it would probably be easier to just geotag second camera photos right there.
It’s a shame that Canon have been a little overly protective on that front. If anyone knows of a way to grab those tracklogs without Map Utility though, that would be great.
Cheers,
Martin.
Martin,
Great review. I am enjoying the GP-E2. Still can’t figure out how to
plug it into the USB port in my computer. Microcenter told me to buy a mini to USB adapter online. I did, but it didn’t fit the GP-E2. Contacted Canon and they want me to buy an expensive cable via telephone ordering. No info online. When I attach it to the camera and then plug the camera’s USB connector into the computer, the computer thinks I want to download the photos in the camera.
Ken
Ken…. You can use that same USB cable which came with your camera.
Just attach that cable between your computer and your GP-E2 and it should work.
Hopefully Martin didn’t mind that I answered even that Ken asked from you =)
Don’t mind at all Petri, thanks!
Ken, Petri is right. Just use the USB cable that came with your camera. Note that the USB terminal on the GP-E2 is under a nicely concealed rubber flap that you have to lift up.
Cheers,
Martin.
Thank you so much Petri and Martin! The cable came with my camera did the trick.
Good to hear Ken. Thanks for letting us know.
It is a little strange that Canon don’t include this cable with the unit. I guess they assume that people will already have one with their camera, but they don’t mention that at all, and even tried to sell you a new one!! Something needs fixing there.
Anyway, glad you’re all sorted.
Martin.
Martin, maybe I missed it, but you didn’t say anything about the battery life of the unit. Does it suck power? Most GPS units really drain their batteries rather quickly.
Now that some time has passed since you wrote this review, any updates?
Hi Matt,
The battery life is really quite good. I have used this unit a lot over the last six months and I’ve only changed the battery three times. I can’t say how many days etc. as I turn it on and off between shoots, but it does pretty well. Certainly not annoying in any way.
Cheers,
Martin.
Thanks Martin and thanks Petri. I just ordered mine.
I was almost two weeks in Africa and had GP-E2 on my Mark III all the time. One AA battery lasted about a week when update time was 15 seconds.
So at my two week vacation on Africa I used just two batteries on GP-E2.
Photos from my trip: http://www.flickr.com/photos/whig/sets/72157631863321970/
I just could not go away your site prior to suggesting that I extremely loved the usual info an individual provide to your visitors? Is going to be again often to check up on new posts
I tried the GPS with my Canon 650D and your report was very helpful. I have some tables but I hope I will over come.
Meir
Hi Martin
have you ever been able to download the track log under osx 10.8.3. MU seems to not recognise the camera since I have upgraded. Worked before.
cheers
Robert
Hi Martin,
A useful article – thank you. It’s obviously a while since you wrote this, so I was just wondering as you mentioned future versions of Lightroom, whether in fact they had included GPS direction info in the EXIF data in Version 5? Or anyone?
I was also wondering if anyone had any experience of using a GP-E2 in a light aircraft [for aerial photography] in terms of getting a good, reliable signal?
Many thanks,
Alan.
Very nice review. Do you know or anybody else if the receiver included cables are just USB cables? Or where to buy them?
I bought a second hand one that came without the cables. I have a canon EOS 7D so I will need this cable. In the manual it tells you not to mix both ends, meaning one is clearly marked to be connected to the camera and the other one to the WFT or GPS.
Thanks in advance!
it does not work well for indoors, even trying to identify North with it indoors cannot be relied on, but in the countryside or town it is excellent.
This is correct Seemore. The unit has to be able to ‘see’ the sky and the satellites.
having had the canon for 2 years now i feel It would be great were it to come with a boster that one can place beside a window and plug in to a thirteen amp socket, thus boosting the signal inside a room. I find shooting panoramas indoors can be a pain when I need to follow a direct specific path and I cannot rely on the canon gps.