
Visit Library for MBP Pro eBooks |
I am often asked about the tools behind the Martin Bailey Photography website, and my knee-jerk reaction is usually to think, “you don’t wanna know” because to achieve what I’ve created there are almost 100 plugins all working together to provide the experience you see. But, the fact that I’m asked about this tells me that at least some of you actually do want to know, so today I’m going to walk you through the main elements that form the backbone of your weekly photography inspiration while providing me with a solid platform to build my business around.
NOTE: Since September 2022 I have stopped using Elementor in favor of the Divi Theme and Theme Builder from Elegant Themes. Elementor is in many ways more powerful, but I grew tired of having to work around a critical error that was thrown after every Elementor plugin update when the database update was performed. Elementor left this issue unfixed for years, so I moved on.
Beneath everything, we have a WordPress installation. WordPress alone is enough to get started creating a website, but the real power of WordPress comes from the plugins that an army of developers around the world create, and the one that I am going to center today’s post around is an amazing plugin called Elementor. Elementor enabled me to transform a number of key areas of my site, and it plays very nicely with all of the other plugins I run, which is amazing when you consider the depth at which this plugin runs and what it can achieve with relatively few steps.
Because Elementor is design-centric, I’ve found it to be the perfect tool for creating a photography business website. I’m still only utilizing a limited number of features, as we’ll see, but I’ll also show you some of the templates so that you can appreciate just how powerful Elementor is. There is a free version that you can use to get a feel for how it works, but if you are going to build a site with Elementor I recommend getting a Pro license, which starts from $49 per year for one site, up to $999 per year for a 1000 sites. I have a license that enables me to use Elementor on up to 3 sites for $99 per year.
Contained Customization
It’s probably important to tell you a little more history as well so that you understand my decision-making to get to the point we are currently at. Until around 10 years ago, I created the MBP website with a mixture of non-related tools, some of which, like the gallery software, gradually became a huge time-suck, as I had to deeply customize the code to keep everything integrated. That means that not only did I spend time on the customization, but every time any of the components was updated, I had to painstakingly go through and migrate all of my changes to the new versions and test everything to make sure it was still working as expected.
Well, after doing that for around seven or eight years, I decided that enough was enough, and so, I moved to WordPress, and I promised myself that I would not get into customizing things at a code level. I wanted everything to be customizable via the interface in the browser because this would allow me to update the components without manually migrating my changes. I did have to spend some time migrating the code that I built to manage and maintain my Podcast feed so that I could access them via a WordPress page, but once that was completed, I had pretty much achieved my goal and with very little code-based maintenance required.
For the small amount of code that I did need to add I created a WordPress plugin, and I use what’s known as a Child Theme for the Qode Bridge theme that I use. This means that when the regular theme updates are released, I can update with a few mouse clicks. Of course, because I run a web server, not just a website, I have other maintenance tasks that sometimes take way more time than I’d like them to, but in general, the main website is relatively low maintenance most of the time.
Max Mega Menu
Anyway, let’s start from the top, literally, and talk about how I created the navigation menu, using a separate plugin called Max Mega Menu. I use the Pro version for the added customization options, but Max Mega Menu enables me to completely replace the WordPress menu with the rich experience that you see at the top of every page. This was actually the first thing that I checked when I added Elementor to the site. It was essential that Elementor worked properly alongside Max Mega Menu and needless to say, it did just that. How I added the menu changed slightly as Elementor added their new Theme Builder, but to show you how easy it is, here is a screenshot of the Theme Builder with the template for the site header loaded.
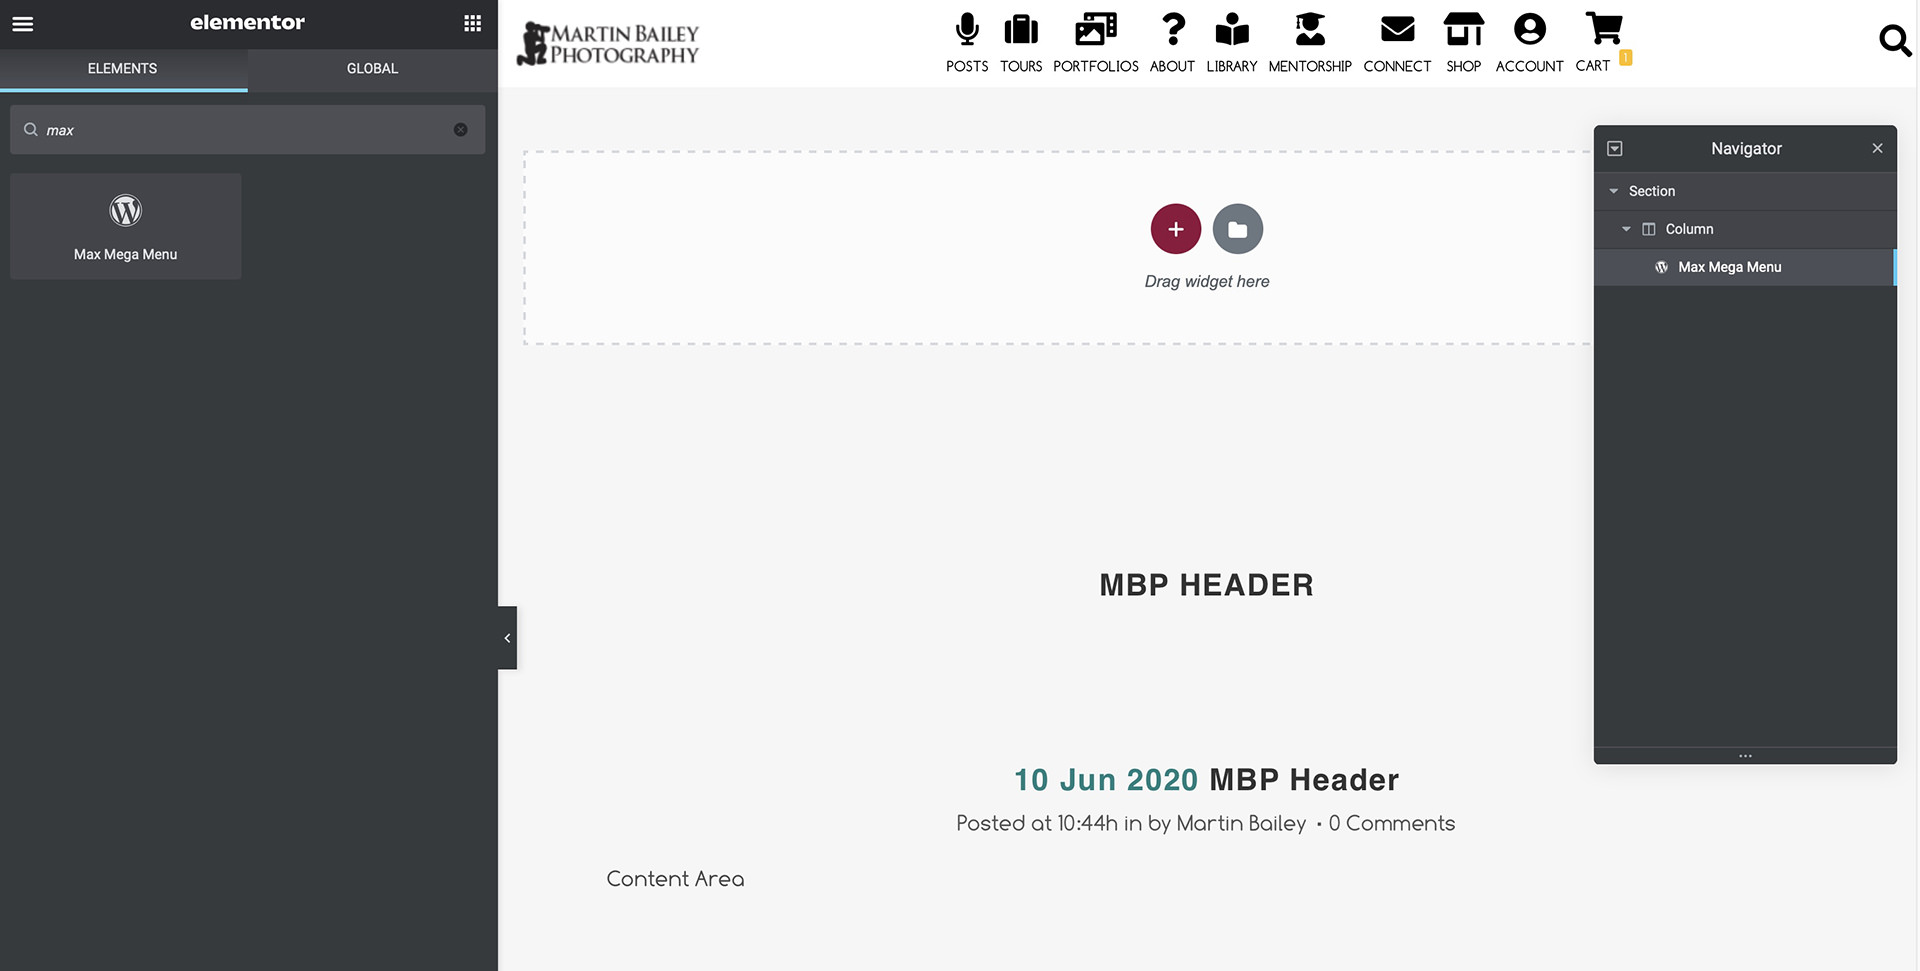
All you need to do is hit that red button with a plus symbol inside and add a section at the top of the page. I have displayed the Navigator so that you can see that this template has just one section, and inside that section is a column, and inside that, is the Max Mega Menu. To add the menu, I simply select the section and then typed the word “max” in the search field, and low and behold, there is a WordPress widget to add the Max Mega Menu, so I dragged that to the section. As I was already using Max Mega Menu and had my menu created, I simply needed to select my menu by name from a dropdown list, and my menu appeared at the top of my new Header Template. I can even click on the menu items to check that everything is in place right there in the Elementor editor.
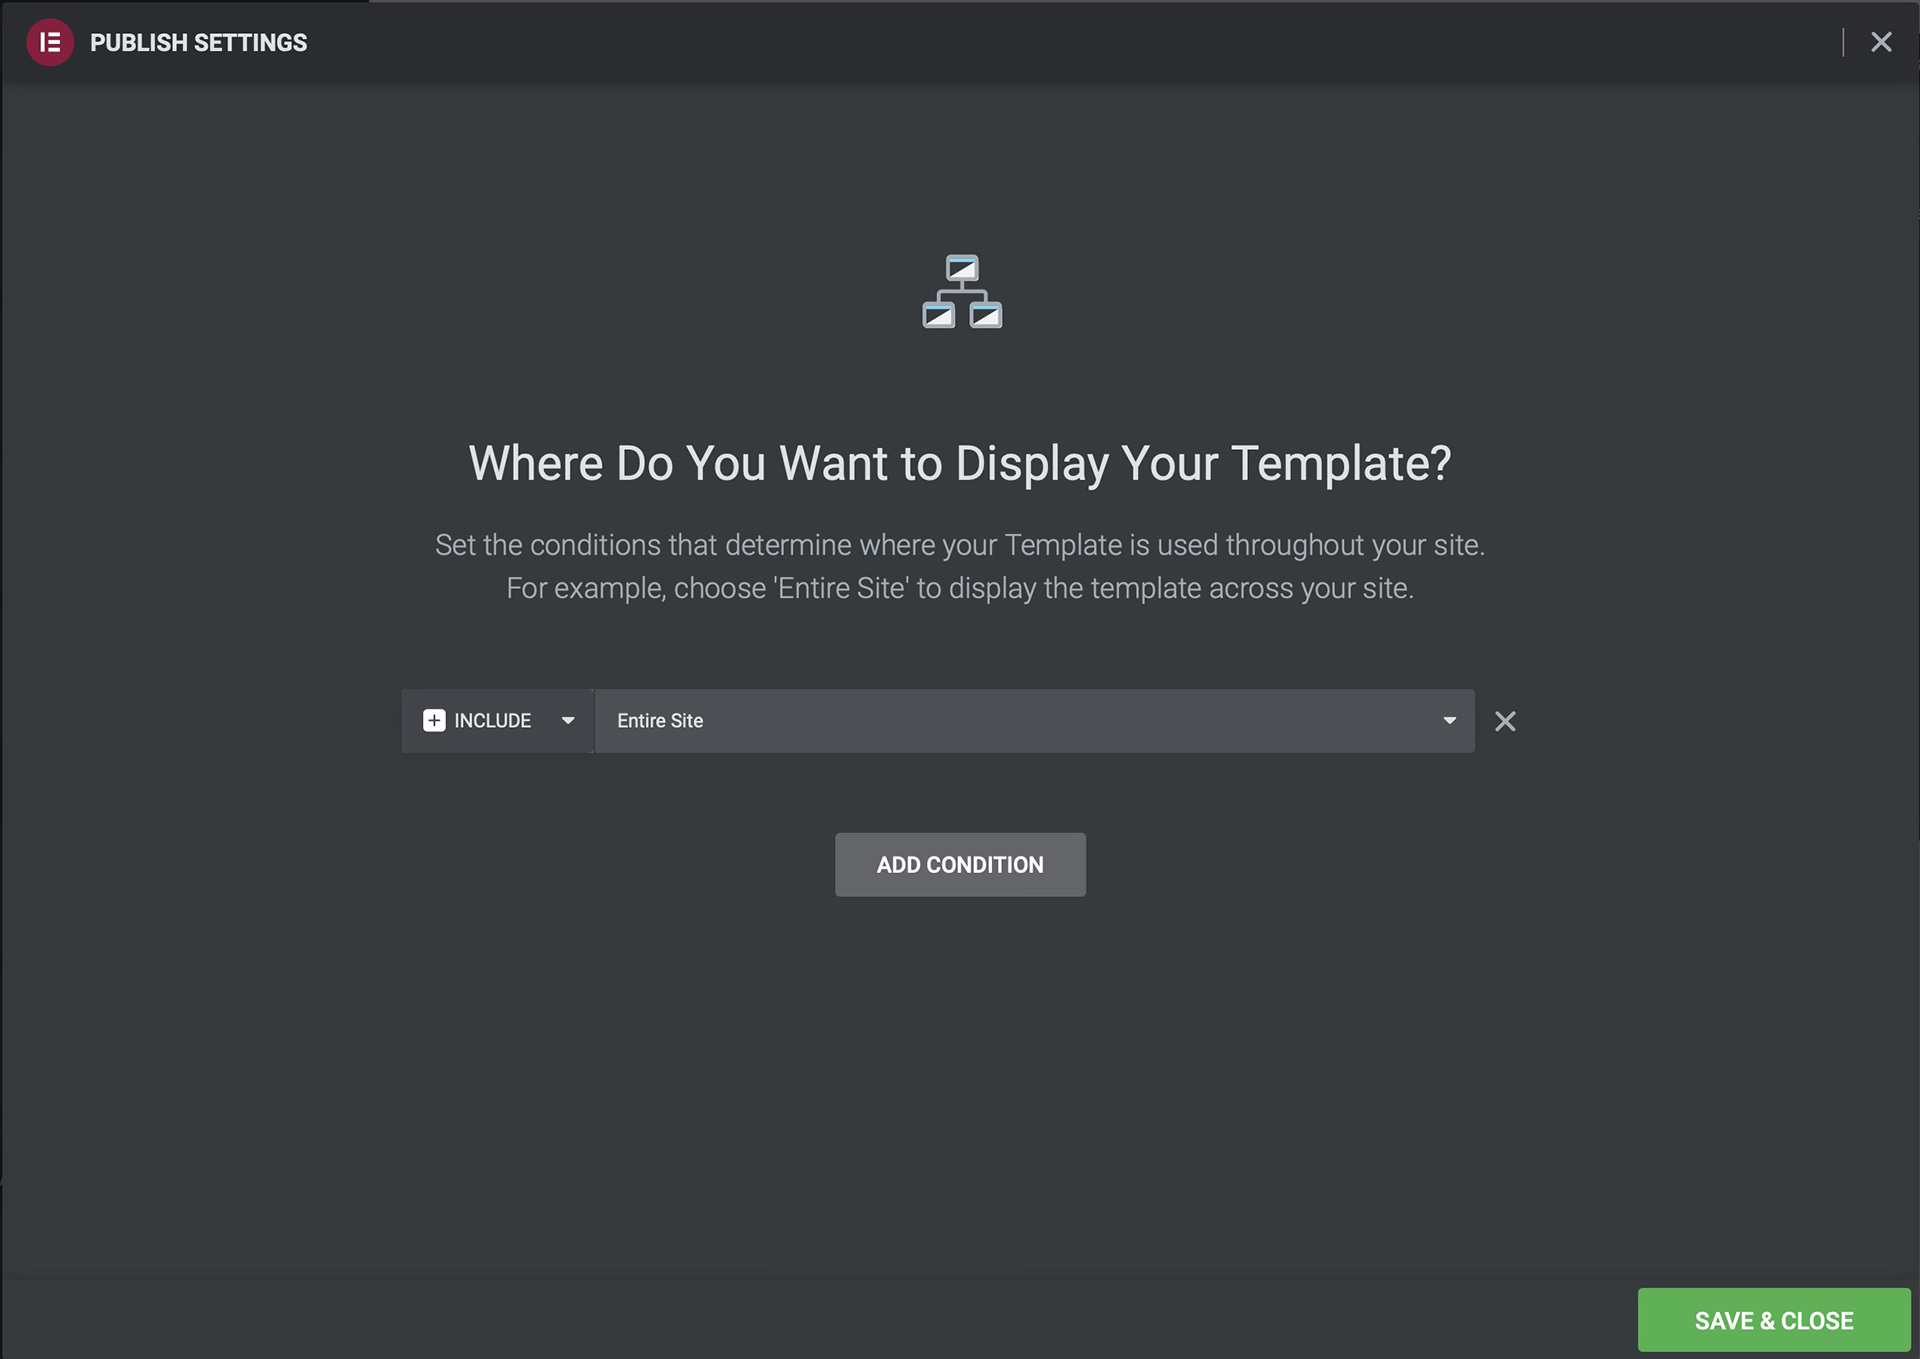
Whenever you create a new Theme element with Elementor, you are asked where you would like to display it. As you can see in the next screenshot, for my menu, which is in the Header, I want that to be displayed on every page, so I selected Entire Site, and after pressing Save & Close, my menu was added to every page on the MBP website. I cleared my cache to ensure that everyone was seeing the new menu, and that was all I needed to do. I’m not going to go into detail on how to create the menu, as we have a lot to cover, and it is well documented.
Changes on the Fly
Any of you that maintain a website have probably already clicked on this, but there is a hugely valuable aspect of what I just relayed to you, which is, I made these changes on the fly. I didn’t have to create a staging site and check that I could get this working before repeating my changes on the production site. I probably should, but that’s time-consuming, and in my opinion, most of the time when working with Elementor, it is not necessary. People using the site could continue with what they were consuming, and when they reloaded a page or navigated to another area, the menu would have been replaced within the new Header and they wouldn’t have even noticed.
Now, of course, there are times when I actually change the design, and they would be noticeable, but not disruptive. For example, another thing that I did that I was really happy with, was changing what you see at the top of each blog post. Visually the differences were minor, and I, unfortunately, don’t have a screenshot of what it looked like before the change, but I started to use Elementor to dynamically add everything that you see in this next screenshot whenever I release a new blog post. I’ve scrolled up a little as the Featured Image for last week’s post was a little taller than usual, but as you can see from the Navigator, everything at the top of each post I create is included in this template.

When I release a new post, the Featured Image is automatically added to the top of the page, and the title, date and time of publication, the number of comments, and the post’s tags are added as links, so visitors can click on the tags and see a list of related posts. Elementor also enabled me to reduce the number of plugins that I use, by enabling the inclusion of that link that you see to go to the previous post. Of course, if this was an older post, on the right, you’d also see a Next Post link. What’s more, I created that Post Navigation as a template, which I embedded into this template, and I also included it after the post content, so I’m reusing my new elements multiple times in multiple templates, making working with Elementor very efficient. And for the display conditions, I simply selected to use this Post Header for all posts that I have, and this is not only for new posts, but all posts I’ve ever published, so I was able to update the header and navigation for more than 700 posts with a few mouse clicks.
Fusebox Podcast Player
We’ll continue to work down a post page until the footer, as that feels like a natural progression, so the next thing you’ll see if my social links, which are added via a plugin called Social Warfare, and the Podcast player that you see on all posts is called Fusebox. This player is actually now not WordPress dependant, so you can use it on pretty much any website, and it’s highly customizable, including sticky players and full archive players, so I highly recommend it.
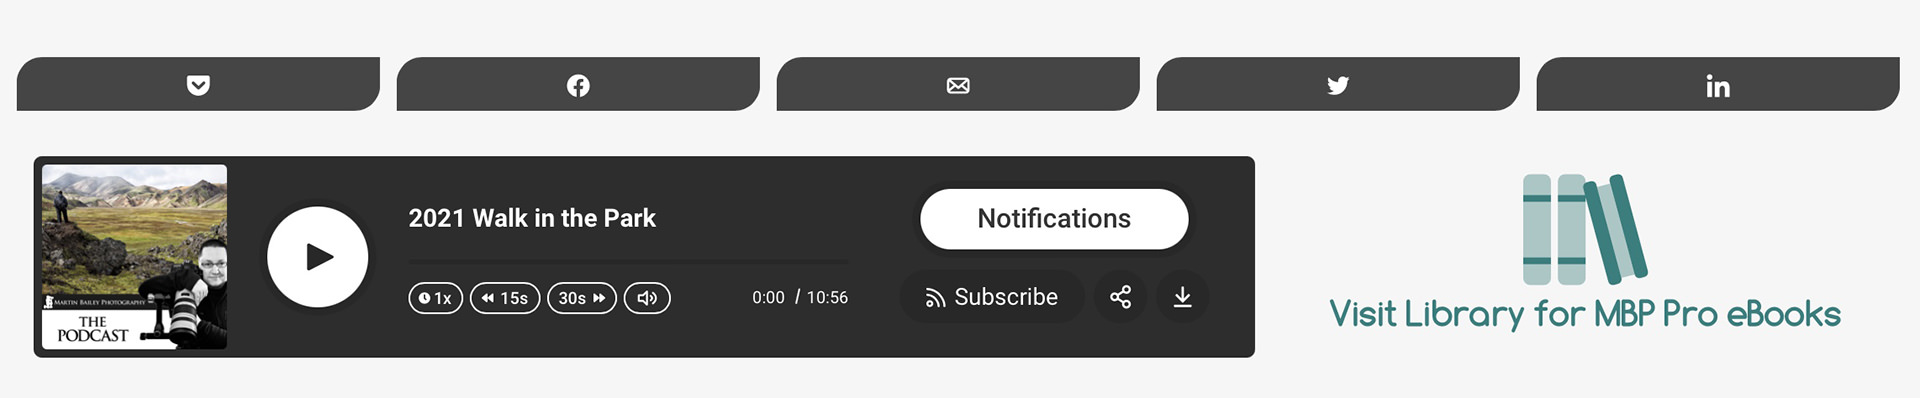
The social links are added automatically through their settings and my Elementor templates, and I add the Podcast player each week by pasting a snippet of code into a Custom HTML widget in the post body and just change the number of the podcast to match the post I’m releasing. The rest is done automatically. My code snippet also contains the link to the MBP Pro Member’s eBook Library, which you can see here for the last few months of eBooks, which all open in a rich PDF viewer and have a download button if you’d like to download the eBooks to read offline. If you are not a subscriber, you will see links to the subscription page instead of the library when you click on the library link.
At the bottom of every page on the MBP website, you’ll see a footer, which is also created with Elementor, similar to the Header, and this leads us to another very valuable aspect of Elementor, which is its rich library of templates that are ready to import and edit to your liking. I just selected one of the templates that I thought would suit the site and changed all the links as necessary.
Post Archives
If you’ve browsed for posts by selecting the Blog & Podcast option under the Posts menu in the navigation, you will also have seen the Archives that I built with Elementor, to display posts, starting from the latest, and dating right back to September 1, 2005, when I released my first post. If you are wondering how I have content in WordPress Dating back to 2005, it is possible to set the date of posts when you publish them, including backdating them, so when I moved to WordPress I posted some of my archives myself and paid a friend to post the rest to get the site up to date, so everything I have released is included in my archives.
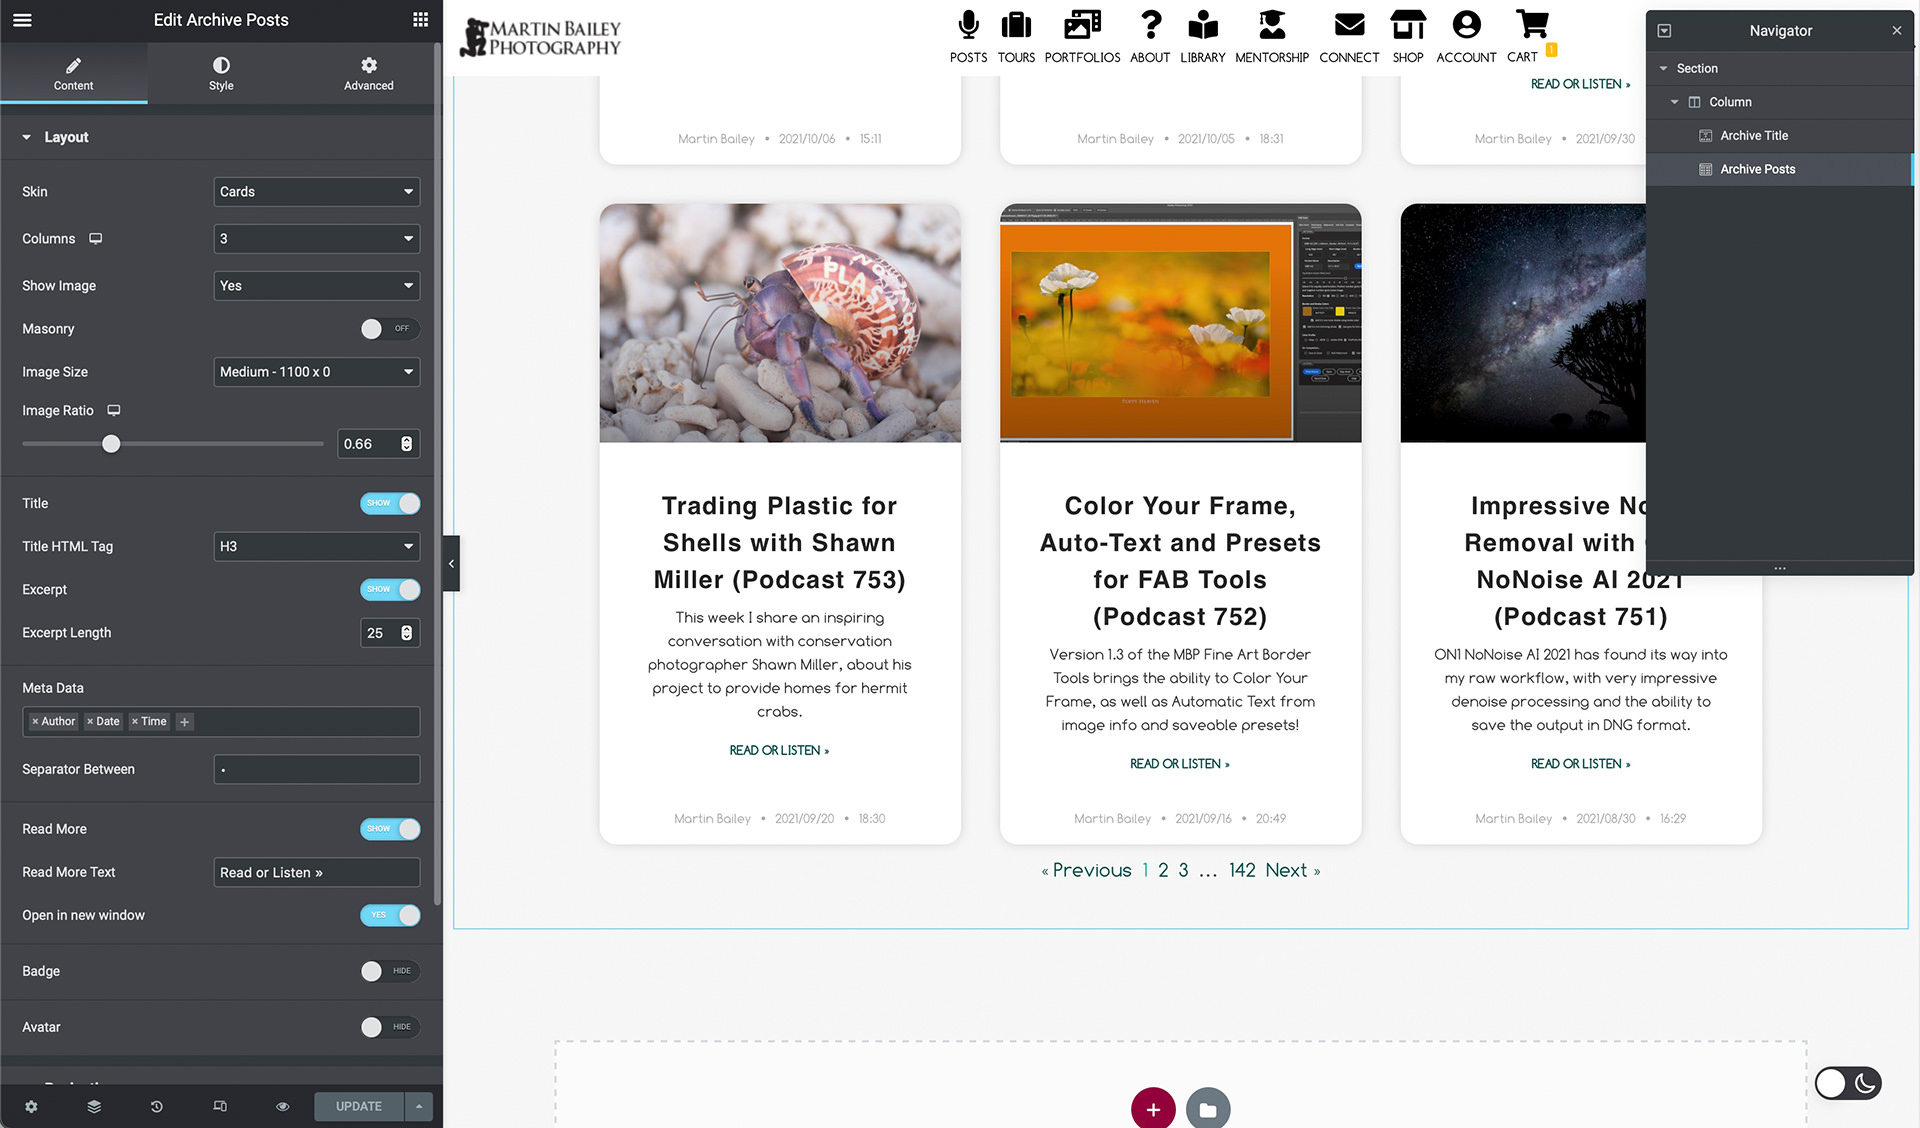
I won’t go into detail on how to create the archives pages, but starting with a Template, it’s really easy to specify which elements you want to include and how many rows and columns you include as well. And when you are ready to publish it, just add it to a page, which in this case was the site’s regular archive page. It even includes pagination to move back through the archives, which is great!
The Kit Library
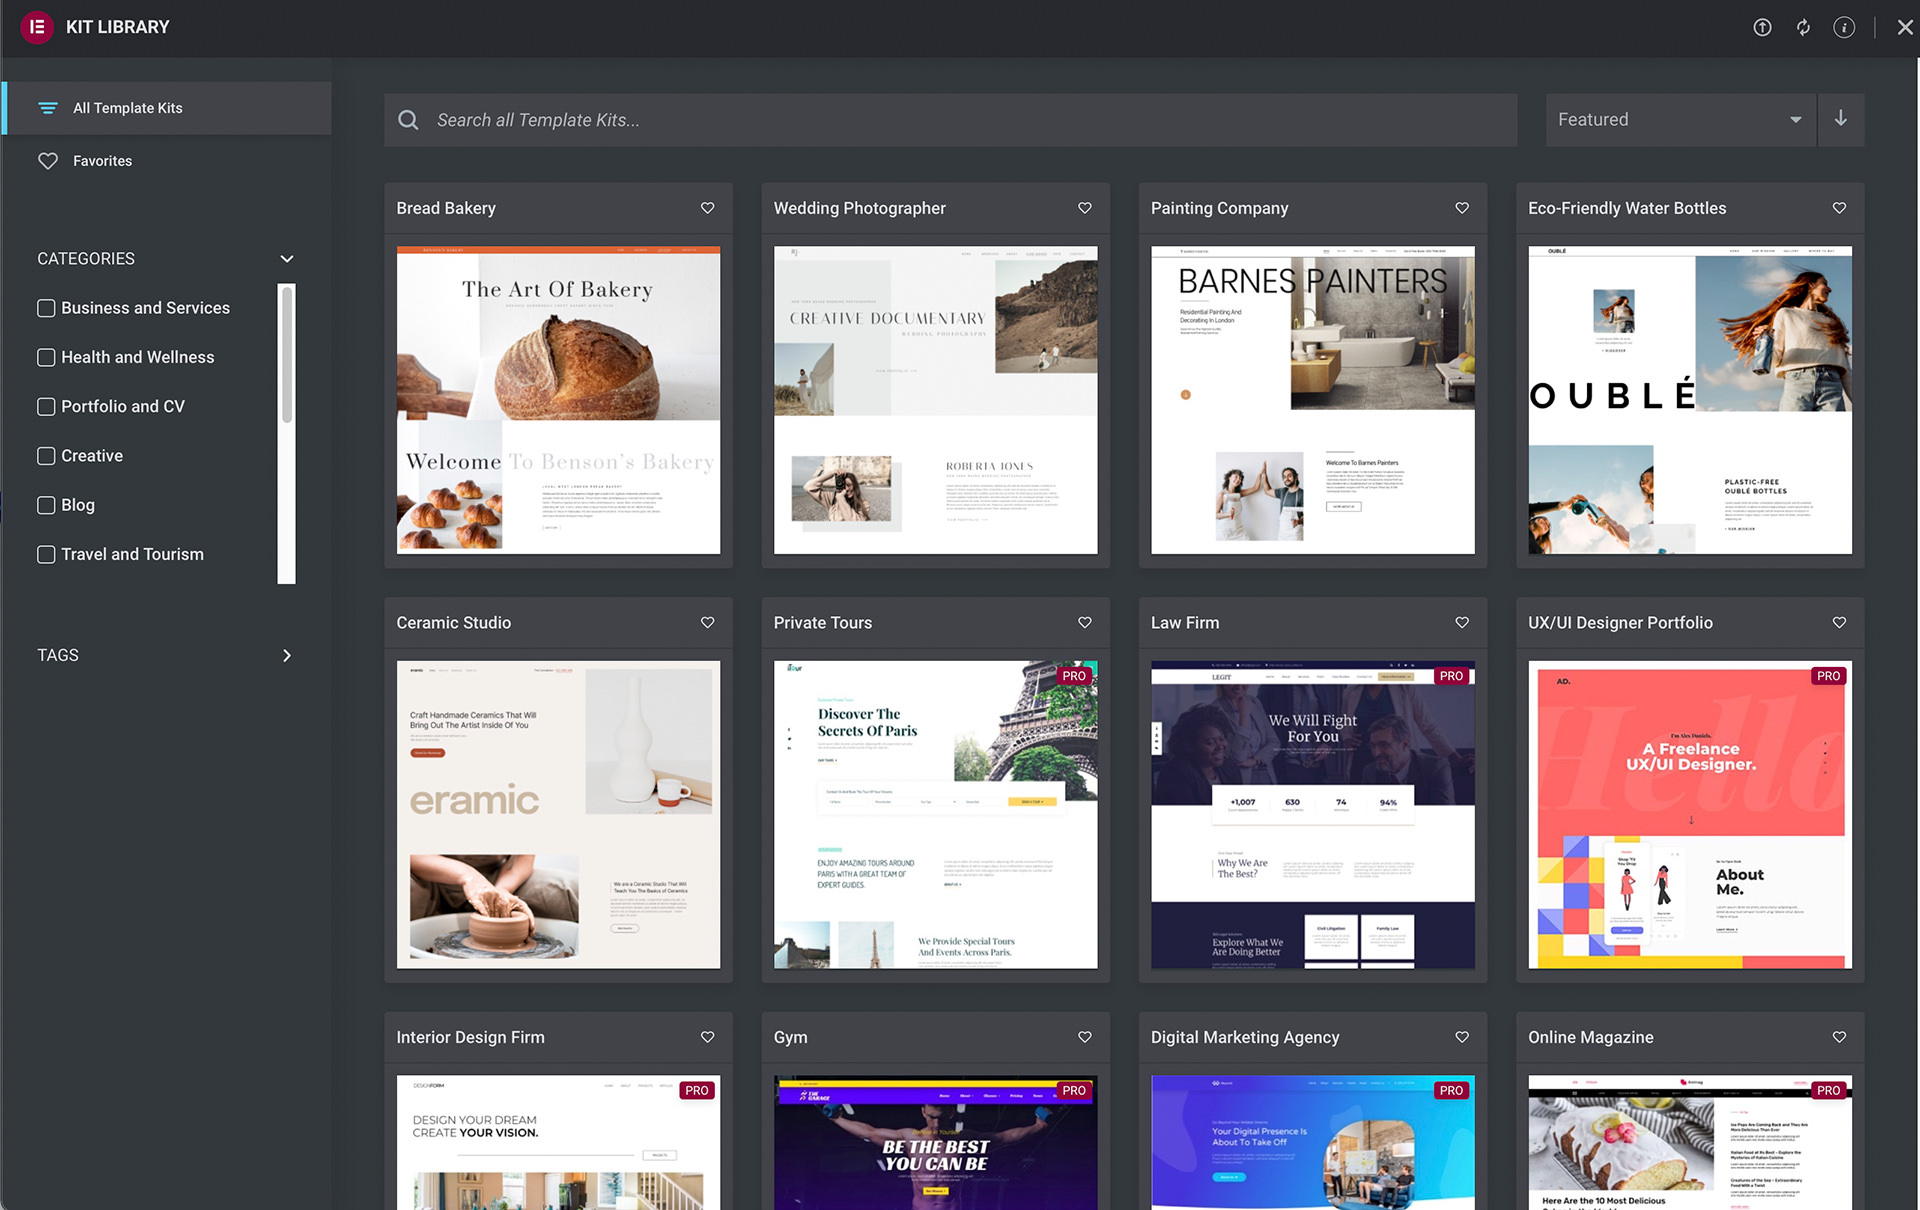
Elementor also includes a Kit Library that contains bundles of themes that help you to build a website with similar design elements. I haven’t used these myself, but here is a screenshot to show you the sort of things included. Note the drill-down list on the left side to narrow down what you see when you are looking to build a new site or update your existing one. You can also just search for keywords, like Photography, to get a list of Kits that work well as a Photography website, although there are currently only three listed at this point in time.
Elementor has a certain amount of useful carousel features, but I already have most of the content that I wanted to display to present ideas made with a plugin called Slider Revolution, and here you can see, once again, how easy it is to integrate Elementor with other plugins. Pretty much everything I have tried to do as I’ve gradually redesigned areas of my site has integration built right into Elementor. You just create your slider and add it to the Elementor page, as I have in the header of my Tours & Workshops page.
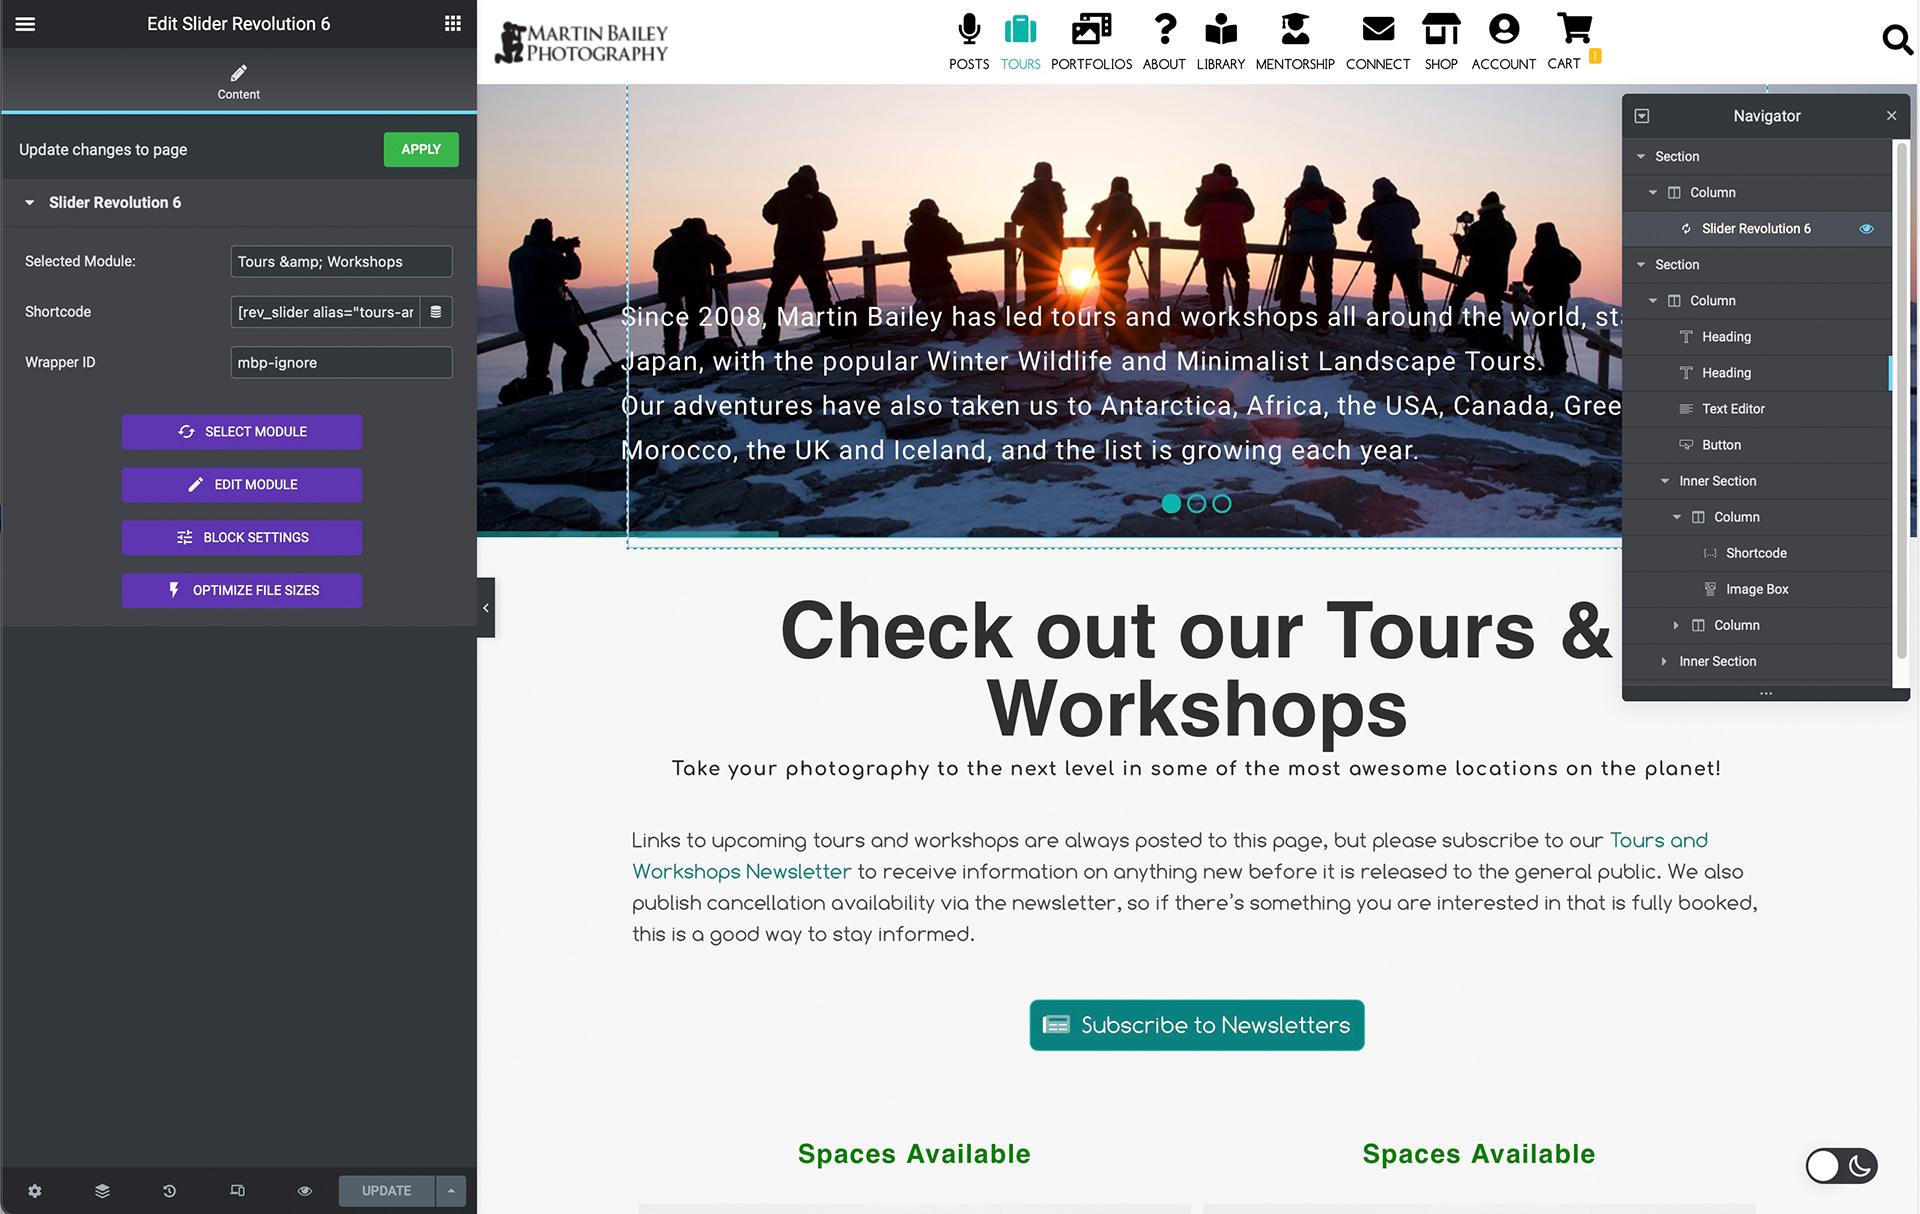
And, of course, I am using my site to sell these tours and workshops, as well as a number of other products, so the ability of Elementor to work with WooCommerce was another very important condition for me starting to use Elementor. The Tours page is slightly deceiving, because I’m using graphics to point to each individual tour page, and I also create some PHP code snippets that keep track of inventory so that I don’t oversell any of my tours and workshops. I use a plugin called Post Snippets to create shortcodes of the code snippets that I can embed anywhere on the site. This is another way in which I have prevented the need to customize the actual code of WordPress or my themes and works very well when a little bit more control is necessary.
WooCommerce Integration
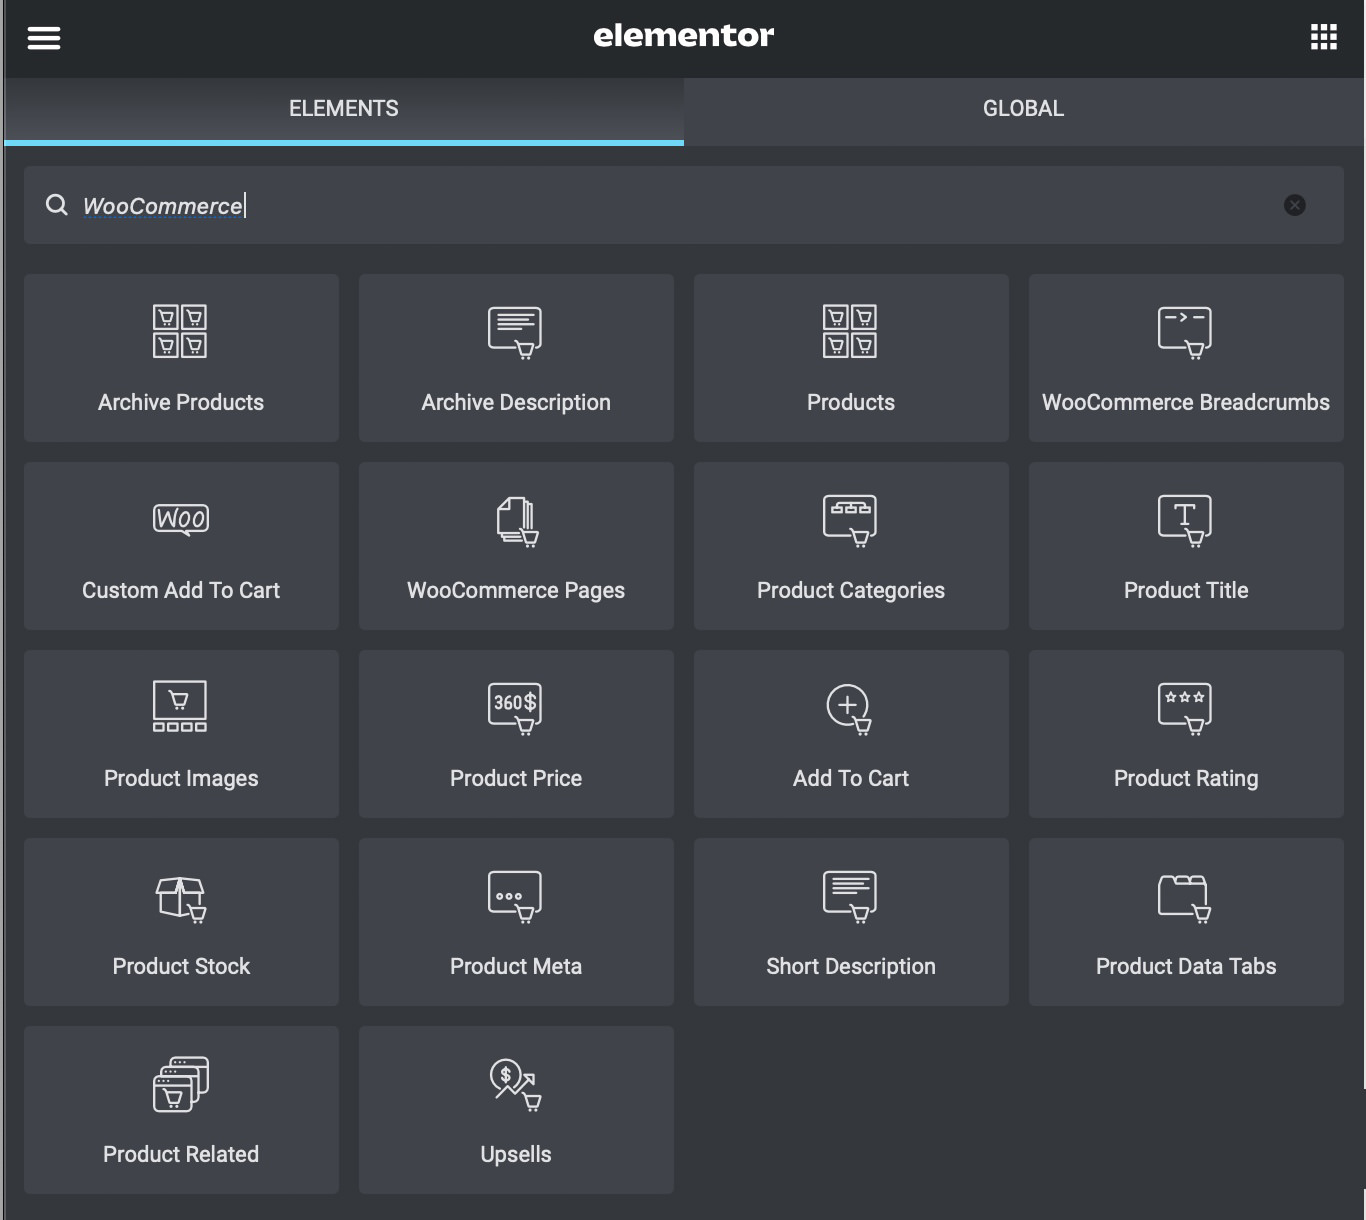
Back to WooCommerce though! Elementor integrated very smoothly with WooCommerce. As you can see in this screenshot, Elementor comes with a slew of widgets to help you to place WooCommerce products and content onto the pages of your site, and these can be any pages, not just WooCommerce pages.
To add my Tour products to the Tour pages I used the Products widget to add a two-column list of products, and as you can see in this next screenshot, I manually selected the two products that I wanted to display. When you have a lot of products defined in WooCommerce, you’ll quickly find how useful it is that to have a contextual search show you available product candidates as you type out the product name.

You can pretty much sell anything via WooCommerce, so this level of integration is very useful. I have in the past sold prints via WooCommerce, and eBooks, but I now sell my eBooks via FastSpring, as FastSpring looks after the international digital goods taxes, which have become a bit of a nightmare to stay legal with over the last few years, so I now pay a slightly higher transaction fee to have FastSpring just handle all of this for me, and it’s so much easier. There is currently no Elementor integration with FastSpring, so I have to rely on the FastSpring native WordPress plugin which I can say with complete confidence, is absolute crap. If I’d have known how crap their plugin is I’d have chosen a different digital goods reseller, so please don’t take this as a recommendation of FastSpring. They have a lot of work to do before I’ll ever recommend them to anyone.
Maintenance Mode
Another great feature is the availability of Maintenance Mode and a Coming Soon mode right in Elementor, and it comes with some great templates for pages that are displayed when you activate these modes. I took one of the templates and changed the colors to the palette that I use for the site, and removed the email subscription field because I didn’t need it on this page, but otherwise, this screenshot shows you mostly what you get in one of the templates. I added an extra sentence saying that we expected the site to be back when the timer expires.
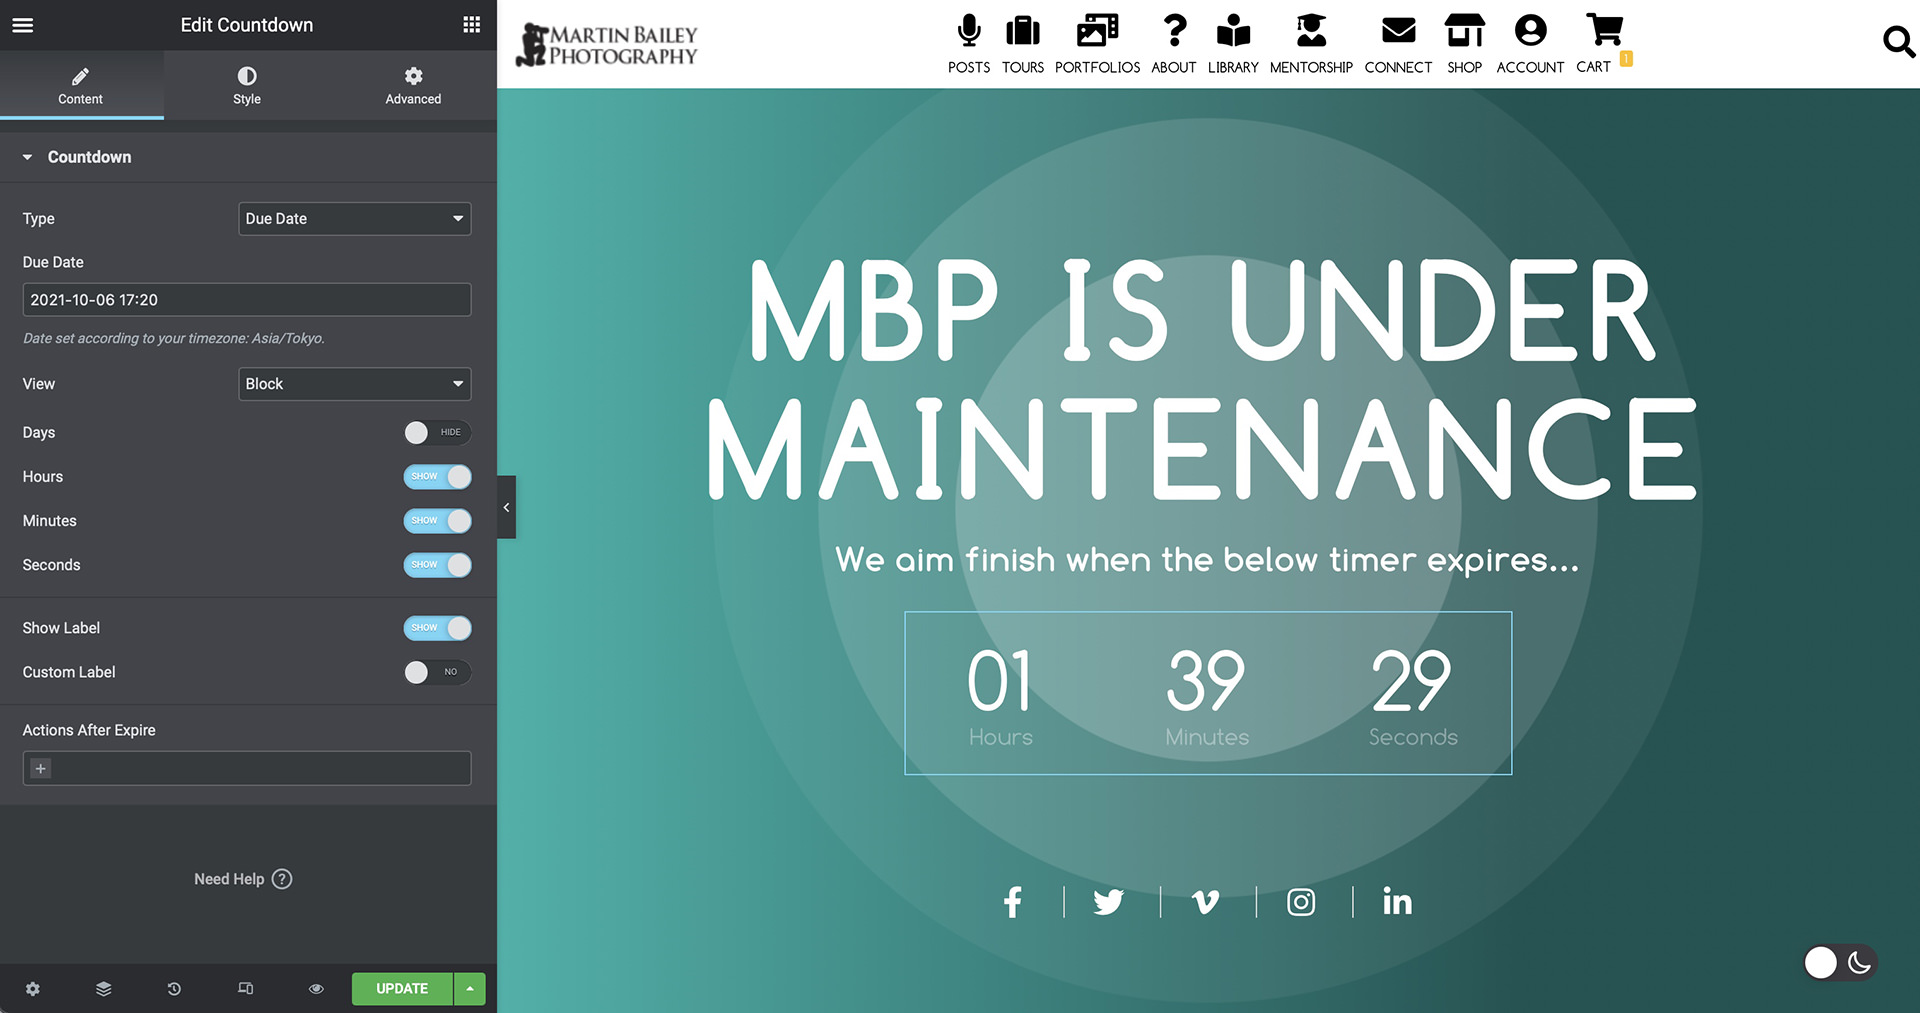
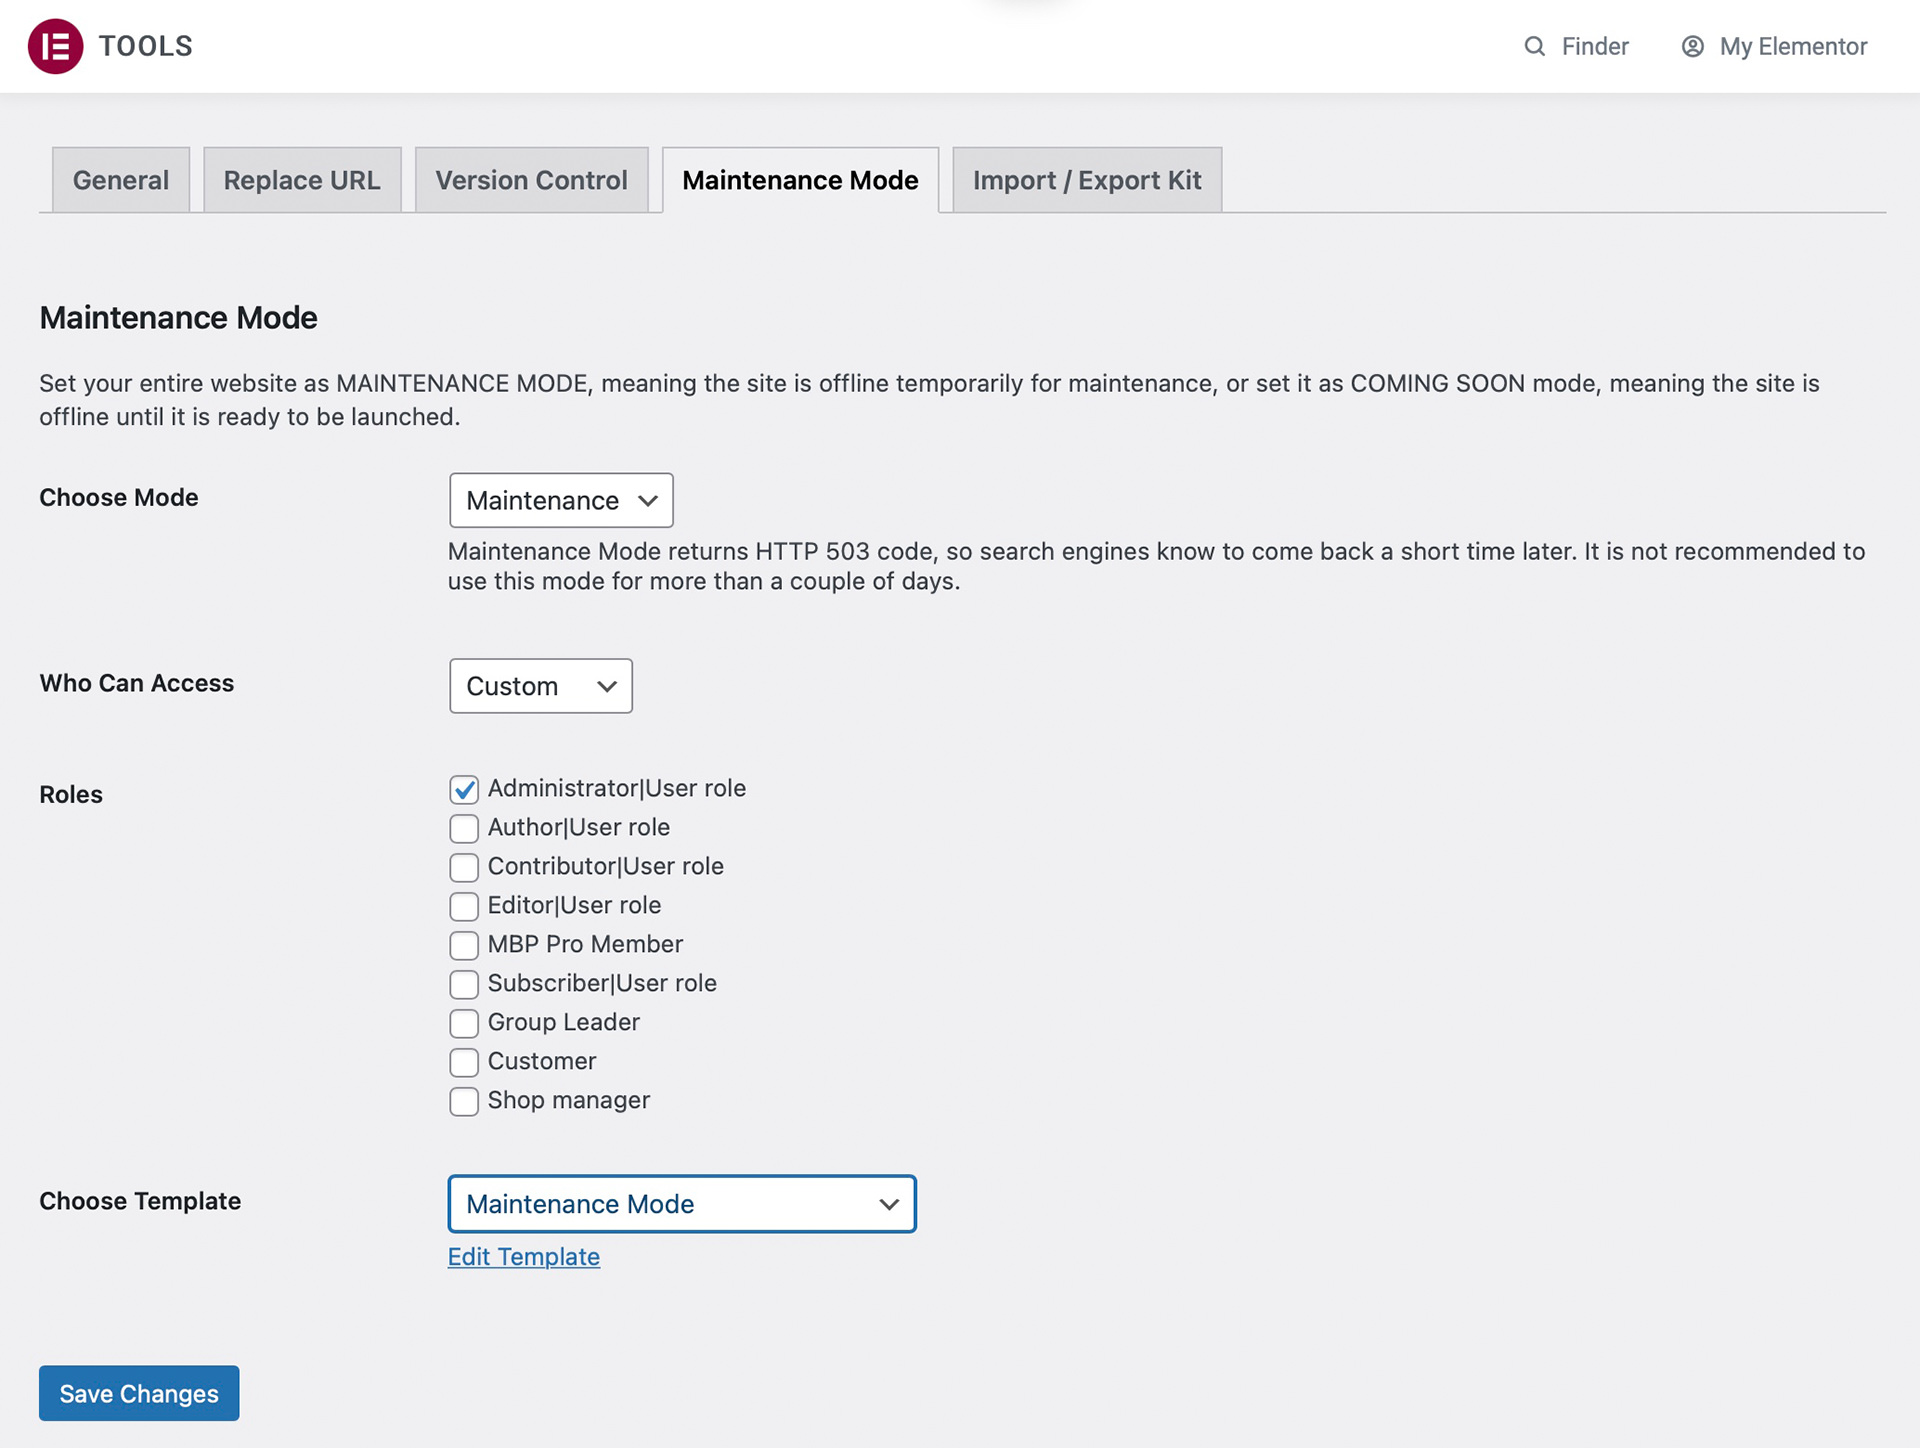
It took me a little bit of time to figure out the details to be able to actually select the maintenance page, but when you create your maintenance page template by selecting Add New under the Templates menu that is added to the WordPress admin console, the important thing is that you select Page, and not Single Page or anything else. It has to be a page to be able to use it as the Maintenance Page. Also, when you come to save your new Maintenance page, don’t publish it, rather select the up arrow on the green Publish button and select Save Template. The name isn’t so important, although I called my page Maintenance Mode, and I was then able to see and select the new template under the dropdown menu that you see in this screenshot, showing where you enable Maintenance Mode under the Elementor Tools menu.
I didn’t need to do any maintenance when I created this page, but if I had hit the save button the Maintenance Mode message would have been displayed instead of any of the regular pages of the website until I turned it back off again. I like that the templates include a timer so that people know approximately how long the site will be down for maintenance.
404 Page
On a related note, Elementor also has some very nice templates to replace the 404 Page that is displayed to people that hit a page that doesn’t exist. In the past, these pages were just boring white screens, but many people now use the 404 Page as a way to be creative, and Elementor is here to help us with that. Here is my current 404 Page, on which I used one of my photos of the Snow Monkeys, with the mother looking up into the hills, and the baby looking back at the camera.
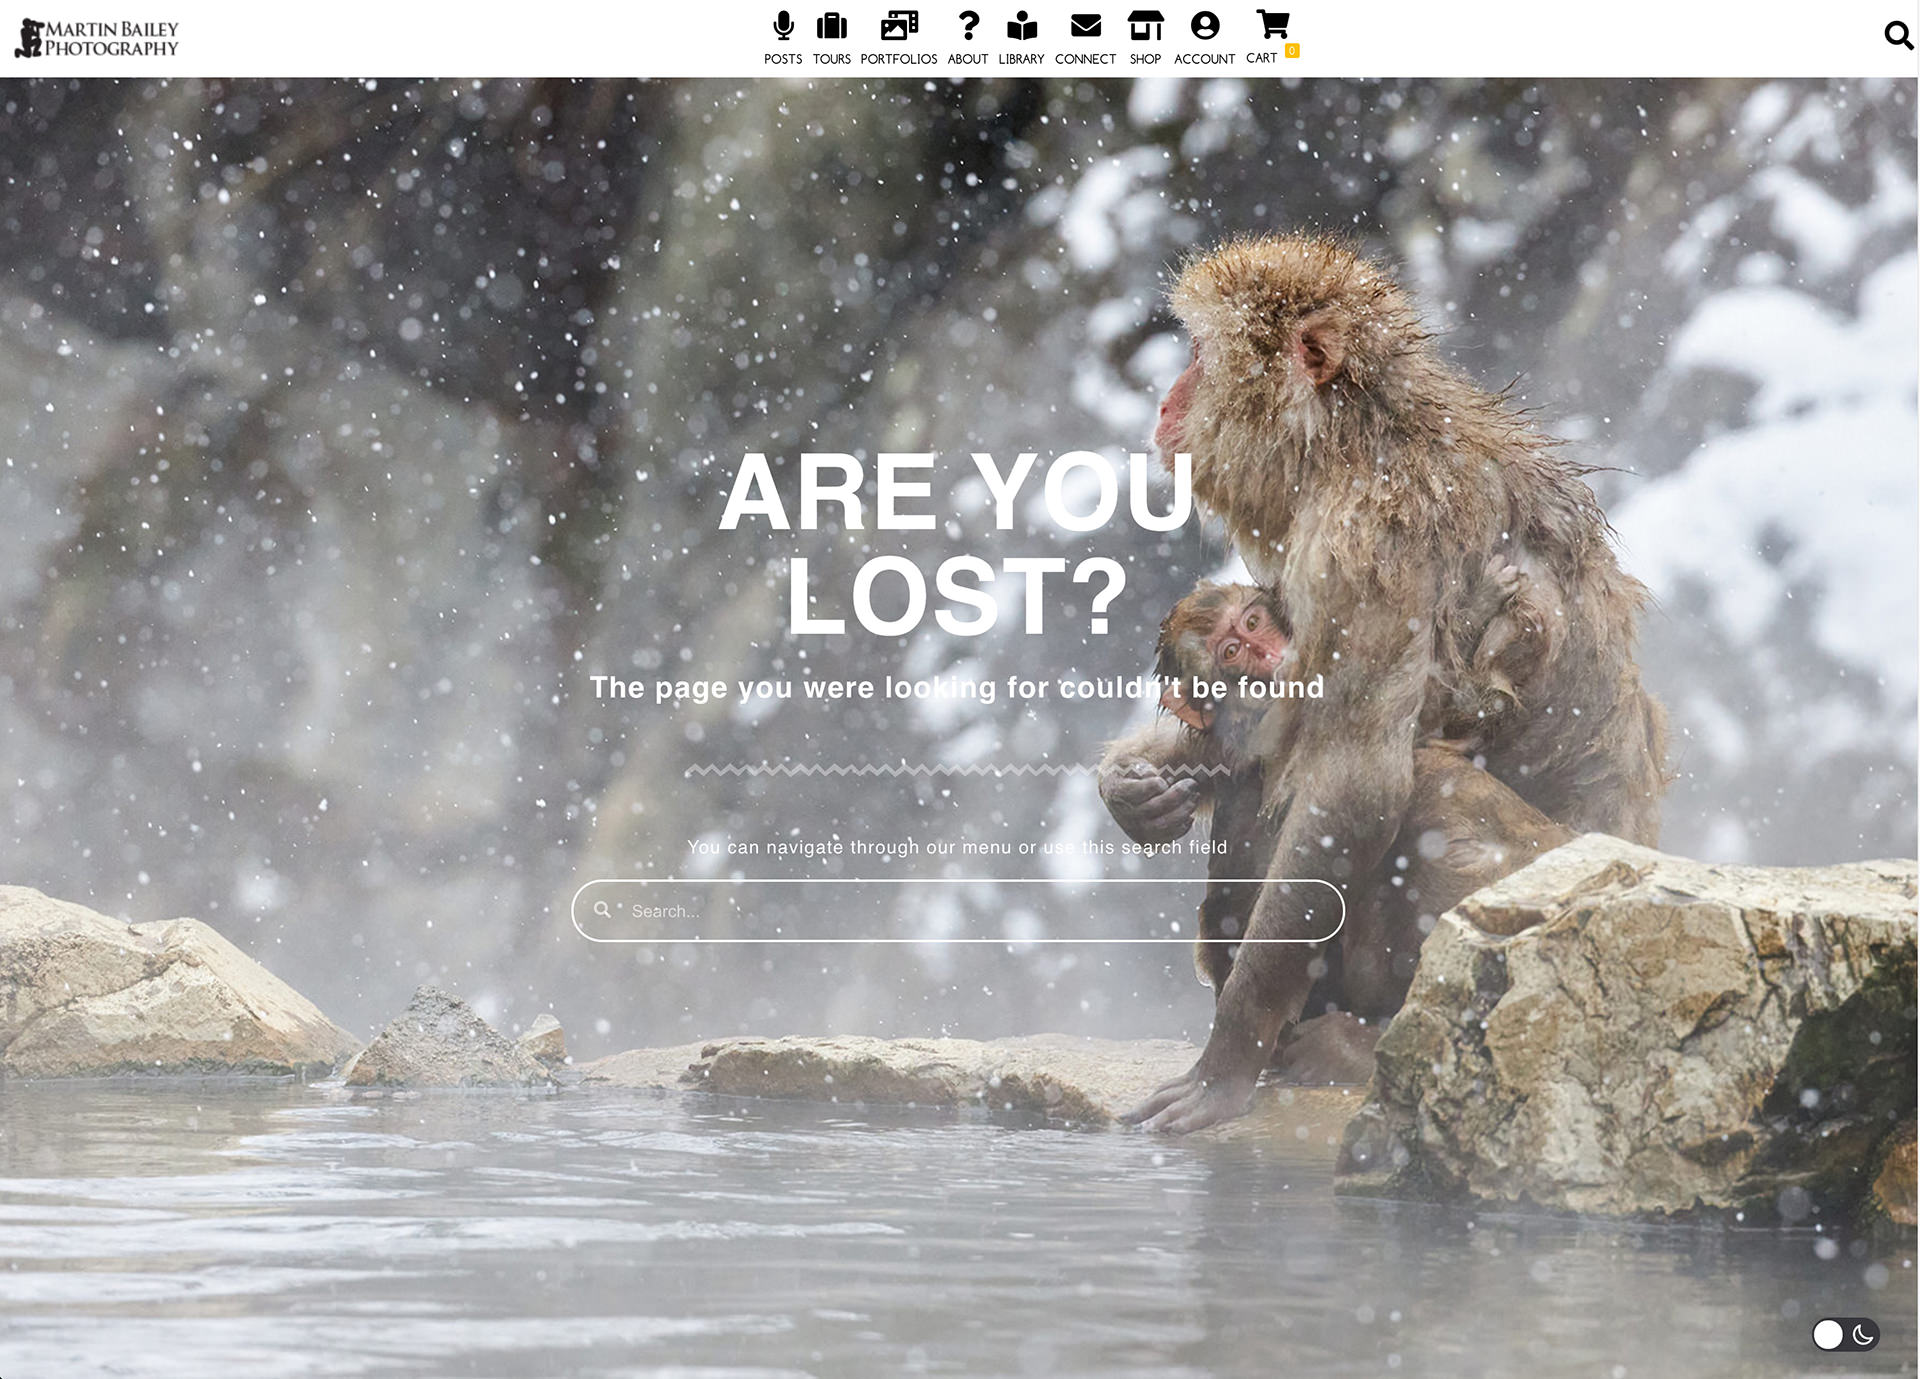
It’s important to still let the user know that this page is not what they were looking for while providing a means to search for what they were looking for or lead them to the menu to navigate away from that page. On the subject of Search, I use the Ajax Search Pro plugin to provide a rich set of highly customizable search results, but I’ve found it to be very sluggish, and I’ve not really been able to find any settings that help to speed it up without seriously reducing the number of posts displayed, so I’m a little cautious to recommend this plugin unless you are prepared to make people wait for search results, and that really isn’t a great idea.
Note: Although I like Ajax Search Pro, I decided to remove this plugin when cutting the overall costs associated with running this website.
Other Templates
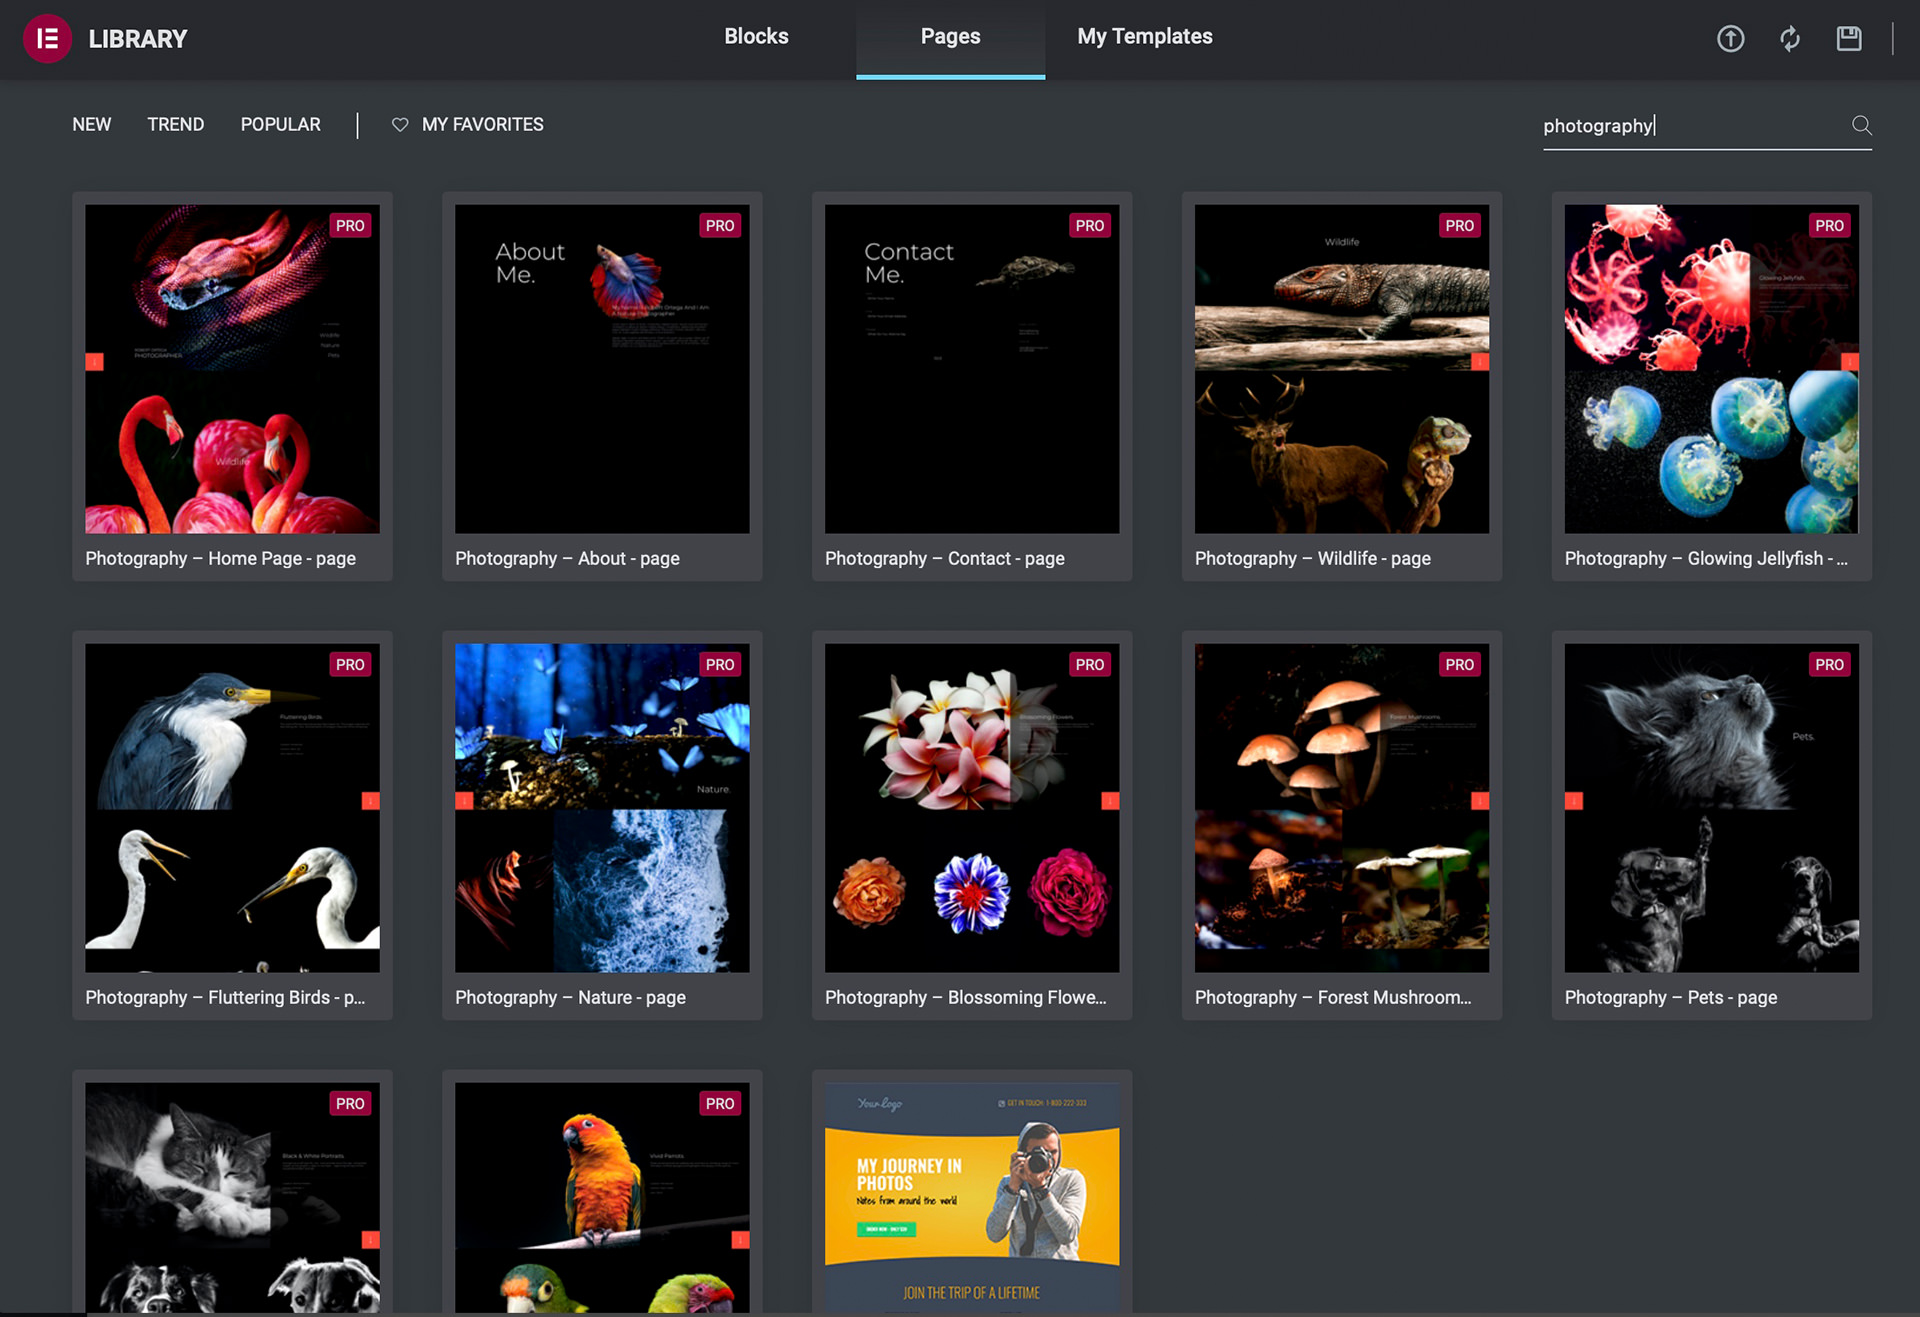
With only limited time to tweak the website, there are still lots of areas of Elementor that I want to attempt to integrate. Here is a screenshot of the photography-related page templates. Granted, they are all so similar that I wonder if they needed so many variations, but they are very cool designs, and great to give you ideas if you are trying to put a page together.
I have actually found that I’ve used mostly templates that aren’t specifically for photography, and I’ve been very happy with how I’ve been able to pull together the design elements of my site, including my Portfolio pages, which you can see under the Portfolios link in the top navigation.
Other Integrations and Benefits
Elementor also includes an Integrations tab that helps to seamlessly work with some other common tools, like Google ReCaptcha and the Facebook SDK, as well as MailChimp if you use them. They don’t have a native integration with SendinBlue, the newsletter management service that I use, but I’m getting by with their native plugin so that’s fine. At the bottom of the Integrations tab, you can also add your Font Awesome Pro Kit ID if you use Font Awesome as I do. I haven’t even mentioned that I now use the contact form included in Elementor the multiple contact forms on the site. I also created a very detailed form for my tour guests which has multiple pages of information to gather, and it all works great. I also created the newsletter signup popup that you’ll probably see at some point with Elementor.
I don’t recall the exact count, but by choosing to work with Elementor on my website, I was able to remove around 15 other plugins. I said at the beginning of this post that I run almost a hundred plugins. I actually used to run around 105 plugins, but by working with Elementor, with the many features that it includes, I was able to get the number of plugins I use down to 92, and two of them are for Elementor and Elementor Pro, so that was a nice improvement under the hood too.
Meow Gallery and Lightbox
I’ve mentioned this before, but we can’t really wrap up a post about the core plugins behind the MBP Website without giving another mention to the guys that create the Meow Gallery and Meow Lightbox. Whenever you see a gallery either embedded in posts or in my portfolios, it is added using the Meow Gallery software, which is fully backward compatible with WordPress galleries. And whenever you click on an image the Lightbox that it opens in, showing EXIF data, etc. is the Meow Lightbox. Both are great plugins with top-class support.
I won’t go into detail on the rest of what I use for now, as I think we’ve probably covered enough for this post. If you have any specific questions about Elementor or any other aspects of the MBP website, leave a comment and I’ll answer as best I can.
Full Disclosure
In the spirit of full disclosure, you should know that Elementor sponsored this post, which helps with the upkeep of the website, so I’d like to thank them for their support and for the amazing work that they do with Elementor. As you know, I don’t accept sponsorship often, and always only when the product is something that I already know and love, and use regardless of any sponsorship agreements. I hope you found this useful and if you would like to try Elementor, please head over to their website here.
Show Notes
Check out more details of what’s possible with Elementor here: https://elementor.com/for/photography-website-builder/
You can also see details of the Elementor Popup Builder here: https://elementor.com/features/popup-builder/
Max Mega Menu can be found here: https://www.megamenu.com/
Meow Apps are here: https://meowapps.com
Ajax Search Pro: https://ajaxsearchpro.com
Fusebox: https://fusebox.fm/?lmref=fWYdQg
Post Snippets: https://wordpress.org/plugins/post-snippets/
Qode Bridge Theme: https://themeforest.net/item/bridge-creative-multipurpose-wordpress-theme/7315054
Subscribe in iTunes to get Podcasts delivered automatically to your computer.
Download this Podcast as an MP3 with Chapters.
Visit this page for help on how to view the images in MP3 files.
Freebie Post
This post is unlocked for non-Patrons as it is a sponsored post or advertising Martin Bailey Photography products. If you found it useful and would like to unlock all other posts please click the button below. Thank you for your support!
Become a Patron!

Useful information thank you Martin. It’s a long time since I was involved in building web sites, so getting an infusion of the latest and greatest will probably help if /when our club web site is upgraded.
Thanks Bruce! I’m pleased this might help.
I’ve used a number of packages over the years that essential (can) take over the regular WordPress page editing tools, but Elementor is the best, and great value as it replaces lots of other plugins with its functionality. I’ve been very happy with it.
Regards,
Martin.