

Visit Library for MBP Pro eBooks |
OK, so I can almost see some of you rolling your eyes as we get into this one, but I wanted to update you on my latest crazy project, which is turning out to be, as I expected, a bit of a rabbit hole. Partly influenced by my friend Don Komarechka's latest book Macro Photography : The Universe At Our Feet, and to satisfy a childhood desire that was never realized, I decided to buy a microscope, and see where it leads me. Now, of course, my main goal is photography, not research, so there are a number of things that I've kept in mind, and a number of things that I'm learning along the way, that I feel may be useful, so in true MBP form, I'm going to share my journey with you.
As we get started, I want to make it totally clear that this is me sharing my findings as a complete newbie. The first time I ever looked through a microscope was last Friday (April 23, 2021). That may surprise those of you with a half-decent education, but unfortunately, that opportunity passed me by, so here I am, at 54 years of age, looking through a microscope for the first time. Luckily for me, I never grew up, so the wonder is there, and I'm finding myself giggling like a teenager each time I drop a new slide onto the mechanical stage and peer through the dual eyepieces at yet another wonder. I'll explain what I've bought shortly, but need to give you more background first, as I really am scrambling my way through this, trying to set myself up with the necessities, while trying to avoid spending too much money, so I'm working in relatively small but planned stages.
The first step was to order a Compound Microscope. I was aware when I placed my order that this may not be ideal for some of the work that I want to do, and after my initial experimentation, I have confirmed that I am going to pick up a Stereo Zoom Microscope, and I'll explain the difference as I understand it so that you can follow along with my adventure. I'm also doing this in stages because I wanted to see what I could do with the lower-priced Compound Microscope and get a better overall understanding before taking the plunge on a Stereo Microscope which is more than double the price.
I also needed a little more time to figure out how to take photos of the specimens I'm studying, and my ultimate goal is to make something that could be considered art, rather than a simple documentation of the minutia around us. I know infinitely more now than I did four days ago, but I am fully aware that I'm still very, very new to all of this, so a seasoned researcher or micrograph expert will probably also be rolling their eyes as we get into this.
There are, of course, other types of microscopes, but they are out of reach for me financially. I'm already stretching myself, but this itch needs to be scratched, so I'm just trying to work as carefully as possible to avoid overdoing it. As one last caveat that I feel I need to cover, if this all leads to very little, and my itch is sufficiently scratched, I may end up selling everything that I buy and simply move on. Fortunately, we have a relatively good second-hand market here in Japan, so if it comes to that, it won't cost me a lot of money and I'll have had fun in the process.
If this goes well, and I find myself getting the results I'm hoping for photographically, then I'll put together a few pages to share more information. I've found a number of sites out there, some better than others, but perhaps due to the nature of this field, I feel that the information is often presented in a relatively dry way that is sometimes difficult to understand. If I build enough knowledge and experience to be useful to others, I'll share it in my own way, and hopefully, it will make what I'm learning a little more accessible to others getting started, even if I'm only a few days ahead.
My First Microscope - SWIFT SW380T
So, what I've bought to get started is a relatively high-end, but not necessarily professional, compound microscope from a company called Swift, and the model number is SW380T. I'm going to include Amazon links for both, but if this interests you, note that if I was to only buy one microscope, I would probably go for the Stereo Microscope that I'll talk about next. Having said that, for its intended purpose, I think the SW380T is incredibly good value for money, and the build quality is excellent.
I chose this microscope because it has mainly very good reviews on Amazon, and it comes with two sets of eyepieces, one pair of 10X wide-field eyepieces, and a second pair of 25X eyepieces. These provide a part of the overall magnification of the microscope. The second part of the magnification equation comes from the objective lens, which sits directly above the specimen. The microscope's nosepiece houses four objective lenses, starting with a 4X lens, which coupled with the 10X eyepieces gives me 40X magnification. The second is a 10X objective, for 100X magnification, then a 40X objective for 400X magnification, and a 100X objective for 1000X magnification. If I switch to the 25X eyepieces I get a maximum of 2500X magnification.
Although this is probably run of the mill for a seasoned user, I found it pretty interesting and somewhat disturbing to find that to use the 100X objective lens, I have to apply a drop of oil to the top of the specimen slide and then rotate the lens into place, actually coming into contact with the oil. When you're finished you have to wipe the oil off with lens cleaning paper. Because of this, if I decide to keep this microscope I will probably pick up a 60X objective lens and switch it out for the 100X lens. The jump from 40 to 100 is huge, and I think I'd probably find the 60X objective more useful.
The Physics Are Fascinating!
With a good understanding of the physics behind my camera, and how the light travels through my lens and is focussed and adjusted by the aperture, I have found the physics behind the microscope to be truly fascinating too. As you can see in this photograph with the parts labeled, the microscope comes with a built-in LED light that sits under a slightly frosted diffuser, and this has a knob to adjust the amount of light passed up through the base of the slide. What I was not aware of or expecting, is that there is what's known as an Abbe Condenser between the LED light and the slide and this condenser unit contains an adjustable diaphragm.

What I found completely fascinating is that the image you see through the eyepieces increases in contrast as you make the diaphragm smaller, to the point that you start to see nasty diffraction halos around everything if you take it too far. It's amazing to me that the image can be affected in this way by focusing the light with the diaphragm, even though it's not actually inside the lens, like the aperture of a regular camera lens.
My Second Microscope - AmScope SM-2TZZ-LED
So, as I mentioned, and as I kind of expected, after playing around with the compound microscope for a number of days, it's pretty obvious to me that I'm not going to be able to do everything that I want to do, without being able to photograph minute subjects that are opaque, and that is going to require a Stereo Zoom Microscope. The compound microscope requires that the objects I shoot are transparent, at least to a degree, but with a stereo microscope, I can photograph pretty much anything simply by positioning it on the stage, so I've placed a second order for an AmScope SM-2TZZ-LED Professional Trinocular Stereo Zoom Microscope.
UPDATED: The AmScope SM-2TZZ-LED comes with both 10X and 20X eyepieces and two Barlow lenses which enable me to adjust the working distance, and essentially the magnification as a result. Without a Barlow lens fitted, using the 10X eyepieces the zoom range is 7-45X magnification. With the 20X eyepieces, the range is 14-90X. If I fit the 0.5X Barlow lens with the 10X eyepieces, the zoom range becomes 3.5-20X magnification. With the 2X Barlow lens and 10X eyepieces fitted the magnification ranges from 14-90X magnification and with the 20X eyepieces it becomes 28-180X magnification. Before using the compound microscope I would have thought that 180X magnification would be too short for some things, but I now know that even this range will be plenty for most of what I want to do with opaque objects.
Attaching a Camera
The next part of the puzzle has been figuring out the best way to attach a camera, once again, without breaking the bank. If you look at the photo of the microscope I already have you'll see a third cylindrical port in the top, which is the camera port. The Stereo Microscope that I have on order also has a camera port of the same size, so whatever I decide should be compatible with both microscopes.
I've spent a lot of time researching this, and I basically narrowed it down to two options, the first of which is dedicated microscope cameras. Both systems that I have bought into, Swift and AmScope, have their own cameras. They look fine, but the maximum resolution I can see available at this point is 20 megapixels. That is very respectable and may end up being what I go with, but they seem somewhat overpriced for what they are.
Another benefit of going with the cameras from these microscope manufacturers is that they provide detailed information about the size of the subjects you are working with through the accompanying software. That will be useful, although I am probably going to pass on this option.
The second option is to use an adapter to attach my Canon EOS R5 to the camera port on these microscopes. I've seen a lot of adapters online, but most of them are simply tubes that allow you to connect the camera to the camera port, without any additional optics, and most of the reviews show that this provides quite poor image quality. The system that I'm looking at from a company called Wraymer includes what's known as a relay lens which also doubles the image size, which will give me a full 45-megapixel image of the center of the image circle from the microscopes, essentially cropping out the largest possible 3:2 aspect ratio image, so I am not photographing a circle of information and then having to crop away the black corners.
The other great benefit to this option is that they have an EOS RF Mount adapter, so I can use it with my EOS R5. Both options also provide the ability to shoot video, but the frame rate is somewhat limited on the native manufacturer optional cameras. My R5 will probably give me better images and video if the image quality lives up to my expectation. There is another option that I researched that I know would work great, but at around $1,500, almost double what I'll pay for both microscopes and the Wraymer adapter, so it's just too costly for me to justify at this point. Again, I'll keep you posted on this option, but I think the Wraymer option is going to be the way to go.
Shooting Through the Eyepiece
I should also mention that I have experimented with another way to make photographs of what I'm seeing, which is to simply photograph directly through one of the two eyepieces on the compound microscope. This works but is very cumbersome and time-consuming. I initially tried just hand-holding my camera and pointing it into the eyepiece, and the images are just not very sharp. I then tried using a tripod and although this enabled me to get some shots, aligning the camera with the eyepiece so that it's in exactly the right position and square to the image plane takes a number of minutes, and then because the camera is in the way, you have to work on the LCD of the camera, or set up a tethering session to a computer.
When I get my Stereo Microscope in a week or so, I will hopefully have an adapter by then too, and I understand that to use the camera port on that you have to pull out a stopper that shifts the prism over to switch the image from the stereo eyepieces to the camera port. You can't use them both at the same time, so I will be setting up tethering anyway so that I can look at my subjects and shoot directly to my computer with that, but with the compound microscope, I can use both the camera port and eyepieces at the same time, so it's more tempting to just have the camera set up for when I'm ready to record an image or video, but do most of the work through the eyepieces.
Here is a photo that I shot through the eyepiece, of a cross-section of a Pine Needle, from a set of 50 prepared slides that I bought to give myself something to look at as I got started. It's a fascinating set to look through, and at a little over $20 great value, although some of the slides are of poor quality.
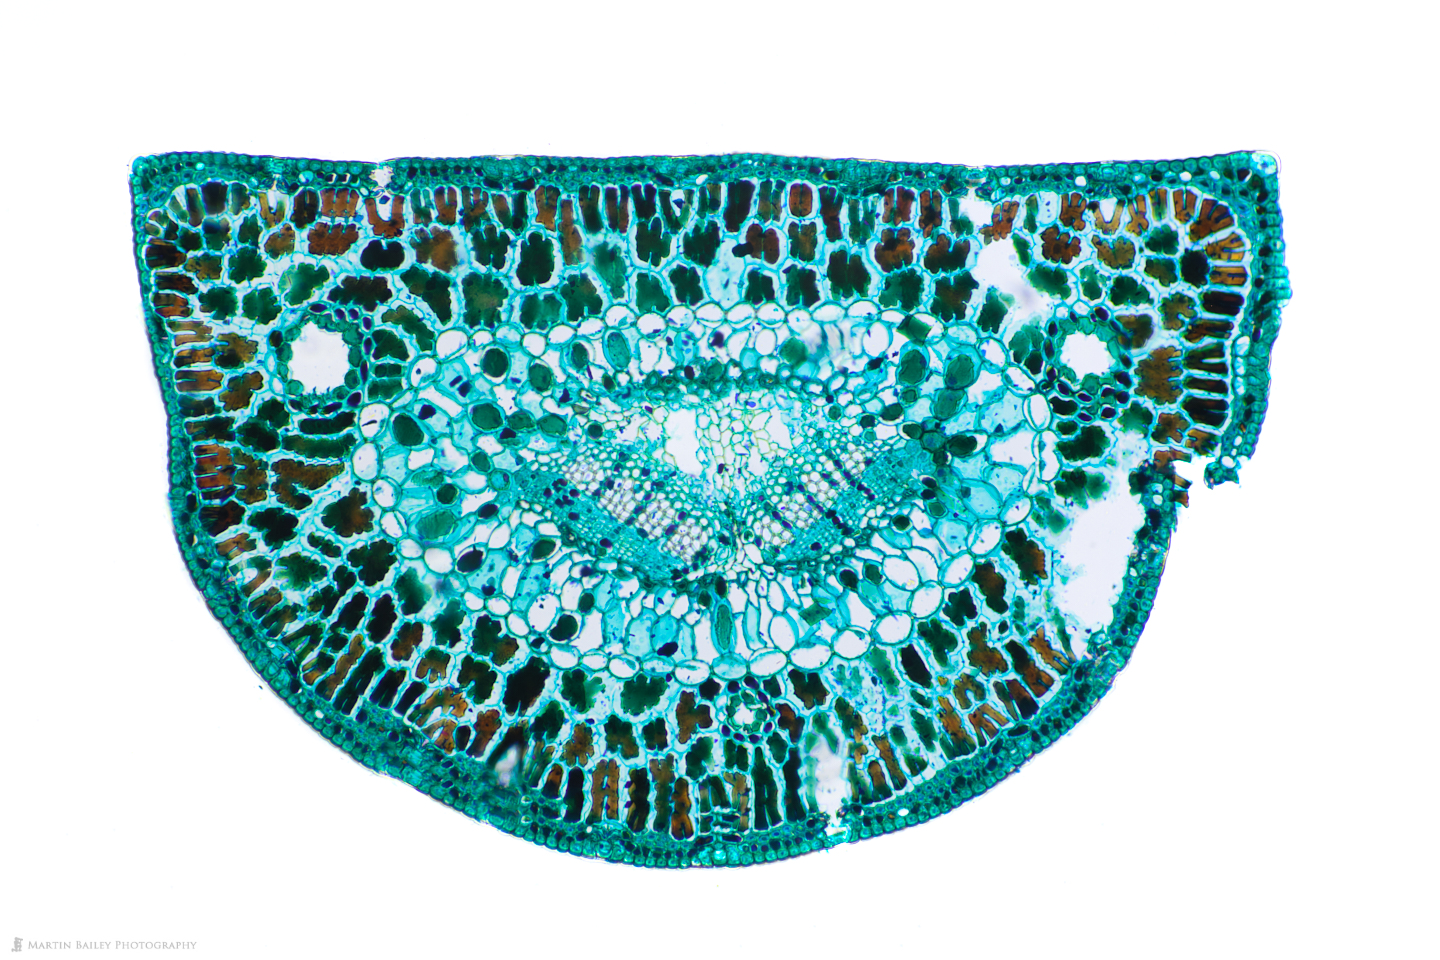
This is probably a very common photo with a microscope or micrograph, as they seem to be called, but I'm having fun and will try to move on to other specimens quickly. To make this photo I used my Canon EOS R5 with the RT to EF Mount Adapter and used my 40mm pancake lens because this was the only one I could find that actually worked. The lens has to be relatively short to be able to focus, although the optics of this almost toy lens aren't great. Still, it works, but cumbersome as I say, so I'll continue working on the photography side and report back over the next few weeks.
My Goals
Ultimately, I'm hoping to be able to get photos of tiny creatures and objects that feel somewhat artistic. I'm not necessarily intending to use the white background that I get with the compound microscope, and I won't necessarily be working with partially transparent subjects. One thing that I have found is that there is a technique called Dark Field microscopy, where you use a small black disk to block the light from hitting the bottom of the subjects on the slide directly but allows the light to spill onto the subject from around the edges. I've tried with a makeshift filter and it's possible, but I've ended up ordering a set of these filters that sit in the holder below the diaphragm of my compound microscope and will enable me to shoot subjects in what will perhaps be a much more pleasing light for some subjects.
Will I Keep the Compound Microscope?
The big decision that I have to make over the next few weeks as I get more into this, is whether or not I'm going to keep the Compound Microscope. I really like being able to view subjects at such high magnifications, but as far as imaging is concerned, I think 100X magnification is going to be the most useful, and I may occasionally use the 400X magnification, but if I decide to keep this microscope, The stereo microscope that is on its way comes with a 2X Barlow lens which will take my magnification to 180X, and I am pretty sure that this is going to be enough for the vast majority of what I want to do.
I'm going to give the compound microscope a good run for its money before I make my final decision though. I am finding it fascinating and a lot of fun, and as I work on my ability to prepare my own slides, maybe the answer will be to simply keep and use both microscopes for their own unique capabilities. I'll keep plugging away at this and let you know how I get on soon. The government's handling of the pandemic here in Japan is proving them to be less than incompetent, as we enter our third state of emergency, so getting out and about is still challenging. This is another reason why I'm looking past what the naked eye can see, and learning new things has always been one of my major driving forces. Right now I feel as though I'm drinking from a fire hose, and I like that.
Show Notes
SWIFT SW380T Compound Microscope on Amazon: https://amzn.to/3tUp9il
The Amscope SM-2TZZ-LED Stereo Zoom Microscope: https://amzn.to/3t0m67f
Audio
Subscribe in iTunes to get Podcasts delivered automatically to your computer.
Download this Podcast as an MP3 with Chapters.
Visit this page for help on how to view the images in MP3 files.

Just a suggestion of course, but wait a good while before deciding on whether or not to ditch the compound scope. I think you may, with a bit of time, develop a deeper appreciation for what your photographer’s eye can see at high magnification levels. Prepared slides may be your best bet for the highest mag range but, since they’ll likely come stained appropriate for subject (as with your example image), you’ll have a chance to see what color combinations have evolved over time to help elucidate things at the microstructural and cellular level in the biological realm while exploring purely for visual interest. In the non-biological, including the formerly living non-biologicals (micro-scale fossils), your early explorations with light source manipulation will yield additional rewards.
I’m envious!
Hi Duane,
Thanks for the advice, and you’ll be pleased to hear that I have already decided to keep both scopes. The Stereo Microscope arrived on Friday and is incredible, but it’s obvious that I’ll need both to do what I want to do.
I have also improved my technique for slicing specimens and I’ve bought some staining fluids, and have studied more what I need to do. My first specimen, a slice of grass stem, shrivel up as the gum media dried, so I need to study and understand more how to create permanent slides. From memory, I think I read that I have to dehydrate the specimen gradually with diluted ethanol before dropping on the media and glass cover. If you have any tips please let me know.
I think my initial reaction was based on a steeper than expected learning curve and not really wanting to fork out for both scopes in such a short space of time. I’m feeling much better with all of my decisions now, and it’s obvious I need both scopes.
I also now have a camera adapter which is not great, but with some processing and lots of image stacking the results are getting better and easier to achieve. I have some IPA and citric acid arriving today so I’m going to make some slides and see if I can create some crystals then polarize them.
I appreciate your advice Duane. It helps me know know that I’m on the right track. Please let me know if you notice any stupid mistakes as I continue to learn this stuff.
Regards,
Martin.