
In the spirit of sharing new things I learn as I live my photography-centric life, today I'd like to talk about a few new tools that I am finding both fun and useful. These are not necessarily photography related but are certainly useful to anyone that needs to communicate with others as part of their business day. These services are not new either. They've been around for a while, but I have really just pulled them into my business, and my goal for this Podcast has always been to share where I'm at, in the hope that you might find some of what I'm doing useful.
Scheduling Solution
So, to provide a little background, until this week I have been using a WooCommerce plugin called Bookings, that integrated with WooCommerce store on this website, and enabled me to configure the times that I am available for meetings or other work like consultation sessions, and it also kind of synchronized with my calendar, so that it would not book meetings or work at times when I had other appointments booked.
It worked, and I liked that I could use the system for both paid and non-paid meetings, and provide my professional looking invoices automatically, but it was cumbersome and required a lot of maintenance to tell the system when I was not going to be available, and it also ate up a fair amount of system resources, as it constantly polled my calendar for updates.
Calendly
As part of my preparation for the new Mentorship service that I'm trying really hard to complete during August, because the mentorship includes two 1-hour mentoring sessions each quarter, I decided to look more closely at a service called Calendly. I've had a Calendly account for a while now, having seen others using the service, but I never really put it to good use until now.
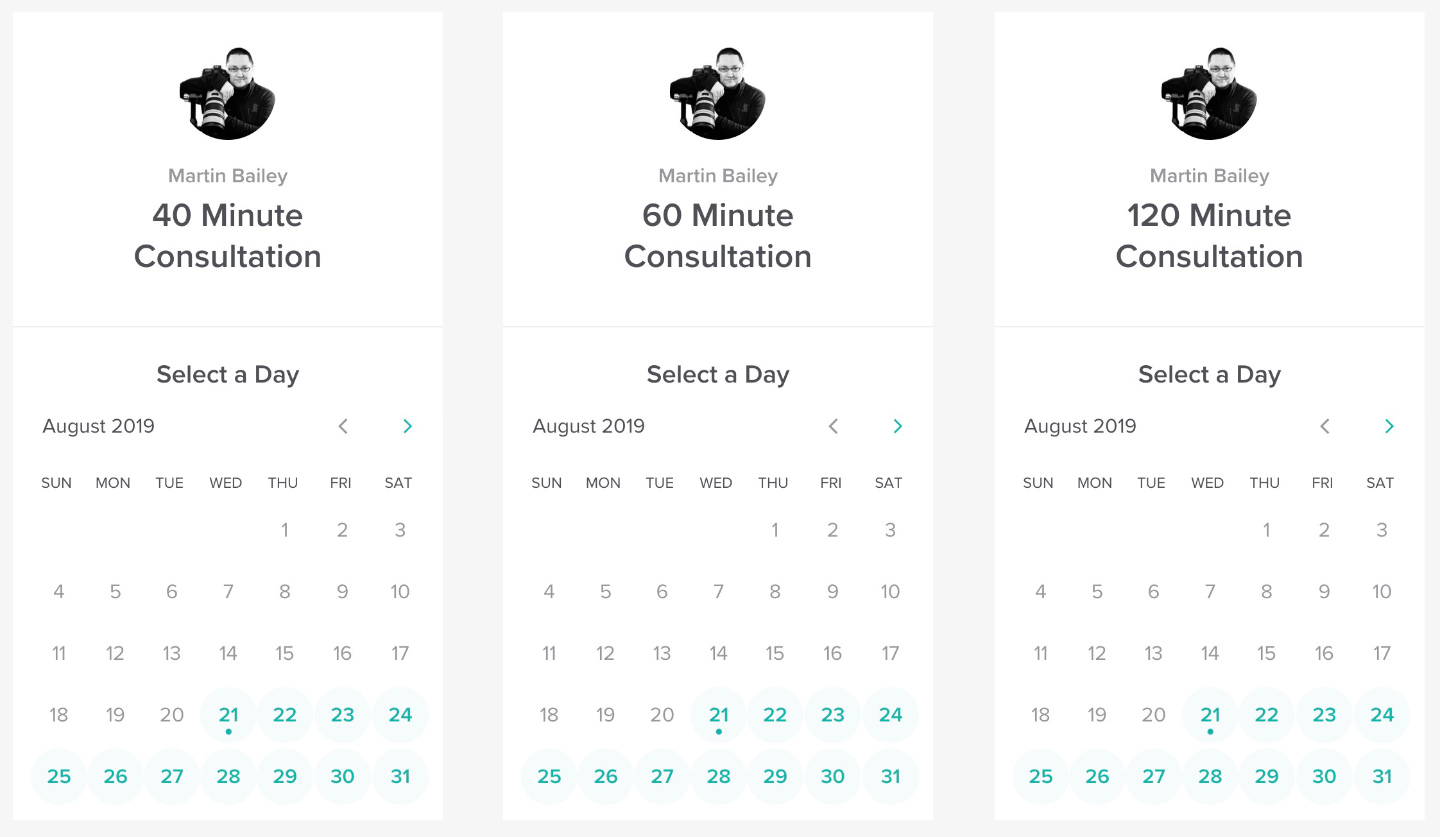
As I looked deeper into Calendly though, as a way to book the sessions included in my upcoming Mentorships, I noticed firstly that it integrated really well with both my Google and iCloud calendars, but I had to start a paid plan to sync with two calendars so I started a Premium Plan and set that all up. I was able to quickly set up a widget to embed into my website to enable Mentees to schedule their mentorship sessions, and the whole thing was much smoother than WooCommerce and the Bookings extension. As you can see from this screenshot and on my Consultancy page, the widgets embed nicely into WordPress and they look great.
Curiosity Rules
As is often the case though, once I find something that is easy to use and aesthetically pleasing, I generally start to look for other ways to use that product. I jumped deeper into the Calendly website and noticed that if I upgraded to their Pro plan, I could link with my Stripe account and start taking credit card payments right there in my calendar, and this means I could stop using WooCommerce Bookings completely and save my own system resources even more. So, I thought about this for a few more hours, basically, as I slept, then when I got up the next day, I upgraded my account again and set up the paid sessions and uninstalled WooCommerce Bookings.
Zoom
Other things that I like about Calendly is that they send an email to both me and the person booking the meeting or consultation, and automatically place everything in my calendar, but another reason for starting one of their paid plans, was because that allowed me to integrate with zoom and embed my conference call details and links to the calendar as well. Zoom is another service that I've been using for a while on a free plan. It's basically a teleconferencing service, that I'm sure you've already heard of or use, but like Calendly, they are doing a really good job on the aesthetics and ease of use, and they also have some pretty neat features that I unearthed as I dug deeper into their system, that quickly made me upgrade to a paid plan here as well.
The first thing I found interesting was the ability to automatically record both the audio and video from calls either to the local computer or into 1GB of cloud storage that comes with a paid plan. Another benefit of the paid plan is that it lifts the 40 minute recording time limit to up to 24 hours, which means I can use zoom to record podcasts with both the video and audio.
Virtual Backgrounds
I mentioned fun in the introduction, and I'm sure you're thinking so far that none of this is really fun, so let's get into this. I noticed an option in the zoom Preferences called Virtual Background. There are only a few options, with one being to add the images that will be used as a background, and the second was to tell the zoom software that you are using a green screen. When you use a green screen, you essentially enable the software to do a much better job of replacing your actual background with your Virtual Background, and I'm finding that the implementation is zoom is really quite accurate, and to me, looks relatively convincing.
The Green Screen
You have to completely block out your background with the green screen for this to work. Here is a photograph of my green screen behind my chair at my desk. I have a 180cm wide green screen which fits perfectly with two bars of my four-bar background support system, and that is just enough, if I place it close to the back of my chair as you see here, my webcam sees nothing but green behind me. I have also set up an LED video light behind my second display so that I can better control the direction and amount of light that hits me as I talk.
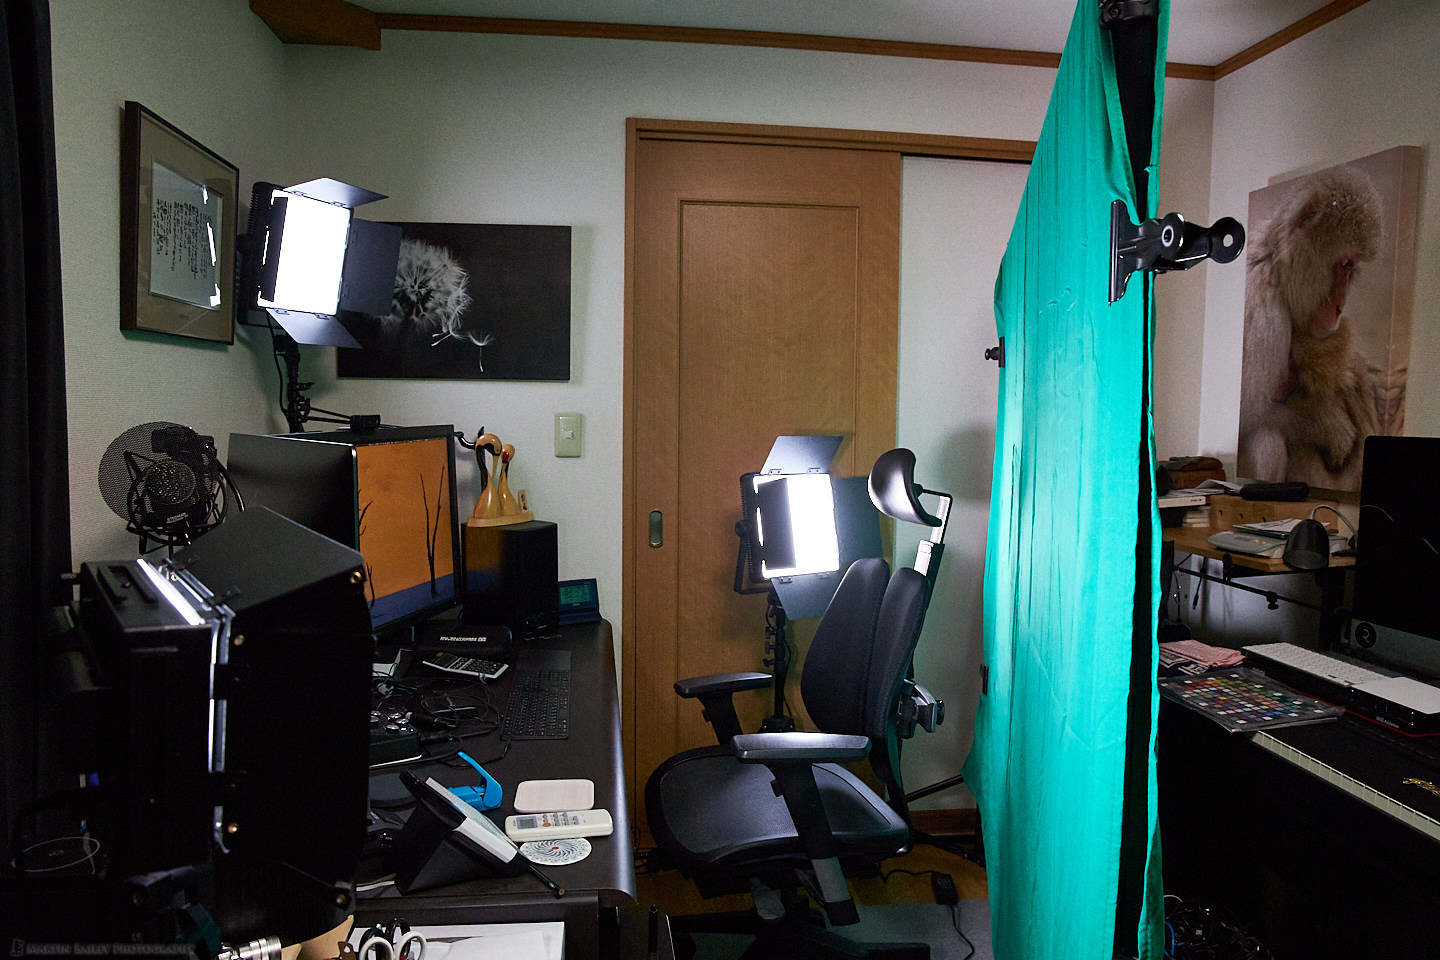
Notice too that I set up a second LED video light to illuminate the far-side of my green screen, and a third in the foreground, illuminating the near-side of the green screen. This is required to ensure that the screen is relatively evenly lit. You can see the areas that need more light because the real background starts to show through where there isn't enough light hitting the green screen.
Quick Example Video
To show you briefly what the video looks like, I recorded a short video within zoom, which I've embedded below, so if you are listening with the audio player, please pause that player and take a listen to the video before moving on.
Actually, as I finalized preparation for this post, I just recorded an interview with Aaron Nace of PHLEARN and used the green screen, and found that my white face looks a little too different color from the warmer background, so I'm going to switch my video lights around, because the smaller one closest to the camera in this shot has a white balance knob that enables me to merge between white and orange LEDs, to warm up my skin tones a little, so it would probably be better for the main light on my face in future.
Creating the Background
You can actually just use any image you want as your background and pretend you are pretty much anywhere, but I decided to mockup a scene that I'd love to be in a position to actually work from, and that's a nice spacy gallery, with some big prints on my wall. I have prints on my wall here in my studio, but the other computers and storage, etc. make it a somewhat cluttered environment, so I figured I'd have some fun and create something closer to my dream background, as you can see in the video.
I've actually at this point created two mockups, one showing two walls of my virtual gallery, and the other showing the side-wall that would be to my left if this was a real space. I got the original images from Shutterstock and placed my own photographs over the blank canvases that are like placeholders in the image. To finish it off, I added my logo to the wall in a prominent location, as a bit of marketing, and added multiple shadows to the logo, as though there were really three lights shining on it.
Fantastical
OK, so there is one last application that I'd like to talk about before we finish, and that is Fantastical. This is another app that I've had my eye on for a while, but figured I'd buy a license at the this point to give myself a little bit more control over my various calendars now that I've linked up with Calendly, and in turn to Zoom.
Fantastical is, in my humble opinion way overpriced, at ¥6,000 for me here in Japan, which is about $56, and then you have a pay again for the iOS version. But, again, aesthetically is much more pleasing to look at than the standard Mac OS Calendar app, and it seems slightly easier to add appointments etc.
Another thing that I like is that you can create Calendar Sets, and so I created a Calendar called Blocked Time, that only contains a slightly extended lunch time each day, and time for evening meals, as well as time to wake up slow on the weekends, and evening time on the weekend that I prefer to spend with my wife, rather than being in meetings. I then created a Default Calendar view, and unchecked my Blocked Time calendar, so that I don't have to look at all of these appointments every time I open my calendar, but because they are still in the calendar, Calendly correctly blocks this time out, so that I don't end up with lots of appoints at meal times or in the evenings at weekends etc.

There are also keyboard short-cuts, using Control, then 1, 2, 3 and so-on, to open the various views that that I've created, so I don't have to go into the preferences whenever I want to see or edit my blocked time. I like this sort of feature that just makes life just a little bit easier. I know that I could do this stuff with the standard Mac OS Calendar app, but not in quite as sophisticated or aesthetically pleasing way. I would have been happier if Fantastical was half the price, and I don't say that often, but hey, they still got my money, so I can't see the price as that big a problem.
OK, so we'll wrap it up there for this week, and I'll push this out, then get back to working on the new Mentorship system that I am really trying to get finished over the next week if possible, and I look forward to introducing you to that very soon.
Show Notes
Calendly can be found here: http://calendly.com
Zoom is here: https://zoom.us
Fantastical 2 is here: https://flexibits.com/fantastical
Audio
Subscribe in iTunes to get Podcasts delivered automatically to your computer.
Download this Podcast as an MP3 with Chapters.
Visit this page for help on how to view the images in MP3 files.


The green screen is a really cool feature. I enjoyed reading your post with a half smile as I also like to try new apps/programs. Some turn out to be nice additions, others I just wonder why I keep trying new things. I think what users might take away from this post is that you really have to dig in and explore all the features available to take really learn how to use it. Thanks
Hi Mark,
Thanks for the comment.
I’m pleased you took this post at face value, getting exactly what I was hoping from it. I have tried apps that I decided later weren’t as useful as I’d hoped, often resulting in them getting deleted, but I’m enjoying these three apps/services. I generally like to make things easier, more streamlined, and/or more aesthetically pleasing. I’ll sometimes go for a better-looking program with fewer features over a crappy looking one with more features, just because it looks or feels better to use.
I guess that’s my only problem with Audacity, that I mentioned in the previous post. The UI could definitely do with a bit of a brush-up. It almost looks like a 20-year-old Windows program.
Regards,
Martin.