
Almost five years ago now I received an email asking how I would answer the question “as a wildlife photographer how do you ensure that your camera is always ready for action?" Today, five years on, I'm going to provide my thoughts on this.
The email came from Bob Brind-
I recently gave a talk to a camera club and at the end, someone asked “What do you do to ensure that, as a wildlife photographer, your camera is always ready for action?” At the time I gave a rather garbled reply but I have thought a lot about it since and recently wrote an article for my latest newsletter and to include on my website here.
Bob went on to say that he would welcome my thoughts on this, so here goes.
First of all, I'd like to start off by saying that Bob's post on this is great, although as you'd expect, there are some areas where our opinions differ. This isn't about who is right or wrong though. I imagine that you'll find something useful in both posts, which is why I'm linking to Bob's as well, and I do encourage you to read it.
I've referenced Bob's post to see what areas he has included, and tried to provide my own advice on all of the areas that I also feel are important, and added a number of additional sections that I thought of as I wrote, so I hope you find this useful.
Us as Much as the Camera
I'd actually like to start off by saying that with all due respect the question itself needs a bit of a tweak, at least as far as my own response goes. Asking how to ensure that the "camera" is ready for action to my mind belittles the part that the photographer plays in the making a photograph. I know that this is not the intention of the person who asked the question, but I would have much preferred the question to be: "What do you do to ensure that you are always ready to shoot?"
Bob starts his article off with a mention of the importance of practicing our craft and gaining the experience required to help us make the right decision
Oh My Goshawk!
In fact, I'd go so far as to say that on occasion, there won't even be time to think. During my Complete Namibia Tour & Workshop in 2017, we were driving along a dirt road in the Etosha National Park, when we saw a Southern Pale Chanting Goshawk dart down to catch a skink, and literally while the safari vehicle crunched to a halt in the dirt, I raised my camera and released the shutter, without even thinking about it.
I was on complete autopilot, to the point that when I got to the lodge that evening, it took me a few minutes to figure out why the below image was staring back at me from my computer screen. I honestly could not at first even recall shooting the image. This was partly because of the excitement as the Goshawk took his catch and stood on a small mound to eat it, and that became the main memory, but as I dug deeper, I did recall myself almost by reflex raising the camera and releasing the shutter as the vehicle screeched to a halt. I literally had one frame, and this was it.
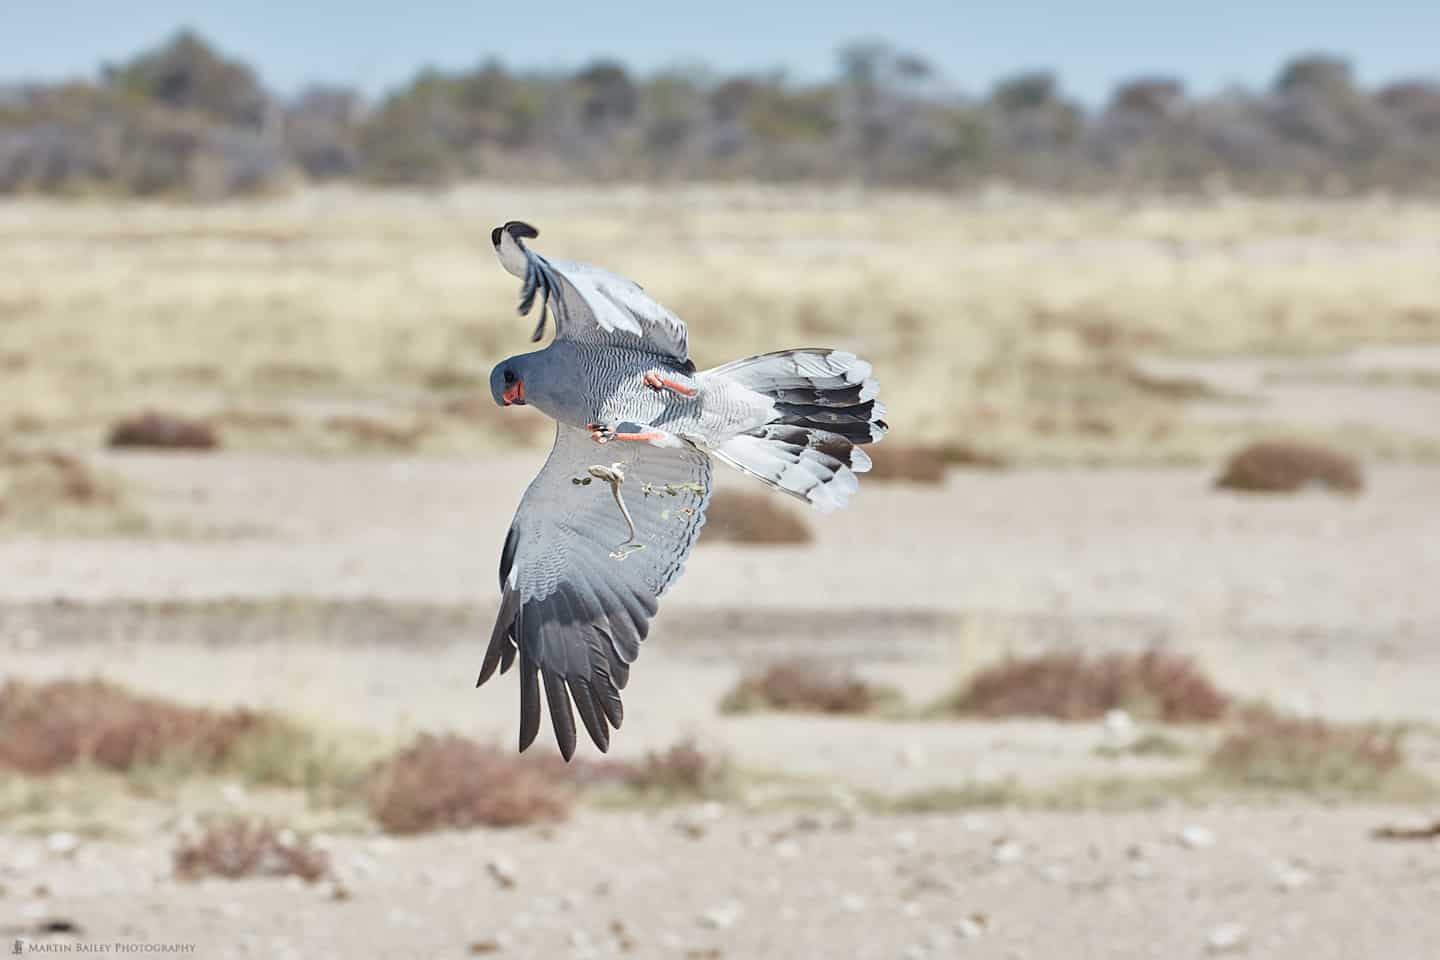
Another probable reason for my selective memory is almost undoubtedly because I ruled out the possibility of having actually successfully captured the photograph. The vehicle was still moving after all. But, sure enough, there it was, on my computer screen, so I gave myself a pat on the back for working so well on autopilot. It's not the best photo I've shot, but I'm relatively proud of my achievement. Although there was an element of pure luck, I was able to nail that photograph for a number of reasons that we'll explore here.
Make Your Camera Ready
First and foremost, is to have your camera out of the bag, ready to shoot. If you are traveling in a vehicle where you can have your camera bag sitting on the seat next to you, assuming that it's not jumping around so much that you have to zip it up while you travel, it would be fine to have the camera in the bag, but unzipped. Personally, I prefer to have my camera on my lap as we drive around, with the lens cap off and the hood fitted.
The camera is turned on, although it will go to sleep to save battery power. If you are in a dusty environment, carry a cloth large enough to drape over the camera to keep the majority of the dust off, but try not to mollycoddle your gear too much. If your camera and lens are not OK with getting a bit of dust on them, you may need to rethink your choice of gear. Of course, even the best L lenses from Canon can get a bit crunchy in dusty places, and may require more maintenance, but this is the price we pay for getting our shots.
Select an Appropriate Lens
It's really important to try and anticipate the appropriate lens to have on your camera at any one time, and that you can quickly access your other lenses in case you do need to change them. I shot the Goshawk image above with my Canon EF 100-400mm Mark II lens, set to a focal length of 248mm. I sometimes also fit an Extender or Teleconverter to the lens for a little extra reach. When shooting domestically, here in Japan, I also use my 200-400mm lens with the 1.4x Extender built-in, and that's great because I can engage the extender with the flick of a switch, but I'm finding that this is too big a lens to cart around the planet, so I rarely take it overseas, especially as the 100-400mm is so good and much more portable.
Also, if at all possible, having a second body nearby with the next lens that you are likely to need already attached can really help you capitalize on any opportunities that might come your way. In dusty
Guesstimate Your Settings Ahead of Time
In his
To ensure that I'm not fumbling with my exposure as the action unfolds though, I do set and check my exposure relatively often even as we just drive around. Although I did tweak the Highlights and Shadows sliders in Capture One Pro for my Goshawk shot, the exposure was spot on despite it being a reflex shot, simply because I had occasionally raised the camera to my eye, and tweaked my exposure based on where the caret sat on the camera's exposure meter. I might also do a test shot and check the histogram from time to time.
The reason I don't like to use an automated
Select an Appropriate Focus Mode
For Landscape work, I pretty much always use One Shot or Single Shot focusing, which is where the camera will lock on to a specific subject and stay there as long as you are holding down the AF button or shutter button. For wildlife work though, or any other type of photography where the subject is moving, I generally work in AI Servo mode or Continuous Focus.
AI Servo mode works great to track a moving subject, although it can take a bit of trial and error to arrive at some good settings initially. I'll share the settings that I have arrived at over the years, but by all
There are a number of schools of thought on whether you should use clusters of focus point, single focus points, or the entire range of available focus points. For me, with the settings that I'll share now, I find that turning on all 61 focus points works best for me, and this gives me the flexibility to recompose with the subject anywhere within the focus area, and that gives me more compositional freedom. I generally find that trying to move a focus point or cluster of focus points around the frame manually is to restrictive, and in my experience unnecessary, because my method works fine with all focus points enabled.
To set my Canon EOS 5Ds R to use all 61 focus points, I hit the AF Point Selection button in the top right corner on the back of the camera, and then press the multifunction or M.Fn button that you'll find above and to the left of the shutter button to cycle through the AF modes, until I see the letters AF in the viewfinder, as opposed to SEL. If you turn on the LCD you'll see what I have in the below image.
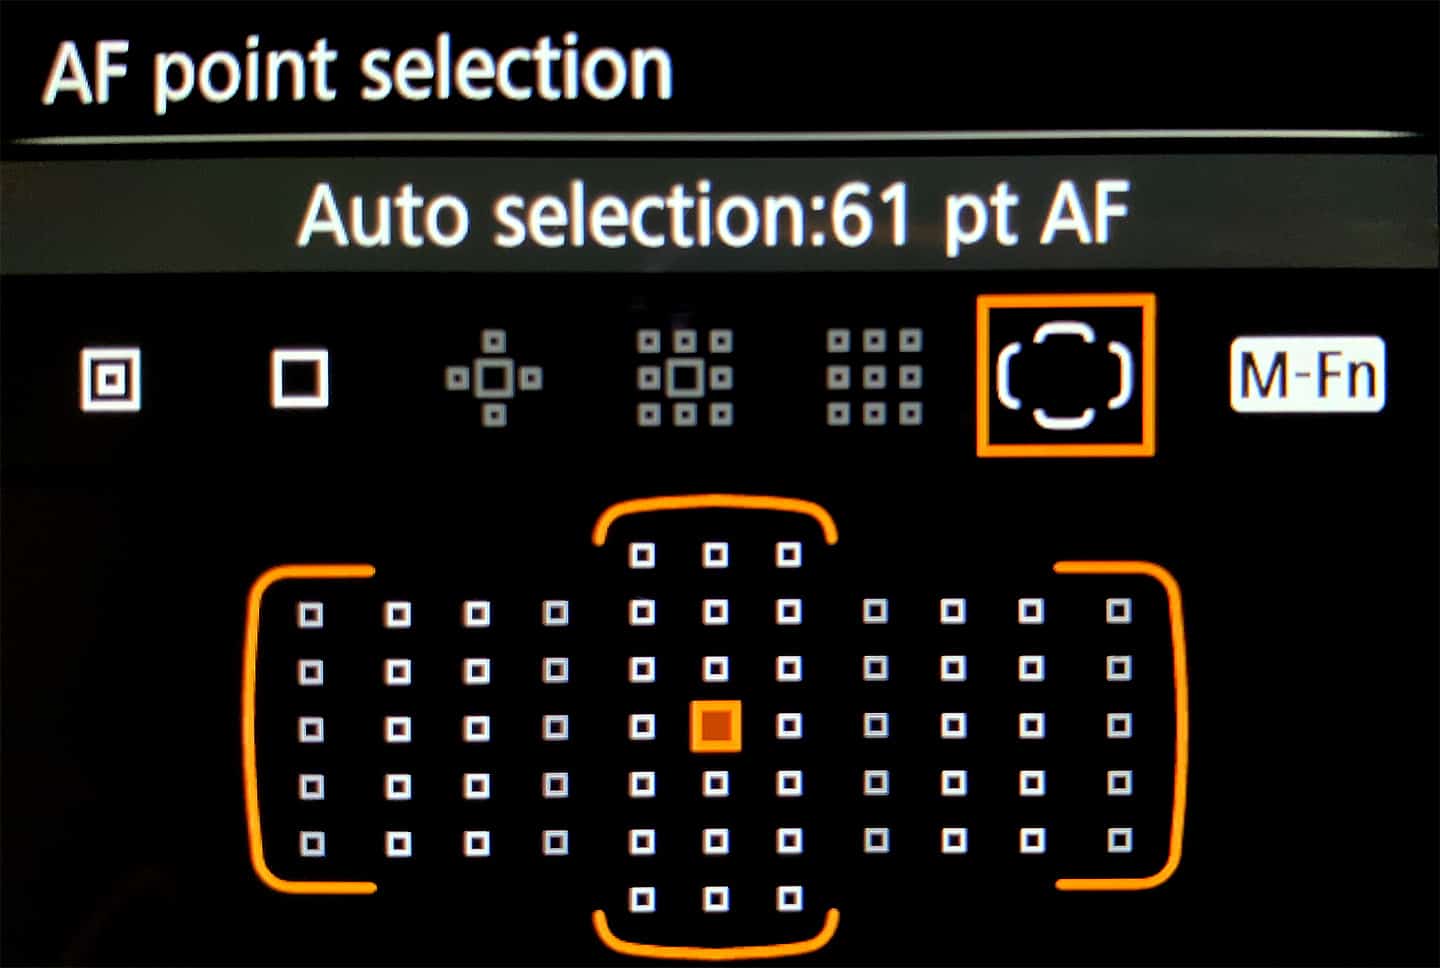
If you find this mode greyed out, like the three cluster modes to the left of the selected mode in this photo, go to the Select AF area selection mode option in your AF menu, and turn on the checkbox to enable this mode. I find that a relatively large number of people have this deactivated having read something telling them to do this online, or during a workshop, so it's worth checking that you have this enabled.
I generally leave my selected focus point in the middle of the frame, although it can be moved,
To really make all 61 AF points work the way I want them to, I have selected and tweaked the three settings that you see in the following image to the point that I rarely have to change them. Although this is based on Case 2 under the AF settings screen, you can see that to gain quick and easy access to these settings, I add them to My Menu.
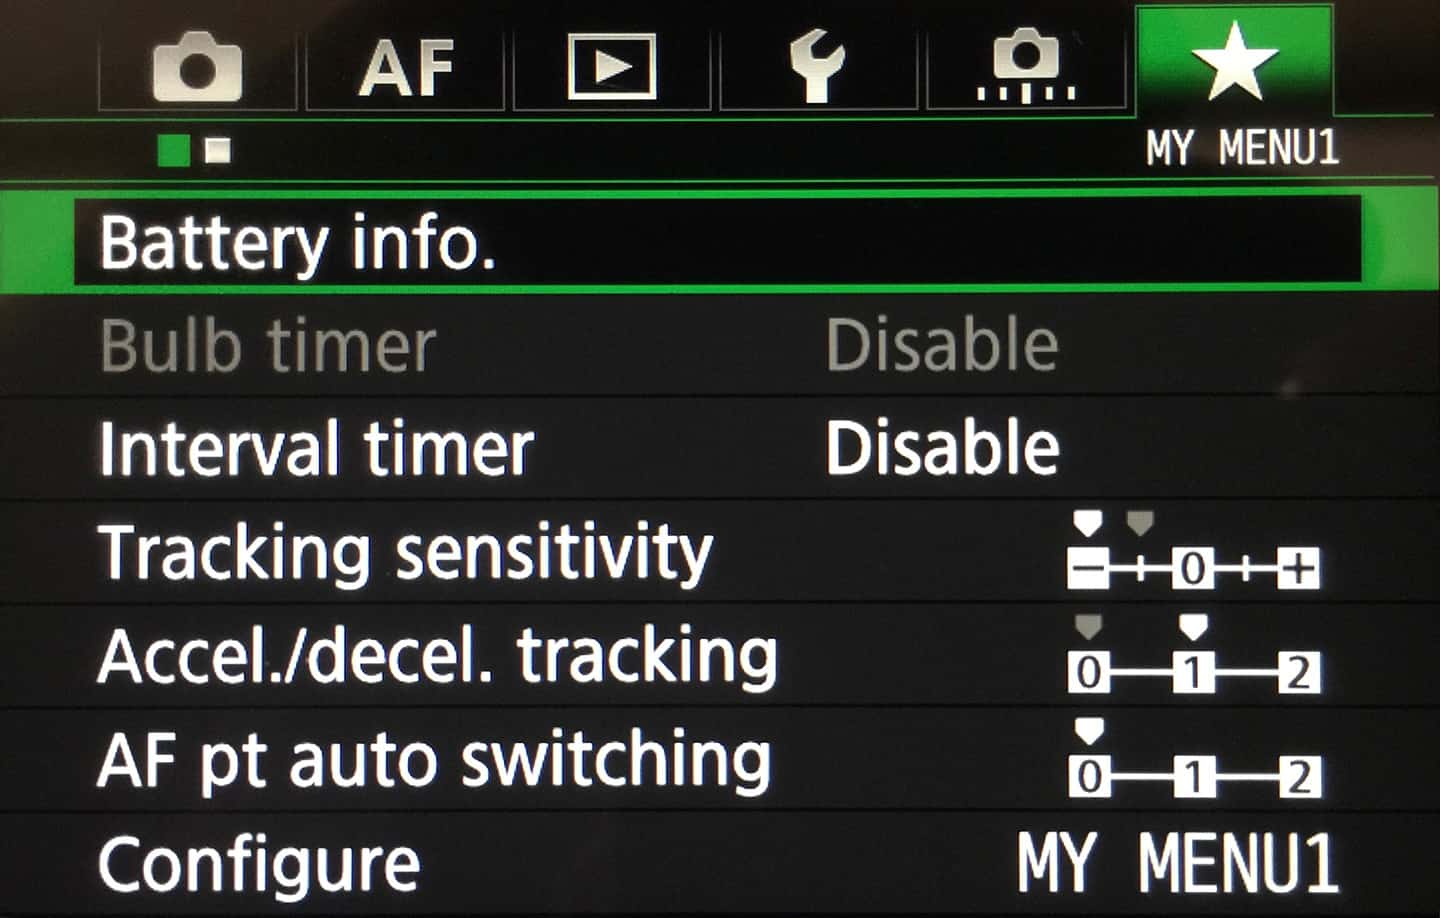
I adjust the Tracking Sensitivity to minus
Back AF Button Focus
I also set my camera up so that my shutter button does not activate the autofocus. It only focuses when I press the AF button on the back of the camera with my thumb. This enables me to quickly change between three focus modes. If
Being able to switch between modes like this is really helpful when photographing wildlife because I can choose to focus as the subject is moving around, but if they are stationary, I can get focus, but then take my thumb off the back AF button as I wait for them to do something interesting. It also enables me to stop focusing if I want to recompose to the point where their head or whatever part of their body that I'm focusing on is outside of the focus area. If the camera tries to focus when I half press the shutter button, it makes it more difficult to do this. It's possible, but you have to keep the shutter button half pressed as you recompose, and when you are waiting for a specific expression or action that can mean half pressing for a very long time.
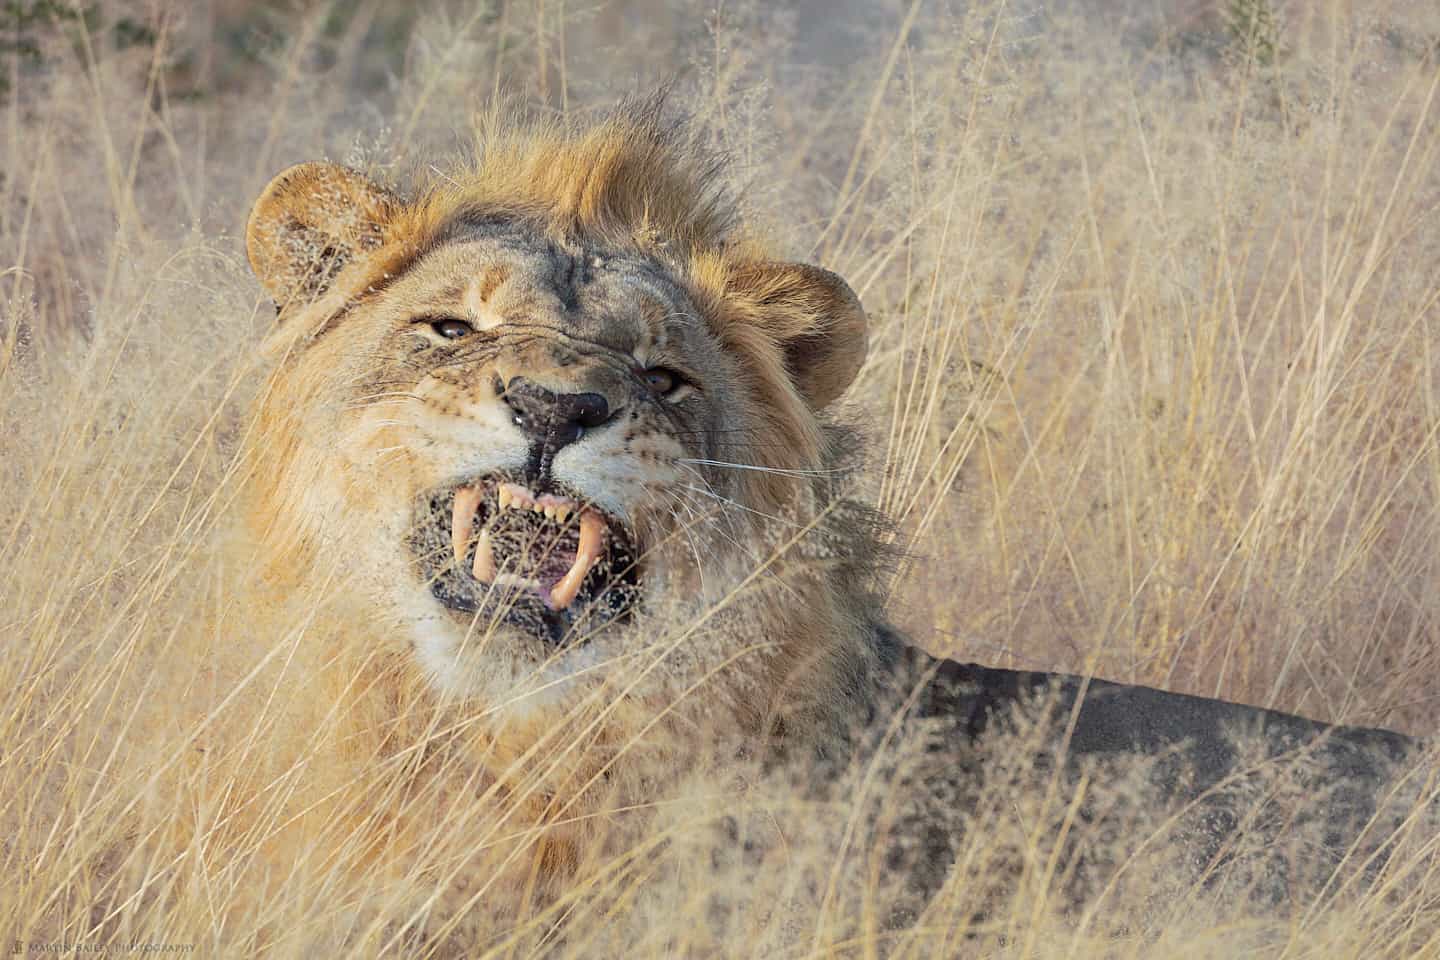
When I photographed the lion in this image earlier this year in Namibia, I was able to gain focus on the lion's eyes before he yawned, and then simply take my finger off the AF button as he kicked his head back, and then lowered it down again after the yawn for this photograph. The whole time his eyes were sharp, thanks to my focusing methods.
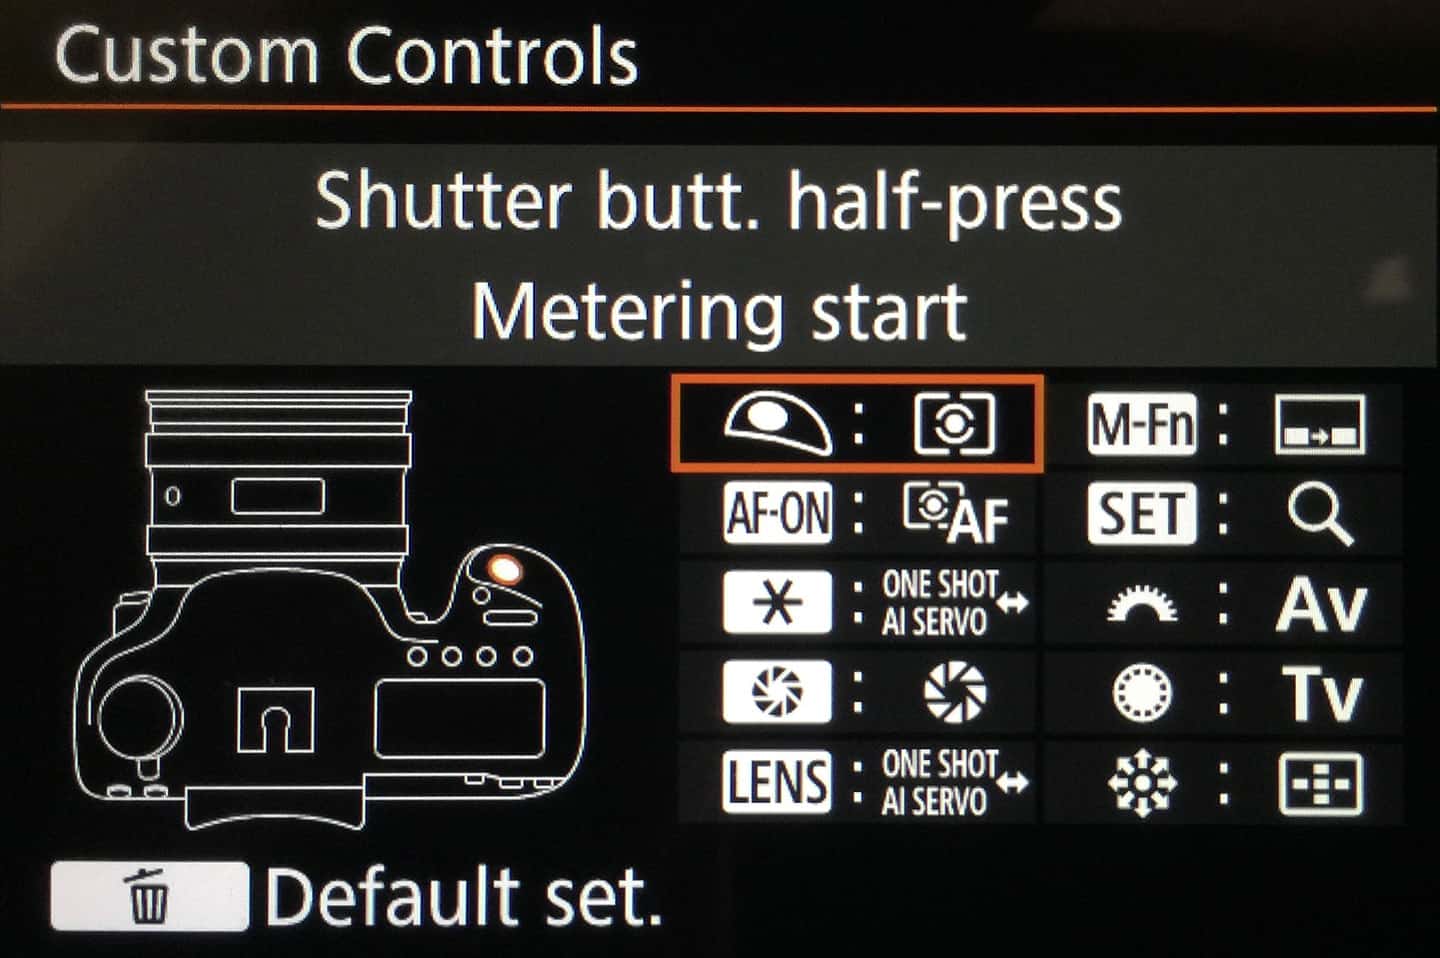
By the way, to set my Canon EOS 5Ds R to not focus with the shutter button, I go to the Custom Controls menu that you can see in the above image and it's the first option in the list. Just select Shutter button half-press Metering Start. Please note though that you will almost certainly forget to focus a few times before you get used to using the back AF button, so I don't recommend you do this while attending a photography tour or workshop. Do it at home and practice using this method a lot before an important or expensive trip.
Note too that occasionally I will lose focus while actively tracking a subject, but you quickly get into the habit of just lifting your thumb off the AF button and pressing it again, to regain focus.
Stop Down Your Aperture Some
Although it's common for wildlife photographer's to shoot with their lenses aperture wide open, I personally don't think this is a good idea. The depth of field when wide open is too shallow to even get most of
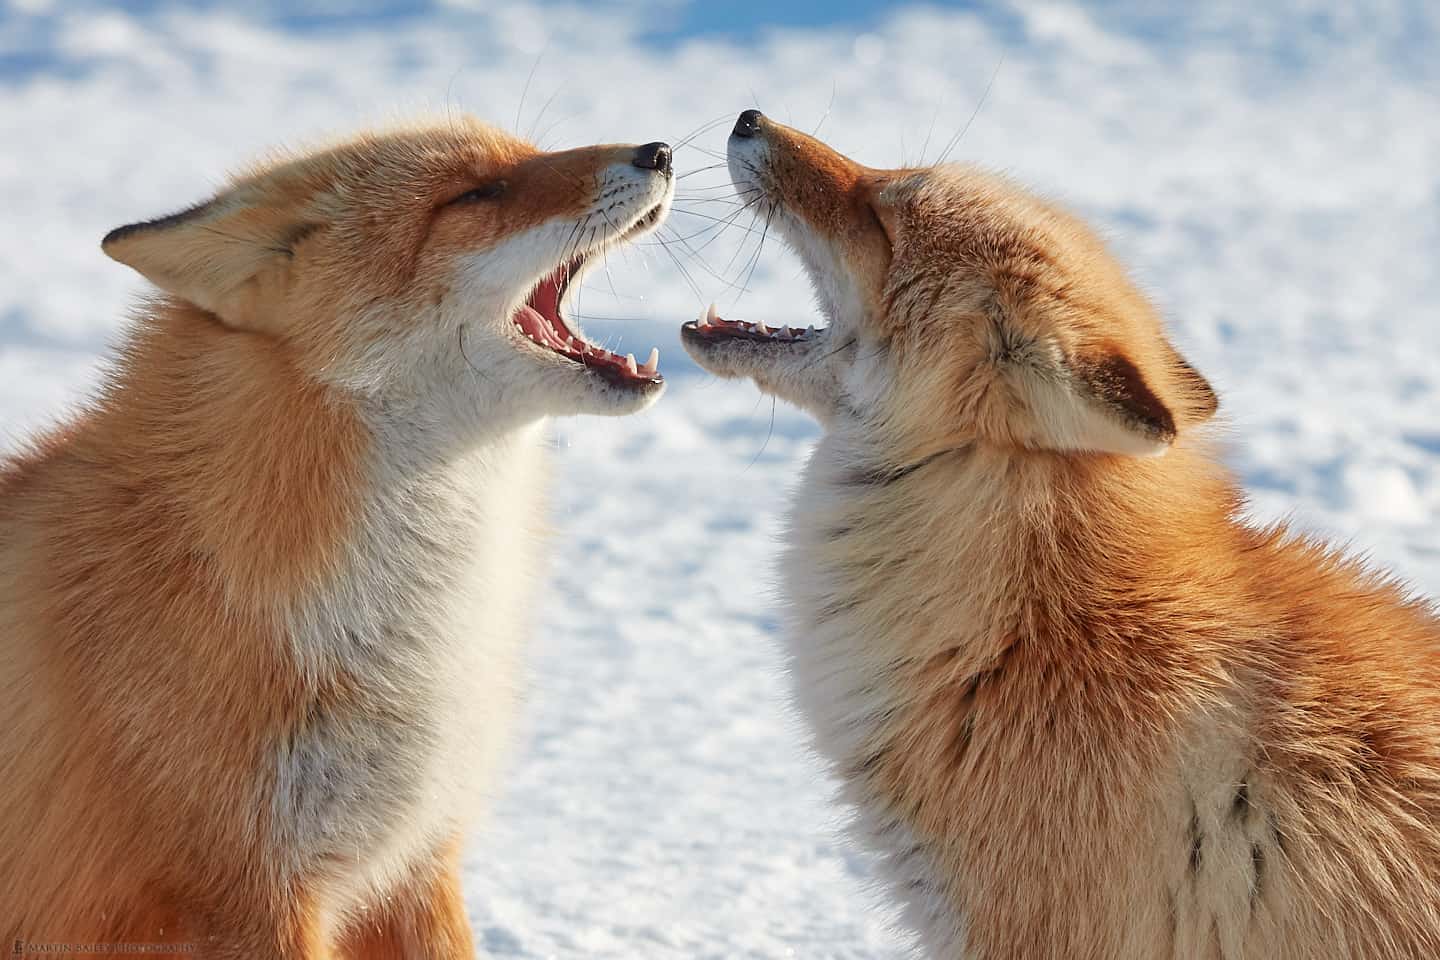
For sure, if the eyes in your subject are sharp, it's generally going to work out fine, but I like to see a little bit more detail in my subject, and so I tend to shoot at between f/8 and f/11 most of the time for wildlife. This is especially important if there are two subjects in your frame. You'd think that even stopping down to f/10 or so would be enough, but as you can see from the blown up area showing the heads of these two red-crowned crane's singing, even at f/14, the back of the two cranes is getting

If we use my iOS app Photographer's Friend to calculate the depth of field, we get a clearer idea of what's going on here. I can see from my EXIF data that I I was focusing at around 30 meters for this photo, and at that distance at f/14 and a focal length of 560 mm, based on the traditional calculation method of evaluating an 8 x 10 inch print at arm's length, my depth of field should be 2.4 meters or almost 8 feet.
However, if we turn on Pixel Peeper mode and set the megapixels to 50, which is the resolution of my 5Ds R camera, we find that the actual depth of field that I get is 85 cm or 2.8 feet. These birds stand over five feet tall, so it's likely that the two birds are least 3 feet apart, taking into account the compacting of the subjects because of the long focal length, and so the second bird is in fact just outside of our acceptable area of sharpness.
Timely Chimping
Regardless of the
Really though, getting good at quickly checking your exposure, then looking back at your subject to ensure that you can capture anything else that they might do is key to getting good wildlife shots. It's a very fine balance, and I'd be lying if I said that I'd never missed a shot because I was looking at the back of my camera, but the times that I have missed shots have taught me how important it is to chimp really quickly, and as seldom as necessary to get good exposure.
Use the Lock Button
Another thing I do is to turn on the Lock button on my camera, especially when I'm using a strap that allows the camera to dangle around and bump into my leg, as this can change the aperture or shutter speed without me noticing, and then I miss the shot until I realize what's happening. Under the Multi-function lock menu, I turn on the checkbox for the Main Dial, the Quick Control DIal and the Multi-controller, and then turn on the Lock switch below the Quick Control Dial on the back of the camera.
If you should forget that you have this turned on while you are shooting, when you try to change any of these dials, an L for Lock will appear on the camera's display and in the viewfinder.
Turn On Image Stabilization
Also, ensure that you turn on Image Stabilization on your lens, and check the mode. For static subjects, use Mode 1 but to stabilize shots where you are
Use Good Quality Large Memory Cards
There is also nothing worse than having to find and change a memory card as the action unfolds. I've heard people talking about using small cards because they don't want to keep all of their eggs in one basket, but
I talked with Canon about this, and they recommended that I always delete all images from the card in the camera before I formatted it, again, in the camera. They also warned against deleting images from the card on the camera and then continuing to shoot with that card, as this can lead to corrupt cards. Since I started to bear these things in mind, I've had no problems for approximately 16 years.
Then, last year, I did actually have a Sandisk CF card fail on me in the field. I was photographing a Northern Red Fox in Hokkaido during my Japan Winter Wildlife Tour and Workshop. Because I check my images on the LCD pretty regularly, as I was shooting I saw a question mark come up on the screen after the image preview flashed up very briefly. I looked and it saw immediately that the last five to ten images were not on the card.
I quickly changed cards to continue shooting, and later found that the card had developed a fault. All of the images to that point were fine, but I lost those five to ten images, and they weren't anything that I really missed. Sandisk replaced the card and it has continued to work fine to this day. I use one 256 GB CF card, which was the one that developed the fault last year, and my second card for my second body is a 128 GB CF card. I always carry two backup 64 GB cards, all Sandisk.
With this size card, I can shoot fast-paced wildlife for one or two days, even with 50-megapixel cameras, and never have to worry about changing cards in the field, and having that benefit to me far outweighs the risk of having something happen to my card. If you do use small memory cards though, at the very least, ensure that you have your spares in a place that you can get to easily, so that you don't fumble for them in the heat of the moment. Also, keep an eye on how many images you have the space for on your cards as you shoot, and change them early if necessary, when you are coming up to an important shoot.
A Place for Everything
In fact, that reminds me of something that I do, which is to decide where everything goes in my bag and my photography vest pockets, and I always keep accessories in the same place. I forget what it was right now, but during a workshop earlier this year one of my guests asked to borrow something, and I opened a specific outside pocket on my camera bag, reached in, and pulled out what they wanted without even looking inside the bag. They were impressed with how I was able to do this, but it really is important that you get to this point.
Use a Photographer's Vest
That actually leads on to another point, about using a Photographer's vest. They aren't the most fashionable item of clothing, but a good vest with lots of pockets to keep the various things that we use as we photograph is a great way to speed up and optimize your shooting workflow. I find that the more obstacles that slow us down that we can remove, the more efficiently we work, and that leads to us getting more shots.
If you have to fumble around just to put your hands on your air blower to clean the dust off your lens, you really need to think about how you carry your photography gear. If I have to put things like my air blower and lens cloth into my camera bag or suitcase as I travel to a location, I move them to my vest pockets as soon as I arrive and they stay there until I'm about to jump back on an airplane to go home.
Custom Shooting Modes
Finally, I wanted to mention that I also make use of Custom Shooting Modes, which are the C1, C2 and C3 modes on my Canon cameras. You can store all of your settings including autofocus modes, and you can set these to revert back to the settings you
You Can't Win Them All
Of course, even when bearing all of this in mind, and with years of experience behind us, we can't win them all. There will be times when something is just too fleeting, and all we're left with is a ghost of a memory to haunt us. In my experience though, it's those ghosts that drive us to be better next time, and the more we do this, the easier it gets. Creating more and more opportunities for ourselves will always help to increase our chances of nailing our shots, and hopefully a lot more often than they get away from us.
In closing, I'd like to thank Bob for his email and interest in my thoughts on this subject. Also, if you have anything that you'd like to add to the conversation, please leave a comment below. It's always nice to hear from you.
Show Notes
You can read Bob's original article here: http://www.naturesphotos.co.uk/media/Tips%20and%20techniques/Being%20prepared.pdf
Check out our iOS app Photographer's Friend here: https://mbp.ac/app
There are links to other posts that I mentioned in the text above.
Audio
Subscribe in iTunes for Enhanced Podcasts delivered automatically to your computer.
Download this Podcast in MP3 format (Audio Only).
Download this Podcast in Enhanced Podcast M4A format. This requires Apple iTunes or Quicktime to view/listen.

Hi Martin!
This is with regard to Podcast #637.
I was very interested in the advice Canon gave you re the proper use of memory cards-namely (1) deleting the images before formatting the card (which I have always done) and (2) not deleting images then continuing to use the card. That is something I have never heard of before and I’ll bet most others have also not heard of this. This sounds like it would make for an interesting podcast (the proper use of memory cards). Regards from Canada! cb
Hi Charles,
Thanks for the comment. You’re right. Not many people are aware of this. The advice I received was from an engineer at the service center, and possibly not Canon’s advice in general, so I’m not sure I want to make it a full blown post, but I have done these things for years and only had two issues, so I’m pretty sure these things are worth bearing in mind.
Cheers,
Martin.
thanks Martin! cb
Interesting, I’ve been told this has absolutely no effect on the card, it is similar to deleting a file on your hard drive, early days of memory cards maybe. So I would love to hear SanDisk’s view on this and I think I will email them, fingers crossed I get a reply 🙂
Hi Martin, thanks for sharing! I would like to practice your advice back button focus, but using a nikon d610. Some settings differ. Know it’s not the most advanced body, still enough for me at my level. I believe I can copy the basics, just to understand the difference in menues. Anyone reading this who knows? Br from Sweden
Hi Martin, Thanks for your great info. Recently in Tanzania I noticed that when I filled a card on my 1Dx the camera did not automatically switch over to the other card. I found no info on this in the manual. Should it switch over? I am not writing to both cards simultaneously.
Mike
Hi Mike,
The camera doesn’t automatically switch cards when full by default. You have to go to the SET UP1 menu and select Record func+card/folder sel, then change the Record function from Standard to Auto Switch card.
In the old copy of the manual that I have this is on page 114. Hope that helps!
Regards,
Martin.
Thank you. Big Help. Pages 118-119 in my book. It was annoying because I have disabled my lower LED screen so as to not inadvertently switch away from RAW. So when a card filled I had to take it out temporarily to switch to the other card.
Thanks again, Mike
I emailed SanDisk who at first didn’t understand the question regarding damaging a card by deleting photos in the camera, however we eventually got this reply:
deleting files or formatting the card in your camera should not affect the card’s health or the data in the card.
So I will continue with my fingers crossed 🙂
Thanks for the update Roger. You do what you feel comfortable doing. I’m sticking to my regime. I’m sure it’s fine these days. It was almost twenty years ago when I received that advice, and digital cameras were still very young. But, having had so few issues while sticking to this, I’m going to continue.
Also note that Sandisk only said “should” and that is not even close to a guarantee. 🙂
Martin, I recently found your podcasts and have found them to be quite useful. However, I’m writing now to alert you to an error in this podcast. In the next to the last paragraph (Custom Shooting Modes) you reference an earlier podcast, #587. This is incorrect. I believe you meant that to be #588: http://mbp.ac/588.
Hi Micheal,
Thanks for listening, and for letting me know about that error. I have corrected it now. Thank you!
Regards,
Martin.