
Following the release of my video on soft-proofing, I received a few questions that helped me to realize that I need to spend a little time going over the reasons that we even need to use ICC profiles, and what they actually do.
You may recall from the video I released a few weeks ago, that I talked about using ProPhoto RGB whenever possible, and some people asked if they should use this for their computer display. If you recall from the video, I showed you the ICC profiles for my two computer screens, and these were very different from my camera Profile, and my various print media profiles.
Device Capabilities and Restrictions
ProPhoto RGB is a much wider profile, larger than all of the other devices and media profiles that we might use, and this is why I recommend using it when editing our images, but you don’t need to use this for your display, or when actually printing, as these modes of outputting our images have their own limitations, and it’s these very limitations that make ICC profiles necessary in the first place.
So, the first thing to remember is that the ability to reproduce color varies depending on the device or media on which we display or output our images. ICC profiles are used to translate the colors in our image to the ones reproducible by any given device or output media. Another way to think of this is the difference between human languages. If one person only speaks English, and another only understands Japanese, they have no way to communicate. For example, I understand the color red, and the word “red” to describe that color. Now, of course, you’d be hard pushed to find a Japanese person that doesn’t understand the word “red” but assuming they don’t, when I say “red” to a Japanese person, they would not know how to process that information.
Another way to think of this is the difference between human languages. If one person only speaks English, and another only understands Japanese, they have no way to communicate. For example, I understand the color red, and the word “red” to describe that color. Now, of course, you’d be hard pushed to find a Japanese person that doesn’t understand the word “red” in English, but assuming they don’t, when I say “red” to a Japanese person, they would not know how to process that information.
Likewise, assuming I didn’t understand Japanese if a Japanese person said the word “akai” to me, I would not understand them either, and not be able to process that information. However, if we had a dictionary to map the color red to the Japanese word “akai” we could communicate. We’d both understand what red is and be able to visualize the color. On a very basic level, this is what an ICC profile does, but for millions of colors, not just one.
What Problems Exist?
Let’s take a look at the problems we are trying to overcome in a little more detail. The core piece of information that we need to keep in mind is that every device capable of displaying an image has limitations on what colors it can display. These days, our computers understand millions of colors. They understand many more colors that they can display or print. You might think that’s strange, but this is the same theory as my reason for recommending that people work in ProPhoto RGB. We need to edit with more wiggle room than we need, and then adjust this to the output device when necessary. More on this later.
To illustrate the issues we face I created a Granger Chart in Photoshop following the steps in this Luminous Landscape article. This chart (below) contains way more colors than our displays or printers have the ability to reproduce. That’s why there are some crunchy gradations in the chart, and those nasty steps in the gradations will change depending on the device on which you look at the image.
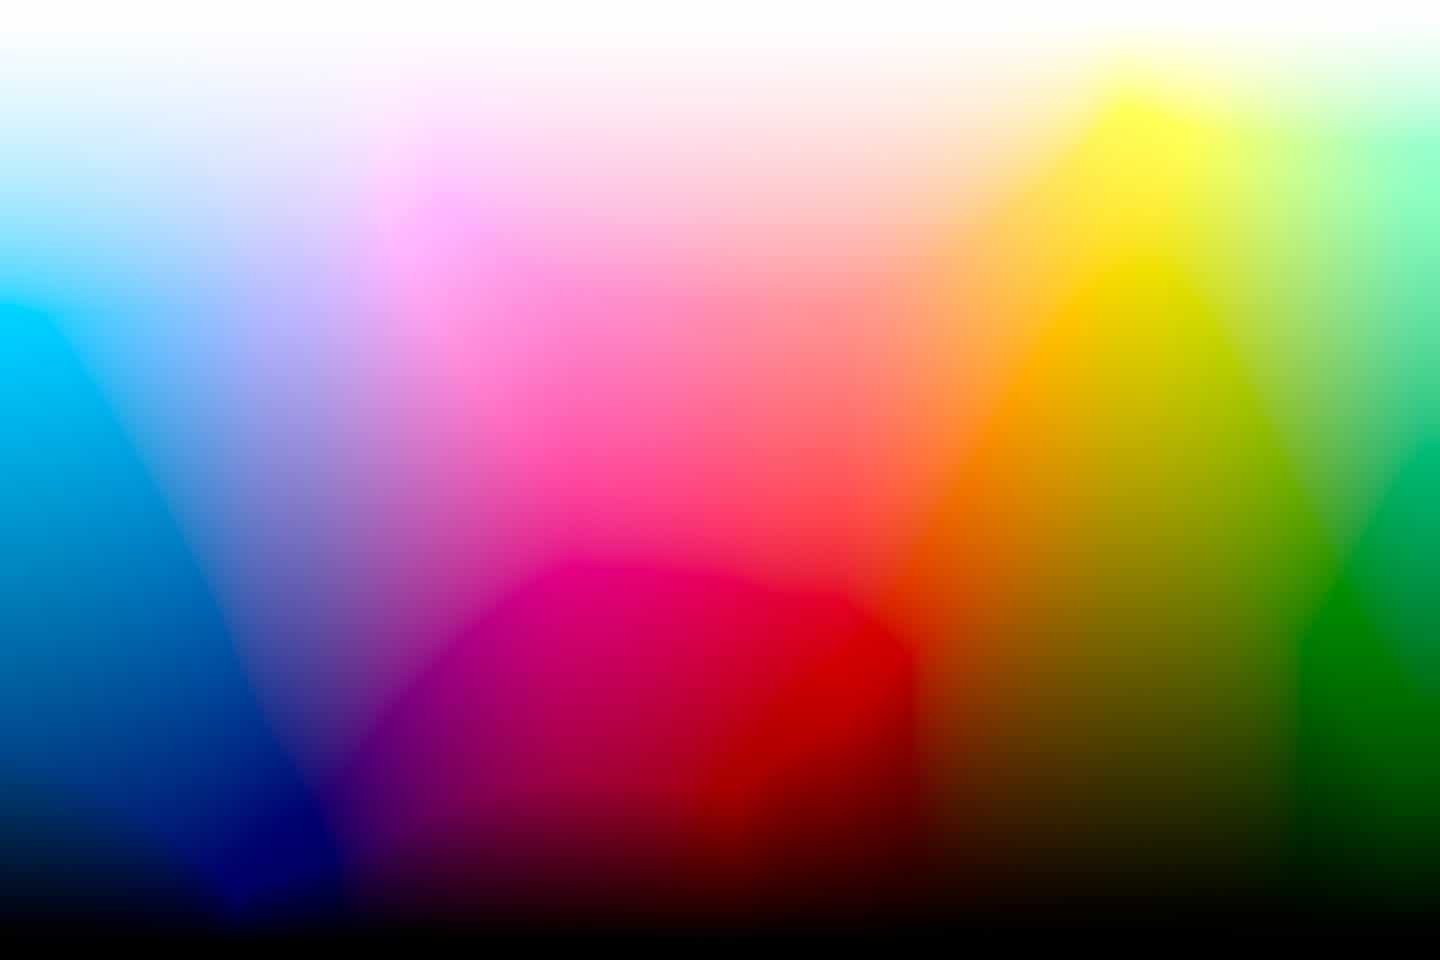
Granger Chart
Take a look at the image on two different displays, or on your phone or tablet, and you’ll see differences, ranging from very slight, to quite drastic, depending on the device. Note that I also use these charts in my printing tests sometimes, because they force the printer and media to very bluntly show us what they can and cannot do. More on that shortly too.
Note that I used ProPhoto RGB to create the chart, but I had to convert this to sRGB for the Web version, so the colors get scrunched a little during that process. This is one of the challenges we face. Although things are gradually changing, sRGB is still the standard color space for the Web. To really see the original chart, you’ll need to create one yourself. Then try moving it across displays, if you use a multi-monitor computer.
If we turn the clock back just 25 years, personal computers were just starting to be able to work in more than 256 colors, but a lot of technology was still restricted to just 256 colors. In Photoshop, using the Granger chart I created, I changed the Color Mode from 16bit color to 8bit, and selected Indexed Color, then chose to change the colors Perceptually, to at least give the image a chance to show us a few more steps, and I reduced the image to 256 colors. Here are is the resulting image (below). The image looks so bad because it contains the full spectrum of colors, so when allocating these to just 256 slots, there’s no room to save the colors required to create finer gradations.
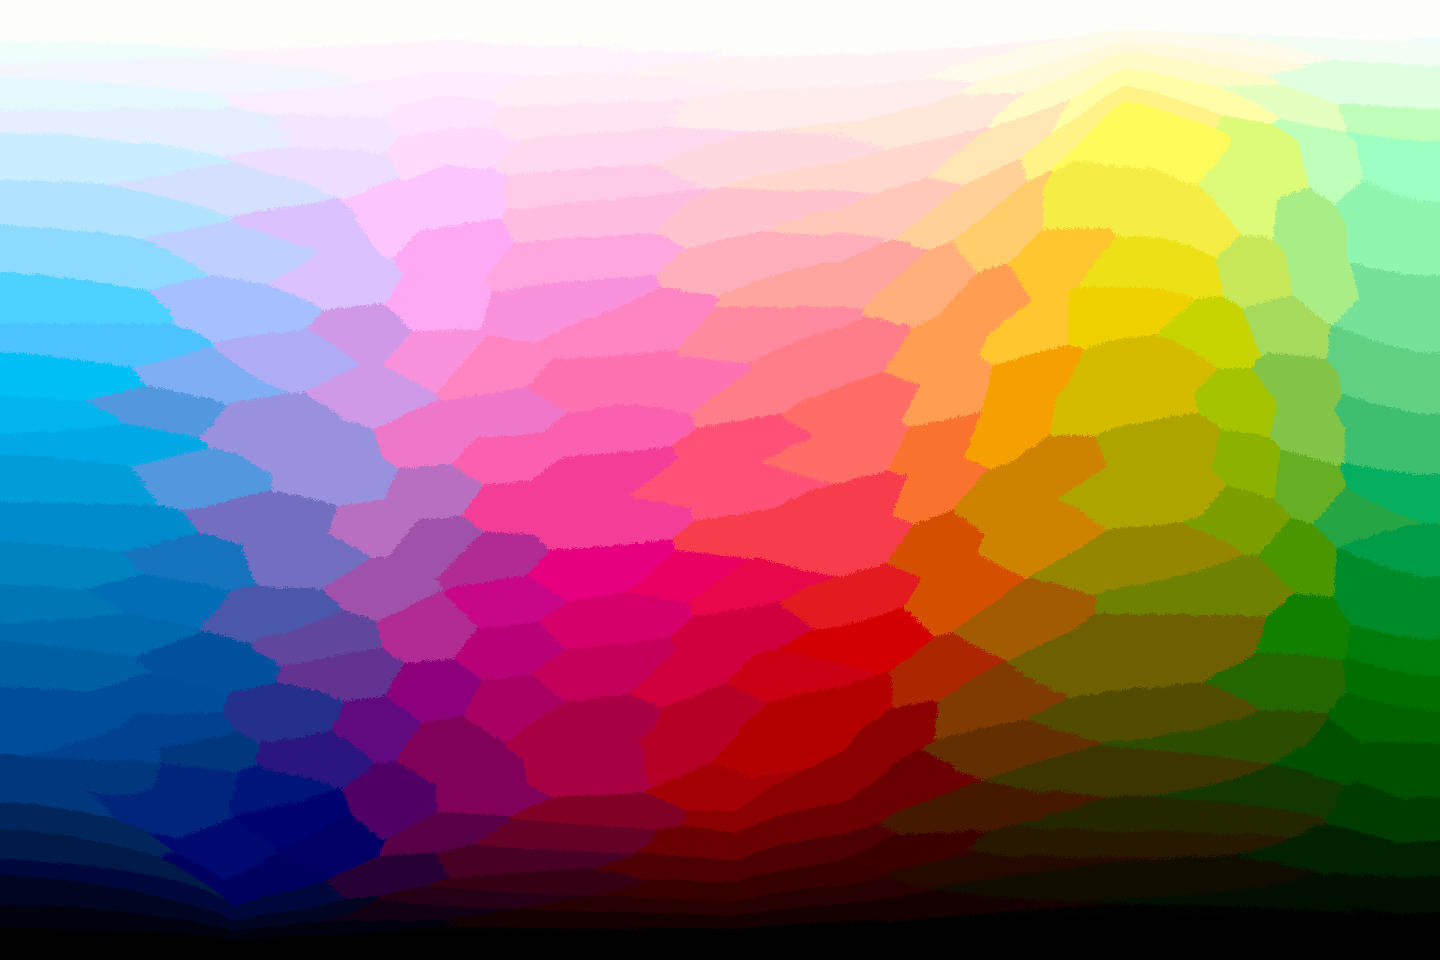
Granger Chart 256 Colors
My first PC that I bought back in 1994 was considered relatively advanced for the time, but it could still only display between 16 and 32,768 simultaneous colors out of a possible 4096 to 16.777 million, depending on the video mode, and the imaging software available to me at the time was mostly restricted to only 256 colors. I recall displaying and even doing some early printing of these images, and I regularly used Indexed Color, because it would select the most used 256 colors in my images.
Here’s a photo (below) that I converted to Indexed Color with 256 colors, to remind myself of those days, and the limitations that we faced, and you can see how nasty the gradations in the sky and clouds become, as we force the image to display itself with such a small number of colors. It’s better than the 256 color Granger chart because there is a much smaller range of colors that need to be assigned to the 256 available slots.

Namibia Quiver Trees in 256 Indexed Colors
In printing, we can simulate the issues that we are working to overcome and prove how much ICC profiles help us, by printing that Granger Chart without any color management. I printed it directly to a matte media, which has a smaller color gamut (can reproduce a smaller range of colors) and I turned all color management off. This is what the print looked like (below). Compared to the image we looked at earlier, you can see that the colors are very different, and some even missing altogether.
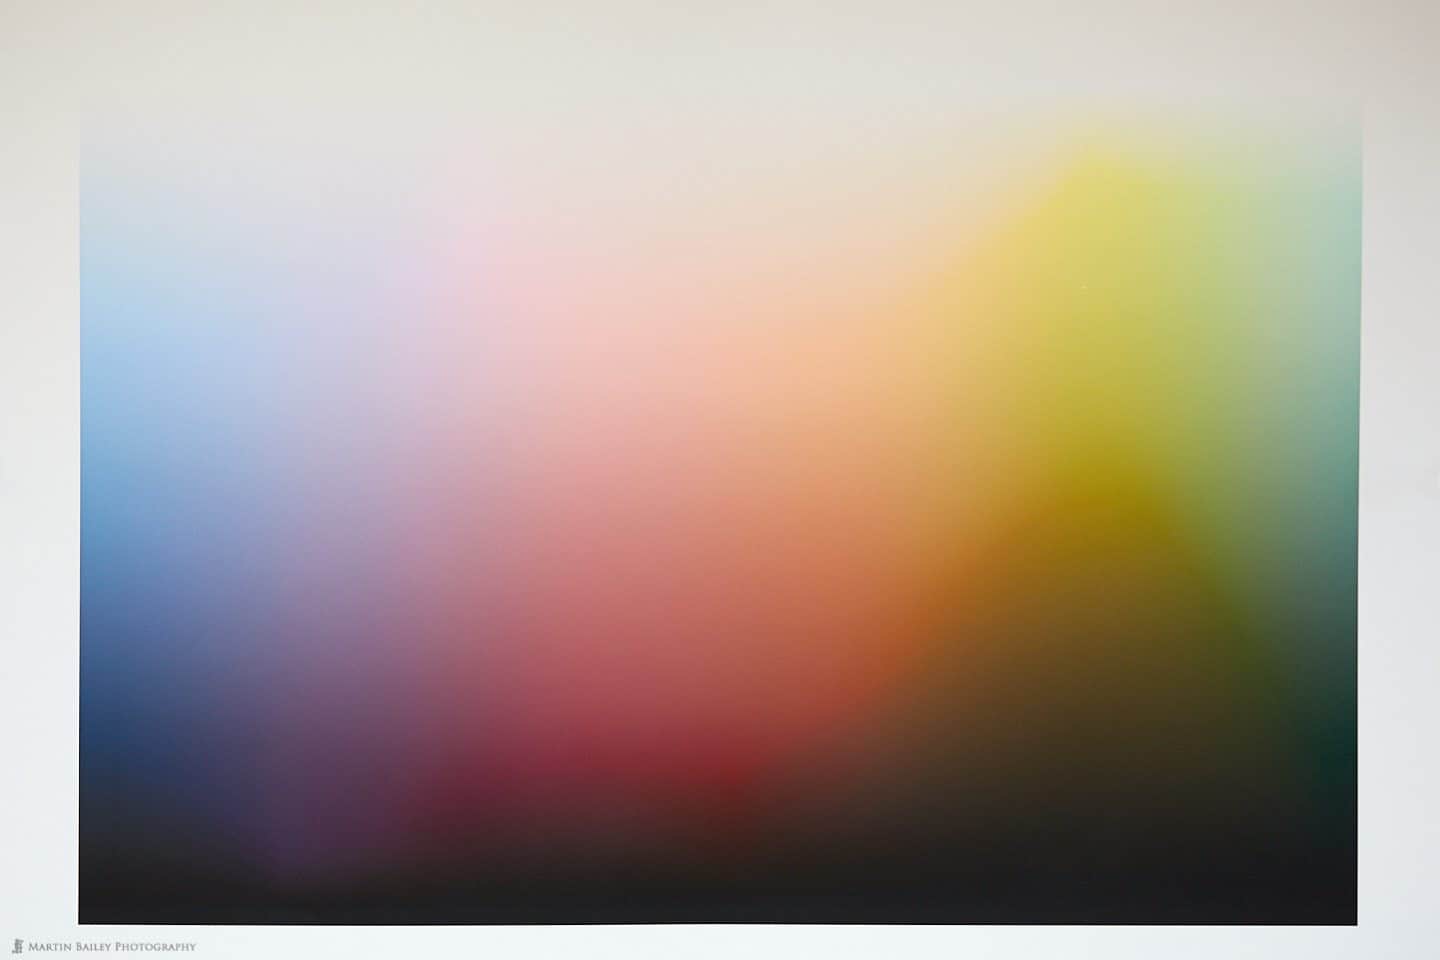
Granger Chart Printed without Color Management
Then, I printed it again, with the color management turned on, and the ICC profile that I created for this media assigned. This is effectively telling the software how to interpret the image, to get it as close to the colors that the ICC profile tells the software that my printer can reproduce. Here is the resulting image (below).
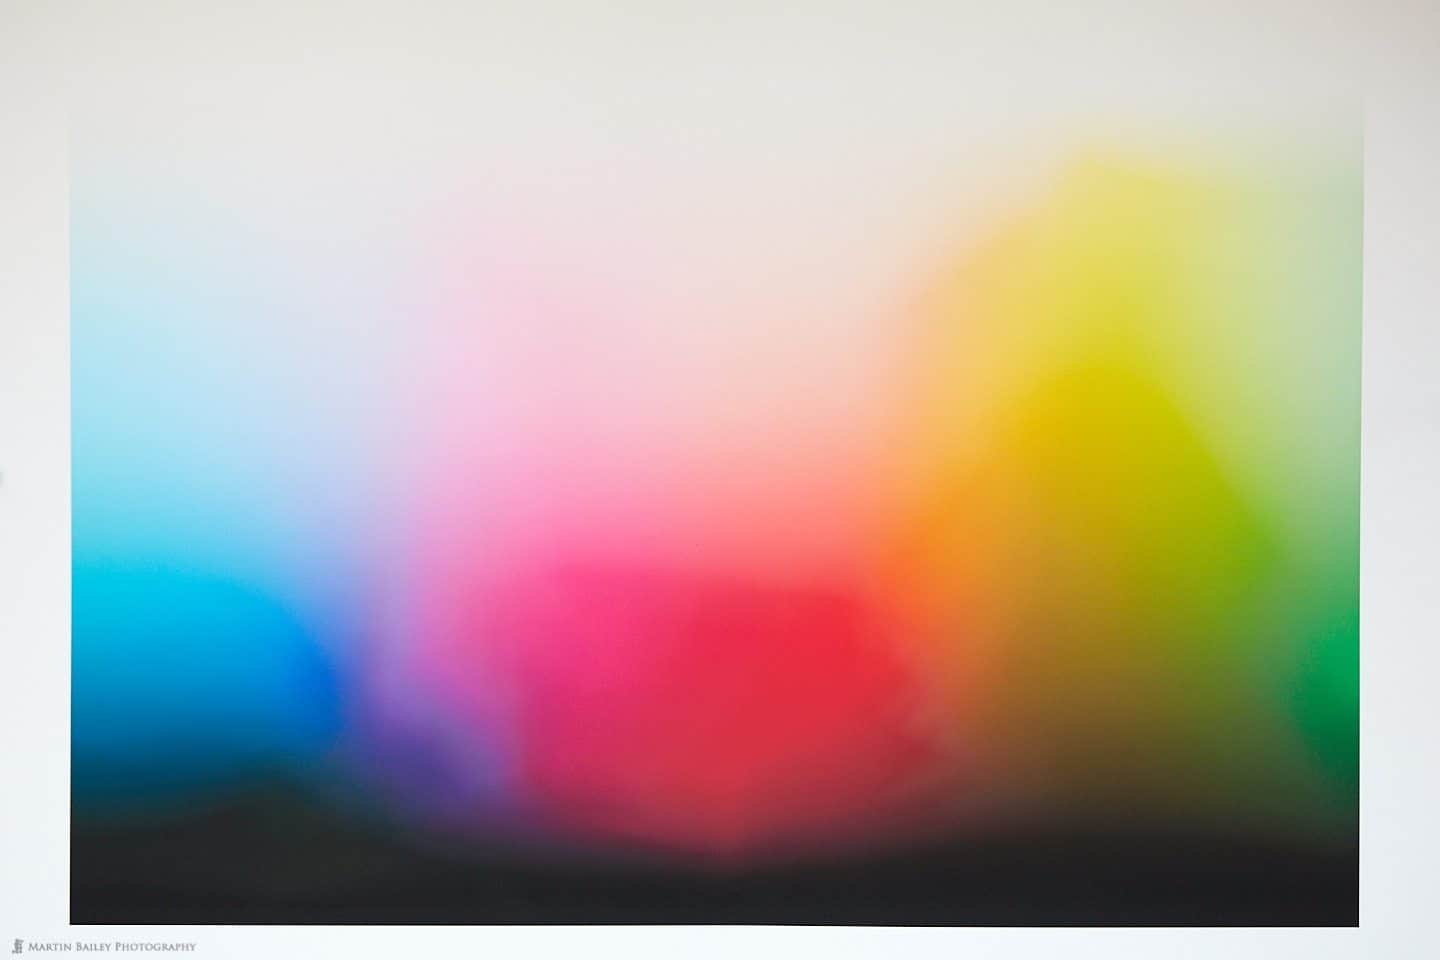
Granger Chart Printed with Color Management
Keeping in mind that the Granger Chart contains many colors that my printer simply cannot print, making it look very different to the chart above, but I’m sure you’ll agree that the colors themselves are much closer to the chart than the version that we printed without any color management. If I was to print the chart out on gloss media, which has a much wider color gamut, we’d see more colors again, but it would still not be the same as the computer generated Granger Chart above, because of the limitations of the printer. Keep in mind too that this is not because I have a bad printer. I have one of the best printers available today, but this is the reality of where printing technology is today.
Keep in mind too that this is not because I have a bad printer. I have one of the best printers available today, but this is the reality of where printing technology is today.
All Devices Are Different
So, just to recap, using a 3D rendition of my displays and matte media ICC profile (below) the important thing to keep in mind is that all devices are different. As you can see, my matte media printer ICC profile is the smallest, then my iMac display is a bit bigger, and for reference, that is actually just a little bit bigger than the sRGB color space. Then the largest wireframe profile here is my BenQ 4K SW320 wide gamut display which is about the same size as the Adobe RGB color space.

Graphed Display and Print Profiles
Why We Need ICC Profiles
All of these ICC profiles are different, and so we use ICC Profiles to interpret the difference, just like an English/Japanese interpreter might help two people that do not share a common language to communicate. With the aid of the interpreter, they might not have 100% smooth communication, but they will be able to understand each other and get closer to fully understanding than they would without any help at all.
Color Management Module (CMM)
In computer terms, the interpreter in this situation is called a CMM or Color Management Module. This is generally provided as part of the computer operating system or built-in to our image editing software. For example, in Adobe Photoshop, if you select Color Settings from the Edit menu, you’ll see a Conversion Options area, with an Engine pulldown. That’s where you select the CMM that Photoshop will use when interpreting colors and matching colors between various color spaces and ICC profiles.
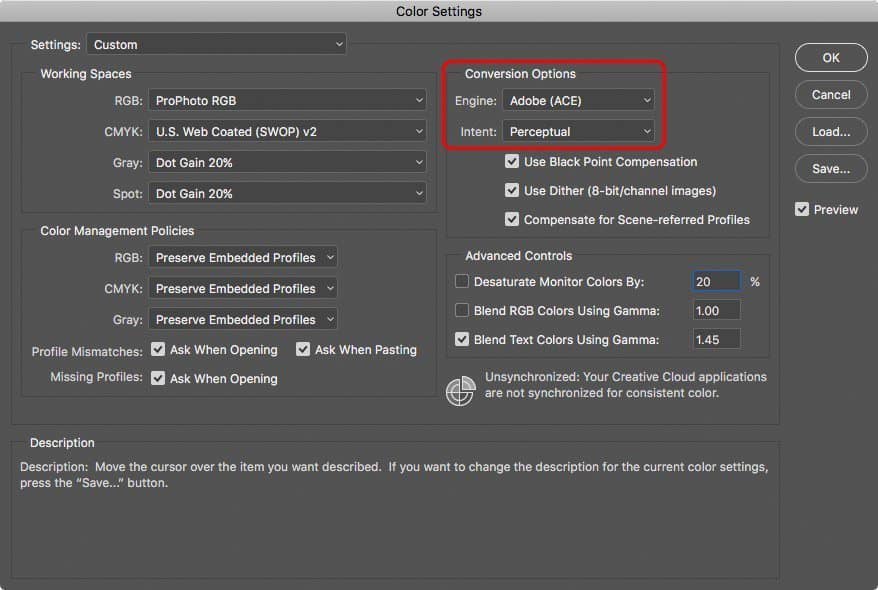
Adobe Photoshop Color Settings Dialog
I generally leave mine set to Adobe (ACE) but if you look in the pulldown you’ll also see the Apple CMM, which is built into the Mac OS. What you are basically doing here is selecting the interpreter. They may do their job slightly differently but will facilitate communication between the various color spaces and ICC profiles all the same.
Input Profiles
Just as we have Output Profiles for displays and printers, any device that is used to reproduce an image, we also have Input Profiles, for devices that are used to input images, such as our cameras or scanners. They follow the same principles and basically act as one side of the interpretation that I’ve been talking about. You can think of the camera color space as English in our human language example, and Japanese would be the printer or display, or vice versa.
Where Do ICC Profiles Come From?
If you are wondering where these profiles comes from, in the case of input devices, there is generally some kind of proprietary computation going on inside the device before the image is saved to the memory card, or in the case of a scanner, you’ll often specify which profile to use, but it’s built into the scanning software.
It’s also possible to create camera profiles for Lightroom and Photoshop, using the X-Rite ColorChecker Passport. You just photograph the ColorChecker Passport (see below) and then use X-Rite software to make a profile. Unfortunately, with this method, the profile is saved in a format that isn’t easily used as an ICC profile, and my attempts at creating a useful ICC profile with the ColorChecker Passport and the larger X-Rite Digtial ColorChecker SG card using the X-Rite software have so far not been very successful.
Luckily, because I use Capture One Pro, they already have a great profile for my camera built in, so this isn’t urgent, but I’m also considering picking up basICColor Input 5 at some point, to see if I can make my own camera profiles with that. I’ll let you know how I get on with that if and when I do pick it up.
For displays, at the basic level, your display manufacturer will provide a profile or it will be handled by your computer’s operating system, but to ensure the most accurate color, it’s better to create your own ICC profile for your display with a colorimeter or spectrometer, such as the one’s available here from X-Rite. Keep in mind that if you use multiple displays, you have to profile each of them, and the operating system will remember which profile is for which display and apply them as necessary.
Let’s note too that you only use your display’s ICC profile for your display, and there’s no need to try to use a different profile for it. Even displays that are said to reproduce Adobe RGB don’t actually use the Adobe RGB color space because they are slightly different. You use your display ICC profile for your display, and that’s all. Remember, every device is different and requires its own ICC profile.
To create my own custom ICC Profiles, I use the X-Rite i1Photo Pro 2 Color Management Kit for Photographers, because I also create profiles for my large format printer. This is an expensive option though. If you want to create custom profiles for your display and a consumer printer, the ColorMunki Photo is a great option, and if you don’t print, the X-Rite i1Display Pro is very good for its price. All are available here.
If you use print media from your printer manufacturer, they often come with ICC profiles for their media that are installed with the printer driver software, and if you use third party media, such as the media I use from Breathing Color, you can often download the ICC profiles for your printer from their Web site.
Standard Color Spaces
The standard color spaces that I’ve mentioned, were created by various bodies. According to Wikipedia, sRGB was created by HP and Microsoft in 1996 for use on monitors, printers and the Internet, and subsequently standardized by the IEC as IEC 61966-2-1:1999.
Adobe RGB was developed as you might imagine by Adobe Systems, Inc. in 1998. It was designed to encompass most of the colors achievable on CMYK color printers, but by using RGB primary colors on a device such as a computer display. CMYK is common in commercial printing, and photographers generally use RGB, even when printing most of the time, so we won’t spend any time explaining that today.
The ProPhoto RGB color space, also known as ROMM RGB (Reference Output Medium Metric), is an output referred RGB color space developed by Kodak. It offers an especially large gamut designed for use with photographic output in mind.
Scanning Color Patches
Creating a custom ICC profile for our devices involves showing the software that will create the profile a series of color samples. This software usually comes with the device or color target used. To create a camera profile you include a Color Checker in one of your photos, and the software finds the color patches to understand how your camera has recorded the colors. Because the software knows the actual physical colors of each of the color patches, it’s able to then calculate the difference, and create a table of linkages between the colors in our image and the actual colors that should have been recorded. Those linkages or mappings are what are included in the ICC profile, or in this case, the Camera Profile that gets added to Lightroom or Photoshop’s Adobe Camera Raw module.
Because the software knows the actual physical colors of each of the color patches, it’s able to then calculate the difference, and create a table of linkages between the colors in our image and the actual colors that should have been recorded. Those linkages or mappings are what are included in the ICC profile, or in this case, the Camera Profile that gets added to Lightroom or Photoshop’s Adobe Camera Raw module.

Including the ColorChecker Passport in a Photo
When you create an ICC profile for your computer display, you attach the profiling device to the screen. The profiling software then displays a series of colors on the screen and the device reads each color, again, so that it can understand how each color is reproduced by your display. It then calculates the difference between what it sees and what it knows the colors to be and creates the profile containing the mappings between the various colors.
When creating a printer profile, you print out a series of color patches, and then scan them with the profiling device, as you can see in this photograph (below). The process is the same here though, as the software then takes the color information that it scans from the printed media and creates a mapping between what it knows the colors should look like, and what they actually look like, and that becomes your ICC profile for that specific type of media when printing on the same printer.
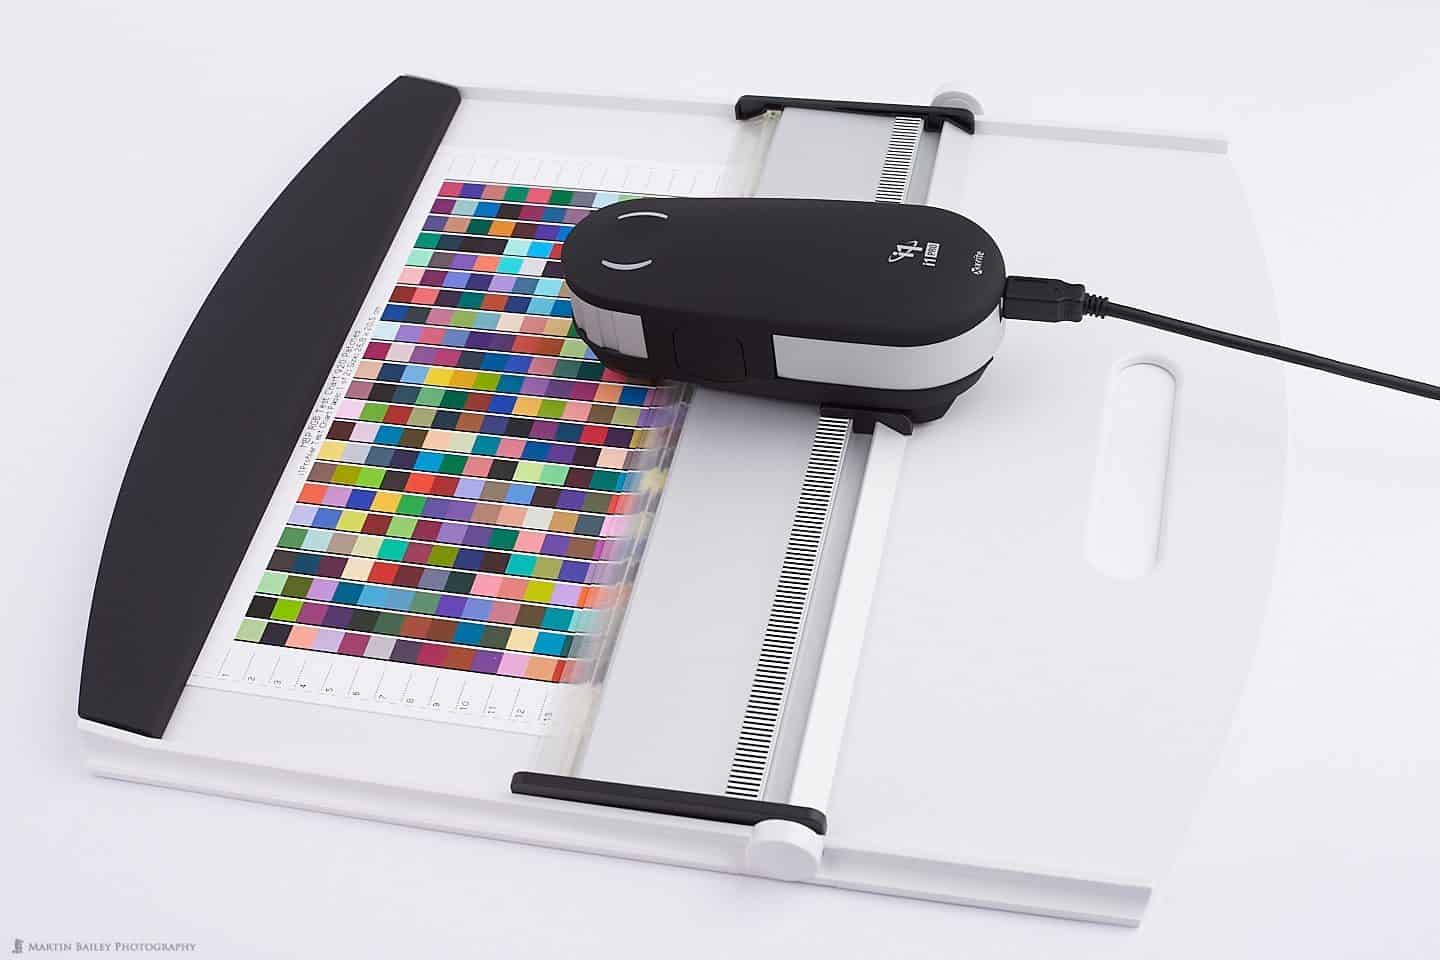
i1 Pro 2 Printer Profiling
Just as you would have to create a separate ICC profile for both displays if you use a dual-display system, you have to create a separate profile for each type of media that you use, and if you use multiple printers, you’d need to create a separate profile for each printer and for each media type.
Although the printer manufacturer or third party media manufacturer’s profiles are usually pretty good, you’ll generally get better results by creating your own custom ICC profiles.
Working Color Spaces
So, we’ve talked about Input ICC profiles for cameras and scanners as well as Output ICC profiles for displays and printers. When you open an image in your image editing software, you’ll use what’s referred to as the Working Color Space. This is where I recommend using ProPhoto RGB because it’s a very large color space, and that gives us plenty of wiggle room in which to adjust the colors in our image as necessary.
Some people recommend working in smaller color spaces, such as Adobe RGB or sometimes even sRGB because there are limitations on our output options, but this is the wrong way to go about this. To maintain the most color information, use ProPhoto RGB, so as not to limit your image unnecessarily. Note once again, that our cameras generally capture colors that do not fit within the sRGB or Adobe RGB color spaces, so let’s give them room to breathe during our editing.
In this graph (below) I’ve included the Canon 5Ds R ICC profile from Capture One Pro, along with sRGB, the small solid color shape, and Adobe RGB, which is in wireframe, and you can easily see that my camera’s profile extends outside of both the sRGB and Adobe RGB color spaces, but fits nicely inside the ProPhoto RGB color space, except for a small area of the blues.
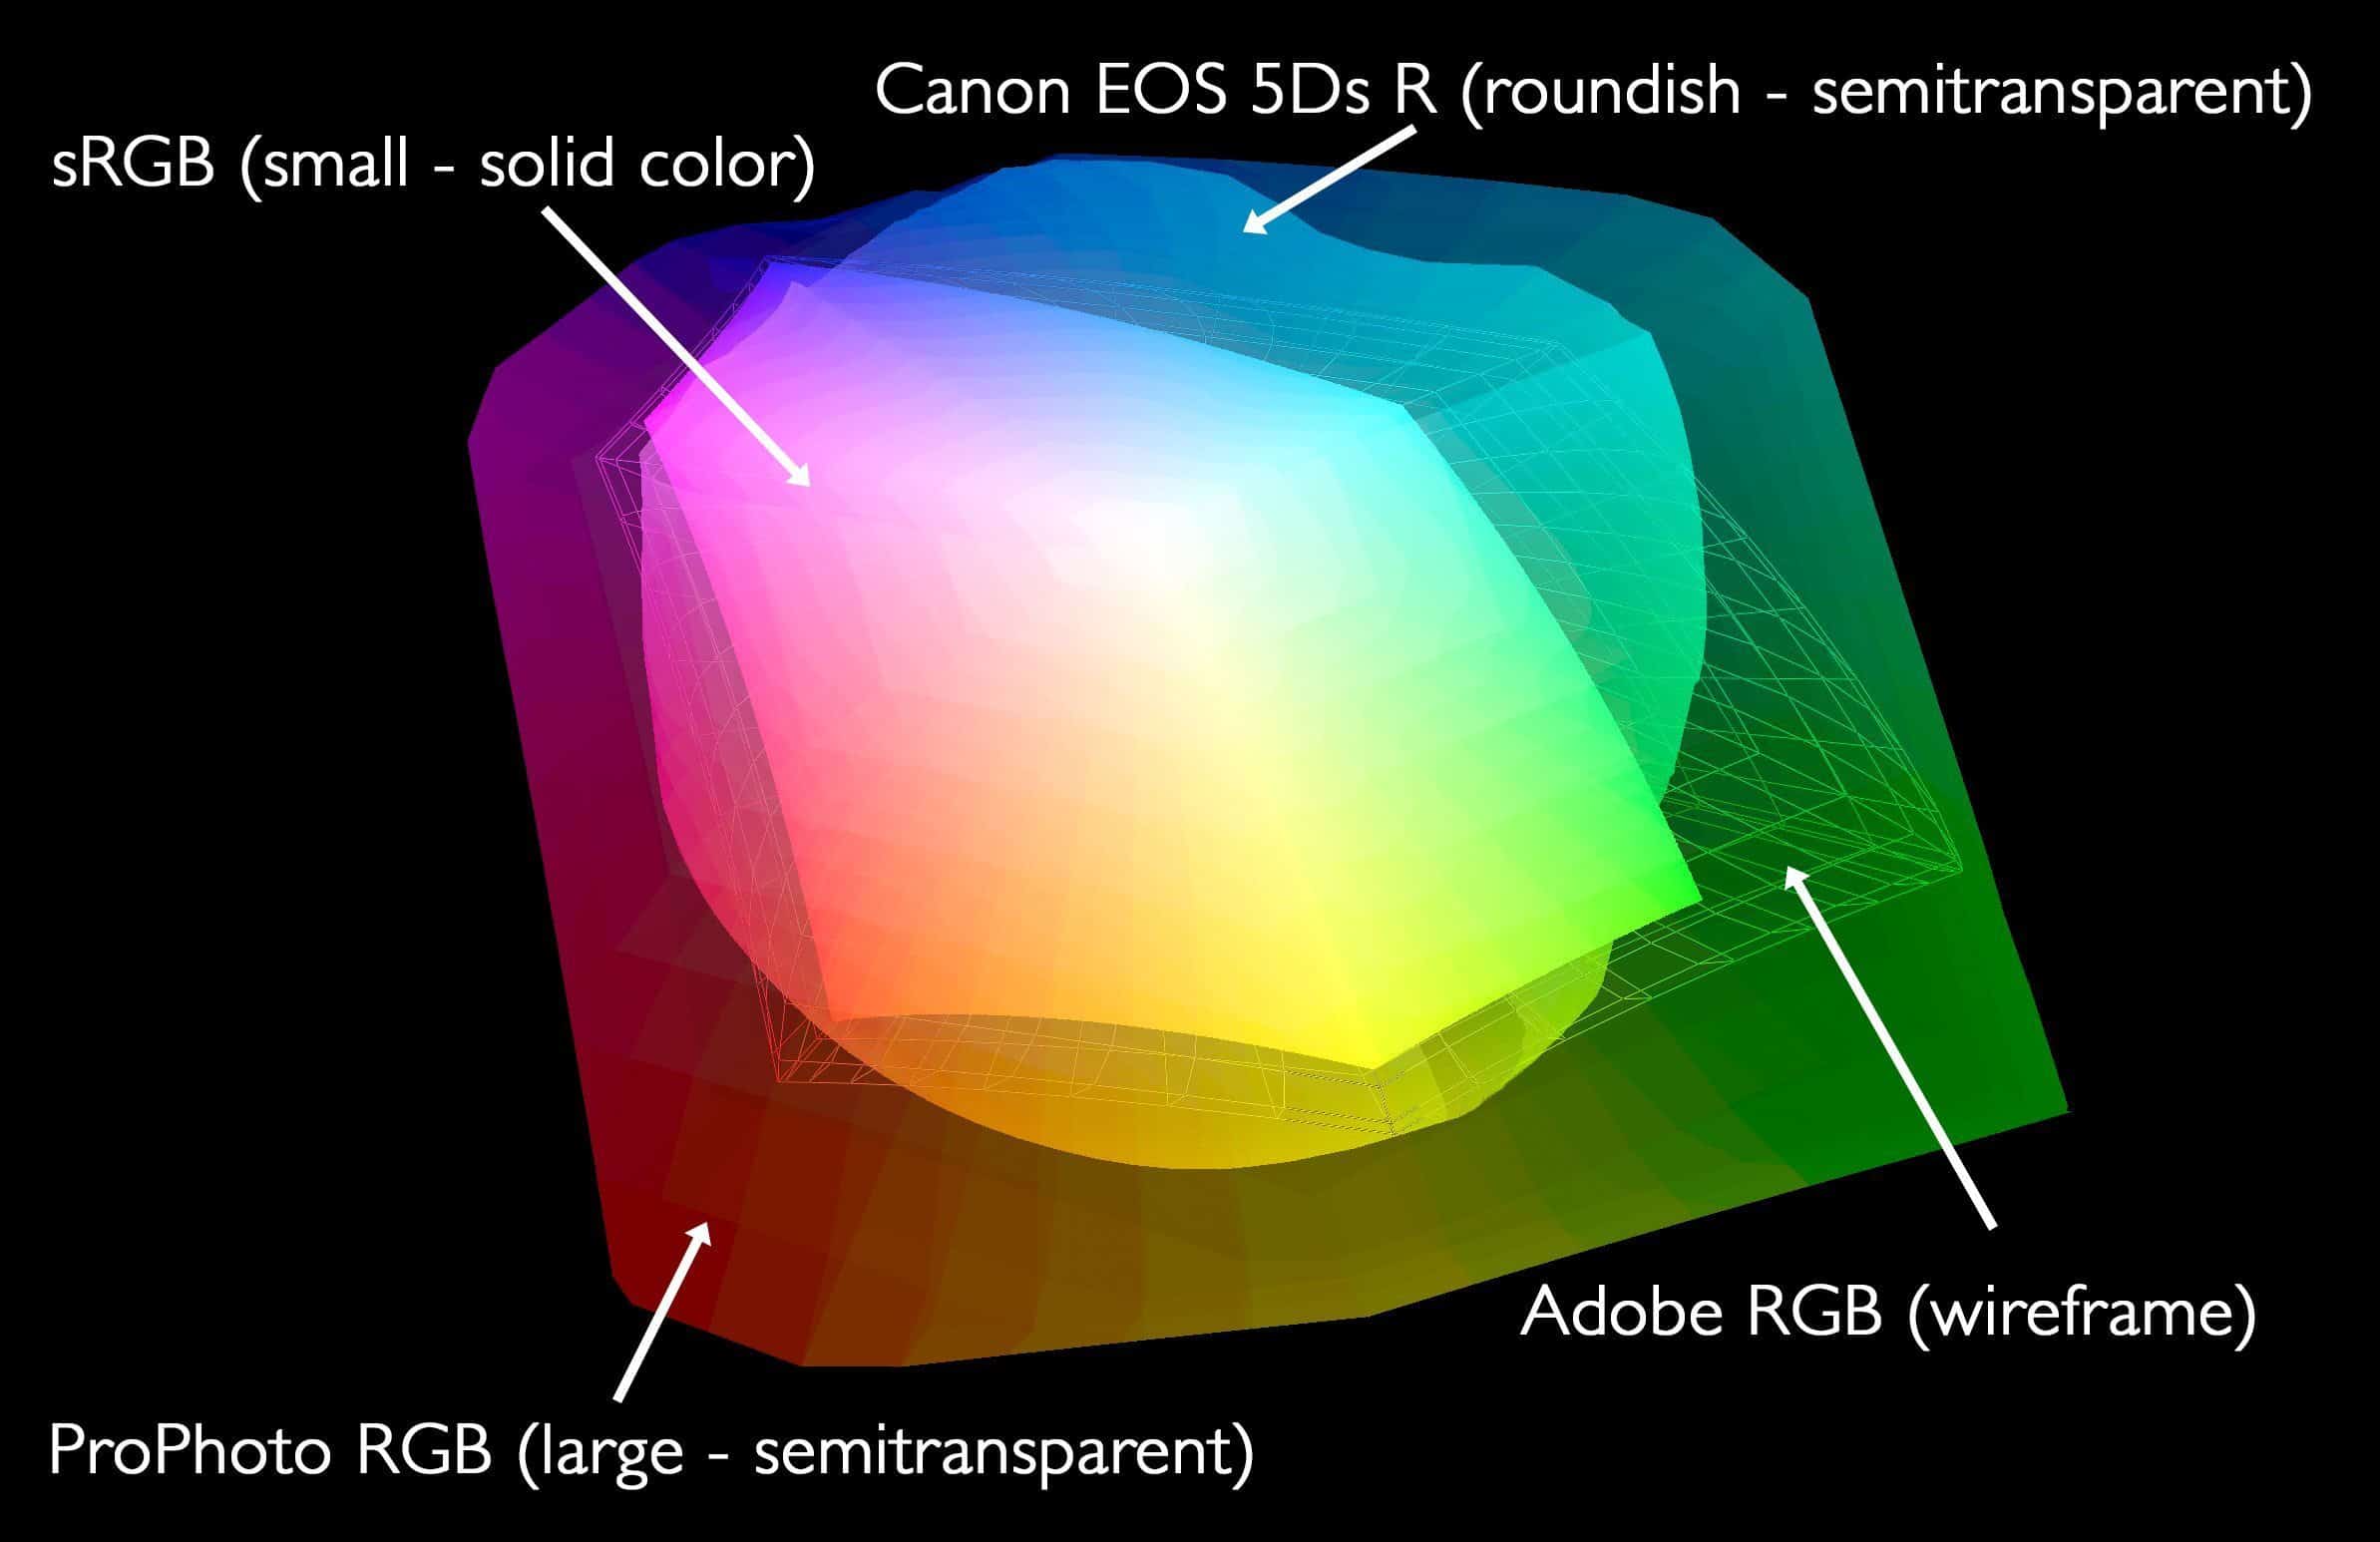
Camera Profile with Working Color Spaces
Note that when working in Lightroom, it uses a proprietary color space similar to ProPhoto RGB, and you can’t change that. This in itself should be a good indication that this is the way to go with regards to selecting a Working Color Space. Capture One Pro has it’s own color space too, but you’ll generally be working on your images in the Color Space for your specific camera, and there’s usually not going to be a reason to change that.
ProPhoto RGB for Editing Whenever There’s a Choice
So, whenever you get a choice, for example, if you are working in Capture One Pro or Lightroom, and you are going to send your images to Photoshop or any other image-editing software, there is always an option to select the ICC profile. My advice is to always select ProPhoto RGB unless you have a reason to select something different. For general editing, keep your images in ProPhoto RGB as long as you can.
As you saw in the screenshot from Photoshop earlier, I set ProPhoto RGB as my Working Space, and I turn on the option to ask me what to do if the images I try to open are not in ProPhoto RGB. There’s no point in exporting from Lightroom or Capture One Pro in Adobe RGB, then converting either. Send what you need, to avoid wasteful conversions.
Why Not?
If you have at some point been influenced by someone telling you that you should use Adobe RGB as your working color space, ask yourself, why you shouldn’t use ProPhoto RGB. Just as you’d need to select Adobe RGB as you pass images around your computer in your digital workflow, you can just as easily select ProPhoto RGB. You lose nothing, but you gain the wiggle room that your images need to be as high quality as they possibly can be.
The idea that you should squeeze them into a smaller working space during your editing just because they’ll get squeezed when you output them later for a specific purpose is seriously flawed. Applications like Capture One Pro and Lightroom enable us to work on our raw images throughout our entire workflow, without any negative aspects. If you need to create a TIFF or Photoshop PSD file, you can work with ProPhoto RGB just as easily as any other color space.
sRGB and Adobe RGB Are Export Profiles
Think of sRGB and Adobe RGB only as export profiles. Use these when exporting images for a specific purpose. For example, whenever I’ve finished selecting my favorite images from a shoot, I save a copy as a JPEG to the Apple Photos application, so that it automatically syncs around all of my devices, as I mentioned in a recent post about how I use Apple Photos. When I export these images from Capture One Pro, I specify sRGB as the color space, because these are only JPEGs for displaying on my various devices.
If you are going to send some images off to a printing lab to get some prints made, they will probably ask you to give them JPEGs in sRGB or hopefully Adobe RGB. Personally, I would avoid using a service that only uses sRGB, but Adobe RGB is generally fine for this specific purpose. When printing at home, usually now directly from Capture One Pro, my images are still in the raw format, using the camera profile provided. If I was to print from Photoshop, I’d use ProPhoto RGB color space when saving my file for print.
OK, so enough on that. I hope you get the message, and I hope this has helped you to understand why we need ICC profiles and the different types of uses of these profiles. If you have any questions or would just like to comment, please do so below. I love to hear from you.
Morocco 2017
Before we close, I’d like to quickly mention that I’ve set up a new tour to Morocco from October 29 to November 10, 2017. We’ll be photographing the wonderful architecture, landscapes, and culture of this beautiful country, as well as using camel handlers as models to photograph them leading their camels through the sand dunes etc. We don’t have much time to lock in on this, so if you might like to join me please check out the details at https://mbp.ac/morocco.

Morocco Tour 2017
Show Notes
Color Management Tools on B&H: https://mbp.ac/bhcolor
Subscribe in iTunes for Enhanced Podcasts delivered automatically to your computer.
Download this Podcast in MP3 format (Audio Only).
Download this Podcast in Enhanced Podcast M4A format. This requires Apple iTunes or Quicktime to view/listen.


Thank you Martin for this very interesting article.
I calibrate my display (Eizo CG277) with the BasICColor Display software and use L* gamma.
Thus, instead of choosing ProPhotoRGB (gamma 1.8) as my working color space, I tend to use ProStarRGB because it has a L* gamma (close to 2.2).
In specialized fora, they say the gamma is irrelevant (http://forum.luminous-landscape.com/index.php?topic=34929.0) in a color managed workflow. What’s your take on this tricky topic?
Also, it has been said that Capture One Pro has a very large working color space (proprietary), but slightly less so than ProPhotoRGB. Is this true?
When we are editing in Capture One Pro, how can set the program to make sure it uses the internal working color space (that is, if you do not want to use ProPhotoRGB or ProStarRGB). Is this related to the setting View -> No proof profile ?
Phil
Hi Phil,
Sorry I missed your comment until now.
I just go with the standard gamma (2.2). There’s no reason, in my opinion, to change that.
The internal Capture One Pro working color space is pretty much the same as ProPhoto RGB. I believe that if you select View -> Proof Profile -> No Profile, you are telling Capture One Pro to use it’s internal profile.
Regards,
Martin.
Hi. Great article. I just getting into more serious about colour management. I have a Benq sw270c calibrated with i1display pro used palette master elements. The profile what i got i use it as primary display. Im on win10. I plan to use dxo photolab4. Just know idea how to use my profile for that. I want to get the best quality possible after editing. Some images will be send to a lab to print, others will be shared on the web. I cant get my head around how to export images to get ready for print? I mean which options would be ideal? I know i have to match the printer to the monitor but what if i dont print at home? What output setting are good? Thx
Hi Levente,
You don’t need to use your display profile for anything else. It is only used by your computer for the display, so once you have the profile created and selected for the display, you can pretty much forget about it.
The color space that you use to edit your images is set by your editing software, and is generally something very wide, like ProPhoto RGB, and this is fine. The other uses for your images use what we refer to as Output profiles, so you can use sRGB when outputting images for the web, but only on output. Don’t save your base images in smaller color spaces like sRGB. If you ever need to save a copy of your original raw file, I recommend saving it with the ProPhoto RGB profile to get maximum wiggle room when editing.
Likewise, when sending images for printing, you would save a copy converted to another profile just for that purpose. Some labs just want sRGB, some want Adobe RGB. Some will tell you a different profile to select and some will actually provide you with a profile file to use. It depends on the lab, so please check with them before you save your images for print.
You don’t have to match the printer to the monitor for this. The printer and media (paper) relationship is all that is important. The printer doesn’t know or need to know anything about your display profile.
I hope that helps!
Regards,
Martin.