
I almost started the title of this episode with Ch-ch-ch-ch-Changes, like the one I released when I quit my old day job to pursue photography full time six years ago. Although not quite as dramatic, I’m really excited to tell you that I’m switching from Adobe Lightroom to Phase One’s Capture One Pro 9 as my main image processing, asset management and workflow application.
I started using Lightroom back in 2006, during the initial beta phase, and I’ve been a loyal Lightroom user since, so this may come as a bit of a shock to many of you, although I can already hear some of you existing Capture One users chuckling to yourselves, not so surprised that I’ve finally decided to make this change.
Why the Change?
Firstly, let me explain the reason for this sudden change in direction. It’s pretty simple, but this is a powerful motive, so I want to take the time to relay this. Then, I’ll go on to talk about some of the tests that I did to see if I really could move over to Capture One Pro 9 completely.
Capture One has been on my radar since around 2009, when I first tried the demo version of either version 5 or 6, I don’t remember which it was. At that time, although the raw processing engine was already very impressive, there were a lot of key features that I relied on Lightroom for, that were missing in earlier versions of Capture One.
When Capture One 7 was released, I took another look, and found that most of the functionality I wanted was now there, but I couldn’t really invest the time necessary to fully check out Capture One, and as a result, I still didn’t really see the benefits to switching.
A Revelation!
Then, a few weeks ago, with Capture One 8 having come and gone, and the latest version now being 9.2, I had a little bit of time, so I decided to take a deeper look. To begin with, I simply grabbed a handful of my favorite images from Lightroom, dropped them into a folder, and imported them into Capture One.
There is a checkbox in the import dialog to Include Existing Adjustments, and I’m not sure if that was on or off during this first import, but my images were totally reset, with none of the Lightroom adjustments that can be imported applied. This was a good thing though, because it enabled me to see something that was a total revelation for me. I saw detail in some of my images that I didn’t even know existed from the view I’d had of them in Lightroom.
First Comparison
The first image I looked at, was my Red-Crowned Crane study, that some of you will recognize from the cover of my Making the Print eBook. Before I show you the new version, I want to let you know that there is perhaps too much detail visible, and I will probably dial that down a little again to the more dreamy look that I had in my original.
The point is though, in Capture One Pro 9, I was able to see that detail, and I have the option to keep it or dial it down as I feel necessary to complete my photographs. In Lightroom, I didn’t even know that the detail was there, so the choice did not even exist!
To illustrate, here are both my original version of this photograph from Lightroom, on the left, and the first version that I did in Capture One, on the right. Regardless of which one you prefer as a photograph, I’m sure you’ll be able to see that the Capture One version has a huge amount of detail, compared to my Lightroom version.
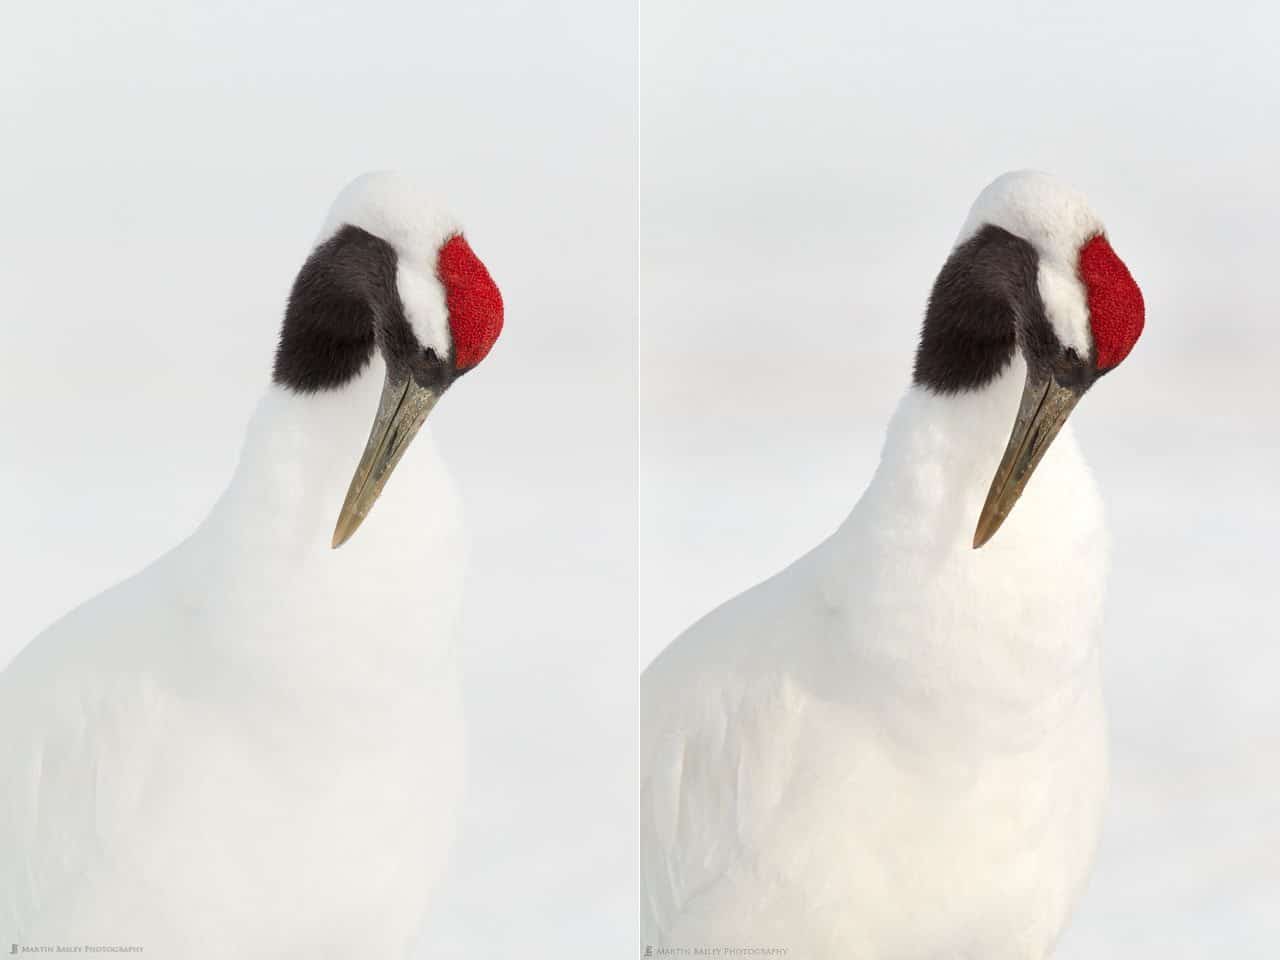
Tanchou Study #7 – Lightroom (left) and Capture One (right)
There are a few things that we need to bear in mind at this point. The first one being that, after I imported my raw file without any of the Lightroom modifications I’d made, although the detail immediately caught my eye, I did have to play with the Levels a little in Capture One to give the image a bit of a boost, but it was pretty easy to bring it closer to how I wanted the image to look, while maintaining the detail.
Now, when I asked for my wife’s opinion on the Capture One version, she said the crane looks like a chicken, and I tend to agree, but the second point I want to reiterate here, is that as I move forward, and import work from future shoots directly into Capture One, I will now at least be able to see the detail, and this will put me in a position to be able to make up my own mind about how much of the detail I want to maintain, and how much I want to lose if I choose to go with a softer look like my original version of this crane shot.
You Won’t Have to Rework Your Archives
Also note that I was going to include the version of the crane photo that I was presented with in Capture One after importing my Final Selects folder using a Lightroom Catalog and Include Existing Adjustments, as opposed to simply importing the file, but it actually looks so similar to the original Lightroom version there isn’t much point. What this means is that you can migrate your work to Capture One and maintain the look of your images as they appeared in Lightroom, to a certain degree.
There are a lot of things that are not imported along with your images, so for example, any dust removable or cloning work that you did against your original images in Lightroom will be lost. All Lightroom Local Adjustments are also lost, so if you want to maintain a copy of the file in Capture One, you have a couple of choices. The first thing you can do is to save the Lightroom version as a TIFF file, and bake your changes into the image.
The second option is to make the changes again in Capture One, but be aware that the spot removal tool in Capture One works differently from the Lightroom version, and for detailed cloning it’s generally better to jump into Photoshop anyway. If this is going to be necessary, just save your image as a TIFF before importing it into Capture One. Note too that it has to be a TIFF because Capture One doesn’t support Photoshop PSD files (as of August 2016) so don’t save your files in PSD format. More on this later…
Tests Continued
Having completed my first test, with my mind already significantly blown by the detail in my crane shot, I decided to take a look at the black and white capabilities of Capture One. As you know, black and white plays a big part in my photography, and I’ve been a big fan of Silver Efex Pro, originally from Nik Software, until they were bought by Google, and therein lies part of another problem I was hoping to fix with a potential move to Capture One.
Although Google have made statements that they don’t intend to kill off Silver Efex or any of the Nik suite of plugins, the fact remains that we haven’t seen a version upgrade since version 2 which was released what seems like an eternity ago now. I have continued to use Silver Efex Pro, because I believe it’s still the best black and white conversion plugin, and Lightroom’s black and white conversion lacks the control that I need.
This doesn’t mean that I am totally happy with Silver Efex Pro though. There are times when it leaves a nasty white line or halo around dark objects, and I sometimes have to spend hours painstakingly removing that in Photoshop before I can print a photograph for a customer.
It can also leave a lot of grain in the sky sometimes, and although that can look organic, it requires a bit of cleaning up at times too. Because of these things, the next thing I tried in Capture One was my ability to create a well balanced and toned black and white image without using a plugin.
Excellent Black and White Conversion in Capture One
Believe me, I’ve tried lots of different methods to convert to black and white, so that I could overcome my reliance on a plugin that is no longer being improved, and none of my tests have really beat Silver Efex Pro, until now.
The first conversion I did was of my Boat Graveyard shot from my Hokkaido Landscape Photography Tour last year. Again, there are a few points that we need to keep in mind, as this is not a straight comparison. First, here is my original black and white version from Silver Efex Pro (below).

Boat Graveyard #2 – Silver Efex Pro
And here is a new version (below) created from the original color raw file, from scratch, in Capture One Pro 9. I didn’t necessarily try to recreate the Silver Efex Pro version, although I could get close if I wanted. Rather I was working here to come up with something with beautiful tonality and texture, and not quite as heavy-handed as my Silver Efex conversion.
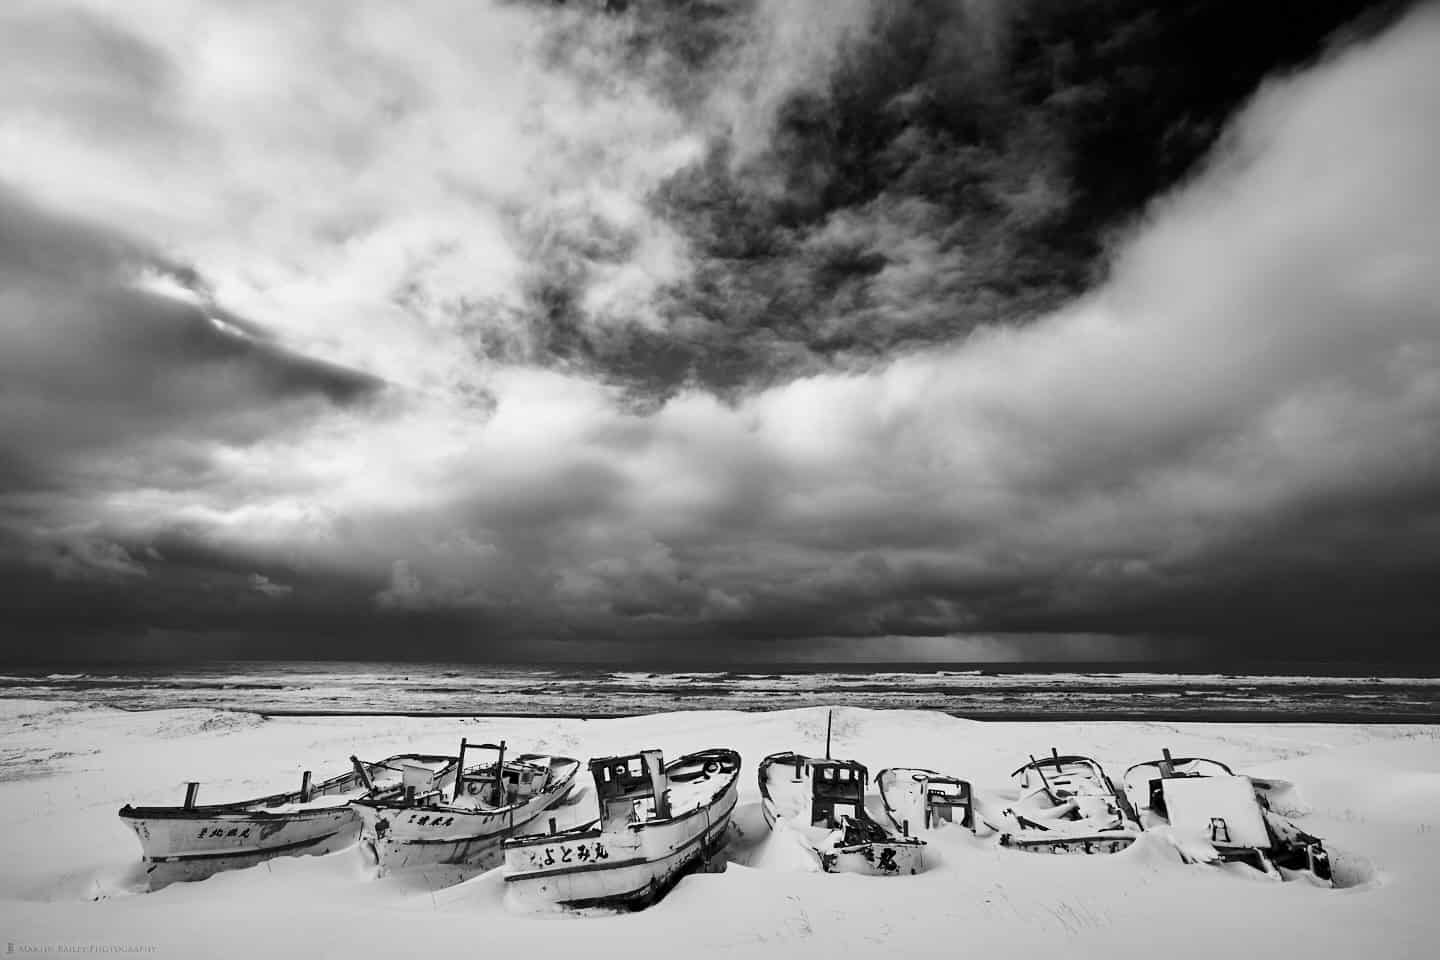
Boat Graveyard #2 – Capture One Pro 9
I’m sure you’ll agree that this conversion shows that it’s no longer necessary to use Silver Efex for this kind of photograph, but there is another kind of black and white photograph that I do, where I make the background go almost totally black, and I honestly did not expect to be able to do this in Capture One, so I gave it a try.
Black Backgrounds
First, here is the original photo (below). I know it’s not a lot to look at, but I knew as I shot it that I was going to make it black and white.

Lotus Flower Interior – Original Color Version
Here now, is the black and white version that I did completely in Capture One. Until now, in Silver Efex Pro, I’ve had to use Control Points to knock the background out like this, but in Capture One, I got it very close to a black background just with the available sliders, levels and other controls, and then took out the last few spots of light grey with a some local adjustments on a new layer. Yes, Capture One supports layers!
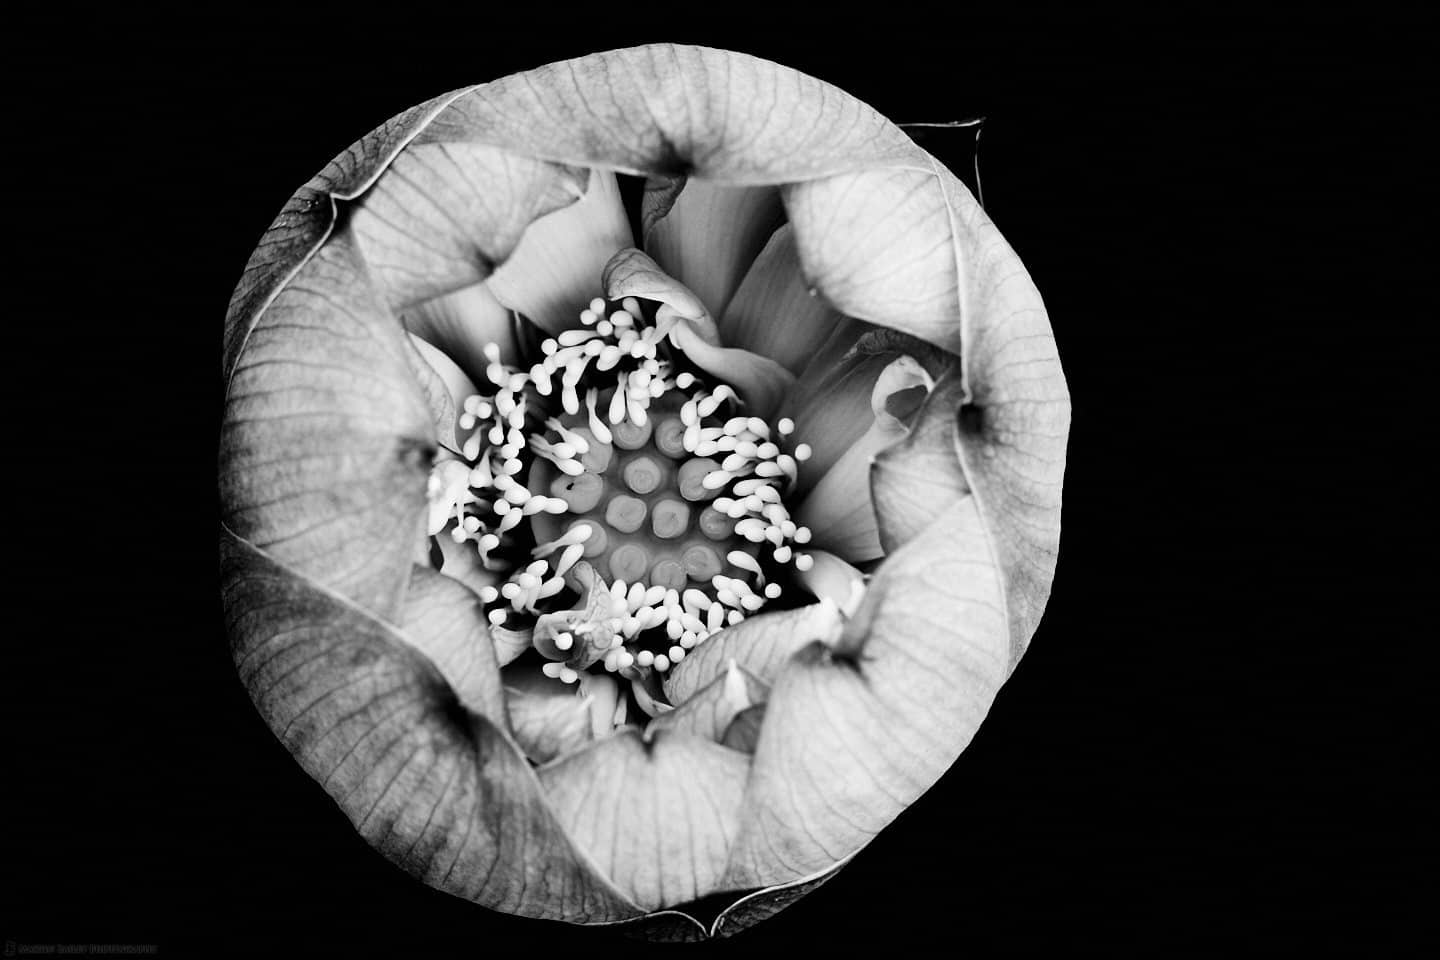
Lotus Flower Interior – Capture One Pro 9
Once again, I was blown away by the fact that I could do this level of black and white conversion right there in Capture One. The image I exported here is sitting in my catalog as a Canon raw file, with a cr2 extension, instead of a 130 megabyte TIFF file. I don’t mind saving TIFF files when they are necessary, but the more you have in your archives, the larger it gets, and the backups take longer too. The more images you can keep in the original raw format the better, in my opinion.
Subtle Tones and Detail
I really have been impressed with the subtle tones and detail that I’m getting from Capture One Pro 9. Here’s one last black and white conversion example, to show that it’s really very possible to get great detail and tones right there in Capture One. You might remember this photograph from Mount Asahi from this year’s Hokkaido Landscape tour (below). Again this is a Silver Efex Pro conversion.

Mount Asahi Trees – Silver Efex Pro
And here is a version that I did in Capture One (below). Again, I was not trying to emulate the Silver Efex Pro version, more I was trying to bring this to a point that I feel it’s actually better, with more depth and tonal quality. Once again, let’s also keep in mind that I was simply not able to do this level of black and white conversion in Lightroom.

Mount Asahi Trees – Capture One Pro 9
I am really just breaking the surface with my processing in Capture One, but I have been totally impressed with it. To the point that I have now committed to myself to switch completely over to Capture One Pro 9. At this point in my evaluation I set about the task of checking out all of the other features of Capture One Pro 9.
Spot Removal & Cloning
Another test that I performed was my ability to do some complicated cloning in Capture One. There are actually a lot of cable car cables that run behind the trees in the left side of this Mount Asahi Trees photo. Even in Lightroom this was too much of a pain to clone out, so I did it in Photoshop in my original version of this image.
At first glance, spot removal in Capture One seems less capable than Lightroom, and I didn’t think that removing the cables would be possible. The Spot Removal tool in Dust mode works well when removing dust from skies or other plain backgrounds. It just makes the dust spot disappear, whereas Lightroom often selects a part of the scene that has nothing in common with the background of the dust spot, and so can be frustrating to use.
With the Capture One Remove Spot tool in Spot mode, I initially tried to remove some people from the beach in the Boat Graveyard shot above, and it just didn’t work. Then, I found that you can use the Adjustments Brush in Clone and Heal modes.
This is actually really quite a powerful tool, and is enough to save me from going into Photoshop and saving a TIFF file in all of the cases I’ve tried so far. For removing the cables in this Mount Asahi Trees shot, it would have still be easier to do the work in Photoshop, but I did it in Capture One Pro 9 to prove to myself that it is possible, and it was.
Import Folder Structure and Filename Change
Another thing that I tested was my ability to import images into my usual folder structure automatically, and I also rename my files on import. I don’t want to have to set this up every time I import, so I need to be able to create presets with the necessary settings.
I import my images into Year/Month/Day folder structure. Capture One has sessions and other ways to organize images, but I want my regular shoots organized how I’ve always done it. I like having everything from each year in a single top level folder, and then 12 month folders, and inside each month folder I have a day folder for all the days on which I’ve made photographs.
If you use location or shoot names to organize your images, it quickly becomes unmanageable, especially when it comes to backing up, so it was important for me to figure out how to automatically import into my preferred folder structure, which is possible by creating a preset such as the one you see in this screenshot (below).
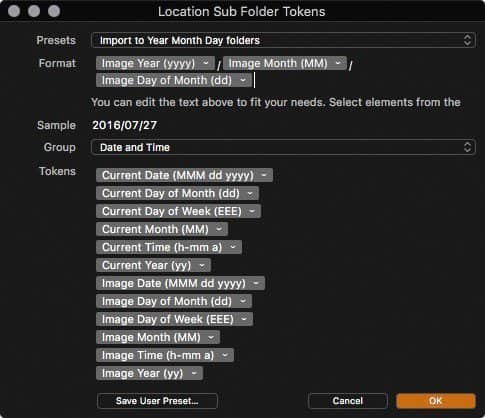
Import to Year/Month/Day Folder Hierarchy
To change the filename during import, I created another preset that automatically uses a shoot or location name, the date of the image, and the original filename, so these were a couple more things I could check off my list. As you see in this screenshot (below) you can build the new filename from text you enter and insert the various metadata tags.
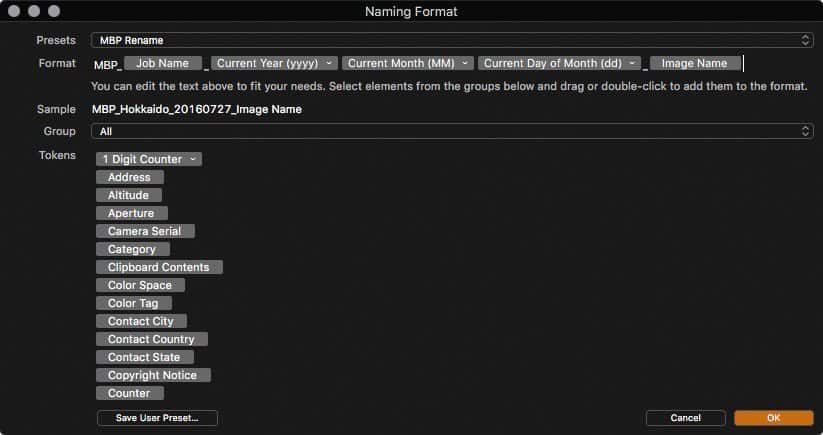
Change Filename During Import
To add my location or shoot information, such as “Hokkaido” in this example, included a tag called Job name, and with this, if I enter a keyword for the shoot into the Job Name field in the import dialog box, it gets inserted into the new filename. Once you save this as a preset, it’s available for selection during import, and is actually automatically selected for future imports unless you change it.
The Importance of Presets
For me, being able to set up this kind of preset is vital to creating a smooth workflow that is automated to highest possible degree. Even if I had to manually create a new day folder inside a month and year folder, and navigate to that in the import dialog, it would have made me think twice about switching to Capture One. I simply feel that the workflow itself should disappear into the background and allow us to get on with our work.
I’ve also mentioned before that I am a big believer in doing tasks such as renaming files as early as possible in the workflow. If you change the filename during import, it’s done, and you never have to worry about it again.
Export Presets
The next thing I tested was my ability to create good export presets. Capture one has a very powerful export feature and uses presets called Process Recipes. Again, I’ll follow up in the coming weeks with detailed descriptions of these features, but by creating a Process Recipe, you can very easily select these and export your images in various formats and sizes, and it’s even possible to select multiple Recipes, so you can export different versions of your photos at the same time, which is great!
Printing
For my final check, I made sure that it is possible to print from Capture One Pro 9, with specific border sizes, and I wanted to save all of my settings in presets, again, as I don’t want to be re-entering these details every time I want to change media, print size or orientation.
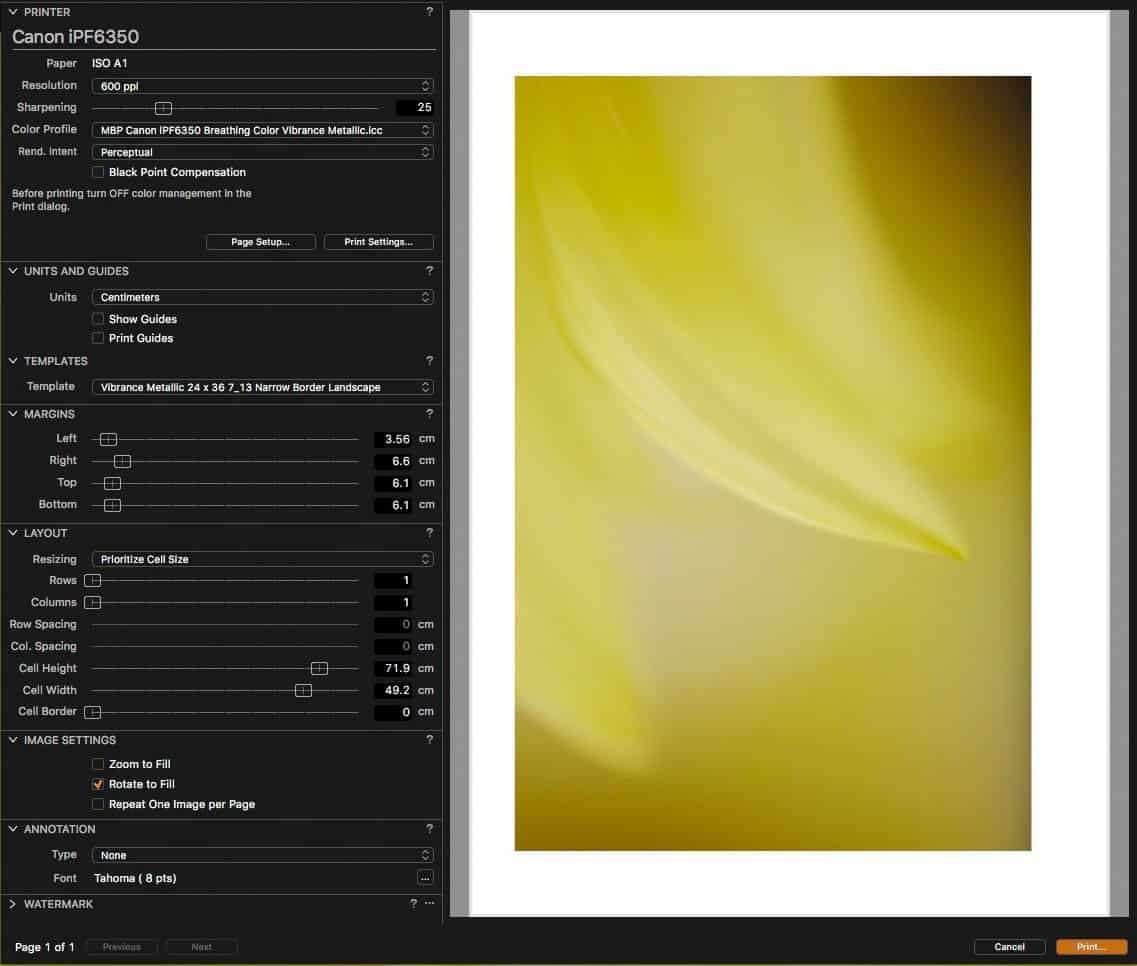
Capture One 9.2 Printing Dialog
At this point, although I have found a way to save my border settings in a preset, or Template as it’s called in the print dialog (above), I have not yet found a way to save all of the print settings in this dialog in a single preset. This means that when I change media, I have to ensure that I change the Color Profile specified for that media in this dialog. I always check that anyway, before I print, so if I don’t find a way to do this later, it’s not going to be a show-stopper for me.
I haven’t actually printed from Capture One Pro 9.2 yet though, because my large format printer has given up the ghost, and I’m currently working with Canon to buy a new one, but once I’ve actually tried printing, I’ll let you know how it goes, maybe as part of a review of the new printer.
Checks Complete!
This was really the last check that I wanted to clear before I made my mind up that I was going to actually jump ship. There are some things that don’t feel as smooth as Lightroom, but that is probably more a case of me not being fully accustomed to working in Capture One yet. Having said that, it didn’t take that long to figure out where things were, and as I’ve continued to work in Capture One Pro, it’s getting more and more intuitive each day.
What Will I Miss?
There are a few things that I am going to miss about Lightroom, one of them being Lightroom Mobile. I made good use of Lightroom mobile, both for sharing work from tours with my wife as I travel, and also for sharing work with potential clients for them to let me know which images they want to license or buy as a print for example. I also keep my portfolios in Lightroom Mobile, so that they are always on my iPhone and iPad, to share with people that I meet.
Because I don’t currently intend to cancel my Adobe Creative Cloud subscription, I will still have Lightroom available, and adding my final selects just for Lightroom Mobile is something that I will consider, but that’s less than ideal.
Another thing that I will miss to a degree is the control Lightroom has over Slideshows. From what I’ve seen so far, Capture One has just one Slideshow mode, with no titles or intro screen, and no way to change the size of the image on the screen.
There is a way to change the transition type and number of seconds before moving to the next slide, but that’s about it, and the transitions, other than fade, are totally tasteless. I thought this didn’t match the level of refinement that I found in the rest of the application in any way. Hopefully this is still a work in progress.
These couple of things are about it though. I’m sure I’ll miss Lightroom in other ways as I continue to make Capture One Pro my main processing and workflow app, but I’ve been using it for the last few weeks, and I’m really enjoying it, so I’m prepared to work around any other shortcomings I might find.
Preparing to Migrate
So, with my tests complete, and feeling happy to jump ship, I set about the task of actually migrating my images into Capture One, and learned a few things in the process that I’d like to share with you today before we wrap this episode up.
Convert PSD Files to TIFF
As I mentioned earlier, Capture One doesn’t support Photoshop PSD files, at least not as of version 9.2, so you need to convert any PSD files that you might have in your Lightroom catalog to TIFF format. To do this, I created a Lightroom preset as you can see in this screenshot (below).

Lightroom Save as TIFF Export Preset
The import things to note here are that you can select Same folder as original photo for the Export To location, which means you can run this on all of your PSD files at once, and not have to worry about where they are and specifying the save location. They’re just go right where your PSD files are, and you can then delete your PSD file.
Also, ensure that you turn on the Add to This Catalog checkbox, so that you don’t have to manually add your TIFF files back. Then under File Settings select TIFF as the Image Format, I don’t use any Compression. For the Color Space select ProPhoto RGB if you want to keep your images in as high quality as possible, but if you don’t use ProPhoto RGB already, you might as well select whatever Color Space you do use. Keep the Bit Depth at 16 bits/component as well.
The Resolution isn’t really import, but I always use 300 pixels per inch because that’s what I use as a base for all of my printing. I also use All Metadata, and of course you don’t need to watermark these images, so ensure that isn’t checked.
Keeping Layers in PSD Files
The only problem with this method of exporting your PSD files as TIFF is that the images will be flattened, so if you have any layers in your PSD files, you’ll need to open each of them in Photoshop and then save them as a TIFF file manually, ensuring that you turn on the Layers checkbox to preserve the layers in the file. If you have a large number of PSD files with layers, you could also create an Action in Photoshop to save them as a TIFF with layers.
Clean Up Your Collections
The next thing I did was to clear out any Lightroom Collections that I didn’t need. Partly because when you import a Lightroom Catalog into Capture One, it will create a User Collection and add the images that were in your Lightroom Collections into these new User Collections.
If you have a lot of PSD files in your Lightroom Collections, you will also need to replace these images with your new TIFF files manually, so the less Collections you maintain, the less time you’ll spend on this task. In Lightroom, I selected my Collections and I turned on the Metadata filter, and under File Type selected Photoshop Document (PSD).
This shows all of the PSD files in the collections. Then I was able to right click each PSD file and jump to that image in the Library. Then I added the new TIFF file that was next to the PSD to the Collection that the original PSD was in. I also right clicked each PSD file and rolled over the Go To Collection option, to see if the PSD file was in any other Collections. If it was, I dragged the new TIFF file to these other Collections too, and then deleted the PSD file.
Once you know that you have all of your PSD files converted to TIFF and check that there are no more PSD files in your Lightroom Collections, you can filter out all of your PSD files again, and delete them. Be careful that you really do have a new TIFF for each of them first, but as long as you do, it’s safe to delete your PSDs.
Export Lightroom Catalogs for Each Import
After this, so that I could maintain these Collections in Capture One, I exported my main Lightroom Library structures as new Catalogs. In Lightroom I was able to keep my Final Selects and all of my original raw files in one catalog, but Capture One doesn’t like really this.
I’m sure it works, but the Capture One Catalog gets huge if you import them all into one Catalog, so I’ve split mine up a little bit. This is actually something else that I’d have liked to avoid, but I’m going to make it work to enable me to switch.
I have three top level folders, one called Finals, with all of my final selects, a 2016 folder with all of my raw files from this year in, and an archive folder called Photo Originals, in which I have year folders from 2000 to 2015. To make importing each of these to Capture One easier and maintain my Collections, I right clicked each of these and selected Export This Folder as a Catalog.
I unchecked the three checkboxes so that I did not Export negative files, Build / include Smart Previews or Include available previews in my new Catalog. With these three top level folders exported, I was ready to import into Capture One.
Importing Lightroom Catalogs into Capture One
To import a Lightroom Catalog, from the Capture One File menu, select Import Catalog and then Lightroom Catalog. You will then see the following dialog (below) telling you what information will be imported. At this point in time, this included Collections, Crop, Rotation and Orientation information as well as White Balance, Exposure, Saturation and Contrast settings, and Metadata, including IPTC, Rating, Color Label and Keywords.
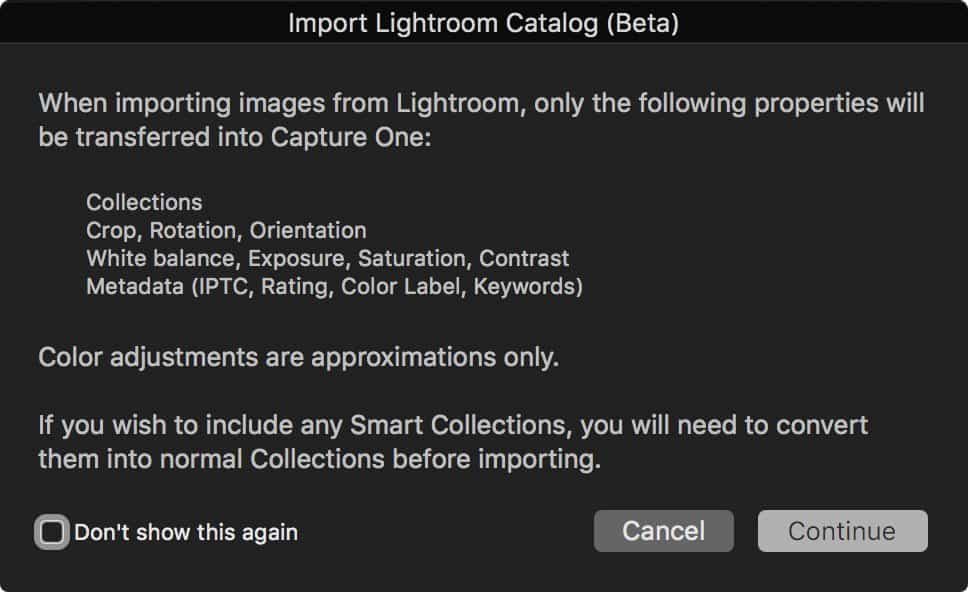
Capture One Import Lightroom Catalog Dialog
There is a note about Color adjustments being approximations, and I did notice some images, probably the one’s which I’d applied a custom white balance to in Lightroom, that were totally off. The White Balance was like 860K, to they were a shocking bright blue. I went back through these and corrected the White Balance. It wasn’t a big job.
Catalog Considerations
After importing my three main catalogs to Capture One, I checked the size of my new Catalogs, and my @Finals Catalog is 8.8GB, which is big, but manageable. My 2016 current year originals is 21GB, and will probably be around 30GB by the end of the year. That’s big too, but I don’t want to split that up.
My Photo Originals Catalog, with every image I’ve shot since 2000 to the end of 2015 is a massive 174GB, which is really too big for my liking. The interesting thing is that all of these catalogs only take around 10 seconds to open, so Capture One isn’t slowed down by the size, so I’m still considering how to move forward, but my current plan is to add my 2016 Catalog to this master Photo Originals Catalog at the end of this year, as I start a new 2017 catalog.
I’ll keep you posted on this, but I think I might end up splitting each new year into a Catalog of it’s own. I don’t really like to do this, as I like to be able to search across my entire archive, and splitting it up removes my ability to do this.
What’s more, in Capture One, you can’t select the top level folder and search across the entire Catalog. You have to actually select the folders that contain images, which is a limitation I’m not entirely happy with, but because of this, there isn’t even a strong argument for having everything in one Catalog.
[UPDATE: I have just found that you can select the All Images Catalog Collection and then search the entire catalog. I’d like to be able to select a higher folder in the hierarchy and search multiple sub-folders, but found, I can at least search the entire catalog when necessary.]
Working on Multiple Computers
You might also remember that I have historically kept my Lightroom Catalog on an external Thunderbolt hard drive, so that I could move easily from computer to computer, simply by moving the hard drive. At the moment, I’m not quite there. I have set up Capture One with a symbolic link to it’s settings folder, with the actual folder in my Dropbox, so that all of the presets and settings are automatically synched between my computers. If you don’t know how to create a symbolic link, there is too much risk in me telling you, so we won’t go into this right now.
I am also currently synching my Catalogs between machines using ChronoSync, but that’s something that we don’t really have time to get into today, and it might be time wasted anyway, because I haven’t really arrived at my final solution for this, so I’ll update you on my strategy later, when the dust has settled.
No Turning Back
As I’ve mentioned, there are a few annoying quirks in Capture One, but nothing at this point that has made me feel disappointed that I’ve decided to switch. In fact, the last few weeks have been a lot of fun, as I’ve dissected my digital workflow and rebuilt it in a totally new application.
I’ve done a number of shoots now too, and imported my work directly into Capture One Pro 9.2 and I am loving pretty much everything about it. The image quality and control that I am finding is making me totally happy with my decision to jump ship, and more than enough of a reason to overlook its few shortcomings.
I think the last time I used the term “jump ship” in the Podcast was around seven years ago when I decided to switch from Windows to Mac computers. This actually feels almost as big a move, and it’s both disruptive and time consuming, but it feels right. I already feel at home in Capture One Pro, so this is it. I’m no longer a Lightroom User.
The Bottom Line
If you want an application that works exactly the same as Lightroom, then you’d better stay with Lightroom. This is why I stayed with Lightroom for such a long time. However, if want the ultimate image quality, and you are willing to make changes to your workflow I personally think it’s worth making the change.
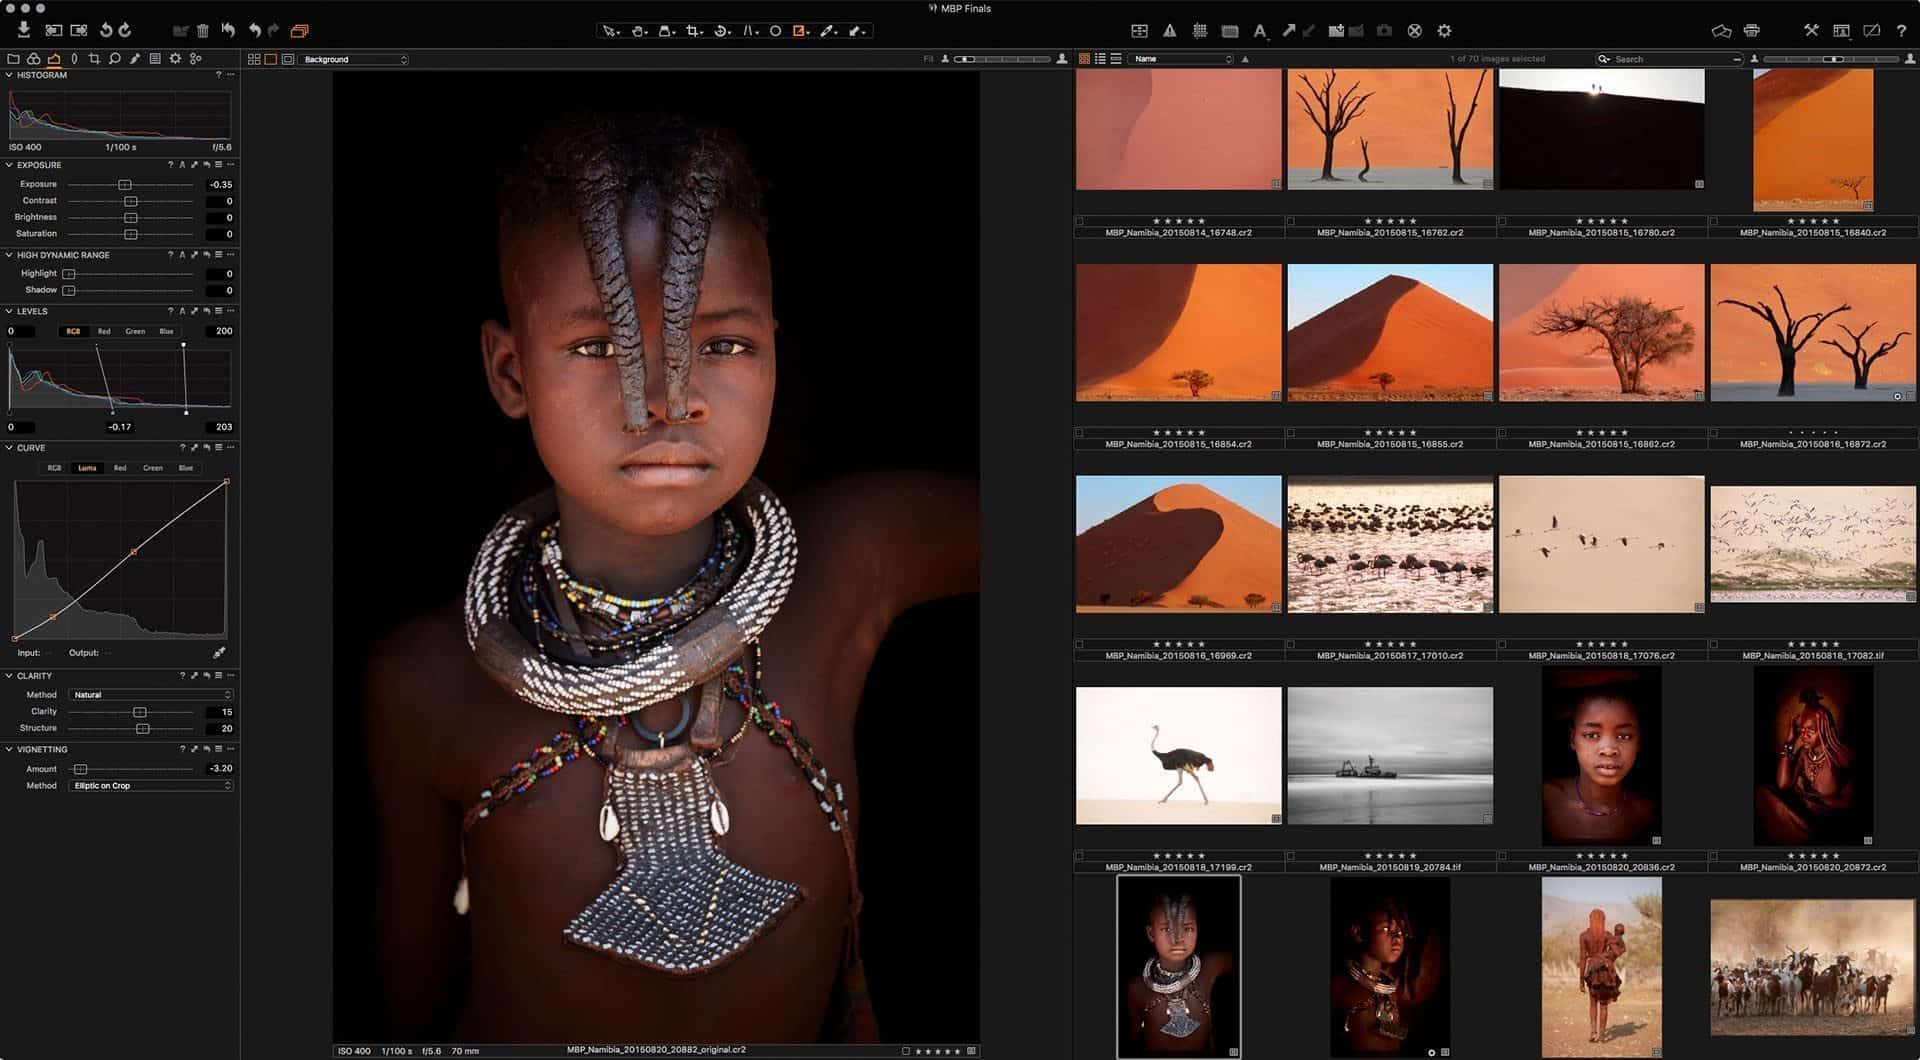
Capture One Pro 9.2 Screenshot
Save 10% When You Buy Capture One Pro
After I’d made my decision to switch, I talked with the folks at Phase One, and I’m excited to tell you that I have been invited into their Ambassador program. This means that I can get you a 10% if you also decide to buy Capture One Pro, and I get a small payment for my effort as well.
Of course, this has no influence at all on my decision to switch or recommend Capture One. My decision was made before I knew about the Ambassador program. I do though hope that you understand that I put a lot of effort into the content that I create and publish here on the blog and podcast, and this kind of program helps me to pay my bills, and continue to offer content for free.
Please note that due to changes in Phase One, the discount code that I mentioned in the Podcast is no longer valid.
30 Day Trial of Capture One Pro
I will be releasing tutorials on Capture One in the coming weeks to build on what we’ve started today, so please do stay tuned for these. Also, note that you can download a fully working trial version of Capture One Pro from the Phase One Web site, and try it out for a full 30 days before you buy. See if you love it as much as I already do.
Show Notes
Download Capture One Pro here: https://mbp.ac/c1download
 Subscribe in iTunes for Enhanced Podcasts delivered automatically to your computer.
Download this Podcast in MP3 format (Audio Only).
Download this Podcast in Enhanced Podcast M4A format. This requires Apple iTunes or Quicktime to view/listen.

Welcome to the dark side, Martin! 🙂 I made the move to C1 earlier this year and it was a substantial investment of time and money for an enthusiast photographer. And since then, I have sworn at C1 more than once, I can tell you.
That said, I love the conversions from my D800’s raw files, and as you point out – B&W works very well. I’m sticking with it.
I’m looking forward to your future posts on C1!
Hee hee, thanks Shane!
I almost knew that I’d hear from a convert before a disbeliever. 🙂
C1 cant do diff layouts/sizes on the same paper like,LR or Qinage so for those who need print layouts C1 is not an option
That’s incorrect. You can do layouts for print, and save them as templates. You have to select your profile and page size each time you reload Capture One, but the margins and other layout options are saved in the template. I show this in an episode lined up for next Monday, so please check that out.
It may have taken you years, but finally, you’ve seen the light 🙂
That is the exact phrase that I used in my first draft. I changed it in case someone thought there were religious connotations, but I certain feel as though I’ve seen the light!
Thanks Geoff! 🙂
haha, no problem 🙂
One thing I found, if there is some reluctance to switch your entire catalogue to COP, is to just create a ‘temporary session’. That way, you can look at files / folders and edit them by just browsing through your normal ‘finder’ or ‘windows explorer’ folder structure. You can then create an ‘export recipe’ that exports to the same folder the file was stored in originally and automatically reopens in Lightroom ready to import; or, you can just ‘synchronise folder’ in Lightroom and can remain using the full functionality of Lightroom for printing, cataloguing, sharing to social media plugins, the Lightroom mobile app etc…It avoids the requirement to switch your whole catalogue over the COP, but you can get all of the benefits of way better RAW conversions that it offers.
I’d also be interested in seeing your soft proofing / print process from COP…it’s different but is definitely workable. One little issue for me is that I’m unable to move my logo onto the white area of the page surrounding the image, it only seems to allow me to move it around within the image area. I’m no COP expert so maybe there is a work around and I’m just not aware of it. Otherwise, I just jump into Photoshop, use your ‘fine art border scripts’ which I amended to suit A2 sized sheets, then drop the logo and resize it there, and then soft proof / print it and / or jump back into COP.
Just sharing my limited experiences of COP, looking forward to your future deep dives setting out your findings 🙂
Cheers for all your thorough posts, I find them an invaluable reference when I’m trying to figure out how to do something 🙂
Hi Geoff,
I’ve actually already migrated my entire catalog over to Capture One, although I am jumping back into Lightroom from time to time to reference stuff at this point.
I remember when I moved to Mac, I kept my old Windows machine for a year, in case I needed it again, and I didn’t boot it up once. I’m hoping it’s going to be the same with Capture One. 🙂
From what I can see, softproofing is pretty much always on in Capture One, if you have your Process Recipe selected. I have created a Recipe with each of my ICC Printer profiles assigned, and can easily switch between them to soft proof. I’ll definitely cover this in an upcoming tutorial.
I just tried to add a logo to the margin when setting up a print, and I can’t find a way to do that either. I’m pleased my fine art border scripts are helping you to achieve that, but I’ll mention this to the Phase One team as well. It seems like a somewhat common use case.
Thanks for sharing your experience Geoff, and I’m happy my posts etc. help you too.
Cheers,
Martin.
Hi Geoff,
Can you please elaborate on how you add files to a temporary session. I’m not sure what to select when the import dialogue opens.
I know that your comment is old. Hope you’ll see my question nonetheless.
Thank you
Hilmar
I switched a few months ago because I also swithced my main camera from Canon to Fujifilm. I had trouble with Lightroom excepting the raw files. Then I tried C1 and loved how the files looked and fell in love with the B&W processing.
My problem is I am not very techy so I look forward to any organization tips you have. I don’t want my C1 to become a mess because I am not sure the best way to import.
But this podcast is a great resource.
Thanks Martin for all that you offer.
I’m happy to hear that you are enjoying Capture One, and especially that you like the black and white processing. I’d not really heard about this before trying for myself, so it’s great that people are generally in agreement on this.
Personally, I find importing into year/month/day folders as I described above the best way to manage an archive. I’ll be sure to revisit this in future episodes though, so it’ll be easy to create and apply the same kind of preset, if you don’t figure it out from the above screenshot.
Thanks for taking the time to comment Gigi!
While I’m still in the process of weening myself off Lightroom to C1, one thing I have been using regularly is C1’s tethering functionality. I use it in my small studio for macro and tabletop photography. Me thinks once you use it, you will never use Lr for tethering again. C1 is truly a professional application, which is what spurred me to begin my transition back when Adobe tried to ‘toyfy’ Lr by screwing with the import process. Don’t think we’ll see that kind of issue with C1, especially since it was originally created by PhaseOne for it’s medium format professionals.
Since I’ve read pretty much everything you’ve ever written and recorded, I know how thorough you are. Like the others here, I’m looking forward to your future posts about your experiences with C1.
HI Barry,
Thanks for the comment Barry!
I have used Capture One’s tethering too. Not since the switch, but in the past, and I’m definitely going to be using it again now I’ve switched. I agree that there will be no going back to Lightroom. I will keep it around for occasional reference, but never as my main application again.
I have to admit, that Lightroom Import mess was on my mind too as I started to consider the switch. I could have put up with it, but really, the image quality grabbed me instantly once I saw it, and I was simply on a mission to ensure that I could switch over the last few weeks.
Thanks so much for the vote of confidence on my thoroughness, and upcoming posts too Barry. I really appreciate it.
Hi Martin
The detail is certainly impressive as you show for C1
What about LR Develop presets (I have about 100) I presume these would not transfer to C1? which would mean recreating them in C1. Also Star ratings, colour tags & Stacks do these transfer over?
Did you consider a LR + Topaz workflow? Which I currently use.
Hi John,
Yes, the detail just blew me away. Develop presets are not transferable to Capture One. You would need to recreate them. But, because Capture One is so different, you will find that you do totally different stuff to make your images how you want them to look, so I personally would enjoy the process. I don’t have that many Develop Presets, but losing what I had is not an issue for me.
Star ratings and color labels are transferred, but I don’t think stacks are. I never use them, so I have no point of reference. Capture One does support stacks though, so you could still use them, but I think they’d need to be recreated after the migration.
I have tried Topaz, and didn’t like it. I’ve tried so many alternatives to Nik that I’ve forgotten exactly what it was I didn’t like, but this is one of the plugins that I have tried, and discounted.
Hi Martin
At the moment I use LR just to add a bit of refinement to the highlights and shadows of my Raw files and may be a few other tweaks if needed then they go through quite a bit of processing and stylisation in photoshop, do you think I would see the benefit of using C1 in this scenario or do you think the processing in photoshop would kind of wipe out any advantage of C1?
Hi Robert,
It depends what you do in Photoshop, but I was certainly say that if you can do what you need to do just in Capture One, it will remove the need to create a PSD or TIFF of each of your images, baking in your changes and increasing hard disk space usage.
Depending on what you do, I think you could probably do it all in Capture One, and then you get to keep your files in raw format, and that means that you will benefit from future processing engine updates, and be able to continue to tweak images without having to start from scratch each time.
The thing to do is to download the trial version and give Capture One a try, but like me, if initially, if you just install it, open it, and expect to be able to jump right in, you’ll be disappointed. It’s by no means a difficult program to use, but there is a learning curve, so you’d need to allot a nice chunk of block time to really appreciate the power of Capture One.
I haven’t viewed any other tutorials, so I can’t point you to anything yet, but I will be releasing some follow up posts to walk you through how I’m processing images etc. so stay tuned, and hopefully I can get you up and running in Capture One in no time, and you can join me into the dark side. 🙂
Hi Martin;
I smell a “sell-out” here. Have you not heard of the highlight slider in LR? I took your minuscule jpeg file and imported it into LR and with just a few tweaks of highlight and clarity produced an image of at least as much or more detail than your C1 result. Keep in mind I’m working with the jpeg. I’m sure I can improve on results if I had access to your RAW file.
EdC.
Hi Ed,
I think you need to get your nose checked. You obviously don’t know me if you think anything has happened behind the scene to cause this switch.
I understand and use all the sliders in Lightroom, but my point is, the detail was never even apparent in Lightroom, yet it was presented to me the instant I opened up the image in Capture One. I agree that I could improve on the results in Lightroom now that I know the detail is there, but that’s an Egg of Columbus scenario.
Martin,
I’m one of the ones chuckling while reading this! One of the things I particularly like in C1 is the ability to customise the user interface. It means that it takes a bit longer to learn than does LR but there’s a big long term gain in flexibility. I always felt the LR UI was a barrier.
If you look closely at the Nik tools they are not supported in OS X El Capitan and I suspect that making them free means that it’s the end of the road for future development.
Hi Miles,
I have to admit, I thought of you a number of times as I’ve made the switch. 🙂
You know, I never really felt there was anything wrong with the Lightroom interface, but I totally see the power of being able to customize the Capture One UI. It’s a much more powerful application all round.
I wasn’t aware that the Nik suite isn’t supported on El Capitan, but I’m with you. I think they’re going to kill it off, despite statement that this is not their intension.
You know what though, even if they do release a new version of Silver Efex, it now has to beat Capture One, and that’s a tough hurdle, as I’ve finally found. 🙂
On the off chance it’s of any help, Nik does continue to work in El Capitan, even if it’s not officially supported. Performance on a 5k iMac is, well, sluggish, however.
Yes, Warren, it does work fine. The point really is though, that lack of a support statement shows that Google are not investing any R&D funds into the upkeep of the Nik Suite.
Hi Martin,
Welcome to the C1 family. I was blown away with it over a year ago when I saw the difference C1 made with skin tones versus Lightroom. I could not believe the difference.
I am a former Aperture user, and looked to making the switch to a new program. I began editing in Lightroom and enjoyed that process for quite a while. Then I tried C1 and have been hooked ever since. I agree with you that there are some things that are lacking with C1, especially along the lines of photo management. There have been significant improvements recently in this area, but not enough to fit my perfectionist style.
I have since been moving my jpegs that I create in the Output folder back into Lightroom and use it for my sharing and even printing needs. Hard to give up Lightroom Mobile.
I was also not satisfied with C1’s metadata abilities during import. I will admit with the latest upgrade, this has improved. However, I use PhotoMechanic to handle the original import, keywording, geotagging, titling, etc. I also use PM to sort and create copyright files to be sent to the copyright office. I then import the selected RAWs into C1 and go from there.
This might be too much for what you are doing (I am an admitted control freak), but maybe this might help someone else who has the same concerns I did.
Anyway, glad to hear you are enjoying the C1 experience and here’s to many more great images. Have enjoyed ALL of the podcasts and listening to you on TWIP as well.
PS: The black and white converter is awesome!
Hi Scott,
Thanks for the great comment!
It’s so cool that you have a perspective from Aperture, Lightroom and Capture One. I’ve used Aperture, but only so that I could write a bit about it in my Making the Print eBook.
You know, I’m a perfectionist and control freak as well, but I’m also a pretty binary person. I’m yes or no, on or off, 1 or 0. I don’t see myself using Lightroom for the bits that are not available in Capture One. Although I may still end up using it for Lightroom Mobile, which I rely on a lot. Like you, I’ll probably just import JPEGs of only the files I need.
At this point, I think the photo management capabilities of Capture One are just about enough for me to switch, but I’d like a number of critical changes. The ability to select a folder higher in the hierarchy and see a list of images in all of the subfolders is one, but also the ability to search within multiple subfolders as well. I have just found that you can select the All Images Catalog Collection to search the entire catalog, which helps, but this area could be improved. The ability to search across multiple catalogs would be great too.
I would have missed Lightroom’s Copyright field and status pulldown a few years ago, but since the Library of Congress made a number of annoying changes to their system, I haven’t been registering my copyright, so that’s not a big deal for me at this point.
Either way, the binary Martin will make do with the few things that could use improvement, until they are improved. I can’t see me using a hybrid solution with Lightroom or PhotoMechanic at this point, although I have learned to never say never, or at least try not to. 🙂
I wish I could be as binary as you Martin, but my program ADHD gets in the way ?. Several of the search features you are looking for can be found in Phase One’s sister program, Media Pro SE. I looked at it as an alternative, but had a hard time justifying the costs when I am already an Adobe subscriber. My guess is that with more photographers making the switch to C1, we will see those search features creep in to the app.
I think we’ll see more features being added too. I’m already putting together a list of questions and enhancement requests. There’s no guarantee that I’ll get anything changed, but it’s worth letting the team know at least.
I think it’s great (and smart) that PhaseOne resets its trial clock with every new release. Like you, CaptureOne has been on my radar for a few years now and the ability to test it once or twice a year is a boon. I can see that the latest version is far superior to Lightroom when it comes to processing X-Trans files from my X100T.
The only remaining hurdle for me is the cost of entry. At twice the price of Lightroom, it’s still a major investment for an amateur.
If PhaseOne ran a competitive upgrade offer for Lightroom owners, I wonder how many more would jump.
That’s a great point Fraser, yes. I have been appreciative of that policy to allow a new trial period for upgrades.
That’s also a good idea about a discount for Lightroom owners, but I’m sure Phase One needs to make a certain amount of profit for their software to stay viable, so simply forfeiting a chunk of that profit as a dangling carrot might hurt their business somewhat. But, there’s a saying here in Japan, which roughly translates as “take a loss to make a gain”. That would apply perfectly for this situation. 🙂
Very cool Martin. I’m glad your happy with the switch. It’s good to hear such a good review and consequentially know competition in raw processing software is healthy.
Thanks Charlie! I absolutely am happy, and for sure, competition is a good thing. I have nothing against Lightroom, but she feels more like an x-girlfriend now, and Capture One has stolen my heart. 🙂
Hi Martin
Thanks for sharing your info on leaving LR.
Interesting and I will definitly test C1 for comparison.
One issue I hoped you had covered though is performance (speed) in C1 compared to LR. This is my #1 issue against LR. Even after latest LR version upgrade. What is your exerience with C1?
Hi Lennart,
You know, performance has never been a problem for me with Lightroom, so it’s difficult to draw any real conclusions. I am able to use both applications without stress. I do find that Capture One starts up a bit faster for me. It takes about 10 to 12 seconds for a catalog to open, and this is regardless of the size of the catalog. Once open, it takes another few seconds before I can start to navigate around the interface. The pictures do seem to display faster in Capture One, but again, in Lightroom this was never a stress point for me.
I know that some people have found Lightroom to be incredibly slow though, so I would recommend that you give the trial version of Capture One a try, and see if there is much improvement for you. Make a copy of a few large directories of images and import them to Capture One, then have a play around with it for a while. It may we be faster for you.
Hi Martin
Very tempted to give C1 a trial but my girlfriend LR is hanging onto my legs! I played with DXO a while back and was quite impressed with the quality. What about a LR + DXO workflow have you tried that out?
Cheers
John
Hi John,
I did try DXO many years ago, and although I’m sure it’s improved, I don’t like hybrid solutions. I want to be able to open one program, and do everything in there. I don’t mind using plugins etc. but I like the core workflow to be all within one application. I also like to keep my images in raw format if at all possible. Round-tripping to most plugins requires us to create a TIFF or other format, and I want to avoid that if possible.
For me, right now, Capture One is it. 🙂
Very clear and well explained as normal.
I came from Apple Aperture 2 years ago. But know Lightroom from my other job.
That said there is no perfect program, but I am very pleased to have begun using C1.
Although I was convinced it’s always nice that the ones that I listen to, also have come to the same conclusion. It is you and Derrick Story. Welcome.
That’s great to hear Stenivo!
I didn’t realize that Derrick had switched. That’s cool.
We’re all one big happy family. 🙂
Welcome, Martin!
I must have been using C1 since some time in 2006: I’d been a RawShooter user before, and when this was bought by Adobe and turned in to LR I decided to take an alternative path.
There have been some bumpy patches over the past decade, but the programme has matured massively in the past 3 or 4 years, which conveniently corresponded with my period of retiring from much of the day job and doing more photography.
I really enjoyed this episode and I look forward to learning to exploit C1 much more now excellent teachers such as yourself and Derrick Story have come on board.
I have already posted a link to the episode on our local photography club page: it will be interesting to see if any of the Adobe diehards there make the switch. Some of them have been pretty frustrated with LR recently…
Hi Mark,
Wow, that’s a long time! Exactly the same amount of time that I’ve been using Lightroom, by the nature of your change of course.
I’m pleased that you enjoyed this episode, and thanks for sharing the link. You know, this is probably one more reason why people should understand that image quality is my main motive for moving, because I was actually not frustrated with Lightroom at all. The start up times have extended over the last year or so, but otherwise, it’s been running fine for me, so it was not a problem with Lightroom that caused me to look for an alternative. It was simply the undeniable image quality of Capture One, and the B&W capabilities. I also am just really enjoying the user interface and control that it affords the photographer.
With ten years under your belt, I doubt there will be anything I can relay that you don’t already know, but I hope you enjoy my follow up posts.
Cheers,
Martin.
Hi Martin,
On Nik I found that the Nik tools had disappeared from my Photoshop/Filters menu on PS CC 2015. Redownload and Reinstall failed to bring them back. This was on my desktop but Nik was still there on my MacBookPro. Or at least it was for a week or two .before it disappeared there also. That’s when I found Google Nik support has disappeared and that El Capitan is not supported. I was surprised at how hard it was to find anything on the web about Nik problems and solutions. Coincidence or not ? Only Google knows. Then I came across a little item somewhere that said to go into Photoshop/Preferences?Reset Preferences on Quit. As if by Magic the Nik tools re-appeared. Despite the lack of El Capitan support the tools now still seem to work fine other though I now use them only for a couple of situations.
Part of my reason for raising C1 in workshops is that I know couple of well respected photographers who feel they have to teach Lightroom but use C1 in their personal work. That may be pragmatic commercially due to the relative market shares of the two products and because of what people bring with them on their laptops. I can’t imagine now buying a camera which is not supported in C1 however attractive that camera might otherwise be.
I’ve nothing against LR. I found a friend was still using PS5 or 6 and persuaded him that he needed to move to some sort of RAW processor. For him LR was the ideal solution and he is very happy with it. Horses for courses and all that.
Hi Miles,
There was a problem with the recent Photoshop update, as it didn’t automatically copy plugins to the new location. You should see the Plugins directory left in your Applications folder and be able to drag and drop them to the plugins directory in the latest version of Photoshop. That worked for me, without reseting preferences. I’ll keep that solution in mind though, in case I need it. Thanks!
I understand what you’re saying about teaching Lightroom because of the audience size. I haven’t decided how to proceed yet, but if I’m not using Lightroom for my own workflow, I’m unlikely to continue to teach it during workshops. If people want an overview, I’ll continue to do that until the version-ups take it out of my grasp, as I don’t see me learning the product separately just so that I can teach it.
I don’t have anything against Lightroom either. I’ve loved using it over the last 10 years, and I was not experiencing performance issues as many currently are. For me, this decision has been purely based on image quality, and the more I use Capture One, the more I’m enjoying it. I had to provide someone with a few photos today, and rather than opening Lightroom, I located them in Capture One and reworked them before sending them off.
Welcome to c1-land. Made the switch about a year ago after a similar put my foot in the water several time adventure. I still go back and check out LR but it’s always like looking back at high school–not as good (or bad) as you remember. Image quality is just better in c1–end of story. Ability to do layers at raw image stage is wonderful. Over time the phase one people will enhance the gui, and make it more accessible. As presets and books and training grow, so will converts. I feel alone in the woods with all my pals using LR, but I have never been a crowd follower. Heck, I switched from nikonland to Sony 4 years ago. Congrats on nice, thoughtful, and calm summary of why you made the switch.
Thanks Lester!
You know, I was honestly always very happy with Lightroom, and don’t think it’s a bad program, but as you say, I have just fell in love with the image quality in Capture One Pro. Layers is nice too, I agree. There is so much going for Capture One, I don’t know how I stayed away so long. 🙂
Cheers,
Martin.
Thank you for your thorough eval of Capture One Pro 9 and for sharing your processes and experiences in this post – it is timely to my decision to “jump” from LR. The additional comments and dialogue between you and fellow followers is very convincing as well. I eagerly look forward to your future posts.
Thank you Ginger!
Having used Capture One Pro for a few extra weeks now, I’m going to put a few follow up posts together for release from next Monday, so please stay tuned, and I hope they help!
Regards,
Martin.
Welcome to C1, Martin! I was an Aperture user and initially moved to Lightroom when development on Aperture was discontinued 2 years ago. However, Capture One showed-up on my radar a few weeks after starting to use Lightroom and I took a look. I ran a test comparing images and was also shocked at the level of detail with Capture One. It was like my lenses and cameras received an upgrade! I quickly made the move to C1 and never looked back. Landscape and nature photographers are truly missing out if they are not using Capture One. That said, I also have a Creative Cloud membership. There is still a need for Photoshop! But Photoshop is now working with superior images.
And while you’re here, I have enjoyed you on TWIP in the past. Now that I saw this article, I will be checking out your podcasts as well!
And here is a tip for new users. Capture One has a lot of tools, but you will use a few over and over. Create a custom tool tab for all of your favorite tools. It is so much nicer to have your most-used tools in one tab instead of jumping from tab to tab. And just so you know, multiple custom tabs can be created and the same tool can be in multiple tabs if desired. For instance, you may want the Exposure tool in your primary tab and also in a second custom tab for B&W work (B&W tool, Grain, Exposure, etc.). The Capture One tutorials and Webinars are fantastic: https://www.phaseone.com/en/Products/Software/Capture-One-Pro/Tutorials.aspx?
Thanks for taking a look and for the posts Don!
I have not yet created a custom tool tab, but I know about them, and decided I would use Capture One for a few weeks to ensure that I was exploring the entire interface, before setting one (or more) up. It certainly is powerful to be able to do this.
Cheers,
Martin.
Welcome to the other side Martin. I switched from Aperture a few years ago because I bought an iQ180. My jump was to capture one 6 which I hated because it was session based and so very different from Aperture. But within the year Capture One went to Catalogs on version 7 and has been improving at a very fast rate with more and more features. The one feature that I have been asking for is a change in the colour tags. As it is now the red tag says “Red”. And the yellow says “Yellow”. I want to be able to have my red colour tag say what is meaningful to me such as “to be printed” or processed with MacPhun” or whatever. I recently looked at some previous photos that had red dots and I had no idea why they were red. Anyway that is the only thing that I am anal about. By the way a little thing you might want to try is to go to Preferences within C1, thenExposure, change the channel mode from RGB Channel to “Red, Green, and Blue Channels. Then if you have a photo that is a little hazy or has a colour cast then in the levels tool hit Auto and BAM, instant fix.
Thanks for the welcome Paul!
I’m with you on the labels, although I have to admit, I never changed their names in Lightroom.
I did change the RGB Channel settings to Red, Green and Blue during my initial pass through the preferences. Whenever I can select something that gives me more control, I do, even before I know the benefits. 🙂
Conversely, I doubt that I’ll hit Auto (although I’ll give it a try now that you mentioned it) but I will see what it’s actually doing, and make those changes myself manually. I’m allergic to anything automatic. 🙂
Cheers,
Martin.
Martin – Thanks for the C1 review. Between you and Derrick Story recommending it and your thorough review, I decided to give it a try and I’m in the 30 day demo period. So far very impressed and learning more about it every day. Since I know you are a control freak and are an advocate of printing images, one issue I’m bothered by is the inability to output in Prophoto RGB. Today’s better printers can, as you know, print in a larger colorspace than Adobe RGB. It appears that the largest colorspace you can output in is Adobe RGB (1998). The recipes in the output tab only seem to allow sRBG or Adobe RGB. Since I still occasionally will do work in PS 2015 and like to work with luminosity masks, the one thing I’m disappointed in is being able to output in the largest colorspace possible. Despite searching for a solution so the Prophoto colorspace shows up in the output recipes, I’ve found nothing. Do you have any concern with this? Have you found a workaround? Thanks so much. David
Hi David,
You’re welcome, on the review. 🙂
You actually can configure Capture One Pro to use and export images using ProPhoto RGB. You just need to locate ProPhoto in the profile pulldown, and use it. I have an episode lined up for next week that shows me using ProPhoto a number of times.
You won’t find a preset for it mind. You have to create your own, but it’s there. Please take another look.
Cheers,
Martin.
Martin –
Thanks for your quick reply. Yes, I realized that I had to create my own profile. And, yes, I do have Prophoto RGB.ICC in my colorsync library (should it be somewhere else?). But when I go to build the new recipe for 16 bit Tiff with Prophoto, when I hit the arrow on the pulldown menu to select a color space ProPhoto isn’t there. It’s likely that there is something simple that I’m just missing, but despite numerous Google searches and going through the online manual, such as it is, I can’t find anything specific to this issue. Thanks again.
Best,
David
Hi David,
The profile that is in my pulldown is ProPhoto.icm in the following location:
/Library/Application Support/Adobe/Color Profiles/Recommended/
Dropping it into the below location should also work.
/Library/ColorSync/Profiles
Try adding the profile to the below path, and let me know if you still don’t see it.
Regards,
Martin.
Martin
Tremendous! Thanks for the road map. Now I’m sure I’ll get there.
Martin – I’m posting this in case it might be a help to anyone else, even though this is a bit embarrassing! So I followed your suggestion above and found that Prophoto RGB was already in both the folders you mentioned. So, of course, my thought was there is something problematic with my copy of C1. So I re-ran the download, went into C! and, nope, in the new recipe I was trying to do, it still only showed sRGB and Adobe RGB. So what the heck?! Well for the very first time i noticed below those two choices was a choice of “Show All.” And, of course, dozens of color space options showed up including Prophoto. Pretty dumb that I had missed that option entirely, but as many times as I looked at it I just didn’t see it. Just something to consider for anyone else having a similar issue. .
Aah, OK. It’s great that you found the answer though David. Thanks for the update!
Martin, I am not sure that the Prophoto RGB is in Capture One. I use either Camera Embedded or basICCrgb. However if it is not there it should be a simple matter of downloading it and putting it in your colorsync folder. I say this because it is not in C1 on myMacbook Pro. But I also try to keep as much of my work in Raw as possible so I usually use Camera Embedded profile as it is as wide a colour range as it can get. I mean regarding photography of course:)
You’re right Paul, it isn’t in Capture One as such, but it’s installed on most systems somewhere. If not, you can download it online, as you say.
For the camera profile, yes, you want to use the Camera Embedded profile provided by Capture One, or something that you create yourself, but let’s not confuse the output profile with the Camera profile.
Hi Martin,
You really pushed me to go with COP in the future. Thanks for that!
My biggest concern right now is how to display my virtual copies from LR in COP. I usually made a few virtual copies for different crops etc.
Do you have a workaround? Did I miss something?
Although you are not the COP support you have maybe a hint for me…
Best regards
Jan
Hi Jan,
I don’t use Virtual Copies really, so I didn’t come up against that. They are not in the list of things that are imported though, so I don’t they they are supported.
Maybe try getting in touch with Capture One support, although I think the answer will be “no”. 🙁
Regards,
Martin.
Hi Martin,
Thanks for your reply!
You are probably right. Maybe I should clean up the VC and export some tiff files then.
Anyway, I will contact the support regarding this topic.
Additionally I would place the question, if they would include the recursive folder view as it is in LR….
Best regards.
Jan
Hi Martin – would you be kind enough to share the steps you took to blackout (or white-out) just the backgrounds, as illustrated in your pictures above?
Hi Paul,
I will make a video to show how I did the black background pretty soon. Please stay tuned.
For the white out images, that’s not post processing, it’s snow. 🙂
Regards,
Martin.
Hi Martin,
I started using CO earlier this year in addition to LR, but didn’t completely jump ship. Been busy with the other stuff, so I had to stick to familiar and therefore faster workflow of LR.
Sat down to compare a set of images on both the programs this morning, but I couldn’t remember how to move the filmstrip, so I did a quick google search – look what I have found – you have jumped ship!!!
Will go through your podcast later today!
Have a very merry Christmas an awesome new year my friend!
Hi Dinil,
It’s nice to hear from you.
Yes, I jumped ship in July and haven’t looked back. I still miss some Lightroom features, but I’m happy to work around not having them for the benefits that Capture One Pro brings me.
Sorry I missed this before Christmas, as I was in the UK with family, but a very Happy New Year to you too!
Regards,
Martin.
HI Martin,
Yes it has been a while; will email you a proper update later this year!
Thanks a million for that cheat sheet – that is a real life saver!
Real good article. It seems like you are quite happy with your switch to Capture One.
I too am right now just in the middle of a trial transition between Lightroom and Capture One. I wrote up a rather verbose description of what I have found so far, not to trash either side, but more my observations while attempting to see if migration from one to the other is possible. If anyone wants to read it… (I hope it is okay to post that here!)
http://www.ephotoquest.com/-/galleries/blog/software-review-capture-one-v-10
Hi Mr Bailey,
I am jumping ship so to speak from LR and currently am waiting for Capture One to export my LR catalog. I would like to emulate your organization but I have organized my LR catalog completely different than yours. What would be the best way to grab all of my images by year and create catalogs to implement your method. Thank you and I love your podcast. I will be buying C1P using your discount, I appreciate that.
Reese
Hi Reese,
Sorry for the late reply. I have been traveling for the last few months and just now catching up.
What I would do in your position is create a new Lightroom catalog, then reimport all of my images while having Lightroom automatically sort them into a Year/Month/Day folder structure. If you currently rely on folder names for something like a note of the location, you might want to go through and add that location to the Keywords and/or IPTC data before you reimport them.
I hope that helps. Drop me a line otherwise.
I’m pleased you enjoy the podcast, and thanks for using our code. 🙂
Regards,
Martin.
Hi Martin,
Thanks for such a well thought through post. I’ve been toying with switching to C1 Pro but decided not to when I read the September 2016 article by Martin Evening on C1 Pro vs LR. I’m interested to know whether you have seen the article and if so what is your view. Martin (Evening) does say that both programs are good and that there is nothing wrong with using the program that gets you closer to the result that you want with the standard import adjustments that are applied to your image.
Cathy
Cathy, I highly recommend at least giving Capture One a try. When Aperture development ended, I moved to Lightroom, thinking it was my only option. However, Capture One quickly came on my radar. After doing a side-by-side comparison of my photos exported from both, I was shocked at the difference. I moved to C1 and could not be happier. You should try it with your images and see first-hand.
Also, keep in mind that people who are in the business of photography training teach Lightroom because it has the most users. It does not mean LR produces the best quality images. Capture One is the standard for most commercial photographers, people who demand the highest quality day after day.
Here is a link to Capture One video tutorials to help you get started:
http://www.phaseone.com/en/Products/Software/Capture-One-Pro/Learning-Hub.aspx
Hi Dan,
Thanks for your comment. Of course you are right there is nothing like giving something a try with your own images.
Cathy
Sounds good, Cathy. And I hope it didn’t come across as me saying Martin is biased. I was just referring to people who train in general. Many want to teach where there will be the most customers. David Grover does a great job teaching for free on the C1 website. And if you really want to go further, he just did a 2 day CreativeLive class on Capture One.
Funny you should mention the CL course as I did tune in to watch the course. I’m pretty relaxed that I would be able to work out how to use the software. I was really just interested in whether Martin had seen Martin Evening’s article as I think he took a balanced approach to looking at the 2 programs.
Sorry for the late reply Cathy. I am just catching up after my crazy Japan winter tour season.
I have read Martin Evening’s article, and while I agree with most of it, the comments in the conclusion are actually in some ways the reverse of my experience. He says (paraphrasing) that people often see the Capture One version of images as being sharper and more punchy from the get-go, and that’s why they think the image quality is better. That’s not my experience. As I have shown, there is more detail, but this is not necessary more punchy or sharper.
But, Martin does say that both programs can be used to make great photos, and this of course is totally correct. After using Capture One Pro for 9 months now, I can say that it has helped in many ways to speed up my workflow, because of the customizability of the UI and amount of work needed to get to my final image. I don’t do a lot of work to my wildlife images, but for landscape, I would often go into Silver Efex Pro or Capture One pro to get the results I wanted. I could not get my images there with Lightroom alone. I haven’t used these plugins once though since switching to Capture One Pro, and this has made all the difference.
You can most definitely stake a case for either program, and having loved Lightroom for as long as I did, I’m not going to tell you it’s a bad program. I’m also not going to tell you that Capture One Pro is perfect. It isn’t. What I will tell you though is that I have absolutely no regrets about switching, and I love the look that I’m getting now, and the ease and speed at which I’m getting those results.
You may have already moved on, but I second Dan’s suggestion, of giving Capture One Pro a try, and actually using it for a few weeks, to see what you think, and then make up your own mind.
And if you have any other questions, just let me know.
Regards,
Martin.
Hi Martin, Thanks for a thoughtful response. I’m really interested that your experience is that you get more detail and that it is giving you the results that you want more easily and quickly. I’ll have to give it a go! Cheers Cathy
Hi Martin,
I’ve been using Capture One Pro (Sony) since I first got my hands on an A6000 & A7ii little over two years ago now. Little did I know how much the Express version will change the way I looked at raw processing compared to Lightroom it was a no brainer and initially zero cost investment from a monetary perspective.
I’ve since got the Pro version (since v8 that is) and have never looked back. I’m glad you have written what looks like an honest subjective review. Excellent work and the black & white’s you’ve posted in this blog are stunning to say the least.
Cheers,
Vas
Hi Vas,
That’s great that you’ve been enjoying Capture One Pro. I’m totally with you.
I’m pleased you enjoyed the black and white shots too. I’ve been using Capture One Pro for all of my work since this post, and haven’t had to revert to Silver Efex once during the last 11 months.
Thanks for taking the time to comment!
Regards,
Martin.
Hi Martin,
I have just started using C1 Pro 10 after, like yourself, a long time user of LR since Beta!
Whilst I know it’s a learning curve, one thing I am really struggling with is B&W conversion that can match Silver Effex. I have images that I have easily created in Nik, and am unable to get any close match. The control points in Nik are really something I have relied on and C1 doesn’t have this functionality. I want to stop my dependency for Nik software for obvious reasons so am looking for any ideas and suggestions you may have.
Thanks, John
Hi John,
It can take a little more time initially to get similar results, but I’ve been happy with my conversions, and haven’t had to go back to Silver Efex at all since jumping ship a year ago.
I find myself using the Levels, Luma Curve and color channel sliders to get the overall look, then I use Adjustment layers brushed over certain areas of the photograph to do what I used to do with Control Points. I did a quick adjustments guide to walk you through one of my black and white conversions here: https://mbp.ac/552
I’ll do another soon to show some more complex adjustments, and hope that helps.
Regards,
Martin.
Hi Martin,
About 10 years ago I worked in a very high volume studio and the great advantage of C1 (v3 at the time) was the direct keyboard control of the major parameters, particularly Exposure and WB/Tint. Although I do not have to process the same volume today at times my throughput can be quite large.
If you spend a lot of time processing in Capture 1 this is really worthwhile investing time in:
https://phodograf.com/controller-1/
This thread on DPR gives more information:
https://www.dpreview.com/forums/post/60167541
Cost is about AU$200 for hardware and software. You end up not having to look at the sliding controls in the GUI or your keyboard for shortcuts. After a few hours practice everything is done by feel with physical dials and buttons greatly increasing ease of use and throughput.
If you think moving from LR to C1 is a headspin this takes it to a different level. But what you end up with is most of the advantages of a Tangent Controller at less than a tenth of the price.
https://www.phaseone.com/en/Products/Software/Capture-One-Pro/Tangent.aspx
there are 3 steps:
1/ Set C1 keyboard shortcuts (about 30 minutes)
2/ Set Beatstep software (about 30 minutes to an hour)
3/ Set Bome translation software (between 2 and 8 hours depending on how long it takes to come to grips with).
The whole process is fairly simple once you understand what is going on. I have ended up with 10 controls for sliders (exp, brightness, shadows ect), 4 for Brushes and Layers (Size, Hardness, Opacity and Cycle) plus Zoom and Navigate. The 16 pads control Colour Pickers, Menu Panels, Copy and Paste and other Keyboard shortcuts.
It is hard to explain the lack of stress placed on the eyes and hands. The advantages are very similar to the advantages of using a Wacom Tablet with buttons over using a Mouse and Menus.
While there are any number of reasonably priced products for LR asfaik there are none for C1 hence my investigation of this solution.
The satisfaction of doing it yourself is a free bonus!
Regards,
Terry
Hi Terry,
Thanks a million for bringing this to my attention. I hadn’t heard of this, but will certainly take a look.
I already have a number of MIDI controllers, one on my main workstation desk, that would be perfect for this.
If I can figure it all out and get to a place that I’m happy with, I’ll show my results in a future post.
Thanks again!
Regards,
Martin.