I’m dedicating this week’s episode to answering a listener question about adding copyright information, resizing images for the Web and adding watermarks etc. to your images using Photoshop Elements.
Listener Michelle D Salati sent me a voicemail via the widget on our site, about resizing images. I would normally just play you the message, but Michelle left the TV on as she recorded, and I’m not sure she meant for me to insert the audio, so I’ll just read out the gist of her message myself. Michelle said…
Hi Martin, I think your web site’s fantastic, your photographs are amazing. You’re inspirational. I’ve also read Tim Ferris’ book and you reinforce that help, so it’s not only about you, it’s about everybody, and I love that.
One question I have to ask is what is the best way to resize my photos so they are sharp and crisp (I’ve got Photoshop Elements) and the best way to add my name and copyright? Should I put a frame around them and add a watermark to the images?
So firstly, thanks for the kind words Michelle. I really appreciate it. I’ll go on to explain a little bit about resizing and exporting for Web, and we’ll cover adding your copyright information to the file and the dilemma of whether or not to add a frame or watermark. I don’t own Photoshop Elements so I’ve downloaded the trial version to help me explain this. Next week I’ll go on to explain how I export my images with one click, including a watermark, using Adobe Photoshop Lightroom.
Before I talk about resizing and exporting, let’s look at the part about adding your name and copyright to your images. I want to talk about this first, because with pretty much everything in the digital workflow, the earlier you do things, the more time you will save. If you add your name and copyright information only as you export your images for web, you have to do this every single time you export an image. There are a number of ways to get this information into your images early in your workflow, but the absolute earliest is to save your details into your camera, so it’s added to your photographs in camera as you make them.
For example, on my Canon camera, there is an item in the menu called Copyright information, and under that menu I have options to Display copyright info, Enter author’s name and Enter copyright details. You can go ahead and enter your details right there in the camera, and it will be appended to the EXIF data of every image you shoot from that point on. I usually enter my name, and then under the Copyright information, I add my name along with the words “All rights reserved”.
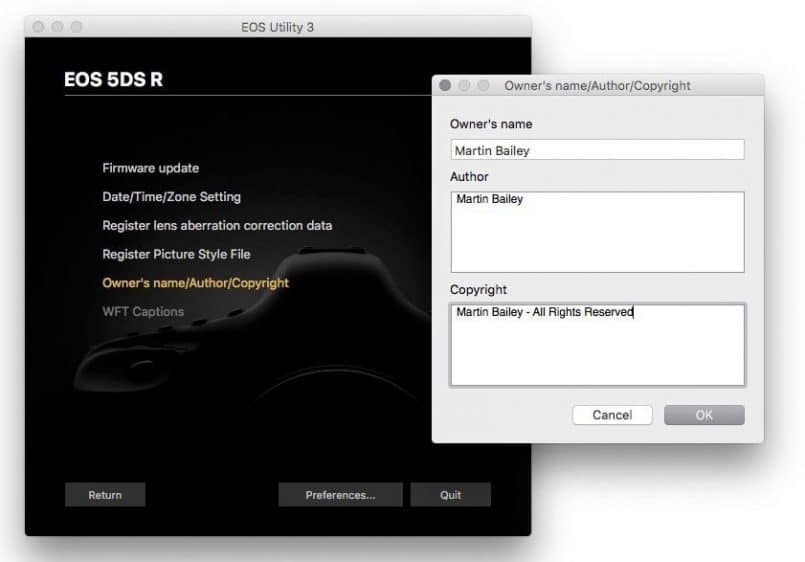
This can be a pain to enter via the in-camera menus though, so I install Canon’s EOS Utilities application, that comes with my camera, and then connect the camera to a computer using the USB cable provided, and then in EOS Utilities I click Camera Settings, which then gives me an option to edit the Owner’s name/Author/Copyright information, as you can see in this screenshot (below).
If you do this, all images you shoot will be tagged, but you cannot add a copyright symbol © to this information, either in camera, or via the EOS Utilities, and I like to add a more complete copyright statement, so I actually apply a metadata preset to my images as I import them in Lightroom, which I’ll show you next week. Also, unlike Photoshop Elements, once I’ve set up Lightroom to apply my preset, it just keeps doing it for every import until I change the settings again, so I don’t have to do this every time I import images.
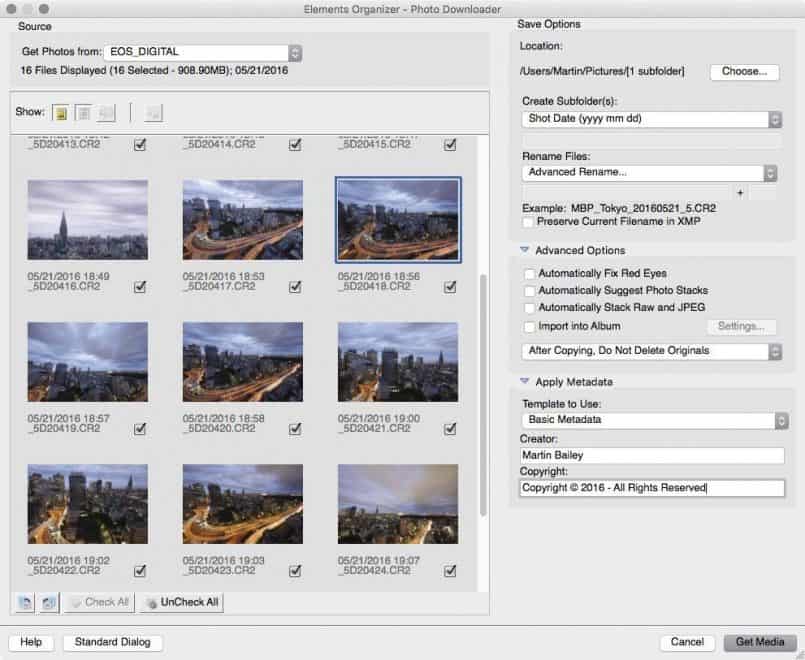
For now though, if you are using Photoshop Elements as Michelle is, here’s what you’d need to do. When you import media from a camera or memory card, click on the Advanced Dialog button at the button of the Photo Downloader screen, and you’ll see something like this screenshot (below).
You’ll notice that I added my name as the Creator and in the Copyright field I entered “Copyright © 2016 – All Rights Reserved”. You might want to add your name to this as well, although it will usually be displayed with the creator name. By the way, to enter the copyright symbol on a Mac, hold down the alt/option key and type a “g” on the keyboard. On Windows, hold down the alt key and type the number 0168.
The beauty of adding this information to your images as you import them, is that now, from this point on, they are all tagged with your copyright information, so you don’t have to add this each time you export them.
Note that I was not able to find a way to do this when importing from a folder, so if you already have your images on your hard disk, you’d need to import your images into the Organizer first and use to the method I’ll cover shortly to apply this information to images after that.
Adding Copyright Information to Individual Images
Adding copyright information on import is going to save you the most time, but if you haven’t been doing this so far, it is best to add this information to your original image files. That way the information will stay with the image in all future exports.
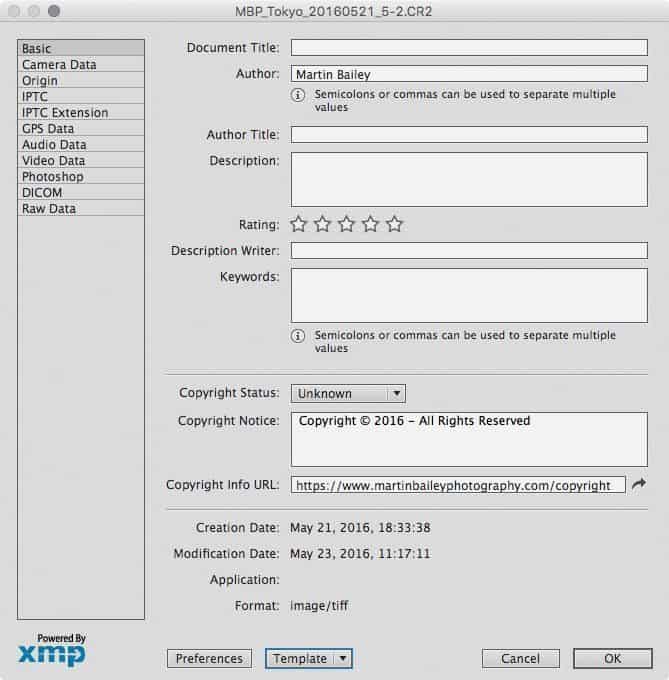
In Photoshop Elements, you can do this by opening the File Info dialog from the Edit menu. You’ll see a dialog like this (below) into which you can enter your details. If you have a web page that explains your copyright policy, you can enter the URL to that page at the bottom of the dialog as well.
We obviously don’t want to have to type this in for all images though, so before you click OK, select Export from the Template button at the bottom of this dialog. Because I added the year to my Copyright statement, I called my template Martin Bailey Copyright 2016. I will need to update this at the start of 2017. If you think you’ll forget to do that, leave the year out of the copyright statement, or a much better option would be to leave the year in and set a reminder in your calendar.
Update Copyright Info for Multiple Images
Using this template, you could then import the same settings to other images in the future. The problem with this method though, is that you have to do it for every image individually, and that’s too time consuming.
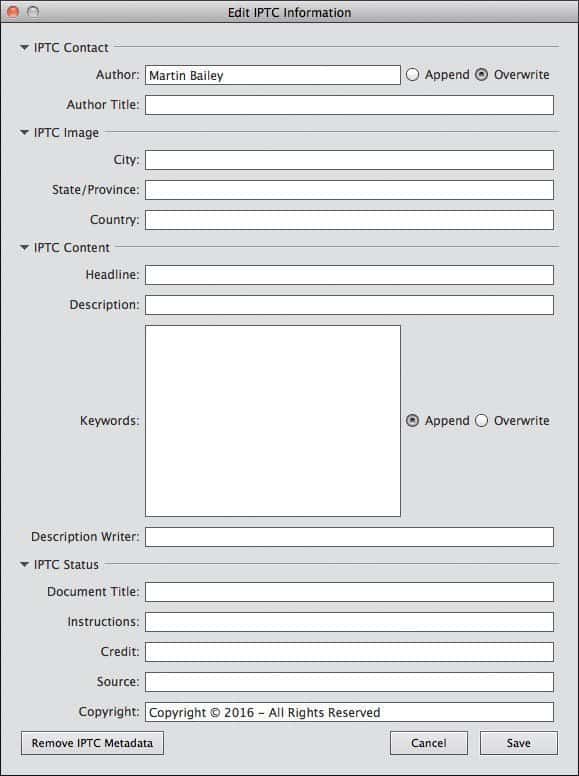
Alternatively, you can go to the Adobe Elements Organizer, and select all of your images by pressing COMMAND or CTRL and the A key on your keyboard, then right click your selected files and select Show File Info, or hit the Keyword/Info button in the bottom right corner of the screen, then click the “Information” label at the top right. After that, click the Edit IPTC Information button in the middle of the right sidebar. You can then enter your details into the Author and Copyright fields in this dialog and apply them to all of the selected photos, as you can see in this screenshot (below).
Notice how I chose to Overwrite the IPTC Contact, Author information. This is to stop the field being populate with “Martin Bailey; Martin Bailey” or similar, as it would be if I simply Appended the new information.
Resizing and Adding a Watermark in Photoshop Elements
Michelle also asked about resizing images for the Web and adding a watermark in Photoshop Elements, so let’s walk through this. Shortly we’ll use an option to process multiple files, both resizing and adding a watermark at the same time, but to do that, we need to either open all of these files, or copy them to a new folder. If you only have a few files to export, then just opening them and then proceeding to the next step is fine. If you have more than a handful of files to export though, it’s best to make a copy of them first.
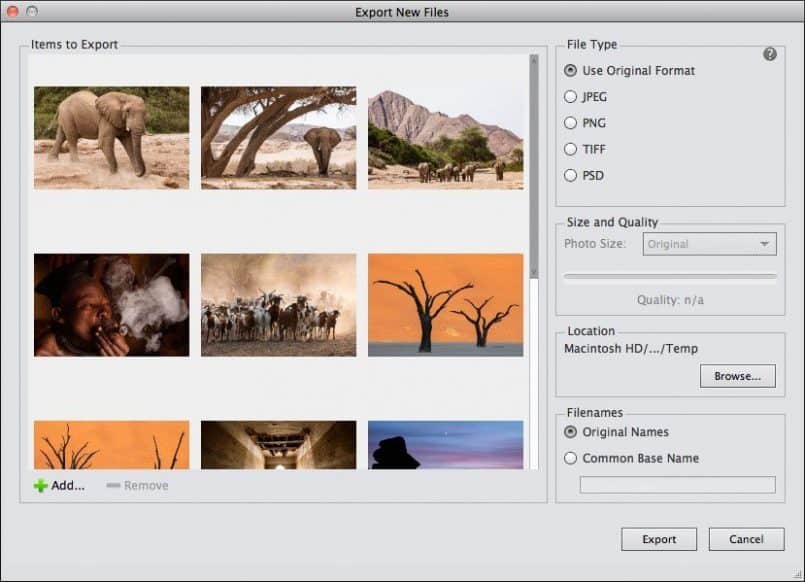
Select all of the files that you want to resize and watermark in Elements Organizer. Then from the File menu select Export as New Files. Select Use Original Format as the File Type, then Under Location click the Browse button and create a folder called Temp or something like that on your Desktop, then click the Export button.
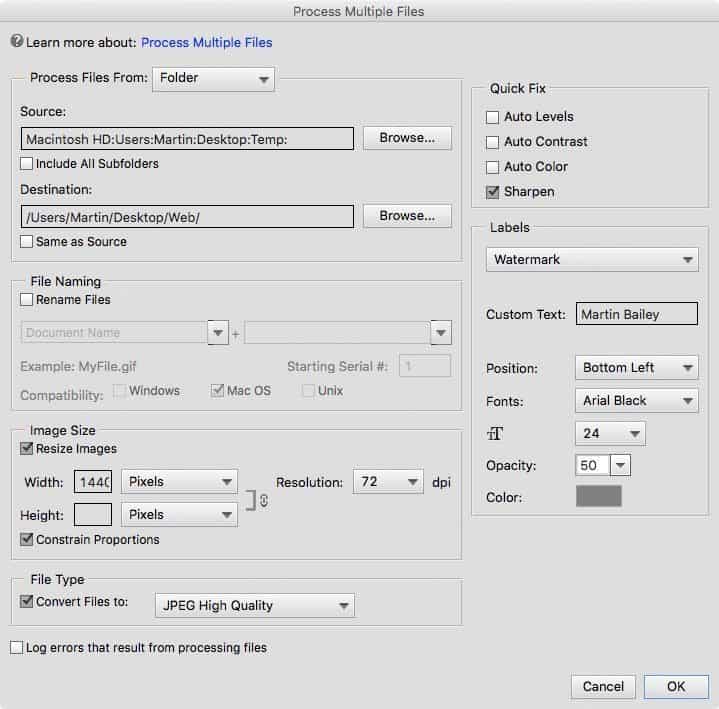
Then in Photoshop Elements Editor, not the Organizer, select Process Multiple Files from the Edit menu. You’ll then see a dialog box like this one (below) into which you can enter the size of the images you want to export, and add a watermark at the same time. Under the “Process Files From” pull-down you can select Folder, Import or Open files. If you already have the files that you want to export open in Elements, that will work. Otherwise, click the Browse button next to the Source field, and navigate to the Temp folder that you just exported your Original Files to, as you can see here (below).
For the Destination folder, click Browse again and create a folder called Web on your Desktop. Under the Image Size section, turn on the Resize Images checkbox. For the size, you need to decide how big you want your images to be. If you make your images too small, people won’t be able to appreciate them, but if you make them too big, it would be easier for people to use them for their own purposes without your permission.
For a number of years now, I’ve resized my images to 1440 pixels wide, and 960 pixels high for portrait oriented images, which is a good size for the Web. Not quite big enough for people to do much with, but plenty big enough to appreciate the photographs. Whatever you chose, select Pixels from the pull-down, and enter that number into the Width field. Also, change the Resolution to 72, which is still pretty much the standard resolution for Web use.
Unfortunately, there is no way that I could find to handle exporting vertical orientation images at a smaller height when selecting 1440 pixels as the width. From Lightroom, I can automatically resized horizontal orientation images at 1440 pixels, and vertical orientation images at 960 pixels high. In Elements if I select 1440 pixels wide then portrait orientation images are exported at 2160 pixels wide, which I obviously don’t want. To overcome this, you’d need to batch process your horizontal images separately from your vertical images, and enter 640 pixel width for your vertical images, which would make them 960 pixels high.
When you’ve done that, under File Type, turn on the “Convert Files to” checkbox, and select JPEG High Quality, and under the Quick Fix box turn on Sharpen. This will ensure that your images are sharpened a little during the export. Even if your images are sharp full size, you need to turn this on, or they will look soft after they have been resized.
Then under the Labels section, select Watermark, then under Custom Text type what you’d like to add as a watermark, and select the position, font and font size. You also need to select a color for the text. If you just leave this as black, then it won’t show up against a dark photograph, so it’s perhaps best to select a mid-gray or even a brighter color if you really want it to stand out, and then make the Opacity between 30 and 50 percent.
Once you have done all that, click the OK button and wait for your images to be resized, sharpened, watermarked and exported all in one go.
Disclaimer
Before we move on, I’ve got to tell you that at this point in time, May, 2016, this process actually doesn’t work for me. It should, but I can only assume that there is a bug in Photoshop Elements that is preventing the watermarks from being applied during this process. I spent a couple of hours troubleshooting it today, but I’m out of time, and frankly I’ll never actually buy Photoshop Elements, so I’m going to give up on this for now.
Exporting for Web – Photoshop Elements
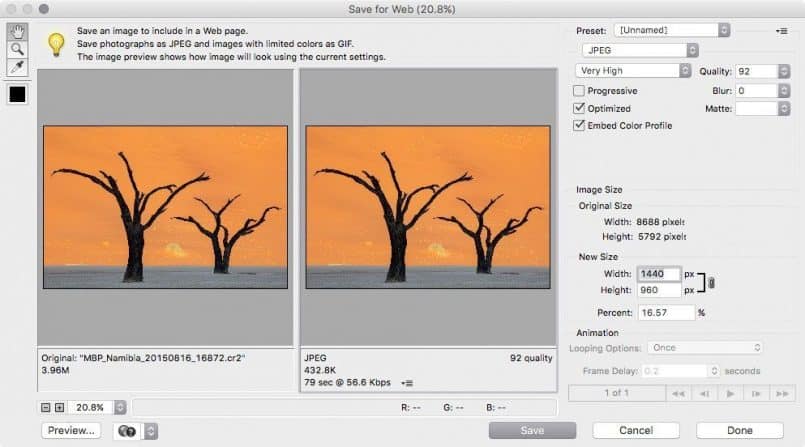
If you are not going to watermark your images, you can also simply use the Save for Web option in Photoshop Elements, after you have opened your file for editing, by selecting Save for Web from the File menu. Select JPEG High from the Preset pull-down, then type in 92 for the Quality. This will approximately halve the size of the image file, but show absolutely no digital artifacts in the image. Ensure that Embed Color Profile is checked too, and then click Save to save a resized copy of your file.
Want More Control?
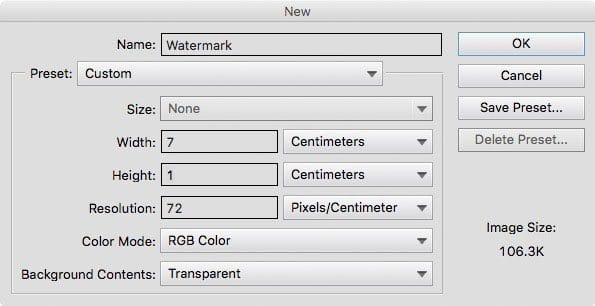
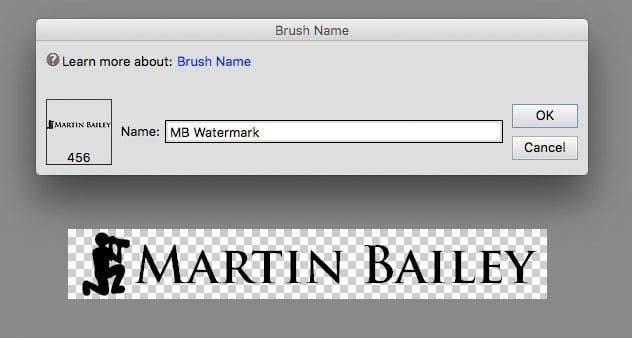
If you want to export with a watermark, but you want more control over process, or maybe want to place it manually over your image, there’s a relatively easy way to do this too. First, let’s create your watermark and save it as a brush. Click create a New Blank File from the File menu, and let’s use a size of around 7 x 1 centimeters, and a resolution of 72. Select RGB Color for the Color Mode and Transparent for the Background Contents, as you see here (below).
Then, select the Type Tool in Photoshop Elements, and type in the text that you want to use as your watermark. Make the color of your text black as you will be able to change it with the color palette each time you use it. You can also add a logo or other graphic by selecting Place from the File menu if you want to. If necessary, use the Crop tool to crop down the image so that it only leaves a little bit of space around your new watermark text or logo, then select Define Brush from the Edit menu, and press OK.
Save your brush in PSD format to a location that you’ll remember, so that you can reload it to the brushes list later if you have to reinstall Elements, or to load on a different computer.
Then, open the file that you want to save for Web with your watermark, and let’s resize it right now, because we also need to change the bit depth to 8 bits, and it’s probably better resize your image while you still have more image information.
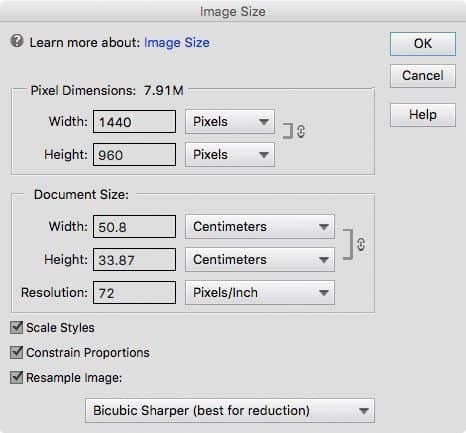
Select Resize > Image Size from the Image menu, then turn on the Resample Image checkbox, and type in 72 under the Resolution and type the new width that you want under Pixel Dimensions. I’ll use 1440 pixels wide again. Select Bicubic Sharper (best for reduction) from the pull-down at the bottom of the dialog box, and click OK.
The Bicubic sharpening there is plenty to cover the softness introduced during resizing, so you won’t need to do this again when you save the image later.
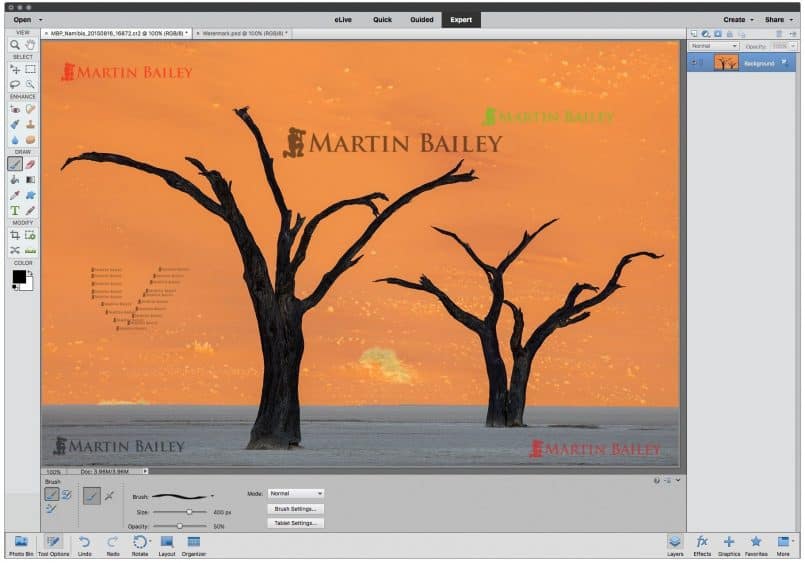
Before we can apply the watermark as a brush, the image has to be converted to 8 Bits/Channel, so select this option from the Image > Mode menu. Then select the Brush tool from the Photoshop Elements toolbar or by pressing COMMAND/CTRL + B, and you should now be able to select your watermark from the bottom of the Brush pulldown at the bottom of the screen. You’ll see an outline of the brush as you place your mouse over your image, and you can make it bigger or smaller with the Size slider or the square bracket keys [ ] on your keyboard.
Give it a try by stamping somewhere on your photo, and adjust the opacity and color as well if necessary. Here you can see I went a bit crazy trying this out, but this screenshot will give you an idea of what I’m talking about. Open up your browser window and click on the image to see it larger.
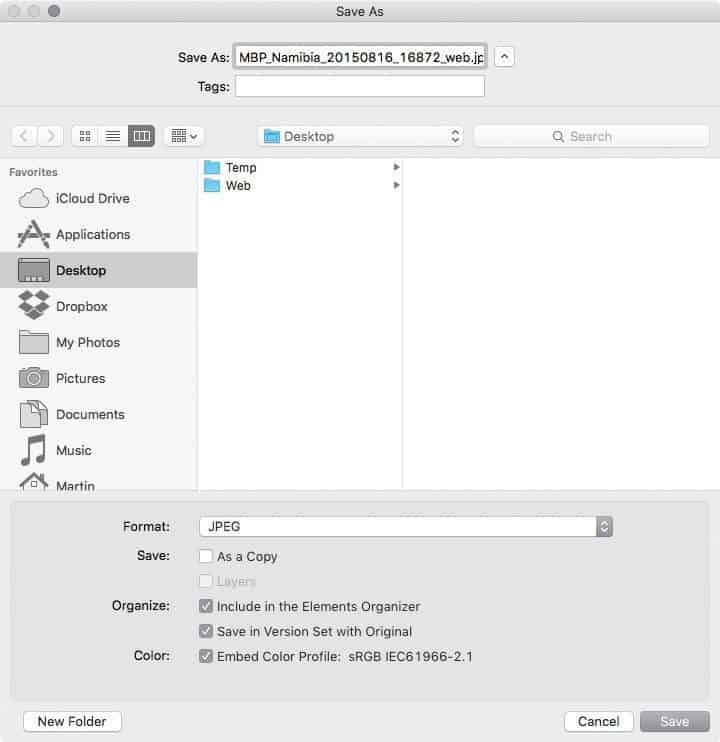
As we’ve already resized this image, and it’s been sharpened as we reduced the size, all you need to do now is save a copy for the Web. Make sure you don’t accidentally over-write your original image, especially if it was a JPEG, as you need to keep your full sized master copy. If you select Save As from the File menu, you can then select JPEG as the format, and ensure that you turn on the check box to Embed the Color Profile, which should be sRGB, then a string of letters and numbers. This helps browsers to accurately display your image.
Once you click Save, you’ll see another dialog to select the compression for your image. I’d recommend between 8 and 10 for the compression, although you can try smaller if you need the image to download quickly from the web. Just check for artifacts in gradations etc. as you increase the compression.
OK, to that’s given you a number of different ways to resize and watermark your images, so I hope that was useful.
A Word on Watermarks
Before we start to wrap up this episode, I did want to quickly discuss watermarking images in general. If you want to watermark your images, and you want people to still enjoy your images, it is best not to plaster your watermark all over them. Some people hate watermarks, and will leave your site or page the moment they see one. Even though I watermark my images, when I look at a photo that has a huge copyright symbol and the photographers name or logo all across the image, I generally stop looking too.
Sure, a huge watermark will stop someone from stealing your photo, but you are not likely to win any fans of your work in the process, so keep it discrete and tasteful. I use a small graphic file logo that I add as I export images from Lightroom, and like I said, we’ll cover that process in a follow-up episode next week. Does it stop people from stealing my images? Not in the least, but I’d rather people enjoy my images.
In fact, although I’m concerned about image theft, and do chase it up when necessary, I actually watermark my images more for the marketing value. When someone sees my images on line, either on my own site, or where someone has stolen the image, if the watermark is still in tact, they see my name, and the more times people see your name, the more likely they are to remember you.
Play with the Frames
Michelle had also asked about adding frames, and there is a Frames option in under the Quick screen in Photoshop Elements, and there are a couple, like the black border or white border which might be useful, so have a play with these if you are interested, just don’t attach them to your master copy of your images and save them. I think it’s best to keep frames as an artistic option added for specific purposes, and not to your original files.
For the Web, I actually really don’t recommend adding a frame directly to your images at all. There are lots of ways of adding frames on the fly with CSS and other tools, and that makes it much easier to change the look later if you change your site theme, but this is not within the scope of this episode, so we won’t get into that today.
Anyway, I hope that has been useful, and thanks to Michelle for the great question. We’ll follow up next week with how I deal with these things in Adobe Lightroom, and believe me, it’s a lot easier!
Have a Question?
If you have a photography related question that you’d like me to answer in a future episode, you can either record an audio message using the voicemail app in the sidebar for each blog post and at mbp.ac/voicemail or drop me a line using our contact form.
Show Notes
Ask a question yourself at: https://mbp.ac/voicemail
Subscribe in iTunes for Enhanced Podcasts delivered automatically to your computer.
Download this Podcast in MP3 format (Audio Only).
Download this Podcast in Enhanced Podcast M4A format. This requires Apple iTunes or Quicktime to view/listen.




Great tutorial Martin! Love your work!
Thanks Konstantinos! On both counts. 🙂