The Zone System has kind of fallen into the shadows as digital enables us to see our images instantly, and view information like the invaluable histogram even before we release the shutter, but The Zone System is still a useful tool, and something worth taking the time to understand whether you use Ansel Adams’ original exposure techniques or not.
I’m sure most of you have heard of The Zone System, and some of you will already have a good understanding of what it means and how to use it, so this might not be new to you, but it’s a great topic to explore, and I find it totally relevant as a follow up to my recent episode about creating camera profiles for the Sekonic L-758D Digital Master light meter.
First, I’m going to explain what The Zone System is all about and intersperse my own take on its applications within digital imaging. We’ll also take a look at how you can use a light meter to evaluate your options in the field as you create your images and evaluate your images on the computer, both of which can be invaluable to help you understand exposure.
The Zone System
The Zone System was developed by Ansel Adams with Fred Archer way back in 1940. It is a system to map the various tonal regions or luminance of objects in any given scene to enable the photographer to reach the optimal exposure during the capture of the image, and the developing and printing of the negative.
OK, so in the last paragraph the word optimal is my take on this, but Adams’ goals were the same. It’s not so much about accurate exposure, because there really isn’t one. Adams phrases this as photographs being interpretations of the original subject values and subjective departures from reality.
The Zone System was most useful as initially intended, to control the exposure of individual sheets of film, rather than rolls of film, because the development and print process could be adjusted for each negative based on shifts applied during the initial exposure of each sheet of film. There are of course limitations on the developing process when using roll film, as all images on each roll are developed in exactly the same way.
Ironically, in the digital age, one could argue that the Zone System is more applicable again, as we go back to being able to adjust our processing of each frame individually, including during the digital printing process.
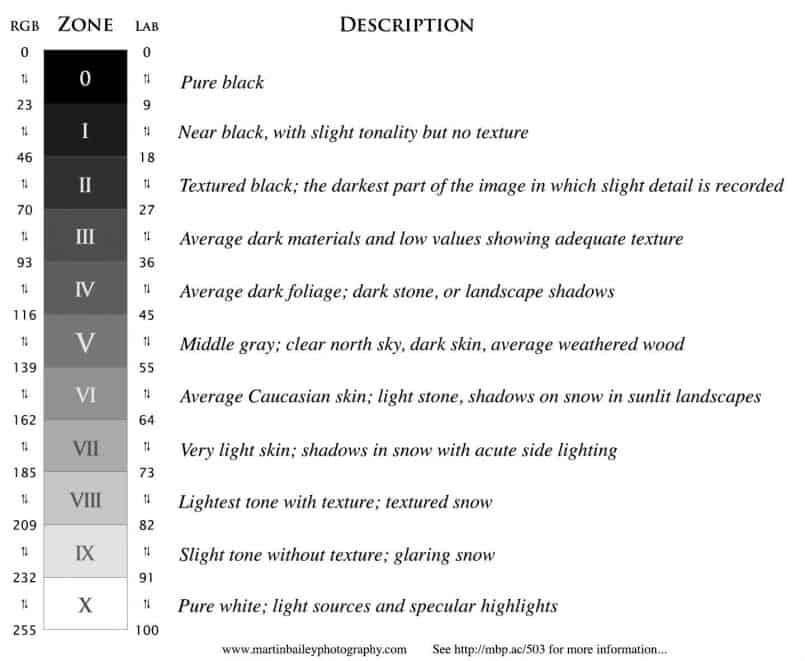
The Zone System basically maps tones into eleven ranges of values from pure black to pure white. How people associate these tonal ranges to numerical values seems to vary, but I’ve split two ranges into equal parts, as Adams did, and created a reference chart on which we’ll base parts of this discussion, including a slightly modified description of what each zone meant within The Zone System (below).
As you can see (above) the eleven zones are marked in roman numerals, from 0 (zero) to X (10). The reason for the roman numerals was to differentiate the zone values from exposure values (EV) or any other arbitrary numerical scale on the light meter which are usually written in regular Arabic numerals. I’ve added the two scales, from 0 to 255 for RGB color values, and 0 to 100 for Lightness values, and I’ll talk about how to use these ranges to evaluate your images in Photoshop later.
Definition of the Zones
Adams further defined groups of zones in the follow ways. Zones 0 through to X (10) represents the entire range of tones, from “full black to pure white”. Zones I (1) through IX (9) are what Adams referred to as the “dynamic range”, and this represents the darkest to lightest tones that can be considered “useful”. Zones II (2) through VIII (8) were referred to as the “textural range” which represents tones that convey a sense of texture and recognizable substance.
Although I’ve seen heated arguments as to whether or not a Zone is equal to one stop of EV or Exposure Value, Adams himself clearly states that this is how he intended the zones to be used in his book The Negative in which he fully describes The Zone System in glorious detail. If you still want to know more about this subject after today’s post, I strongly recommend that you pick up a copy and read it for yourself. In fact, it’s just a great read for any photographer, so I highly recommend it either way.
Now, in practice, we’ll find that as the dynamic range that our cameras can record increases, strict use of The Zone System requires that we will have to move away from thinking of each zone as one stop of exposure, or, simply use more zones, keeping the zone to EV stop relationship. But, as of 2015, most cameras have a dynamic range of about 12 stops.
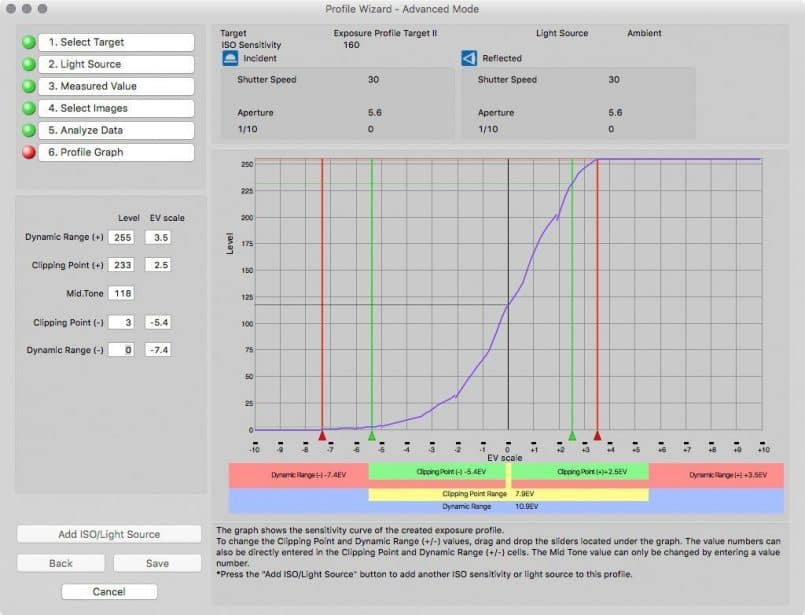
As we found in my recent discussion about creating profiles for the Sekonic L-758D light meter, I actually have a measured range of 11.9 stops on my Canon EOS 5Ds R, and DxO Mark have it at 12.4 stops, so we’re at around 12 stops of dynamic range in digital terms. This is the full range from full black to pure white, and I consider almost that entire range to be useful, so it’s a bit wider than Adams’ definition, but in practice I’ve found that even now, thinking of each zone as a stop of exposure works fine.
Exposure “Stops”
Just in case this talk of “stops” has you scratching your head, this is how we talk about steps of exposure, controlled by three main camera settings, the aperture, shutter speed and ISO. We can also change exposure with filters such as neutral density filters, which we talked about in episode 391.
Modifying your camera’s exposure by one stop you could for example change your aperture from f/5.6 to f/8, or from f/11 to f/16, with some of the main full stops of aperture being f/1, f/1.4, f/2, f/2.8, f/4, f/5.6, f/8, f/11, f/16, f/22 and f/32.
Because the aperture value represents the area of a circle, they are approximations of a sequence of numbers that are the power of the square route of 2. Although it can be confusing at first, this means that the smaller the number, the larger the area of the circle, and therefore the more light passes through the aperture and onto our camera’s sensor, increasing the exposure. Less is more.
This also has the effect of increasing or decreasing the depth of field of the scene or subject being photographed. For more information on how that works, check out episode 132 or episode 437 in which we discussed hyperfocal distance.
Shutter speeds are easier to grasp, because you simply halve or double the time to change up or down by a stop. One stop faster than 1/500 of a second is 1/1000 of a second and one stop slower is 1/250 of a second. A stop slower again is 1/125 but then the next stop slower is 1/60, so it’s not exactly half. In fact, the real shutter speed for 1/125 of a second is 1/128, and a stop slower should be 1/64. They are mostly adjusted slightly, but there’s no reason to be concerned about this. You get used to the actual numbers used.
The ISO range can also seem a little confusing, but again you get used to it. Film years ago was much slower, or less sensitive to light, but these days, although some digital cameras start at the expanded ISO 50, most start from ISO 100. To increase the ISO in full stops, you just double the value for each subsequent ISO, so one stop more sensitive than ISO 100 is 200. The next full stop is ISO 400, then 800, 1600, 3200, 6400 and so on.
A full “stop” increase or decrease in aperture, shutter speed or ISO will have the same effect on your exposure. For example, an exposure of f/8 for 1/250 of a second at ISO 200 can be made one stop brighter by changing our aperture from f/8 to f/5.6, one stop larger, or we could make our shutter speed twice as long by changing it from 1/250 of a second to 1/125 of a second, or we could make our ISO one stop more sensitive by changing from 200 to 400.
Identify Your Mid-Tone
OK, so back to The Zone System; Ansel Adams wanted a way to evaluate the exposure levels of a scene, so that he could place certain tones at certain places and calculate from that exposure whether or not the other tones in his scene would be too dark or too bright, and adjust the exposure if necessary to protect those extremes in contrast.
As I said, this also carried over into the development process, which was adjusted as necessary as well, but we won’t go into detail on that here as it’s not relevant for digital. Again, if you want to understand this more Ansel Adams’ The Negative should be your first stop (no pun intended).
You would start metering your scene by identifying the tone that you would place in Zone V (5). In black and white terms this is called the mid-gray or middle-gray, but in color photography, let’s call it the mid-tone, as it’s referred to on my light meter. The beauty of this first step is that if you can’t easily identify what in your scene is a mid-tone, if you are outdoors with the same light falling on your scene as where you are, you can simply take a meter reading of an 18% gray card to get this exposure value.
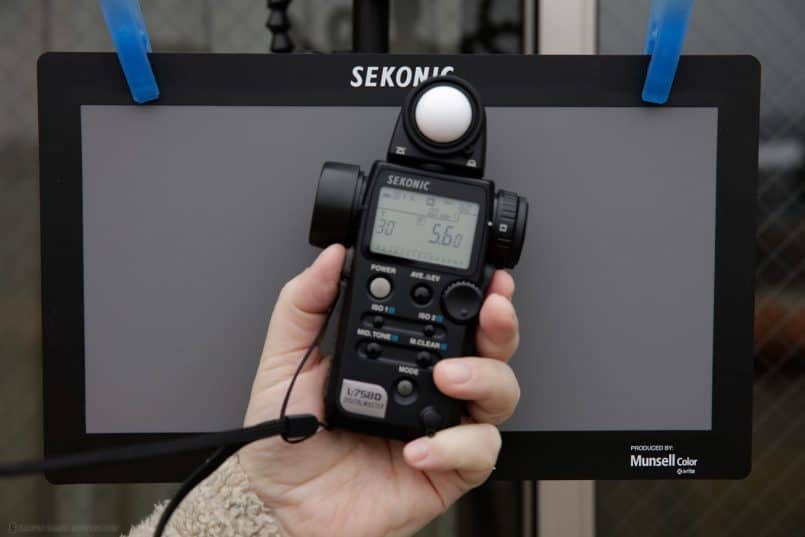
There are lots of conversations around the web regarding whether cameras are calibrated to 18% gray, 12% gray, or 12.5, 13% or 14% etc. During the creation of my camera profile using my Sekonic L-758D light meter and the Sekonic (X-Rite Munsell Color) Exposure Profile Target II, I first took meter readings with both incident and reflected light from the 18% gray side of the target.
I then set my Canon EOS 5Ds R camera to the exact same settings that my Sekonic L-758D light meter measured and the exposure scale on the camera indicated that there was zero discrepancy from what the camera’s spot meter measured. The meter reading was exactly the same, and this tells me that Canon is using 18% gray.
This can vary depending on the light source, but this result is enough for me to proceed with this article using 18% gray as the middle-gray, and you’ll also learn why I don’t think this is totally important in the age of digital, and with the understanding that Ansel Adams adjusted exposure as necessary, we also know that it wasn’t something to get too bent out of shape about, even during Ansel Adams’ day.
Start With Your Mid-Tone
So, the starting point for setting your exposure with The Zone System was to identify your mid-tone or middle-gray. You can do this by viewing your scene, and taking meter readings from a number of subjects that you think would be close. Adams would look for something that he felt would spoil the photograph if it was allowed to become too dark, although he does talk about using an 18% gray card in The Negative as well, as a way to get an accurate exposure, if that is what you require.
When you first take a meter reading from your scene, the light meter will interpret the luminance value as though the substance being measured was a middle-gray. Although you can change this functionality, the meter will often assume that the first reading you take is the mid-tone, and start to record subsequent measurements in relation to this mid-tone, or middle gray.
I generally like to start my metering with an incident light measurement when I’m outdoors, assuming I’m in the same lighting conditions as the scene I’m photographing. This of course would not work if I was in shadow photographing a brighter area not under the same cover.
The Beauty of the Light Meter
The thing that I absolutely love about using a light meter though is, because they are measuring the luminance of a subject, unlike a camera’s built in metering system, they don’t try to convert everything to a mid-gray. If I take an incident meter reading of the light falling on a snow scene, then take a reflective meter reading of the snow itself, the snow will be around two stops brighter than the incident meter reading. I’d get the same two stop difference by taking a reflective meter reading from an 18% gray card as the base.
If this isn’t making much sense, get a piece of white paper and a piece of black paper, or anything that is black, but both need to be big enough to fill the frame of your camera. Put the camera in Aperture Priority mode an set the aperture to say f/5.6 and ensure that exposure compensation is at zero.
Fill the frame with the white paper, and take one photograph. Then, put the black object in the same place as the white one, under exactly the same light, and take a second photograph without changing the camera settings. Then, on the back of your camera, flick between the two images that you just shot. You’ll most likely find that they are both exactly the same. They’ll be a mid-gray. To actually make them black and white, you’d need to add +2 stops of exposure compensation when shooting the white paper, and -2 stops of exposure compensation when shooting the black paper.
Play the Metering Game
As another learning exercise with my light meter, I like to play a game where I measure the light falling on a scene with the incident meter, which is the method using the white dome on the light meter, and then press the Memory button on the meter to record that base measurement, and then try to meter something else in the scene that is as close to this incident meter reading as possible. You can do this in your living room, or outside, it doesn’t matter.
This helps to train your eye to find the mid-tones in your scene, and can actually be quite satisfying when, for example, you meter the light source, then find something that is within just a third or two thirds of a stop brighter or darker than the incident light measurement. A little geeky, maybe, but this is the sort of thing that I’ve done over the years to hone my skill in estimating exposure, and that is a big part of what this is all about.
Find Your Extreme Luminance Values
Back to metering your scene in the field now, it’s not important that your metered mid-tone is absolutely the middle-gray, as we’ll adjust this anyway, based on the following part of the exercise. You now need to identify and measure the lightest and darkest parts of your scene. If you are following along with me here with your own light meter, figure out how to memorize the tones that you are measuring.
The Sekonic L-758D can memorize up to 9 meter readings, by pressing the Memory button on the left side, underneath the spot metering lens. Once I have my incident light measurement saved, and probably one or two reflective measurements from what I thought were the mid-tones in the scene, I’ll start to measure and save the luminance values for the lightest and darkest parts of the scene.
If the sun is in your scene, there isn’t much point in taking a meter reading from the sun’s disk itself, and you also need to be careful not to look directly at the sun through the light meter’s spot meter viewfinder, as many of these are magnified so you could damage your eyes. In The Zone System, the sun would also be considered a specular highlight, falling in zone X (10), so we wouldn’t try to prevent it from over-exposing anyway.
Do take a reading though, for example, of bright cloud near to the sun, especially if it is important that there is some detail recorded in these areas. The same goes for the darkest parts of the scene. Record some values from foreground rocks for example, that might have their shadow side facing you. These might be very dark.
Protect Your Shadows?
If you find that the shadow areas in your scene are very dark, you have to make a decision as to whether or not the detail and texture in the rock is important. In the original Zone System, if your shadow areas were more than three stops darker than your mid-tone, you would start to lose the appearance of substance or texture in these areas.
This means for example, if your mid-tone Zone V (5) with the aperture set to f/8 was metered to give you a shutter speed of say 1/125 of a second, and your dark foreground rocks were metering at 1/8 of a second, that’s four stops darker, putting the rocks in Zone I (1), and that’s where The Zone System is defined to have slight tonality but no texture. If you were to go to 1/4 of a second that would put your rocks in zone 0 (zero) so they’d be completely black, with no visible texture.
As we’ll see later, this is one key area where modern digital imaging has exceeded the boundaries of The Zone System as defined by Ansel Adams, because it was based on old film, which had a much smaller dynamic range. This means that now we would need to either remap the zones to not mean one stop of EV per zone, or do what I do, which is to learn how far I can push my exposure, and work to new boundaries, but still keeping the Zone System in mind.
So, if you do need to protect your shadow areas for some reason, say they are even darker and you feel that there will be no detail there, even with the dynamic range of your camera, which we’ll talk about shortly, then you have to consider brightening up your image.
Protect Your Highlights for Digital
The major difference with the film based Zone System and how it is applied to digital imaging, is that in the film days, it was much easier recover detail in bright or over-exposed highlights than it was to recover lost shadow detail. In The Negative, Adams says “The low values (shadow areas) are controlled primarily by exposure, while the high values (light areas) are controlled by both exposure and development.
In digital imaging, once we’ve over-exposed our highlights, there is no way to get any detail back, so we have to do the reverse, and protect our highlights when shooting digital. If we look again at the graph showing data from my 5Ds R during the creation of my camera profile (below) we can see that the drop-off of information in my shadows is a much shallower curve than my highlights, so there is a much better chance of me saving my shadows, than salvaging detail from blown highlights.
Digital Place and Fall
If, like me, you use a technique called ETTR or Expose To The Right, this means that you set your exposure so that your highlights are almost or even just touching the right side of the histogram, and then let the mid-tones and shadows fall where they will. Adams uses the term Place and Fall when describing the Zone System, meaning that you find your mid-tone or Zone V (5) exposure tones, and then let the shadow and highlight detail fall where they will, unless you have to adjust exposure to protect either of the extremes.
You can do exactly this in digital as well, and with today’s image quality, your images won’t suffer much for this, but because of the way digital images are recorded, we get more and more grain as the mid-tones and shadow areas get darker and darker, so you will get better image quality by recording your image as brightly as possible, and this is exactly what ETTR does.
Even if my darkest shadows are only in Zone V (5) I still exposure for the highlights, and if necessary, I can darken the image down in post, getting the same exposure that I would have if I’d exposed with those mid-tones in the middle of the histogram, but I have much cleaner shadow areas using this technique. I place my highlights as close to the right as possible, and let the rest of the image fall where it will.
I use this technique pretty much across all of my photography, and I love the results I’m getting. Note too that even when my shadow areas seem incredibly dark, I am still getting detail from these areas, fully utilizing my 12 stops of dynamic range, as we’ll see in a moment. We can consider this digital place and fall.
In Meter Dynamic Range
If you recall from episode 501 in which we created the camera profile for my Canon EOS 5Ds R and transferred it to the Sekonic L-758D light meter, the reason I was so excited about this is because it enables me to show the dynamic range of my camera right there on the meter, so I can see if the luminance values in my scene fall inside the capability of my camera to record without over or underexposing my highlights and shadow areas.
In practice, because I’ve been using a meter for around 15 years, mostly as a learning and teaching tool, I don’t meter my scenes in the field all that often, especially as we can see the information we are capturing right there in the histogram, but I am really excited about having my dynamic range displayed right there on the L-758D light meters exposure scale, both to work with students, but also just to easily check the extremes of contrast in my scenes as I evaluate my options.
Evaluating Your Scene
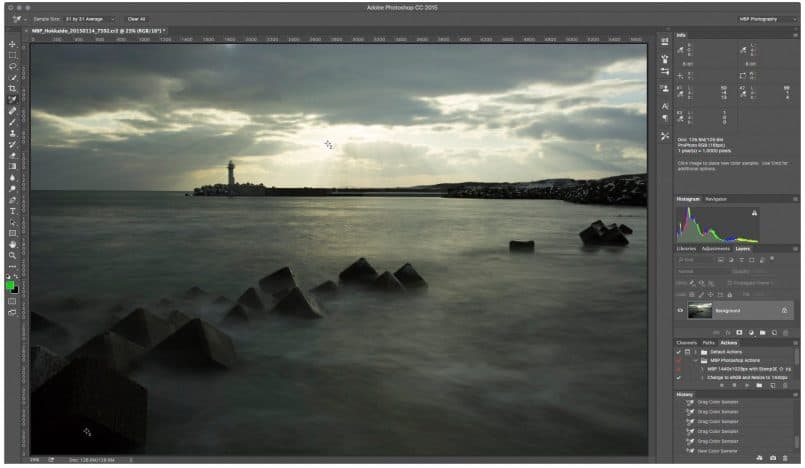
Let’s now jump into Photoshop and evaluate a photograph that I made on my Hokkaido Landscape Photography Adventure Tour in January 2015. We’ll open the original photograph, straight out of the camera, and then I’ll show you the final image after converting it to black and white, and bringing out all the lovely detail from the tetra pods in the foreground, that I knew would be recorded, but really could not see in the image as I viewed it through the viewfinder or on the LCD display on my camera.
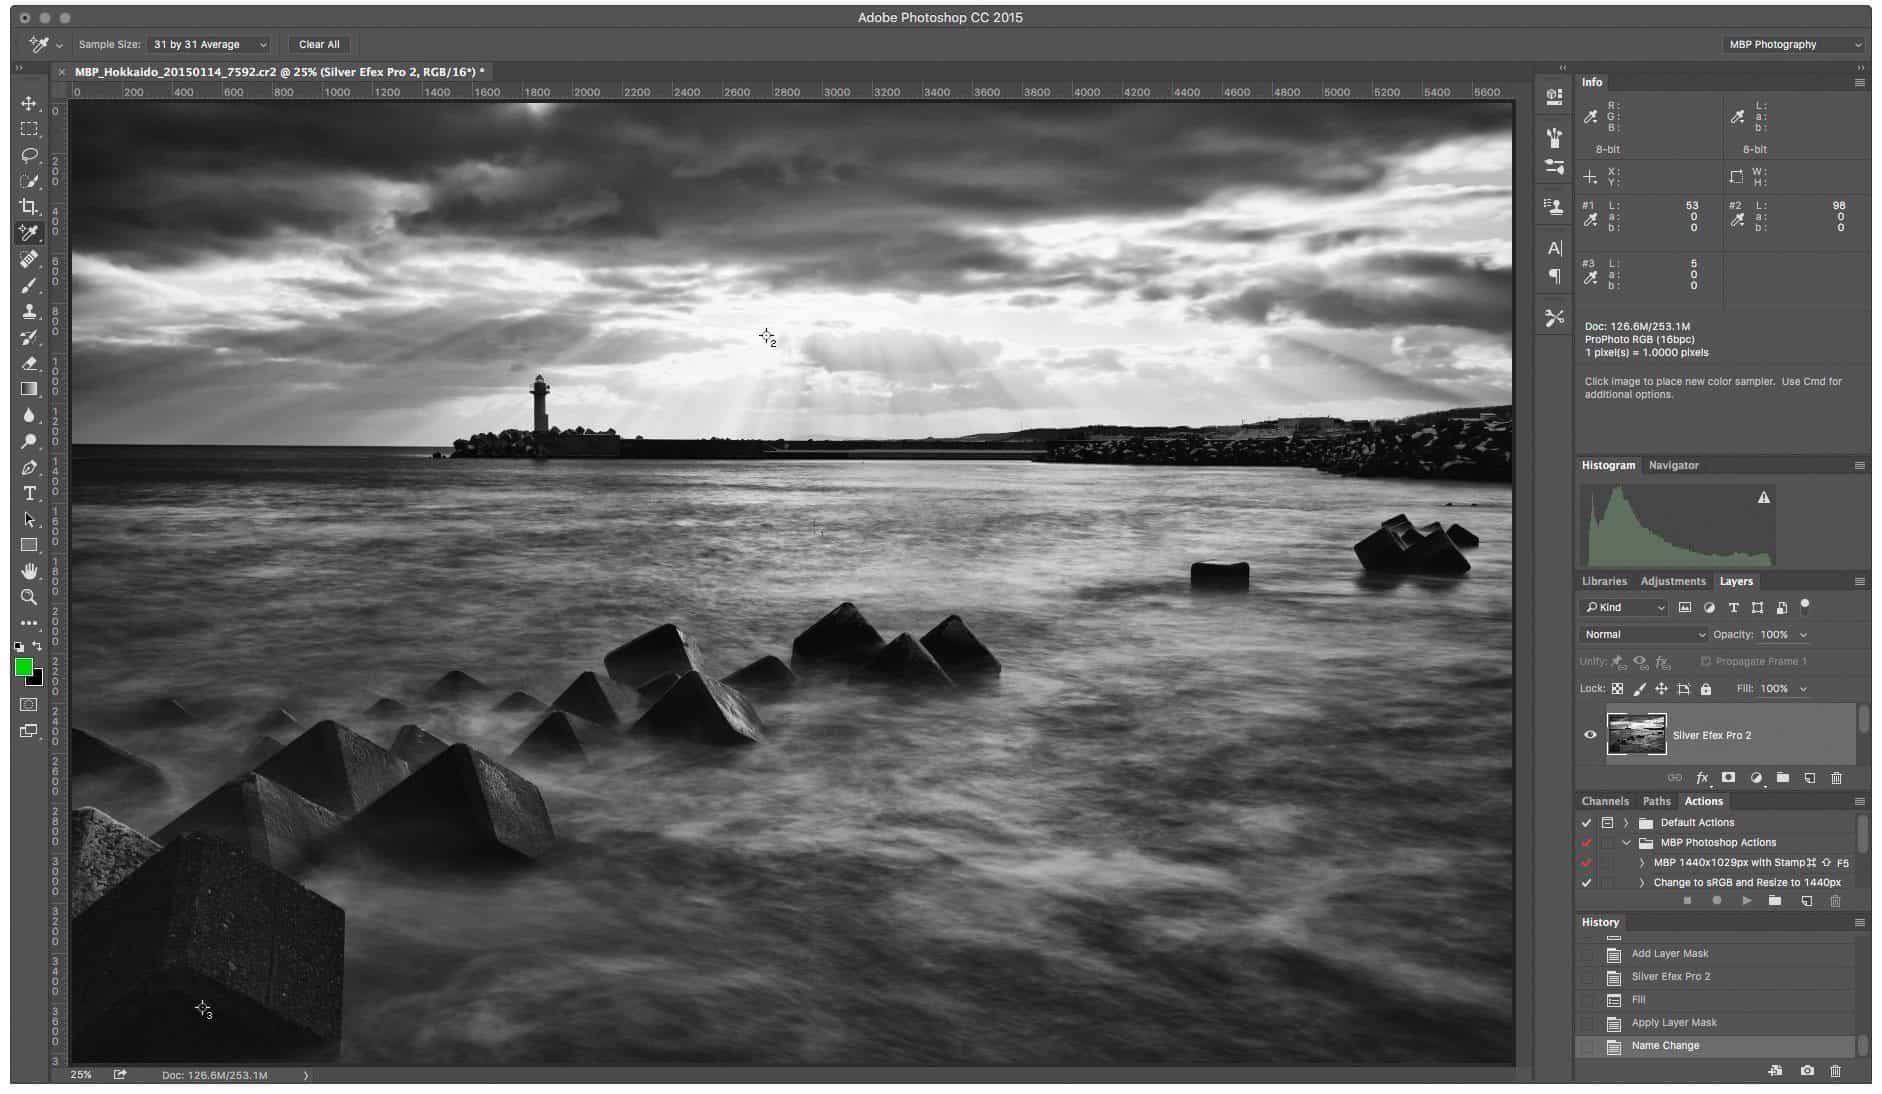
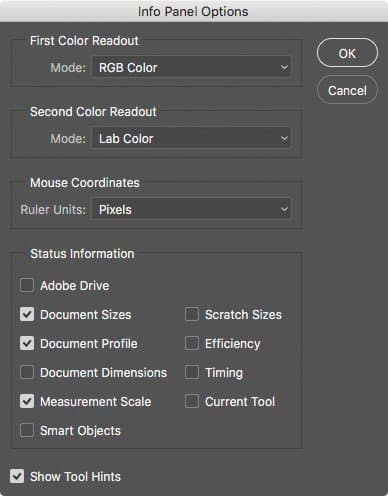
If you don’t have your Info panel displayed in Photoshop, hit the F8 key or click Info under the Window menu. Then click the button in the top right of the Info panel and select Panel Options… and you’ll see this dialog. I have my First Color Readout set to RGB Color and my Second Color Readout set to Lab color. Then, from the Photoshop tool bar select the Color Sampler Tool, which you’ll see when you click the Eyedropper Tool.
Now, as you roll your mouse over the image, you’ll see the numbers in the Info Panel change, showing you the values of the tones that you are rolling over. These numbers correspond to the ranges of numbers that I added to The Zone System chart that we looked at above, so you if you click on that image, then drag it to your desktop, you can open it as a reference.
The other cool thing about the Color Sampler Tool, is that when you click it, it adds a little marker to the image and you can see all of the Lightness values of the tones you click on. The L in Lab, as in the Lab Color that we selected earlier stands for Lightness, and ranges from 0 to 100.
Once you are at zero, you are recording pure black and at 100, you are recording pure white. These are the absolute extremes of The Zone System. After you’ve clicked to record a sample, if you right click it, you can change it to Lab if you prefer to reference the 0 to 100 scale, which I personally prefer for this exercise. Before you start to sample tones, change the Sample Size to 31 by 31 Average in the top toolbar, so that you aren’t sampling too small an area.
You’ll need to click on the below image to see these sample marks, and maybe even drag it to your desktop and open it on your computer to see, but in the middle of the image, you’ll find my first sample, which we can see in the top right has a Lightness of exactly 50, which is smack in the middle of Zone V (5). This is my mid-tone for this scene.
If you look at the second easier to see Sample 2 (above) you’ll see that this Lightness value is 99. It’s just a hair under 100, where all detail is lost. That’s the brightest part of the scene, and very close to being totally blown out. Down in the bottom left corner, you’ll see Sample 3 (above) which has a Lightness value of 1. This is the darkest shadows I can record and still have a chance of recovering any information.
Looking at this image, if you have your display calibrated and the correct Brightness, you really shouldn’t be able to see much, down there in the bottom left corner. That’s how it looked through the viewfinder and on my LCD display in the field as well. I went ahead and made this exposure though, because I knew that these values were close, but not totally out of my dynamic range.
Converting to Black and White
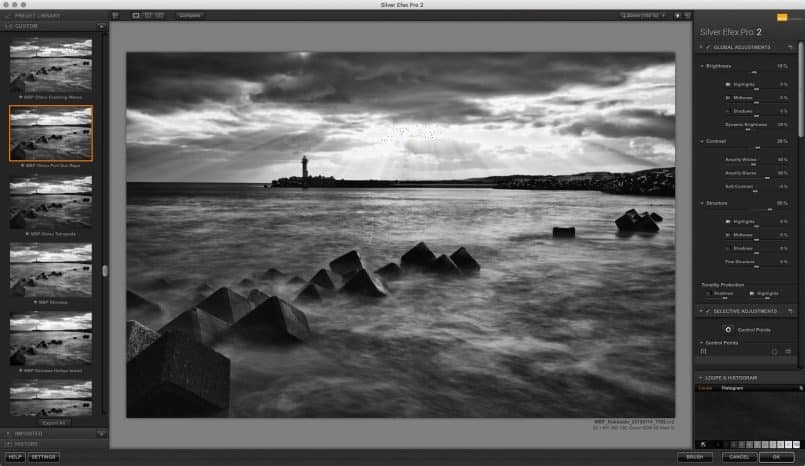
If you know my work, you’ll probably know that I’m a huge fan of black and white photographs, and even as I shot this image, I knew that I would take it into Silver Efex Pro 2 and convert it to black and white as my final image. I’ve done tutorials on Silver Efex Pro in the past, so we won’t look at that today, but I wanted to point out one important feature of Silver Efex Pro that I use before saving every image I convert to black and white with it.
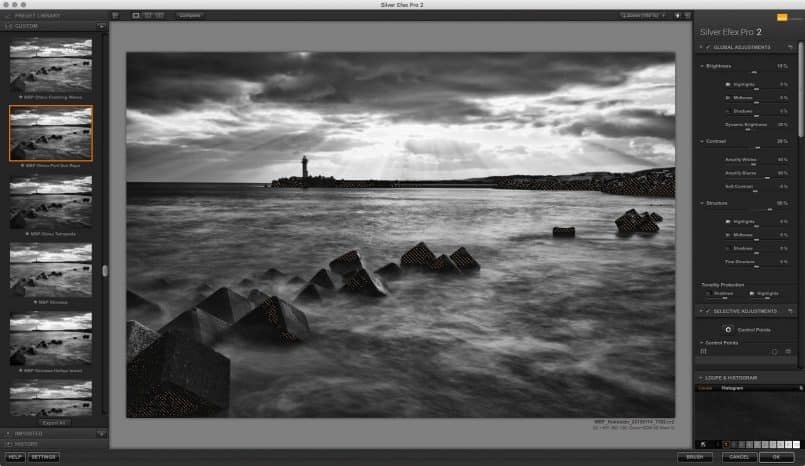
You’ll need to click on the image (below) and open up your browser window as wide as possible to see this full size, but if you look down in the bottom right corner, you’ll see 11 small boxes, ranging from black to white, numbered 0 to 10. You’ve guessed it. This is a dynamic indication of The Zone System, right there in Silver Efex Pro. (Remember that once you’ve clicked the image to view it larger, you’ll need to place your mouse over the image to stop it advancing to the next image automatically.)
As you can see (above) when I roll over Zone 10, there are some diagonal lines that have appeared over the brightest part of the sky where the sun’s rays are radiating from. If I wanted to I could have brought these down a little in my final image, but I actually consider these silver linings on the clouds as specular highlights, and decided to leave them this bright.
As long as I know which areas are very bright, I can make the decision as to whether or not I will change the image, and that is the beauty of these Zone System displays. I am though less likely to allow shadows to totally plug up, because blacks tend to print really dark anyway. For this image, when I rolled my mouse over Zone 0 (zero) there were no areas that are totally black. This screenshot shows areas in Zone 1, and they are basically limited to areas of deep shadow, which is exactly how I planned this photo.
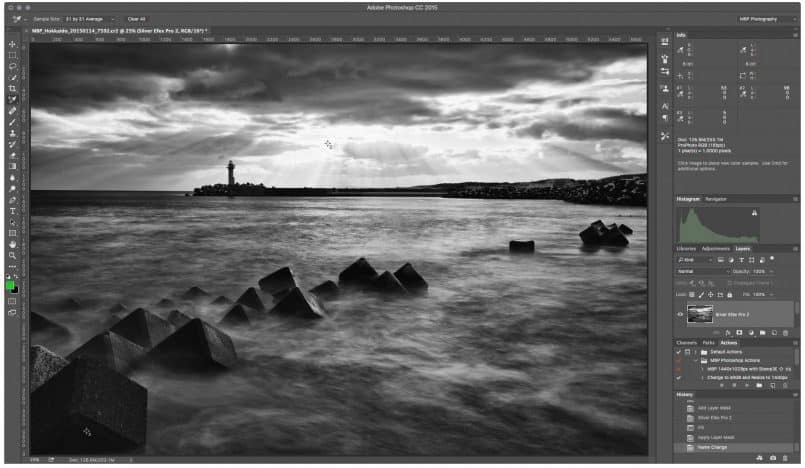
Finally, once I saved the image and return to Photoshop (below), we can now see the new values from the black and white image, as the Color Sample markers are still in place. My darkest shadows have increased from 1 to 5, my brightest highlights have come down from 99 to 98, and my mid-tone has become very slightly brighter at 53.
The important thing to note here as well is that what appeared to be very deep shadows in my original image actually contained a lot more texture and detail that you might have thought, especially if you’d seen this on the back of the camera as I shot this image. It’s at times like this that many people start to think of HDR to increase the dynamic range, but as I’ve mentioned in the past, I rarely do HDR, as I don’t believe it’s necessary.
If HDR is a creative avenue for you, then that’s fine, but if you don’t particular enjoy the process, then hopefully some of what we’ve covered here will help you to rely a little more on your cameras ability to capture a full range of tones.
Just to clarify as well, before we finish, the image I’ve used in this example was shot with my 5D Mark III, not the 5Ds R. The 5D Mark III actually had very slightly less dynamic range than the 5Ds R, so we’d be looking at a very similar example anyway.
Conclusion
OK, so to wrap this up, I’d like to reiterate that you don’t necessarily need a light meter to make great photographs. I didn’t meter the above scene in the field. I relied totally on the histogram, which I do believe is an essential tool, especially when we are pushing the extremes of our cameras’ dynamic range.
I also find it very important to turn on highlight warnings on my camera. The highlight warnings are based on the in camera JPEG, so I tend to keep my Picture Style set to Neutral or Faithful, so as not to change this much, but it’s still an 8 bit JPEG and there is much more detail and information captured in the raw file.
I use the preview as a guide, and sometimes set the exposure so that I’m just starting to blow out my highlights, and then I find that the resulting images are actually just inside the limits, and very usable, right up to a point that would probably have had Ansel Adams rethinking his Zone System as well. If he was still with us though, he would have embraced digital with open arms, and I’m sure he’d be pushing exposure to extremes like this, pulling as much out of the technology as possible.
If you are thinking of buying a light meter, although it’s been on the market for a while now, I can’t recommend the Sekonic-L-758DR Digital Master light meter enough. The ability to create those camera profiles using the Sekonic Exposure Profile Target II takes it’s usefulness to a whole new level, as you can see right there on the meter exactly how your scene maps to your own camera’s dynamic range. If you haven’t already, check out episode 501 for more on that.
The other important feature of the Sekonic L-758D or DR in the US, is that it has a 1° spot meter, which is vitally important for taking accurate readings from your scene. Many other meters have 5° spot meters, which are too wide to really pick out and meter fine details in your scene.
Although the light meter is not 100% necessary today, as I’ve mentioned, I do find them very valuable as a way to learn about exposure, and light, and how it affects our images both in the field and in post processing. I also find the light meter to be a very useful teaching tool, so if you teach photography yourself, it’s also definitely worth considering, and I’ve included a number of exercises today that you can do yourself, so I hope that this whole post has been useful for you.
Show Notes
Ansel Adams’ The Negative on Amazon: https://mbp.ac/TheNegative
Sekonic L-758DR : https://mbp.ac/Sekonic-L-758DR
Sekonic Exposure Profile Target II: https://mbp.ac/ept2
Subscribe in iTunes for Enhanced Podcasts delivered automatically to your computer.
Download this Podcast in MP3 format (Audio Only).
Download this Podcast in Enhanced Podcast M4A format. This requires Apple iTunes or Quicktime to view/listen.


Hi Martin, thank you for such huge, detailed and useful article. I found some takeaways for me like Silver Efex Pro that I had never used but will try.
You’re welcome Aleksandrs. I’m pleased you found this useful.
Thank you, Martin for this excellent tutorial on the zone system for digital. I’ve been wrestling with the rechnique for quite a while without ever really getting to a point where I could put it to use. Reading through this definitely has remedied that!
Hi Søren,
Thanks for letting me know that this helped. That’s great! I’m pleased to have been able to help.
Cheers,
Martin.
I’m very happy thet you are stress that the ZoneSystem from the analog era is of great value in digital photograpy.
You explain the Zone System without over simplyfying it, yet it is very clear to the photographer who hears about it for the firt time.
I am sure that even in colorphotography the Zone System will find people practicing it and getting more out of there pictures,
Thanks Jeroen! I’m pleased you found this interesting. Thanks for taking the time to comment!
Regards,
Martin.