

After using the Canon EOS 5Ds R digital SLR camera for just over four months now, today I’m going to do a follow-up review to let you know how I’m getting on with this new ultra-high-resolution offering from Canon.
If you didn’t catch my earlier 5Ds Review, you can check that out in Episode 478. That review contained a lot of test photos and I went into detail on how it is totally possible to shoot with the 5Ds R hand-held and still get sharp photos. This has been one of the main things that people have been asking about since that review, so I’ll include an update on this, now that I’ve been shooting in the field in Namibia and Iceland, and I’ll share some example photos with some 100% crops to really show you the results I’m continuing to get with this camera, and we’ll touch on a lot of other areas that people have been asking about as well.
Am I Still In Love?
My initial impressions as I started to use the Canon EOS 5Ds R was just WOW! I didn’t hold anything back as I relayed my enthusiasm for this new camera from Canon, and I know that some people probably thought that this was partly just coming from the newness and finally having a camera with amazing, ultra-high resolution, that our friends in the Nikon and Sony camps were already enjoying.
I have to tell you though, that after shooting with the 5Ds R for the last four months, I’m as in love with it now, as I was when we first met. In fact, the first vote of confidence came as I started to prepare for my Namibia Tour, and realised that I could not use my old 5D Mark III as a backup camera. It’s a great camera, and I don’t want anyone still shooting with one to take this the wrong way, but I knew that if anything was to happen to my 5Ds R, I could not bear to go back to the 22 megapixels of my 5D Mark III now.
A few years ago when I almost killed my 5D Mark III in Iceland, seeing just how weatherproof it was, it was really hard to shoot landscape for a few days with the 18 megapixels of the 1DX, until the 5D came back to life a few days later. The 1DX was my backup camera on that trip, and I still hated having to shoot with the lower resolution, and that was only a 4 megapixel difference. Dropping from 50 megapixels to 22 if I had to fall back on my 5D Mark III would have broken my heart.
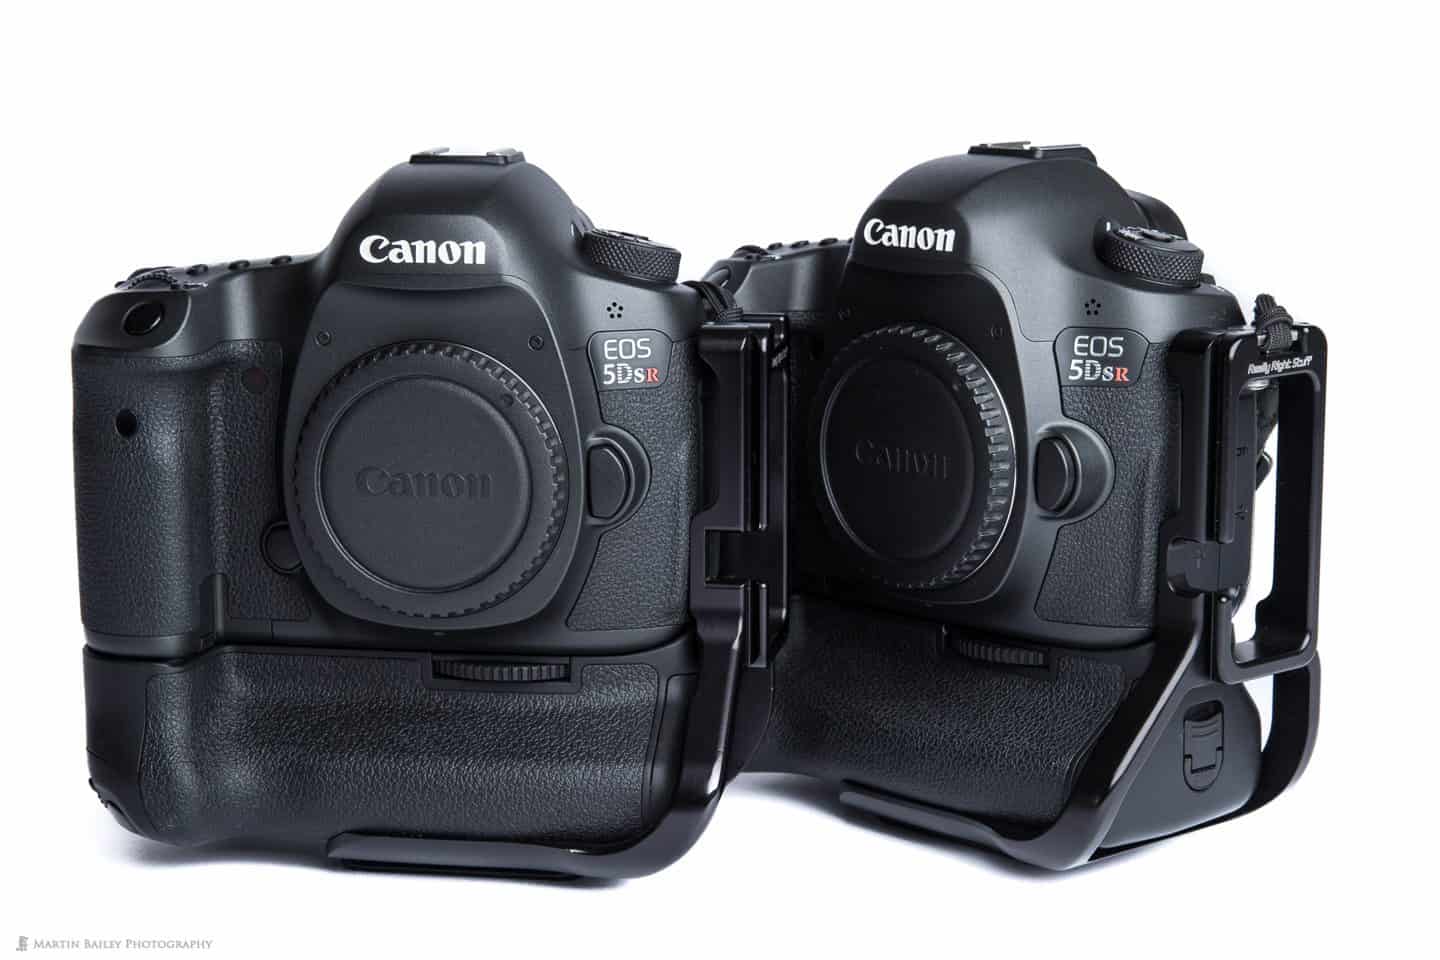
Two Canon EOS 5Ds R Bodies
The image quality from all of these cameras is of course incredible, so if you don’t need any more than 22, then the 5D Mark III is still an amazing camera to own, but I felt so strongly that I personally couldn’t handle dropping back to that resolution if something happened, that I actually bought a second 5Ds R body shortly before leaving for Namibia. Of course, with both cameras being exactly the same, that meant that it wasn’t a backup body as such. I just shot equally with both cameras, and it actually saved me from changing lenses in the dusty conditions as much as I would have done with just one main body. So, I’m not only still in love with my 5Ds R, I’m now two-timing her.
Shooting Hand-Held
So, let’s look at some examples of images as I reiterate that for me, I’ve found there to be absolutely no problem shooting hand-held with the 5Ds R, despite the high resolution. I should add though, that I have been perhaps more conscious than ever of using the focal length as the minimum shutter speed rule of thumb, even with lenses that have Image Stabilisation. This means of course, that say for example, I am shooting at 100mm, I would try to make my shutter speed at least 1/100 of a second or faster. If shooting at 50mm, my minimum shutter speed would ideally be 1/50 of a second or faster.
Of course, there are other factors that come into play, like going faster to stop movement in the subject, but using this as a minimum shutter speed when hand holding the camera has pretty much prevented me from seeing any issues with blurred shots due to the high resolution. I have shot some images slower than this, often getting good results, but that increases the risk of blurred images, and yes, I have had some at slower speeds.
For this photograph of a Juvenile Blacksmith Lapwing (below), shot hand-held in Namibia, I was at a focal length of 400mm and therefore selected a shutter speed of 1/400 of a second, at f/8, ISO 500. This was shot with the new Canon EF 100-400mm f/4.5-5.6L IS II lens.
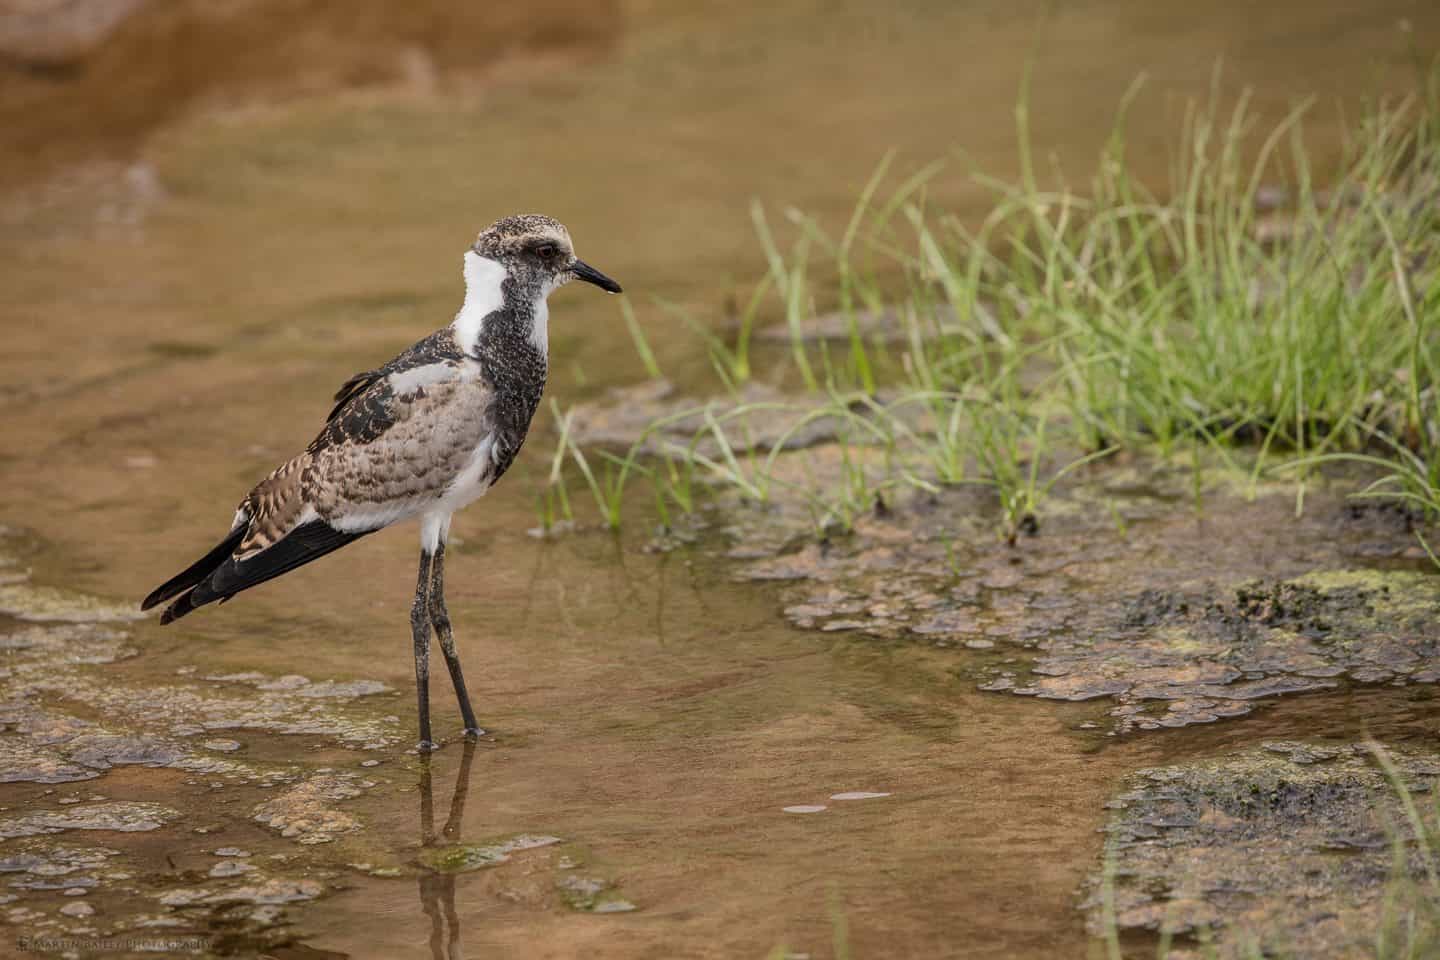
Juvenile Blacksmith Lapwing
Here is a 100% crop of the head of the Lapwing, and I think you’ll agree that the sharpness is there. Click on the image to view it at full size for the web, as the embedded version here is reduced in size a little to fit in the blog content size. Remember too that if you want to stop the images from advancing automatically while you study the detail, just place your mouse over the image.
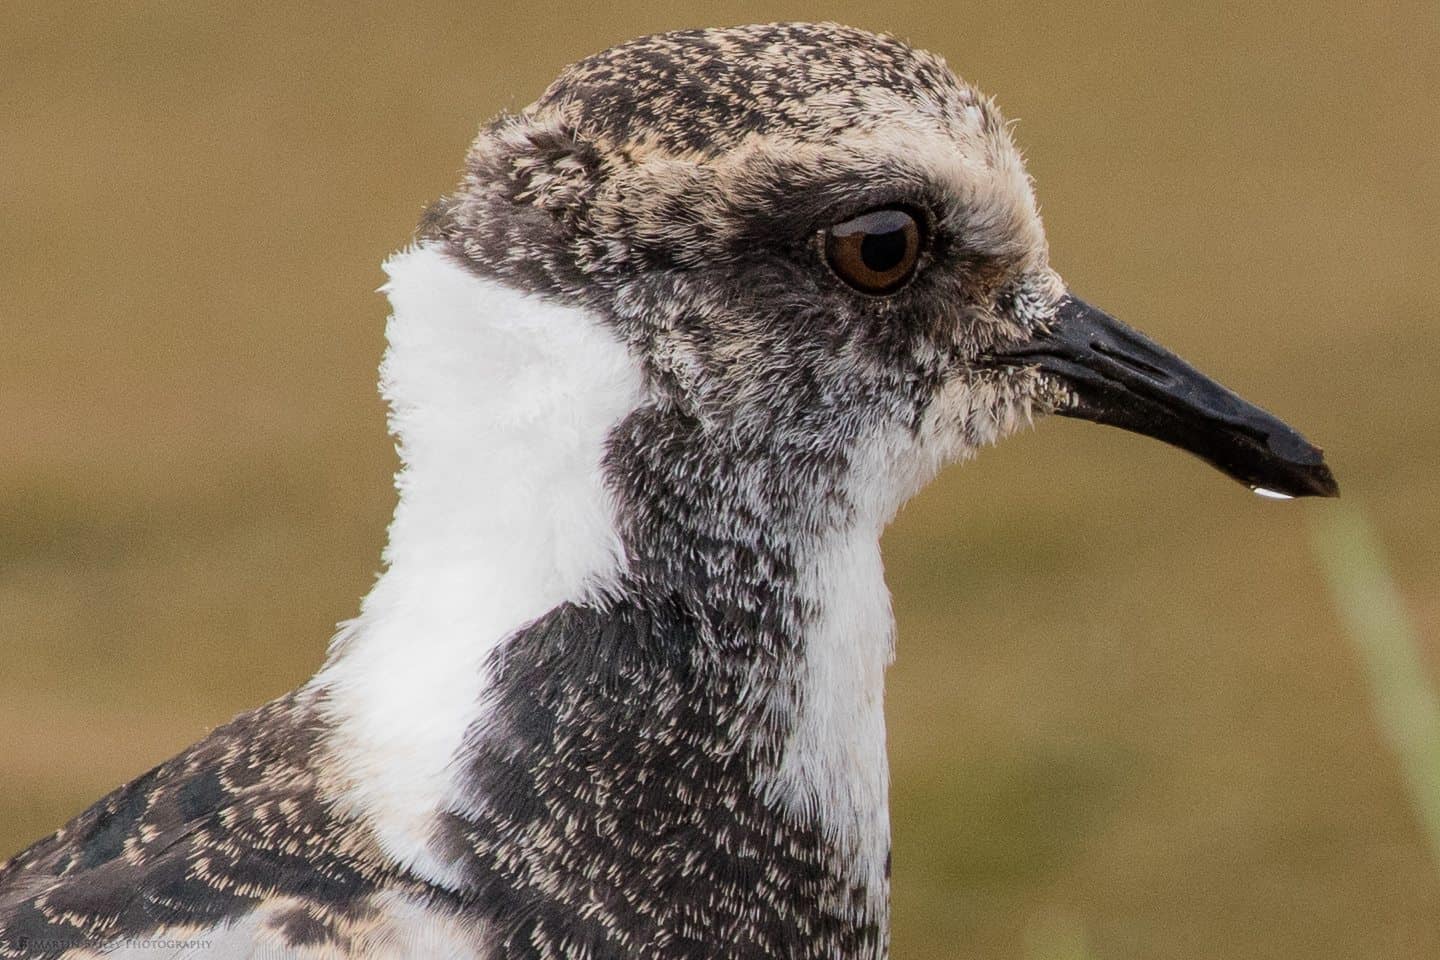
Juvenile Blacksmith Lapwing 100% Crop
No Moiré So Far
Another thing that I know people have been concerned about, is the possibility of seeing moiré in photographs shot with the 5Ds R, as it has the low-pass filter effect cancelled, which gives you sharper images than the standard 5Ds body, but it increases the risk of getting nasty patterns, called moiré, forming in man made textures and some naturally occurring textures. Well, having shot some 8,000 photographs of natural subjects since June, at this point I’ve still not seen a single image that exhibits moiré.
Bird feathers do seem to be causing a little bit of moiré for some people, so I think I might see this with some of the larger birds I’d be photographing during my Hokkaido winter wonderland workshops in January and February next year, as bird feathers can form an evenly distributed pattern, but I don’t expect this to be a big problem. Even the conversation I’ve seen online about this seems to be somewhat over-dramatised.
Some People Aren’t Happy Unless They’re Unhappy
The tendency for people to get really worked up about gear seems to be getting worse as the technology advances, and the pace of development increases, but there does seem to be a lot of heated debate about the 5Ds and camera technology and gear in general. People have tried really hard to pigeon-hole the 5Ds as a landscape and still life camera, because they say it can’t be used hand-held (huh!?) despite the most vocal forum members around the world not even owning one of these cameras.
People generally raise a ruckus to protect themselves from their own egos and emotions. For one reason or another they decide that they don’t want to invest in a new piece of gear, which is their choice of course, but instead of just making the decision and being happy with it, they have to spend countless hours online talking about why they don’t need the thing that they’ve decided not to buy, or why what they already have is THE best possible gear to own. I’m pretty sure it’s just their way of justifying their decision, and probably rooted in a desire to actually own the thing that they’re getting all worked up about.
New Really Right Stuff L-Bracket
One such conversation that was brought to my attention, was the fuss about Really Right Stuff redesigning the L-Bracket for the 5Ds. As I mentioned in my earlier reviews, the 5D Mark III L-Bracket fits fine on the 5Ds, and I have continued to use mine on my first body without any problems, but, the guys at Really Right Stuff decided to take the opportunity, especially with the higher resolution in mind, to redesign the bracket. They have built in an additional component that fixes the top of the L-Bracket to the camera strap loop on the side of the camera, as you can see in this photograph (below).
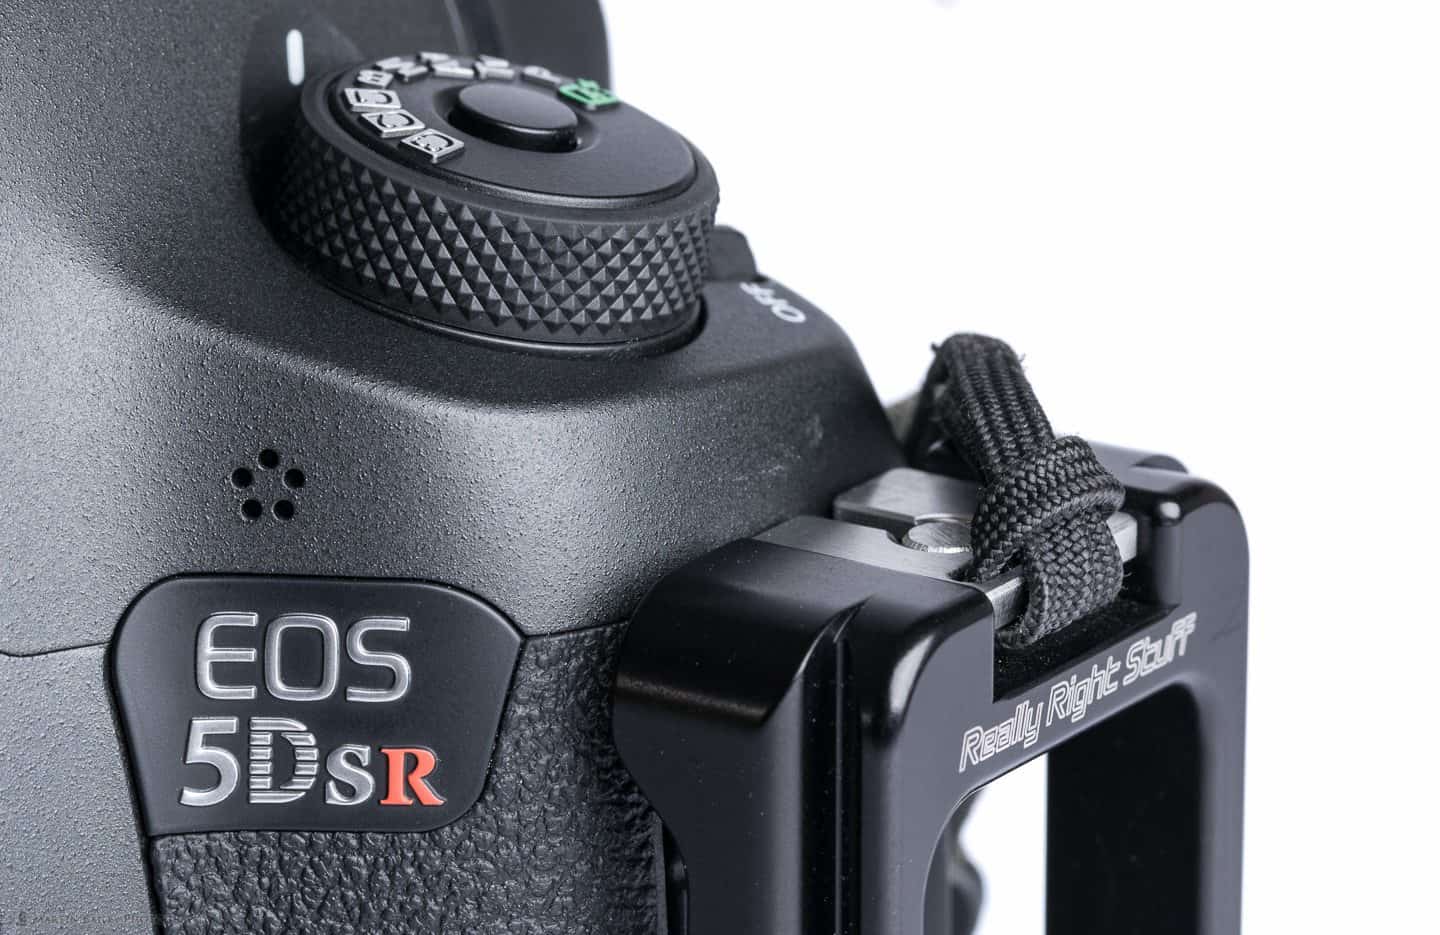
New Really Right Stuff L-Bracket
You basically clamp the silver component that you can see here to the camera strap loop, then fix the camera strap to a new loop in the bracket. It works well, and although you have to unscrew this to get the L-Bracket off now, it’s like a 30 second job, and in my opinion totally worth it for the additional stability and security.
The reason people are getting upset though, is because they see it as an unnecessary design change, and therefore have to give Really Right Stuff a hard time because now they have to justify not buying the latest model. Hello! So what!? If you really believe the new design has no benefits, then just use your old bracket, or if you never owned one, buy the old Mark III bracket or buy from another manufacturer.
Sure, the new design is more expensive. It has additional components that cost money to develop and produce. I have continued to use both brackets, because I have two 5Ds Rs and needed an extra one, so I thought it was worth getting the updated version. I can’t say I’ve noticed any problems with my old one on the 5Ds, but I haven’t used it much in the portrait orientation. I do reach for the camera with the newly designed L-Bracket a little more when shooting from a tripod though. Why risk seeing an issue, right?

Himba Lady Taking Smoke Bath
Anyway, I won’t go on about this, but really, it’s bewildering to me how some people seem to spend so much energy complaining about a companies decision to innovate, and dare I say it, try to increase their bottom line. Really Right Stuff have never been a budget camera support company, so what’s the point in getting all bent out of shape about this?
High ISO Still Not an Issue
Another assumed issue with the 5Ds that I dispelled in my earlier review, was that people, including me before the 5Ds was released, thought that a camera of this resolution would have poor high ISO capabilities. We looked at a series of test shots, in direct comparison to the 5D Mark III, and saw that their was very little difference between the two cameras. Based on my tests, I’ve set my mental soft-ceiling for how high I’ll take the 5Ds R ISO to 3200, but also using up to ISO 6400 if necessary, and 12800 at a push.
I shot this photograph of a Himba lady (right) at ISO 6400, with a shutter speed of 1/80 of a second at a 50mm focal length. The only light entering the hut was though a small entrance that you have to crouch down to walk through, but it was not practical to try and set up any kind of lights or reflection, plus, I prefer this kind of lighting. That’s why I asked her to do inside the hut.
Here is a 100% crop of just the ladies face and some of her clay covered hair. Again, click on the image to view it at full web size (below). As you can see, there is a little bit of grain, but for ISO 6400 and what this enabled me to do, I am not concerned about this at all. I should also mention that I did not apply any noise cancellation to this image in Lightroom. Apart from reducing the exposure slightly to increase the mood, and adding a bit of a vignette, this is straight out of the camera.
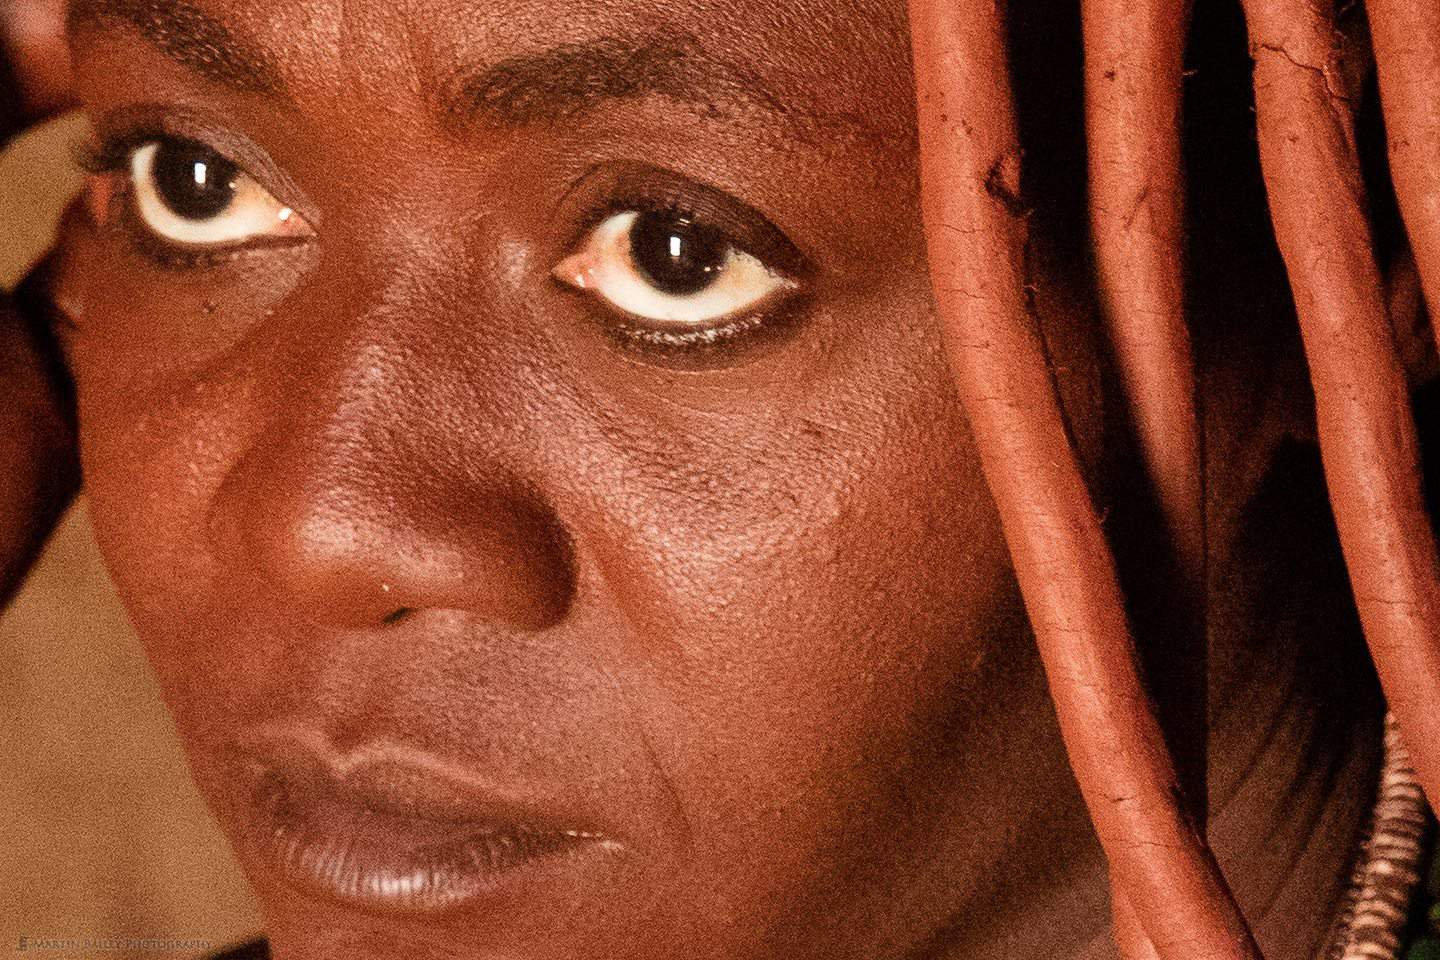
Himba Lady 100% Crop
ETTR to Maximize ISO Performance
Now, before you run out and shoot a bunch of images at ISO 6400 because I told you it was OK, note that you have to expose your images more carefully to maximise ISO performance. I always shoot using a technique called ETTR, or Expose To The Right, which means that I expose my images so that the information on the histogram is as close to the right shoulder as possible without over-exposing the image.
You can see in this photograph that the whites of her eyes are very white, which is just how I want them to be. As I just mentioned, I actually reduced the Exposure slider in Lightroom for this image, to increase the mood of the image, but shooting this nice and bright, then adjusting that way really helps to keep any noise that can creep in at bay, especially in shadow areas. Check out Episode 381 for more information on Exposing to the Right.
Still Blown Away by the Level of Detail
As I look through images from the last four months, the hair on the back of my neck stands up as I explore the incredible level of detail captured in these 50 megapixel images. Here is a wide angle photo made with the EF 11-24mm f/4 L lens at the Jökulsárlón Glacial Lagoon in Iceland (below). This was shot at f/14 for a 1/200 of a second exposure, ISO 100.
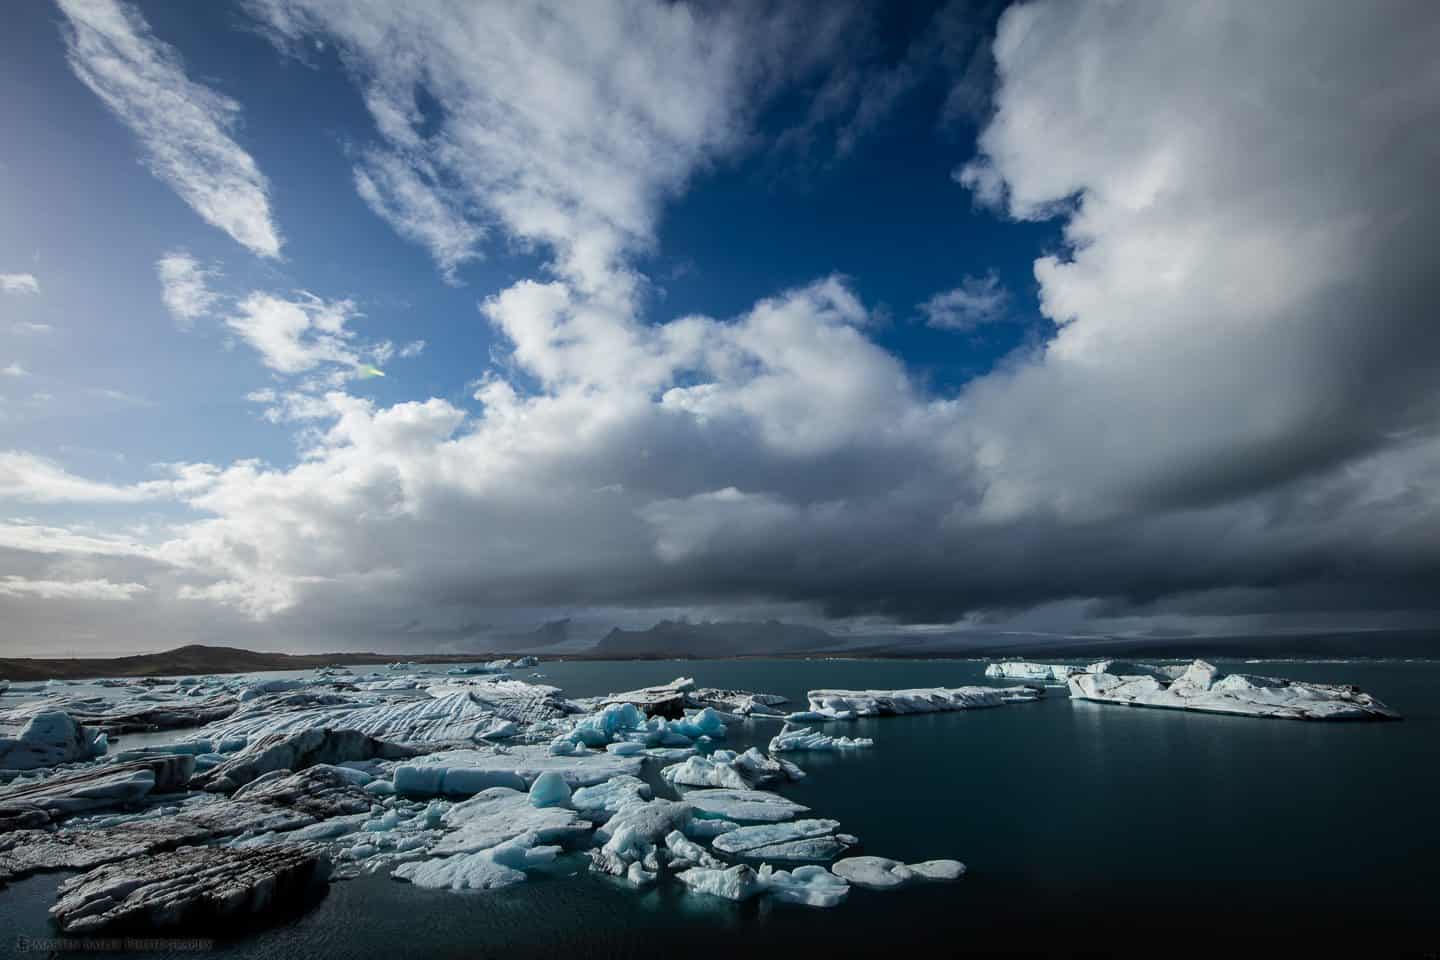
Jökulsárlón Glacial Lagoon
And here is a 100% crop from the centre of the bottom edge of the photograph (below). This is pixel for pixel, cropped at exactly 1440 x 960 pixels, but when you consider how crisp and clear the detail is, compared to how small a portion of the original image it is, I’m sure you’ll agree that this is pretty impressive.
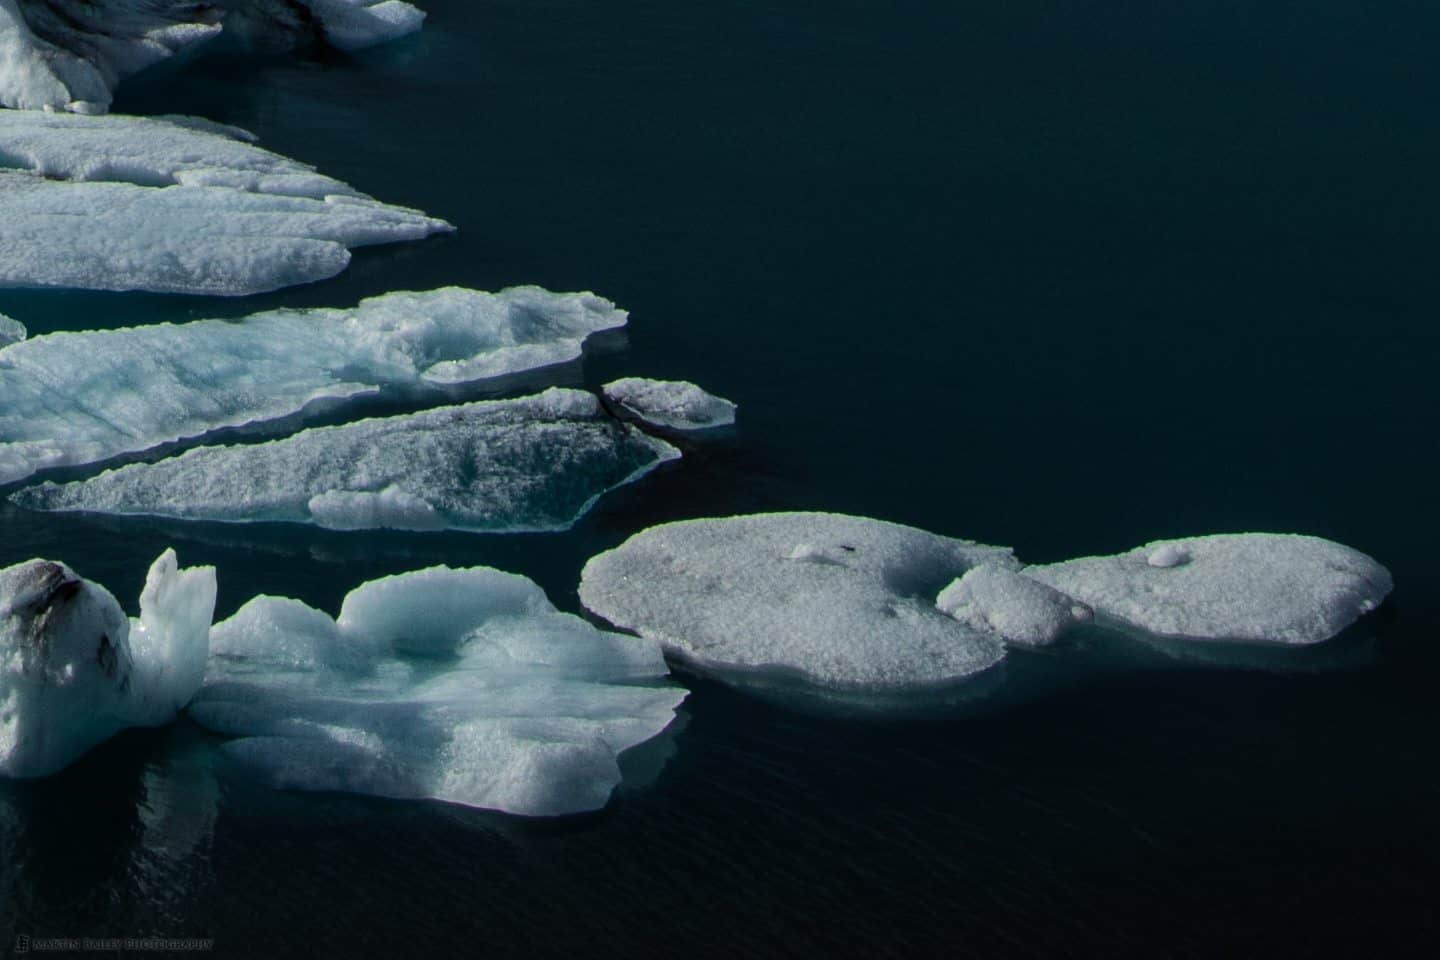
Jökulsárlón Glacial Lagoon 100% Crop
Young Himba Man
Of course, if necessary, this enables you to crop in very tightly on photographs, especially if you only need it for Web use. I personally prefer not to do that, but the option is there if you need it. Just don’t post anything too heavily cropped somewhere that might end up in a request for commercial use or a print, as you couldn’t print something like this much larger than a postage stamp.
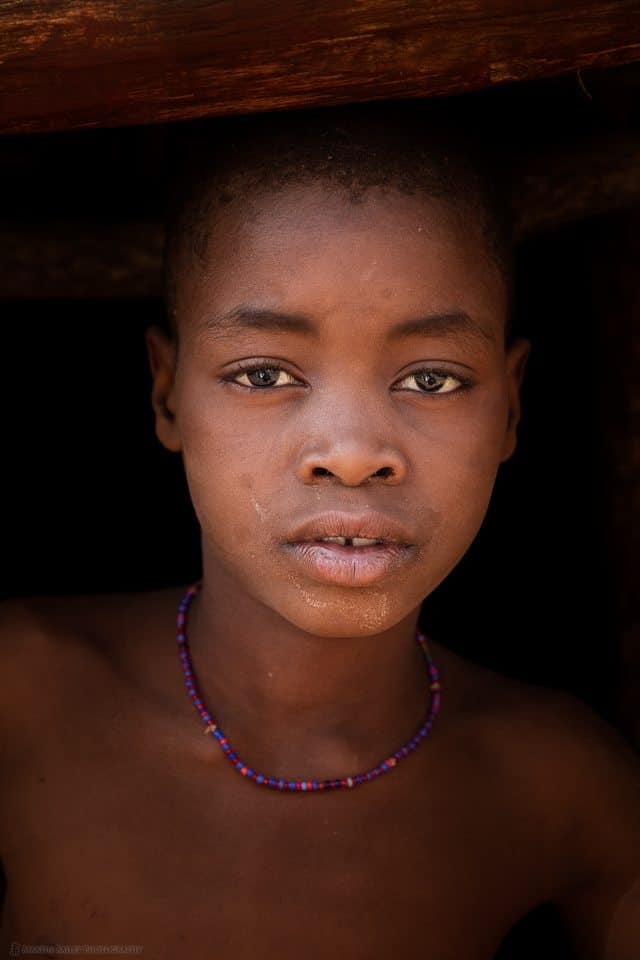
Here’s another fun example of the amount of detail. This photograph almost feels a little bit Bladerunnerish to me, when Harrison Ford uses a computer to delve into details of a photograph trying to find some clues to the whereabouts of the escaped Replicants.
This young Himba man (right) was standing in the doorway of the hut inside which I photographed the woman that we looked at earlier, and I crouched down in front of the hut to get a good angle. You don’t have to take my word for it though. We can just look in his eyes for proof (below). Again, click on the image to see the largest web version. This was shot at f/5.6 for 1/100 of a second, ISO 320, with my 24-70mm f/2.8 lens at 70mm.

Young Himba Man 100% Crop
So far, we’ve looked at images from some of Canon’s highest quality lenses. The new 100-400mm, the 24-70mm f/2.8L and the 11-24mm f/4L lenses, and these of course are coping fine with the high resolution of the sensor.
Cocoon Building
In fact, the feeling I get having tested all of my lenses now, is that the 5Ds R is bring out more from my lenses than my 5D Mark III did at 22 megapixels. I was starting to get a little disappointed with the results from my 70-200mm f/2.8 L lens for example, but the 5Ds R has totally revived this great workhorse lens.
Probably the lowest quality lens I own is the 40mm f/2.8 STM pancake lens. I sometimes drop this on the camera, almost as a glorified body cap, because it’s so small I can still drop the camera into a space in my camera bag that I usually use just for storing a body without a lens on it. I sometimes put this lens on the camera when I’m just going for a walk around town, and don’t necessary need one of my bigger zoom lenses. It’s also just a nice focal length as a walkabout lens.
Well, just to show you the image quality, here’s a photo of my favourite building here in Tokyo, which you’ve seen before, I’m sure (left). Of course, I’ve converted this to black and white, but take a look at a 100% crop from the building, and again, I’m sure you’ll agree that the image quality is totally acceptable, and this is from a $149 dollar lens.
Cocoon Building 100% Crop
Canon actually released a recommended lens list, with all of the lenses that they considered to be good enough to work with the 5Ds and 5Ds R cameras. Sadly, just a few days later, they took the page down, but do a search on the Web if you are interested, as there are plenty of copies of it around.
I don’t know why Canon took this page down. Maybe it was too controversial, and caused a stir with people that didn’t find their favourite lens included. It is actually quite an extensive list though, so it does show how confident Canon are in the ability of these high resolution bodies to work with their lenses. I just wish they had the guts to stick by their original decision to publish the list.
Not a Wildlife Camera?
The other bit of pigeon-holing that people have been doing, is trying to rule out the 5Ds as not being capable of shooting wildlife. Of course, at 5 frames per second, it’s not the ideal camera for wildlife, especially birds in flight, when it’s nice to have more frames to chose the best wing position from, but, as far as my field tests have shown me, the auto-focus of the 5Ds is very capable of locking on and tracking with subjects, as we can see in this image of a flock of flamingoes flying in front of a sand dune in Namibia (below).
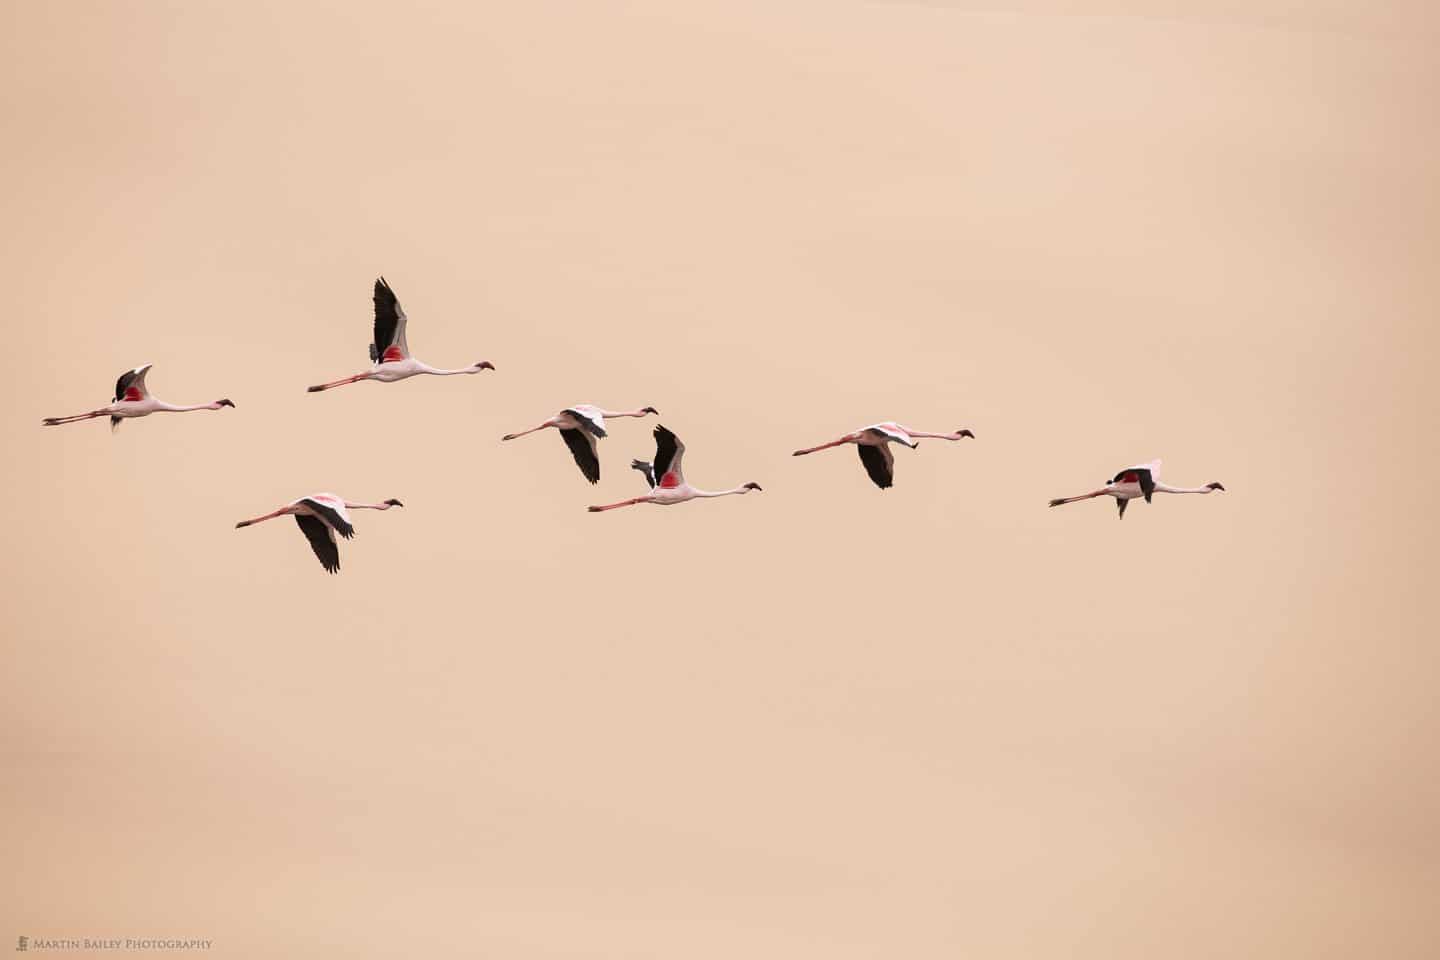
Flamingoes against Dune
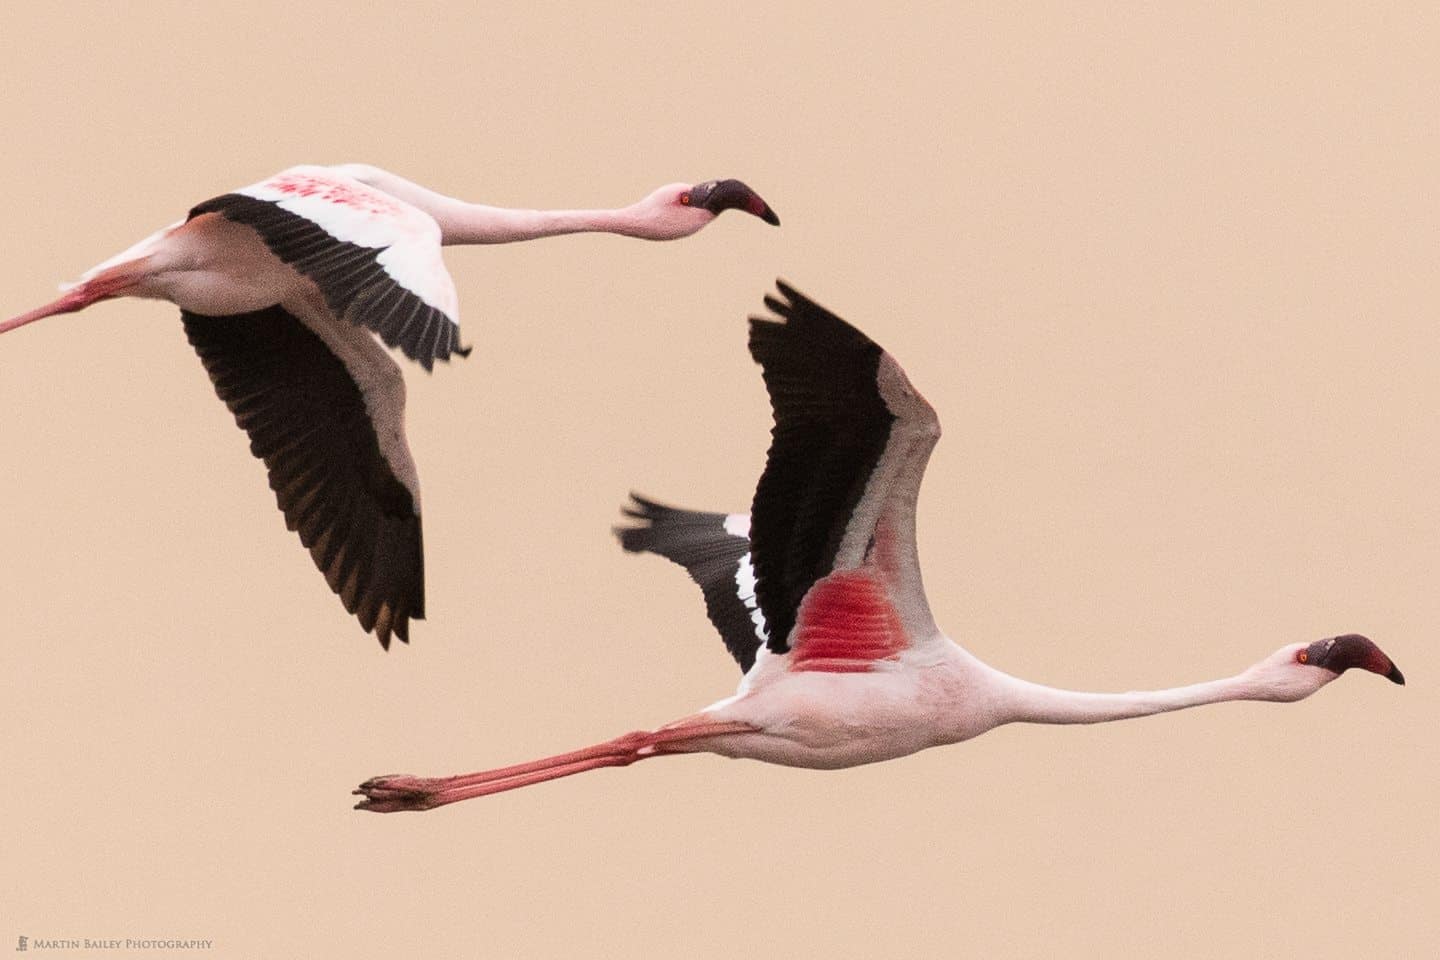
And here is a 100% crop of the two flamingoes in from the centre of the frame (below). I shot this hand-held at f/8 with a shutter speed of 1/800 of a second, ISO 1250, at 312mm with the 100-400mm lens. This amount of detail is plenty for me, for this kind of photograph, so absolutely no complaints here.
Flamingoes against Dune 100% Crop
Although I might get some more birds in flight shots this year, I will be using my 5Ds R bodies for the Snow Monkeys and the cranes, swans and sea eagles that we shoot in Hokkaido on my Winter Wonderland Tours in January and February next year, so I’ll report back on how the cameras fair in this really challenging situation during my tour updates. If you don’t visit my site regularly, maybe you could sign up for our newsletters, specifically blog posts via email, so that you won’t miss those updates early next year.
I actually shoot with three bodies a lot of the time on my Hokkaido tours, so I will be taking the 7D Mark II as well, but I’m pretty sure that I’ll stick with the 5Ds bodies for the majority of my shooting. I started photographing the wildlife in Hokkaido with my old 10D, with 7 focus points and just 3 frames per second, and I have some shots from back then that I’m still proud of, so I’ll probably just make it work. My thinking is that I’d rather have less images at 50 megapixels than more at 20 megapixels.
That choice for you is yours to make of course. I personally would just rather have fewer high resolution files. Although the 7D Mark II is an absolutely wonderful camera, if I find myself using it very little during the upcoming winter season, I’ll probably sell it in March next year.
Yes, I Sold the 1D X
One other question I’ve been asked a lot, is whether or not I’m holding on to my Canon EOS 1D X body now that I’m using the 5Ds, and bearing in mind that I also have the 7D Mark II. Well, the answer is yes. I actually sold the 1D X to help pay for my second 5Ds R. The 1D X is another great camera, but the 7D Mark II at almost a quarter the price is just as good, if not better in some aspects, so I knew that I was not going to shoot much with the 1D X any more, and there’s no reason for me to keep it sitting around collecting dust.
Incredible Print Quality
The last thing that wanted to touch on is something that I was not able to really report on in my earlier reviews, and that’s the print quality from these beautiful big image files from the 5Ds R. Well, with all the traveling I’ve been doing, I still haven’t printed a lot, but from what I have done, I can happily report that the print quality is every bit as amazing as I thought it was going to be.
This is one of the major benefits of such a high resolution camera. For example, I printed this image of the Himba people herding their goats on 24 x 36 inch paper, including borders, with the actual printed image size at 20 x 30 inches. This gave me a native resolution for print of 285 ppi or pixels per inch. I printed directly from Lightroom, and turned on the Print Resolution checkbox under the Print Job panel, and set it to 300 ppi, so Lightroom upsized the image very slightly for me before printing.
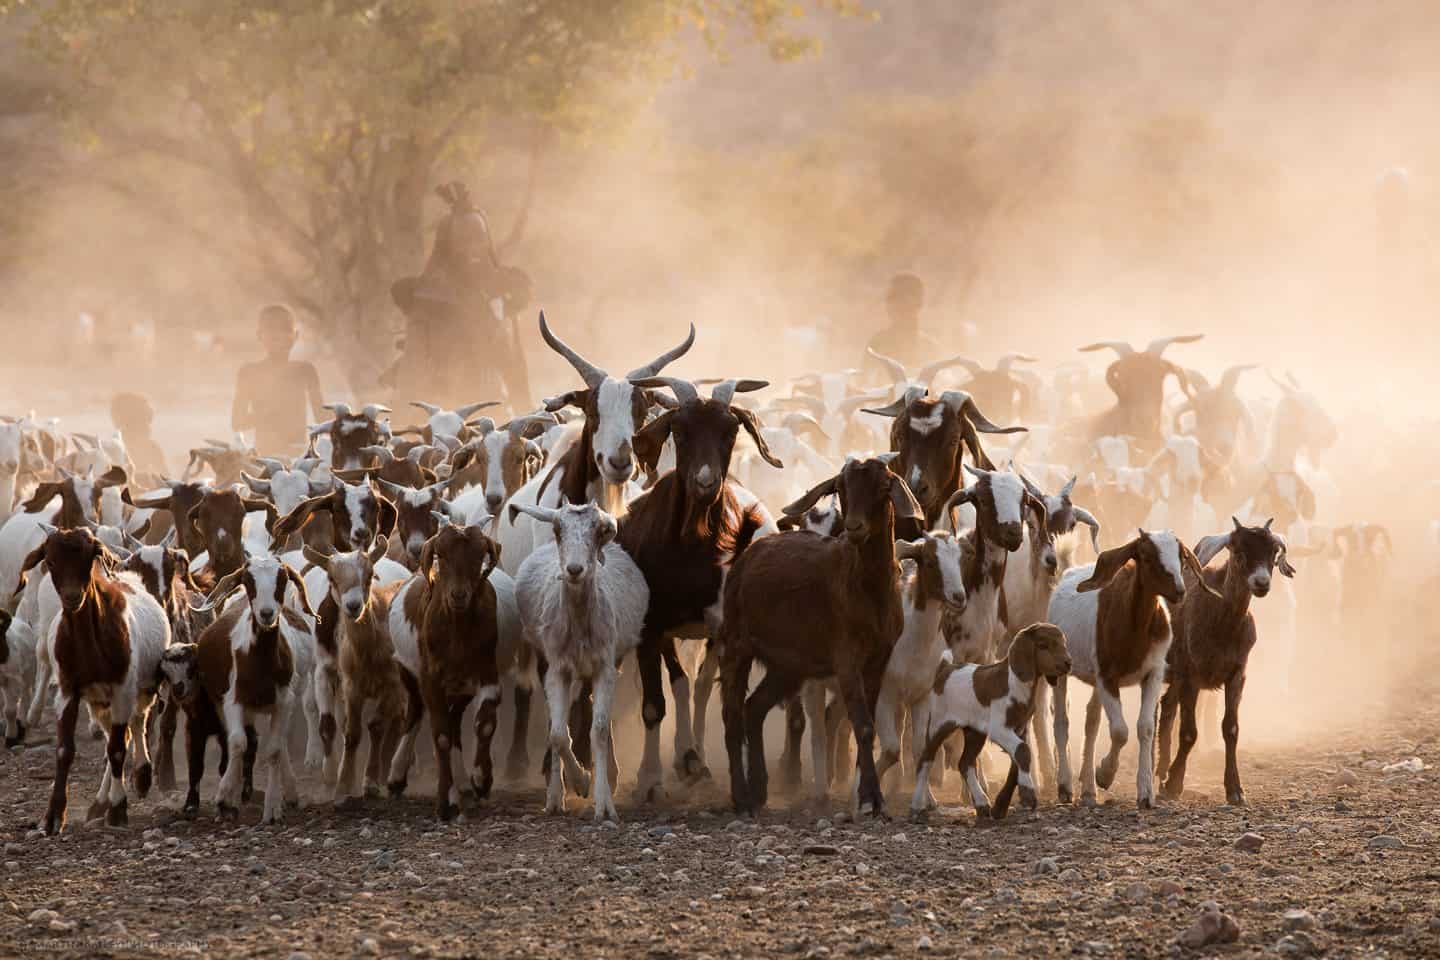
Himba Goat Herding
I can of course do this with smaller files, like the 22 megapixel files from the 5D Mark III, but at the same size, 24 x 36 inches, they only have a native resolution of 192 ppi, and having printed these images out many times at this size, experience tells me that you have to use a third party tool like ON1 Software’s Perfect Resize to increase the size of the image to 300 ppi before you print to ensure that the final print looks any good. If you don’t upsize for a print of this size, the image looks soft, and quite poor quality.
It does work of course. The quality can be brought back by upsizing, and you don’t generally look at a 2 x 3 foot print with your nose against the paper, unless you are a photographer of course. 🙂 But, having the higher resolution right there in your base image not only removes the necessity to upsize for print, but you aren’t actually creating pixels. You have enough resolution to send straight to the printer, so the end results are just stunning.
I’ve photographed the face of the print to give you some idea, although it really just doesn’t come across. You have to dive into the photo in real life to fully appreciate how beautiful these images are when printed.
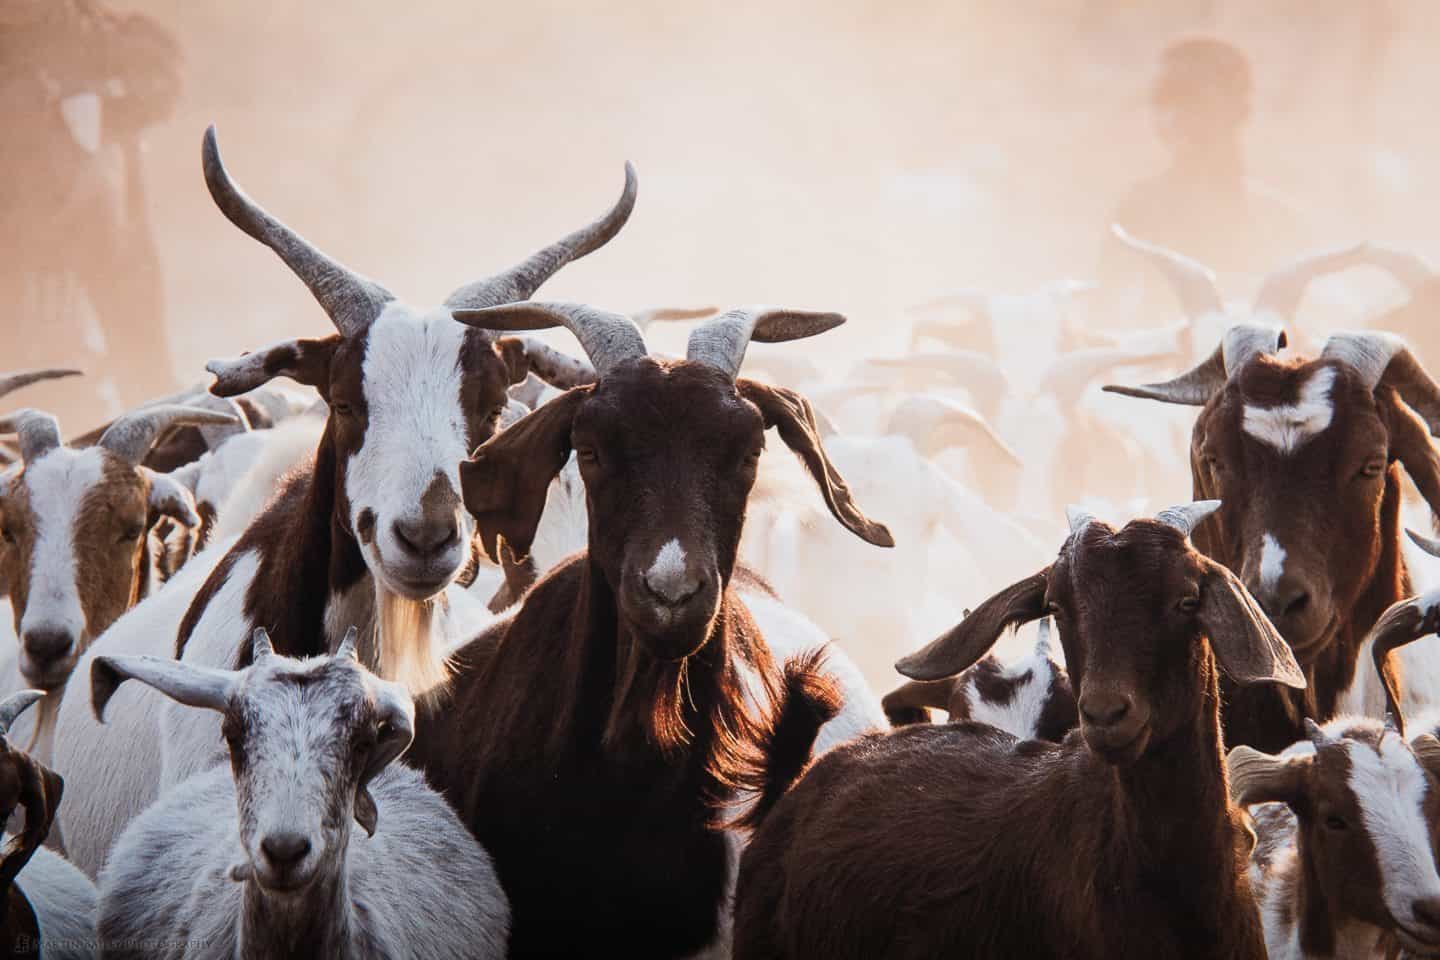
Himba Goat Herding on Breathing Color Pura Bagasse matte media
I printed this image on Breathing Color’s new Pura Bagasse Smooth matte media, and photographed the face of the print in my studio with a Profoto Studio light in a 2 x 3 foot softbox, so it’s quite smooth light, off to the right, at about a 30° angle, so that it highlights the texture of the paper just a little, but hopefully gives you an idea of the fidelity of the print. The hairs on the goats, and every detail if faithfully reproduced, and remember the printed area here is 20 x 30 inches, so it’s a good sized print.
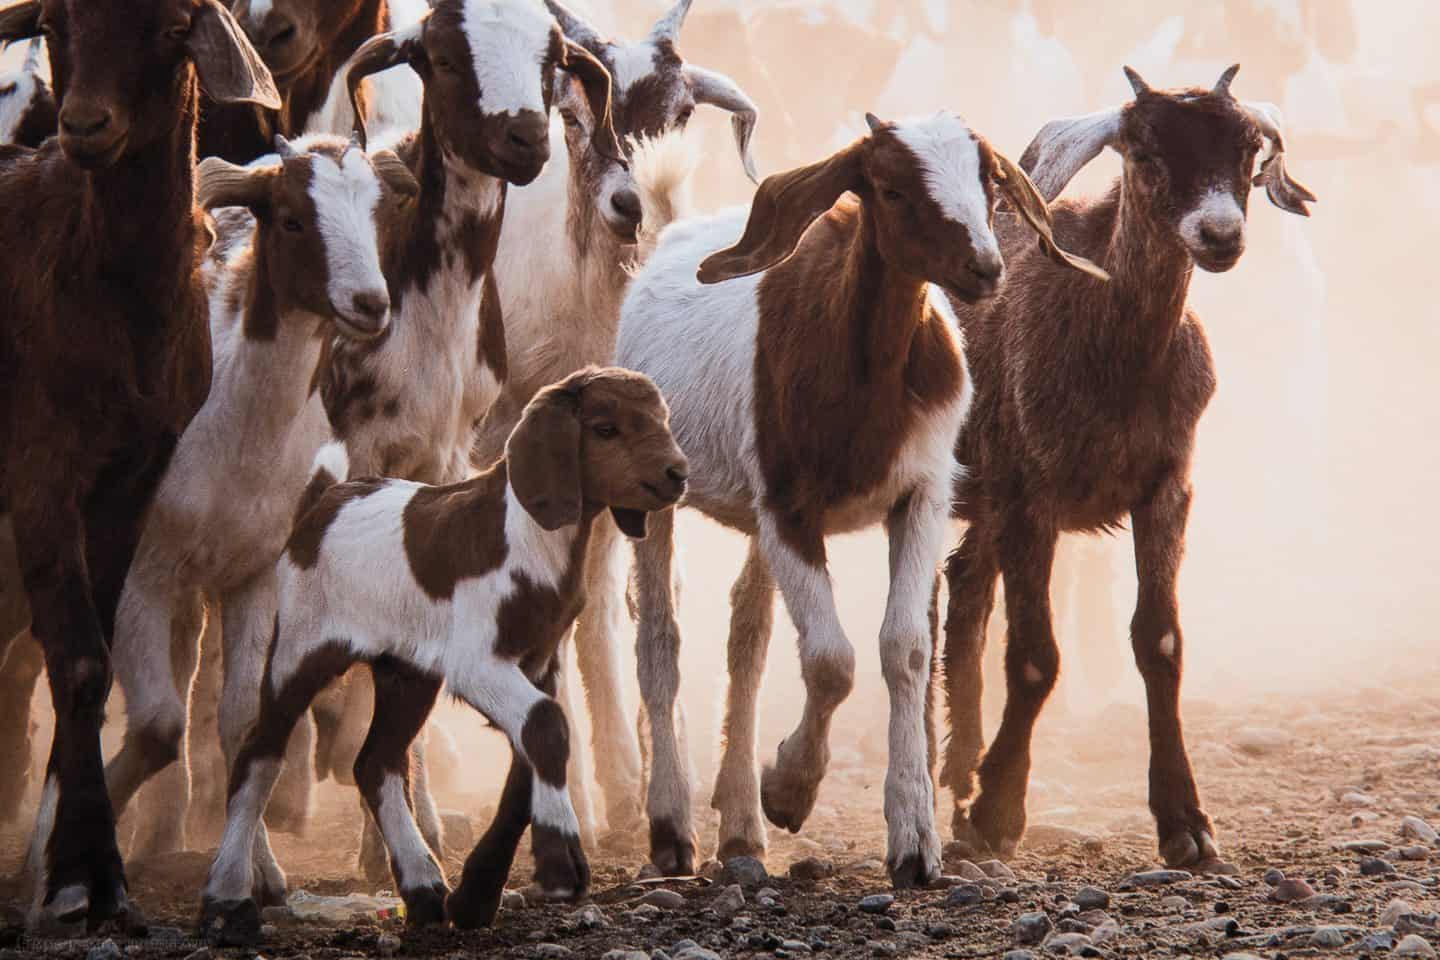
Himba Goat Herding on Breathing Color Pura Bagasse matte media
I have to admit, I had not even noticed the trampled plastic bottle between the little goats legs in this photograph, until I looked at the large print. As usual, I did go over the print at 100% to check for dust spots before printing, but it wasn’t until I saw the actual print that I saw the bottle, and that to me is part of the fun of printing this large, and now, with this amount of resolution.
Has the File Size Been Crippling My Computer?
Having processed all these photos over the last few month, with much of the editing done on my MacBook Pro Retina computer, and the rest done on my 27″ iMac, I can still confirm that I am not feeling any stress with the speed of the images being displayed on the screen, because the files are much larger than my previous camera. Sure, it can take a few seconds sometimes for images to load if they don’t have a preview built, but if you build previews on import, it’s usually less than a second, if not almost instant.
I generally set up Lightroom to create Standard Preview images of 2880 pixels, which is big enough for me to get my initial view on both my MacBook Pro and my iMac. Then of course, when I jump to the Develop module to make any adjustments, Lightroom creates a larger preview anyway, as required, but this too is usually a pretty quick process, just a second or so.
If you are the impatient type, this may concern you, but personally, I think the additional information recorded in the images is worth the wait. There was a comment on my original review of the 5Ds R, about the amount of time required for the preview of the files to display on the back of the camera after making an exposure. This does take a little longer with the 5Ds, but I honestly hadn’t even noticed it until he mentioned it.
The reason I bring this up, is because you may be concerned about some things that simply don’t bother me, and if they don’t bother me, they are unlikely to end up in this kind of review. If you have any questions or would like me to test something specifically, and if it’s not too time consuming, drop me a note in the comments below, and I’ll try to answer as best I can.
Conclusion
We’ll start to wrap it up there for this four-months-in review, but I do hope you’ve found this useful. If you are on the fence regarding whether or not to pull the trigger on the 5Ds or the 5Ds R, you really don’t have any reason from the camera’s technology point of view to hold off. Of course, not everyone needs or wants this level of resolution in a camera, and if that’s you, don’t sweat it. No one is forcing you to buy this camera. If you are undecided for any of the reasons that we touched on today though, please don’t be. It’s an amazing piece of engineering.
If you do decide to buy one, and you shop with our friends at B&H, please use the links that I’ve embedded in this blog post. You know that the opinions expressed here are my honest, from the heart opinions, and in no way biased to make you buy these cameras. I paid for both of mine, with hard earned cash, just as you will if you spring for one, but I put a lot of work into these reviews, and you can help to support my efforts, by using our links.
As I mentioned in my initial review, I’ve never been happier to be a Canon user. I know that mirrorless are great, and a lot of people are getting amazing results with them, but for me, I still like the full SLR format, and the range of lenses, autofocus and having everything at my fingertips just still feels great. The addition of the 11-24mm lens and the release of the updated 100-400mm lens, and then the release of the 5Ds camera bodies, have pretty much removed any temptation to stray from the fold, at least for the next few years I imagine.
Show Notes
The Canon 5Ds R on B&H: https://mbp.ac/bh5ds
Canon EF 11-24mm f/4L lens: https://mbp.ac/11-24mm
Canon EF 24-70mm f/2.8L II lens: https://mbp.ac/24-70ii
Canon EF 100-400mm f/4.5-5.6L IS II lens: https://mbp.ac/100-400ii
Canon EF 70-200mm f/2.8L II lens: https://mbp.ac/70-200ii
Canon EF 40mm f/2.8 STM lens: https://mbp.ac/40mm
Subscribe in iTunes for Enhanced Podcasts delivered automatically to your computer.
Download this Podcast in MP3 format (Audio Only).
Download this Podcast in Enhanced Podcast M4A format. This requires Apple iTunes or Quicktime to view/listen.

Can you point me to the story behind your comment, “A few years ago when I almost killed my 5D Mark III in Iceland, seeing just how weatherproof it was…”?
Sure Dan. I talked about this a little in Episode 388 here: https://mbp.ac/388
Scroll down to the heading 5D MARK III “IMPROVED” WEATHERPROOFING.
Thanks for pointing me to your experience with 5D3 weatherproofing. In Iceland last month, in days of rain, I had continual, but thankfully intermittent problems with my 5D3. This is why I am curious what Canon will do for the next version of the 1DX, especially if its resolution increase will get anywhere close to the 5Dsr.
Hi Dan, I doubt that Canon will increase the resolution on the 1D X update by much, but I hope they do. I actually would rather see them bring back the 1Ds. High resolution, like the 5Ds but with complete weatherproofing.
BTW, in Iceland, I generally just drape a cloth over my camera when it’s raining (most of the time!). The wicking effect of the material is generally enough to stop the water getting inside the camera. When I killed my 5D3 I was literally testing it, and just let it get totally wet, just like I used to shoot with my 1Ds.
Hi Martin, if really enjoy to listen your podcast. I have a question about the 5DS, did you test long exposure, let say over 60 secs? I read few comments about high noise in the photo. Thanks in advance for your answer
Thanks for listening to the Podcast Gianpaophoto!
There are no issues at all with grain in long exposures. I have shot up to 150 second exposures, and they are fine. I do expose to the right for long exposures too though. People that are seeing grain probably are not exposing to the right.
I can not help but reflect of the Blogcast extolling the virtues of the 7D mk II and it’s crop factor for wildlife photography, over the full frame 1DX, so it may be an idea to wait until the Winter Wonderland workshops are over before getting rid of the 7D, you never know….
HOWEVER – if you are happy with the gear that you have then that is all that counts. The 5DSr is an awesome piece of kit and you seem to be as happy as the proverbial sand-boy.
Interesting podcast as ever Martin, keep up the good work.
That’s my plan, to wait until this year’s workshops are over. The crop factor is a big plus for the 7D Mark II, but when you consider that I can crop into a 20 megapixel 1.6X crop factor image on the 5Ds R images, and the image quality is actually better, I get the best of both worlds with the 5Ds R. I.e. if the subject is closer, I can get a full frame shot, but when it’s further than my zoom will allow me to shoot it, I can crop down to as far as a 1.6X crop factor image as well.
Because of this, I’m not worried about the crop factor at all. My biggest concern is the autofocus capability of the 5Ds R. It’s been pretty impressive so far, and even if it’s not brilliant, I’d rather nail fewer 50 megapixel frames than nail most shots with the 7D Mark II. I’m taking the 7D2 on my Winter Wonderland tours, as my third body, and in case I have to resort to it for autofocus etc. but I think I’ll end up using the two 5Ds R bodies almost if not totally exclusively.
I’ll be sure of course to let you know how all of this pans out. 🙂
Thanks for the great review! I have seen banding is a lot, lot less on our 5DS R’s than on the 5D III’s. There is certain lighting conditions that bring some of the shadow banding back at base ISO on rare occasions, pushing shadow the same amount. Have you encountered this situation? If so what do you recon is the cause? I’ve encountered only a few blogs that have noticed this but no answers. Thanks for your time and great work!
Hi Joe,
Thanks for the kind words.
I’ve not seen the banding that you mention, that I can recall at least. If I hear or see of anything though, I’ll let you know.
Cheers,
Martin.
Hi Martin
Many thanks for detailed review!! Could you please share the same for 5Ds. The link which you referred – Episode 478 is not detailing 5Ds.
Hi Raj,
If you mean a review of the 5Ds, I don’t own one, so I can’t do a review I’m afraid. I only review gear that I use myself. I see that I omitted the R in the text, but it’s really the 5Ds R. Sorry about that.
Cheers,
Martin.