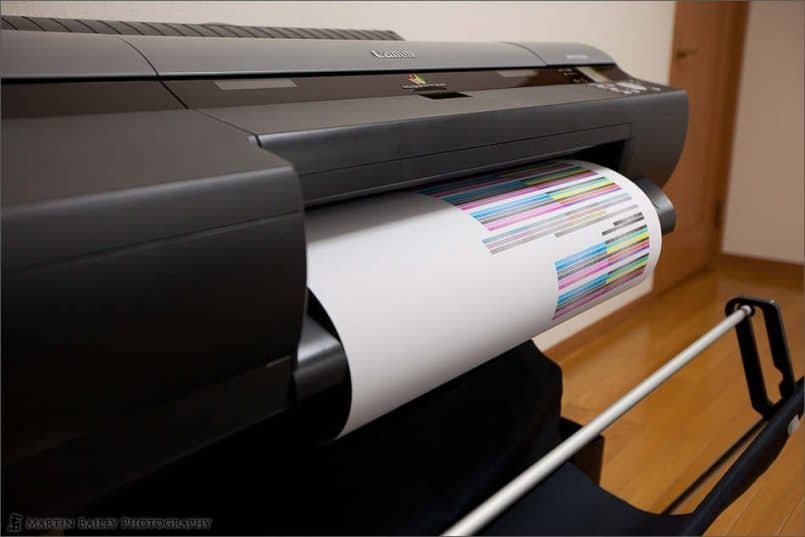
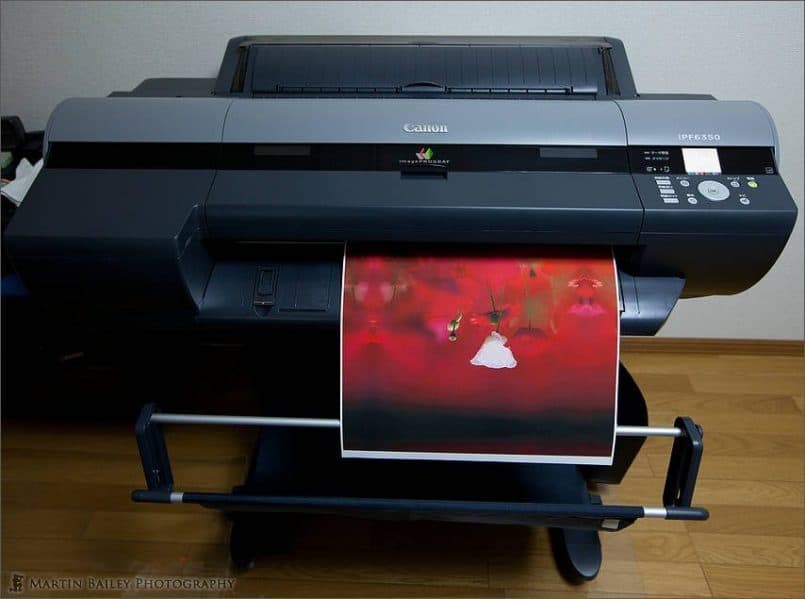
My new Canon imagePROGRAF iPF6350 large format printer was delivered on August 13, 2010. The first thing to note with this printer is it’s big! Not huge as far as really large format printers, like the 44″ or 60″ models, but still, with the ability to print 24″ or 610mm wide sheet or roll paper, it’s a hefty bit of hardware. It weighs 51KG without and 66KG with the stand.
I’m not sure how it is in other countries, but in Japan, some distributors provide the stand as an option, and some include it, with an increased price of course. Take my advice, and get the stand. Trying to work with this printer on a table or workbench could be a pain, unless you have something about the same size as the Canon stand, on wheels, and that you can leave the printer on all the time. If you don’t have that, just get the stand. On the stand the dimensions of the printer are 39.1″ high, 46.4″ wide and 34.3″ deep. You also need space around the printer for airflow and to operate it.
The company I bought from here in Japan offered free delivery to drop the printer off in my car park. They wanted an extra $100 just to bring it up to my third floor studio, or I could pay $500 to bring the printer up to the third floor, unpack it, set it all up on the stand, and then install the drivers to my computer and check connectivity. They would also take away all of the packaging materials.
With me being pretty technical, I didn’t like the idea of paying someone to install drivers and stuff, so I didn’t take this service, and I wasn’t too impressed with the $100 just to carry it up two flights of stairs, so I refused, and just went with free delivery. The more I thought about this decision though, the more concerned I became. I had kind of thought that my wife and I could carry it up the stairs, but then I read in the Canon Manual that it requires three people to lift the printer onto the stand. I started to get really worried, and called the distributors to see if I could add the setup fees, and they said that if I did, they’d need another two weeks for delivery, so I gave up on that idea.
You’ll Need Help Setting it Up
On the day of the delivery, when I got out to the truck, I was pretty shocked to see the size of the box that the printer was in. I wished I’d been able to take a photograph of it, because it really was huge. It wasn’t even really a box. The printer was laid on a polystyrene frame on top of a huge wooden palette, and some double thickness super strength card board over the top and sides. My plan was to plead for help if my fears came true, and they’d come true.
I asked the guys that delivered the printer to help me carry it up to the third floor, and one of them helped me to do so. It was the middle of August, so as we carried the printer, my hands started sweating and the plastic was slipping in my hands. We had to turn the printer sideways to get it up the stairs, and only just managed to get it around the corner and through the door into the studio. I was so relieved when we put it down on the floor, but already knew it was going to be difficult to lift it again later with my wife, after I’d put the stand together.
I gave the delivery men $10 each for their trouble, and figured it was still cheaper than the $100 that the distributor had asked for, but I was still wishing I’d paid the $500 for the full treatment. After I’d set the stand up, I asked my wife to help, and she initially couldn’t lift it. After trying a few different ways, she was finally able to lift the printer up and straighten her legs. It was a tense minute or so until we got it in position and I was able to bolt the printer to the stand. Ultimately I was able to get the printer set up, but the moral of this story is, unless you have a couple of strapping mates to help you, pay for the white glove treatment, and have the printer installed by professionals. It’s really not worth the hassle if you don’t have the help.
You can connect to the printer with a USB cable or a network cable. With the printer having a Gigabit network adapter installed, I figured I’d use network, as opposed to USB, so that I could print from multiple computers more easily.
Dual Print Heads
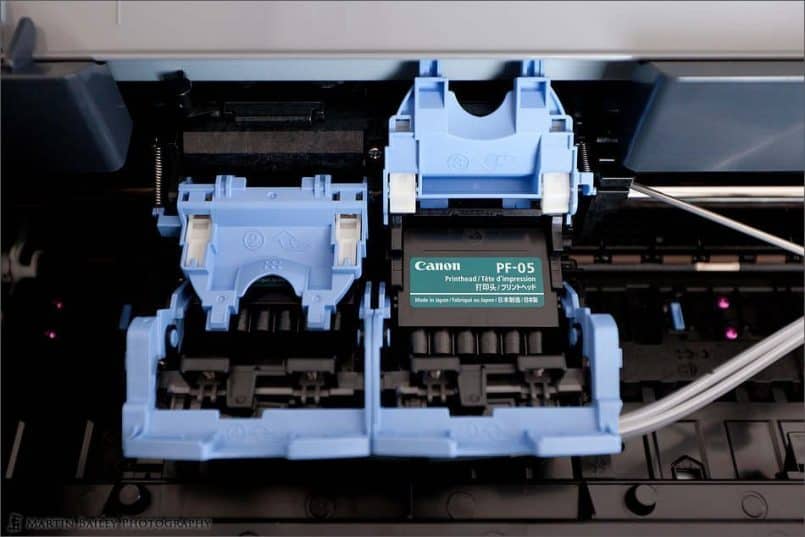
After connecting the power and network cables, I followed the instructions to fit the two print heads that come with the printer, but not fitted. It’s not a difficult job, but there are parts that you aren’t allowed to touch, which is always a bit nerve-wracking for the uninitiated.
12 Color Lucia EX Pigment Inks
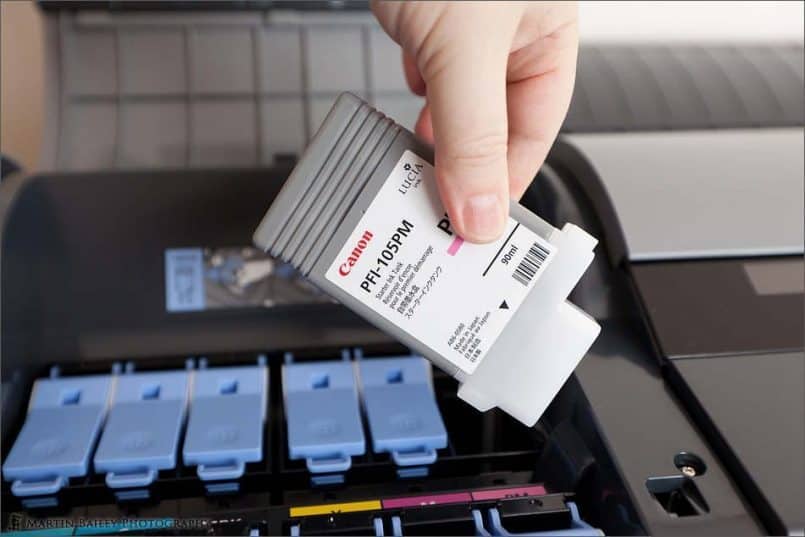
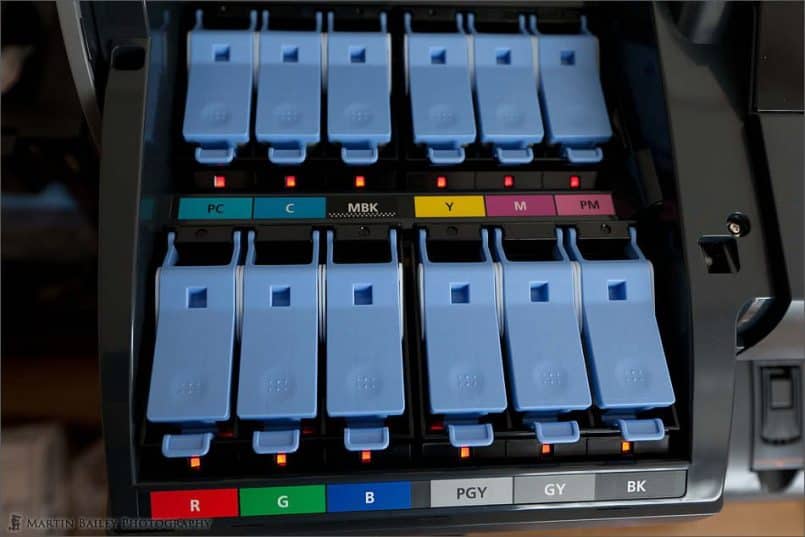
Then you have to insert the 12 Lucia EX ink cartridges. The printer comes with only 90ml of ink in the cartridges, despite them being 130ml cartridges. A little bit stingy on Canon’s part I thought, but then it does cost over $900 to buy a full set of inks, so I can kind of understand too.
Having given each cartridge a bit of a shake, and dropped them all in, you check that everything is alright with the little red light in front of each ink cartridge cover. The labels in front of each cartridge slot are color coded, and have the code for each cartridge, so there’s little room for error here.
As the printer takes about 20 minutes to initiate and draw the new ink through the pipes etc. the manual suggests quite considerately that you use this 20 minutes to install the printer drivers and software, which I did. In my network router settings I made sure that the printer would always be assigned the same IP address, so that the printer driver port, which is basically an IP port, would not lose contact with the printer if the IP address was changed in the future, due to the timing of other devices coming on to the network.
Automatic Print Head Adjustment/Calibration
After I confirmed that I could connect to the printer from my PC, I loaded the half roll of paper that Canon includes, and proceeded to tell the printer what sort of paper it was. I’ll go into this in more detail later, but basically, you have to specify the type of paper and the length of the roll when you insert the paper. The printer then continues to print a series of patches, and then from time to time pulls the paper back inside the printer, and scans the results. Then, using these results it calibrates itself, to ensure that the dual printer heads are aligned. This is basically the same as when you print out the pages of lines on consumer printers, and then have to tell the printer which number is most in line. The iPF6350 does this automatically, which I thought was pretty cool.
This might also be a good time to mention that the iPF6350 has a total of 30,720 nozzles, with 2,560 per ink at a pitch of 1,200dpi. Using the optical scanning mechanism that I just mentioned, the printer automatically detects non-firing nozzles, and compensate for that using other nozzles. I have never had problems with nozzle blockage with my Canon Pro9500 printer, but I can imagine it would be a real pain when printing a 24×36″ print, if you had lines on the print caused by a block nozzle, so this functionality is very welcome.
The printer comes with drivers for Windows, both 32bit and 64bit, and Mac OS too. It also comes with a whole load of application software. There are plugins for Digital Photo Professional, but as that software is the son of satin, I won’t be using that plugin, so we’ll just touch on the drivers and software that I’m using today.
iPF6350 Media Configuration Tool
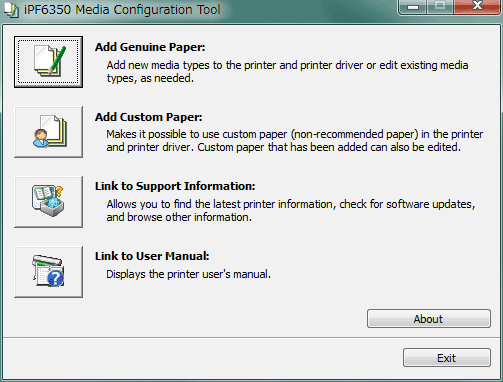
Before you use a new paper, you have to configure it, either on the small LCD panel on the printer, or via the iPF6350 Media Configuration Tool. When you install the tool with the drivers, you add a batch of preset Genuine Papers based on your location. You are asked to make a selection. I believe this is based on what Canon has available in the various locations around the globe. You can also specify some generic papers and also cloths, and fabric, as well as synthetic paper and film, among other things.
You have to select Add Genuine Paper from the Media Configuration Tool, and tell the printer what it is, and input the size of the paper on the printer LCD as you load it. Once you’ve added a paper it will be available on the LCD for the future, and you can also select it from the printer drivers now too.
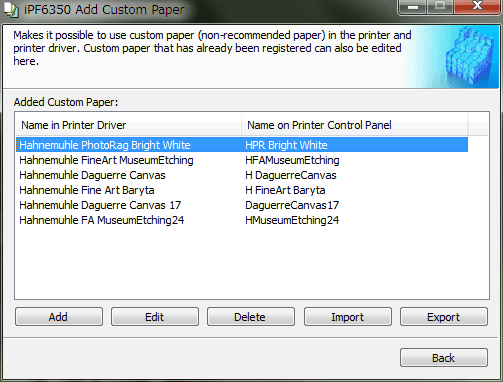
This batch of presets also includes 10 “Special” settings, which is what you have to select when adding some third party papers, such as the Hahnemühle papers that I use. When you add a new paper, the Media Configuration Tool sends a subset of data to the printer, and you then have to load the paper, be it sheet paper or roll paper. After you load the paper, you select the paper with the name that you specified, and then the printer asks the length of the paper. It gets the width automatically when you load it. After loading the paper, the printer will again print some sample patches, but this time it’s detecting the best settings to correctly feed the paper through the printer.
It’s probably a good time to mention too that if you want to use the Accounting Manager that I’ll talk about later, you’ll need to add the same paper multiple times if you use more than one width of paper, and you probably should for various sized sheet paper too. This will probably also lead to better paper advancement through the printer.
The printer uses a vacuum to suck the paper against the Platen, which is the plate below the paper. When you add new paper you can adjust the feed and vacuum strength, as well as a few other paper specific settings, but so far I’ve been fine with Auto for these settings. I did notice some black marking on the underside of some of the sheet paper that I did some initial test prints too, but that cleared up after I wiped what looked like a bit of oil off the paper guide rollers.
No Native 16bit Printing in Windows
The one thing that I find annoying when working with this printer is that despite it being able to print in 16bit mode, only the Photoshop plugin has this ability on Windows. The Windows OS does not natively support 16bit printing yet, so this means the only way that Lightroom will be able to print in 16bit mode, is if Windows supports it. Canon could probably develop a plugin for Lightroom, but if it’s like the one they have in Photoshop, you’d probably have to export the image to a standalone print module, and lose many of the benefits of the Lightroom Print Module, which is one of my favorite modules. I’ve done all of my printing from Lightroom until now, because it’s easy to use, and you can save everything as a preset. If a Canon plugin just made me export to a separate module and do all the same stuff that you have to do in Photoshop, there wouldn’t be much point.
The Mac OS though does natively support 16bit printing, so Lightroom on the Mac does have 16bit printing for this printer. I would just really like to see Windows include 16bit printing support, as I don’t want to have to crank up my Mac just for printing, and I have too much investment in Windows software to switch.
Although I’ve not tested to see if there really is any improvement when printing in 16bit compared to 8bit, what this means is that I am at the moment pretty much stuck with printing from Photoshop CS5, with the Canon plugin. This means that I don’t get the benefit of the Lightroom’s automatic resizing and output sharpening, so before I send my print job to the printer, I have been resizing to the size that I want to print the image at. You can use the Canon resizing and scaling in the printer, but I haven’t really gotten used to it, to the point that I can get the right border sizes etc. It’s pretty fiddly, and makes me miss Lightroom a lot.
Nik Software Sharpener Pro 3.0
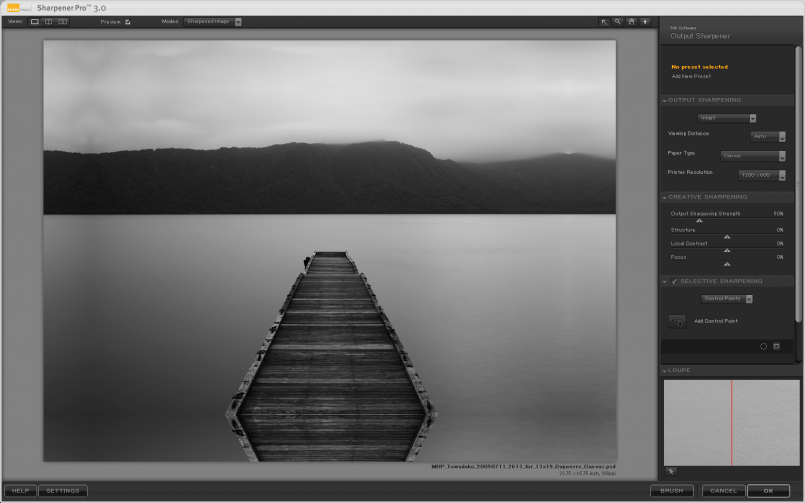
I’ve also been using Nik Software’s Sharpener Pro 3.0 to sharpen the images specifically for the output size. It’s easy enough to use, but it means that even if I didn’t have to do any soft-proofing on my images, I pretty much have to create and save a PSD file for everything that I print. That’s not a bad thing I suppose, but it’s just not necessary when working with Lightroom alone.
Printing with the Photoshop Plugin
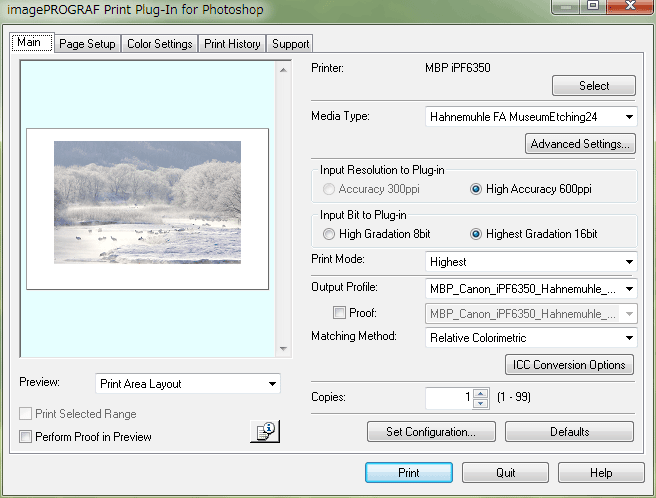
Once I’ve done my sharpening, or applied a boilerplate, I’m ready to send the image to the printer, which you do by selecting File > Export > iPF6350 Print Plugin… This invokes the printer plugin, and you can start to layout the image for your print. You need to select the paper that you already added via the Media Configuration Tool, and the resolution of the image, and whether to use 8bit or 16bit printing, which is linked in the plugin to the quality of the Gradations to be printed. I’ve created my own printer/paper profiles, so I select them under the Output Profile, but you can use the profiles from the paper manufacturer or Canon if you are using Canon paper.
I’ve got a little bit of hat eating to do here, in that I have said in the past that I always use the Perceptual rendering mode when printing, but when soft-proofing images for this printer, I’ve found that Relative Colorimetric often gives better results, so I’ve been using that more often recently.
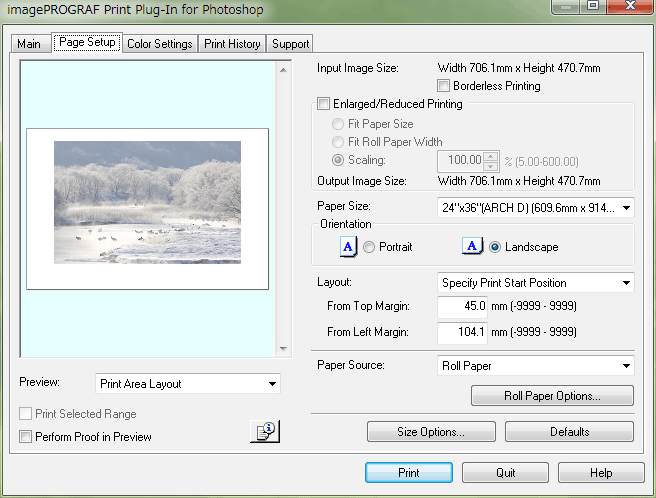
Once you’ve completed the settings on the Main screen of the plugin, you’ll want to go to the Page Setup screen, and get your image laid out how you want it. You can see below that I’ve not used the Enlarging in the printer driver as I mentioned earlier, but I probably will give that a try as I get more used to the plugin. You specify the paper size here, as well as whether you want to print the image in the middle of the paper, or specify your own size for the top and left margins, giving you more control over where the image sits on the paper. That’s what I’ve done here, as I wanted that fine art spacing, with a larger border below the image than above. You’ll select your paper source here too, either Roll Paper or Sheet, and you also have to tell the plugin the width of the roll of paper that you will print to.
That’s pretty much it though, and then you just let it rip, and watch your print come out of the printer. I should note here that this printer is fast. I haven’t timed it, but even when printing to 24″ wide roll paper, the print seems to come out in no time. As a guess I’d say it’s about 3 minutes for a sheet of Super A1, at high quality. For reference, I’d say it’s even faster than my Pro9500 from Canon can print a sheet of Super A3, which is a quarter of the size.
Before we move on, I did just want to mention that so far, I’ve been incredibly impressed with the color gamut of this printer. It is able to reproduce far more colors and subtle tonal values than my Canon Pro9500. Even when I’m soft-proofing before printing, there is often just no need to change the image, and on images with very bright reds and greens, that often take a little more work in soft-proofing, they take much less time to get right than with my old printer. The new Lucia EX pigment ink system, plus the additional 2 colors that this printer has over the 9500, really seem to have improved the quality and accuracy of image reproduction.
A few weeks ago I showed you How to Create a Gallery Wrap, and for that, I was using the Hahnemühle Daguerre Canvas, on a 17″ roll. As I said earlier, when you load a new roll of paper, you tell the printer the length. The full rolls of Hahnemühle paper that I’ve been buying are 39′ long. One problem is though, that when you print, using a few feet of paper, and then remove the roll, the next time you load the roll, you’re not likely to know exactly how much paper has been used already, and so you can’t tell the printer how much paper is left. If you are near the end of the roll, this could result in you running out of paper before the end of your print.
Automatic Roll Paper Recognition
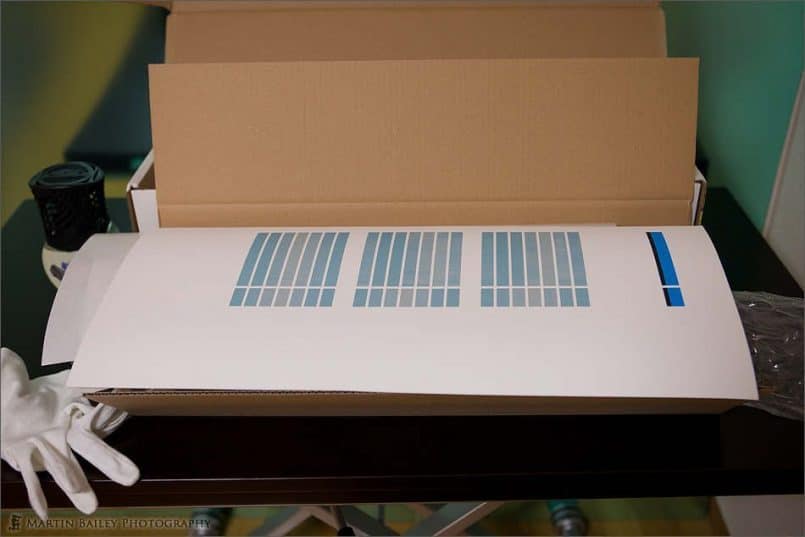
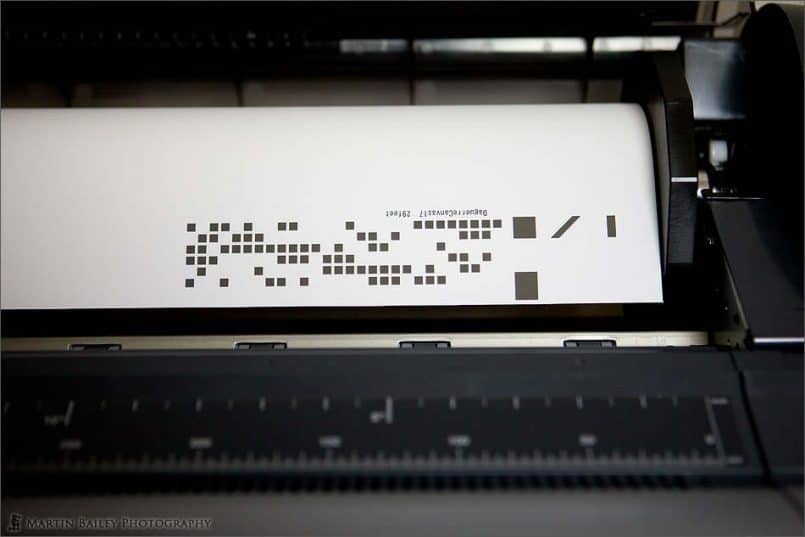
To overcome this, you can select an option to have the printer print a bar code on the end of the roll when you eject the paper. Because the printer has that scanner built in, when you reload the paper at a later date, it reads the bar code, and can automatically tell what paper it is, and how much paper is left on the roll. This of course does waste about 5cm of paper each time you reload the paper, but I think it’s worth it to easily keep track of the paper I’m using.
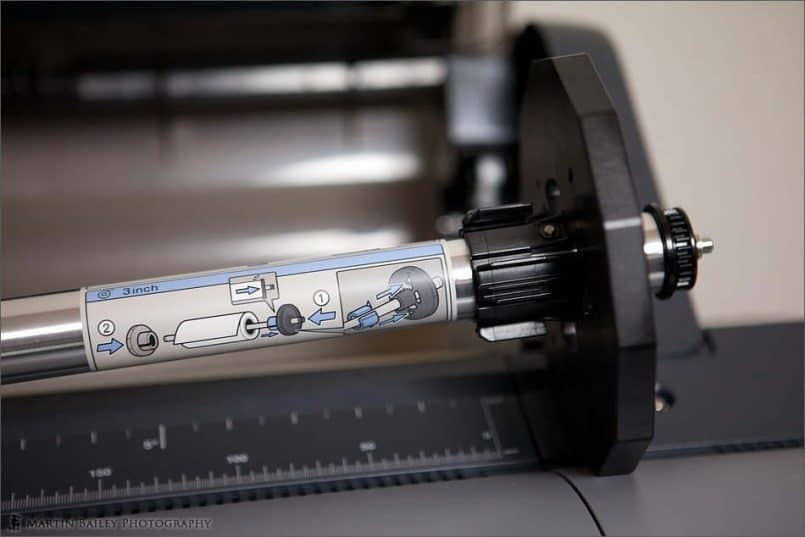
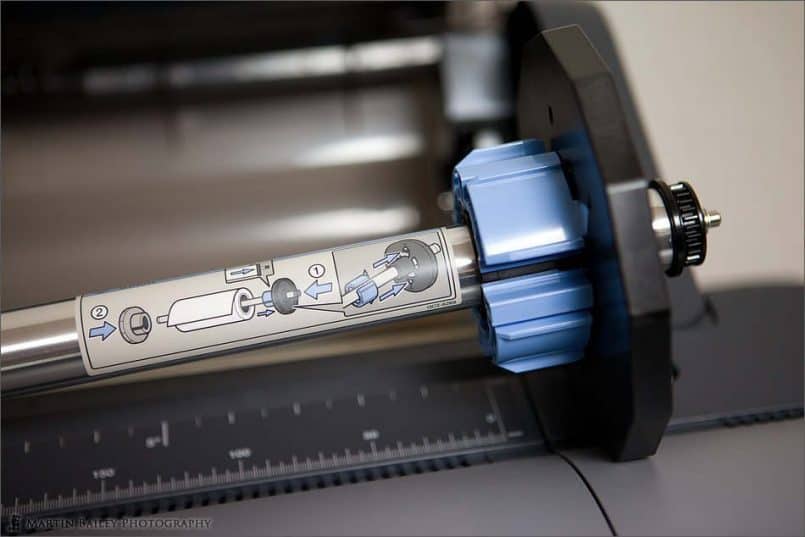
Yesterday, I printed my first 24×36″ print which will be a gift for the colleagues that I’m leaving behind in my day-job that I just resigned from to pursue photography full time, and I used different paper to that which I had loaded, so I needed to switch them out. The iPF6350 takes both 2″ and 3″ core roll paper. The Daguerre Canvas comes on a 2″ core, which is the native size that the Roll Holder takes, as we can see above.
The Hahnemuhle Museum Etching paper though, is a much stiffer paper, and I assume to help to prevent it from curling, it comes on a 3″ core. To fit roll paper with a 3″ core, you have to fit an adapter to the right side of the roll holder, like this, and use a different left side Roll Holder Stopper. These come with the printer as standard of course.
I should also note that when handling the rolls of paper, or any large sheet paper too, I always use white cotton gloves, to prevent the oils from my skin touching the paper, and discoloring it, either now, or in the future.
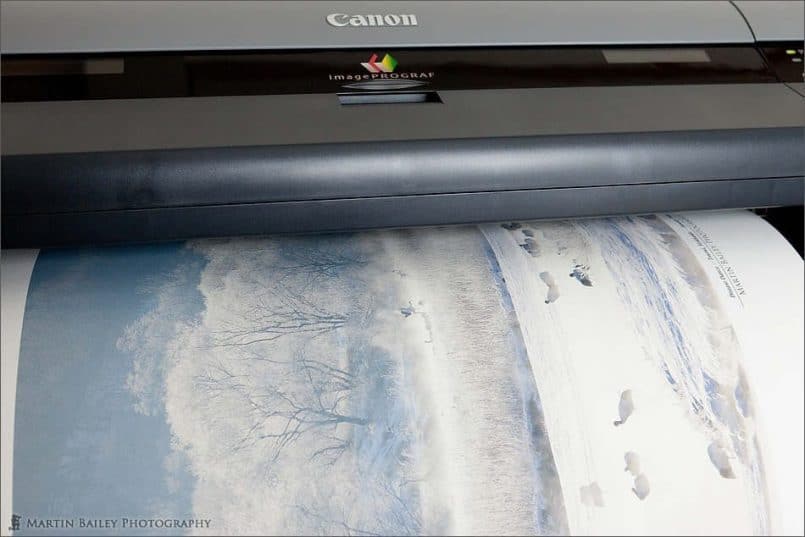
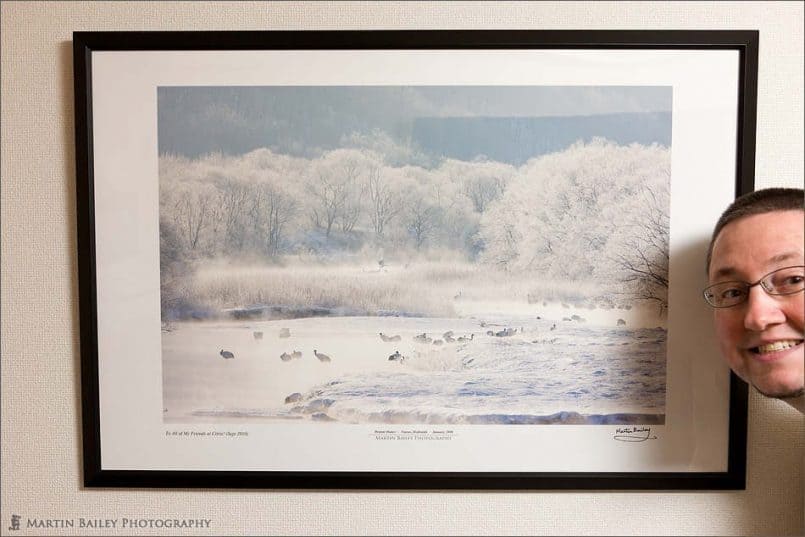
One of my best selling prints, and the one that my colleagues liked the most on my old office wall, was the one from the misty morning in Hokkaido, in 2008, with the Red-Crowned Cranes in the river, and the couple dancing in the distance. Although the printed image didn’t fill the paper, it was so cool to watch one of my favorite images comes out of the printer on 24″ wide paper.
Here is the finished print in a frame that I picked up yesterday. I shot just the picture, but it’s difficult to see the size of the print without a reference point, so I stuck my fat head as well, to give you some scale. I applied my signature with a water based pigment ink, fade proof pen from Sakura Color Product Corporation in Japan. I created a simple boilerplate in Illustrator for the middle, and added a simple message on the left, to my buddies from the day-job, in Photoshop before printing.
There are a few other bits of software that come with the printer that I wanted to mention before we finished.
Accounting Manager
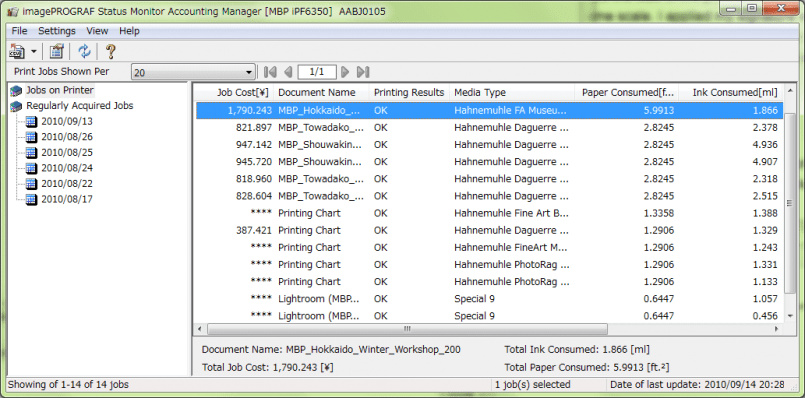
First, the printer comes with an Accounting module, built into the drivers. If you register the cost of your ink cartridges and the paper that you use, you can use the Account Manager to calculate the exact cost of the prints you make. This is not only a lot of fun, but it’s essential if you are going to print for other people. I already have a few people that are asking if they can come round to do some large prints, which I don’t mind doing, but when it comes to asking for money for the prints, it’s really useful to be able to show them exactly how much each one cost.
Of course, this cost doesn’t include my time, or wear and tear on the printer, or the time spent learning to use it, or the skill involved in soft-proofing and laying the print out, etc. etc. So this would not be the amount that I charge a total stranger for a print. Also, it goes without saying that if I’m printing a fine art print of my own work, or prints for a client from a portrait shoot for example, I will be charging much more than this. As you can see though, the print that I did for my colleagues cost ¥1,790, which is about $20 at the current exchange rate. Not cheap by any means, so you don’t want to be making too many mistakes with these large prints. Test prints on smaller paper stock is certainly the order of the day.
Remote UI
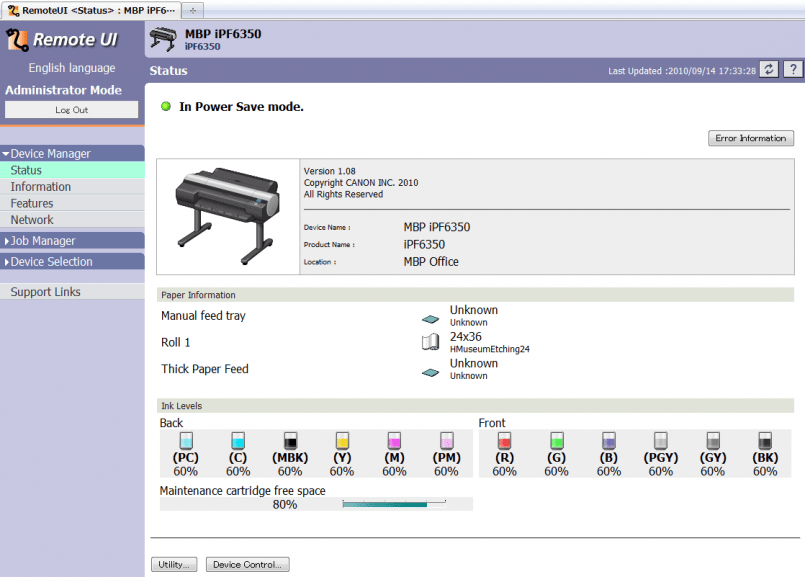
As I say, the printer comes with a lot of software, but let’s look at one last thing that I’m finding useful, before we finish. If you enter the IP address of the printer into a Web browser, the printer dishes up a nice Remote UI admin console to any computer on your network. I can even check the ink levels on my printer from my iPhone if I needed to. You don’t need to install the drivers or anything to check that things are OK with the printer, or modify settings, check logs etc.
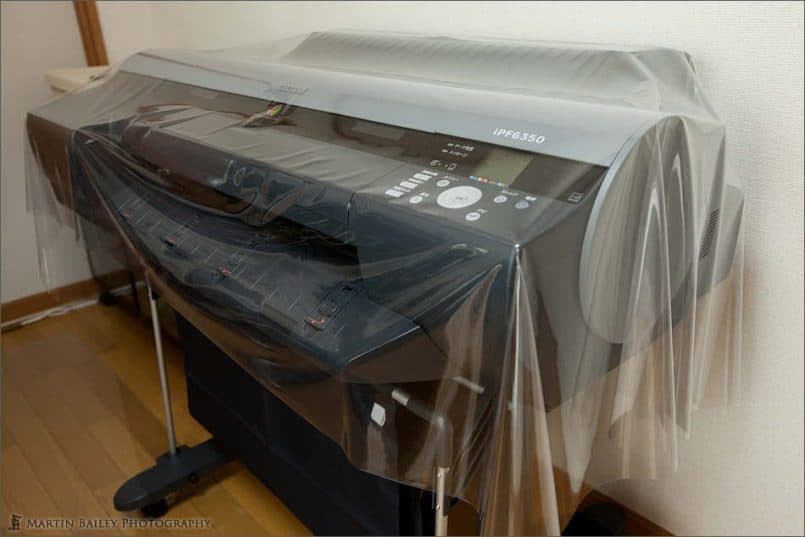
Although the printer has a very low level sleep mode, basically turning it off, but keeping an eye out for jobs coming in over the network, I’m not leaving mine on all the time at the moment. It just gets too hot in my studio when I’m not around. I’ll be in there much more often now that this is my full time job of course, and I’m looking forward to cooler days coming soon with the Autumn, so I might start to leave it on, but for the moment, I’m turning it off when not in use. And when I do that, I’m covering it with a large piece of plastic sheet from the hardware store. This is just to keep dust out, as dust in a printer can cause problems if it drops on the face of the paper as you are printing. Basically you print on the dust, not the paper, and then if the does falls away later you end up with a white spot, which I like to avoid.
One other thing that I didn’t mention is that the printer also requires a Maintenance Cartridge, which is used to dump waste ink during cleaning cycles. These are about $70 to replace, but I don’t know yet how long they last. I’ll find out as I start to print more in the coming months, and if it seems excessive, I’ll let you know.
Conclusion
I haven’t really done any comparison tests, and at $20 a chuck, I’m not about to start doing multiple copies of the same print with different settings, just to see if there are any minute differences in quality, but my initial impression of this printer is that it delivers incredibly high quality prints.
I’ve output large prints on Hahnemuhle Daguerre Canvas and Museum Etching now, and for smaller prints, I’ve also used Hahneumhle Photo Rag and Fine Art Baryta, all of which are showing excellent results. The printer reproduces a huge color gamut, amazing tonal range, easily achieved vivid and highly saturated colors, as well as breathtaking black and white prints.
At $3,995 on B&H and another $900 just to replace a full set of ink cartridges, this certainly isn’t a printer for the hobbyist. There are over a thousand pages in the multiple User Manuals, and it takes a fair bit of reading and studying just to figure out how to set up the paper and start printing. But if you have a need for large prints, and are somewhat technical and enjoy getting your hands dirty, like I do, then you’ll love this printer.
Just make sure you have enough space to put it, and a few friends to help you get it set up, or buy the white glove delivery service when you buy the printer, and you won’t regret a thing.
Podcast show-notes:
Details of iPF6350: http://bit.ly/MBPiPF6350
Buy from B&H: http://bit.ly/BHiPF6350
Music from Music Alley: http://www.musicalley.com/
Audio
Download the Enhanced Podcast M4A files directly.


Very interesting. How would you compare the price per print to include time and amortization, with an online service? Thanks for the write up.
You mentioned that you turn it off when not in use, per Canon, this is not the best idea for a few reasons. First, it eats up ink when it is turned on (in general, you will spend a lot more money on the wasted ink vs any power savings). Second, printer will run preventative tasks while powered on to stave off clogging.
In summery, these printers want to stay on and be used.
Hi Mark,
I’ve not checked, but I’m it has to be cheaper to print yourself, as long as you have a market for the work, or print often enough to make it worthwhile buying the printer.
Hi Steve,
Yes, I realize that I should be leaving it on, but it get’s up to 38 Celsius in this room during the summer, if I don’t have the AC on. I didn’t want to risk it until it gets cooler. I’ll start to leave it on as soon as it cools down enough, and I’ll see how it fairs as things start to warm up next year. The end plan is to be able to leave it on.
Cheers,
Martin.
Great overview.
Just bought the same model and am currently installing it (quite a job indeed)
But I am really struggling to find the PS CS5 plugin, either in 32 or 64 bit. I now use the CS4 plugin which I manually installed in the CS5 32bit plugin directory and that seems to work fine. But am really hoping for a native CS5 (64 bit even?) plugin
Where did you get yours?
thnx
Peter
Hi Peter,
Congrats on the new printer. Mine’s whirring away behind me as I type, printing out 24×36 inch canvases for gallery wraps.
I am using the CS4 plugin with CS5, but there is only 32bit. It’s a pain, but that’s all Canon have seen fit to develop, in their ultimate wisdom.
Cheers,
Martin.
Hi great info on this printer.
I wanted to ask some ?s if you have time.
I am looking at the Canon 6000s for its listed super fast print speeds but i can not find any revies on it or find a place by me to go to try it out.
My ?s are
The 6000s is only 8 inks VS what you have 12 inks. From what you have printed so far how much do you thing you would see in your prints if it was from only 8 inks VS the 12??
You listed that a A1 print is only taking around 3 mins. Is that a full coverage print.
Do you know how long it takes for a 16×24 print from the time you hit the print button?
I need super fast printing that is good quality but not fine art super quality. I will be printing 12×18, 16×24, 20×30 and 24×36 prints live as customer wait for them to take home right after shooting their photos for a event system.
Are the prints 100% dry when they come out?
Can i right away mount them in a frame with clear plexiglass to give to a customer?
Dost it take a long time to spool the print to the printer before it starts printing?
One last ?
Just starting out what should i buy?
Extra ink
What is a good photo paper for photos
Anything else that is needed to get going?
Thanks very much.
Can you please e-mail me the reply so i do not miss it.
I am looking at buying the 6000s in Dec B&h has it on sale for $2600 right now.
Hi Eddin,
I’ve not seen prints from a 6000s, so I can’t talk about the quality first hand, but I can’t imagine it being bad. I can tell you though that the prints from the 6350 are superb, and require very little soft-proofing, if any for most prints.
On the speed, as I said above, 3 minutes is a guess. It feels like about 3 minutes. Canon specs say that the 6000s will print full page A1 in High Speed mode in one minute, and 3.2 minutes for normal printing mode. Canon says it’s actually 4.1 minutes for the 6350, so it’s a bit slower.
I haven’t timed anything, so I can’t really say how long a 16×24 print would take, but I’d say you are still only talking a couple of minutes. Unless you set up the printer to wait for the entire job to spool before printing, it starts within a few seconds of you kicking the job off, and is printing while the rest of the data is transferred.
From your question, it looks like you are planning to print to sheet paper, not rolls. One thing I’ve found with my printer since I did the above review is that it isn’t all that good with sheet paper. You can get ink marks on the side of the sheet quite regularly, because sheet paper is rarely totally flat. Even having straightened it out carefully before feeding it into the printer, you get marks and have to throw out the print pretty regularly.
I’m going to be doing most of my printing from rolls, so it’s not such a big deal for me, but if your plan is to use sheets, you might want to rethink.
With most papers, the prints will be dry to the touch when they come out of the printer, but they should really be left to dry for 24 hours before you frame them, but at a push, you could frame straight away, especially as you’re naming aiming for fine art quality.
To start out, I suggest you just buy a maintenance cartridge, unless you are going to be printings lots and lots straight away. I’ve done around 70 square feet of printing with mine so far, and only the black cartridge has just dropped from 60% (this is all the cartridges that come with the printer have in them) to 40%. These printers are very economical compared to consumer printers.
As for paper, ultimately you’ll need to decide yourself, but from what you wrote above, I’d say just some standard Canon Gloss or Semigloss paper will be fine.
I hope this helps some.
Martin.
Martin, thank you for the review.
I received this printer as a Christmas gift. I’m concerned it may be too much for me. I am an amateur of intermediate skills, shoot using a Nikon D300, and use an iMac 27″ and Aperture.
I have not used on-line services to print in large format, so I have no idea what sort of quality is to be expected from those services vs. using a printer like this.
I would probably not print more than 2 or 3 large format prints per month using this printer. Would that be too low a duty cycle? Clogged ink, wasted ink, etc. What are the advantages/disadvantages using cut sheet vs. roll paper?
Would it make more sense to use an on-line service in such low volumes? Apple’s print service lists 20 x 30 in. prints at $15.
I do like the idea of having more control and reduced turn-around time.
Any thoughts would be greatly appreciated, from you as well as any others.
Hi Steve,
The quality from this printer is amazing. You will have to learn some printing basics first though.
Only printing a few images per month should hurt. I sometimes go a few weeks between prints and I haven’t had any issues yet. I have started to leave mine turned on though now, and every so often the printer shakes the ink cartridges to keep the ink from clogging. It might also do other stuff, but I’ve not noticed anything other than ink agitation.
You would be doing yourself a disservice using an on-line service while owning this printer. You have much more control over the entire process now. I would certainly make the most of that.
Ink and paper costs can be calculated per print with this printer, so I suggest you enter the cost of inks and each paper, and take a look at what it’s costing you. It almost certainly be less than $15 for a 20×30 print. Mine does get close to that, but I have to import my paper from the US, so the cost is higher.
The majority of the prints that you make with this printer will look great, assuming that you have your monitor calibrated, including lowering the brightness. Some will take some soft-proofing, but nowhere near as much as your usual consumer printer. If you need help with calibration or soft proofing, search here on my blog. I have released videos on both.
Cheers,
Martin.
Just a note…’
I’m getting ready to purchase the 6350, and the current price at B&H is now US$2895 with shipping free to CONUS. NOW, on top of that… if you get it (Or the 6300, 8300, or 9100) before 31MAR11 from ANY US dealer,(BH Photo has the lowest price) Canon has an awesome rebate in progress. It’s $750 on the 6350 and $1000 on the 8300. That makes the price $2145… Delivered… if in the USA! Awesome!
By the way, Martin… Omedeto on your citizenship! That’s a big jump, and you’re the only third white Gaijin I’ve heard of that’s converted! I’d love to have a chat sometime. (I spent 15 years off and on living in Japan)
Yuroshuku onegai,
Frank
Congrats for the new printer and thanks for the review. Hope it will help in reducing some more price per print.
It look good and great printers. we are also around burbank USA . A large format printer distributor company Including Mutoh valuejet, OKI procolor910/920WHT/930 and GO printers(Go ecoMax )
Don’t have cash to buy a house? Don’t worry, because it’s possible to receive the loan to resolve all the problems. Therefore take a short term loan to buy all you require.