Just under a year ago, in Episode 151 of this Podcast, we looked at my Speedlite studio lighting, and I gave some tips on how I handle that gear etc. Today we’re going to take a look at a simple way to light products to shoot only with ambient light. There’s nothing really amazing or difficult about how I set these things up, and I’m sure there are lots of people with other ideas about the right way to do this sort of thing, but I personally find that most of the time this works for me, so I just thought I’d share my simple set up with you today.
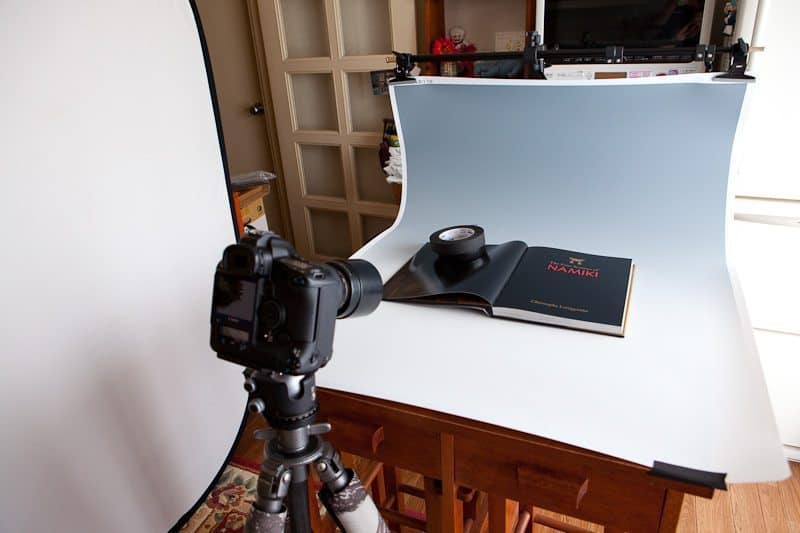
So, here’s a photo of my simple ambient light studio setup.

Ambient Light Product Shoot Studio
Literally, this simple setup is, as you can probably see (above), my kitchen. As of June 2009 I do not have my own studio. If I did, it would be nice to have things set up all the time, or at least have a number of setups that I can rotate easily, but like most of us, this isn’t the case. I build makeshift studios in my kitchen for things like this, and I find that this works for most of what I have needed to do so far. Let’s talk through what we’re looking at here and the reasoning behind it. Firstly note that the main light source is a large double window that goes right down to the floor to the right of the frame in this shot. I have white lace curtains across this window that not only stops my neighbors from seeing my expensive camera equipment; it also creates a much more diffused soft light for this sort of work.
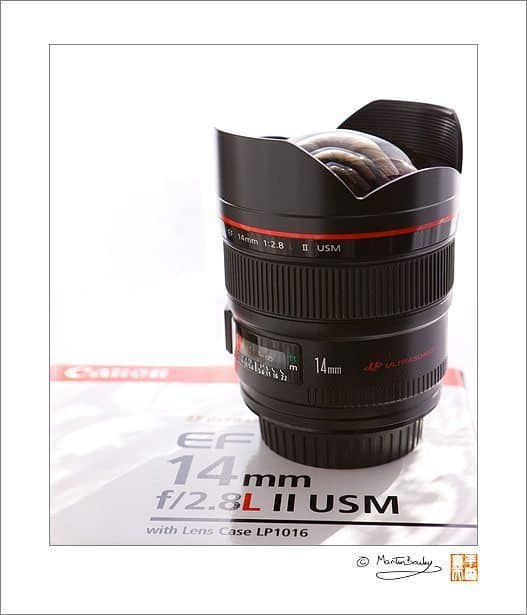
Actually, if we look at another image which is number 2017 (below) and image I shot of my 14mm F2.8 lens, we can see that if I shoot directly into this light, and pretty close to the lace curtains, you can actually see the pattern of the lace sometimes. This of course is not going to be a good thing if say you are shooting images that have to be a perfect and accurate representation of the object or product, say for a catalog. I find though that if I move far enough away from the curtains, the pattern is not recognizable in the resulting images, but I do get a nice defused light.

14mm F2.8 Lens Shot with lace curtains behind
The next thing to note is that I am using a graduated paper backdrop as my background. This is a white to grey graduated paper from HCL, or Horiuchi Color. I’ll put a link to Horiuchi Color’s web site in the snow-notes, but I don’t know if their products are available outside of Japan, and they don’t have an English version of their Web site either from what I can tell. I have a number of these papers though, in various sizes. Many of these papers are actually waterproof, which is great, but they mark very easily with metal objects. If I put my camera down on them for example, the Really Right Stuff lens plate will leave a black mark on the paper. This is the same for pretty much anything metal, so these things aren’t going to last a lifetime. Once the marks start to take too much hiding or cleaning up in post processing, the only option really is to buy a new one. They do give a really nice smooth graduated background though, and I do like to use these, despite them being easily marked.
You’ll also see that I have taped the backdrop to the front of that table. This is with a non-reflective black tape, also from Horiuchi Color. I have a roll of black tape and a second roll of white tape that I keep handy whenever I’m shooting anything like this. It’s really strong tape, but doesn’t leave a mess when you peel it off. Also, because it’s totally non-reflective, you can use it in the frame, say behind an object to keep it in place, and it will not reflect your light-source around into visible areas of your image. In fact, looking at the image of the setup again, I just realized that the roll of tape is sitting on top of the cap for the tube that the backdrop is stored in, on top of the book I was photographing, to hold the page down. I’d chosen the shiny cap from the backdrop tube to rest the tape on, to actually add some reflection to the image I was shooting. I’d actually set up this backdrop and everything on the weekend to shoot tear-sheets from the book that we can see here, which is something that I did a number of assignments for in August 2008. I posted these tear-sheets on my blog too.
The backdrop is being held up by an Impact Telescopic Collapsible Reflector Holder. I rarely use this to hold a reflector mind, usually using it like this, to hold up a backdrop. I have it standing on a light-stand, which is one of the stands that I usually use my Speedlite with an umbrella on. I used to use a second tripod to hold this up before I got my light-stands.
To the left, you can see that I am bouncing a lot of light back into the scene with a very large, 41×74” oval reflector. This reflector is white on the side you can see here, but is a beautiful mix of gold and silver on the other side. I find silver too harsh, and gold too warm, but this mix of both is really nice in my opinion, making this a very versatile reflector. It’s made by Impact as well, and collapsible of course, but there are no instructions on how to collapse this reflector back down, and believe me, you need them. I had to go online and find a video of someone doing this before I could collapse it down. You have to hold the top side and bend it forwards while using a spare foot to kick the bottom edge upwards before this baby will fold up for you. It takes literally seconds now, but when I first got it, it was a lot of fun trying to figure this out. Of course, the reason I have the reflector is to reduce the harshness of the shadows to the left of the objects I was photographing. With the reflector, you still have shadows, but they’re much softer and very natural looking.
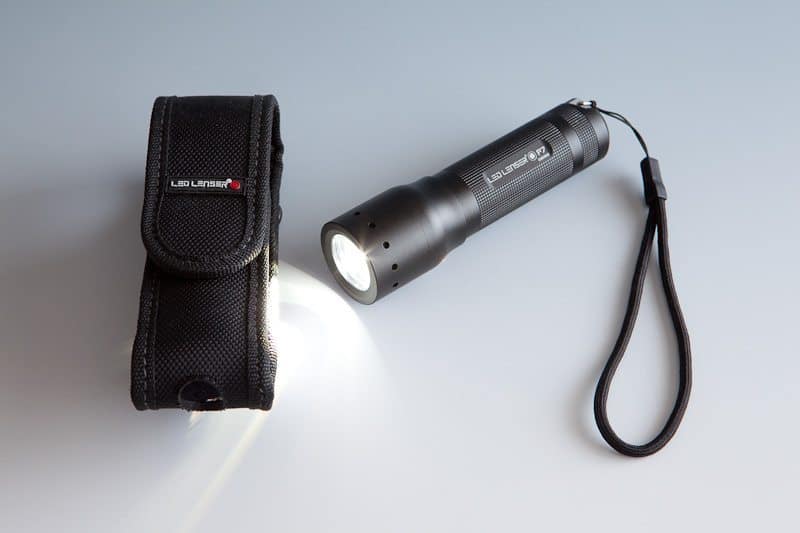
While I’d got the makeshift studio set up, I shot some images of some of the things that I use in photography for a future podcast, and wanted to look at one of these pictures to help me explain the benefits of using ambient light like this. The image is on the blog post, and will be on your iPod screen or iTunes now as well. You can see a flashlight here, and see how we can actually see the flashlight on. We see the brightness of the beam inside the glass element on the front of the flashlight, and we can see the light falling on the pale grey backdrop, as well as hitting the flashlight case. Think about this though. If I was using Speedlites or studio lights for this shoot, as powerful as this little LED LENSER flashlight is, I’d have had problems enabling you to see the light from it, because it would be drowned out by the light from the flashes. I could have balanced it out, and got something, but with my setup as it was, once I’d finished photographing my tear-sheets, I dropped the flashlight into position, turned it on, and shot away without even adjusting my exposure.

A LED LENSER P7 flashlight shot with this setup
I should also note that I included my WhiBal white balance card in one of the first shots in this set up, so that I could set the white balance in all of my images from this shoot with a few clicks of the mouse. If you are actually shooting products for a catalog or something, then white balance becomes incredibly important, as you have to provide accurately colored images, or your client will not be happy.
The downside of shooting indoors with ambient light of course is that your exposures are going to need to be longer. I shot most of these shots at ISO 400 at F11 for 1/4 of a second. The small aperture was to make sure that I got everything sharp. Because of this long exposure though, you need to make sure that there is no movement in your subject. It was thirty degrees Celsius, or 86 degrees Fahrenheit in my kitchen when I was shooting this, but I had to turn the fan that I had to the left off, because the wind was blowing the pages around a little. I’d probably have turned it off even if I’d used Speedlites, but you do have to be more careful when using longer exposures.
The final thing that I want to add about this sort of setup, is that you have to be careful of the height at which you set up the backdrop. There are two reasons for this. The first, and most obvious is because you want to have your product positioned nicely somewhere on the gradation of the backdrop, if indeed you are using a graduated color paper. The other thing though, is that you also have to be conscious of where the reflection of the top of the paper falls. When I first set up the backdrop and started to put my camera in place, I quickly realized that the white line at the top of the graduated paper was reflecting in the glossy surface of the book. The image that we see here or on my blog post is not going to help to explain this, because there are reflections in the black pages, but this was when I was shooting just a part of the page with the credits on, and have that tape on the page etc. Note though that I shot this from a different angle, and not the angle that the main camera was looking at the scene from. It’s very easy to overlook reflections when actually shooting though, and some people don’t notice this until later when they view the images on the PC, so take care of the reflections while shooting, and reposition the backdrop as necessary before you get started.
I shot a new self portrait image in my kitchen the other weekend, also using the diffused light through the net curtains, and the reflector, as we’ve seen today, but with a totally black background, which I thought worked pretty well as well. It’s a bit embarrassing, but if you are interested in how the soft light and shadows helped to make me look a hell of a lot better than the real thing, take a look at that post on my blog as well. It’s called Lessons Learned from the Luxury of Self-Portrait.
Podcast show-notes:
The backdrop I used in this shoot is from Horiuchi Color, but I’m not sure these are available outside of Japan: http://www.horiuchi-color.co.jp
Here is the Blog post in which we take a look at the tear-sheets from a book that I did a lot of work for that is just back from the printers: https://martinbaileyphotography.com/2009/06/28/the-four-seasons-of-namiki-tearsheets/
Here’s the blog post with the self-portrait that I mentioned too: https://martinbaileyphotography.com/2009/06/24/lessons-learned-from-the-luxury-of-self-portrait/
Listen to me as the special guest question answerer on Scott Bourne’s great photography podcast and Web site, Photofocus here: http://photofocus.com/2009/06/25/photofocus-podcast-episode-7/
This episode is sponsored by WebSpy, the Internet Monitoring, Analysis & Reporting Specialists.
The music in this episode is from the PodShow Podsafe Music Network at http://music.podshow.com/
Audio
Subscribe in iTunes for Enhanced Podcasts delivered automatically to your computer.
Download this Podcast in MP3 format (Audio Only).
Download this Podcast in Enhanced Podcast M4A format. This requires Apple iTunes or Quicktime to view/listen.


I was hoping you’d talk about how you took those shots of the book. Didn’t know there were graduated papers like that—I thought that was purely a lighting effect. I’ve been using large art paper, but even the biggest sizes are a bit small.
“Flashlight”?
A clearly British family was in front of me at the grocery store a few months ago, and their daughter was holding a colorful thing. The cashier asked her what it was, and she replied, “It’s a torch” (in a proper London accent).
“A what?”
“It’s a torch.”
“…oh.”
Was hoping you would shoot the book, cool.
Got to love gaffer’s tape, would not want to be on a shoot without it!
Hee hee. I’m kind of localizing this a little bit. My first thought is a torch, but having been outside of the UK for 18 years, it doesn’t come as easily to me as the Japanese, or flashlight. When I think of a torch now, I think of a medieval scene with people in the dark with burning sticks! 🙂
This graduated paper is cool. I have a number of them, both graduated and plain.
So, is this what you’d call gaffer’s tape Landon? I have been using this stuff for a while, but never thought of it as gaffer’s tape. I’m learning new words here too. 🙂
Speaking of language and expressions and how they vary across cultures, I should tell you that you used an expression in this podcast that most American men would consider unacceptable. You said, “I have white lace curtains across this window…” In the U.S. we would say, “My wife has white lace curtains across this window…”
🙂
Great podcast!
This did cross my mind. I hope my foolishness doesn’t alienate too many listeners. 🙂