

Visit Library for MBP Pro eBooks |
I recently had the opportunity to take ON1 NoNoise AI 2021 through its paces, and for a number of very cool reasons, decided it has a place in my digital workflow, so today I'm going to share my findings with some real-world examples. As you know, I'm a huge fan of Capture One Pro and like to stay in Capture One as much as possible, and really try to avoid saving Photoshop files or TIFF files of images after processing, unless they're for output purposes. If I'm going to continue to work on an image, even just reprocessing as the raw processing engine of my chosen software is updated, the benefits of keeping an image in its original raw format are huge.
For this reason, I was initially reluctant to round-robin to an external program with a raw file, but I had some noise that was a little bit much for Capture One Pro to really deal with, so I initially figured I had no choice. To my surprise though, when I came to save the image that I worked on, I had the option to save it as a DNG file, which is Adobe's Digital Negative format. Not the original raw format from my camera, but in this case, I was working on a DNG file anyway, because it was an image I'd shot with my microscope, and used Helicon Focus' Raw-in DNG-out technology to maintain the integrity of my images as much as possible, so I was really losing nothing.
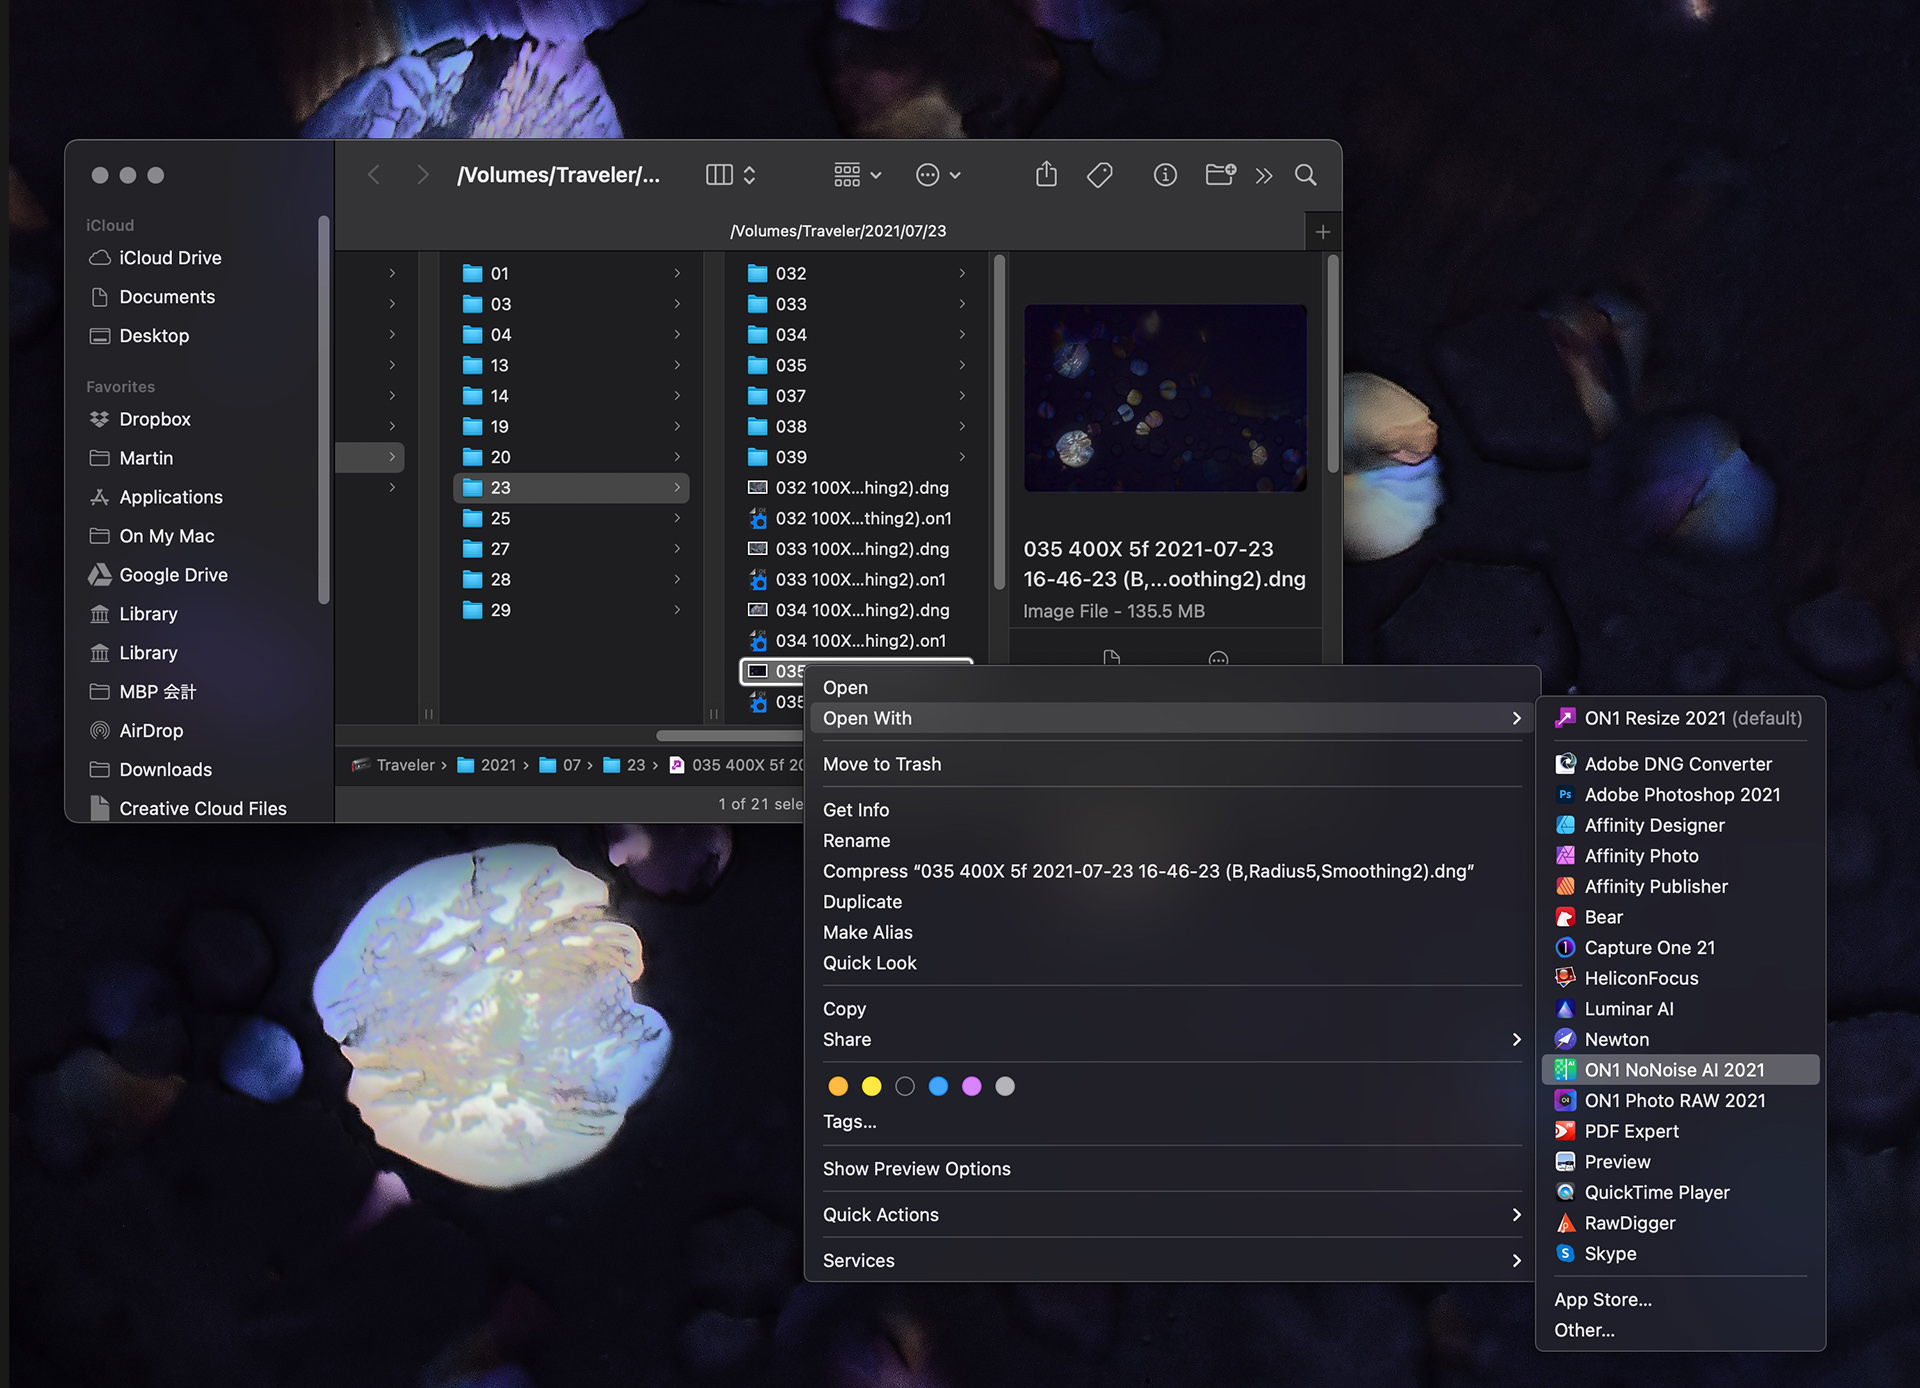
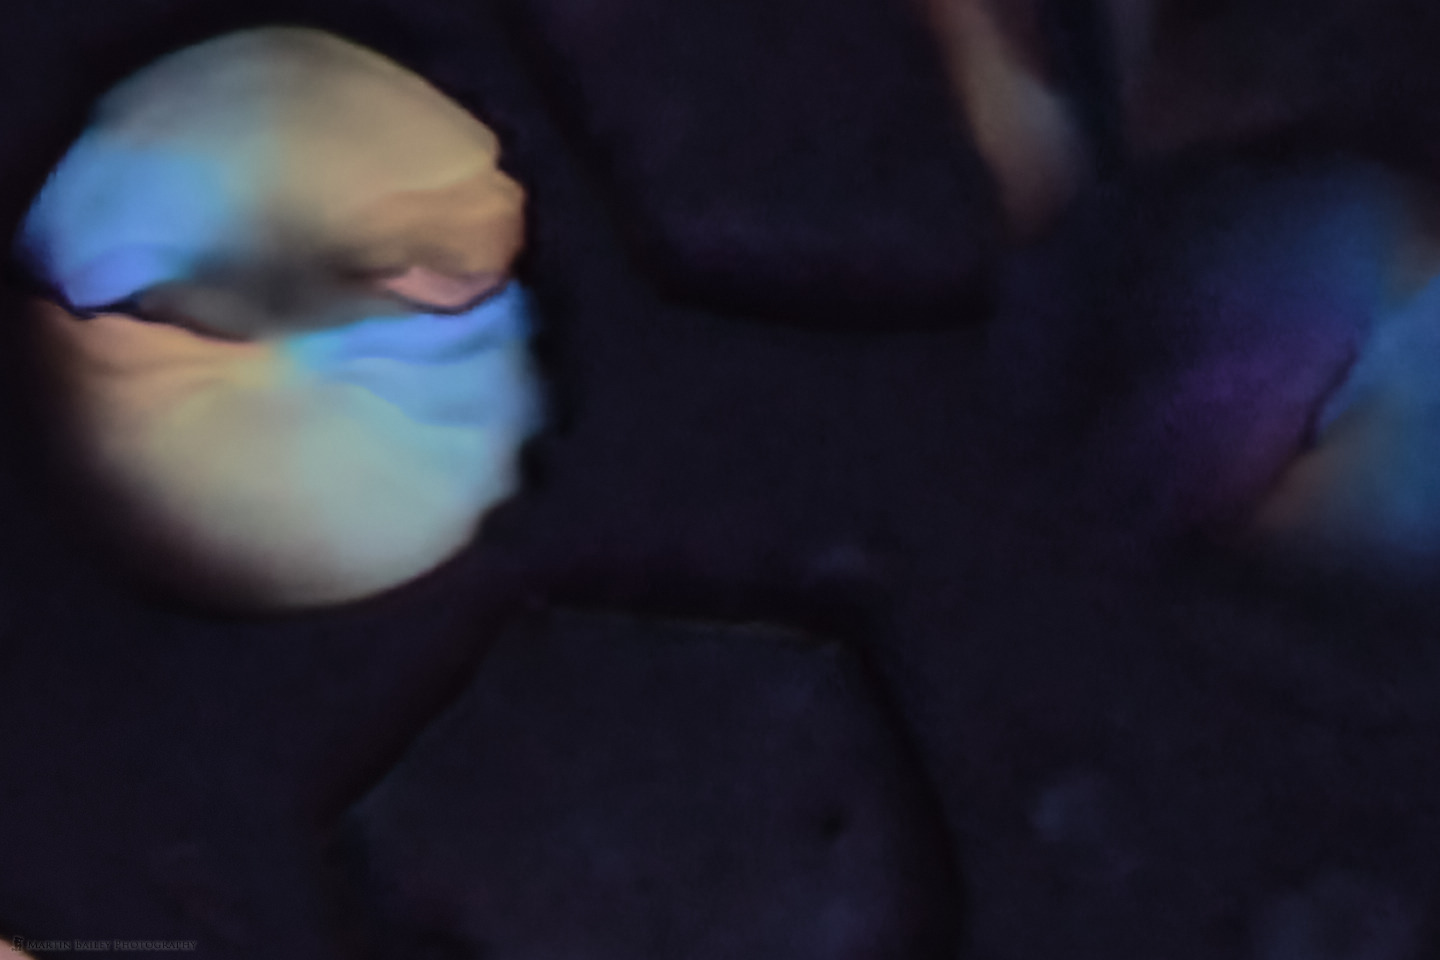
The first image that I tried was of an ant's face, but as close-ups of insects aren't everyone's cup of tea, I'll walk you through this process again using another image that needs to be cleaned up a little, which is another microscope photograph, that I think looks like looking into a shallow pond, seeing the stones and pebbles on the pond bed. After installing ON1 NoNoise AI, you get an Edit With shortcut menu that you can select to jump into NoNoise AI, but if you use this method, you have to save as a PSD, TIFF, or JPEG, and I want to avoid that. Of course, if I go back to my original raw file I lose the settings that I have already made to the image in Capture One Pro, but we can copy and paste those changes back onto the denoised image later, so instead, I'm going to right-click my image and select Show in Finder. From Finder, I can right-click my original DNG image and from the Open With menu, select ON1 NoNoise AI.
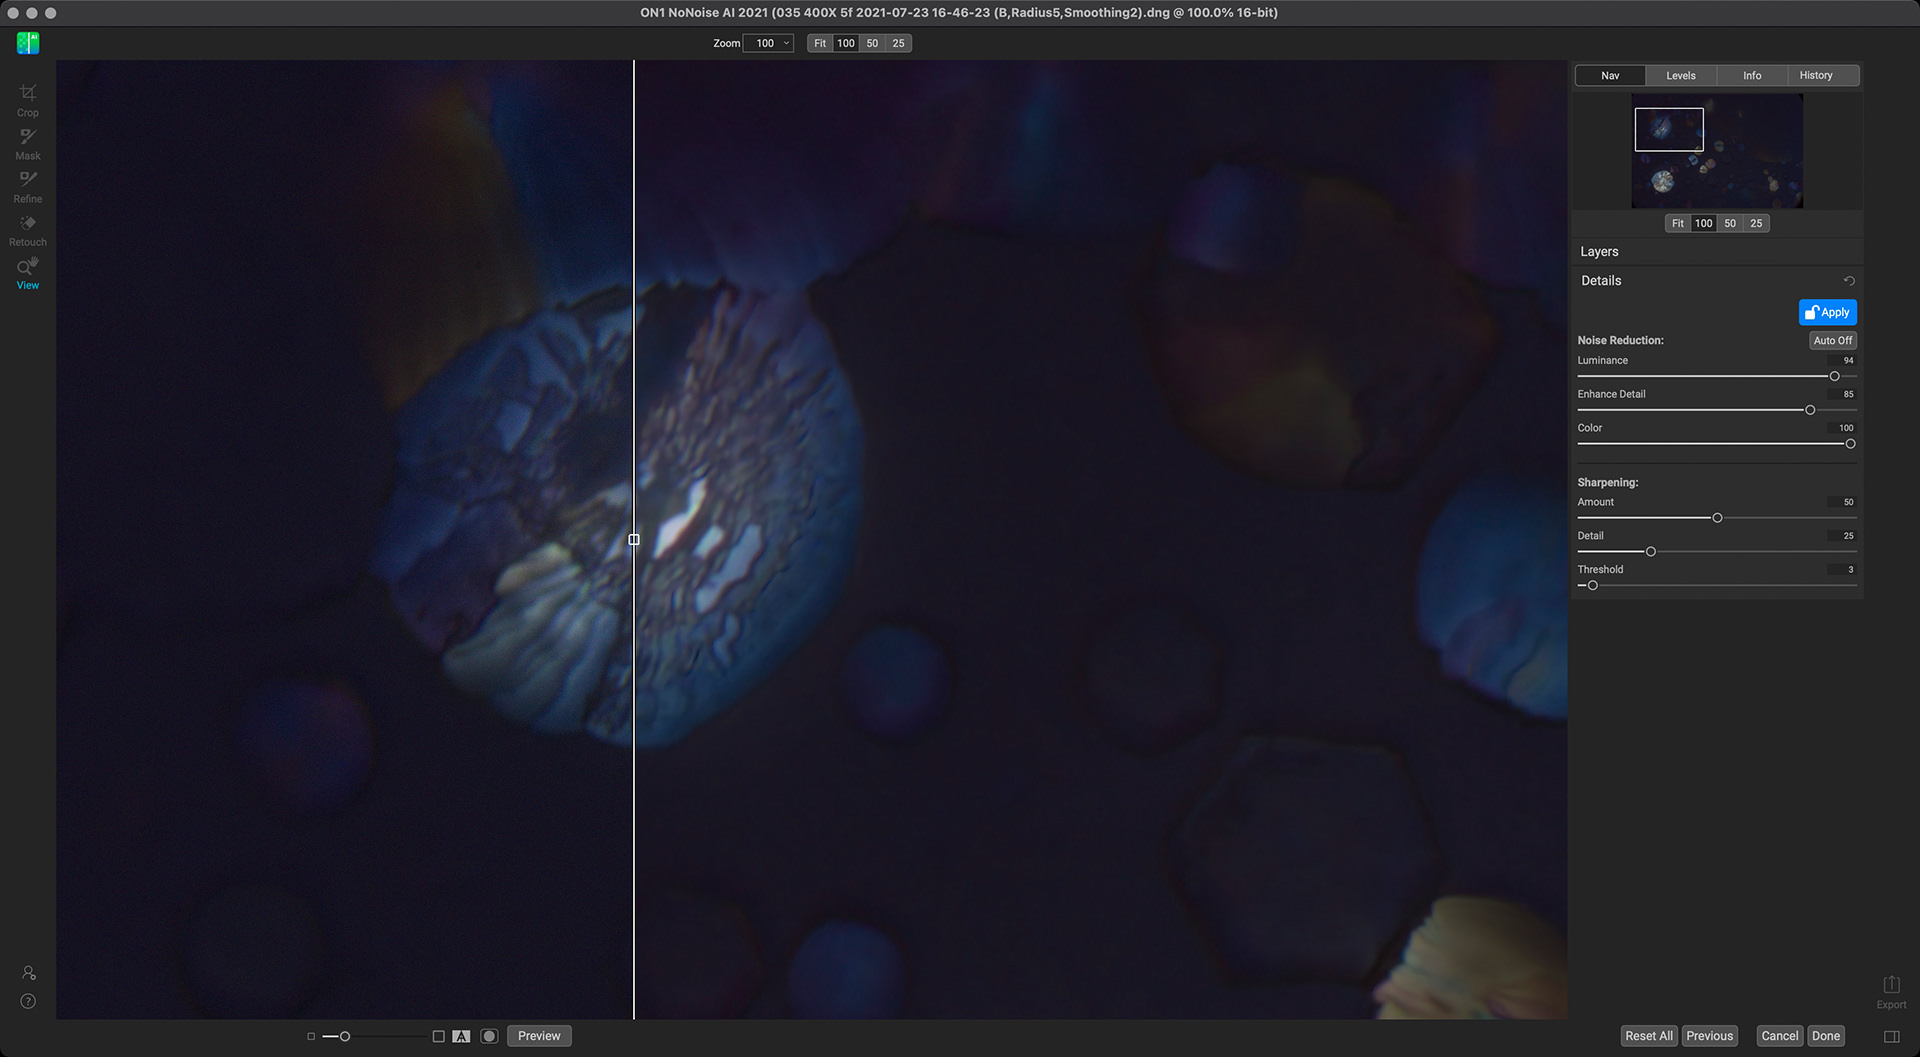
After opening your image in ON1 NoNoise AI you'll see the controls over on the right side, and can adjust the Noise Reduction sliders to suit your needs. For this image, I'm going heavy on the sliders, taking them almost all the way over to the right. As my camera adapter isn't great, I'm also going to take this opportunity to sharpen the image a little using the Sharpening section. It will be difficult to really see the changes in the web version of this, but there is a slider that you can move from left to right to check the results of your settings as you move the sliders. Unlike ON1 Photo Raw which I also tried recently, NoNoise is really snappy and responsive. I found ON1 Photo Raw to be so slow to do anything, even on my 8-core CPU iMac Pro, that I decided not to review or recommend it to you. It's not completely terrible, but when you are used to the responsiveness of Capture One Pro, pretty much everything else I try falls flat on its face.
Anyway, adjust your settings, while checking the results with the Preview slider, then when you are ready to apply your changes, hit the Apply button in the right Details panel. Once you hit apply, the button turns red and the lock is applied, leaving you free now to select Crop, Mask, Refine and Retouch from the toolbar on the left. The Mask option is really useful if you want to apply your denoizing to just specific areas of the image, but I'm just going to apply them across the entire image, so I'm going to hit the Done button in the bottom right corner. When you hit Done, you'll be presented with a dialog to save your image, and can select Photoshop PSD or PSB for large documents, or TIFF, JPEG, or PNG, but as I explained, I'm most interested in the final option, which is DNG, enabling me to essentially resave my raw file. I added the word NoNoise to the end of my filename so as not to actually overwrite my original file, for comparison, but you could overwrite your original if you are happy with the changes and want to save a little space.
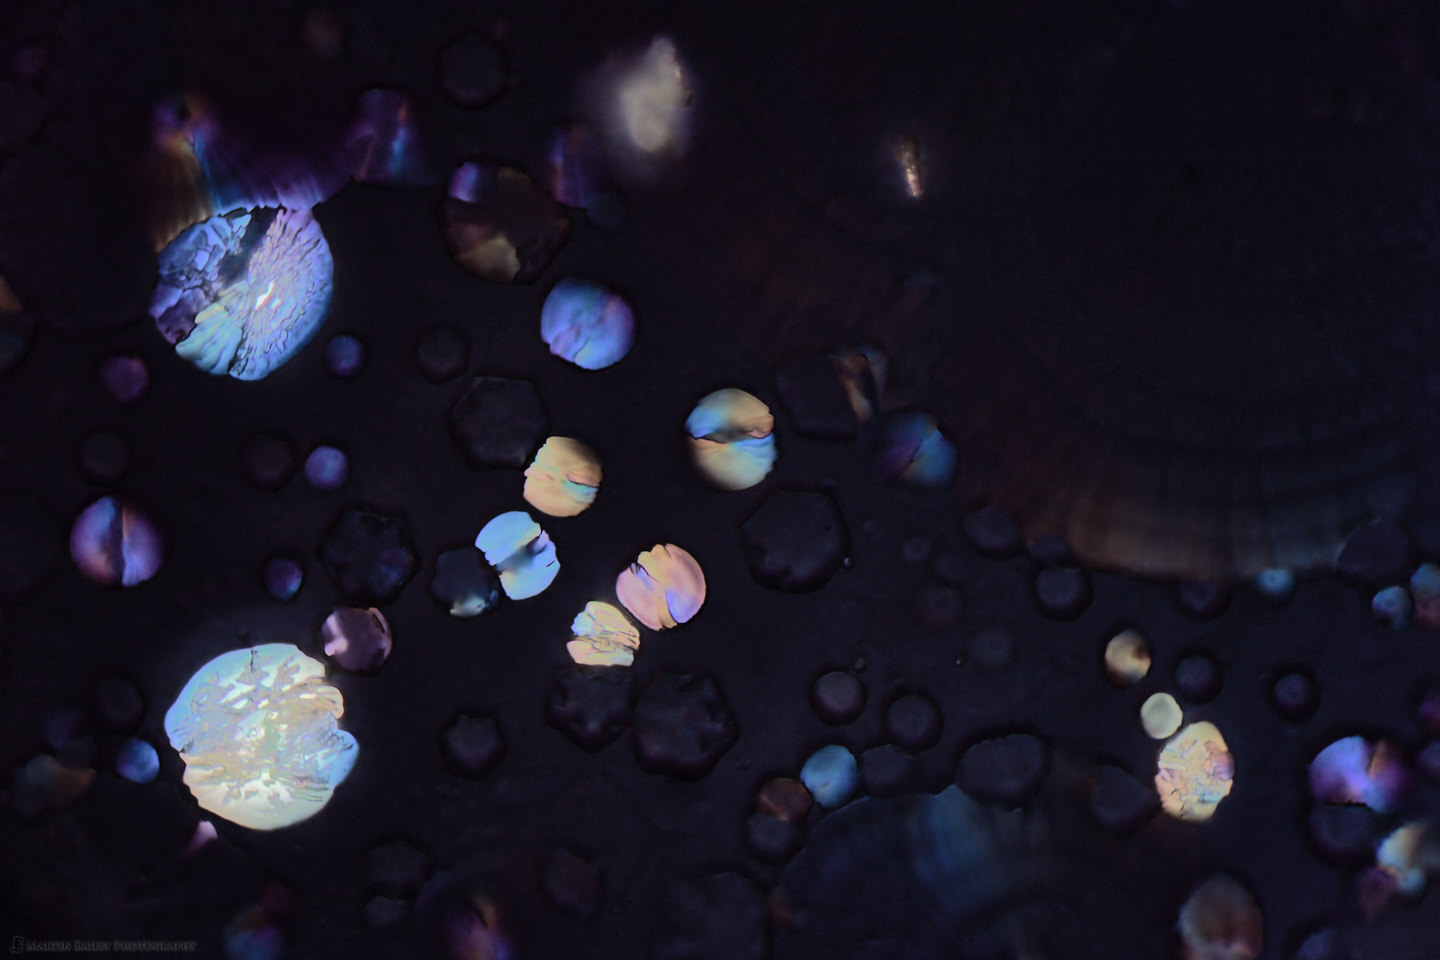
Back in Capture One Pro, because Capture One doesn't know anything about the new file yet, I have to right-click the folder with my original image in and select Synchronize which enables me to import the new denoised image, and now I can use the Copy and Apply button in Capture One Pro to copy all of the changes from my original image and apply them to my new denoised image. Here first, is the original Capture One Pro processed image with a bit more grain than I like to see, mostly from the fact that the image was of a very dark area of a microscope slide, rather than any deficiency in Capture One Pro.

This is still only web size, but if you click on it to open it up wider in the lightbox you can see the difference as you navigate through these example images. Here next, is the ON1 NoNoise AI version, again, the entire image first for comparison.
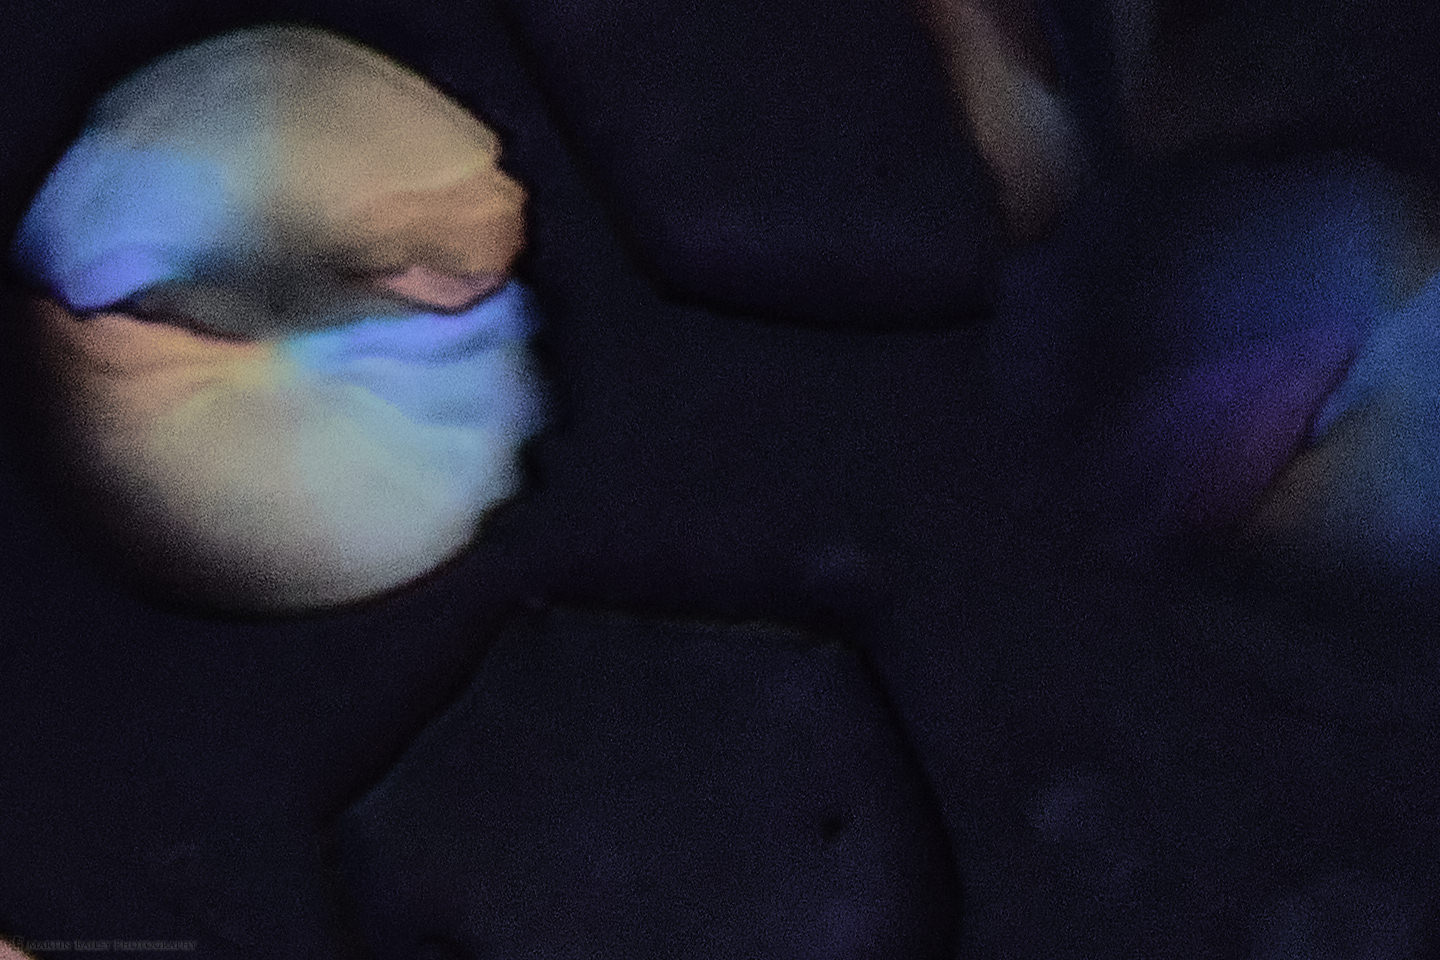
You can probably see an improvement, even in the resized web version, but to ensure you can appreciate the difference, here now are two 100% cropped images at 1440 pixels wide, so once again, click on them and open them in the lightbox, but then use your keyboard arrow keys or swipe to navigate between the two images, and you'll see how much cleaner the denoised version is. Keep in mind that you are looking at a 100% crop of a microscope photo with a crappy camera adapter, so it's not great definition to begin with, but will illustrate how well ON1 NoNoise AI has removed the noise from the image.
On my computer, I only get the short-cut menu to open an image in NoNoise AI when I right-click DNG files. The option is missing when I right-click raw files, but NoNoise AI is designed to work on raw files rather than PSDs or TIFFs, and I found that you can simply drag raw files to NoNoise AI, or use the open file option. As a second test though, I opened a Canon raw file of a Milky Way shot from Namibia in 2019, which had a fair amount of grain that I wanted to try and remove. After opening in ON1 NoNoise AI I allowed the AI to select its recommended settings and hit the Done button to save a DNG file again.
Back in Capture One Pro, after Synchronizing to pick up the new file, I once again copied and pasted all of my original adjustments to the newly denoised DNG file and the image came to life without the original grain in the sky, and none of the stars as far as I can tell were removed in the process, and that's pretty impressive considering how small many of them are. Here again, are the two photos for comparison. Please open them up in the Lightbox to check out the detail.

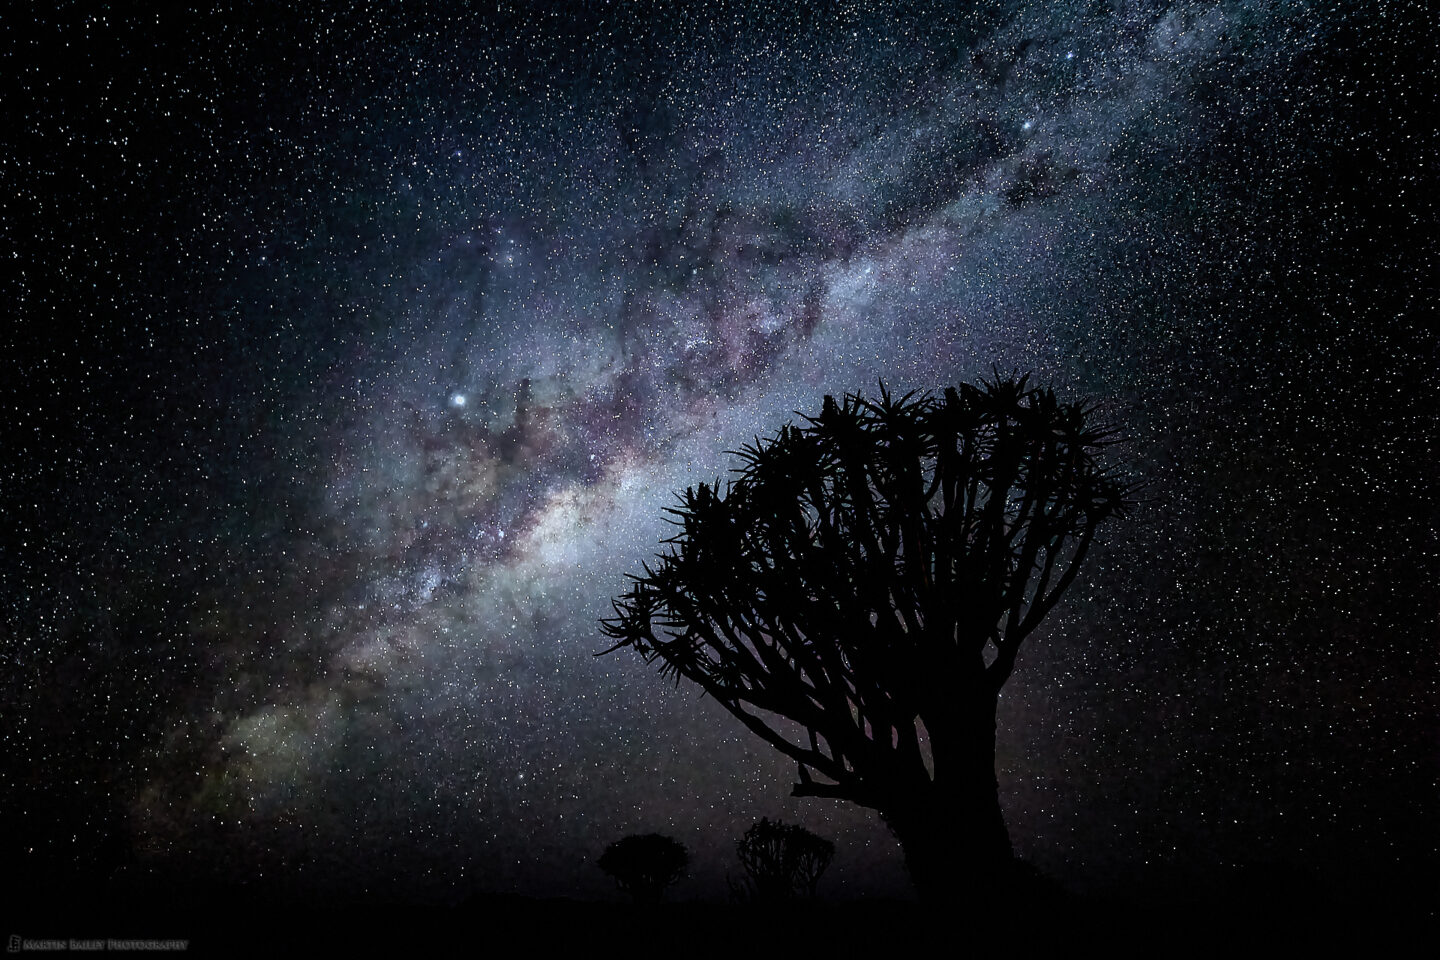
I think you'll be impressed by the difference. Even just with 1440 pixel wide web-sized images, the difference is easily visible. So, ON1's new NoNoise AI 2021 has a place in my workflow now, even though I don't have that many noisy images. It's really nice to have an option to remove heavy noise easily though and save it to a pseudo-raw file in the form of a DNG. If you are as impressed as I am and would like to pick up a copy of ON1 NoNoise AI 2021, and you feel like supporting this blog and podcast in the process, please use our affiliate link to jump over to ON1.
Show Notes
Use our affiliate link to grab your copy of ON1 NoNoise AI 2021 - https://mbp.ac/ON1NoNoiseAI2021
Subscribe in iTunes to get Podcasts delivered automatically to your computer.
Download this Podcast as an MP3 with Chapters.
Visit this page for help on how to view the images in MP3 files.

That’s very interesting Martin! I used to use ON1 raw some years ago, or rather played around with it, but never took to it, so I was a bit sceptical about the NoNoise AI. It looks good from the demo and what you’ve provided here in your blog. I have experienced noise problems in Milky Way and night time photography and it is frustrating to deal with. What particularly caught my attention was your mention of being able to save a DNG file so it can be further processed in CO. I too prefer tiff or psd as more final files once finished processing. Thank you for this. I will think about it and if I think it’s worth it, I will purchase.
I enjoy your posts as always!
– Thysje
Hi Thysje,
It’s great to hear from you! I gave ON1 Photo Raw a good run for its money a few weeks ago but it was just unrealistically slow. I was hoping to be able to share an alternative to Capture One but it doesn’t even come close. Nothing I tried did.
Following that, NoNoise AI was surprisingly good, and the DNG output a very nice addition. I’ll be using it when necessary from now on.
I hope all is well!
Regards,
Martin.
Hello Martin
Thank you for your continues photography education and podcasts! I recently tried a couple of a high noise reduction and stumbled upon DXO deep prime.
I meant to write to you, and ask if you have tried it, earlier, and now your latest podcast prompted me to do so!
What first raised my skepticism, shortly turned into my favorite feature of DXO Pure Raw (Deep Prime): no slider!
In Lightroom and ACR the images are automatically copied into DNG files, with all develop settings, including local corrections, copied and applied from the original raw file. Noise reduction, lens corrections and sharpness are applied by DXO directly to the DNG file, and the respective settings are turned off in the ACR develop settings, all with one click.
The resulting Image sharpness, and noise reduction is mind-boggling. I would usually spend several minutes within camera raw to tweak noise and sharpness setting for each image specifically. The one click results from DXO, are better than what I can achieve.
Last week, I edited a low light, high ISO candlelight concert. and DXO took care of all my noise reduction and sharpening. I could not find need to tweak it.
I can simply go back to 10 year old raw files, and with one click improve the quality. All edits still applied (ACR)
I do have a couple of issues of digital artifacts though, that I need to contact DXO for. The DNG files are larger inside than the original raws.
Here is an article, that compares DX oh deep prime with on one no noise:
https://lenscraft.co.uk/photography-blog/on1-nonoise-vs-dxo-deepprime/
I am very happy, how much this is a headache saver, as it easily integrates into my workflow.
Maybe you have a look at it. I’m neither sponsored not affiliated, just happy how it works for my pictures.
All the best from Canada, Jens
PS I’m curious: Are the OnOne DNGs larger than your original raws as well?
Hi Jens,
Thanks for the great comment!
I have recently tried DXO, and was generally not very impressed with the speed/performance. I don’t recall stumbling across anything called Deep Prime though, and you certainly make it sound interesting, so I’ll check it out again in the coming week. Thanks for the pointer!
Regarding file size, yes, the DNG files are significantly larger than my original raw files. The Milky Way shot in the post is 37.6MB in raw and 111MB in DNG format, so it’s tripled in size! I honestly hadn’t really thought to look until you mentioned this. I don’t convert many files, so it’s not a big deal, but if you find out why this is from DXO please let me know.
Regards,
Martin.
Hi Martin
I found the reason for the additional file size of both the On1 No Noise and DXO Prime files.
In the process of calculating the noise reduction (and sharpness respectively) the RAW files are being de-mosaiced. This means the previously single coloured pixels (r,g OR b) from the camera sensor data are turned into pixels containing 3 colour values each(r,g AND b) – resulting in files of about 3 times the size which are saved in a format called “linear DNG”.
https://blog.dxo.com/what-is-linear-dng-and-how-to-use-it-in-your-postprocessing-workflow/