
Visit Library for MBP Pro eBooks |
Today I'm very happy and honored to be joined by one of the premiere microscope photographers in the field, Håkan Kvarnström. Having communicated with Håkan for the last four or five months, it was a pleasure to actually catch up with him for the Podcast. I needed a few months to learn enough to be able to have even a half-intelligent conversation with a micro-photographer at Håkan's level. It was worth the wait though, so I hope you enjoy our conversation. I had it transcribed, for those that prefer to read, and you can use the above audio player too if you want to listen to us chat directly. Either way, I hope you enjoy my conversation with Håkan Kvarnström.
Martin: Håkan, it is absolutely an honor to have you on the show today. Welcome.
Håkan: Thank you, Martin. Delighted to be here.
Martin: I am very new to microscopes or micrography. It's been three months or four months now since I got my first microscope. I have had no experience with them until that point. So, I am looking forward to learning some stuff from you today. But tell us a little bit about yourself, how you got into photography initially before micrography, microscope photography?
Håkan: Well, I've had different cameras since I was a kid. I grew up in a small village in Sweden and started photography quite early having cameras, mostly analog at the time. But the photography interest took off when I got kids and I wanted to start documenting celebrations, weddings, birthdays, and family events, and also a dedicated motorcycle biker, and I wanted to document the road trips. This way, I got into photography more and more over the years.
For the last few years, besides microphotography, I'm also starting to get an interest in portraiture and other types of normal photography. I'm also moving into medium format cameras, digital, of course. I'm not only focusing on microphotography nowadays.
Martin: I see. Well, you are obviously one of the first names that come to mind. As I've looked at your website and seen more of your images, I've realized that I had seen some of your images before I bought my microscope. You're probably one of the forerunning people in the field. I know that, as I was looking through, and I'm thinking, “Hang on, that's one of those photos that I showed my wife to say, ‘This is why I need a microscope.’” It really is amazing to be sitting here talking with you.
We'll touch on some of the things that you would talked about a moment ago about your other photography. It's great that you do other types of photography, and it also plays a part in how beautiful your microphotography is as well. We're going to talk about all of that as we get through this. When did the microscopes come onto the scene?
Håkan: I'm a scientist by heart and education. It started maybe six, seven years ago when I was reading a local website with classified ads, and I saw a very nice microscope for sale. I did have a microscope as a kid. I sold it in my late teens. But all of a sudden, I got this itch again and realized I definitely need a new microscope to explore the micro world. I'm somewhat interested in both the microworld, but also the macroworld. I'm a dedicated Star Trek fan and like stars, the universe, galaxies. It was more of a lucky strike that I found a microscope before I bought the telescope.
The good thing about a microscope is that you can do it all year round. You don't have to have good weather, Sweden can be quite cloudy, but the microscope, I can use all year round and not dependent on light pollution and stuff like that. So, it's a very good hobby.
Martin: I have to admit, a big part of me jumping into this year has been the pandemic. We can't really get out. I can't go on tours, I can't do a lot of the things that I usually would do. That was part of it. Then for me, Don Komarechka, a good friend of mine wrote a book that I reviewed. He talked about shooting some macro work with microscope lenses, the objectives. I was looking at that and I was thinking, “Oh, this is really cool, but I don't think I want to get into botching things together. So, I'm just going to go buy a microscope.” It was then when I saw some of your work as well.
Håkan: Actually, I got his book last week as well. It's an amazing book.
Martin: It is. Well, I was lucky that he sent me the PDF because he wanted me to review and write a few words about it. I was lucky to get an early sneak peek at it. You got into the microscope, you told me that you recently have started working with a 60x water immersion lens, and that to me, I was thinking okay, so I knew about-- My microscope came with a 100x oil immersion lens, but I didn't even realize that there was such a thing as a water immersion lens. Tell us a little bit about that, is it really difficult to work with liquids and lenses?
Håkan: The water immersion is quite good. The basic problem with microscopy is that the higher magnification you want, the more important it is to have a good level of refraction indexes. The whole light chain going from the condenser to the specimen, through the objective and so on, the higher refractive index you get, the more resolution you can squeeze out of the system in a way. The problem with the air gap, normally, if you have lower magnification objectives, you have an air gap between the specimen and the objective, but you can't have that for 60x, 100x, and even higher magnifications because the image quality will degrade. Then, you use immersion. The most common way is to use oil. The problem with oil of course is that it's very messy and you get oil everywhere. And you need to clean the objectives using special cleaning fluids and stuff, so it's something I try to avoid, even though it gives you probably the best resolution in most cases.
Water immersion is a middle ground. You have lower refractive index, but it's good enough to dramatically increase the resolution compared to using an air gap, and you don't have to deal with a mess. You can just wipe it off with a lens tissue afterward. It's very simple to use, very quick, no smell, no mess, and you get really good image qualities.
The other advantage of using water immersion is that, if you compared to oil immersion where you might have a working distance of maybe 0.15 millimeters, you get double that with water immersion. So, you can image much thicker specimens. If you have a small animal, for example, or if you have really thick algae, you can get a better image quality because of the increased working distance. I can definitely recommend using water immersion lenses.
Martin: This is me trying to learn from a master here, not so much providing something for the audience. I'm totally selfishly trying to learn something here. When you're using either water oil, you've got your specimen under a coverslip and you've got the oil on top of the coverslip?
Håkan: Yeah. That's the way. First of all, you have a glass slide where you put your specimen and then you put a drop of water on the glass slide and then you cover it with a coverslip. So, you have glass, water, glass, and then you put water on top of the coverslip again to go into the objective. You have an uninterrupted chain of high refractive indices going from the bottom of the cover glass all the way through the objective. That is what gives you the increase in resolution. There are also objectives that you can dip directly into the specimen, but those are more for in vitro procedures when you do live-cell imaging. Not very good resolution perhaps, but for specific purposes only.
Martin: I recently replaced the-- well, filled the four slots on the turret of my microscope with the plan achromatic lenses. The highest magnification I got was a 60, but it's an air 60, it's not made for going in water. I understand what you're saying. The jump from 40 to 60 even, and you can see that the image, the resolution, drops relatively quickly when you switch them out. But it is still really nice to be able to get in that close and still be able to see. I’ve still got the 100x oil objective, so I think I'm going to put that on and give that a try at some point.
Håkan: Yeah, definitely. In my view, the 40x air is difficult enough to use. I rarely go with an air gap higher than 40x magnification because it becomes almost impossible to get good image quality. I have a long working distance 50x objective, which is designed to be used without the coverslip. They are used for more macro-like work. You don't really have an insect eye, for example, or something you want. But using a coverslip and then have a 60x air will not give you much quality, I would say.
Martin: I haven't been using it with coverslips. I haven't really used coverslips very much at all yet, but I've got a few questions about staining and some of the other things later. So, I'll save that.
Håkan: It's very important. It's only the really low magnification objectives like for 4x and to some degree, 10x can be used without coverslips. Otherwise, they need to be specially designed at higher magnifications to be used without the coverslip. There are special objectives you need to use if you don't have a coverslip on. Otherwise, you will not get any image quality at all.
Martin: Well, the 40x objective works pretty well, but the 60, I have found it's pretty difficult to get anything decent with. It's nice to have the plan achromatic, that makes a big difference over the original ones that came on my relatively cheap microscope. So, that's nice just there.
Håkan: Agree. Microscope lenses are exactly like cameras, or normal photography, it's not the camera body that is important. It's the lenses. You have to put all your money and spending on the right lenses that will give you the quality you need, not the camera or the microscope stand as such.
Martin: Yeah. You talked in your email about the importance of camera techniques, and good composition and lighting. Tell us a little bit more about how that plays into your microphotography.
Håkan: That was one of the reasons as well as I started to learn more about more normal photography, about composition, about how to use lighting and flashes and how to work with the foreground, the background and the subject, and try to use well-known photography techniques also to improve the quality of the images from using the microscope. The basic principles on what makes a good photograph is still valid even though it's a microphotograph. If you look at my images, many of them are quite have clean backgrounds and so on. But I'm starting now to change my artistic language, if you like to have more details in the background, trying to use different foregrounds, and also working with not overdo the focus stacking part, so everything gets sharp, but also try to make out of focus areas to use the bokeh, also in microphotography. By learning normal photography better and understanding the masters of photography over the years, I think I can also start making better microphotographs, which appeals to a wider audience perhaps, not only the micro nerds probably.
Martin: I am fully with you. I found that as I've done certain work with certain specimens that I've left a fair amount out of focus. Because we are all working with such shallow depth of field, pretty much everything has to be focused stack to a degree. But I agree, you don't have to have sharp from front to back. It's much better sometimes to just let it fade off into the bokeh as they say.
Håkan: Yeah. You are way ahead of me there in terms of maturity as a photographer, because I have an engineering background, and for an engineer, if you can make it sharp, you make it sharp. As an artist, you have to think differently. I guess I'm maturing later. I have recently learned what makes a good photograph. I'm learning all the time. Well, I haven't really implemented that fully into my micrographs yet, but I'm working on it.
Martin: Well, there's one of the photographs. You've sent me eight photographs to talk about, but one of them has really nice layers of focus with the specimens in the background, and a few in the foreground that is very much like you just said. You're doing it, it's there, and it's beautiful.
Håkan: I'm trying.
Martin: You're achieving.
Håkan: Trying to use the techniques I've learned in other fields of photography.
Martin: Yeah, we might as well right now start to work through your images. You've sent me eight shots. The first one, can I guess what this is before you tell me, just in case?
Håkan: Yeah.
Martin: Is it fishing wire?
Håkan: No.
Martin: So, it's a natural organism?
Håkan: It is.
Martin: Oh, okay. Then, I have no idea. I thought it was fishing wire. [laughs]
Håkan: Do you want to know what it is?
Martin: Yes, please.
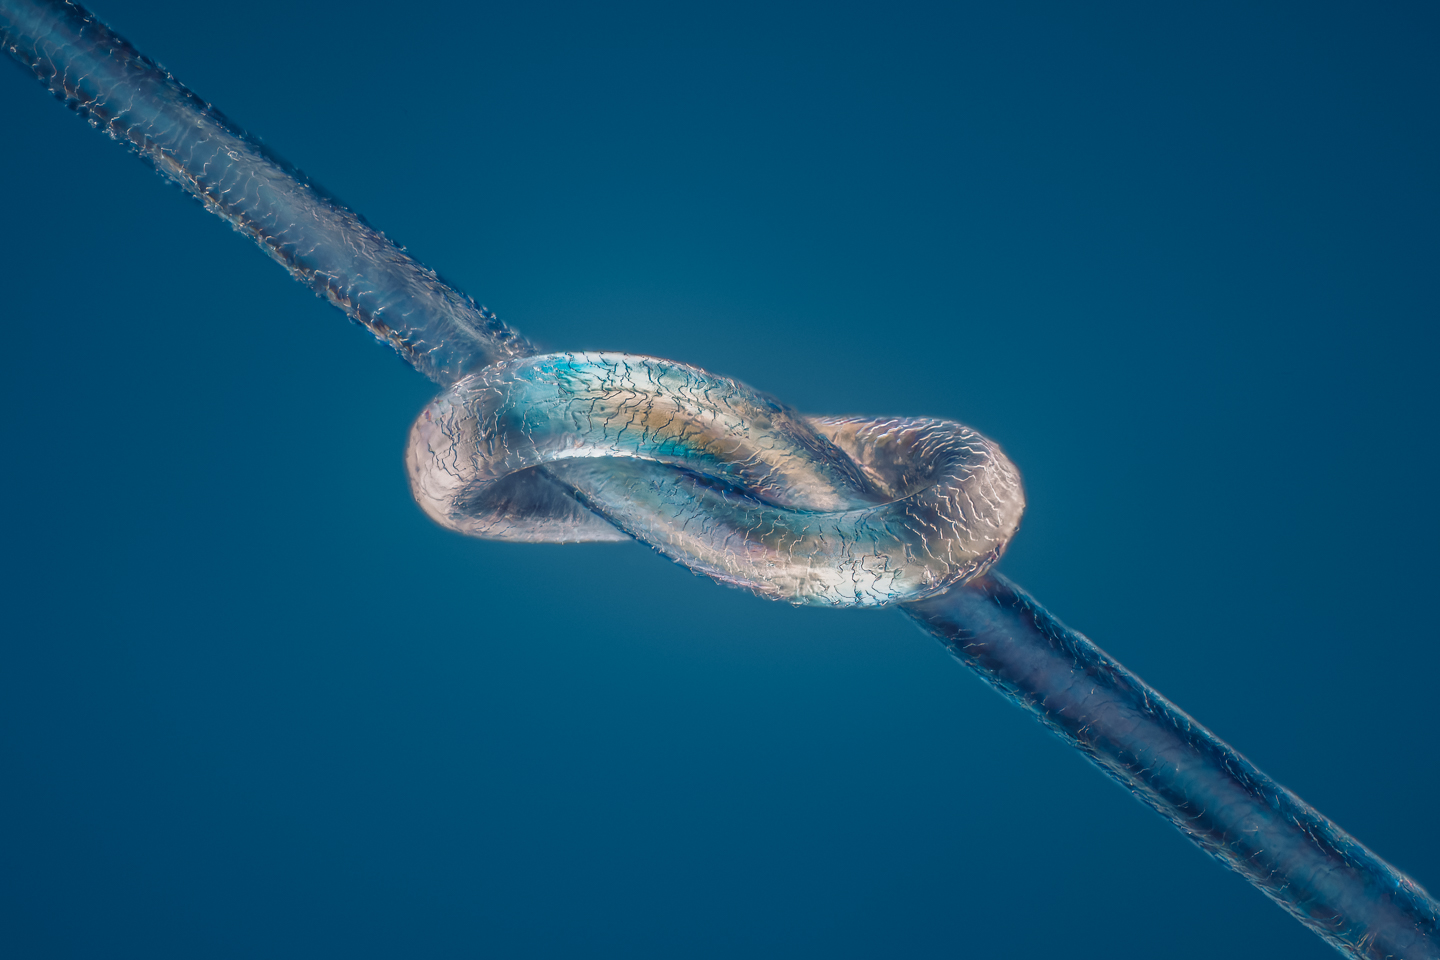
Håkan: It is the hair from my 10-year-old daughter, which I tied in a knot and photographed.
Martin: It looks as though you've polarized some there as well, you've got some color coming through.
Håkan: Yes. I used polarized light. That's one of the tricks you should learn, or everyone should learn using microscopy because it's very cheap and very easy to do. You have to have a set of polarizers, and you can twist the polarizers to different angles and get different color effects.
Martin: Most of what I've done so far has been exactly that. It's such a lot of fun.
Håkan: It's a lot of fun. Then, I tied the hair in a knot and I used super glue to glue the knot, the hair strand to a piece of rubber, into each end to a piece of rubber. And I used super glue to get it to have exactly the right tension. The problem I had was sometimes I tied the knot too hard, and sometimes I tied the knot too loose. So, it took a while before I found the perfect knot. It's very difficult to see because it's so small, so you have to guess a bit and try it out. In the end, I got the results I wanted. I used a 20x objective for that one.
Martin: Is your daughter fair-haired then?
Håkan: She has white hair.
Martin: Okay, that's why it looks so translucent. It's such a beautiful shot. The coloring, not so much the color of the hair, but the background and everything, what did you use for the background?
Håkan: Well, I used the retarder. I have a retarder in the microscope as well. More or less, if you tweak the retarder, you can get any color you like. I usually try the different dials and try different angles to get the colors I like and want, and that's where I end up. It's trial and error more or less.
Martin: I'm getting loads of ideas here. This is such fun. I realize now, of course, as you rotate one of the two polarizers, you go from white to black, and then there are loads of shades between. I see now.
Håkan: Yes. It's amazing to work with those filters. You can get any color you like, more or less. It looks more complicated than it is, I think when you are playing around with it.
Martin: Oh, yeah. I know now that I could have bought some for like $100 that fit onto my microscope, but I couldn't find anything that I could use. So, I started with old polarizing filters, just sort of wedging them in here and there. And then, I bought some circular drill bits, and drilled circles out of polarizer filters and cleaned the edges up, and I've actually inserted those. One in the filter holder above my condenser. The other one, I take the head off of my microscope and put it in on top of the tube where the light comes up.
Håkan: Yeah, that works.
Martin: Yeah, it's working pretty good.
Håkan: This one, I used to 20x objective, which was a long working distance, designed to be used without a coverslip. So, that's why I got the resolution. You can actually see the scales on the surface of the hair.
Martin: That's the next thing. I've got the plan achromatic 20x in my Amazon cart. It's waiting for the next time, and they're not that expensive. The ones that I've been getting, it's like, I think it's $60 for the next one. I'll get that.
Håkan: It's a good investment. If there's anything you should spend money on in microscopy, it's the objectives, so that's the secret to everything. It's different depending on what you're aiming for, but if you want to do video, for example, it's to have a longer working distance, so you can get more depth of field because video gets really boring if you only see one half of micrometer every time.
Håkan: And then you have to move back and forth to get focus. Then, I use longer working distance objectives to get more in focus. You lose resolution, but you gain depth of field.
Martin: Yeah. I've done a few videos because it's been so amazing to see some of the stuff that I'm looking at. When you're having to tweak the focus all the time, it's much better when you use the 4x or 10x.
Let's take a look at the next one. This is amazing. Tell us about the second image you sent.
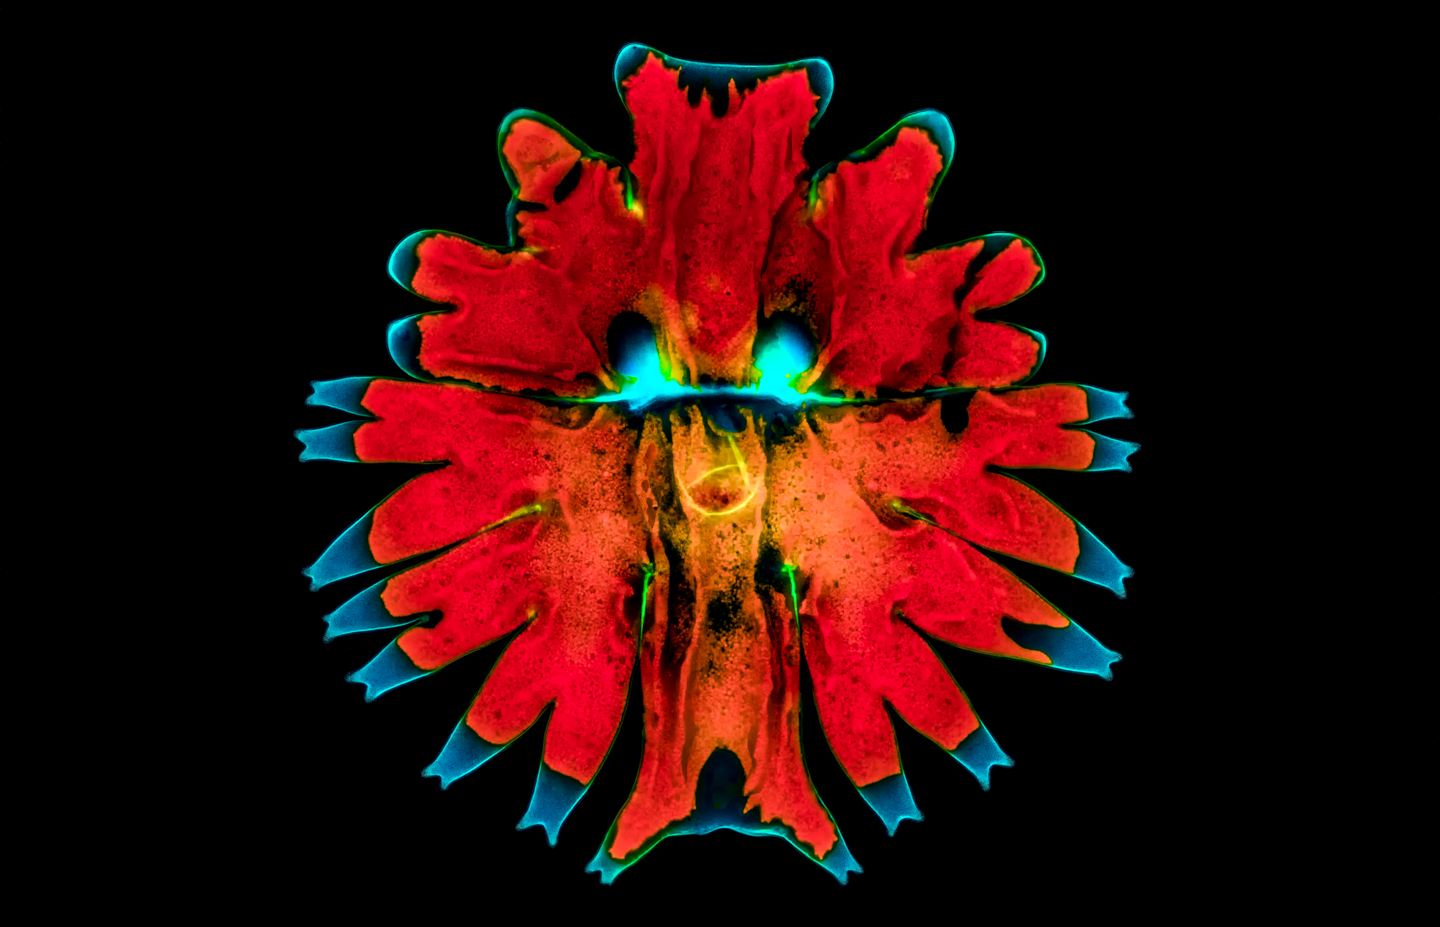
Håkan: Yes. That's a green alga. It's one of the biggest green algae, it's called a Microasterias, and it can be up to maybe 0.3 millimeters, 300 micrometers in diameter. That one is actually stained. So, I stained it with calcofluor white, which is a really useful stain. It stained the outer shell in a way in blue, so it radiates in blue light. The red one, you can see is the red parts, is the chlorophyll that autofluoresces. All chlorophyll autofluoresce when you shine them with ultraviolet light.
Martin: Oh, I see.
Håkan: So, that’s the natural light. Blue parts are stained.
Martin: Ultraviolet light, amazing.
Håkan: Well, it turned out to look like a man with two eyes and a nose.
Martin: How are you getting the light in there? Are you shining in from the side or have you got something in your--?
Håkan: All I have a fluorescence attachment to the microscope. So, it's like a top light you use. Instead of illuminating the specimen from below, you illuminate it from above. There's this small mirror cube with fluorescent filters in them. So, you radiate them with a very wide bandwidth light source ranging from 300 nanometers up to maybe 1000 nanometers. And then, you have filters to only let through specific wavelengths. Let's say in this case, I used I think a 340-nanometer filter. So, specific stains go with a specific wavelength, then you can filter out the rest. Then, you get the black background because everything is filtered out except for the radiation or the photons with a specific wavelength designed for that stain. It's a very useful technique to get higher resolution and to get specific features of a specimen to be visible, and you can take away the rest.
Martin: Wow. This is probably one of these shots that I would have said to my wife, “Look, I need a microscope because of this.” And now, I've found that sometimes they're still out of reach because I need a particular type of microscope. But it's all great, it's such amazing work.
Tell us about the next one.
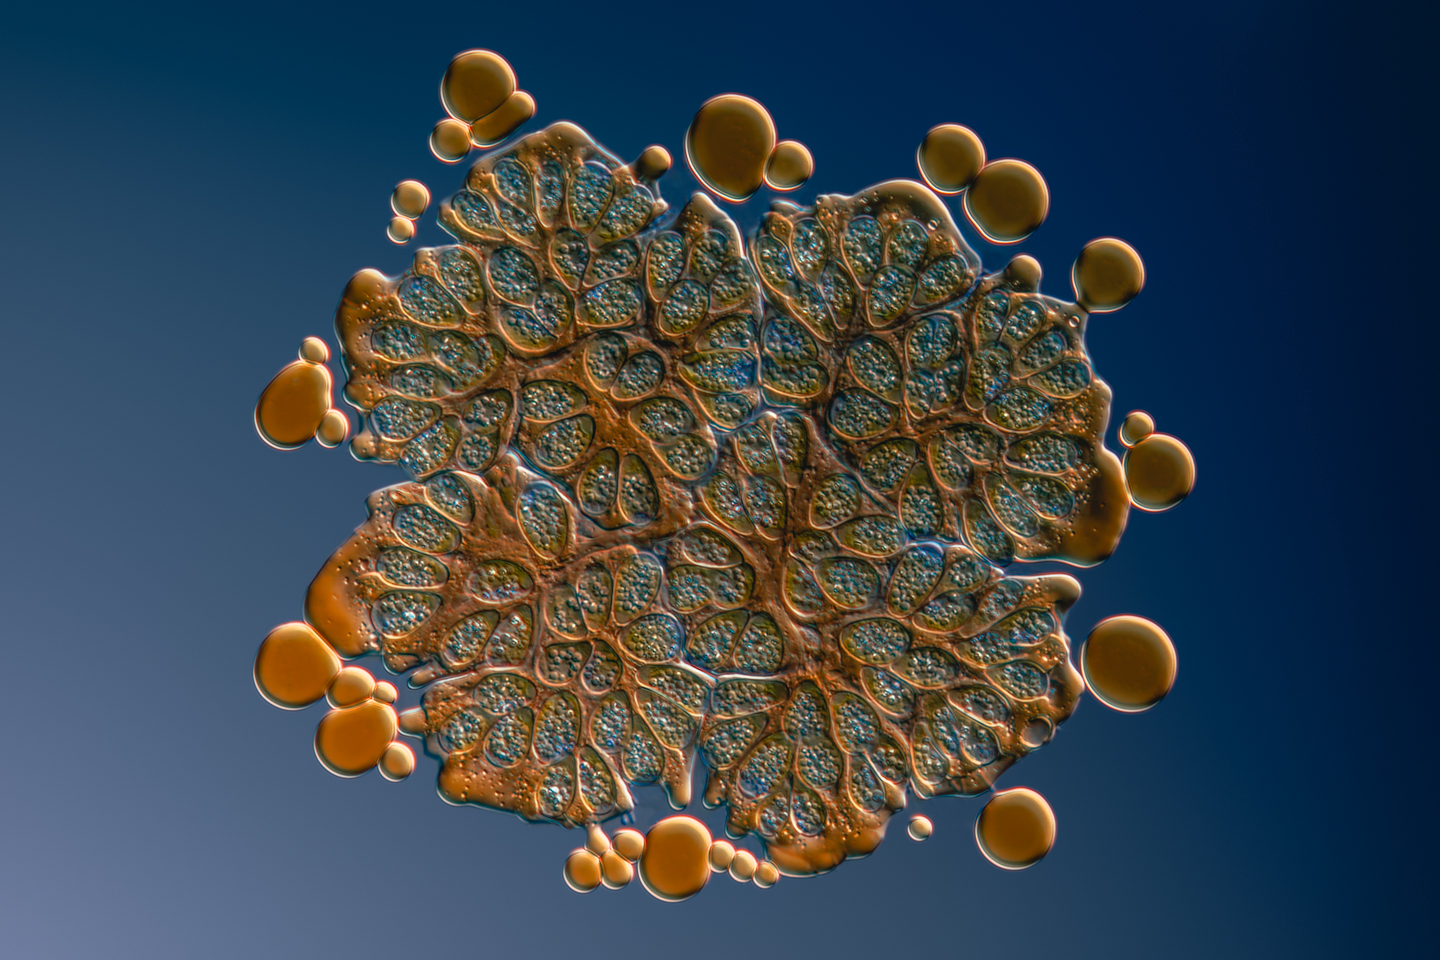
Håkan: The next one is also a green alga called Botryococcus braunii, is the Latin name for this. That is an interesting alga because it contains so much oil. I think 40% of the biomass is oil. When you put it between the cover glass and the slide, and the water starts to evaporate, it squeezes on the alga. When it squeezes on the algae or the weight of the cover glass, pushes out the oil in small droplets around the surface. So, you get this fantastic effect where you can see all the small oil droplets around the edges of the specimen. In fact, I think this type of algae can be used to produce biofuels, so you can grow them, even though they grow slowly, but still, there have been trials to do biofuel from these types of algae.
Martin: I was thinking that. That's amazing. I would have guessed that they were air bubbles, but I thought, “He's too careful to get air bubbles in there.”
Håkan: No, it's oil. If you look closely at the image, you can see the channels inside where the oil flows.
Martin: It's amazing, absolutely beautiful. The next one, this beautifully symmetrical shot. Tell us about this.
Håkan: Yeah, that's Cosmarium, it's also a green alga, and that is also polarized light. There I think I used some retarders and filters as well to get the sort of shining effect in the background. It looks like a world within. It looks like there's some kind of a shell where you have a secret world inside the-- you can actually see how transparent the shell is, and you can see all the chloroplasts inside. I think it's very beautiful in a way.
Martin: Oh, absolutely.

Håkan: It's so interesting that all these algae you have in the sea actually produce an equal amount of oxygen as the rain forests do. Even though you can see them if you take the diatoms and the algae you have in the sea, and also the cyanobacteria, are one of the major contributors to oxygen production and also the carbon capture in the world. They are amazingly important, even though most people have never seen them.
Martin: And that is why it's so important that global warming makes the seas too hot and then this stuff starts to die off, or you end up with too much of one. We have this thing in Japan. I haven't a clue what you would call it in English, but it's like the red tide if I-- do you get what I'm saying.?
Håkan: Yeah, I know what it is.
Martin: It's a type of red algae, but it grows so thick, actually the algae itself changes the temperature of the water below because the light can't get through it. It's crazy stuff.
Håkan: It's important with the balance, it can't be too warm, it can't be too cold, you have to be careful. Also, if it becomes too many of them, they fall to the floor of the sea and they start consuming oxygen when they break down and creating these dead bottoms, where the fish dies and so on. Finding the right balance is important, and I think these are too important to be ignored. You have to work on--
Martin: Yeah. Nature did a really good job of finding that balance until we started messing it up.
Håkan: Yes, unfortunately.
Martin: Oh, dear. Okay, the next one, this is simply amazing. It looks like wheat, the head of a wheat plant.
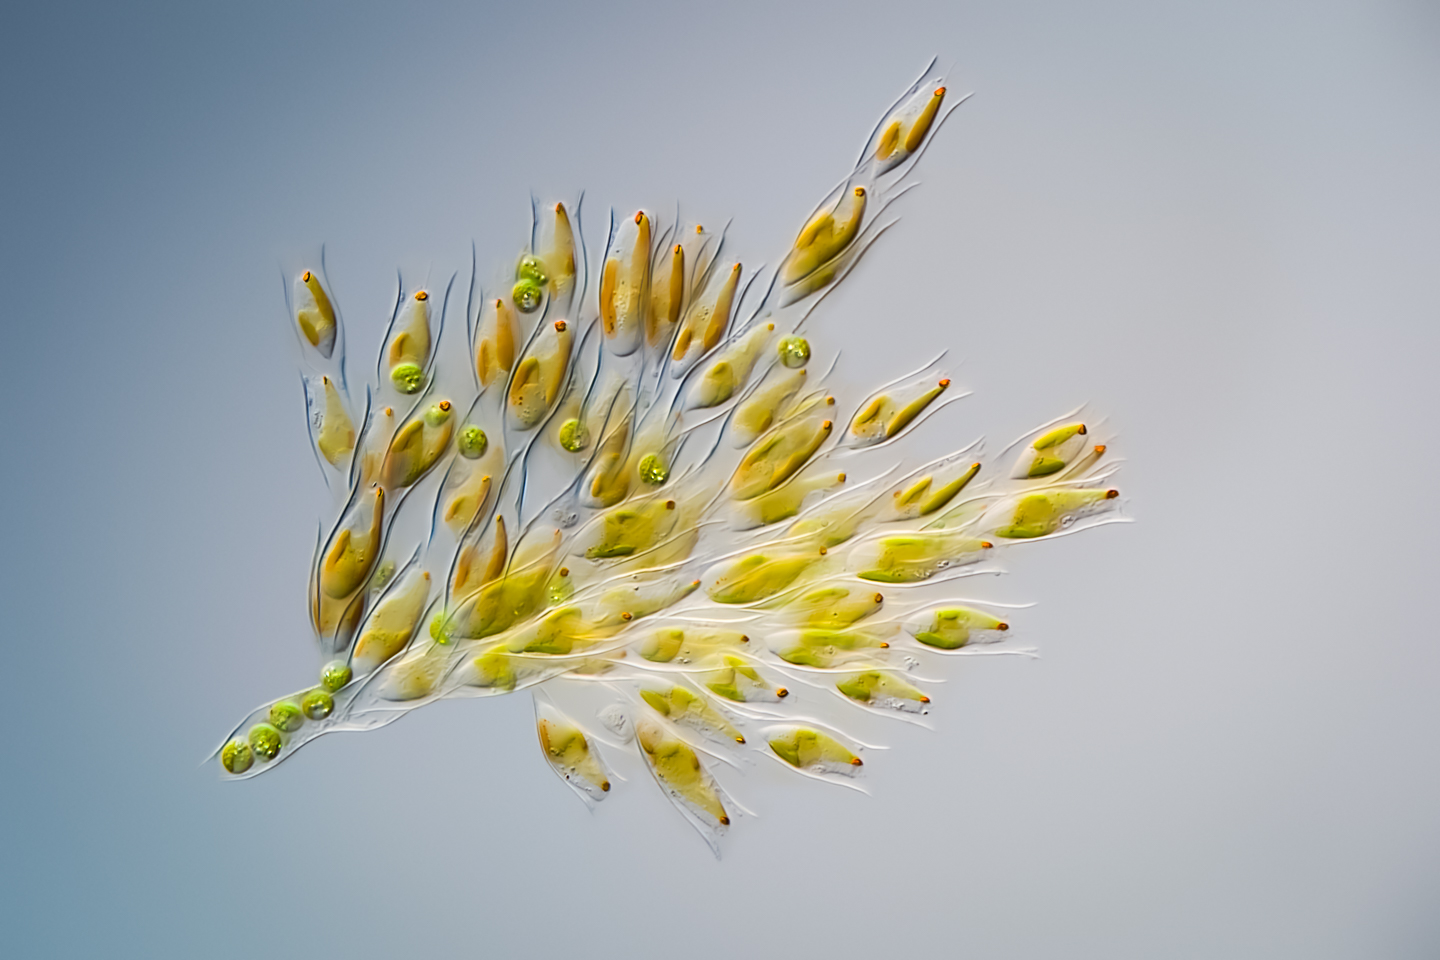
Håkan: Yeah, many people say that it looks like wheat, but it's called Dinobryon, it's also a Latin name. It's actually a colony of-- it's called golden algae. They are quite interesting because they have these two hairs at the front, flagella. They can actually swim, so they can move around in the water. And you can see there's a red spot in each one of them, and they can sense light, so they can swim towards the light.
Martin: Oh, wow. Are these classified fully as an animal then or--?
Håkan: No, it's still an alga.
Martin: Still an alga, wow.
Håkan: And they are also very useful or they are very efficient in cleaning lakes and ponds because they eat bacteria. If there's a bacteria-rich lake, if you have a lot of these, they will eat the bacteria and convert them to biomass instead. Very useful in many ways, but they nice smell bad, unfortunately.
Martin: Really? Oh, dear. Well, they don't look smelly. They look absolutely beautiful.
Håkan: Yeah, looks can be deceiving.
Martin: I'm looking at the same photo that I see in your background. Is this a feather?
Håkan: Yeah, it's a peacock feather.
Martin: Oh, wow.
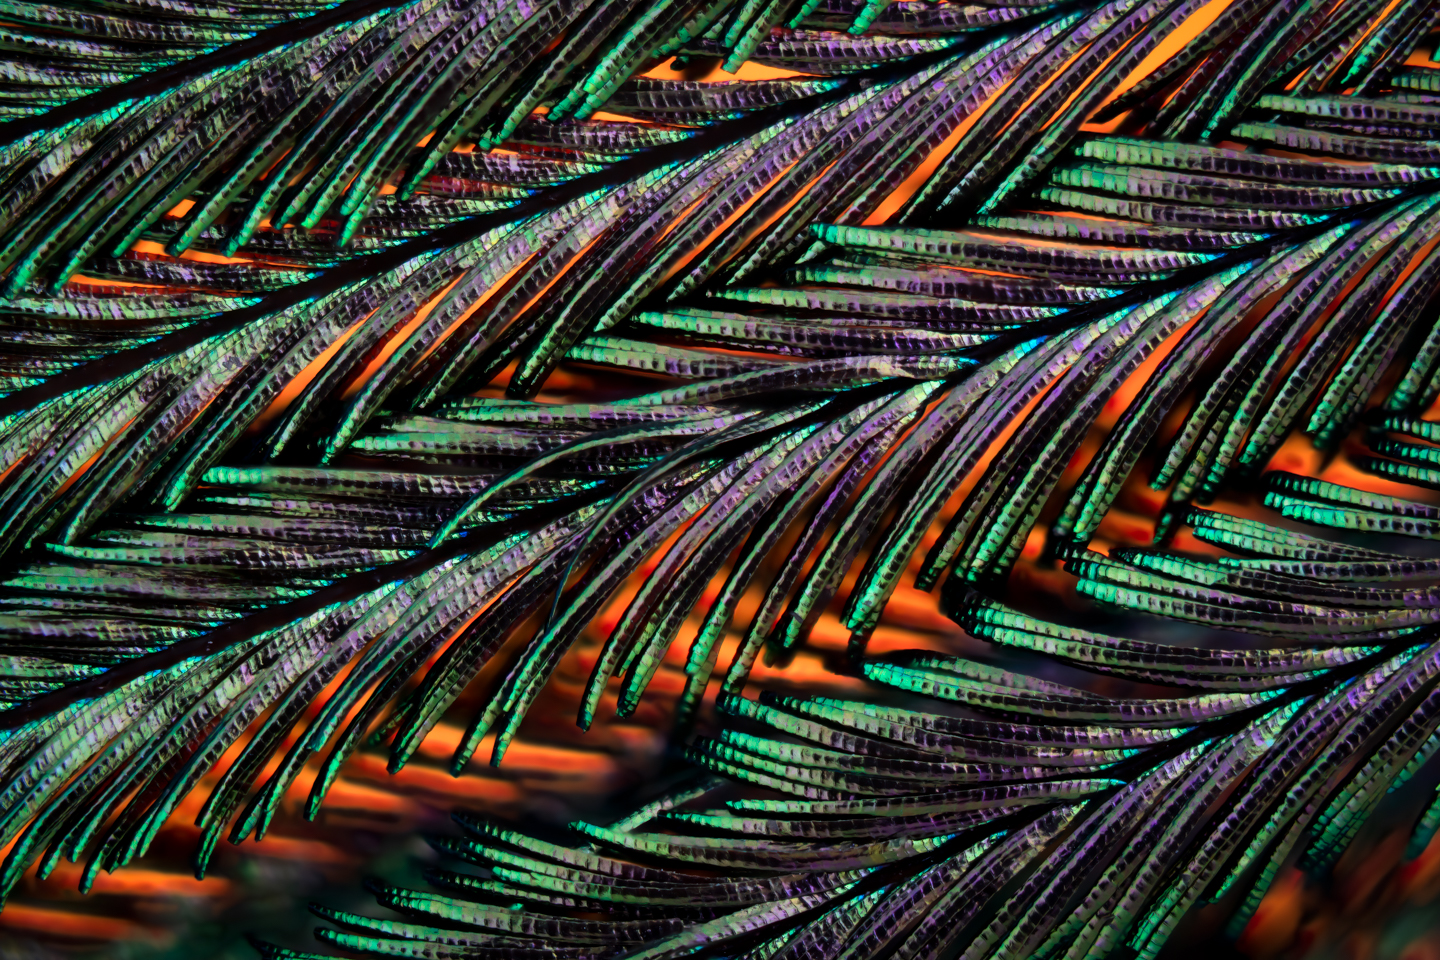
Håkan: I think that's 10x magnification. I also illuminate from the top, so I use LED lights, I think I had four different LED lights. And then, I use ping pong balls like a lightbox or what you call a softbox. I put one ping pong ball over the specimen, and then I put ping pong balls on each light to get the diffused light, really diffused light as possible. And then, I turned on also the normal illuminator on the microscope to get the very faint background light. Because I had such a low voltage on, it turns almost red or orange. That’s why you got the orange color.
Martin: Yeah, that’s amazing. Were the ping pong balls white?
Håkan: Yeah. I use white.
Martin: They're great diffusers.
Håkan: I use two sizes. I have the normal ones, which I normally put for smaller specimens, and I cut a hole for the objective. So, the objective goes inside half of the ball.
Martin: Oh, wow.
Håkan: And then I have a bigger jumbo ball size for the bigger specimens. It's a very good trick actually, you should try it.
Martin: Yeah. I can imagine it because it's thin, and yet it's a good shape. Obviously, probably 50% translucent or cell size. Amazing. I'm learning so much. This next one is the one that I was talking about earlier, where you've got the different layers of bokeh with the background containing stuff. Tell us about this.
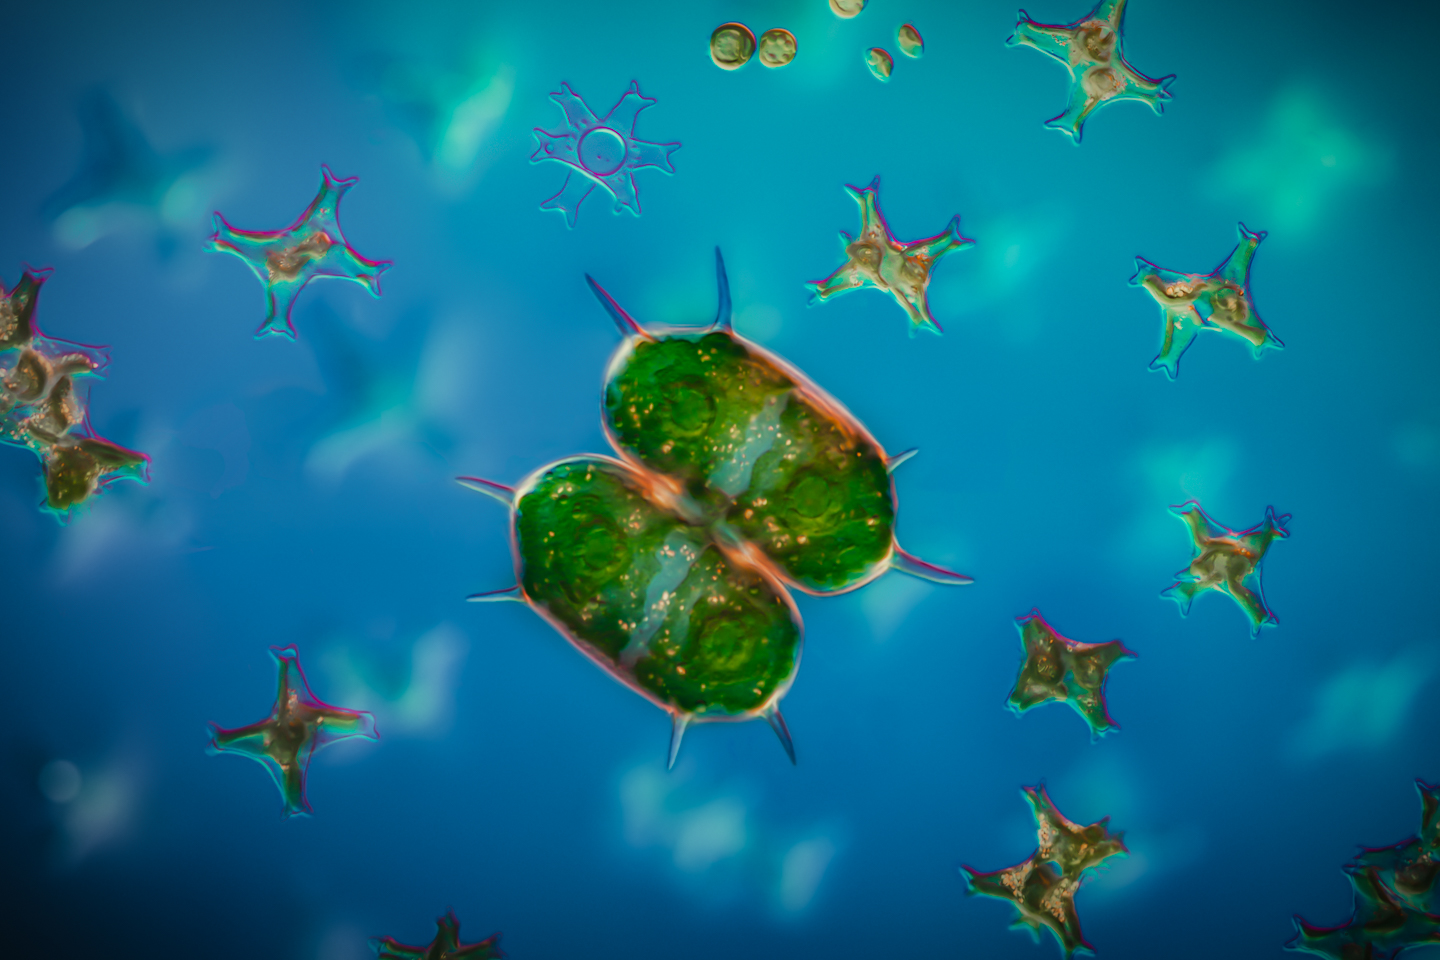
Håkan: Yes, that specimen is called Xanthidium. It's also some kind of Desmid. It belongs to the group of Desmids. It's a green alga as well. In this case, I used focus stacking, but I use focus stack them in, I think three or four sections. I've realized that it's very difficult to do focus stacking and get everything perfect at once. You need to break it down into several stacks. So here I use the stack with the surrounding algae, the smaller ones with one stack, and I used this one set of the stack for the foreground, the specimen in this case. And then, I actually took a single shot where almost everything was out of focus for the real background. And then, you need to combine these images into one image when you do the focus stacking, because you can do it in the stacker if you include the images, and then you do retouching in Zerene Stacker or Helicon Focus, for example. But it takes some work. It's done at the same time but requires more manual work to get their final result.
Martin: I see. I've really not used the retouching module in Helicon Focus yet. I've had a few plays with it, but it always seems a bit clunky, I'd probably end up jumping into Photoshop to do that. But I see what you're saying. I definitely can understand the necessity and the reasons why you would do that. One stack for a certain area, another stack for other areas.
Håkan: I think that's a very good trick, because if you have two deep stacks, for example, if you do more macro-like work, when you have thicker specimens, you might have hundreds of photographs that you need to stack. The problem is that some blurry areas might become sharp again because you're reaching deeper into the specimen. And then, the stacker gets confused. Is it sharp or should it be out of focus? And then, you get artifacts in the image, so then you really need to break it down. Okay, focus on the surface first, and then you get the surface clean, then you can focus on the other parts later, and so on, and I try to divide and conquer your way forward to get to a good final image. It can take hours. You can spend hours on this. But the results, I think, it's getting better when you are doing it like that, especially for the deeper stacks.
Martin: That's great advice, I'll give it a try. I'm not a very patient postprocessor. The good thing with Helicon that I found is that once you've processed a stack, you can reprocess it with different settings pretty quickly. I've been playing with different settings and going through, but I get a little bit frustrated with the retouching because you click something, and then it takes a while even with an eight-core CPU iMac. So, that does get a little bit on the edge of my limits of patience with photo retouching.
Håkan: Normally, I use two stackers. I use Zerene Stacker, which is one commonly used software in photography. I use Helicon Focus, which is the other one. I think they're both good. They both have strengths and weaknesses. The retouching module is better in Zerene. It's easier to use. I use that quite a lot actually because let's say you have a stationary specimen, but you have maybe bacteria swimming around or you have other small creatures swimming around, moving during your shoot, they will leave streaks when you stack, so you get black streaks on the image, a lot of black streaks. And then, I also have a trick, I always shoot a way out of focus image, which is very blurry, so I get the perfect background, and then I include that image into the stack. Even though I won't use it for any of the focused parts, I can remove all the streaks by selecting that image as the source and then just painting away all the streaks with it out of focus background. So, that is a good trick to use if you want to clean up the background, and maybe you don't have an image in the stack that is completely clean. That's why I really go far beyond focus to just get that image into the stack as well.
Martin: That’s such great advice. I wouldn't have thought of that. So, yeah, I’ll write that one down. Another great piece of advice. This final one looks like Christmas crackers. What’s this?
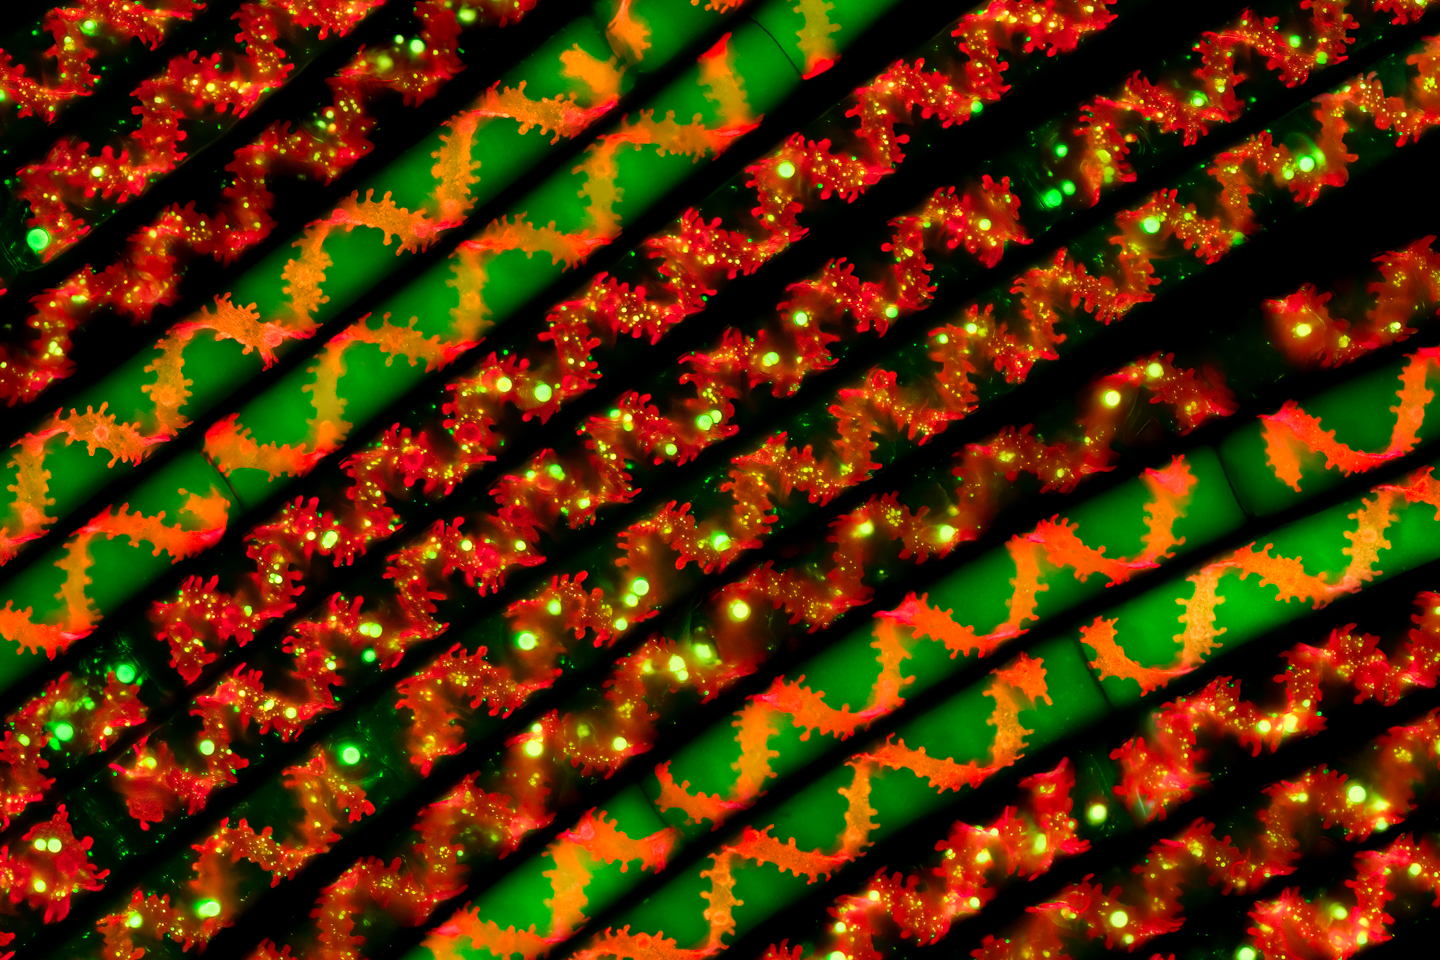
Håkan: That's also a green alga called spirogyra. It's very interesting because the chloroplasts have a spiral shape, so they are like a tube with spirals inside. If you see the middle parts, you can see them with pure autofluorescence, meaning you can only see the red shape, the red spiral. The other ones that are green as well have been stained. It was a lucky strike here as well. I took three different stains, and I mixed them in various portions in different bottles. And then, I added the spirogyra into those, and I mixed it. And then, I pulled strains up from the jars and rinsed them, put them on the slide. Some of them were stained, some were not, so I got this pattern. So, I tried to stretch them to straighten them out. And, of course, they are no thicker than a strain of hair. So, they're really, really thin.
Martin: Wow. That's amazing that you not only did that with the different stains, but you were able to get them all nicely spread out and everything.
Håkan: Well, if you have enough of them, and you pull them out on a piece of glass, you have to look, of course, to find that small portion. 99% of the slide looks like a mess. You need to look for the composition you want where something looks nice. And then, sometimes you're lucky, and sometimes you're not lucky. Sometimes, you need to crop a bit to get what you're-- But that's the problem with microscopy as well, you don't have a zoom. Based on the magnification you have selected, you have to live with the composition you get because you can zoom in, you can't move closer, you can't move away, and you have no zoom lens, so you have to live with what you get and just crop instead.
Martin: They call the 4x a scanning lens, don't they?
Håkan: Yeah.
Martin: It's so amazing, just scanning across-- I scan with the 10x as well, depending on what I'm doing. But just looking across a slide and seeing everything down there, and then zooming in-- Well, not zooming, change your objective and getting a closer look, just amazing.
Håkan: If you're moving up to maybe 40 or 60 or 100, it's almost impossible to scan a slide because it will take forever. And by the time you're done, the water has evaporated and you have to start over again. So, it's very good to go back quickly to lower magnification to see what you want to focus on.
Martin: Yeah, that's a good point. The thing with me so far is that most of what I've been doing has just been crystals, and they hardly change for days. So, it's a lot easier to have fun with that. I can imagine the--
Håkan: Yeah. Now, that’s also a really interesting specimen to work with. Different chemicals and crystals and salts and whatever you have and to see-- amazing shapes and patterns coming from those crystals, especially if you're using polarized light.
Martin: Yeah. We watched a good movie on a Saturday afternoon. I have to admit that a tear dropped down from my eye, and I thought, “Hang on.” While it was still on my eye, I ran upstairs and got a slide, dropped it onto the slide, and then let it dry and polarized. It was amazing. All of the patterns that form just in the salts in a teardrop, it was pretty amazing.
Håkan: Yeah. I guess, it's the salt as you said, that does the trick. It crystallizes.
Martin: Yeah. Almost like snowflakes in some parts. We've just seen some amazing specimens. W\here do you find them?
Håkan: Well, that's the good part with microscopy as well as your hobby, that you don't have to, or if you compare to nature photography, in general, you have to travel. People go to Iceland, Greenland, Antarctica, wherever they need to go to find good-- There's inflation in photography that you have to have all those exotic places to go to. I think with microscopy, you don't have to go far. You can go outside and you can find the closest pond or you can find an insect or you can find a lake, you can have a net, and drag the net in the water for one, two, three minutes. And you will have endless of material to look at.
Even though I've been doing this for like five, six, seven years, every time I look, I see something I have never seen before. They're millions of shapes and species in those samples. I am living close to the King's castle here in Sweden, Drottningholm, it's called. They have this English park where they have a huge number of ponds and small islands, and you can walk around, it's open to the public so you can get specimens there. That's the main source I use for all my findings.
Martin: So, that's mostly freshwater, then?
Håkan: It's only freshwater, I would say. I haven't done much saltwater photography at all. I'm living close to a lake, which I'm using, and I live close to this park, where I take my samples. On occasion, I have also looked at more marine saltwater specimens, but not that much actually. Mostly freshwater.
Martin: That's good to hear. I've got a river near me, although rivers are running water, there is some sort of like stagnant pools at the sides in the summertime, and there's always algae in there. So, I've been trying to make a day when I can just go down with a couple of tubs and scoop some out and see what I can find.
Håkan: Yeah. But the trick, if you have running water, is to buy one of those sampling nets. So, you can put the net into the running water for an hour or so and come back and get the net. And then, you have maybe collected quite a few things.
Martin: I see. That’s a good idea.
Håkan: Getting more condensed, so you don't have to look-- You can only look at one drop at a time. It's very good to have a condensed sample of material. Otherwise, you have to look forever.
Martin: I'll be on Amazon after talking and see if I can find one. Excellent. What do you do to keep them alive? I know that you were saying earlier that you have live specimens on your slides. What do you do to keep them alive?
Håkan: Well, I use simple glass jars. I collect them, I try to figure out what I have, using the microscope to see what type of algae or what type of animals I have in there, and I try to find the right conditions for them. I read up. I tried to read books and see what they like, what type of nutrition they need, how much light they would like to have. Some species want a lot of light, like green alga, some want less. Like cyanobacteria, they don't want much light. I have a table with wheels that I can push back and forth. And then, I have one growing lamp that I use so I can adjust the light by moving the table back and forth depending on what I'm growing at the time.
And then you use nutrition, like BG-11, which is a common one. I also buy nutrition from Carolina Biological in the US. They have this Alga-Gro, which I use. But in many cases, you can buy any plant nutrition bottles from the grocery store to kick off some rapid growth.
Martin: We talked earlier a little bit about the staining. What sort of things do you do to prepare? So, you're going to sit down for a session and try and capture some of these algae? What sort of things do you do to prepare that slide for viewing and photographing?
Håkan: Well, the majority of the specimens I photograph, I don't do any real preparation. I just take a drop and I put them on the slide. I put the cover glass on and I start photographing. The advantage with my microscope is I'm using also a contrast technique called DIC, Differential Interference Contrast, which is like optical staining. It uses differences in refraction index to highlight edges and highlight differences. So, you can get increased contrast just by using optical means. Therefore, you don't need any stains.
But for fluorescence microscopy, you need stain because then something needs to be shining when you light them with ultraviolet light. So, therefore, I have used various, like calcofluor white, another one is called eosin, there's also one called acridine orange, I think is called, which I use, which is like an orange color. And then, you put them into the stain for a few minutes, and then you rinse them in water, and then you put them on the slide and put a drop of water on and the cover glass on, and then you blast them with various frequencies of light only, and to see what happens.
But the most interesting part, I think, is to find specimens that fluoresce by themselves. You don't have to stain them, you can just try it out with-- you can buy a flashlight, which sends out around 300 nanometers or 350 ultraviolet light. And you can go around in the garden, try and see what gives red light, what gives some other color, blue light. And if you find something of interest, you bring it to the microscope, and you can use the same technique there to really see the specimen, shining and different colors by themselves.
Martin: Wow. I'll have to try that.
Håkan: That’s a really good trick.
Martin: Yeah. I have some small ultraviolet, like keyholders with one LED on it.
Håkan: That is good enough, you can try that. If you take that one, and then you shine that onto some green alga or green leaf, and you should see the red immediately.
Martin: Well, I'll take it out and have a play. You already mentioned a number of these to eliminate your specimens. I imagine that you can relatively easily do darkfield work with your-- do you do darkfield at all?
Håkan: I do. The simplest one, of course, being bright field, which is just having a plain light source, and you don't do anything with filters and stuff, and that gives you poor contrast. It's difficult, and also, since many of the specimens you are trying to look at are more or less transparent. They don't have any color. They are completely transparent, especially if they're swimming in water. So, it's very difficult to get good contrast. But there, you can use the various techniques to improve that, DIC being one of them, which unfortunately is quite expensive compared to many of the others. The most effective, I will say, and the most beautiful, perhaps in a way is darkfield, as you say. Having a black disk, a darkfield stop that you put on top of your condenser or inside your condenser to avoid direct illumination onto the specimen. It gets lights from the sides, from the top and it gets a completely black background and very colorful images. Not really many details but, like art, you don't need all the details all the time. It's more like the colors and the shapes. A darkfield is very simple to build yourself as well. You didn't have to buy expensive equipment, you can just use what you--
Martin: The listeners will be able to hear it rattling around, but I bought a set of rings that go into my filter on eBay. Someone's making them with a 3D printer. I've had a lot of fun with it. I tried making them myself, to begin with, with a marker pen and some clear files and everything, and then it got everywhere. I'm like, “Oh, no, I need to just buy some.” But they were like $30 for a full set.
Håkan: Yeah, but definitely worth every penny. It's an amazing technique and it's very simple to use as well. The problem normally with darkfield or in many cases is, it works up to the 20x objective. Above the 20x objective, it's very difficult. You need special equipment, and then you need to use oil. You have to oil the condenser to the underside of the glass slide which creates a mess because if you then move the slide back and forth on the stage, the oil starts to drag off the stage. But if you have the patience and if you have the time, it gives you extremely good resolution, even at high magnification and the darkfield, so it's a very beautiful image.
Martin: I'm going to have to talk to my wife and get permission to buy that 20x, that's in my car because it's definitely necessary. The gap between 10 and 40 is huge in size. It will be really nice to have something between--
Håkan: I would say the 20x is, I think, my most used objective.
Martin: I can imagine.
Håkan: 20x is really good. I think that's extremely important to have. Definitely convince your wife.
Martin: It's not a huge amount of money. I wouldn't get onto her about that if she's in a good mood later. And it's crazy because it's a business expense, but this is how it is, especially with the corona days.
Håkan: Yeah, I understand.
Martin: I've got a number of questions left, and I'm aware that you've got-- we don't want to keep you too long. So, we'll try and jump through these a little bit. One of the things that we are going to talk about was depth of field. We've mentioned this a number of times. We are working with such shallow depth of field, is there anything that we haven't already mentioned that you do to work with that or overcome it?
Håkan: Well, that's the tricky part. The more resolution you want or need, the higher numerical aperture you need to have on your objective, and the less depth of field you’d get. So, it's a combination that is not very good in a way, making it more and more difficult to get decent images. And also, then it becomes very sensitive to the distance between the specimen and the cover glass. The higher up you go, the more sensitive and more difficult it will be to get good images even though you're using focus stacking. My general recommendation is to if you want to take pictures, don't select objectives with too small depth of field. Use objectives with slightly lower numerical aperture, that gives you more freedom to move up and down and give more depth of field. Also, for video, it's crucial, of course.
It's very difficult because compared to normal photography, when you have meters or at least decimeters or inches of depth of field, here you have micrometers or half of a micrometer. So, it's a constant challenge, of course, to work on those, especially at high magnifications. For the 4x and 10x, I think it's fairly okay.
Martin: You could get away with single photos and lots of bokeh with the 4 or 10. I have a note as I hear about ISO. I've been finding that I've been using ISOs between-- sometimes rather than letting my shutter speed get too low, increasing the ISO to like 800 or 1200, 1600. What sort of ranges are you working with, with your ISO?
Håkan: Well, it depends. Normally, the default mode I do-- in most cases we have fairly stationary specimens, they don't move very fast or it can be an alga, they are sitting still, so you don't have to have a fast shutter speed. You can be quite slow. So, I set the ISO at 100, and then I just adjust the shutter speed to get decent lighting, to get the exposure right. The aperture is fixed, you can't change that for your microphone. It is what it is. So, the only two things you can play with are ISO and shutter speed. So, I adjust the shutter speed, but if I have moving specimens like I shot some vorticella that was moving really fast, then I need to increase the ISO to get the shutter speed I need, and maybe go down to 1000, 2000, or something like that, then I need to go up fairly high. But I do have a 100-watt lamp on my microscope, so I have quite a good light. I do have a strong light-- [crosstalk]
Martin: That's the thing. Mine's only got a cheap light. I need to see if I can actually change that out.
Håkan: Yeah, because that's really important to have good lighting. You have really strong light, you can tweak it up dramatically compared to the 20 watts that you might have.
Martin: Yeah, I'll have to take a look. I don't know if I can even change it. I imagine I can with a bit of wrangling.
Håkan: When I do fluorescence photography, it's different because those autofluorescence capabilities of these specimens, they've very weak lights, so I need to go up to maybe 3000, 4000 in ISO, and then I would need to work with noise reduction instead postprocessing, and also deconvolution to some degree because I don't want to expose for like 30 seconds. I'm trying to avoid that. I try to do maybe one or two seconds but then increase ISO. It's a mix, but you need to have a good camera. I use normal mirrorless cameras, I don't use specific microscope cameras. It's better to use regular cameras, which--
Martin: I decided that from the start. Even the expensive microscope cameras are like 20 megapixels. I wanted a little bit more wiggle room than that.
Håkan: I totally agree.
Martin: That's the main thing with me at the moment. Without breaking the bank, and even this, it's going to take a lot of wiggling around financially, but I've got to get a better camera adapter. That's the weak link in my system at the moment.
Håkan: Yeah. But that's the trick, to always try to find the weakest link and then to improve that to see if it can raise the level of quality. Unfortunately, they're becoming more and more expensive. The weakest links disappear, they will be more expensive weak links to-- [crosstalk]
Martin: Well, my microscope, my compound microscope or biological microscope cost me under 400 bucks, which is probably on the high-end amateur, not professional level. My stereo microscope was actually about 600. That's probably a better microscope in its class, but a good adapter is probably going to cost me around $1,000, which is about the sum of both of my microscopes. So, I'm a little bit cautious about that.
Håkan: We talked about that before, but you might be thinking about designing your own as well, buying lenses. That’s a possibility as far as you get the cost on it.
Martin: You make it sound easy in your email. I can't really get my head around that just yet. Maybe we'll have to take that offline and see.
Håkan: Yeah, definitely.
Martin: Okay. Your work is incredibly artistic. You're probably making the most artistic microphotography or microphotographs that I've seen. What are your thoughts on this form of photography as an art? You're not just documenting stuff, you're making beautiful art with it. I'm sure you've developed some thoughts on that.
Håkan: Yes, but I do find these specimens really beautiful. I think it's so fascinating to see that, even though you can't see them and they're so small, they have such fantastic shapes and forms and colors. You can see shapes where on a micro level, like in spirogyra, for example, it goes all the way through the universe, all through the galaxies and the same shapes reappear from micro to macro level. I think the beauty of nature is amazing. I never get tired of looking at these specimens and to see them and to see them under the microscope in real-time and see them moving, see how they are bubbling with life if you look inside them, and you can actually see the photosynthesis ongoing in there-,
Martin: It's amazing.
Håkan: -crystals moving around. I think they are really beautiful. In general, nature photography, if you consider this to be nature photography, some people don't do that, but I do.
Martin: I do, too.
Håkan: Even nature photographers are struggling with getting their work seen as art. Landscapes are doing a better job, nature photography, animals are having more of a struggle. Some people like these images, some people think they are creepy. They don't want to see the eye of a fly.
Martin: My wife won't look at my bug shots.
Håkan: No.
Martin: She doesn't want to see them at all.
Håkan: I think they're beautiful, bug shots.
Martin: I do too.
Håkan: They're amazing design, these bugs. The eyes and the different parts, the eight eyes of the spider, and so on and so forth. It's amazing.
Martin: I'm waiting now to find-- we have the cicada, they're like little matchbox cars with wings. There was one dead on my balcony a few days ago, but it was in the middle of some pigeon crap. So, I decided to give that one a miss. But I'm looking forward to getting-- there's usually one or two drops and die on the balcony a year. So, I'm going to get some of the eyes and see if I can get some good specimens.
I think we're just about coming towards the end of my list of questions. Can people find you online? I know your website, and can you tell us where to go and I'll put links into the show notes?
Håkan: Yes. My website is https://hakankvarnstrom.com. But it's easier to find me on Instagram and you can find a link to my webpage on Instagram as well, in my profile. It's micromundusphotography.
Martin: Mundus is world, right?
Håkan: Yeah. It's microworld.
Martin: Excellent. I look forward to continuing to learn from you as I've watched these accounts. I've been a huge fan of your Instagram account. I will put all of the links to your stuff in the blog post and the blog post for this is going to be at https://mbp.ac/750. Is there anything else that you wanted to share with the audience before we wrap up, Håkan?
Håkan: I'm not sure. I think we've covered a lot of interesting topics. I'm looking forward to talking to you some time again.
Martin: Yeah, absolutely. I will be picking your brains on the camera adapter as well.
Håkan: Yeah, let's work on that, let’s see if we can find a solution. I will try to build mine now for the medium format cameras, and then see we can adapt it to your setup as well.
Martin: I eventually found one that I think is pretty much what I want. It's a very wide field, it goes into the seamount rather than the smaller tube. It gives you a really big wide image pretty much to the edges of the circle. I'm trying to get them to loan me one for a week to see if it will actually work.
Håkan: Oh, that’s good. The important part is that you have your objective. Normally, objectives have an image circle of maybe 20 to 25 millimeters. Cheaper ones maybe 18 or 20 and the more expensive objectives 26.5 even. And then, you need to magnify that a little bit to fill the sensor. Otherwise, you will get dark corners on your images. To find those lenses that will magnify just enough to fill the sensor, but not too much, because then you are losing so much working area, so you need to find the sweet spot depending on the camera you have and the size of the sensor you have.
Martin: Well, the one that I'm looking at, they say it gets you just inside the image circle. If it does, I'll be happy.
Håkan: For a full format camera, then.
Martin: Yeah. But it's $900.
Håkan: Yeah, that's the issue. It cost more than your microscopes.
Martin: Exactly. Okay. Well, we'll wrap it up then. Really, thank you so much, Håkan. It's been an amazing hour. I'd love to catch up again at some point. And yeah, we'll talk about the other things in email and see if I can pick your brains a little bit more. But thank you.
Håkan: Thanks for having me. Very nice to be here.
Martin: Not at all. It's been my pleasure. Thank you very much.
Håkan: Thank you, bye.
OK, so that's it for the interview. I hope you enjoyed that fascinating conversation. I'll leave you with one last very cool photo that Håkan sent me. Amazing!
Show Notes
Check out Håkan's work here: https://hakankvarnstrom.com
As well as on Facebook: https://www.facebook.com/micromundusphotography
And Instagram: https://instagram.com/micromundusphotography
Subscribe in iTunes to get Podcasts delivered automatically to your computer.
Download this Podcast as an MP3 with Chapters.
Visit this page for help on how to view the images in MP3 files.


0 Comments