
Visit Library for MBP Pro eBooks |
It's been a crazy week as I tried to pull in a little bit of microphotography while working on a second update to my new MBP Fine Art Border Tools plugin for Photoshop. I'm almost ready to submit a new version that includes text-based watermarks in addition to the graphical watermarks already available. I have a few more creases to iron out, but it's shaping up OK and I hope to get it into the system during this week.
There has also though been a nice little addition to my Microphotography world too, that has led me to a number of conclusions that I wanted to discuss, and also get onto the main topic which I'm really still learning myself, which is measuring minutia with the aid of a microscope Calibration Slide or Stage Micrometer, and as you'll see, I've created some overlays that I can apply in Capture One Pro that enable me to show the size of specimens or the field of view in my photos when necessary. This is more for scientific presentation than artistic, but it's nice to be able to do this, so I figured I'd share what I'm up to.
So, the addition I just mentioned is a set of Plan Achromatic lenses for my compound microscope. As I mentioned when I bought this microscope, it was positioned as a somewhat high-end but still very much amateur microscope. At just under $400 compared to the thousands or tens of thousands of dollars for real high-end gear, you can probably appreciate that my microscope is good for hobbyists and serious home users, but not great compared to what the big boys and girls would buy. Because of this, the more I worked with it, the more I am learning about what I need to do to really start getting better image quality.
Something that had been frustrating me a little was that I was having to do really long image stacks to get everything in focus, and as I continued to study this field, I found out that my achromatic objective lenses that came with my scope have a tendency to get soft or blurry as you move away from the center. I could overcome this to a degree by stacking more, but the edge really never got totally sharp, in some images, so I looked around to see if there was anything available to cure this.
I found that there is a type of lens called a Plan Achromatic lens, which creates a flat image, so that when viewing through the eyepieces and supposedly for my camera too, the image would be flat to the edge. After hankering for a few weeks, I decided to take the plunge and buy a set of lenses when the company I bought them from, Amscope, in the US, had a Fourth of July sale. I was able to get a 4X, 10X, 40X, and a 60X objective lens all for less than $200, excluding postage to Japan. I decided to go for a maximum of 60X objective and replace my 100X Achromatic objective lens with that because the thought of using oil to see with the 100X lens scares me, plus, most of what I'm looking at still doesn't require a cover-slip, and applying oil directly to the crystals I'm photographing would make a bit of a mess.
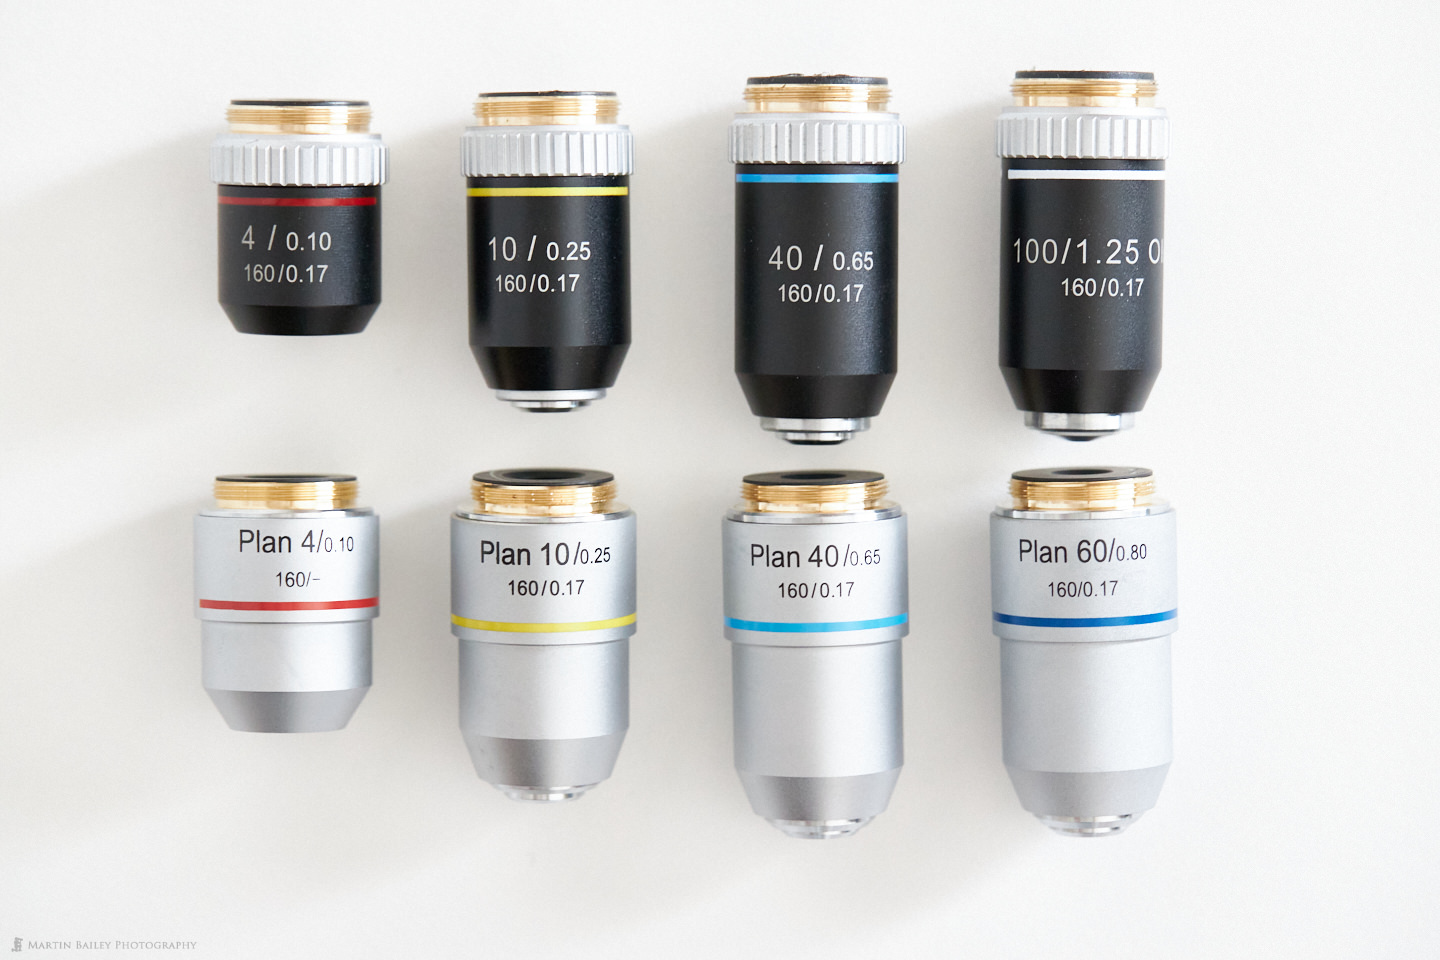
After a mysterious four-day stop-over in Calgary, my new Plan Achromatic lenses arrived a week after I ordered them, and I was pretty amazed by the difference. Through the eyepieces, the difference is huge. They seem brighter, but the bigger benefit is that they are sharp as tacks from edge to edge, so I was very happy to have upgraded. However, when photographing with the new lenses, although the flatter image made it possible to create sharper photographs with smaller image stacks, I noticed that the right side of the frame was still a little bit soft, but only on my camera. As a test, I rotated the camera in the camera port and the soft area moved with it, meaning that the flaw that remains is in my camera adapter, but then I always knew that this was the weak link. At some point, I'll pick up a better adapter, but for now, I can overcome that deficiency with a few extra images in my stacks.
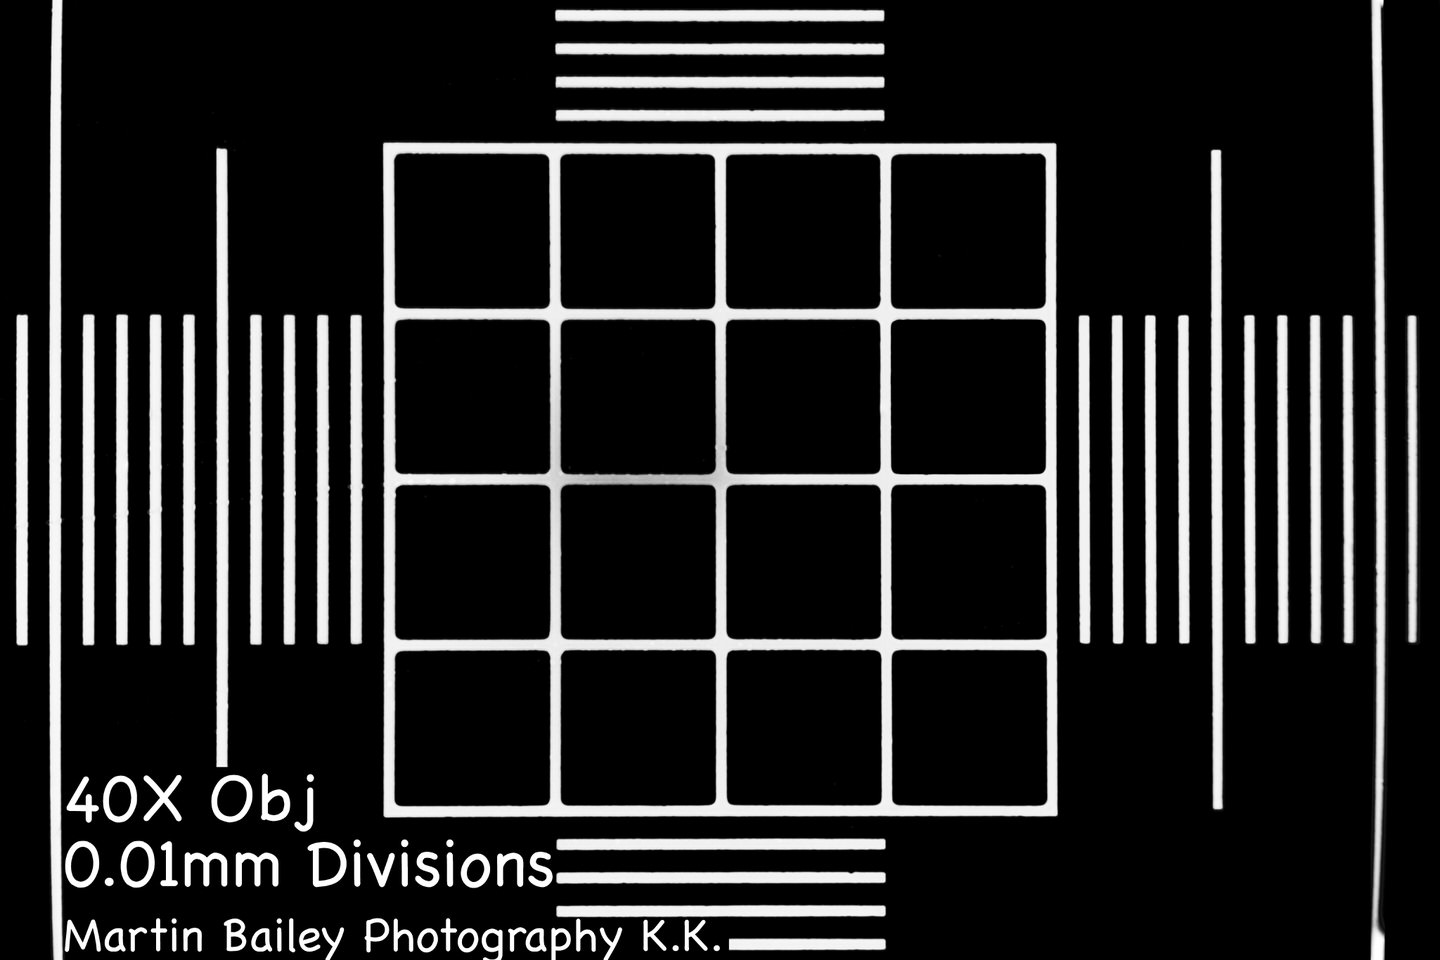
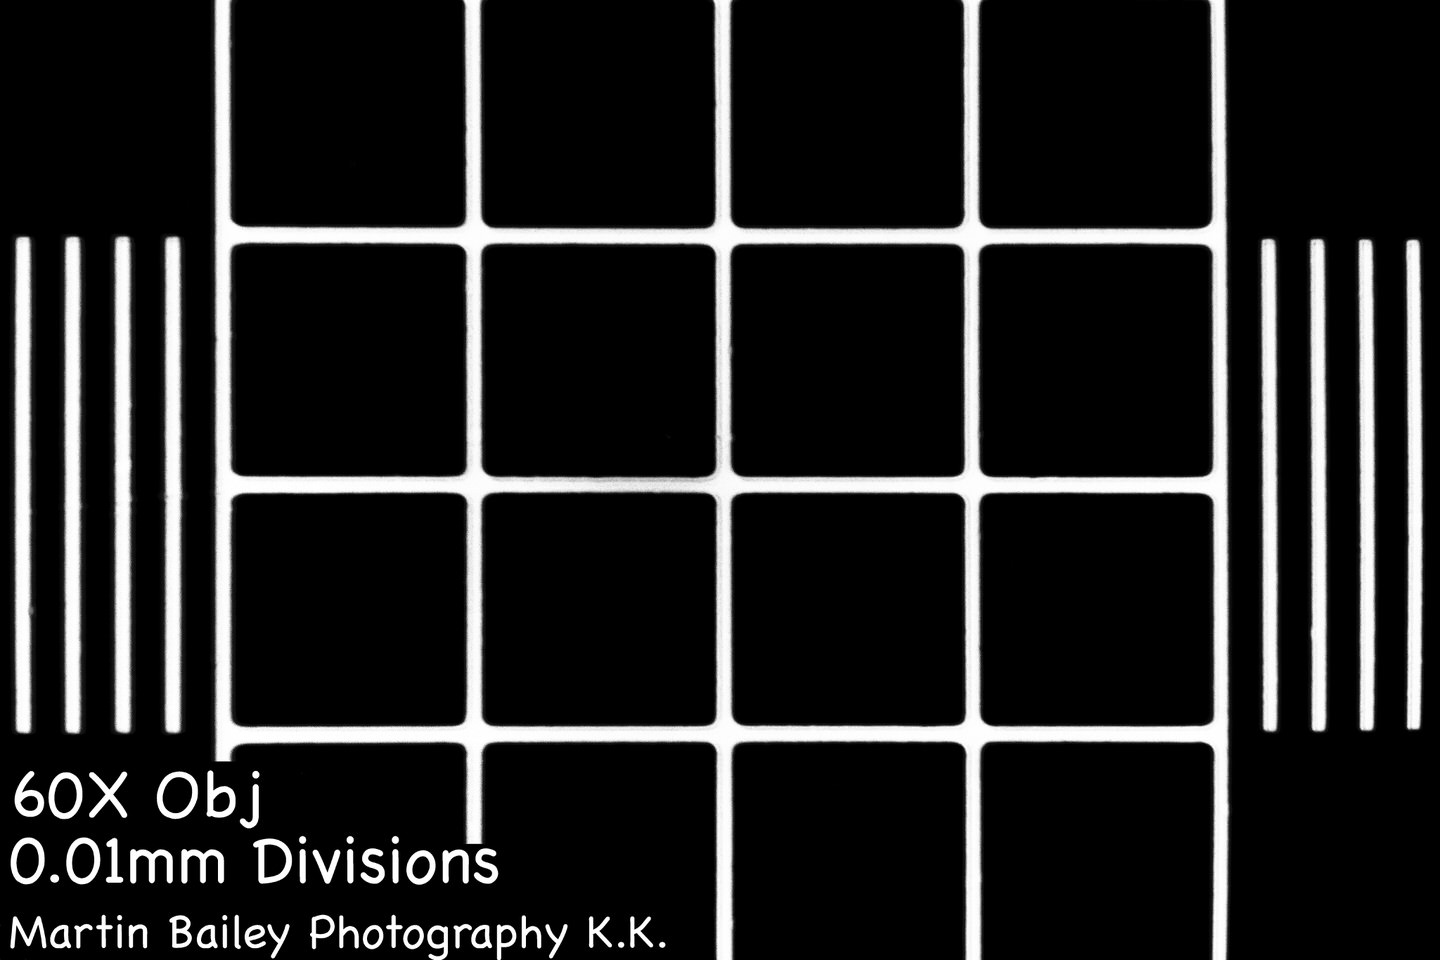
I needed to rephotograph my Calibration Slide with these new lenses, so I'm going to continue now and talk about how I'm using that. First of all, this is a photo of the Calibration Slide, shot with a regular macro lens for illustration purposes. On the left side, there is a 1cm wide micrometer numbered in 0.1mm divisions, and to the right of that, inside that bold circle, there is a cross-shaped micrometer 1mm wide and 1mm high, with larger divisions which are 0.1mm apart, and between them are 0.01 mm markers, which we can convert to 10 microns per division. On the right, there is a dot with a diameter of 0.15mm and finally a smaller 0.07mm diameter dot.
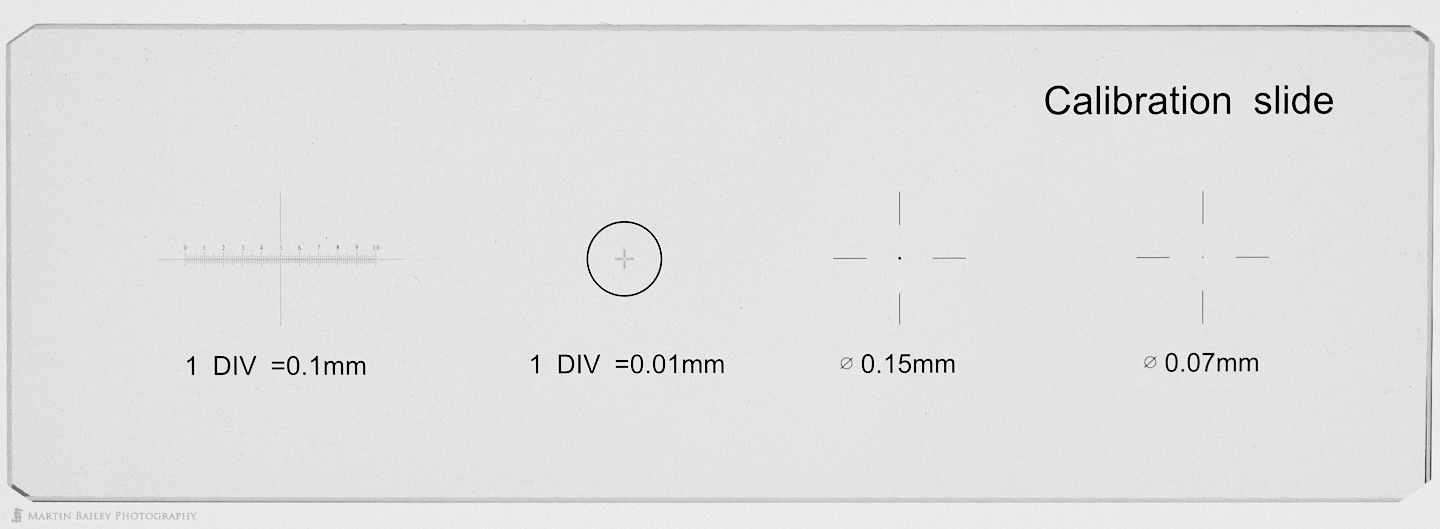
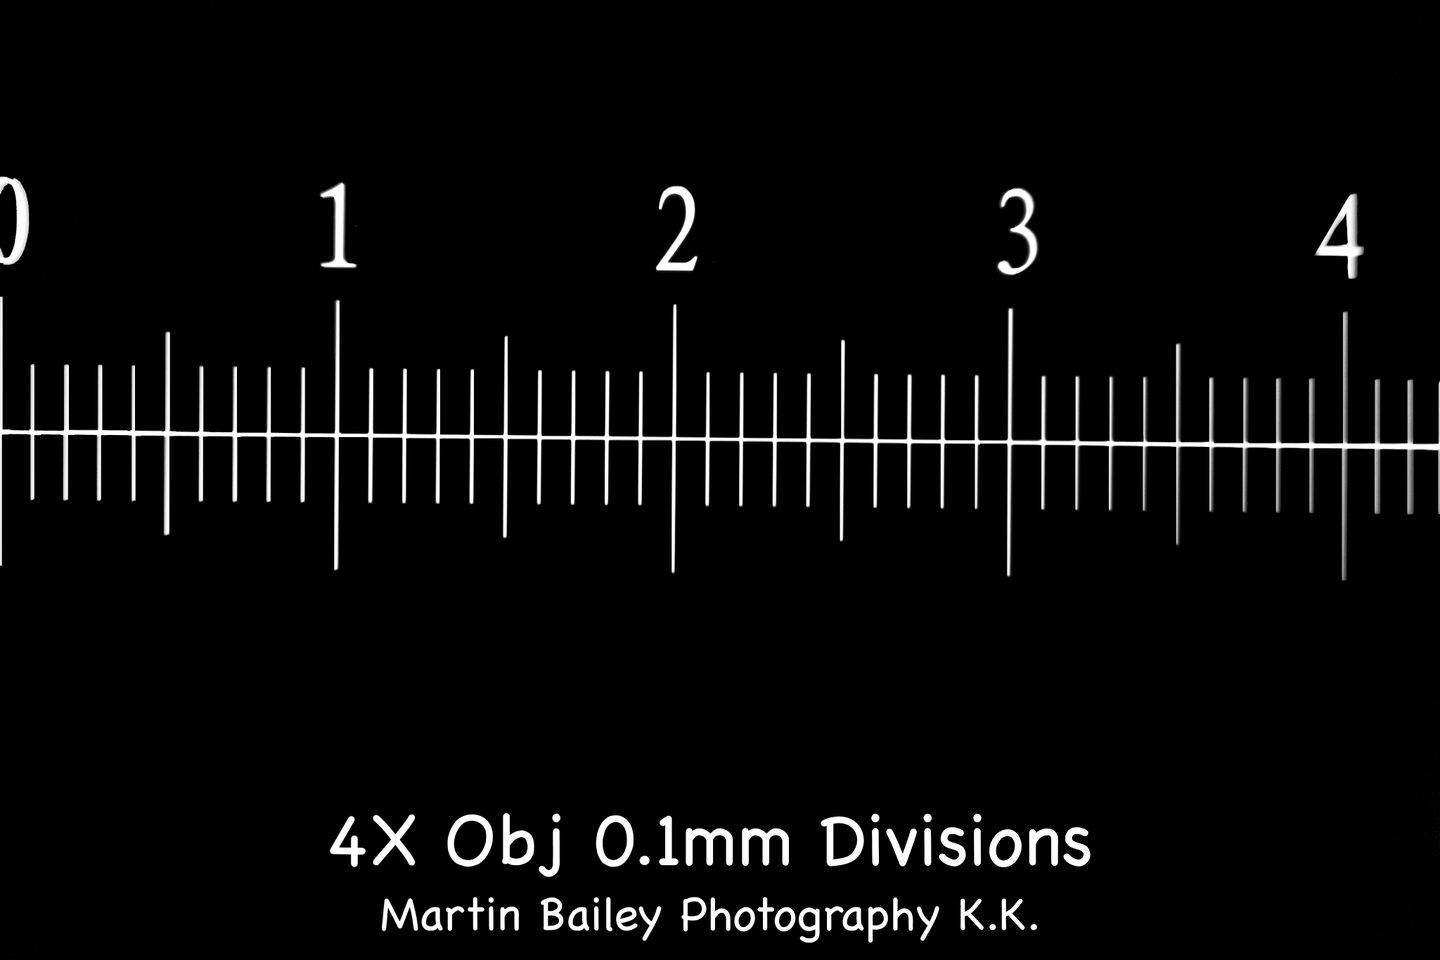
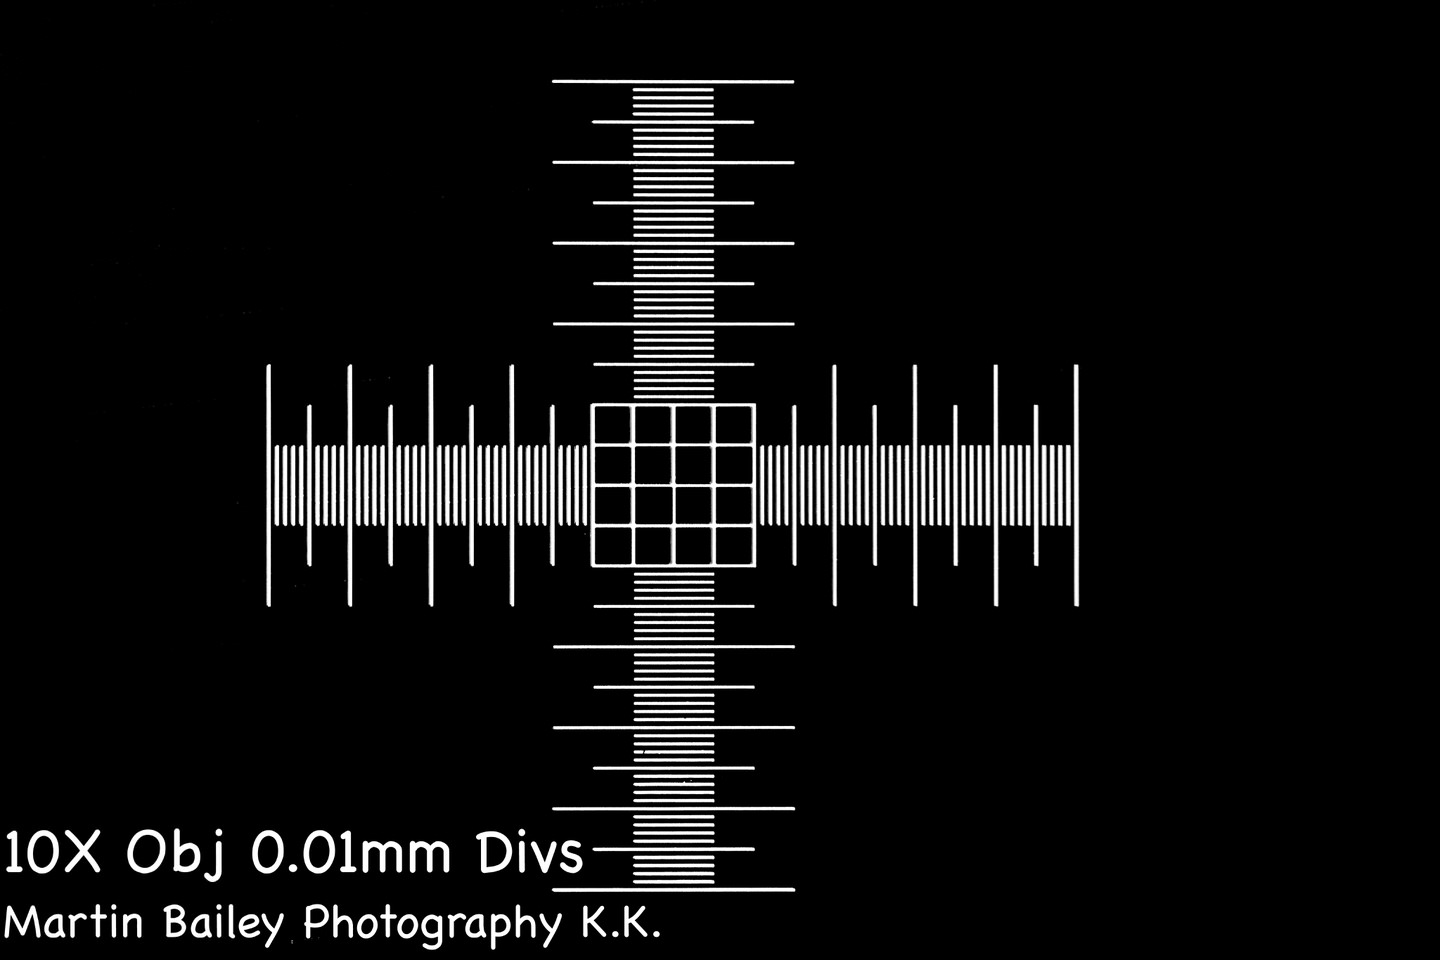
So, to put this into perspective, let's take a look at how I'm using the two micrometers on the left. I haven't really used the dots much, so I won't talk about them. I should also note that to properly calibrate my microscope for scientific purposes, I should use an eyepiece that contains what's known as an ocular micrometer, but I don't have one of them, and I'll explain my process, and why it's not a big deal for me. First of all, here are four images, shot with my new Plan Achromatic lenses. There are a few things to note before we move on. Firstly, I've cleaned up each image, and inverted the color, so that they are white on black. This makes it easier to overlay them on an image to measure the subject, as I'll show shortly. Also, I've marked these images with the magnification of the Objective lens, which doesn't take into account the magnification of the ocular lens or camera adapter. I generally use my 10X magnification eyepieces, although I also have some 25X magnification eyepieces. Also note that the micrometer that you see in the first image shot with the 4X objective lens shows 4.3 mm of the 10 unit 1cm wide micrometer, but the other three images show the center of the 1mm wide micrometer, which we can see in full with the 10X objective, but only the center of it with the 40X and 60X objective lenses.
In a scientific situation, I would compare the units on an ocular micrometer with the units on the stage micrometer to calculate the size of a specimen that I'm viewing, so that I could make notes about the specimen for future research. But for me, I want to know the size of the specimens in my photographs, as it's the photograph that is the main purpose of my use of the microscope. Measuring anything requires that we have a reference that won't change, and that is why I prepared these images. Consider that the images were shot with a camera that is mounted via an adapter to the triocular port directly above the slide. I have two spacers on my adapter that move the camera far enough away that I am photographing the inside of the image circle, generally allowing me to see small black triangles in the four corners. This means that I am actually photographing at a higher magnification than my objective lenses.
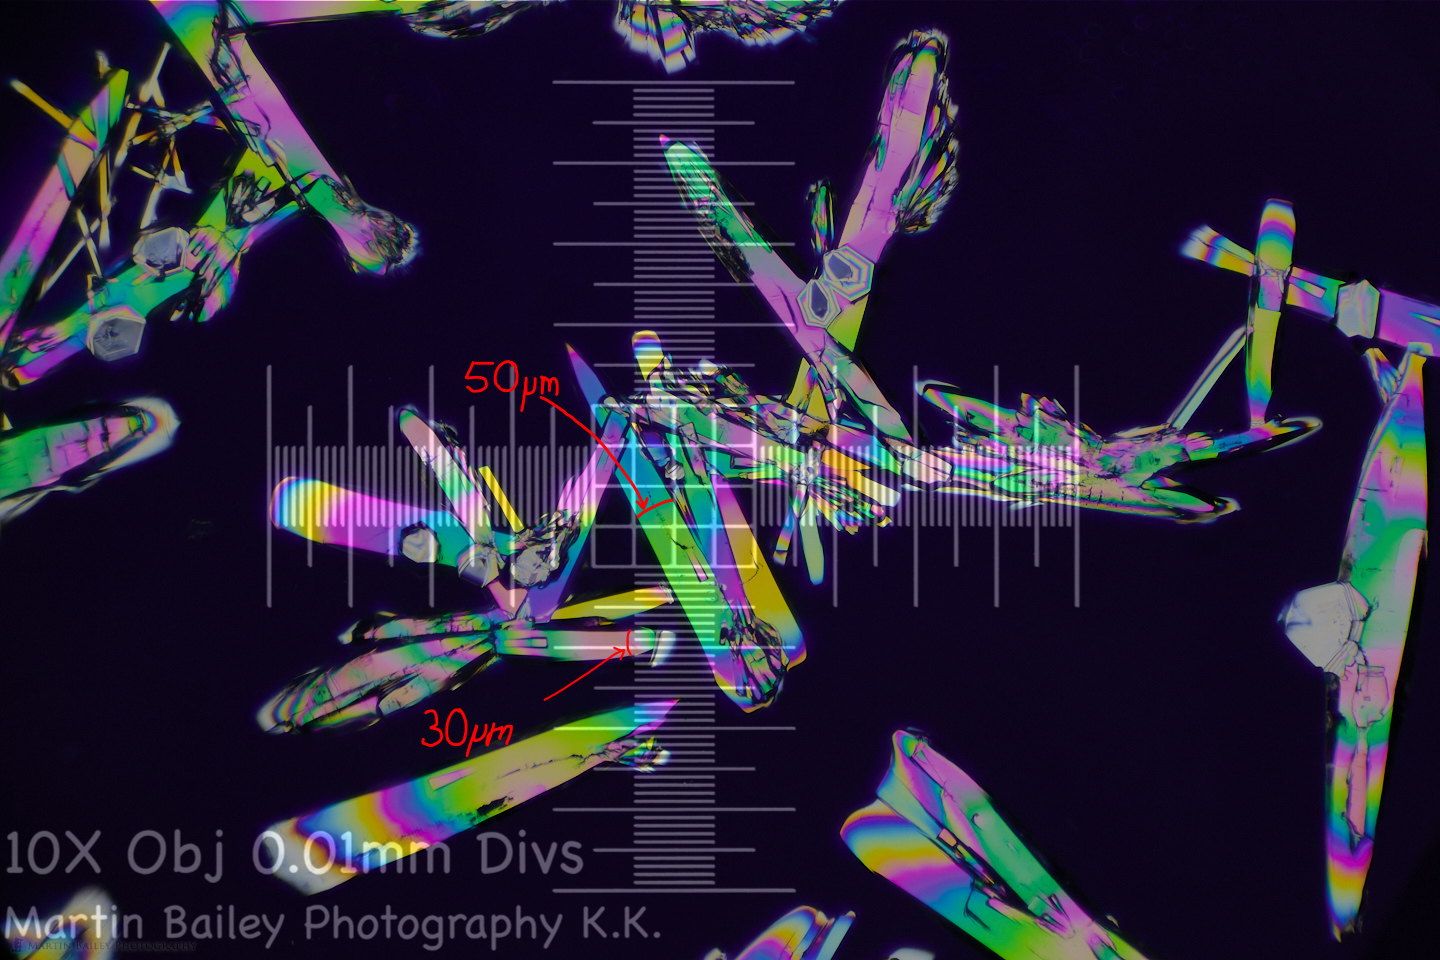
As long as I don't crop my image though, if I overlay the photograph for the objective lens in Capture One or any image editing software that enables me to overlay an image, and the two images are the same size, anything that I can see in the photo can be directly measured with the respective micrometer. Here, for example, is an image of some polarized Sodium sulfite crystals shot with the 10X objective lens with its respective micrometer overlay at 33% opacity. We know that this entire scale from side to side represents just one 1mm. The tall increments are 0.1mm apart, with the smallest divisions being 0.01mm or 10 μm (microns). Based on this, we can measure the width of the crystals, with the larger ones being around 50 microns and the smaller around 30 microns wide.
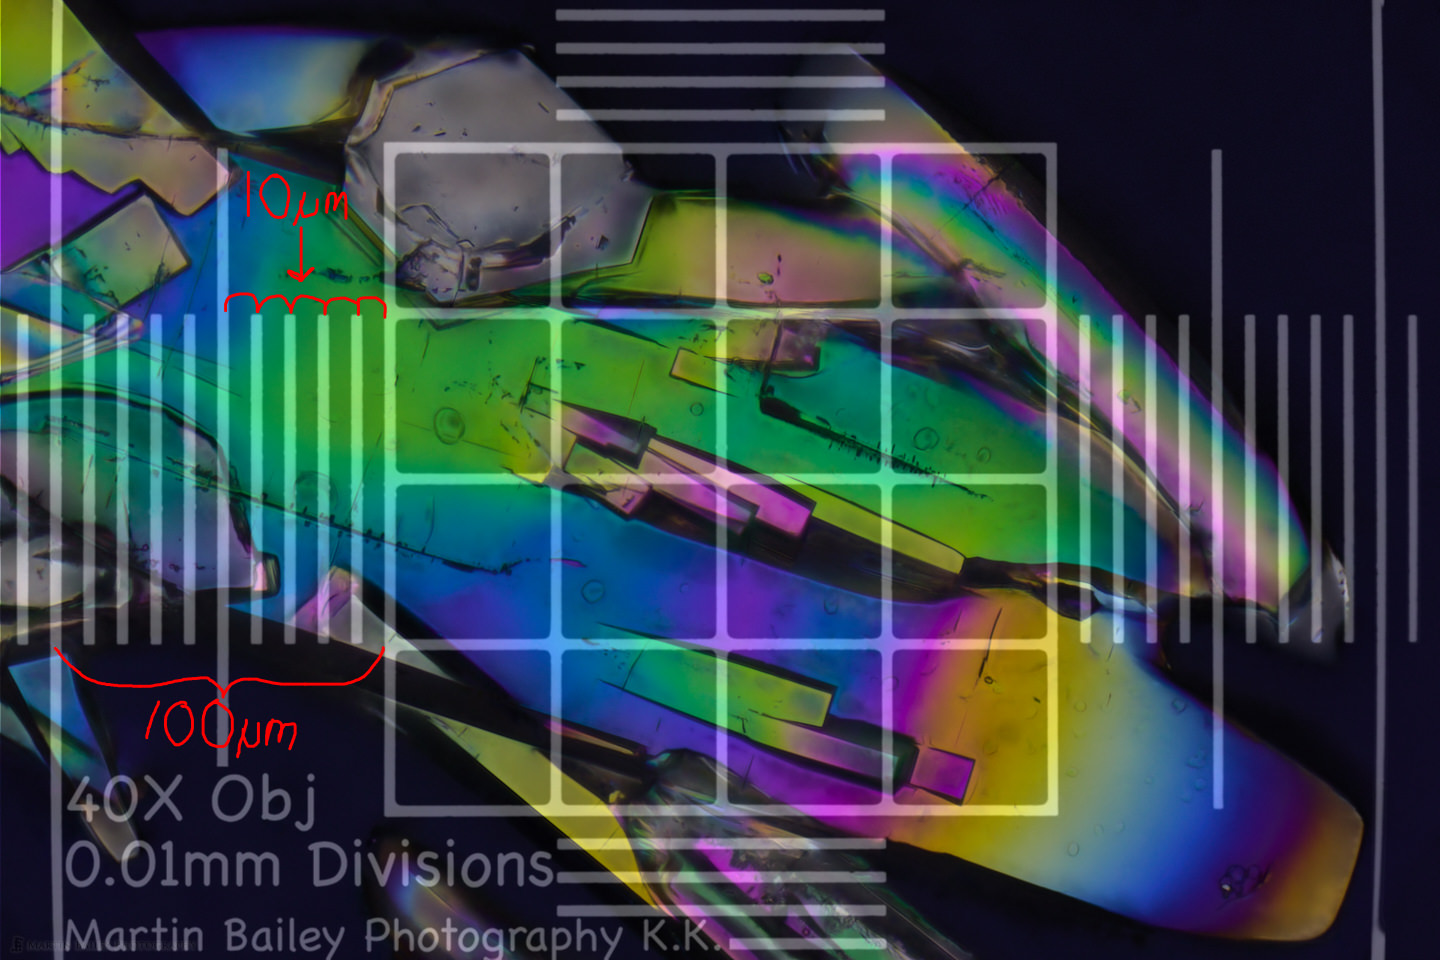
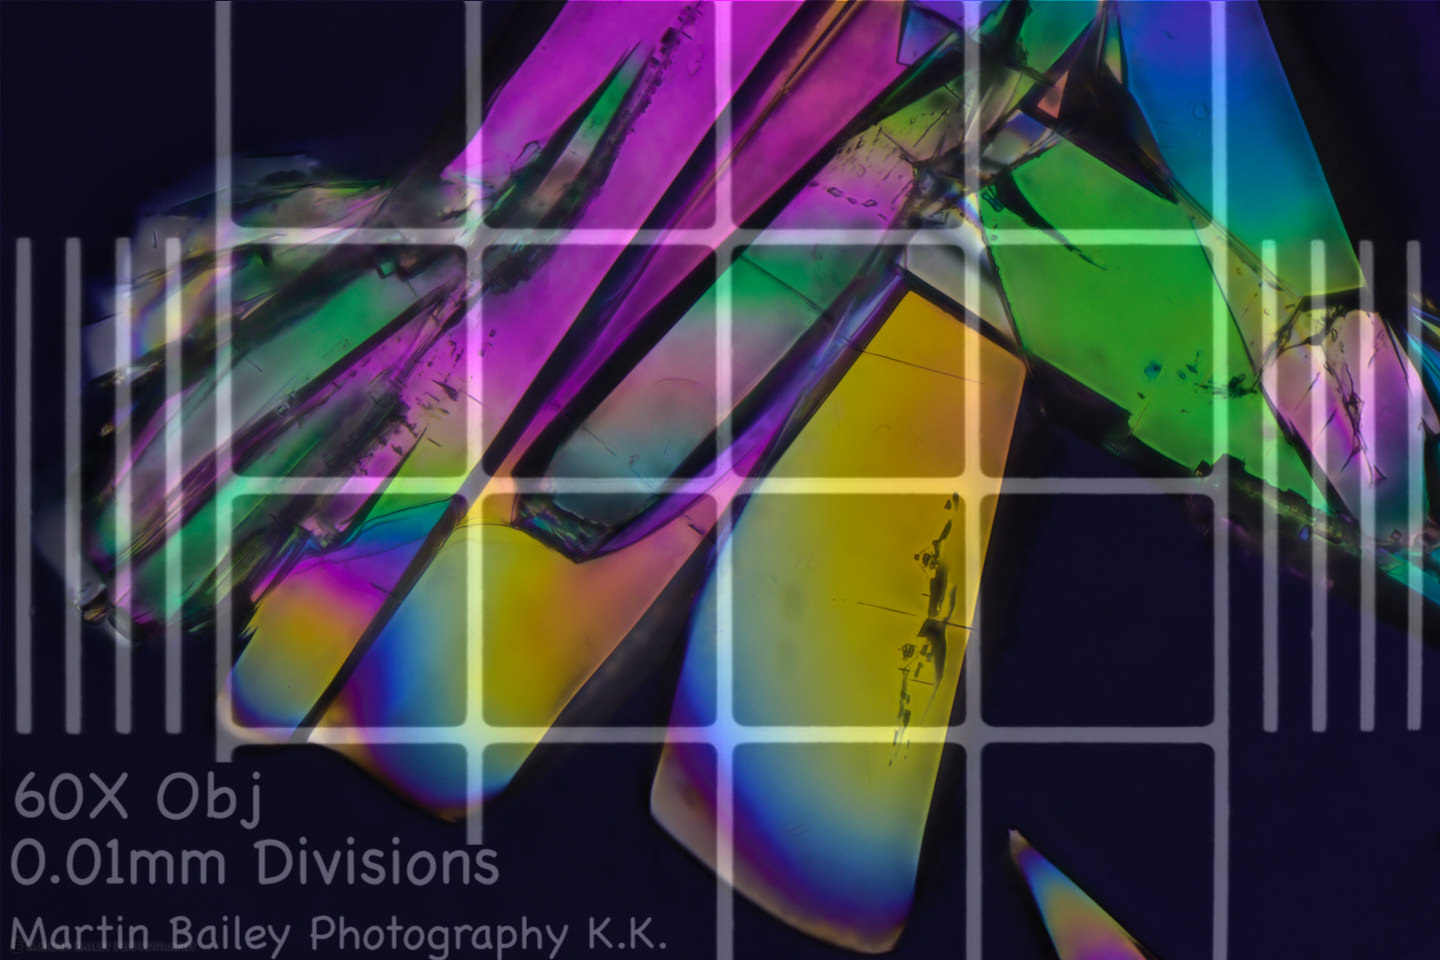
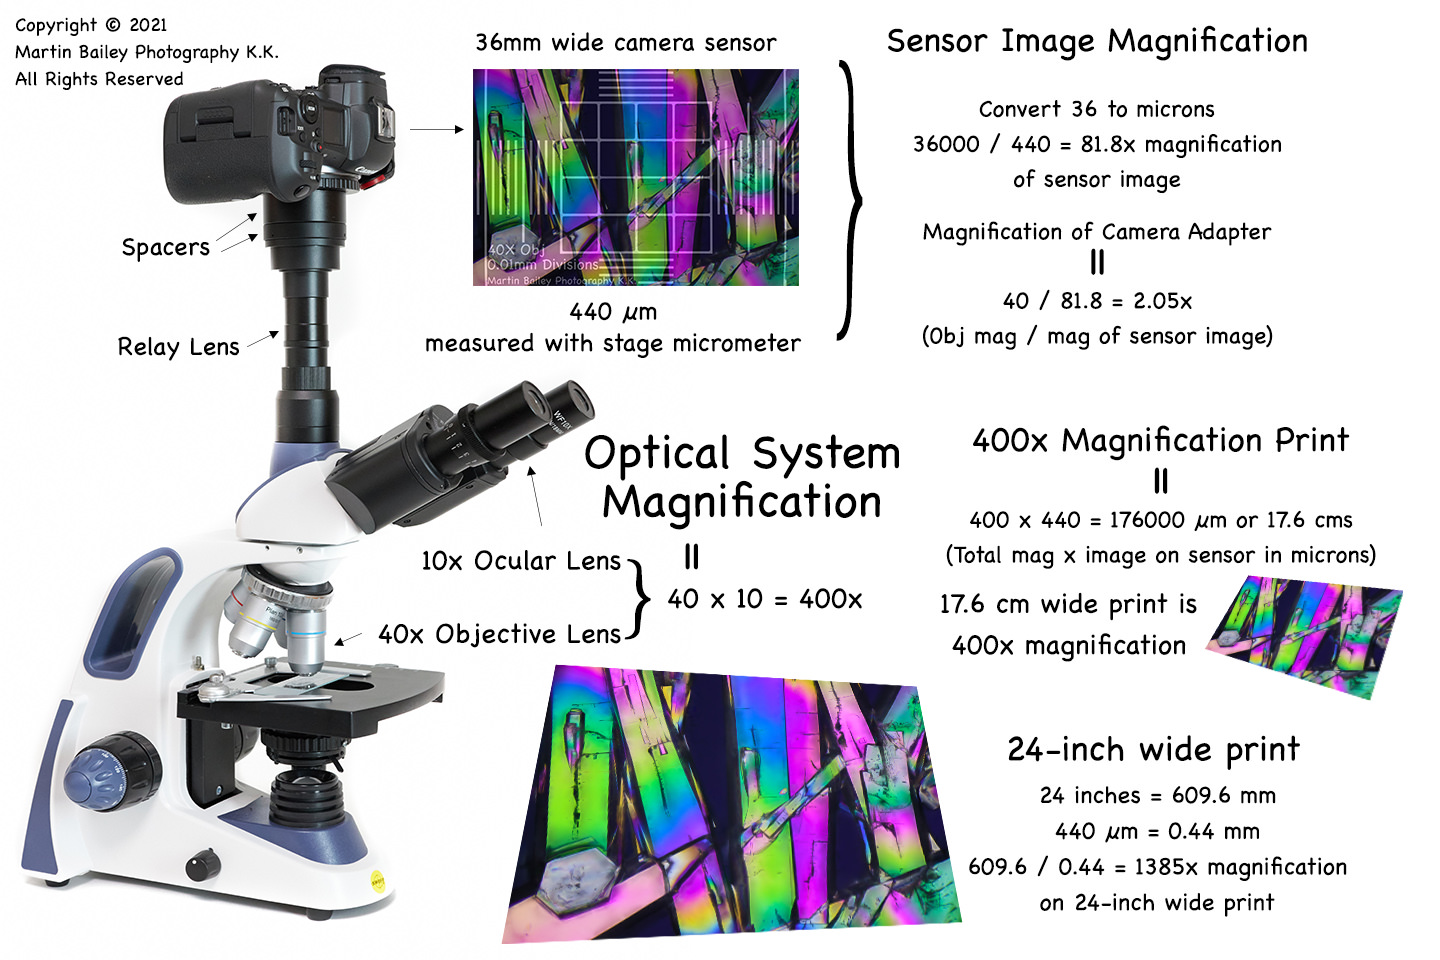
Here now is another image shot with the 40X objective lens, using the center of the same stage micrometer. The first thing we can learn is that we are looking at 440 μm or 0.44 mm of the world. Also, we know that the camera sensor is 36 mm wide, which is 36000 μm, so if we divide 36000 by 440, we get 81.8 which tells us that the magnification due to my camera adapter's relay lens and spacers is actually a hair under 82X, not the 40X of the objective lens. This means that my camera adapter is magnifying the image 2.0455 times. To check, we can do the reverse calculation to anticipate the size I'm seeing with my 60X objective lens, by multiplying 60X by 2.0455 to get 122.73. This should be close to the magnification we can calculate using the same formula that we used for the earlier images.
Here is a photograph with my new 60X objective lens, which, with the stage micrometer we can see measures 290 μm wide. If we divide 36000 (the width of the sensor in microns) by 290 we get 124, so my 60X objective is providing 124X magnification with the adapter spacers, which is slightly larger than my check calculation, but I'm estimating the find 10 microns as being 5 microns for each of those two gaps, and that may be slightly off. There may also be some variance in the marked magnification of the objective lens, so I am now confident that my camera adapter is providing approximately 2.05X magnification for the image size on the sensor.
The last calculation that I had to sleep on before understanding is how come I'm seeing an image that is approximately 400X with my 40X magnification objective, multiplied by the 10X of my ocular lens or eyepiece. I'm seeing an image that is roughly double area that I'm seeing in my camera image, but one is 82x magnification and the other is 400x magnification. I tried to figure this out yesterday and did a bit of searching online, but I couldn't find a definitive answer, so I went to bed feeling relatively stupid.
My web searches told me that the calculations I've explained so far are correct, which is great, but I also learned that you can use the same calculation to calculate the magnification of a printed image. It still didn't click until I got up this morning, and I reverse calculated a 400X magnification by multiplying 400 by 440, the width of my 40x objective field of view in microns, and that gives us 176000. This means if I was to print an image shot with the 40x objective and my 2.05 magnification camera adapter at 17.6 cm we'd be looking at a 400x magnification image. The magnification on the sensor is accurate, but we are not going to view the images at 36mm wide. There is always going to be some magnification as we project the digital image onto a larger viewing media, be it the computer screen, or a print. I've tried to layout most of what we just covered in the below graphic.
Let's do one last calculation to extend this, just for fun. So let's say I print one of these images at 18 x 24 inches, one of my favorite print sizes. We know that 24 inches is 609.6 mm. To avoid using really big numbers, we can convert 440 microns to millimeters, which is 0.44 mm, so if we divide these two numbers we get 1385, which we now know to be the magnification of my digital image when printed at 24 inches wide. Of course, we then have the magnification due to viewing distance, but let's stop there. I'm sure you get the picture.
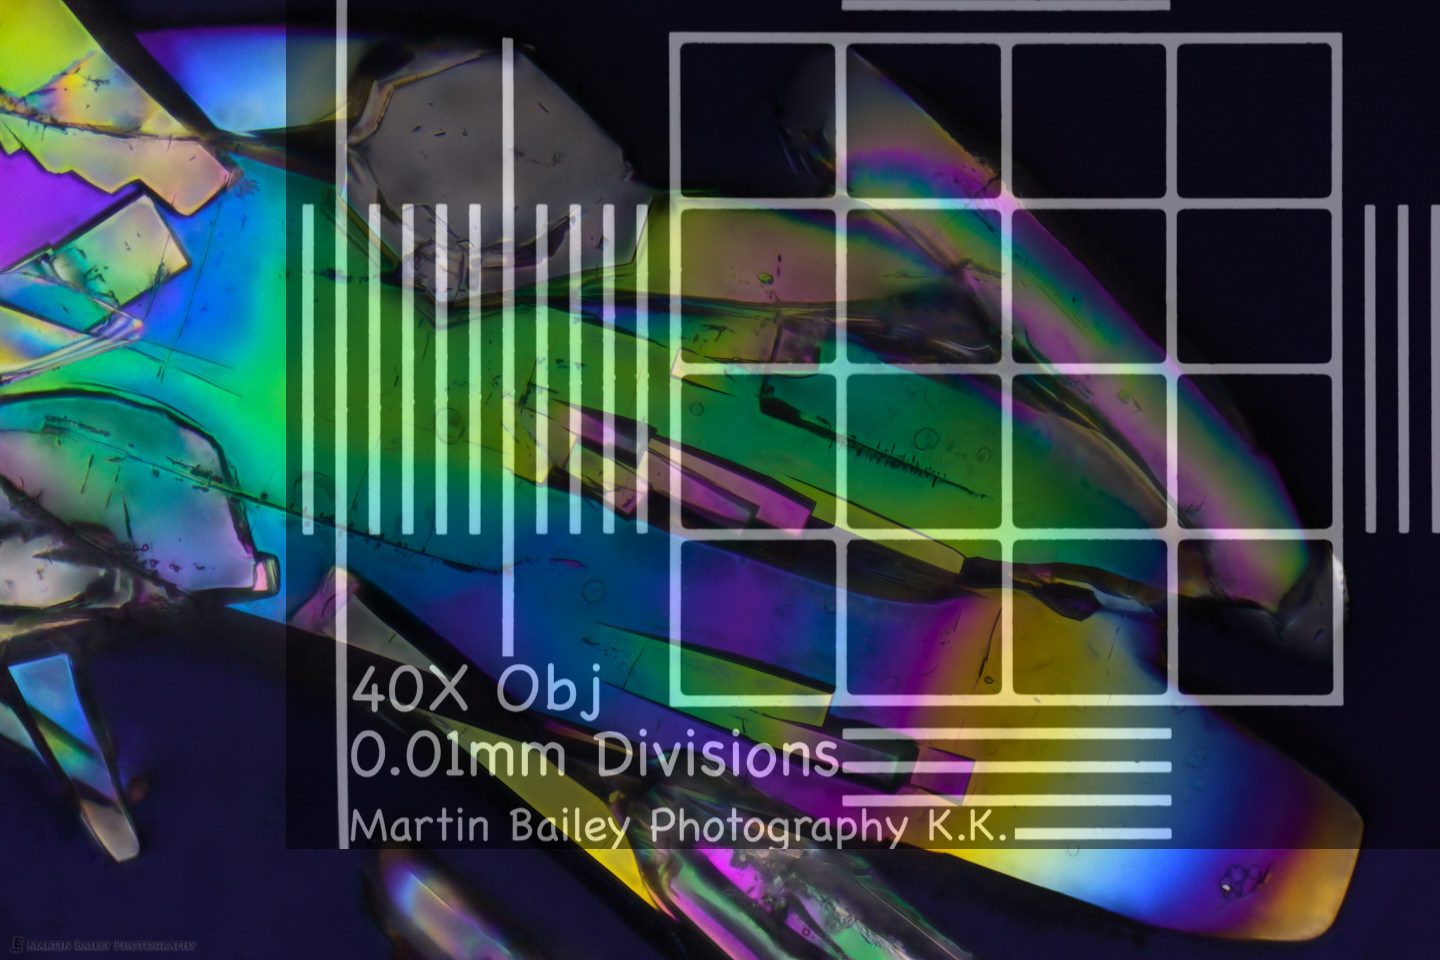
One last thing that I wanted to share with you is that although I left the 50-micron squares in the center of the stage micrometer photos that I shared earlier if I need to measure something with the smaller 10-micron divisions, I can actually move the overlay around in Capture One Pro for a more accurate measurement. As you can see in the below image, the hexagonal crystal in my 40X objective photo is approximately 93-microns wide.
OK, so we'll start to wrap it up there. If you are looking for an upgrade for a microscope with Achromatic lenses, I can definitely recommend picking up some Plan Achromatic lenses. The total cost of my microscope including this upgrade is now running at just under $600 and there are some models available that come with Plan Achromatic lenses at around this price, but many are much more expensive, so I'm relatively happy with the path I've taken still. And, I can probably sell my original four lenses for around $100 if I'm patient, so that will help me to recoup some of my outlay. I think I'd prefer to keep the 100X oil objective though, just in case I need that later, as I don't think I'll use it often enough to buy a Plan Achromatic objective to replace it. Before that, I'll probably get a 20X Plan Achromatic objective as the jump from 10X to 40X is quite large and I often find myself wanting something in between.
My next job is to figure out how to accurately measure objects on my stereo microscope, which will be infinitely more complicated as it has a zoom mechanism, so that should be fun. Note that I've added a Microphotography link to the Posts menu above that automatically pulls together everything I'm posting related to microphotography, so check that out if this subject is of any interest to you.
Show Notes
Check out the Amscope website here: https://www.amscope.com/
Audio
Subscribe in iTunes to get Podcasts delivered automatically to your computer.
Download this Podcast as an MP3 with Chapters.
Visit this page for help on how to view the images in MP3 files.


0 Comments