
Visit Library for MBP Pro eBooks |
Not long after I started living in Tokyo, I reached for an old 50mm lens to find that the view it provided through the viewfinder was cloudy. I took the lens off and held it up to the light, and could easily see that a large area of the inner lens elements was covered in a grey-white mold. I took the lens to the camera store and it cost me as much as the lens did to get it refurbished and the mold removed. I can’t remember exactly when this was, but my guess is around 2002 or 2003, at least before 2005, because I can’t remember ever talking about this in my now 16-year-old podcast.
Shortly after this, I bought my first Humidity Controlled Dry Cabinet, which is still running perfectly well after probably around 18 years of use. The reason I decided to talk about this today though, is because the addition of my new microscopes got me thinking about humidity again, as they were sitting on my work table in my studio, and just entering the rainy season for this year, the humidity was gradually climbing. At first, I tried to figure out a configuration of my 18-year-old cabinet that would enable me to store my microscopes in that, but because it is a wide configuration, with shelves that are fixed at both edges, there was no way for me to just make room on one side of the cabinet.
After a few weeks thinking about what to do, I decided that the best option was going to be to buy a new cabinet with shelf configuration options that would allow me to store both of my microscopes and hopefully all of my camera gear. I have downsized a lot over the last few years, and no longer have the large 200-400mm lens to store, which was the last lens that required the wide configuration of my old double-sided cabinet, so I initially toyed with the idea of just using the one new cabinet, but then I started to think about my options for storing the chemicals and other supporting apparatus that I’ve acquired over the last month or so as I got into microphotography, and I figured I’d store that in my old cabinet, so I’ve now got them both, side by side in the corner of my studio. I’m happier with this decision, as the original cabinet was not broken, and will probably give me at least a few more years of loyal dryness, if not longer.
To put things in perspective, Tokyo rarely goes below 40% humidity, but when it does, it’s generally not for long, and usually during the winter months. The average humidity for December through to February is about 48%. It climbs to an average of 63% in April, a little higher in May, then hovers just below 80% from June until September, 70% in October and back down to 60% in November. I’ve heard that you need to start thinking about protecting optics if your gear will be stored in 60% humidity or higher for prolonged periods. If you live in a country where people generally keep air conditioning on in all rooms during the more humid months, or you live in a predominantly much dryer climate, you really don’t have anything to worry about.
The exception to that would be, for example, if you tend to leave your camera gear in a camera bag, and you get the bag wet, either through rain, or perspiration, and just leave it to dry with your gear inside. That is looking for trouble. If your bag is wet, take your gear out and put it in a dry place, and allow your bag to dry, generally leaving the gear compartment and any pockets open. I’d also recommend keeping some silica gel pouches inside if you are in a borderline climate. If you know that you are not in any danger of suffering from mold due to humidity, and you have anything better to do, you can probably stop listening around now. If this is a concern for you though, listen or read on, and I’ll share a few more details and considerations that lead to my recent purchase.
The first thing I found with interest when I started looking for my recent dry cabinet, was that there is a new kid on the block. When I bought my first cabinet, the market was relatively restricted. My first cabinet has a logo on it that says Dry-Cabi and was made by a company called Tolihan Corporation. They are still in business, but their prices are considerably higher than the company that I bought my new cabinet from. Spec-wise, they are very similar, with a few nice added details in my new cabinet, which made the decision to defect quite easy.
The size of dry cabinets is graded by their volume in liters. Both my first and my recently purchased cabinet are 155L models. The 155L wide cabinet from Dry-Cabi is now listed at $680 at the current exchange rate, and my new cabinet cost me just $450. For domestic listeners, here in Japan, that’s ¥75,350 and ¥49,805 respectively. The new cabinet is branded here in Japan as Hokuto, from the Arvex Group, but they seem to be branded differently in other countries, and I have not been able to find out if the one’s I found on Amazon.com are from the same manufacturer, but other than the brand name, they look identical, so I will provide some links later.
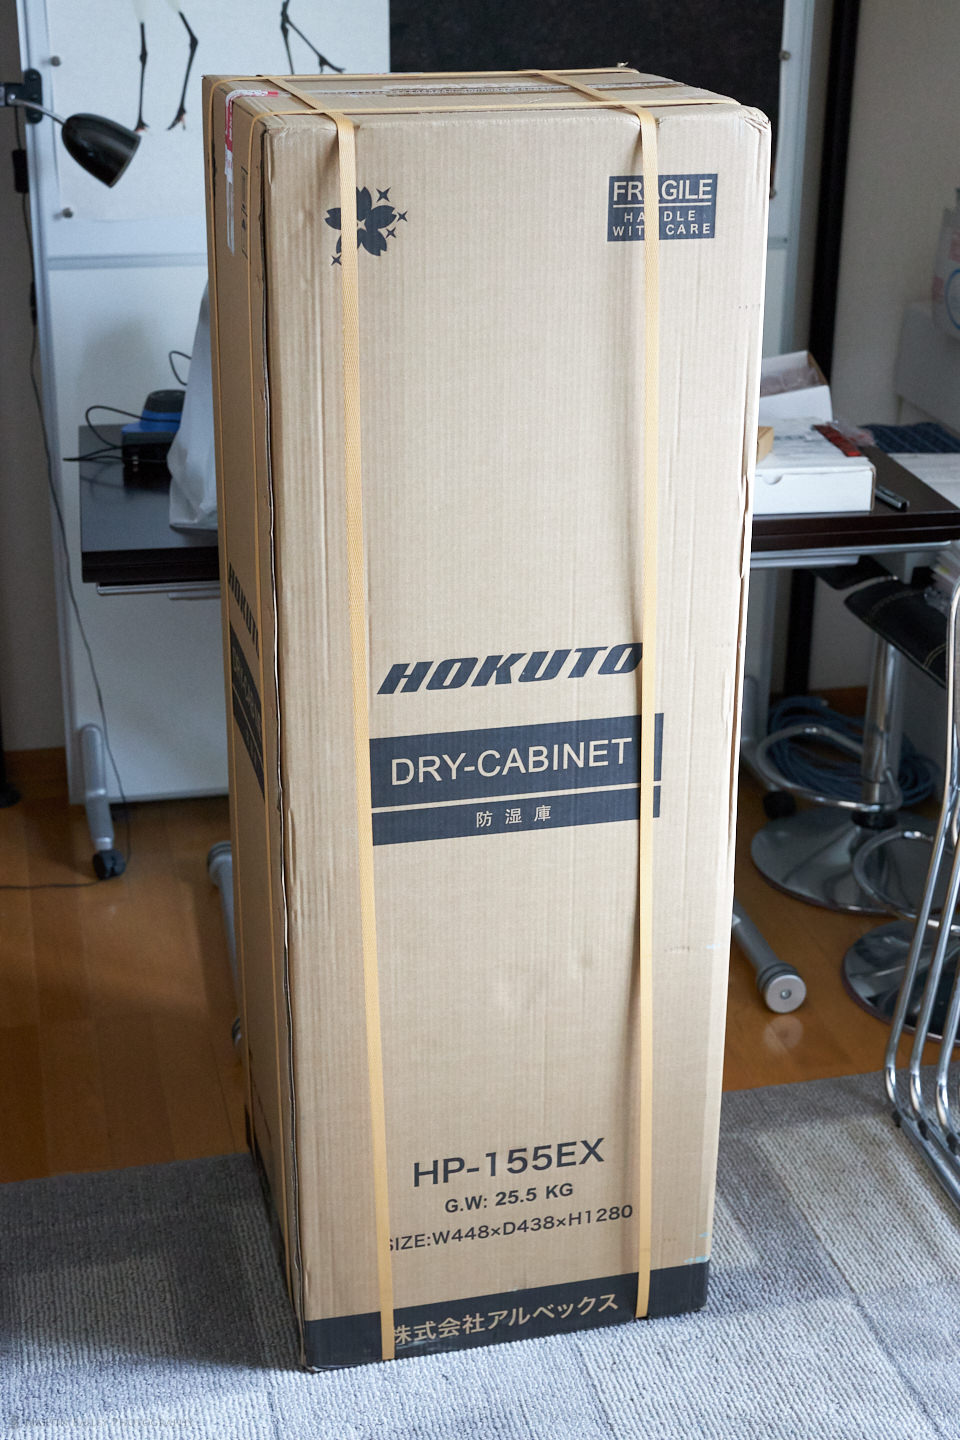
Delivery of HP-155EX Cabinet
I ordered the HP-155EX directly from the manufacturer, and it arrived two days later, boxed up as you can see in the photo to the left below. I was able to carry this up my stairs by myself, but it’s a good weight at 25.5 KG or 56 lbs, so keep in mind that you may need some help with this if you ever buy a cabinet as large as this.
Rather than trying to pull the cabinet out of the top of the box, or laying it down, I decided to cut the box down both of the two front corners that you see here and then peeled that front face away to get access to the cabinet. There was a layer of polystyrene on each edge and corner braces to keep it protected in transit. Having removed the packaging, I walked the cabinet out of the box and removed the final polythene bag that it was in to reveal the shiny new cabinet.
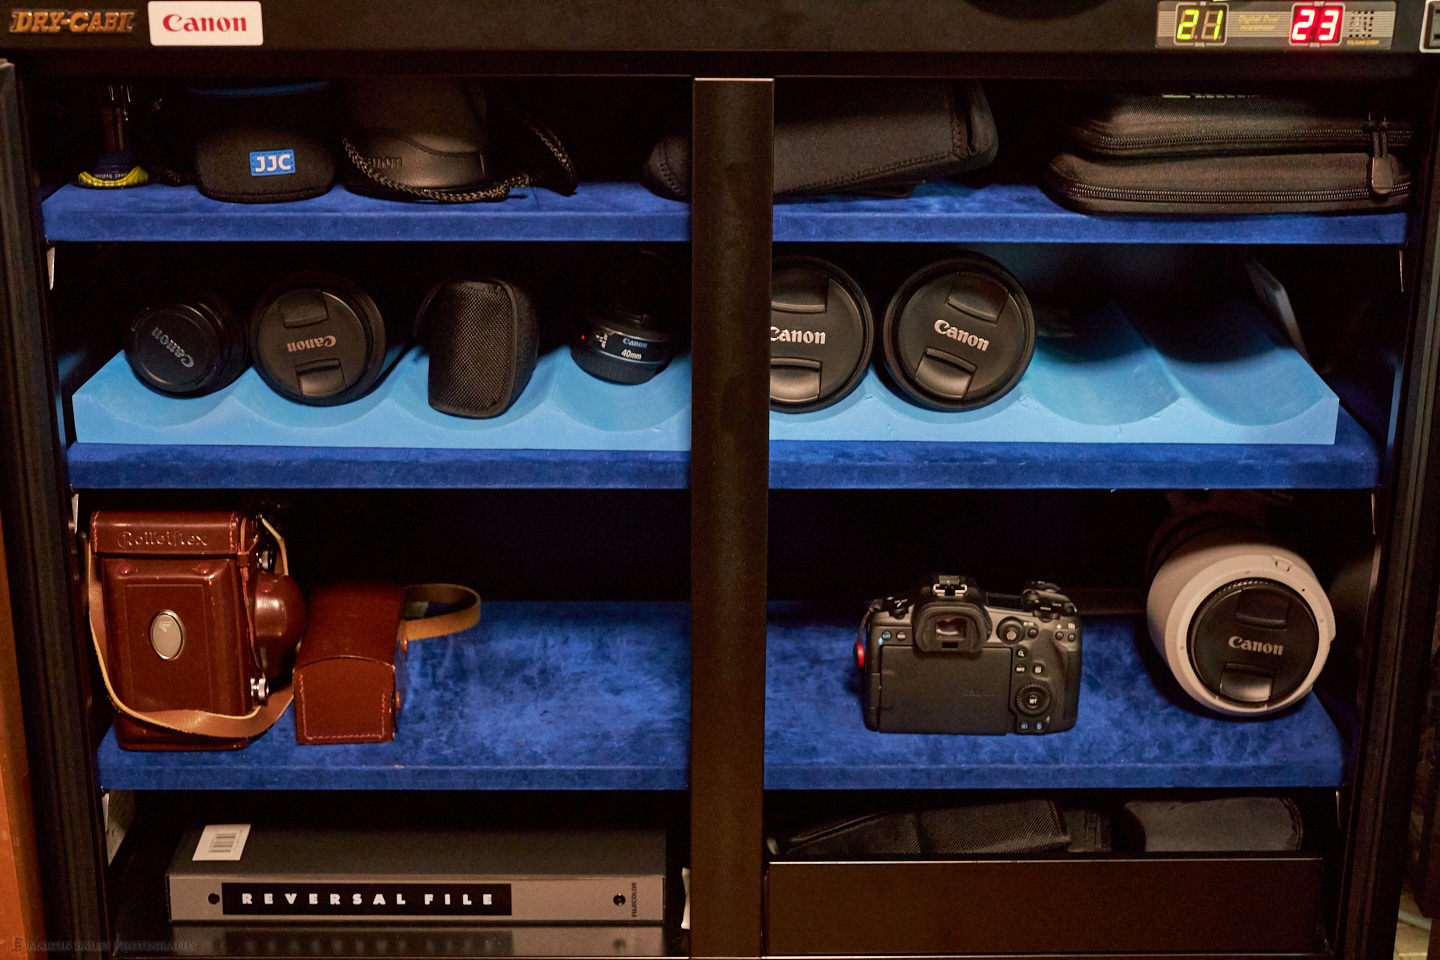
Before we look at how I stocked the new cabinet, to the right above is a photo of my old Dry-Cabi while it still contained my camera gear. As you can see, it’s not completely full since my downsizing, and this was why initially tried to move everything to the bottom section of the new HP-155EX. I had carefully measured my two microscopes together to ensure that they would fit into the top compartment of the HP-155EX, and they did, as you can see in the next photo.
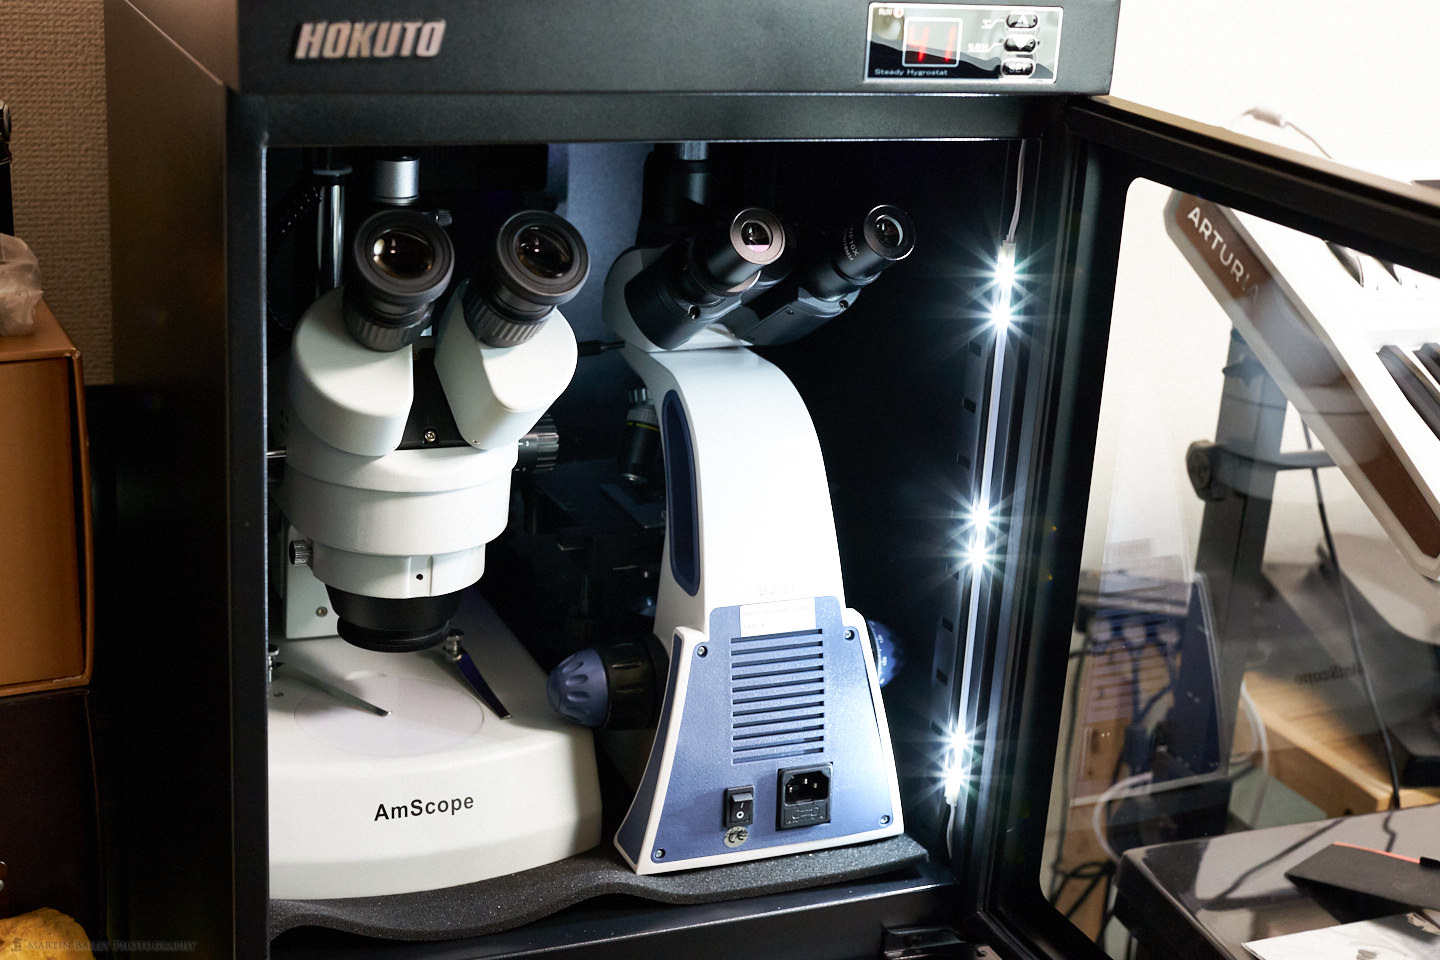
I removed both of the trays from this top section and found initially that the metal flap that the magnets on the door attach to actually prevent me from simply sliding my microscopes straight in vertically. I have to tilt them forward and ensure that the camera port is inside the cabinet before righting them vertically and positioning them next to each other in the cabinet. I also actually still place their covers on for extra protection from dust when I won’t be using them for a few days.
Also, note the fancy LED lights along the right front edge of the cabinet. These help to see what’s in the cabinet to a degree, so they are more than a marketing gimmick that I’d initially expected them to be. In the below-left photo, you can also see the bottom compartment of the cabinet. The top compartment is about two-thirds the height of the bottom section. The thing that I really like about the new cabinet is that the shelves all pull out pretty much completely, allowing me to place lenses behind each other, rather than having just one lens on each row, which is how I used my Dry-Cabi. This really helps to place your gear very efficiently, though the lens feet on my two macro lenses take up an extra row, and I’ll try to figure out what to do about this at some point.
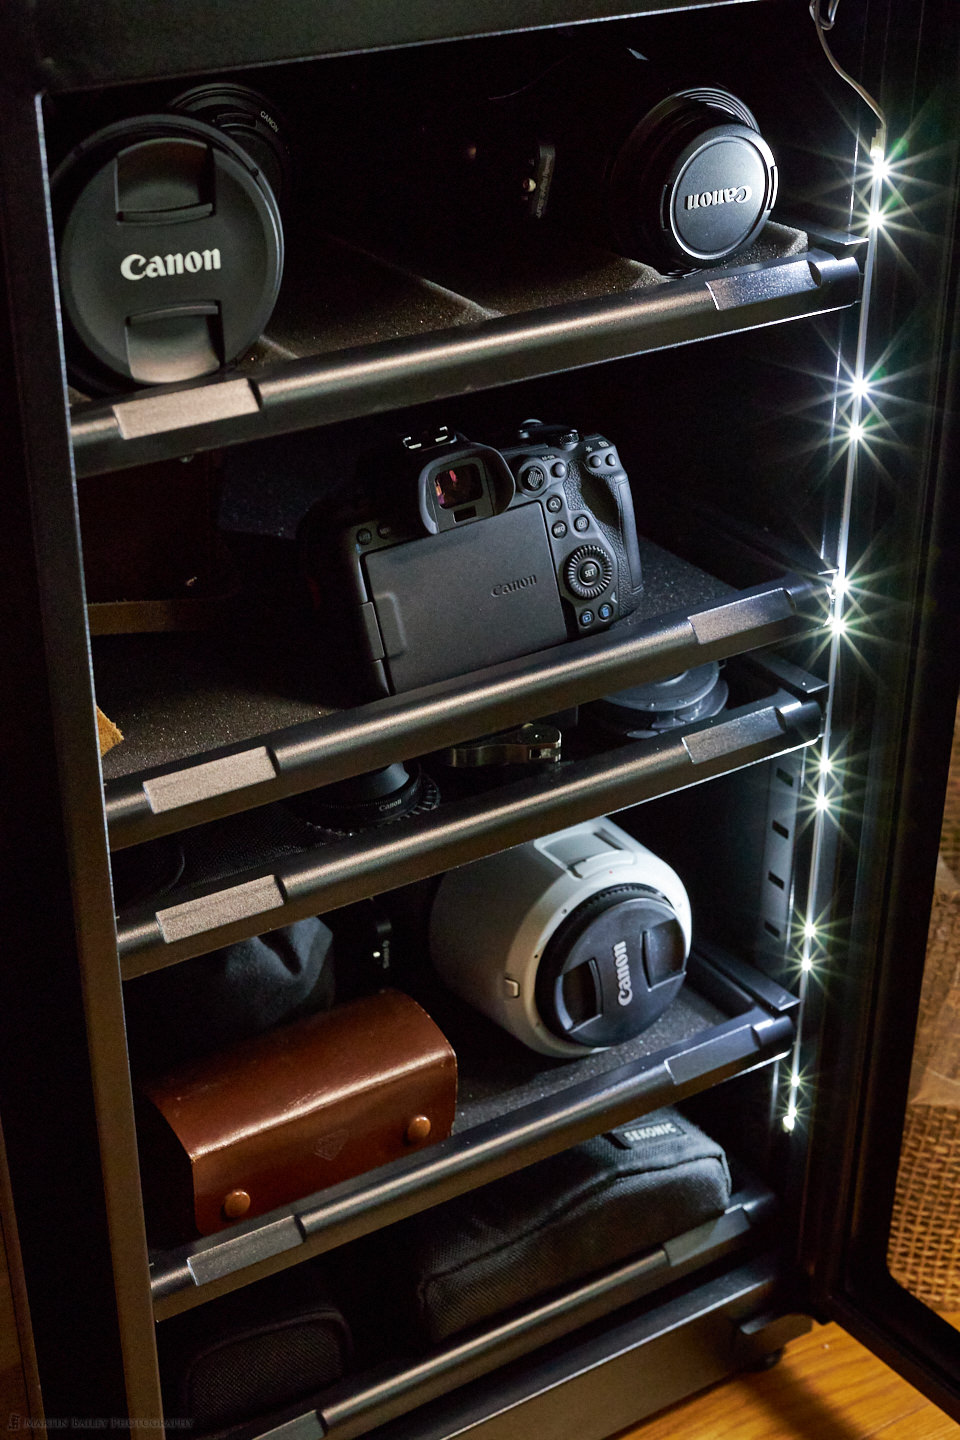
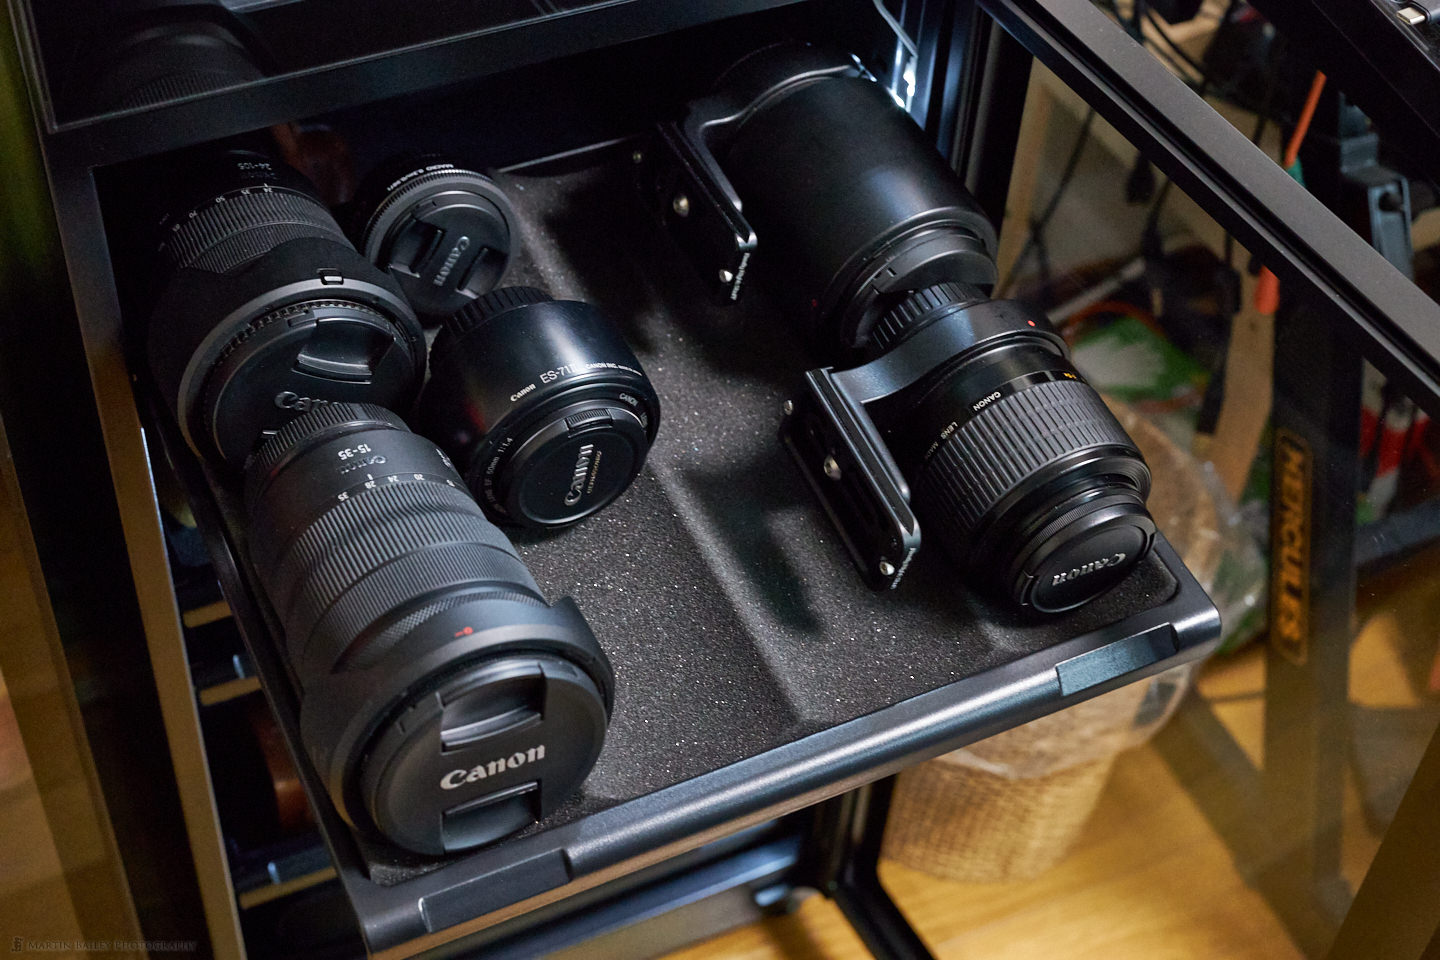
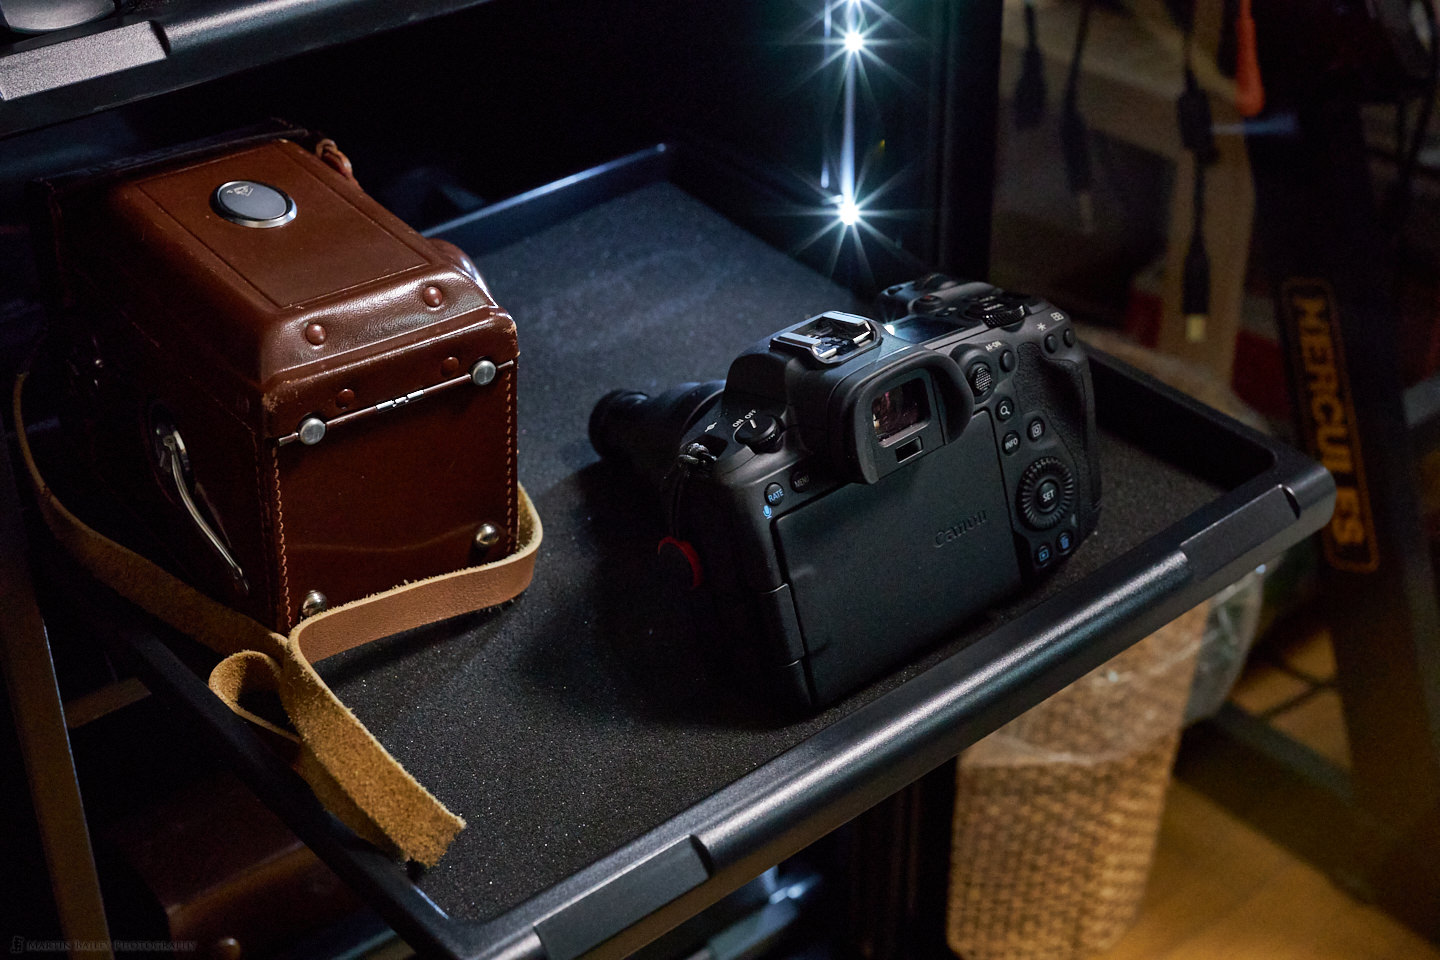
I’m keeping my three main camera bodies on the next shelf down, and you can see my EOS R5 sporting my microscope adapter at the front of this shelf, and my Rollieflex to the left. My EOS R has been living in the back-right corner with the 50mm ƒ/1.2 lens attached, as I often grab that to get shots like these for the blog etc. In the right photo below you can see my Rollei filter case, my Canon RF 100-500mm lens and the two RF mount Extenders, as well as some RF mount extension tubes that I picked up and will report on at some point soon. I found it interesting that the third-party manufacturers beat Canon to the market on the Extension Tube front.
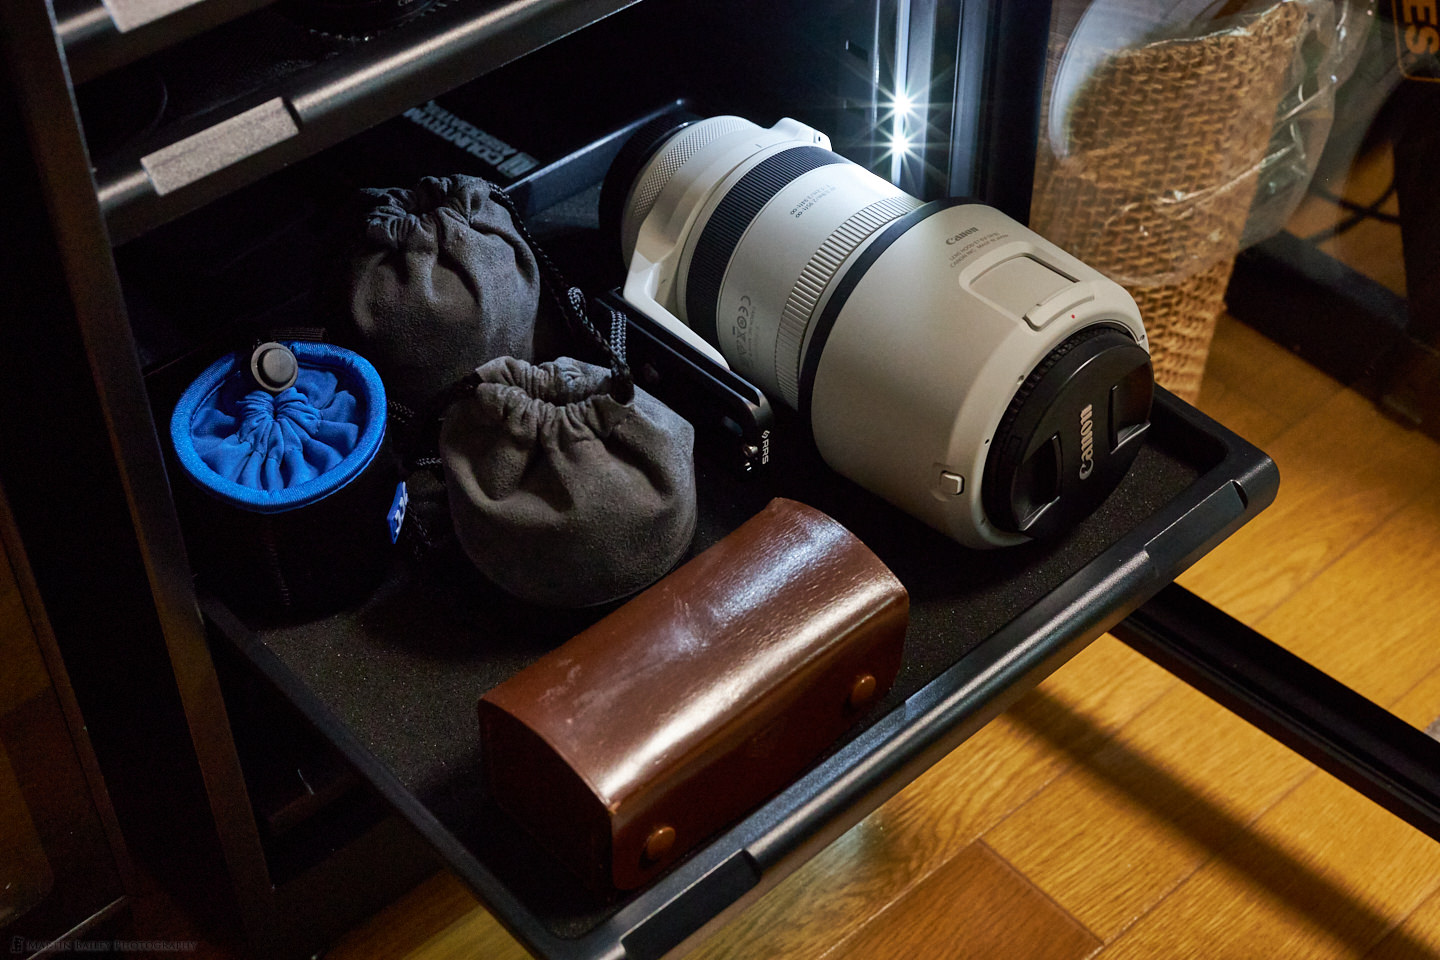
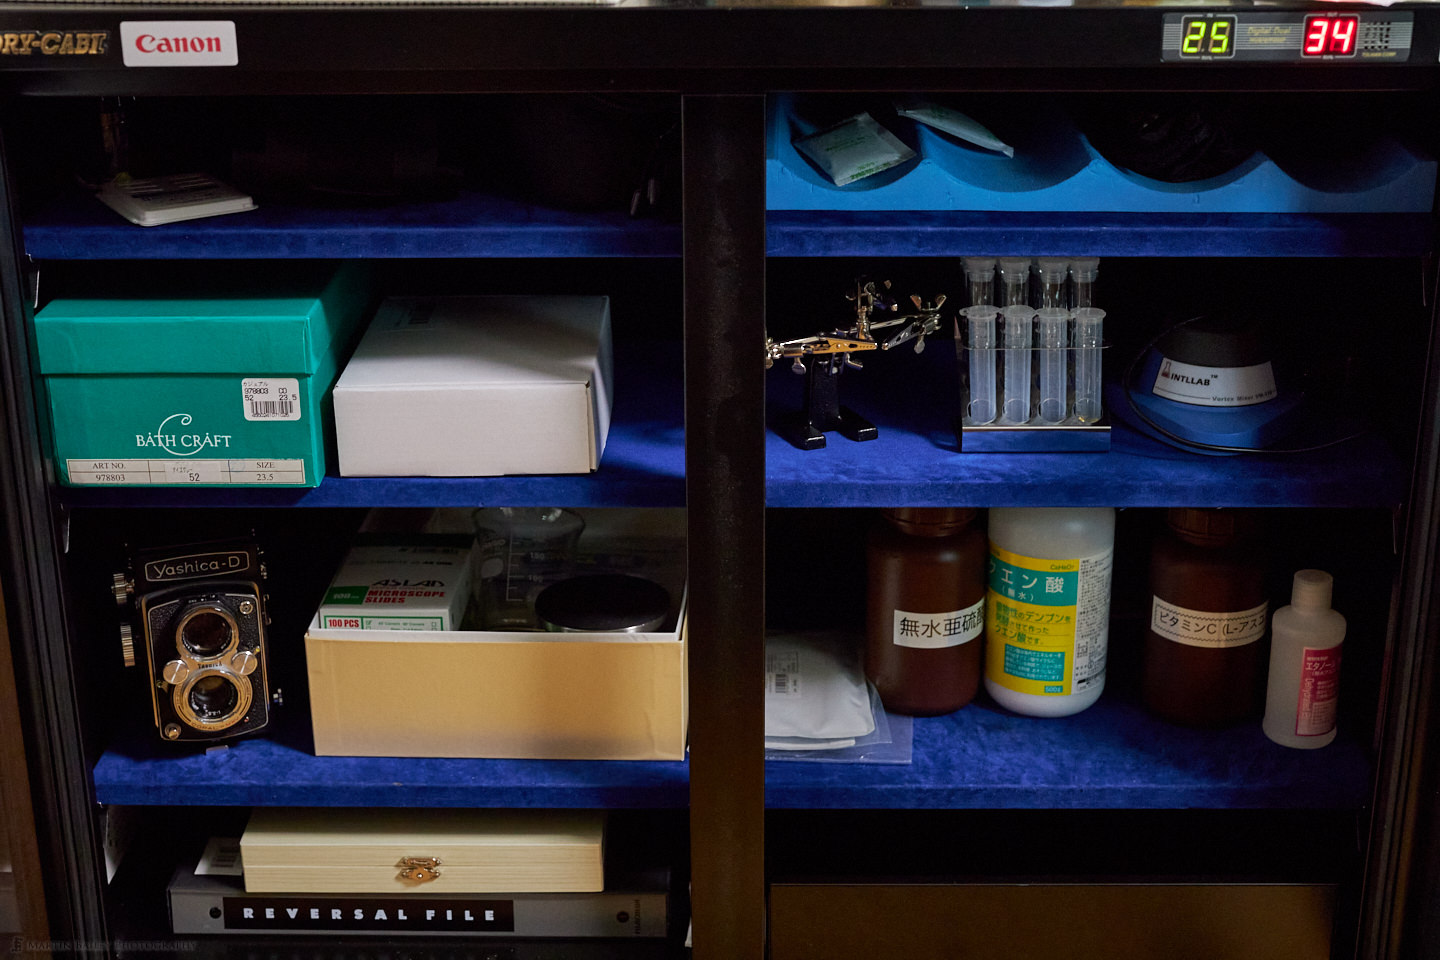
I have a very shallow shelf between the two shelves in the last two photos on which I’ve stored my filters and macro rail etc. Back in my old Dry-Cabi, you see that apart from my old Yashica TLR camera, I have pretty much filled it with stuff that I’m using for my microphotography. The Vortex mixer that you can probably just make out to the right of the middle shelf there, has a rubber cover on the top that you push the test-tube down on to mix its contents, and I’m pretty sure that if I left this out in the heat and humidity of the Tokyo summer, that rubber would go all sticky and probably completely break down over the course of one or two years. The chemicals and things like citric acid that I’ve bought also won’t fair well in the humidity, even though I have put them in relatively well sealed containers.
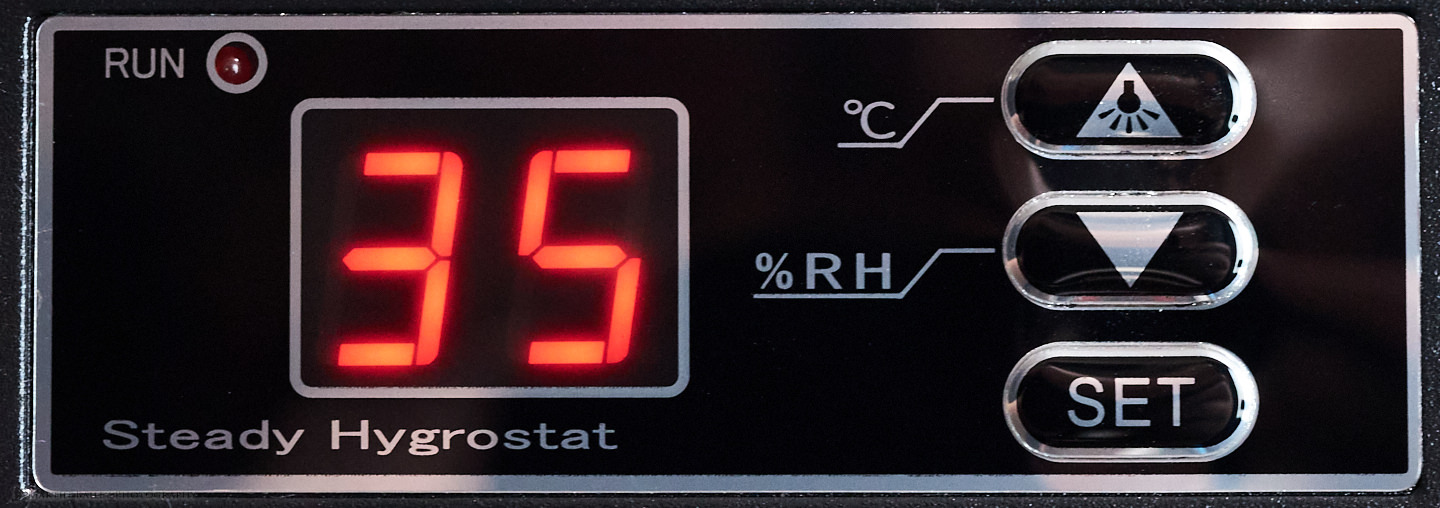
Here also is a photo of the control panel and hygrostat that is positioned in the top-right corner of the HP-155EX cabinet. When you haven’t pressed any buttons, the number you’ll see is the humidity inside the cabinet. Pressing the top button turns on the LED lights inside the cabinet, and shows the temperature inside the cabinet, both of which are nice little features.
To see the target humidity you long press the SET button, then move it up or down using the top two buttons, then press the SET button again to store the value. I have mine set at 35%, as you see here. They say that for camera gear around 40% is a good humidity, and for electronics, setting the cabinet at 30% is good. So, as our cameras are also electronic goods these days, I take the middle ground with 35%.
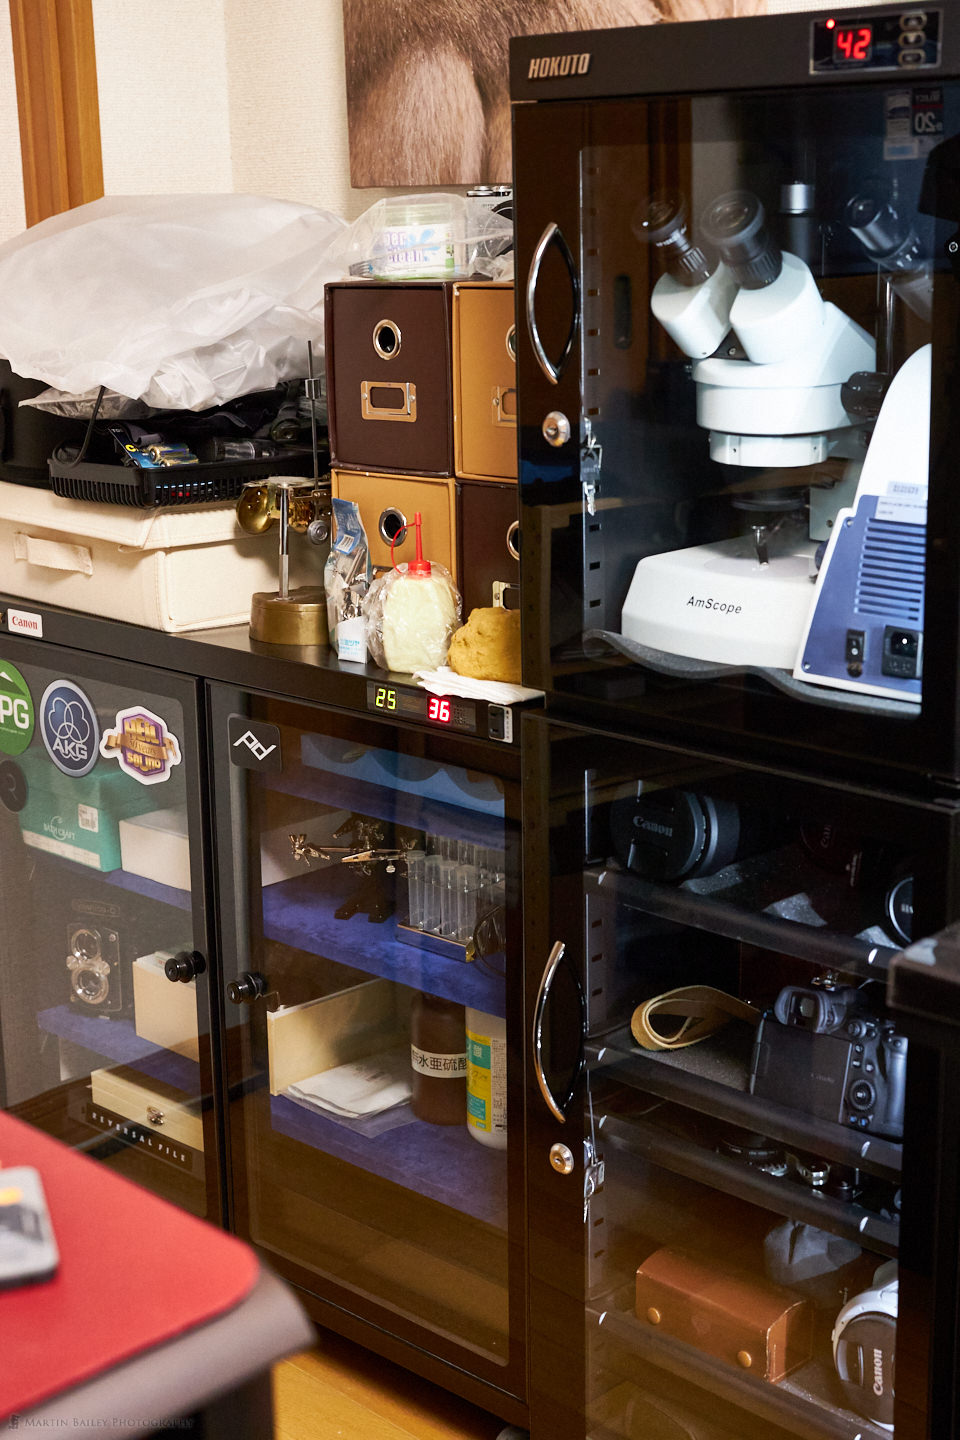
Finally, here is one last photo of both my old Dry-Cabi and the new Hokuto HP-155EX playing nicely together in the corner of my studio. I feel much better with the humidity setting in for the summer now that my microscopes are inside this new cabinet, and it’s also helped me to clear away my work table of all the microphotography gadgets that have found their way into my studio, mostly during May before I went down-periscope to create my new MBP Fine Art Border Tools plugin for Photoshop that I talked about in the previous episode. I’ve peered into the microscopes a few times and actually watched something that looked like a very small damselfly shed its exoskeleton with my Stereo microscope one-morning last week, which was fascinating.
Also, if you are wondering why I left the shorter cabinet in the corner rather than switching it out for the taller one, that’s because a strong earthquake could cause the taller cabinet to completely topple over if it was in the corner because there is nothing in front of it to stop it. Where it is though, you can see the corner of my desk in the bottom corner of the photo. That might stop the cabinet from toppling over completely if I’m lucky. Of course, it would all depend on the direction of the shaking, and a quake strong enough to topple over that cabinet would probably be pretty devastating anyway, but here in Japan, these are things that we have to keep in mind, in addition to the high humidity.
If You Buy From Amazon.com
Anyway, we’ll start to wrap it up there, and I’ll leave you with a few thoughts on what you might want to look at if you decide you need one of these and look to pick it up from Amazon.com. The one that I found that is the closest to what I bought is from a company called Ruggard, although it has a capacity of 180L, so it’s actually slightly larger than mine. Another slightly smaller cabinet that I found is from a company called FORSPARK at 125L. They also have a nice looking 80L cabinet if you don’t have too much gear to keep safe. If none of these fit the bill, scroll down on any of these pages and you’ll see some similar cabinets that might work for you.
Note that these links are affiliate links, so although the price is unchanged to you, you would be helping to support the podcast by buying with these links, and I do, of course, thank you for that.
Show Notes
Ruggard 180L: https://amzn.to/3hqHKOe
FORSPARK 125L: https://amzn.to/3605cMT
FORSPARK 80L: https://amzn.to/3Ag5KMe
Audio
Subscribe in iTunes to get Podcasts delivered automatically to your computer.
Download this Podcast as an MP3 with Chapters.
Visit this page for help on how to view the images in MP3 files.

Martin – I made one business trip to Japan before I retired. I was struck by how humid it was. In hindsight I now understand why so much of the used gear from Japan has fungus problems. Does you new cabinet have provisions for bolting it to the floor? At one time i considered buying a gun safe for my camera gear. They all have provisions for bolting them to the floor. It would have been great for theft protection. I gave the idea up because of the weight. Humidity controlled ones are available and quite expensive.
Also I posted a comment on your Helicon stacking software post. It disappeared. Did I do something dumb or is it lost somewhere in your system.
I note that Tokyo is entering another lockdown for the Olympics I guess.
Stay well and all the Best – Rich Ball
For sure Rich, any gear that is not stored in a dry cabinet will develop fungus damage. The cabinet I bought doesn’t have an official way to bolt it down, although it could be done quite easily by removing the feet and then sealing the holes properly. The cabinet does have strengthened glass and keys to lock both doors, so it’s relatively safe, but probably wouldn’t stand up to a hammer blow or two, which would negate any benefits of bolting it down as well.
Tokyo has actually never been fully locked down. The government doesn’t have any laws that enable them to do that. It’s all based on asking people to stay at home, and most people are still commuting into the city. Still, the new daily cases are relatively low though, and the vaccinations are gradually rolling out, so hopefully, we have some light at the end of the tunnel.
Regards,
Martin.
Martin – I’m afraid my comment was incomplete. I apologize for that. The reason I asked about bolting the cabinet down was to prevent the tip over scenario in an earthquake. Tokyo is in a pretty active earthquake zone. The Seattle area had an earthquake in 2001. It was only 6.8 magnitude and the epicenter was some 40 miles away but it did do significant damage. The building I was in was torn down because of the damage. I hope your apartment is up to current standards for earthquake design.
Aah, I see. Thanks for the update Rich. Our apartment is relatively new and follows the required standards, but it’s still a concern. Unfortunately though bolting stuff down isn’t possible in a rented apartment. The only options, which we do with our refridgerator and crockery cabinet is to put an extendable pole between the top of it which pushes against the ceiling. That is something I could certainly consider for the new dry-cabinet as well, although the pole would need to be over a meter long. I’ll see what I can find. Thanks for getting me thinking about this again.
All the best,
Martin.