
Visit Library for MBP Pro eBooks |
Continuing our series to cover my new adventure in microphotography, today I’m going to walk you through using Helicon Focus with Helicon Remote to shoot a series of images which are then processed as focus stacks to create the images that you’ve seen. We know that focal length, subject distance, and aperture all affect the depth of field in a photograph. With microphotography even at 40x magnification, I have a working distance of 37.5mm and at 400X magnification, the subject is only 0.63mm from the lens, so the depth of field is very restricted. Consequentially, most of the images that I’ve created so far are focus stacks ranging from 8 to over 100 images, depending on the subject.
Another aspect that comes into play for me, is that my microscope uses Achromatic objective lenses, which means the colors are corrected to a degree, but the focus is best in the middle of the lens and drops off quite quickly towards the edges. To overcome that to a degree, I can change the focus so that I get images with sharper edges too, but there are also what’s known as Plan Achromatic lenses, which have a flatter plane of focus, and therefore give better focus towards the edges as well, but they are much more expensive than regular Achromatic lenses. I’ve decided to replace the 100X objective lens, which requires a drop of oil between the lens and the specimen coverslip to be able to focus, with a 60X Plan Achromatic lens. This will get me 600X magnification through the eyepieces and on the camera, which is closer than my next highest magnification of 400X, with a 40X Achromatic Objective lens. For now, though, I’m making the most of what I have, aided to a degree by this focus stacking technique.
When I first started to create these stacks, I was using Capture One Pro in tethering mode, and Photoshop to create the image stacks. However, towards the end of my first session, Capture One froze on me, and I lost around 40 images that just never made it to my computer, and Photoshop was sluggish and lacks support for anything other than the actual stacking process, so I decided it was time to buy the industry standard, Helicon Focus from Helicon Soft. I’ve been aware of Helicon Focus for many years, but so far, even for the macro photography work that I’ve done, I’ve not really felt a need to stack, often just enjoying the out of focus areas for what they are, but that wasn’t an option with the images from the Microscope.
Luckily, Helicon Soft provides a fully working trial version of their software, so I gave it good hammering before buying a license, confident that it was the tool for the job. The licensing and pricing are pretty fair, with a Lite version at just $30 for a 1-year license, or $115 for a lifetime license, but the Lite version doesn’t include Helicon Remote, which I knew was also going to be necessary, and I’ll explain what it does shortly. I went for the Pro Lifetime license at $200, which includes a number of additional features. As I say, Helicon Remote was one of them, but even at a glance, features like Raw-in DNG out mode are pretty important, as is OpenCL hardware acceleration and Folder Monitor. You can get a Pro License for $55 per year, but I like to avoid ongoing payments when possible, so I went for the Lifetime license.
Helicon Remote
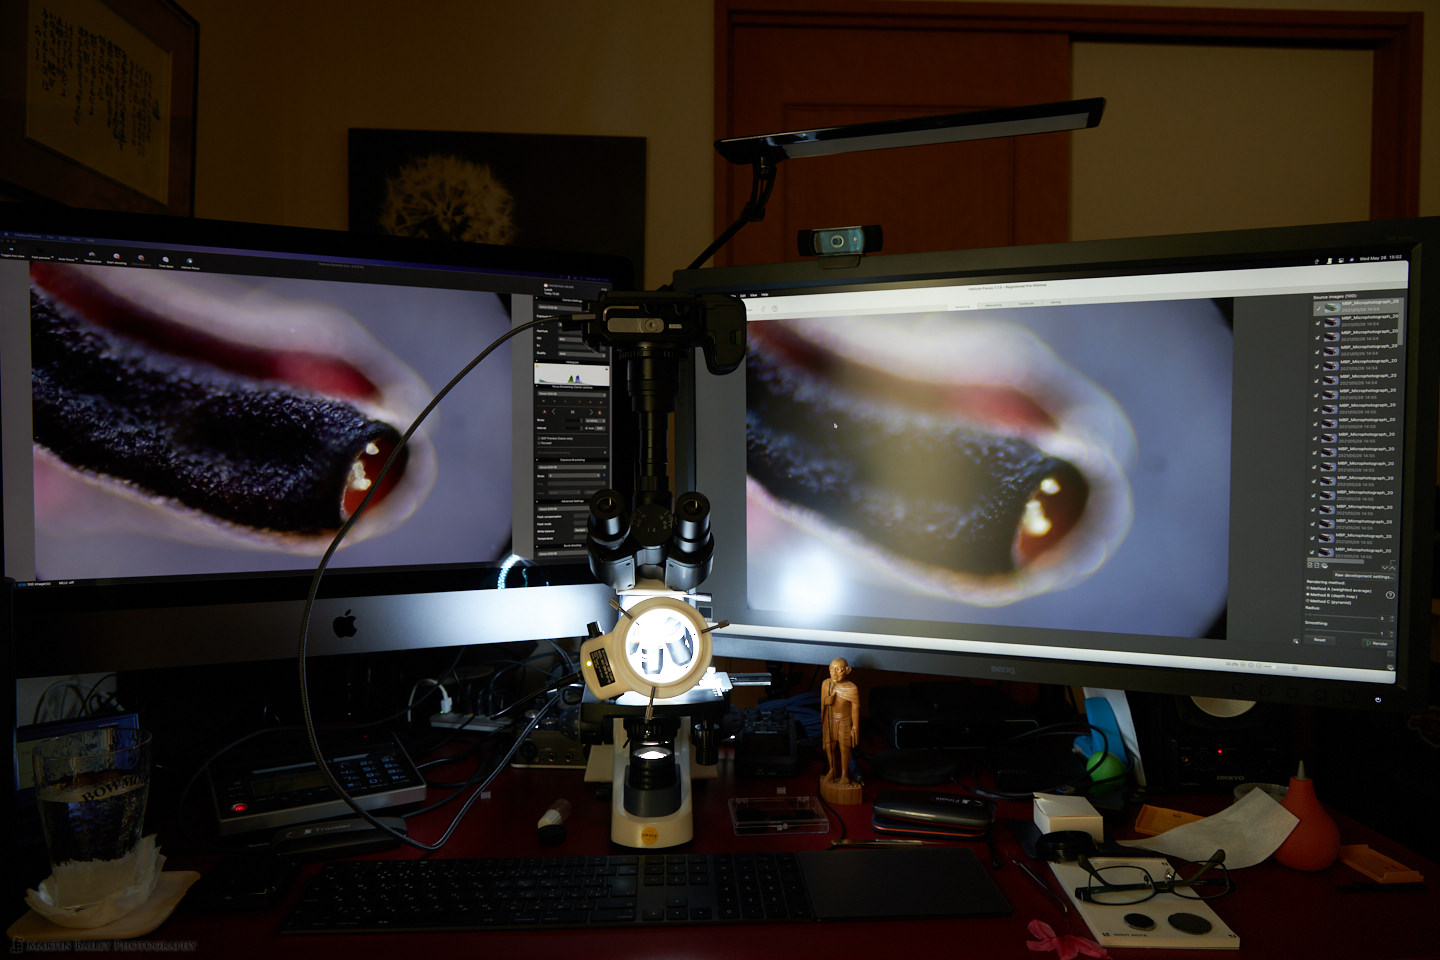
OK, so let’s talk about the workflow now, starting with a photo of my main desk which is where I’m doing my microphotography with the Microscope in the middle of the desk. As you can see, I am able to rotate the camera in the adapter, so I can choose the angle that I want to shoot at very freely. On my screens there, you’ll see Helicon Remote on the left screen, which is in the middle of shooting a new stack of images, and Helicon Focus on the right screen, working on stacking the previous set.
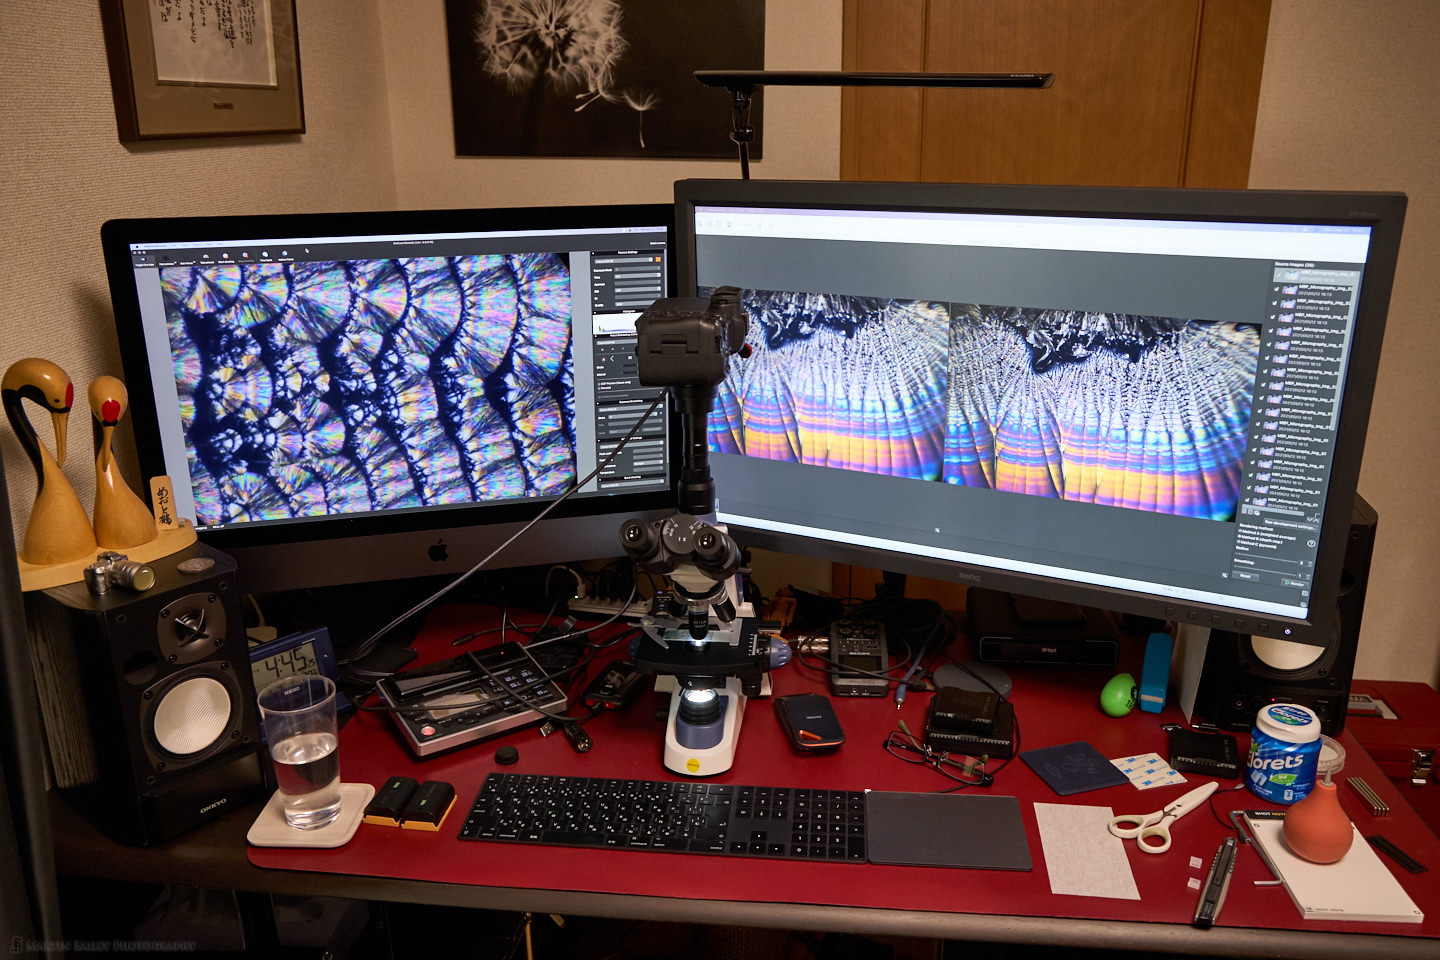
With very large stacks I sometimes find that Helicon Focus is still processing when I’ve finished shooting the next stack and I’m ready to move on, and when I get out of sync like that, I keep note of which stacks I’ve done, how many frames they were, and the magnification used, and I put the letters NP next to the stacks that are not processed. This helps me to go back and pick up on the processing later because I generally find it easiest to send the latest stack directly to Helicon Focus as soon as I’ve finished shooting it.
Anyway, let’s start with Helicon Remote, and I’ll talk you through some of the settings and what it takes to get through stacks in an optimized way.
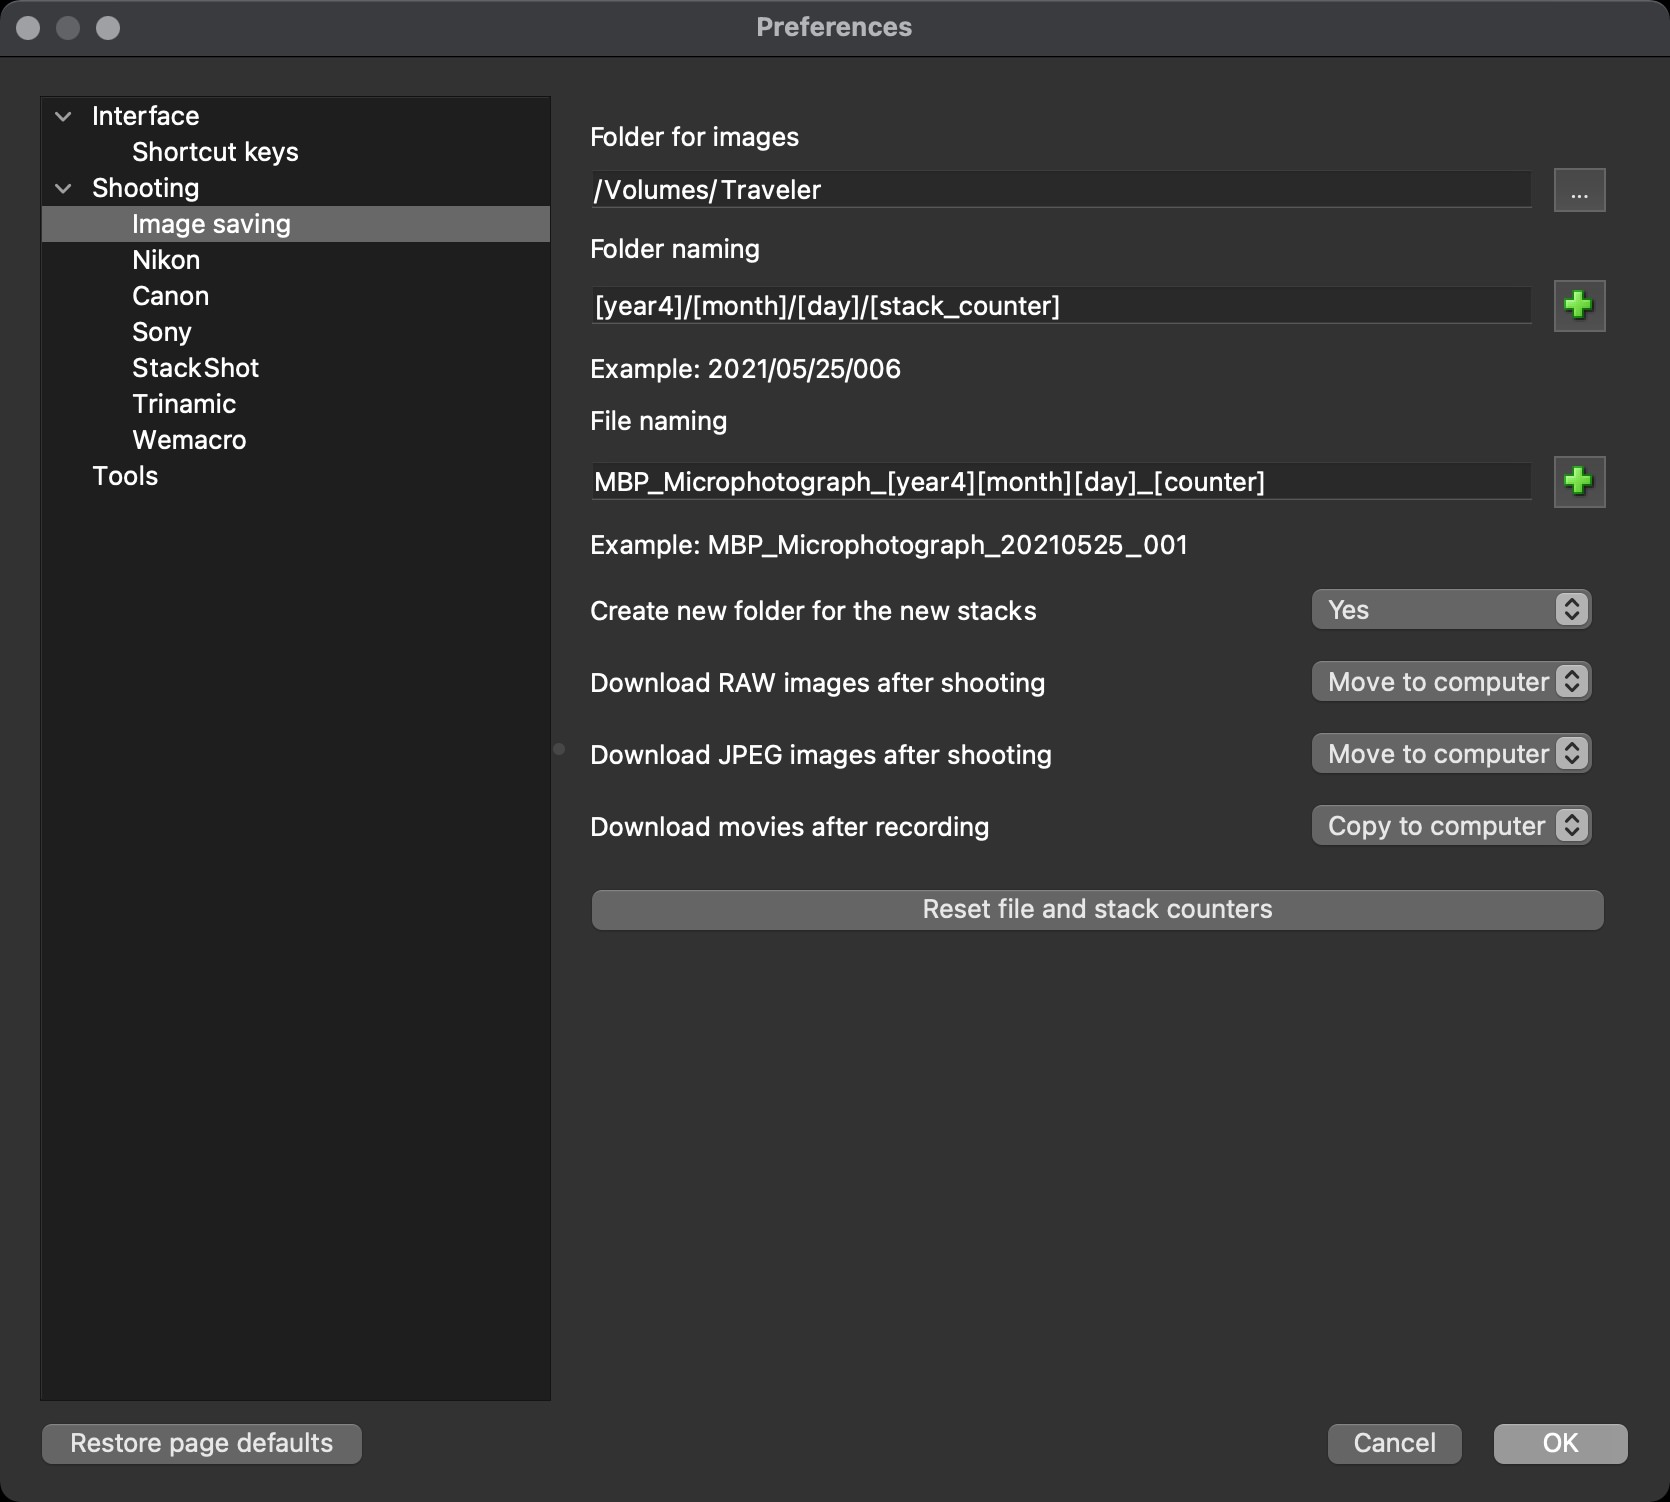
Helicon Remote has a number of features that really help to streamline the shooting process, and that starts with opening the preferences, and select the Image Saving option under the Shooting menu, as you can see in this photo. Select the location that you would like to have your stacks automatically saved. and I recommend you create a useful naming scheme for your folders and files.
As you can see I’ve told Helicon Remote to automatically create a year/month/day folder in my Traveler SSD, which will put the stacks into the same folder that Capture One Pro would create if I shoot any other images on that day. Below the day folder though, I’ve selected [stack_counter] by clicking the Plus icon to the right of the Folder naming field. This will put each new stack that I shoot into its own numbered folder, starting at 001. The stack counter actually doesn’t reset, so if you want to keep track of the total number of stacks you’ve created, use this. If you just want a new folder starting at 001 for each day, then just use counter, as opposed to stack counter.
I then also added MBP_Microphotograph_ to the File naming field, and selected four-digit years, then month and day fields, then another underscore, and the counter field. This will append the year, month, and day to each image, along with a three-digit numerical counter to the end of each file as I shoot. and create a numbered stack folder for each of the stacks that I shoot.
Note too that I have set Helicon Remote up to move Raw and JPEG files to my computer, but to just copy movie files, leaving a copy on the camera’s memory card as well. These settings have been working well for me, and result in Helicon Remote automatically creating the folder structure that you see in this next screenshot, completely automatically as I shoot.
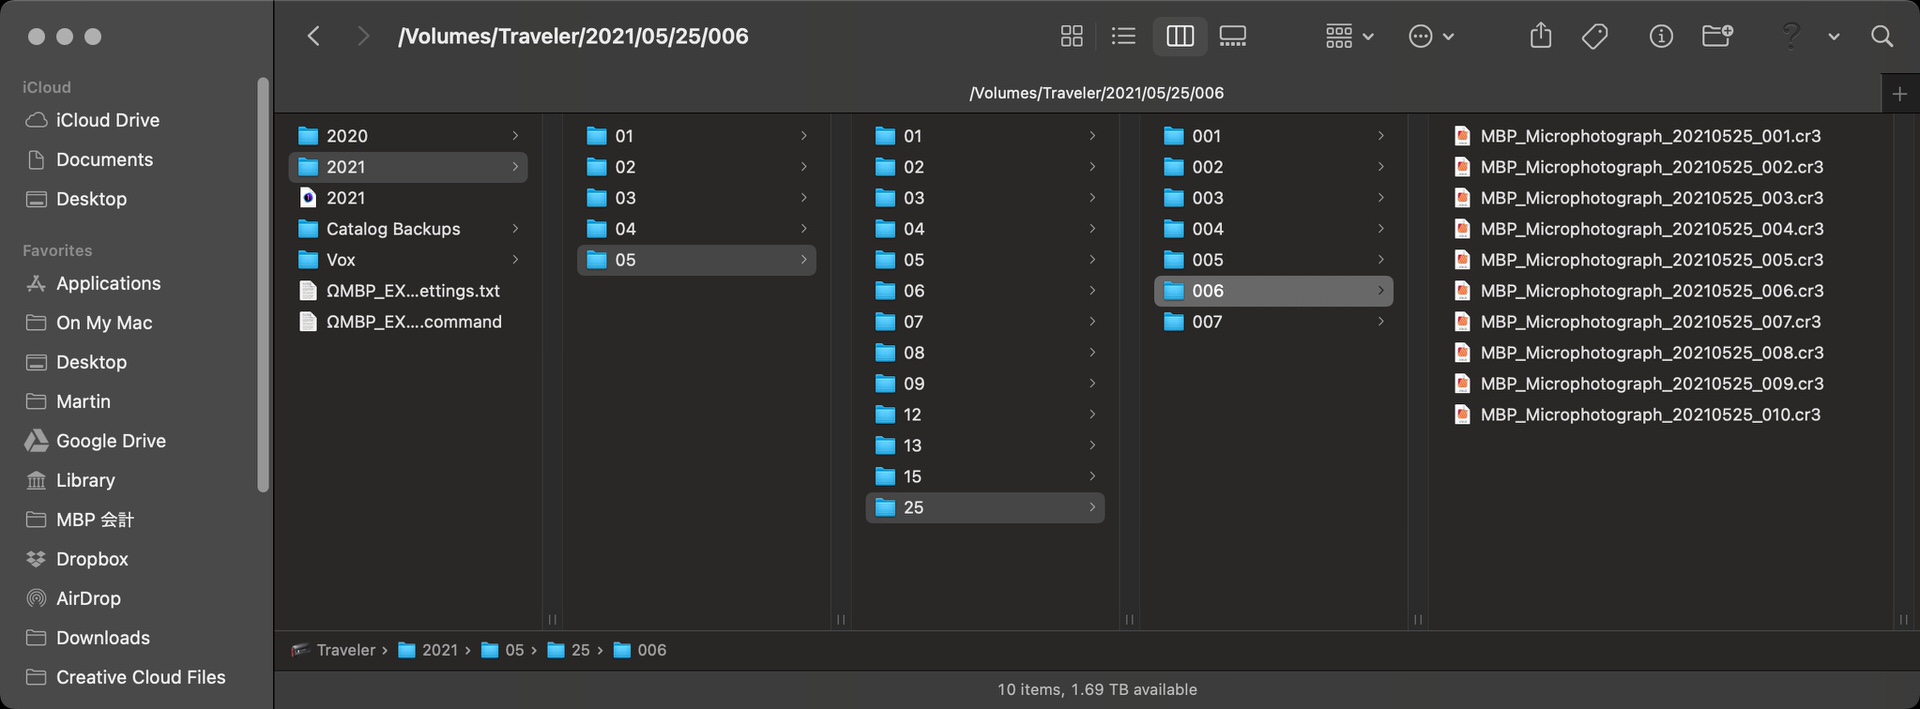
When I first open Helicon Remote to start shooting, after I turn on the camera, connected by a USB-C cable to my iMac, Helicon will look to see if the folders already exist, and create them if necessary. If I’ve not shot any stacks that day, it will create the first stack folder, either 001 if I’m using a regular counter, or if I’m using the stack counter, it will be a number incremented from the previous stack number, and then Helicon Remote will wait for the first image of the stack to be shot. Note too that even if I’m just using the regular counter, if, for example, I’ve already shot five stacks on that day, it will automatically create a 006 folder, and continue the sequence.
Once I’ve finished shooting a batch, I hit the Helicon Focus button in the toolbar of Helicon Remote, and that sends the batch to Helicon Focus for processing. Before I do anything else, I also press SHIFT + CMD + N to create a new batch folder ready to start on my next batch. Then I go to Helicon Focus and hit the Render button, and go back to Helicon Remote to shoot my next batch while the previous image processes.
Helicon Remote also has a host of features for finding the optimal number of images per stack and automatically adjusting the focus distance to move through the stack, but because I’m using an adapter with no way to adjust the focus of my microscope, I’m working in manual with regards to focusing. I have found it very useful to be able to see adjust things like the shutter speed and the ISO from the sidebar in Helicon Remote, but apart from that, it’s really just a matter of focusing and releasing the shutter once it’s all set up as I just mentioned.
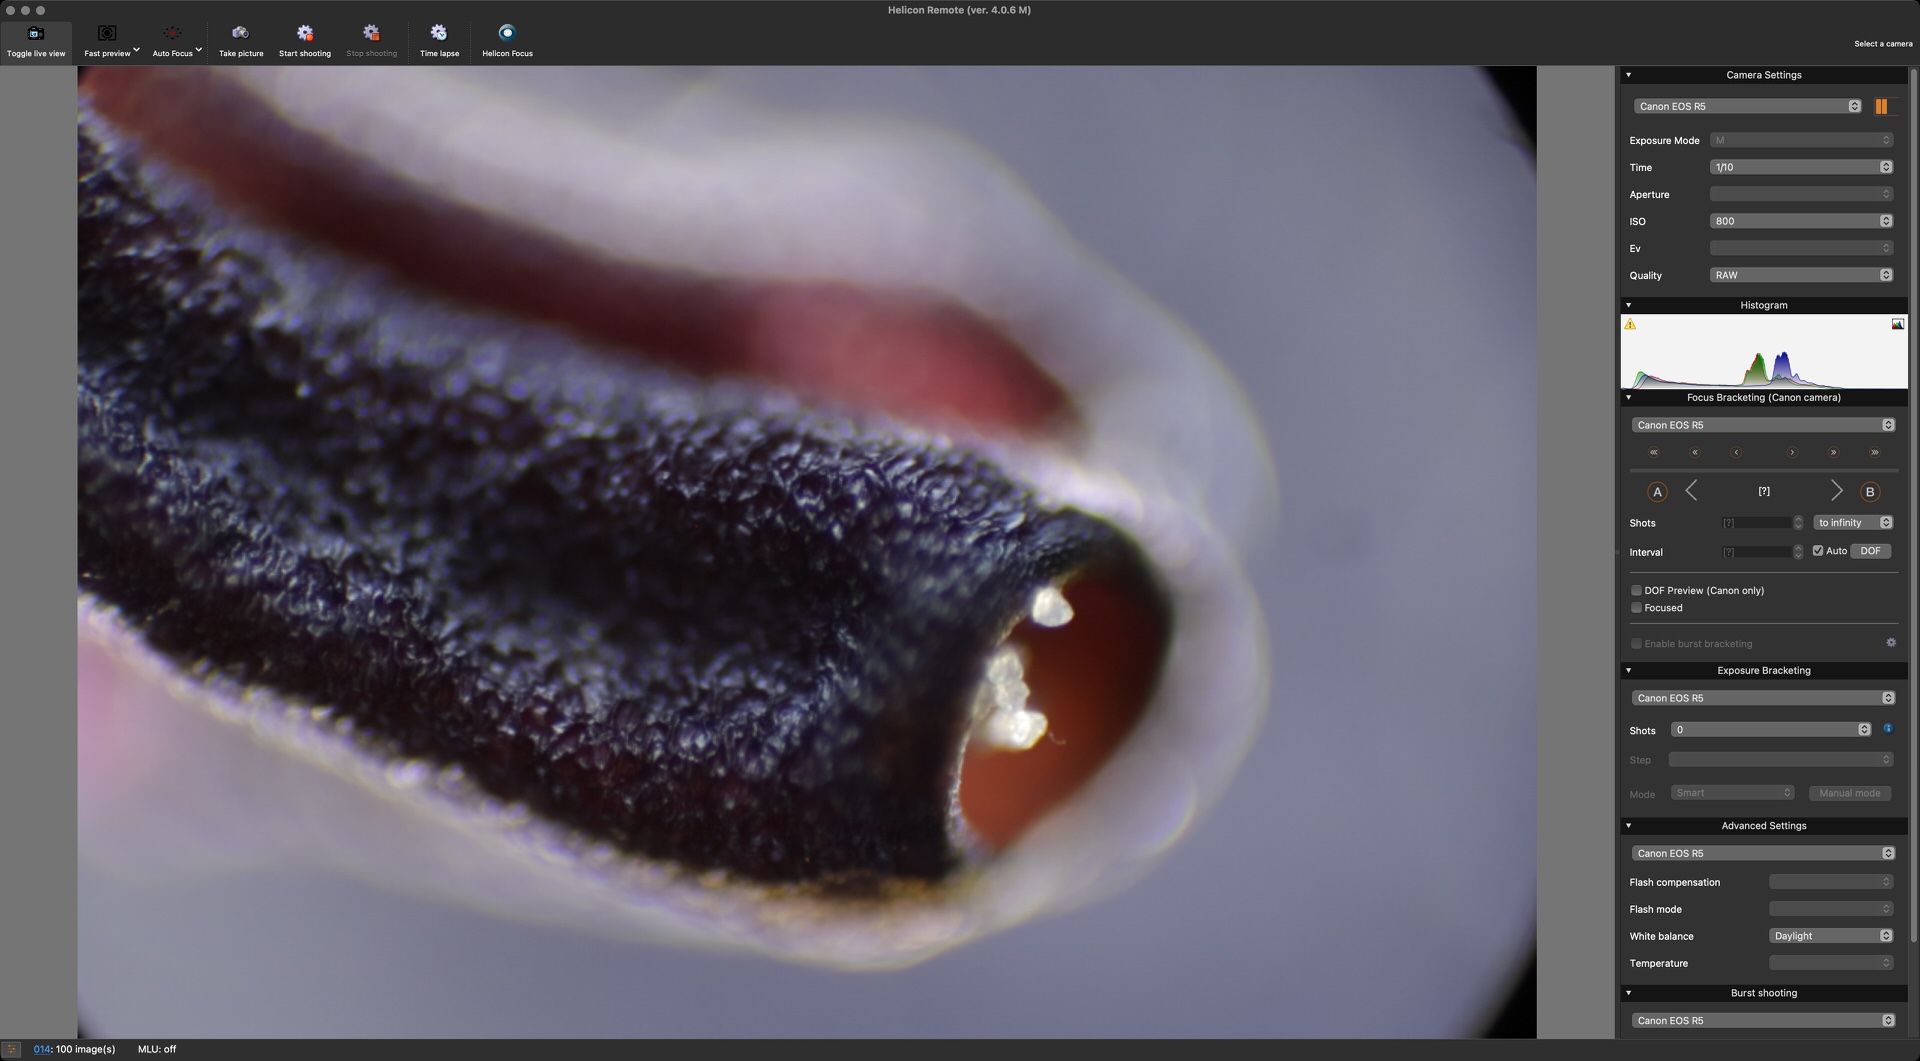
So, I prepare my specimen, place it under the microscope and scan the slide for an interesting portion of minutia, then once I’ve got the framing how I want it, I manually adjust the focus until I’m at the highest point of the specimen that is starting to come into focus, and I then hit the CMD + T buttons on my keyboard, which are the shortcut keys to take a photo. Helicon Remote then stores the photo in the folder it created for the current stack and gets ready for me to shoot another frame. I make a minute tweak of the microscope focus and hit CMD + T again for frame two, and repeat the process until my focus is at the deepest point that I need in focus. Once I’ve finished the stack, I send it to Helicon Focus again and start the Render.
Helicon Focus
Before we start using Helicon Focus, once again, there are a few settings that we need to tweak. First of all, for the best image quality, I’m using the Raw in DNG out workflow in Helicon Focus. I also recommend using ProPhoto RGB as the working color space, and both of these settings can be accessed by selecting the Raw Development Settings button in the bottom right corner of the main screen in Helicon Focus. Having done some tests on the various Rendering Methods, with my relatively poor quality camera adapter, I’m finding that Method B with the Radius set to 3 and the Smoothing set to 1 is giving me the best results. You’d need to find the best settings for your own gear, and I imagine if you had a better camera adapter, you could increase both of these numbers some and get more pleasing results.
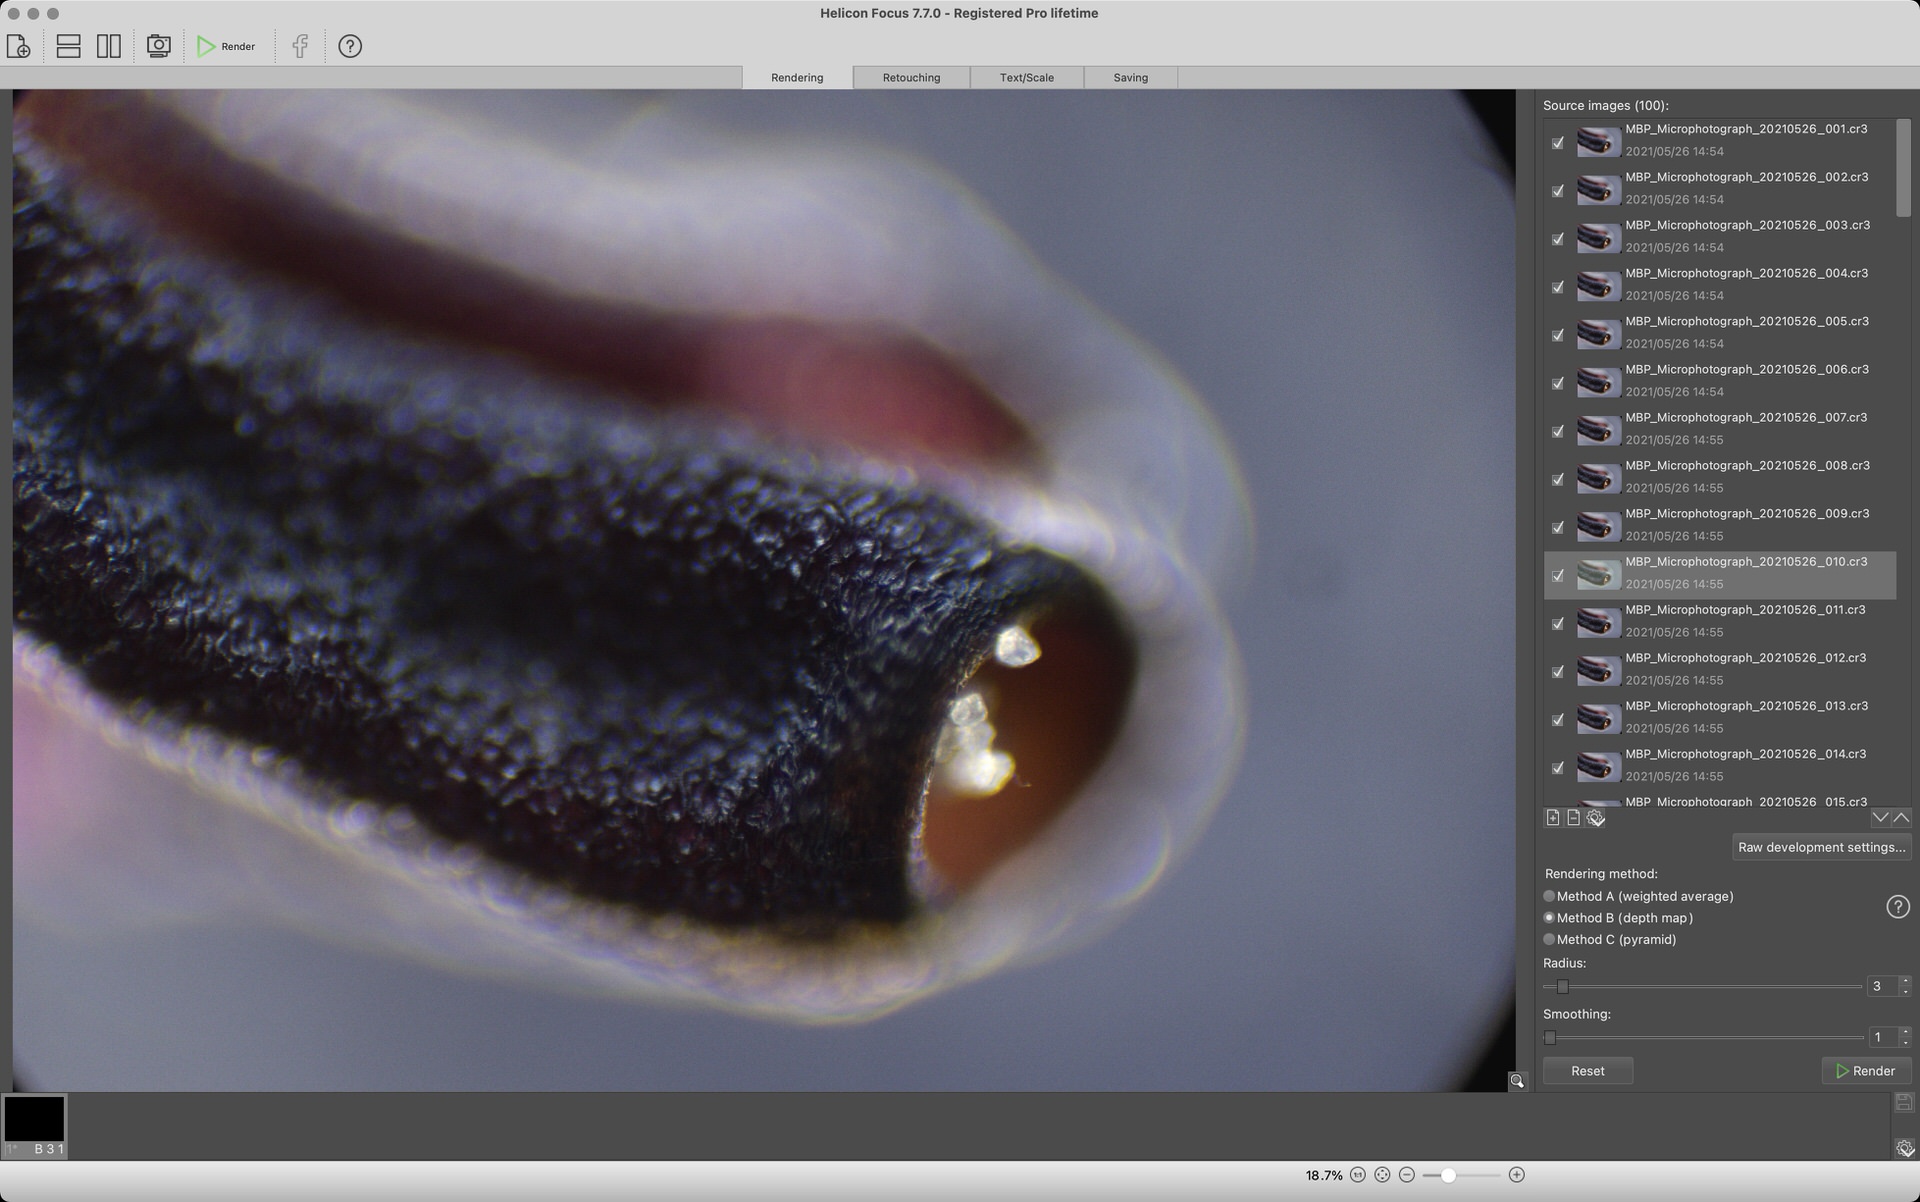
Assuming you don’t need to go through and cull any images out of your stack for any reason, once you have these settings dialed in, you can hit the render button. Rendering takes a few minutes for small stacks, but can take considerably longer for stacks with say 50 or 60 frames, for example. It helps to have a powerful computer of course, and I definitely find that my iMac Pro works much faster than my 13-inch MacBook Pro. Also note that if you buy the Pro license, you’ll be able to turn on the OpenCL hardware acceleration by selecting your graphics card under the Performance tab in the Preferences. That helps to speed things up a little too.
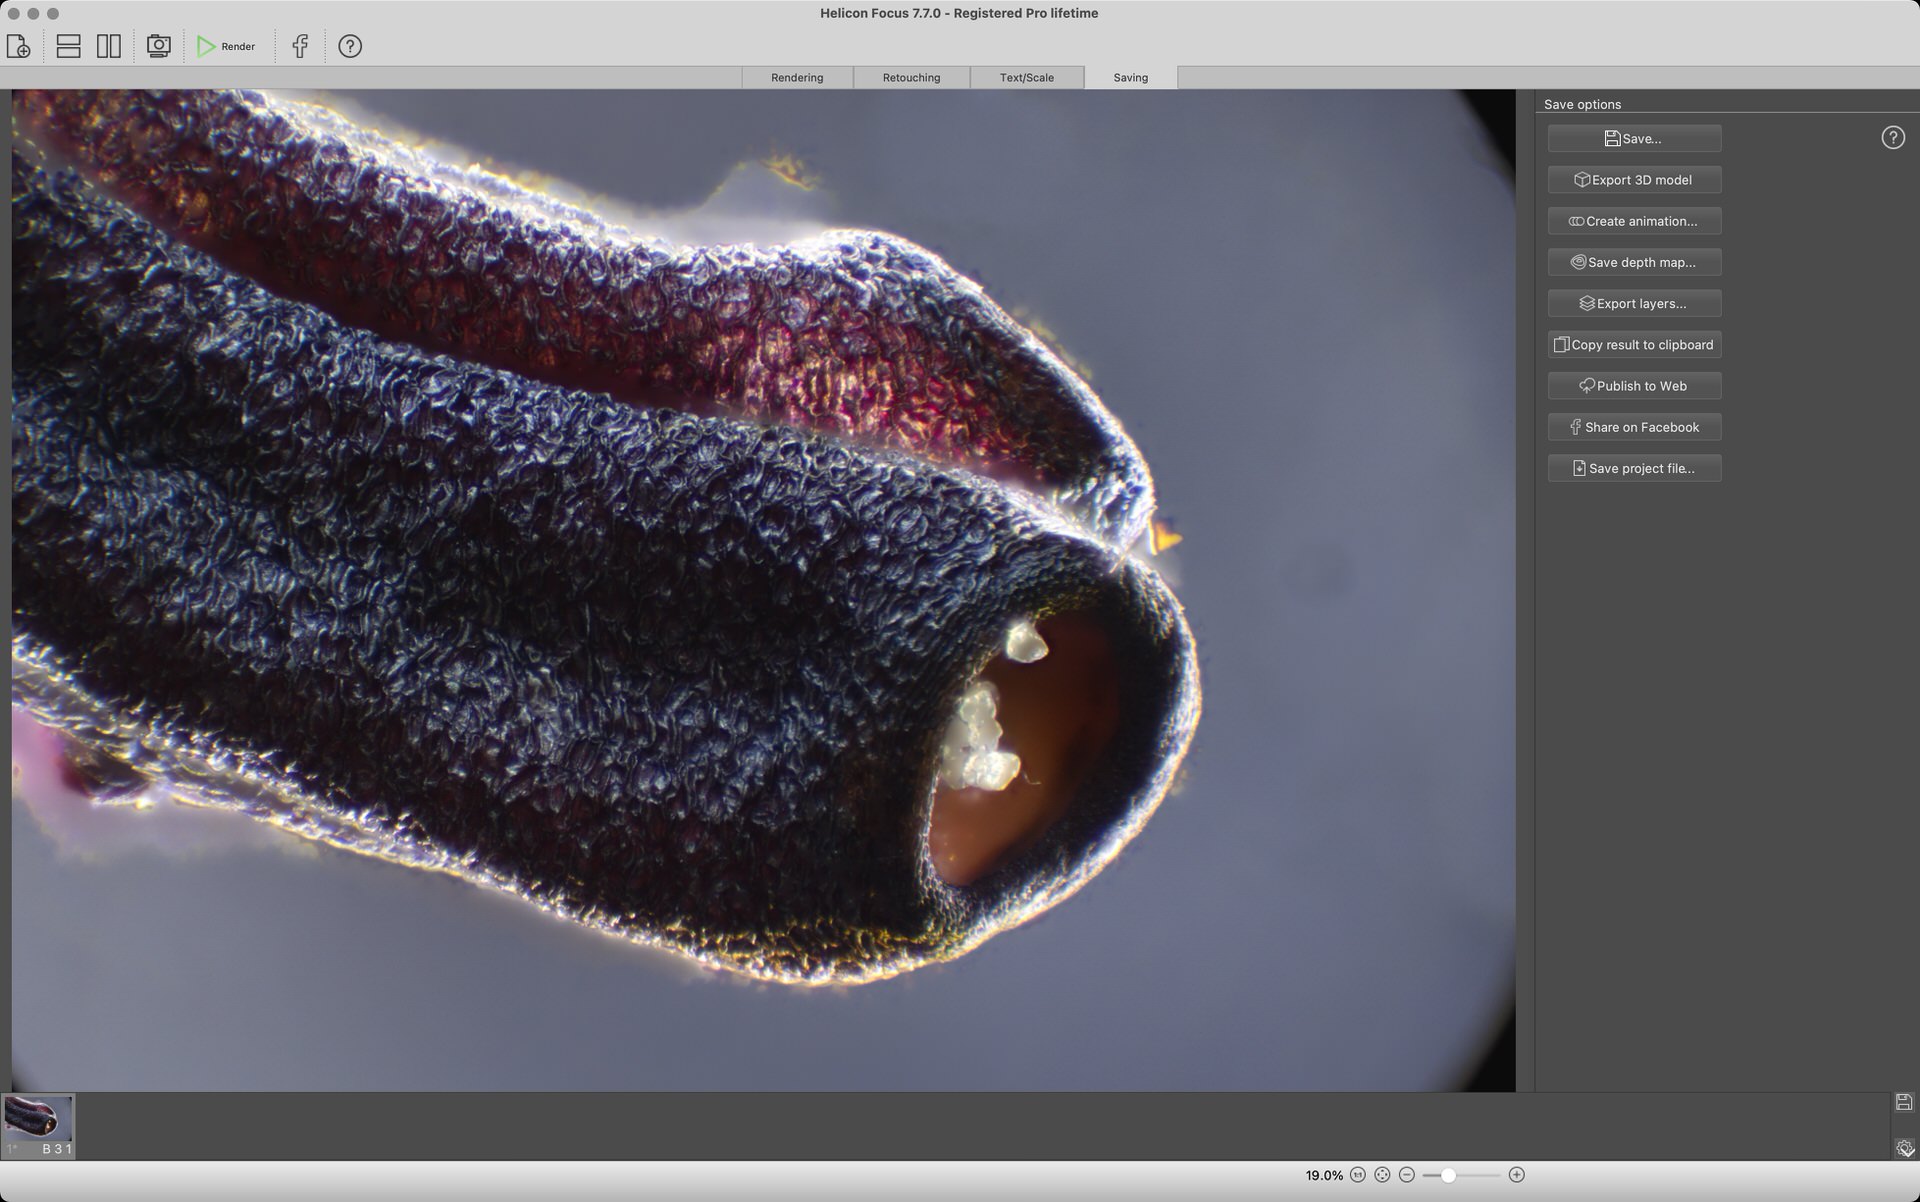
As you can see in the above screenshot, there are also Retouching and Text/Scale tabs to play with, but I have been doing all of my retouching in Capture One Pro after saving the resulting file as a DNG. I’ve found it makes things easier later to stick to the same naming convention for all files. I have a day folder for each day I’m shooting, and inside that folder, I have multiple stack folders, all automatically created due to the settings that we looked at earlier. I save the DNG files in the top-level day folder, not the stack folder so that I can easily see all of the processed images I’ve shot on that day in Capture One Pro.
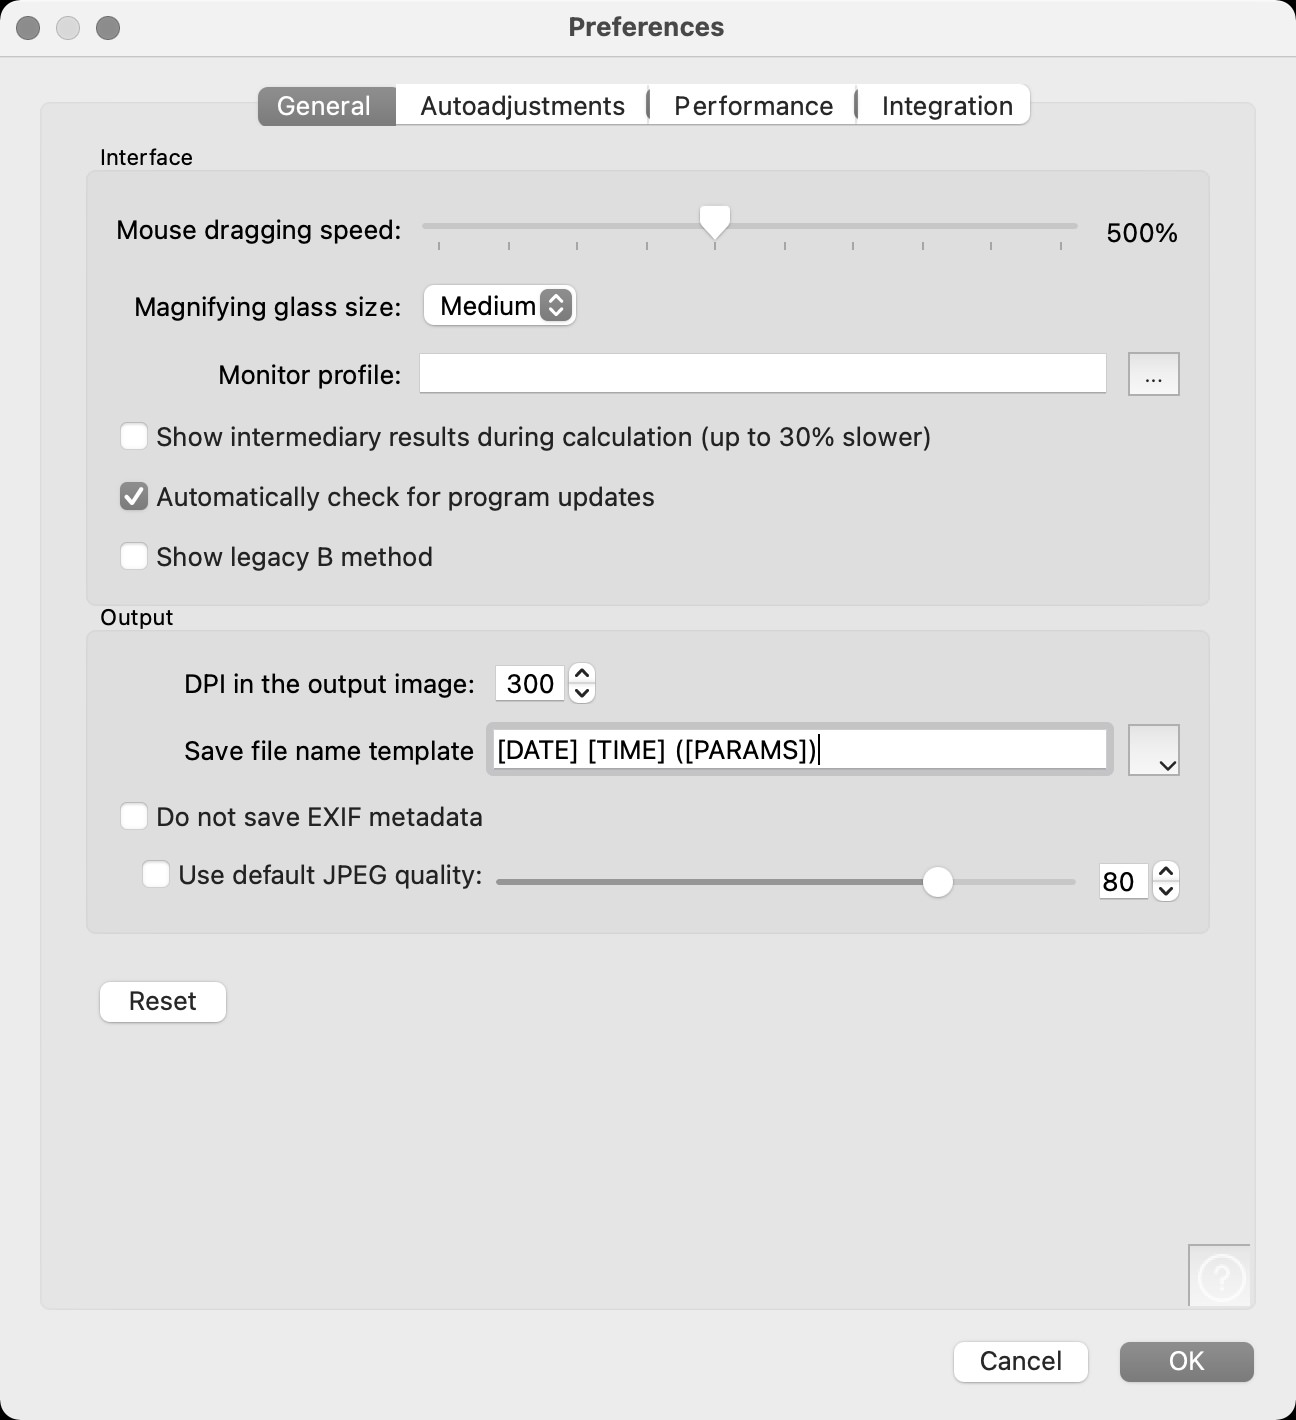
When I name the files I’m starting with the number matching the stack batch folder, so 001, 002, and so on. Then I add the magnification, and the number of frames, with frames abbreviated to just “f”, so my file name would start with, for example, 001 40X 30f, and I leave the date and time that the stack was made and the settings, which are added by Helicon Focus by default. These can be changed in the preferences, as you can see in the screenshot to the right, but I have left them as they are. Saving your focus-stacked image takes a few seconds, but nothing stressful at the pace of shooting we’re in.
Another interesting feature is the ability to create 3D Models and Animations. These take the difference between the frames and exaggerate the distances a little, and show your subject as a rotating 3D scene, which can be cool to look at. I don’t really have time this week to put together a video to show you this, but do check it out if you use Helicon Focus, it’s absolutely fascinating.
To wrap up, here is 100X magnification 100 frame focus stack of the pollen tubes in the anther of an Azalea flower that I grabbed from the bush outside our apartment this morning. Every time I look into the microscope I learn something new. I had never really thought about it very much, but the pollen on the anther of flowers doesn’t just grow there, it is stored in these tubes and dispensed as necessary. I used a pair of surgical tweezers to pull on the pollen, trying to separate it from the anther so that I could photograph just the pollen, and I was surprised that it was attached to lots more pollen inside this tube and it all came out attached by tiny fibers. I would never have guessed.
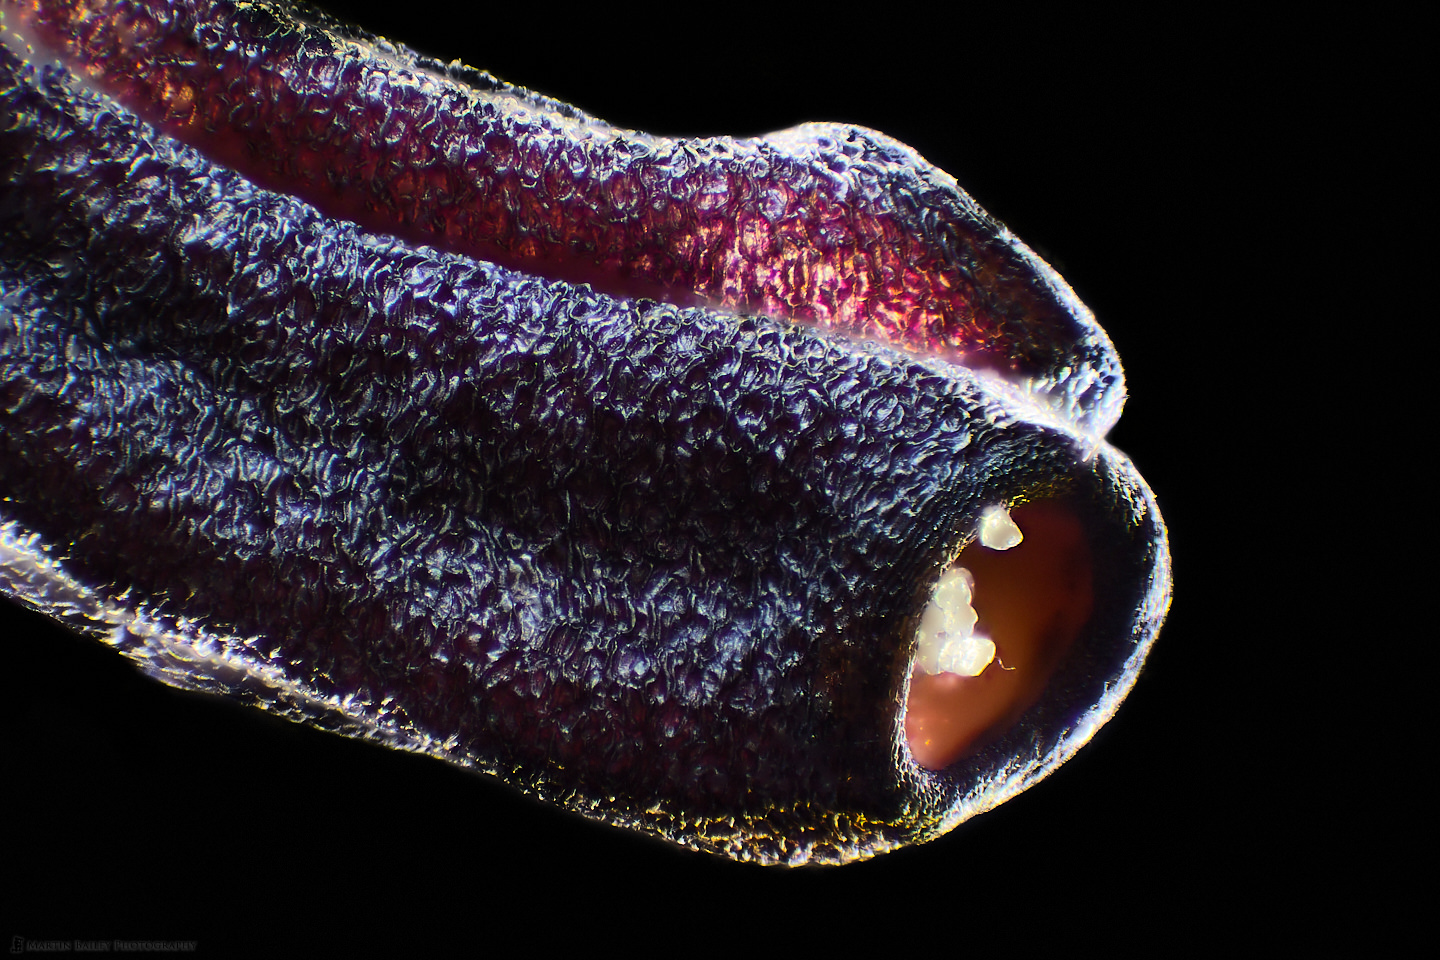
Note too that this shot was made with my compound microscope using the Darkfield technique, in which you block out the direct light from under the subject and illuminate it with light that spills in from around the sides of the disk used to block it out in the center. For this shot I also used the LED ring light from my stereo microscope to pop a little bit of extra light into the top side of this anther, as you can see in the below image.
Also note that I darkened the background down in my processed image, mostly to remove the remnants of the halo that you see in the above image, although that is just a single frame on my computer screen, not the final stacked image, which had much less halo.
OK, so we’ll wrap it up there for today. I hope you found this useful or at least a little interesting. I’m still having a blast with this stuff, and you can see the results of what I’ve been up to in my Microphotography Portfolio. Currently, there is only a crystals portfolio uploaded, but as I get more work that isn’t crystals, I’ll start to pick the best and post that too, so please take a look if you are interested.
Show Notes
You can see all posts related to Microphotography here: https://mbp.ac/microphotography
Check out my work in the Portfolios section here: https://martinbaileyphotography.com/portfolios/
Audio
Subscribe in iTunes to get Podcasts delivered automatically to your computer.
Download this Podcast as an MP3 with Chapters.
Visit this page for help on how to view the images in MP3 files.

Martin – I just took a look at your portfolio of microphotography photographs. Wow! Awesome. Amazing how many different abstracts can be derived out of citric acid crystals. The Hummingbird crystal photo is truly unbelievable. As a child of the 60s some of this reminds me of being on an LSD trip. Not that I was every on one, mind you.
Great work!
David
Wow! Thanks David! I’m pleased you enjoyed that work. I developed a hernia in my neck through too much computer work, and probably looking into the microscope. That, along with going down periscope to work on a new Photoshop plugin that is now almost done, meant that I haven’t done any more of this for the last three week’s or so, but I’m looking forward to getting back to it very soon.
Martin – I’m enjoying your journey into the world of microscopy. Next thing we are going to hear from you is you are going to go all Nikon and enter their tiny world contest. (I suspect the Nikon microscopes are really first rate… Of course then there are the Leica $$$ microscopes). All kidding aside I do like the work you are producing. It always visually stimulates me to see the textures that are on an object as one magnifies it.
With respect to Helicon stacking software I got a little lost on some of technical intricacies you went through. But – did you consider the Zerene stacking application? It claims to be able handle very large stacks. I’ve see it recommended in other blogs. If memory serves me correctly Don Komarcheka has mentioned it.
In closing I’ve been thumbing through my back issues of LensWork looking for some sort of new inspiration. In the June 2018 issue there was some work presented from Robert Dash. It is visually very arresting. The work is composites of images taken with a Scanning Electron Microscope and life size images. According to the Lenswork intro to his work he lives on Orcas island here in Washington State. It is very rural. I don’t know where he gets access to an electron microscope. Mr Dash has a web site:
robertdashphotography.com
All of the work shown on his site is very different and original. With training I might be able to carry his memory cards.
I hope you and your wife are well in these trying times.
All the Best – Rich Bahl
Hi Rich,
Not sure why, but this post was in the spam folder. Perhaps the multiple dollar signs triggered something.
I won’t be getting a Nikon microscope, and contests have never interested me, so sorry to disappoint you on that front, although I know you’re only kidding. I have though just upgraded my new compound microscope’s lenses to all Plan Achromatic lenses and the difference is amazing! The lenses on my scope were just Achromatic, so they were sharp in the middle, but got gradually softer towards the edges. I tried to overcome some of it with more stacking, but it just wasn’t sharp at the edges. My new lenses are amazing, now leaving just the camera adapter to upgrade to get really good image quality, but that will not happen for a while yet.
I hadn’t heard of Zerene, but I’m very happy with Helicon, so no worries there. Thanks for pointing out Rob Dash. I’ll check out his work in a few days when I come up for air again. I need to get a bunch of other stuff finished first.
All the best to you too, Rich!
Regards,
Martin.