
Visit Library for MBP Pro eBooks |
OK, so it's been a couple of years, and coincidentally exactly 100 episodes, since I reviewed and created a tutorial to help you to create camera profiles for use in Capture One Pro using the Lumariver Profile Designer software, and with my new EOS R5 sitting around without a custom profile, I figured I'd make one, and I was pleased to see that a few changes made to the Lumariver software have made the profiles easier to create than ever before!
There are a number of ways to create these profiles, and I haven't tried all of them, but the main thing to note here is that I followed Lumariver Manual instructions for Making Capture One ICC Profiles, and did NOT use the simpler workflow for reproduction. I went through the full steps, and in step 14 I used Alternative A to get the Capture One curve for my profile. The instructions from Lumariver are clear enough, but in my humble opinion could be a little clearer and better illustrated, so here goes with my version.
Preparing Your Photograph
First, you'll need an X-Rite ColorChecker target. There are other targets that you can use, but I recommend X-Rite's as they are what I use. You can use the ColorChecker Passport, but for my profile, I used the Digital ColorChecker SG that you can see in this photo, that I used to create my profile. Excuse the grubby outside air-conditioning unit that I placed the target on. I didn't want to spend much time on this, so I didn't cover it up or anything. I exposed the chart in Manual mode and ensured that I pulled back slightly from the setting that started the white patches blinking with exposure alerts, so the base image is as bright as it can be without starting to overexpose, just as I shoot all of my images.
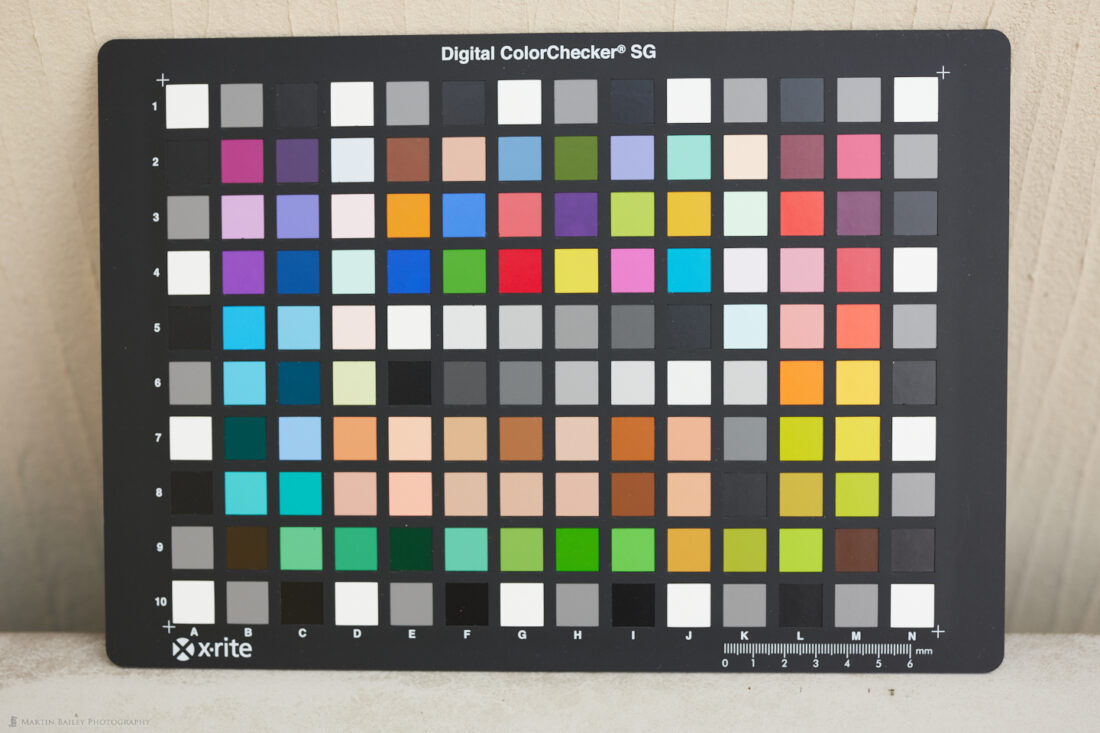
For the sake of this process, note that I used the White Balance picker tool in Capture One Pro and selected one of the neutral gray cells on the target, and that set the custom white balance of the image to 5757 Kelvin and a Tint of -2.8. You can use this profile for a wide range of white balances, but to create it, we need to set that custom white balance in this way, and remember the kelvin value for later.
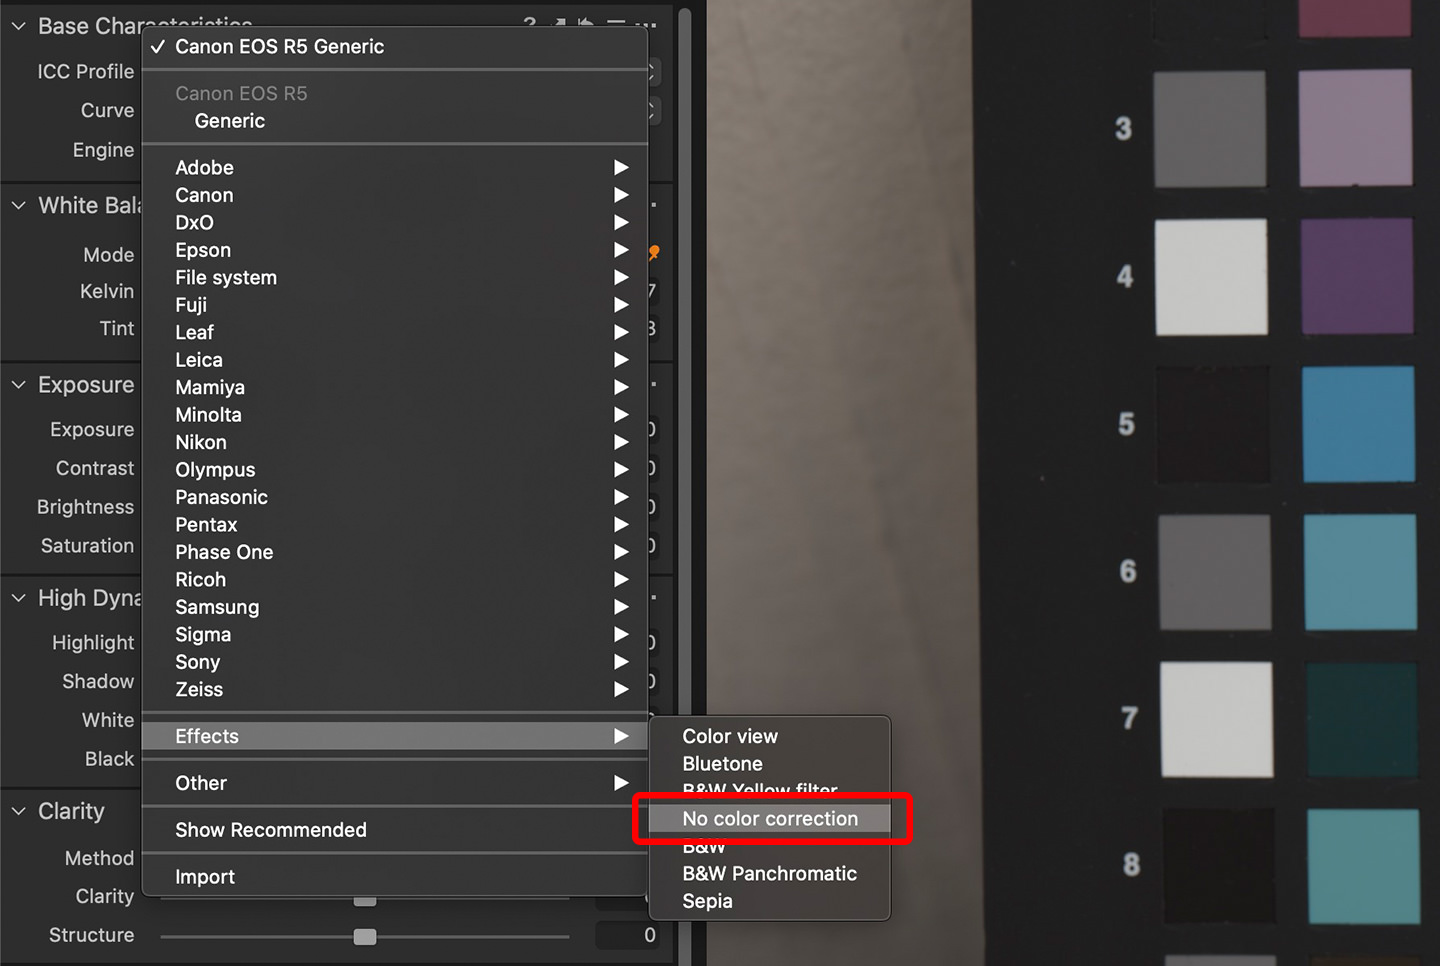
The next part of the process will make your image look crap for a while, but this is necessary, so let's work through it. As you can see in the screenshot, under the Base Characteristics panel in Capture One Pro, you need to select No Color Correction from the Effects section of the ICC Profile pulldown. If you don't see this option, click on the Show All option first. It's also important here to select the Linear Response option from the Curve pulldown, below the ICC Profile pulldown. This is the part that will make your image look flat and much less colorful, so if it still looks OK, go back and check these last few steps.
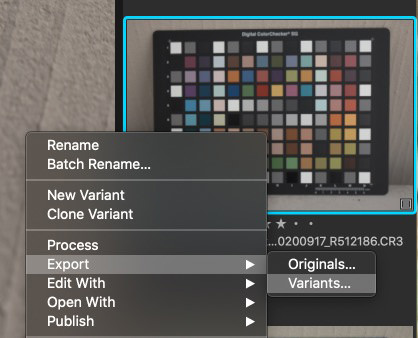
Then right-click the image that you just changed, and select Export, then Variants, from the shortcut menu that appears (right). You'll then see a dialog box to select the settings, which need to be the TIFF format, 16 bit, and under ICC Profile select Embed camera profile. For the filename, to make the following steps easier, either change the name to Linear or append the word Linear to the filename as I have (below).

After exporting your Linear copy of the image, go back to the Curve pulldown from the Base Characteristics panel, and this time select Auto, unless you usually select one of the other options, such as Film Standard. I just selected Auto, and then exported a second copy of the image repeating the previous step, but this time appended the words Auto_Curve to the filename so that I can easily identify it as we proceed.
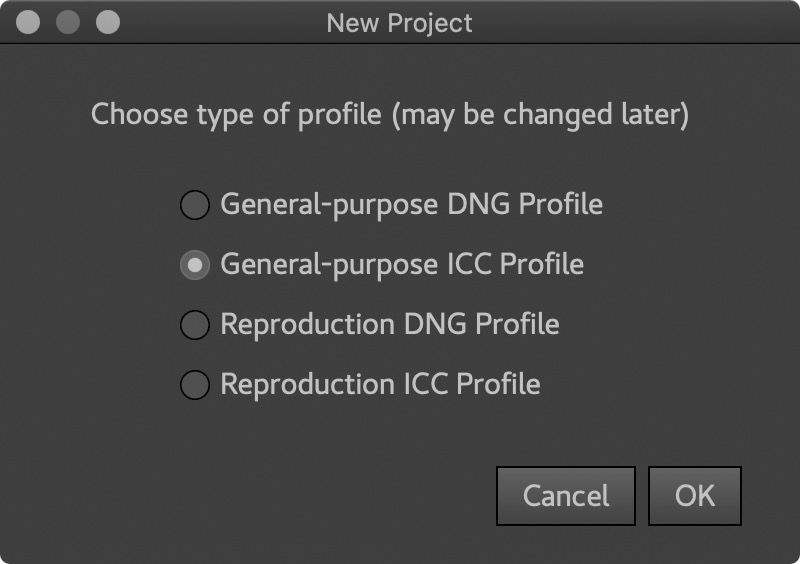
Next, assuming you have already installed and licensed your copy of Lumariver Profile Designer, open it and select General-purpose ICC Profile, as you see in the next screenshot (right).
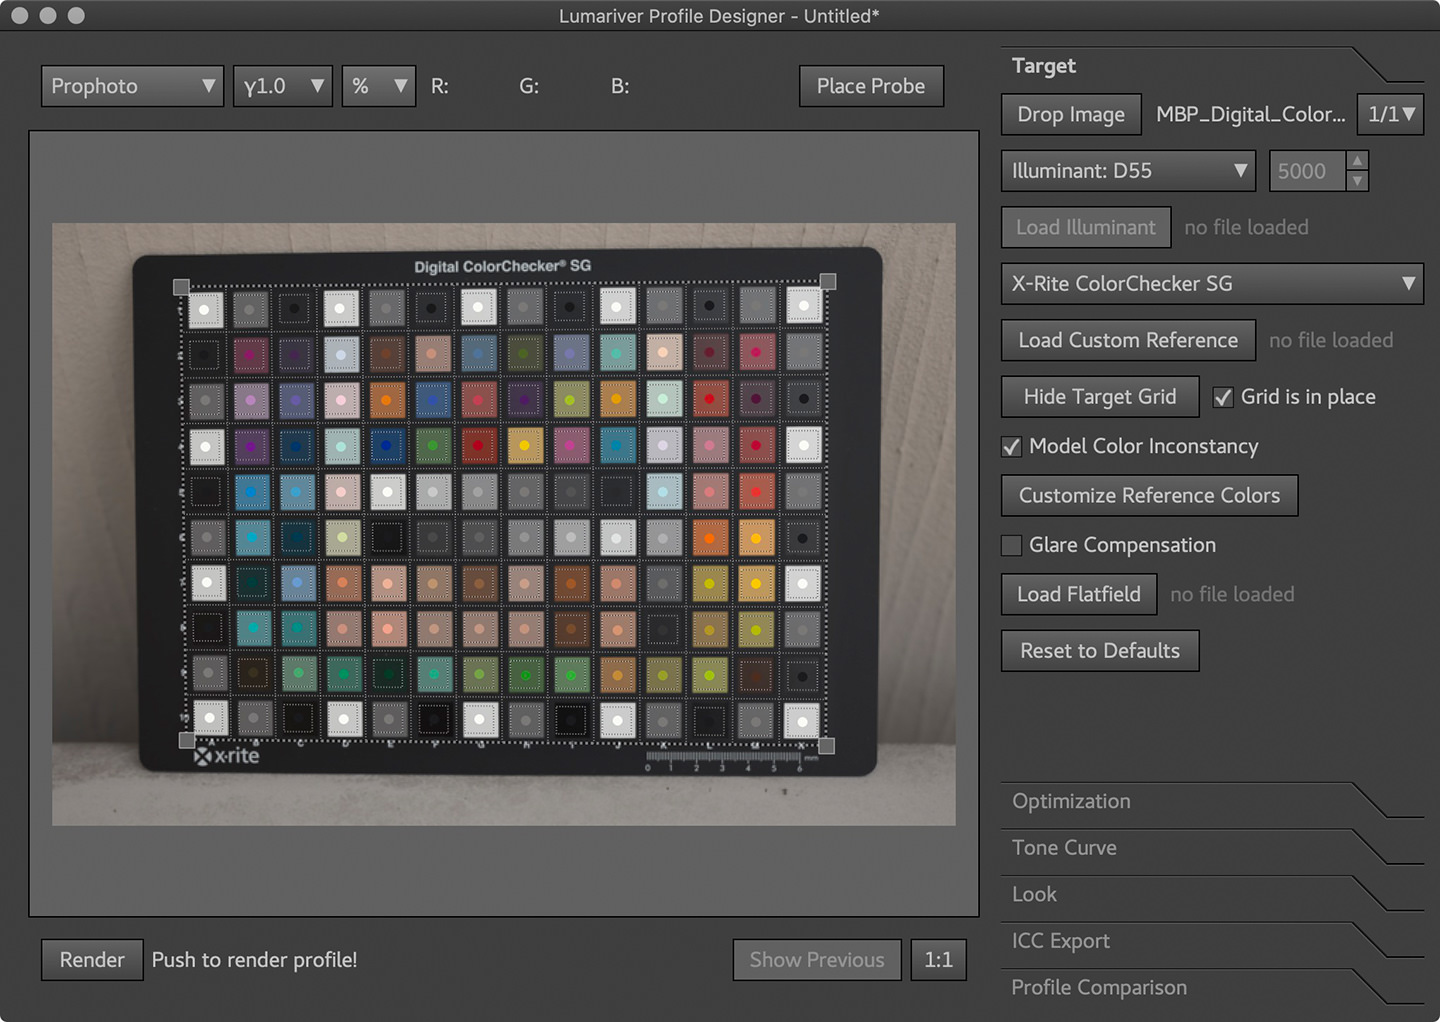
After that, click on the Load Image button under the Target dialog that should already be selected when you start Lumariver. In the below screenshot it says Drop Image because I have already loaded the image when I captured this. You will just need to hit the Load Image button and select the Linear TIFF that we exported first of the two. Also, select the Illuminant which is closest to the White Balance that you made a mental note of earlier. My image was 5757 Kelvin, so I chose D55. Next, select your target from the pulldown that says X-Rite ColorChecker SG in my screenshot. Again, I've already selected this. After that, select Show Target Grid, and align the corners of the grid that will appear with the plus symbols in each corner of your ColorChecker, as you can see in my screenshot.
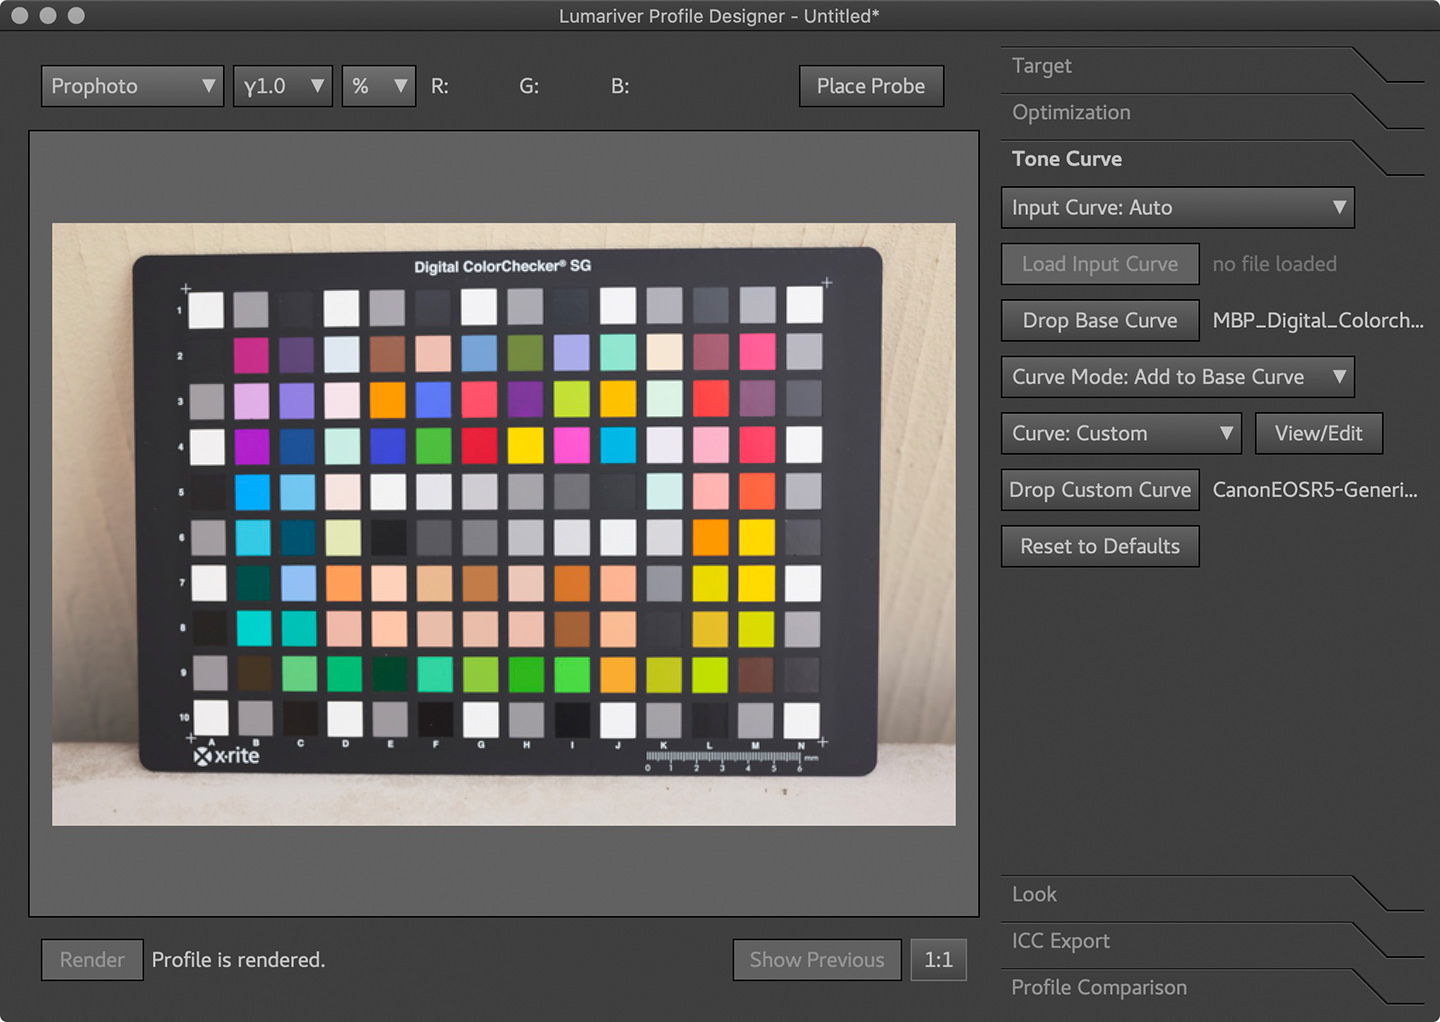
Now select the Tone Curve option in the bottom right of the Lumariver dialog, and select Load Base Curve, and load the second of the two images that you exported earlier, marked with Auto_Curve in my example. Then, under the Curve Mode pulldown, select Add to Base Curve, and then select Curve: Custom and press the Load Custom Curve button and a dialog will open. Leave that dialog open and go back to Capture One Pro, and go back to the Base Characteristics panel, and locate an image that still has your default camera profile selected, not the one that you used for this export because we changed that.
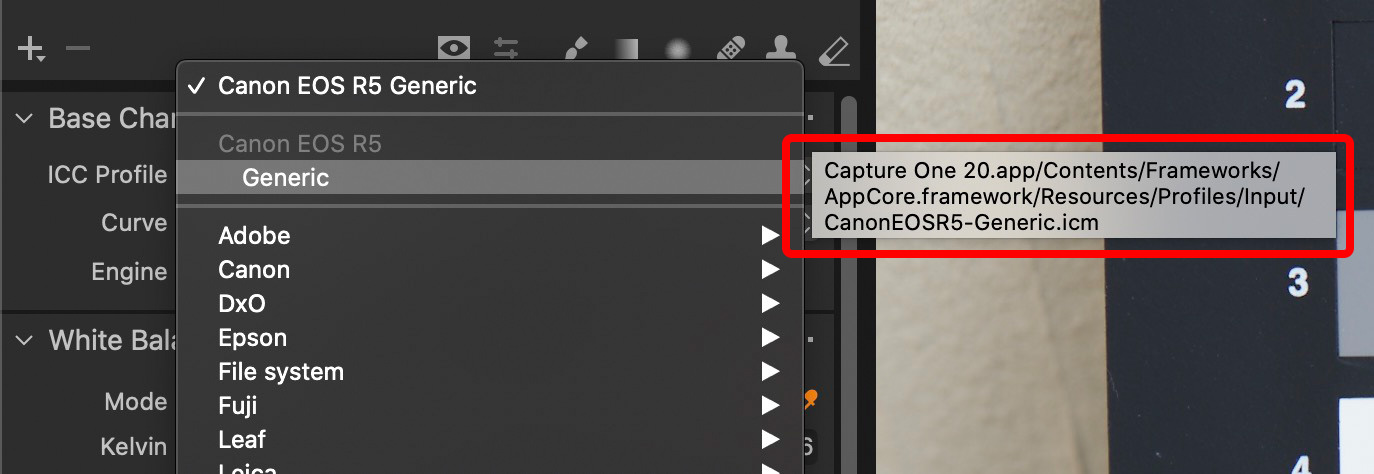
In my case, the Canon EOS R5 Generic profile was selected. Mouse over the profile that is applied to your images, and you should see a popup with the path to the Generic Capture One Pro profile that your camera has been using. Go to that folder, and locate the profile, then drag the file to the dialog that we left open in Lumariver earlier. This will move the dialog to your profiles folder and select the file that you just dragged, ready for you to import. Also, at this point, note the name of the profile file, or better still, select it and copy the filename to your computer's clipboard for use in a few moments.
Once you have your Generic profile loaded, you are ready to hit the Render button. As you can see in the below screenshot, once Rendered, you should see a beautiful full-colored version of your original photograph, and this indicates that the process was successful. In previous versions, following the Manual as we just did never gave me a useable profile, and I had to select some other options to get that, but now it works right out of the box, which is great!
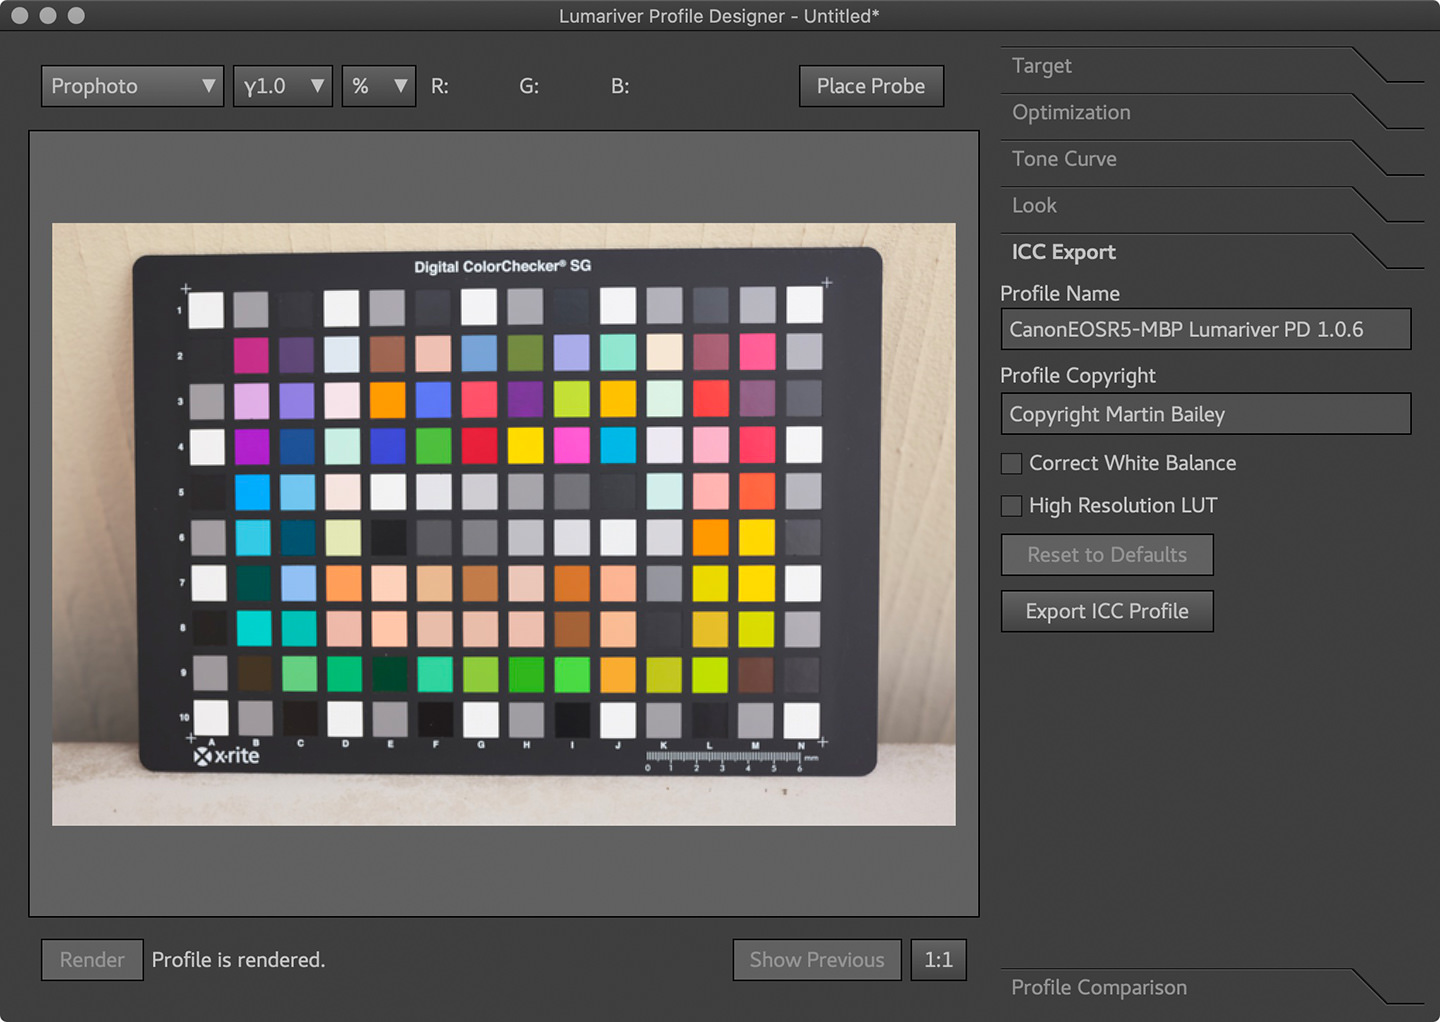
Go to the ICC Export tab, and type or paste the filename that I asked you to copy to your clipboard a few moments ago. You just need the first part of the filename, up to the hyphen, which is CanonEOSR5 in my example, and then you want to add something descriptive after that. If you don't use the same start of the filename as your camera's generic profile, the new profile will not be listed with your Generic profile under the Base Characteristics ICC Profile pulldown. Any other filename will cause your profile to be listed under the Other section, and that makes it more difficult to locate later.
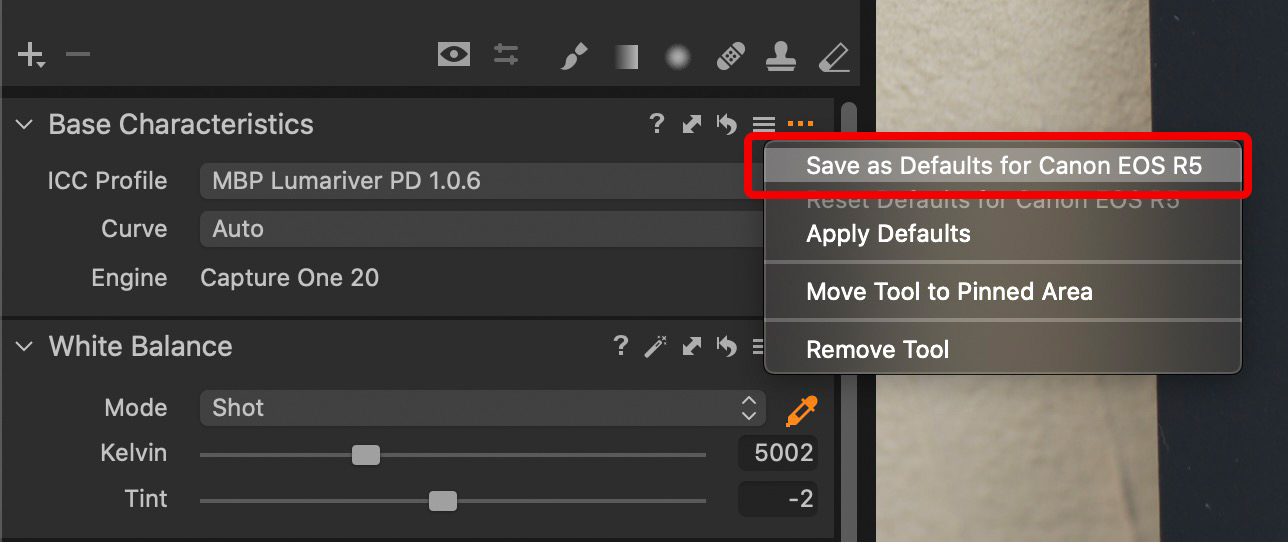
Check your profile, and see if it is at least marginally better than the Capture One Pro Generic camera profile. The one that I just created is, so I am going to use it by default for my EOS R5 from now on. To make that happen, right-click the ellipses in the top right corner of the Base Characteristics panel, and select Save as Defaults for Canon EOS R5 or whatever your camera is called.
If you do that, from now on, all images that you import into Capture One Pro from the same camera will get this new camera profile assigned. If you prefer to just assign the profile yourself, skip the last step, and just select the profile from the pulldown manually when you want to apply it. To apply the new profile to images that were imported before you created this new profile, you just need to select them, and then select the new profile. If you made the new profile the default, you can also just select Apply Defaults.
Note too that the first part of the profile filename, used to identify it and group the profile correctly, is not included in the pulldown, because it is displayed under the camera's profiles. This is why you still want to give it a meaningful name after the hyphen. Also, if you want to see your original target photo in full splendor, you'll need to change the Linear Response curve back to Auto or whatever you use, as well as assigning the new camera profile.
Before / After
So that you can see the difference, here is a Before / After slider. Drag the vertical bar back and forth to reveal the Lumariver camera profile. It's pretty obvious which it is but I have also labeled them, just in case.


If you are interested in grabbing a copy of Lumariver Profile Designer to create your own profiles, you'll find it at http://www.lumariver.com and note that to create profiles for Capture One Pro as we've done in this tutorial, you will need at least the Pro Edition, and the Repro Edition also works for this. The Basic Edition does not work. That will only create DNG based camera profiles, but that should mean that it will be enough if you use Adobe Camera Raw based camera profiles. Also, if you need a ColorChecker target, you can get both the ColorChecker Passport and the Digital ColorChecker SG from our friends at B&H Photo or Amazon and if you use our affiliate links it helps to keep the lights on the content coming, as well as being very much appreciated.
Affiliate Links
ColorChecker Passport on B&H Photo https://mbp.ac/ccp, and on Amazon.com https://amzn.to/2RwrCOq.
Digital ColorChecker SG on B&H Photo https://mbp.ac/ccsg and on Amazon.com https://amzn.to/3c5ApjK.
Show Notes
Audio
Subscribe in iTunes to get Podcasts delivered automatically to your computer.
Download this Podcast as an MP3 with Chapters.
Visit this page for help on how to view the images in MP3 files.


Great info Martin,
Would I need to create a different profile for each camera/lens combination? Or is one profile sufficient?
Hi Mike,
Many years ago I used to create profiles for many different White Balances, but I find that if you create one profile at around 5000 Kelvin, it is good for most, if not all, images. I created a profile for my 5Ds R and for my EOS R and I only ever used and needed that one profile. In my opinion that is enough.
Regards,
Martin.
Martin, is there a difference between your profile and the EOS R5 profile Capture One supplies? If so, is this because of differences in your specific camera, or is it because the Lumariver software permits the creation of a better generic EOS R5 profile?
Thank you.
Dan
Hi Dan,
If you can’t see the difference in the before/after slider, then your display can’t show you the difference, and it probably wouldn’t be worth it to you. On my displays, the colored cells on the ColorChecker SG are more vibrant than with the standard Capture One Pro profile, so I’ll be using the new profile because I like my color work to be more colorful.
I don’t necessarily think that the generic profile is bad or lower quality, but I think it is probably a ‘safer’ profile to include for use with every image created. I couldn’t tell you why it’s different, but like with printing, I always like to create my own profile with my own gear, as that does generally give slightly better results.
Regards,
Martin.
I hope that you take this as constructive comments Martin, It has been two years since the first Lumariver podcast and for the benefit of new listeners, you could have explained why you wanted to make colour profiles for Capture One.
Did you know that X-Rite now have support for C1?
The workflow is very similar, although to be honest and objective, it didn’t work for me and the Fuji profile that I made. It’s on my roundtoitlist to find out why.
As an aside, you must be hurting really bad with the lockdown restrictions and the loss of revenue from your workshops, how about getting some relief from the severe technical content of your podcasts and just get out somewhere with those new cameras of yours, even to the local park and just shoot some photos. My sanity anchor was just being able to get out once a day for a walk with one of my cameras, photographing a wide variety of subjects, which increased my familiarity with my cameras and widened my photographic scope.
Hi Wallace,
Good point, and yes, taken constructively.
Yes, I do know that X-Rite now supports Capture One Pro, but the last time I tried I did not get good results. I’ll try again soon as it’s been a few years. I did provide my feedback to the X-Rite team as a member of their Coloratti, but I did not hear back, despite them coming to me directly to help with their testing. Interesting that you couldn’t get the X-Rite solution to work as well though. Maybe they still haven’t ironed out the issues that I also ran into.
We’re not locked down here in Tokyo as such, but we’ve been asked to stay in-state for the last few months, and most of my favorite places to shoot our in other prefectures, so yes, it’s been a bit stressful. I’ve been shooting some, but I’m more stuck in trying to complete the latest update of my Photographer’s Friend app. I just made two huge leaps forward though, hence coming up for air and answering these few comments, and I’m hoping to get on top of this update very soon. Hopefully in time to go and shoot some autumn colour. 🙂
Stay well and safe, and thanks for taking the time to comment.
Regards,
Martin.
Hi Martin,
First off, thank you for this detailed write-up. I’ve been looking for another option after failing with Xrites software; they just haven’t figured out how to set the black point correctly. This really helped, I made a test run in the trial version of Lumariver. Since it’s only the trial version, I cannot save it out, but I was able to do a screen side-by-side with the new ProStandard profile from CaptureOne for my Sony A7rM3 and wow, they seem really similar. Have you had the chance to look at these upgraded profiles from Capture one? I used the profiles with a recent product shoot and they were really bang on. I’m not the biggest fan of how it affected the skin, which is why I’m now thinking about upgrading my color target with something that covers more flesh tones.
Do you have any experience with the CMP color targets ( http://www.cmp-color.fr/eng%20digital%20target.html)? It looks like there are new options. I was thinking perhaps the Digital Mini as it seems more like an enhanced XritePassport (portable) ; or the standard digital edition to create the base profile and when I need other color-critical custom profiles; I would use the passport for general white balance selections.
The profile I get from x-rite (minus the black issue) is really different; far more vibrant. I’m not sure if this is, in itself, a result of the incorrect black values.
Just looking for your thoughts.
Thanks again,
Ronald
Hi Ronald,
I’m pleased that you found this useful. Unfortunately, I only have experience with my X-Rite color targets, so I can’t really comment. If the CMP targets are supported by Lumariver, maybe it would be best to email the Lumariver developers directly. They are generally responsive and helpful, so should be able to point you in the right direction.
Regards,
Martin.
I run an art reproduction shop and its been quite a journey trying to find a good solution for color calibration. The software from Datacolor and X-Rite both are not good, switching to Lumariver Repro Edition was the best thing I ever did – not only does it give much better results on those cards, but it opens up the possibility of custom cards (assuming you have the tools to read in the color data from them). I actually just got two cards from CMP in the mail today (their Mini and Studio versions) I’m waiting on them to send me the data file to read into Lumariver but I’m anxious to try them out 🙂
I haven’t used Datacolor for more than ten years now, so I wouldn’t know about their software. The X-Rite software is good at some things, but Lumariver is currently the only way I can create profiles for use in Capture One Pro. X-Rite was working on this and I helped them with their testing for a while, and then they fell silent, so I’m not sure what happened.
Still, I’m pleased you are enjoying working with the Lumariver products. I am really finding them useful too.
Hi Martin,
Excellent run through of Lumariver. Many thanks!
I have been profiling with Lumariver using the ICC Reproduction option.
1. Since making an ICC Reproduction profile entails replacing C1’s generic ICC camera profile with the one Lumariver creates, how is it that adding in C1’s generic camera profile as part of your General Purpose profile (in order to make the profile image brighten, as you say) does not affect the quality of the profile, colour-wise? I hope that makes sense! Do you work from a Linear curve back in C1 after applying the profile?
2. You comment on the clarity of the Lumariver instruction manual – Amen to that!
When I return to C1 after creating a Reproduction ICC Profile and browse to the newly-created Lumariver profile and select it in C1’s ICC Profile, I’m still left with Linear as my Curve setting.
I’ve been resetting this to Auto (the C1 default), rather than trying to create a bespoke curve for each new profile. I then set the brightness of the image using the green value of the green patch on the X-Rite CC. So, brightness is set to about 150. (I’m strictly talking repro photography here, not general photography.)
But, I find this can give me issues with for example the yellow patch, where I frequently get zero for the blue RGB value of the yellow. Unless I’m missing something, the manual doesn’t appear to deal much with handling the curve in C1, after the profile is created.
Have you any views on the curve issue for colour critical work?
Thanks.
D.