

Visit Library for MBP Pro eBooks |
As I finally catch up on tasks after completing my 2020 Japan Winter Tours, I have just organized the images from the three trips and took stock a little, and being as so many of us are spending time indoors at the moment, I figured I’d share some thoughts on the process, in the hope that it might help you with your workflow too. Now might be a good time to enjoy your photography introspectively, and taking a look at your organization can lead to a deeper appreciation of your work as well as making it easier to get to.
If you’ve been following how I work, you may recall that I keep all of my current year’s images on one SSD drive, which includes everything I’ve shot, and then copy all of my final selects into a second SSD drive. My entire year drive is called my Traveler, because it not only travels the world, but it travels nicely between my computers too, as I also keep my Capture One Pro catalogs on the drive, so I can just catch up where I left off simply by moving the drive between my computers. I won’t go into as much detail as my previous posts, such as episode 466, so check out that post if this isn’t just a top-up for you.
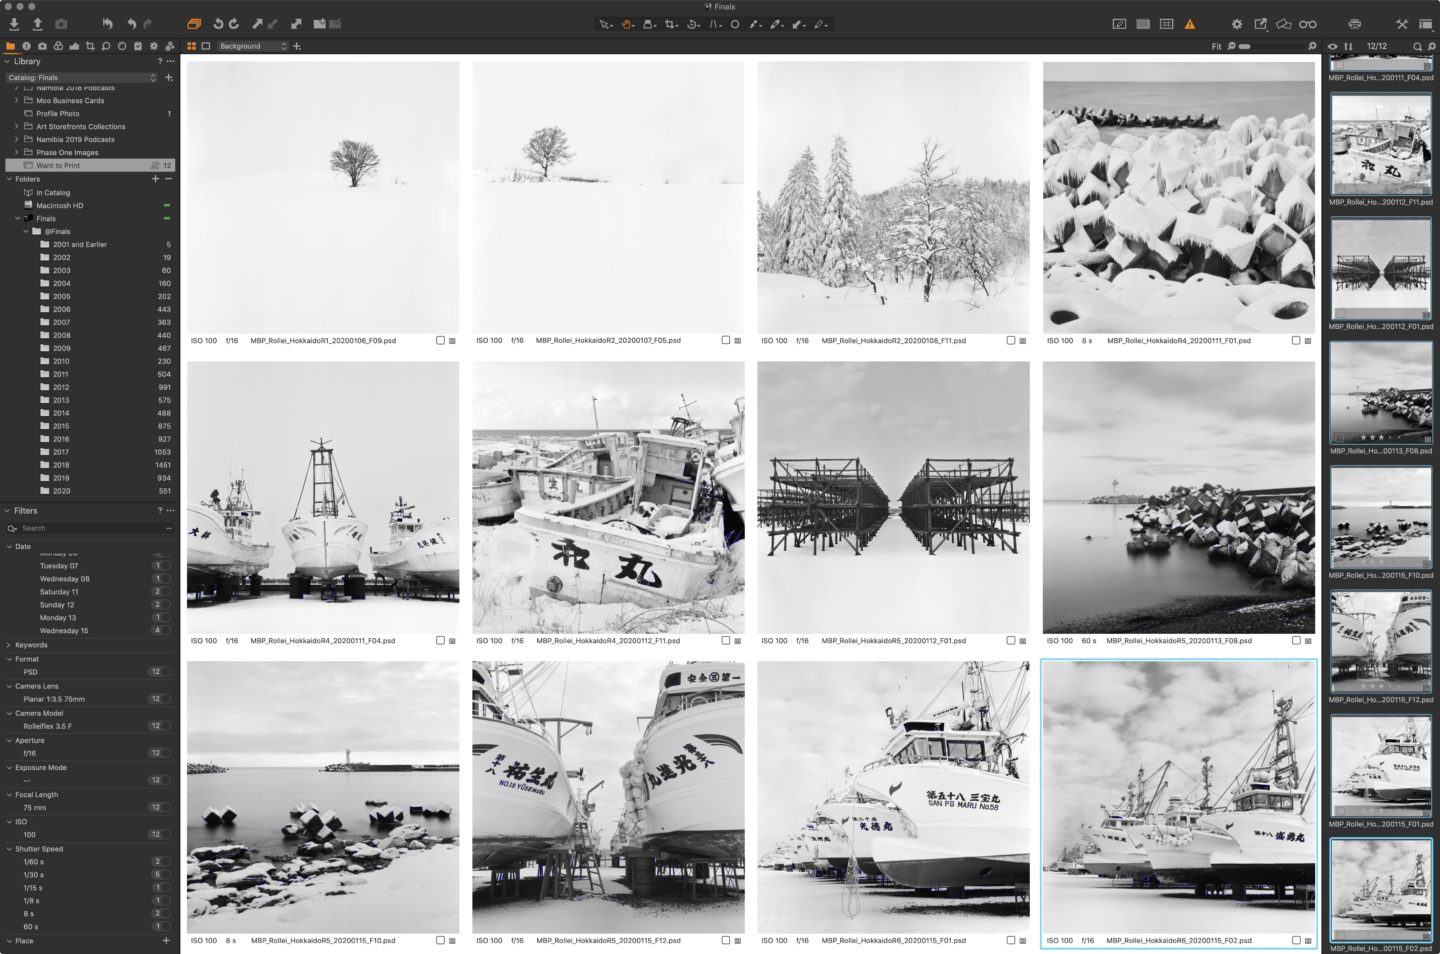
My Finals drive also travels everywhere with me, but that is where I store everything that I feel is worth showing people, and images that I will actively use going forward. From this year’s trips, I ended up with 96 images from my Hokkaido Landscape Tour that I’m really happy with. 77 of them were shot with my EOS R and 19 of them shot with my Rolleiflex medium format twin lens reflex camera. From the first of my Japan Winter Wildlife tours, I came back with 270 images that I am really happy with, and from my second Japan Winter Wildlife tour, I found myself with 179 images. The main reason for the reduction on the second tour was the warm winter affecting the behavior of the sea eagles. Although we did still get some great shots, it wasn’t as productive as the first tour.
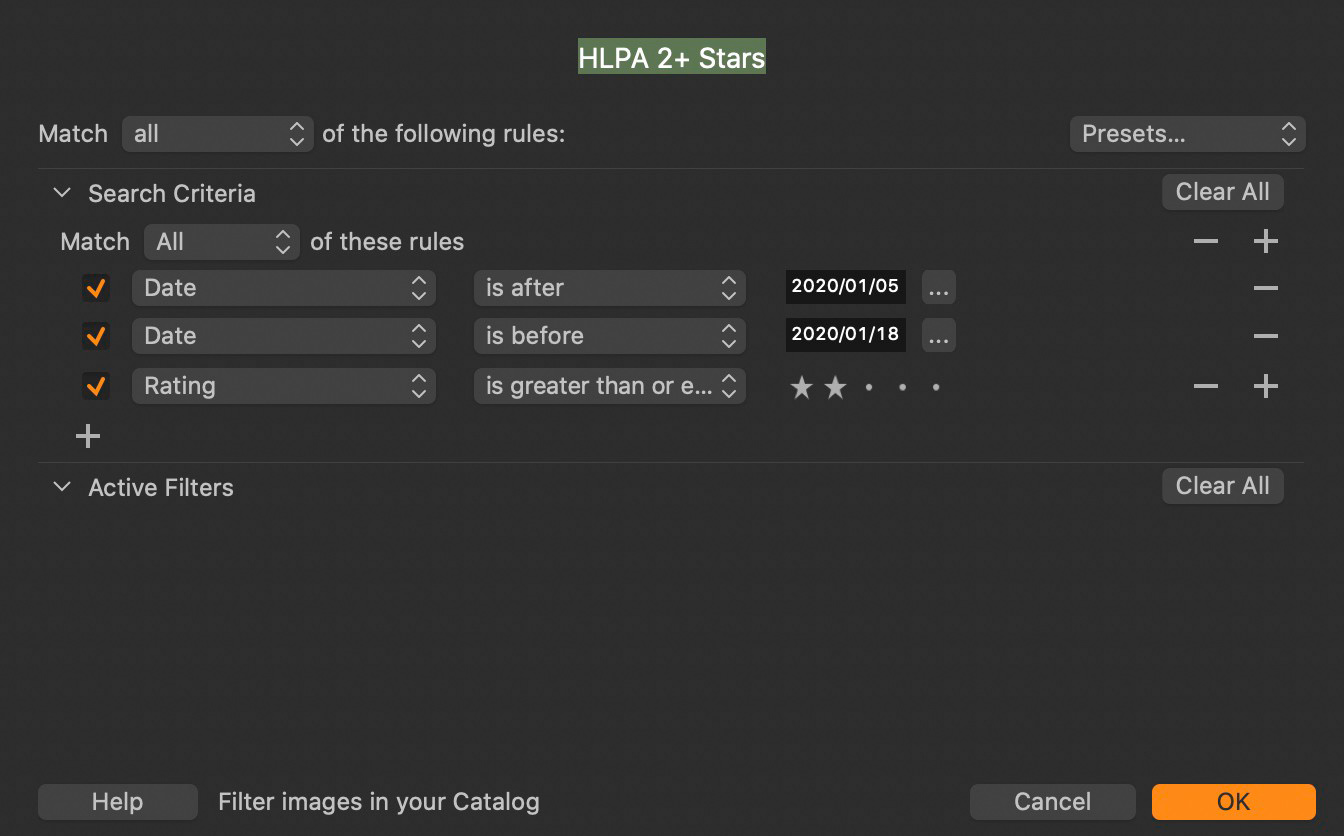
During my tours I try to show the group what I’ve been getting from time to time, to hopefully inspire them, but also to encourage them to share their own work, as that really helps us to inspire each other as we travel together. To facilitate this, and to help me speed up my workflow, I create a Smart Album at the start of each tour, that will automatically gather all images of two stars or higher during the dates of the tours, so as I go through my images each day and make my selections, they automatically appear in this Smart Album. Here is a screenshot of the settings, and although this is in Capture One Pro, you can do something very similar in Lightroom.
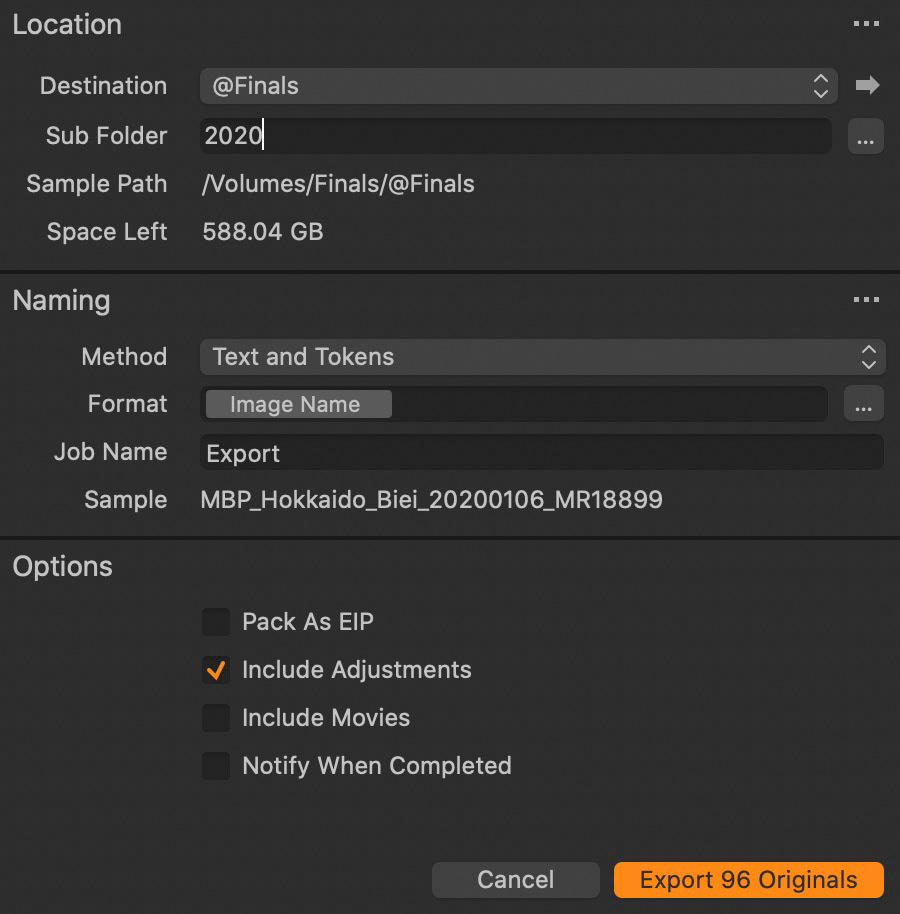
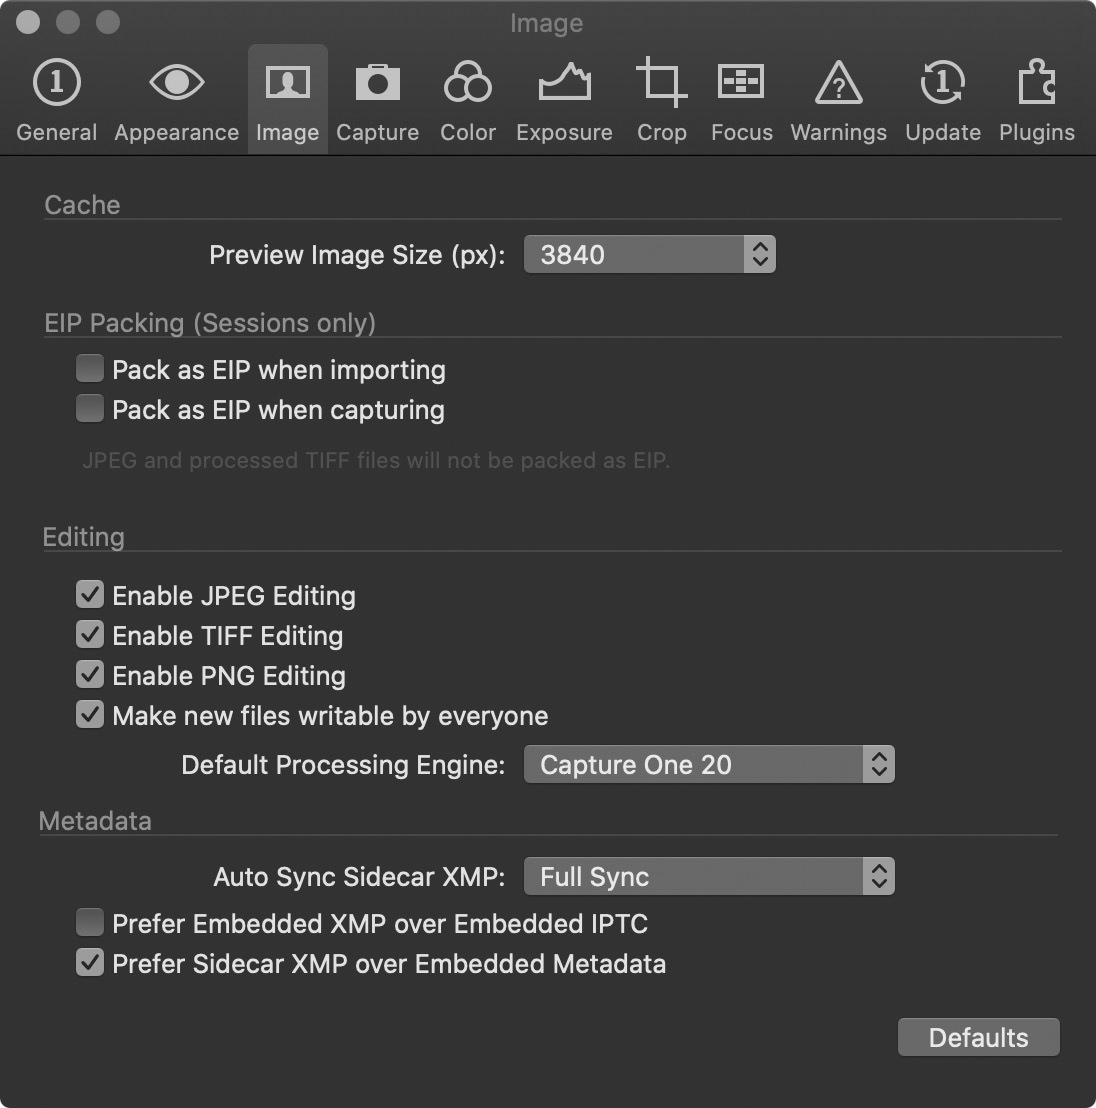
You can’t, unfortunately, select multiple Smart Albums at once, although you can create a new wider-ranging Smart Album, but I’ve just selected the albums individually and right-clicked the images in each album, and selected Export > Originals to copy them to a 2020 sub-folder on my Finals SSD. I usually specify to Prefer Sidecar XMP over Embedded Metadata in the Capture One Pro Preferences > Image dialog, as well as selecting Full Sync for the Auto Sync Sidecar XMP option. This, coupled with selecting the Include Adjustments checkbox during the Export of my Originals ensures that Capture One Pro includes all of the edits I’ve done to my images.
Capture One creates a few extra folders in the export directory to include some cache and settings files, including masks that I’ve drawn on images to make adjustments etc. When I open my Finals catalog, because this is the first time I’m copying images across for 2020, I initially have to Import my images at their current location, selecting the 2020 folder that was just created in my Finals folder on my Finals SSD. The important thing here is to ensure that the Include Existing Adjustments checkbox is turned on under the Adjustments section.

You can’t actually see the adjustments in your images in the import dialog, but once you have completed the import, all adjustments will be applied to the images and so we don’t have to redo any work that we did on the images on the original drive.
I actually recalled that I’d shot a few movie files while traveling as well, and so went back into my Traveler catalog to copy those over, and that reminded me that if you do have movies in your selection, you need to turn on the Include Movies option in the Export dialog, otherwise these will be ignored. I hadn’t even rated my movie files yet, so there were not included in my Smart Albums anyway, but that is something to keep in mind if you do shoot movies and use Capture One Pro.
Synchronizing Updates
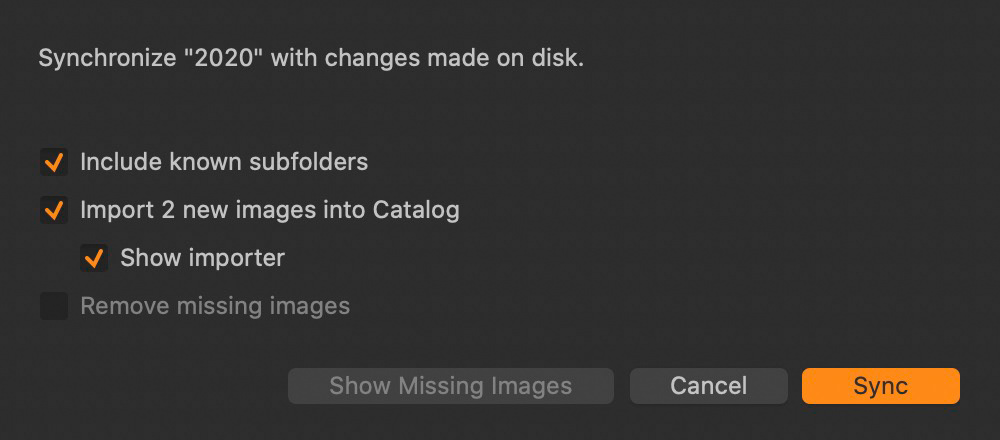
That did give me the opportunity though to show you how updates are handled for the rest of the year, as I now have a 2020 folder in my Finals catalog, so all I have to do after copying any new work across is right-click my 2020 folder and select Synchronize. I find that it works better to select Show Importer on this dialog, as some changes to files have not been reflected when I haven’t done this in the past, although I haven’t checked recently to see if that is still a problem.
Once this process is complete, the beauty of my workflow is that I now have all of the current year’s work on one SSD, and I keep that with me at all times, until my cloud backup is completed, and we’ll touch on that shortly. In addition to the current year though, I also have one more drive that essentially has every image I’ve ever shot that I consider being worth a hoot. So with more than twenty years of my favorite shots in one catalog, I can get to images easily to send to people, for example, even if I’m traveling, or to use in demonstrations during my workshops or talks.
Brief Summary of Backup Process
As we came so close to this during the last paragraph, I’ve updated my Studio Backup workflow slide and included that here for your reference. To summarize, I shoot my images and initially store them in my Traveler SSD, and although it’s not on this slide, if I’m actually away from home, I do daily backups to a second drive, just in case anything happens to the first. I will then keep the Traveler in my pocket or a locker for the entire time.
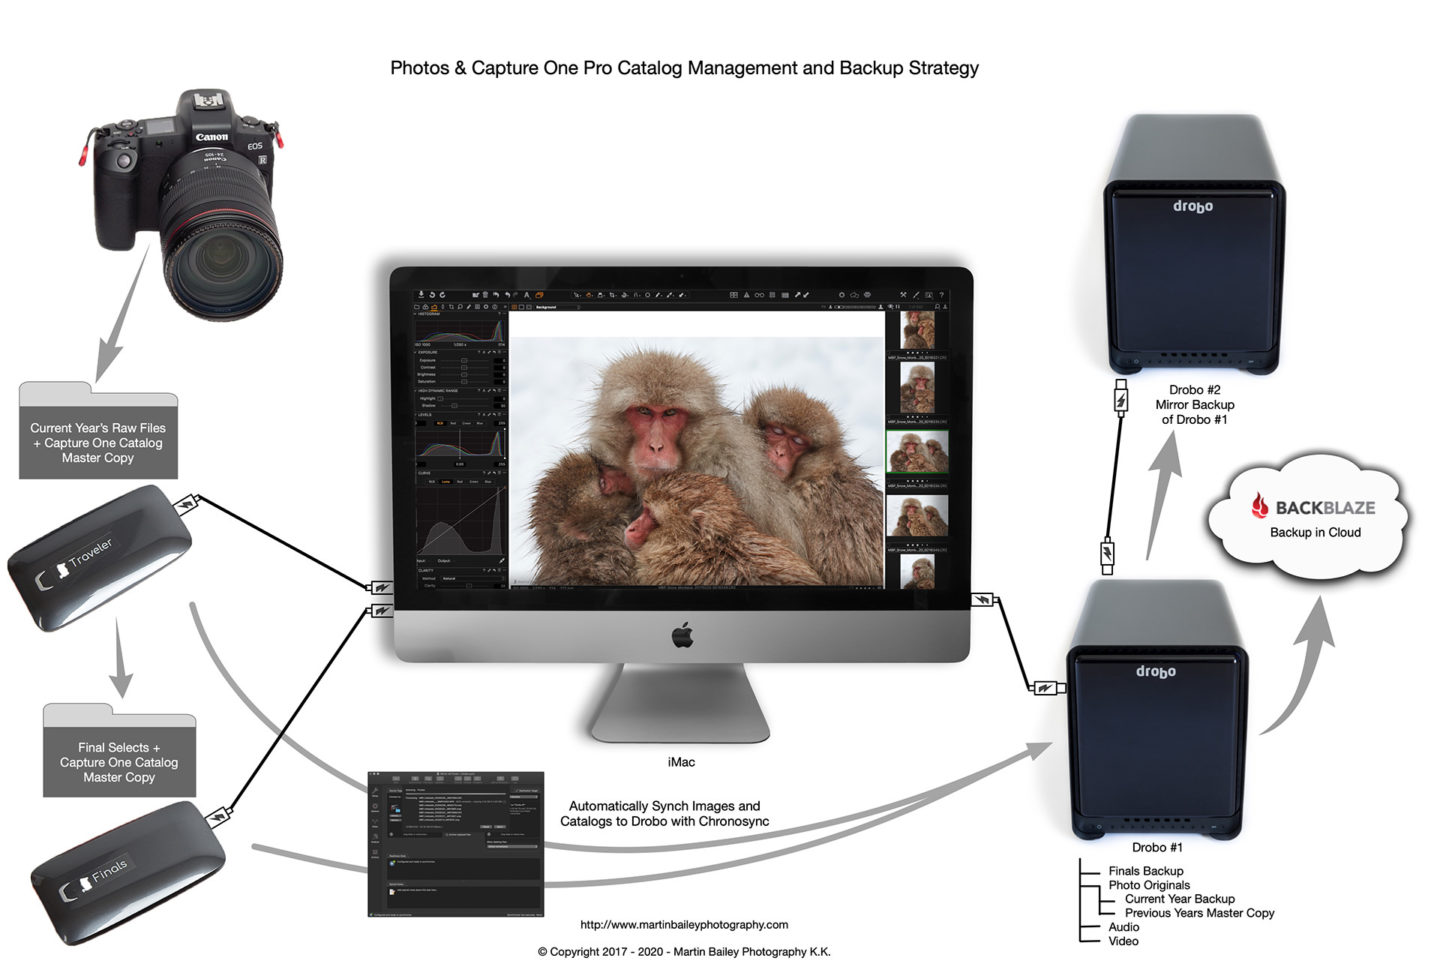
When I get home from a trip, I plug the Traveler into my iMac Pro, and that kicks off a Chronosynch job I’ve created to synchronize my new images and updated Capture One Pro catalog to my Drobo. On my iMac I’m running Backblaze which then starts to transfer my new images and catalog into the cloud. This can take a while, and I have to choke the upload speed a little so as not to get my Internet connection crippled by my stingy provider, but even after a wildlife trip with thousands of images, within a few weeks of getting home my new work will be backed up in the cloud.
Being slightly paranoid, I actually have a second Drobo which I turn on occasionally and run another Chronosynch job to synchronize my first Drobo with my second. This is just to save me waiting for a cloud backup to be delivered from Backblaze should I ever have anything go wrong with my Drobo. The cloud backup is really my ultimate disaster recovery plan, should something happen to my entire house, taking out both Drobos. My entire back is currently around 17TB though, so downloading it over the Internet is not really an option. I’d have to pay for physical drives to be sent out to me.
I also backup my Finals SSD to the Drobo, including the Finals Capture One Pro catalog, as I make most of my final tweaks on there, and it also contains lots of Collections for things that I’ve done over the years, including my yearly Top Ten selections, which I love to go back through from time to time. I also use it to create temporary collections like this Want to Print collection.
Printing Our Work
I’m not sure if I’ll have time to do this during the coming week, but I was thinking that I’d love to print some of the medium format work that I did during my Hokkaido Landscape tour in January. so I’ve just dropped twelve images into a Want to Print album. I might tweak the selection too, but there is something about the tactility of the format that makes me want to print at least a selection of images. I found it so interesting and calming to work with film after almost twenty years and also developing the film myself using the Lab-Box. There is something about deciding how to complete this analog work in the digital darkroom though that has me thinking a little harder than I have so far when printing digital work, so I’ll try to nail that down and talk about it once I’ve come to some conclusions.
Whether you shoot film or digital though, printing can be incredibly fulfilling, so I wanted to suggest that if you are staying safe and healthy during these times of crisis, and find yourself with some time at home to enjoy your photography, printing can be a great way to do that. It might be hard to source a new printer at the moment, but even if you have an inexpensive A4 inkjet printer hanging around, the results can be surprisingly good, so maybe give it a try.
Show Notes
Check out Chronosynch here: https://www.econtechnologies.com/chronosync/overview.html
Audio
Subscribe in iTunes to get Podcasts delivered automatically to your computer.
Download this Podcast as an MP3 with Chapters.
Visit this page for help on how to view the images in MP3 files.

Thanks for sharing your process. I’m migrating to Capture One and this was super helpful and timely. What are the advantages of using a year-long catalog over individual sessions?
Also, how do you determine what becomes final? Anything with 2 stars or higher?
Hi Bryan,
There are no clear-cut advantages as such, it’s more just a personal preference. I prefer to have all of my work from the year in one place, and then copy all of my finals to another catalog of my best work over the years. It allows me to quickly get to all images in either catalog as I work through the year and onwards.
A session, usually one per shoot, is more of a closed box. Once you complete a session, you close it and move on to the next. To see images from a previous session, you have to go back through your sessions and open them up individually, and that is, in my opinion, a bit of a pain. You could, of course, continue to add to the same session, but they are not designed to be used like that. If you want more work in a single place, use a Catalog.
Yes, anything with two stars or higher is a final. I use 3 stars to select anything that I think is worth working with, my keepers. Then as I work on images, very seldomly, I have to jump into Photoshop or Affinity Photo to work on an image, and when I do that, I store the saved TIFF or PSD in the same folder as my original and mark it with 3 stars or higher, and at that point, I mark the original as 2 stars, just to keep it in my final selection.
4-star images are better than 3, and images that I will generally more proactively try to use and display, and anything that makes my portfolio becomes a 5-star image. I keep the 1-star rating for demotions, as in, when I am going through my initial selection of 3-star images, if I demote something, I give it 1 star, just to keep a record of what I once selected. Occasionally I go back through my 1-star images to find an alternative, say if I find that the image I decided on was a bit shaky or need to replace it for any reason. But, I don’t include these in my finals, as I rarely have to go back that far, and when I do, I can go to my original yearly catalog.
I hope that helps.
Regards,
Martin.
Thanks for the great writeup. I learned a lot.
I found your site while googling for capture one workflows. Your photographs are truly wonderful and I look forward to more of your posts.
Thanks again,
Bryan
Thanks for the kind words Bryan. I’m pleased you found the post useful too.
Please follow this link to see a list of other Capture One Pro related posts.
https://mbp.ac/cotutorials
Regards,
Martin.
Great post Martin. Thanks for providing this.
You are very welcome Dave. Thanks for the comment. I hope you are well and staying safe.
Thank you for showing your process. I haven´t used Capture One. Do you use it for all of you b BW photos as well?
Hi Jens,
You’re very welcome. Yes, I use Capture One Pro for my black and white work too. I haven’t used a plugin or third-party tool for conversions since I switched in 2016. You can see some of the techniques in my previous posts here: https://mbp.ac/cotutorials
Regards,
Martin.
With MacOS Catalina, I am finally moving from Aperture. So, I really want to be clear about this workflow, particularly which catalog you make what edits/adjustments. As I understand it, On your Traveler SSD, you mark your selects, so the ratings gets saved in the current year catalog. You have a smart album in Traveler’s current year catalog of images rated 2 stars and above. You export those, including the adjustments to the Finals SSD. On the Finals SSD, you have a Finals catalog, to which you import the export images along with the adjustments. When you get back to your workstation, you do a file system backup (synchronization) of both drives to your Drobo. On the Drobo you make final(?) adjustments and you house additional collections. So, when on the road, do you ever go back to earlier work and make edits on either the Traveler or Finals SSD. Do those edits get get picked up and moved to the Drobo catalogs via this process. Do you only work off the Drobo version of the Finals catalog for adjustments for printing? Basically, do yo restrict what kind of work you do from which catalog, or does this workflow allow you to do any type of work, independent of location, because it all makes its way to the Drobo? Do you ever make edits on the Drobo’s catalogs that you need to on have on your Finals SSD? If yes, is it simplistic to have the sync work backwards?
Hi Louis,
Congratulations on jumping ship. You won’t regret it.
On your steps, you have it almost as intended, with a few changes required.
This doesn’t necessarily need to be a Smart Album. Generally after a trip or shoot, I do have a smart album, but say I just go for a walk and come back with some images I like, I will just filter out the 2 star and above and copy those to my Finals > Year folder. The result is the same; a new copy of my final select images in my Finals folder.
Not quite. I do the synchronization when I get back, yes, but that is just so that the images start to get backed up into the cloud, because my Drobo backs-up automatically to Backblaze. Until the end of the year, all changes that I make are A) on the Traveler while I’m still working on the final selections, or B) in the Finals SSD once the shoot has been copied to it.
Only after that year finishes and I wipe my Traveler clear does the Drobo folder for that year become my master copy, but I still generally do all of my editing on the Finals drive. If I was to go and get a new image from the Drobo I generally copy that to the appropriate year on my Finals drive and work on it there. The Drobo is just an archive with cloud backup.
Good point – Even the copy of my Finals on my Drobo is just for backup purposes. My Finals SSD drive is my main copy, so all edits are done there, not on the Drobo copy of the Finals drive/folder.
I believe that pretty much answers your questions Louis, but let me know if anything is still unclear.
Regards,
Martin.
Hi Martin!
Thank You for Your very detailed description. I am setting up/ modifying my workflow following your post but I am having a hard time finding the DROBO 5N2. Perhaps this specific model is outdated? Do You see advantages with this specific brand or would You recommend a (pair of) Synology units instead? Is there anything specific to look for in the NAS based on Your experience?
Thank You!
/Vania
Hi Vania,
Sorry I missed your question for a few days.
The Drobos that I use are Drobo 5D no 5N, which are networked. If your computer has Thunderbolt 3 then the 5D3 is the latest model that I would recommend. I definitely prefer Drobo over any other type of storage, simply because of its built-in redundancy and ability to gradually switch-out drives for larger ones. I have one of my 5 HDDs in my Drobo fail on average about once a year, and when they do, I put a larger drive in than the one that fails, and that gradually increases the overall volume of the Drobo, which I love! Whenever I replace a drive, I always buy a new one, so that I’ve got a spare waiting for the next failure.
I honestly don’t know what features or redundancy other manufacturers’ drives have, so if you are happy with the spec of something else, it may well be fine, but I can only really recommend what I use and know.
Good luck!
Regards,
Martin.
Also, regarding NAS based, if you absolutely need NAS, rather than a device wired to a computer then the Drobo NAS storage is fine, but keep in mind that cloud backups like Backblaze generally will not backup NAS drives. The drive has to be physically attached to the computer to be backed up into the cloud.
Great write.
Which SSD are you currently using for moving between machines?
I’m currently using the Samsung X5 2TB SSDs. They have a $150 discount on B&H right now -> https://mbp.ac/samsung2tbx5