
Visit Library for MBP Pro eBooks |
Four years ago I walked you through scanning 120 format film on my Epson Scanner, which was around six years or so old at the time, making ten now. When I came to scan the film that I had processed recently, I found that my scanner had broken, so I replaced it with a Canon CanoScan 9000F Mark II. This scanner is also a few years old in design, but it's the latest model that I could find that offers high-resolution scanning and the film guide for 120 film.
Note though that B&H Photo and Amazon.com don't seem to stock this scanner anymore, and Canon's website here in Japan also marks it as running low on stock. This is a sure sign that Canon is probably preparing to release something new, which I would like to have waited for, but I didn't have that luxury with my old scanner having broken.
Regular flat-bed scanners designed just for documents shine light onto the document while scanning, but to be able to scan slides or negatives, the scanner has to have a light built into the lid to shine through the film, so this is something to be careful of when buying a scanner for this purpose. Also, not that all of the dedicated film scanners that I could find online were relatively low resolution. We're talking about creating images that are around 10 to 15 megapixels, even when scanning medium format film, and that is just too low to be of any use in my opinion. Of course, if you never want to make any large prints, and your final use is the computer screen, then that resolution would be fine.
When I first installed the software that comes with my new Canon scanner, there were a number of limitations forced on me by the software, which would have resulted in lower quality scans, so we'll cover this first, in case you have bought the same or a similar scanner. Note too that I have not been able to access these settings via the TWAIN scanner drivers that are installed, so I am not able to get higher resolution scans from within Affinity Photo or Photoshop, I have to use the Canon IJ Scanner Utility. There are other dedicated scanning applications available, but at this point, I have not tried any, so we'll stick with the method I'm currently using.
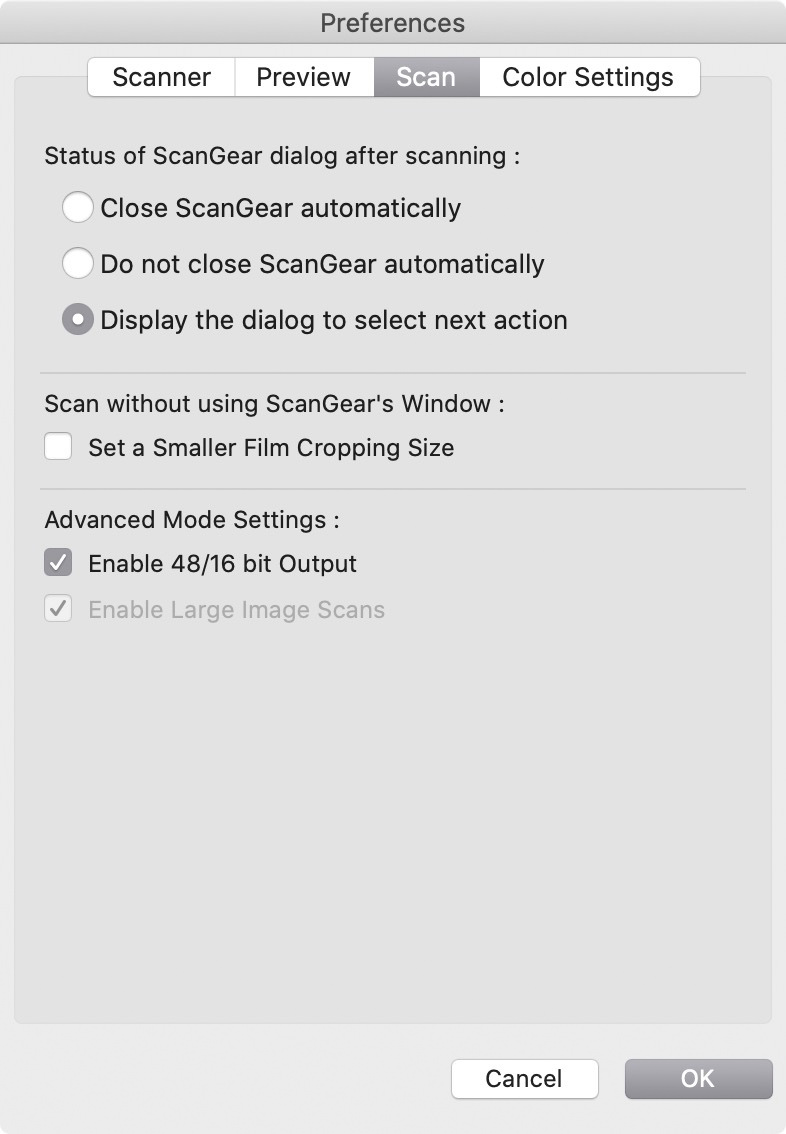
Settings for Higher Resolution Scans
To enable higher resolution scans, when you first start the scanner software by opening the Canon IJ Scan Utility application and then clicking the ScanGear icon, switch to the Advanced Mode, then open the Preferences panel. Under the Scan menu Advanced Mode Settings section, enable both the Enable Large Image Scans checkbox and the Enable 48/16 bit Output checkboxes. Without these options, the scanner will only provide relatively low-resolution scans of medium format film.
You can also turn on Enable Large Image Scans by clicking the Settings button on the Scanner Utility and it's a good idea to select TIFF for the Data Format under ScanGear, as you ideally want to be saving your images in a lossless format. JPEG is compressed generally, and will gradually degrade as you resave your images, so in my opinion, JPEG should really only be used as an output format. The only other options are PDF and PNG, neither of which are suitable formats for photographs.
What Resolution to Use?
In my earlier tutorial on this, I mentioned that I was scanning at 4200 dpi (dots per inch). I also mentioned that this was possibly overkill, but I did some more experimentation with my new scanner and found out a few other interesting points that I also want to relay. Firstly, I found that I was still seeing a usable quality increase in my scans when using 4800 dpi. This gives me scanned images that are slightly over 10,000 pixels square, which means the images are 100 megapixels. That's almost ten times the resolution of the dedicated film scanners I saw, many of which are a similar price to the CanoScan that I decided on. I also tried the higher setting of 9600 dpi, but this just increased the file size. No more usable resolution was recorded.
This got me thinking about my original tests though, so I double-checked some other recent photos shot with my first TLR camera, the Yashica-D, but scanned with the new scanner, and I found that photos were limited by the optics of the Yashica, rather than the film or scanner. I just completed some tests using ILFORD DELTA 100 film and processed it with Perceptol, which is a very fine grain developer, and the images were all pretty soft compared to the images I'm getting from my new Rolleiflex.
Of course, the takeaway for you here is that this really is something that you need to test and decide on for yourself. With my Yashica-D, we were probably looking at me realistically only being able to scan up to around 3600 to 3800 dpi and still getting usable resolution, but with the Rolleiflex 3.5 with the Planer lens that is up to 4800 dpi. I'm not sure how this compares to other vintage medium format cameras, so the best thing to do is to keep increasing the resolution until you stop seeing any more usable detail.
Also, note that I am scanning with the Color Mode set to Grayscale (16bit). I've experimented with the color scanning modes, and there are lots of methods discussed online, such as scanning in color but only using certain color channels, and throwing the rest out, then ultimately going to a black and white image, but I really don't see the benefits in doing that, so in my usual way, I have decided that these are hoops that we don't need to jump through. 16bit Grayscale images are very high quality, and ultimately I want a neutral gray toned image, so this works for me.
Here's a screenshot of my final settings in the ScanGear window, and you'll notice that the Data Size number is in red, which is Canon shouting at me for scanning my image at such high quality. As I've already told the software that I want a high-quality scan, I find it a bit pointless to display this number in red, but that's how it is. Also note that I am leaving Unsharp Mask turned on, but Image Adjustment and Grain Correction are off.
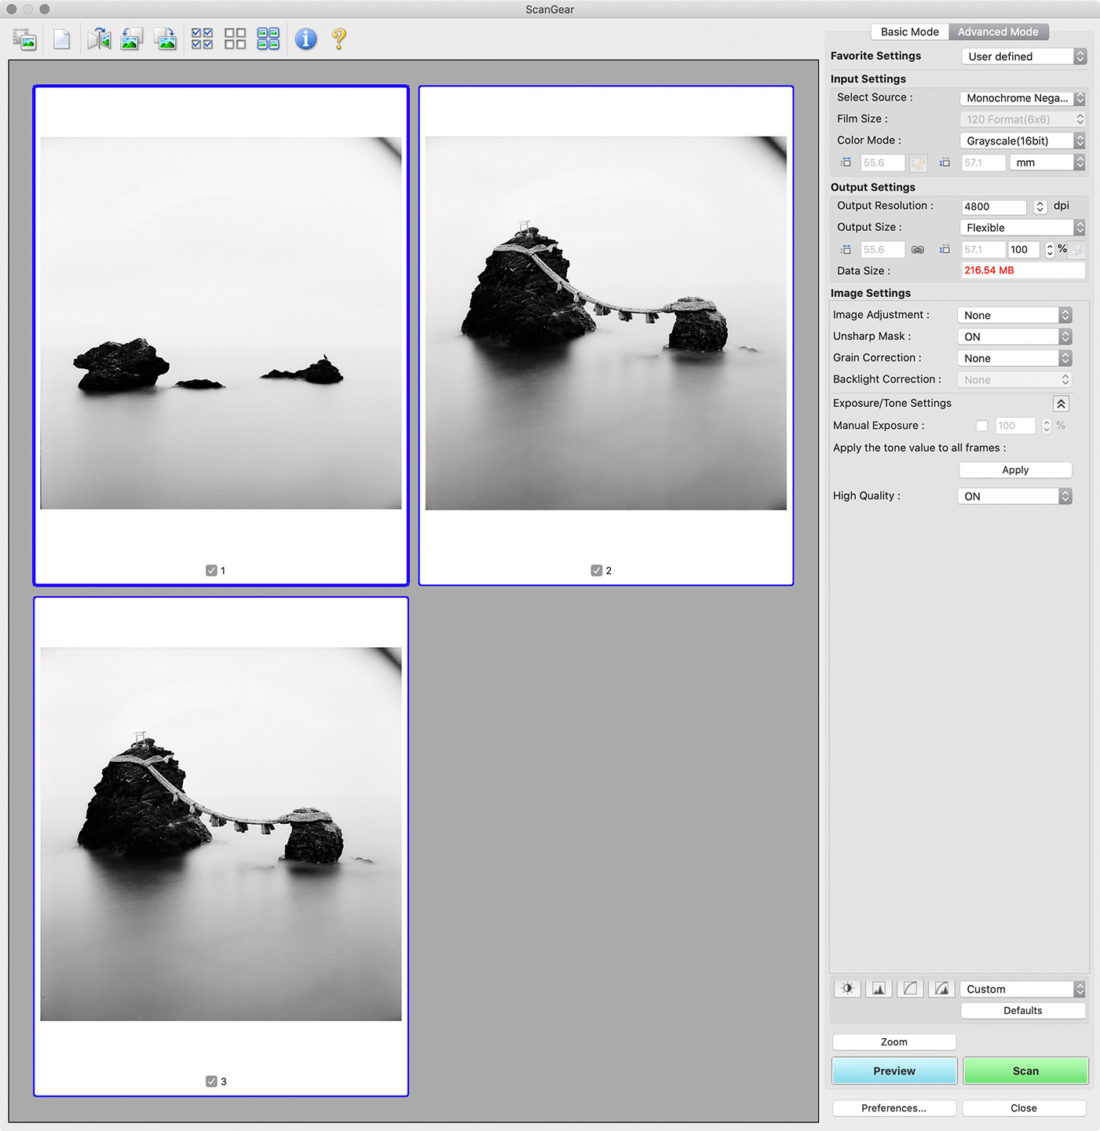
I am also leaving the Manual Exposure checkbox turned off most of the time, but if I inadvertently over-expose something, or the software just seemed to misunderstand the content of the image, I can override that with the Manual Exposure checkbox and adding a new percentage. Going higher than 100% seems to reduce the exposure and lower than 100% increases the exposure in the image. You can also adjust exposure using the Tone Curve options that you can see towards the bottom right corner of this screenshot.
You can actually see the images that you are about to scan pretty well, especially if you are working on a large display with this window maximized. I also like that I can scan up to three frames at a time now. The Epson scanner was only two frames at a time, so this is another benefit of replacing my scanner. I can now scan a 12 frame roll of film in four sections. One other thing to note is that the shiny side of the film should be facing down when scanning. That's the front of the film, so although you can flip the scanned images if necessary it's better to get the orientation right for your scan.
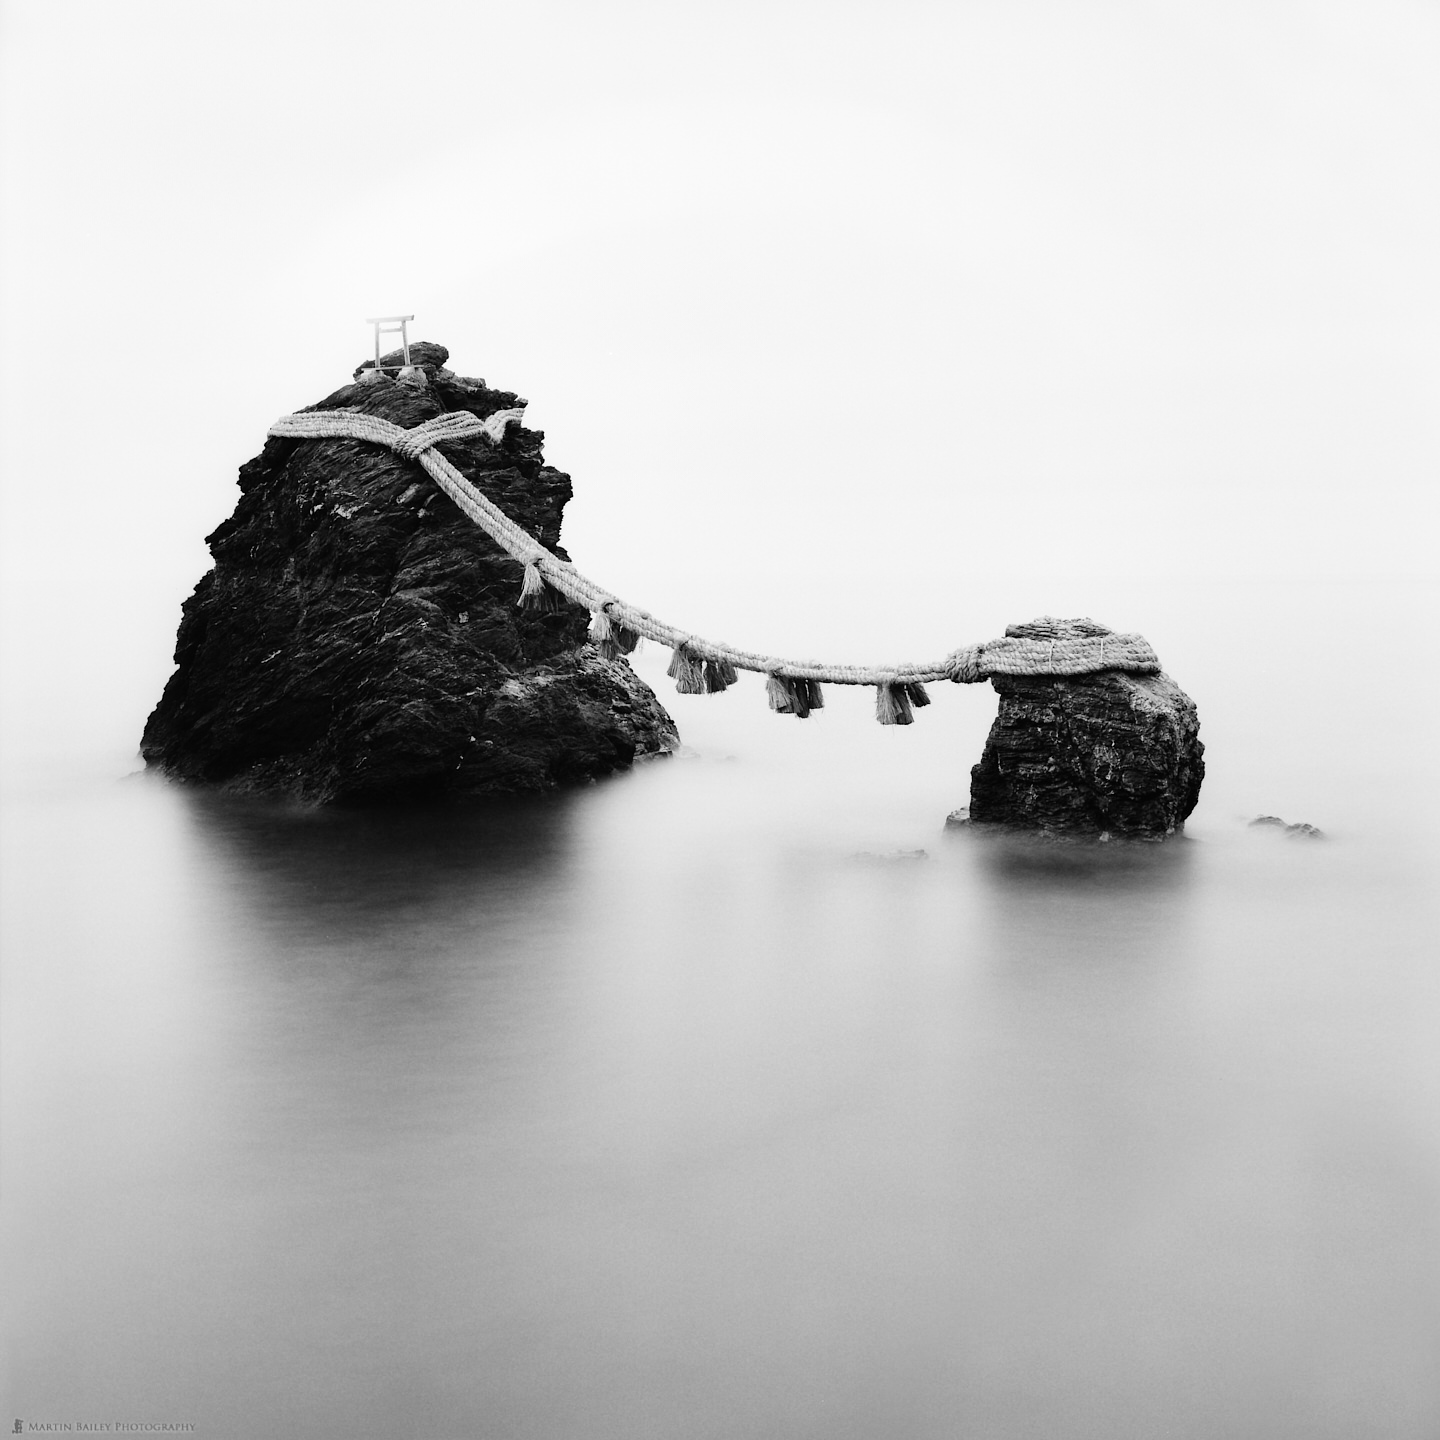
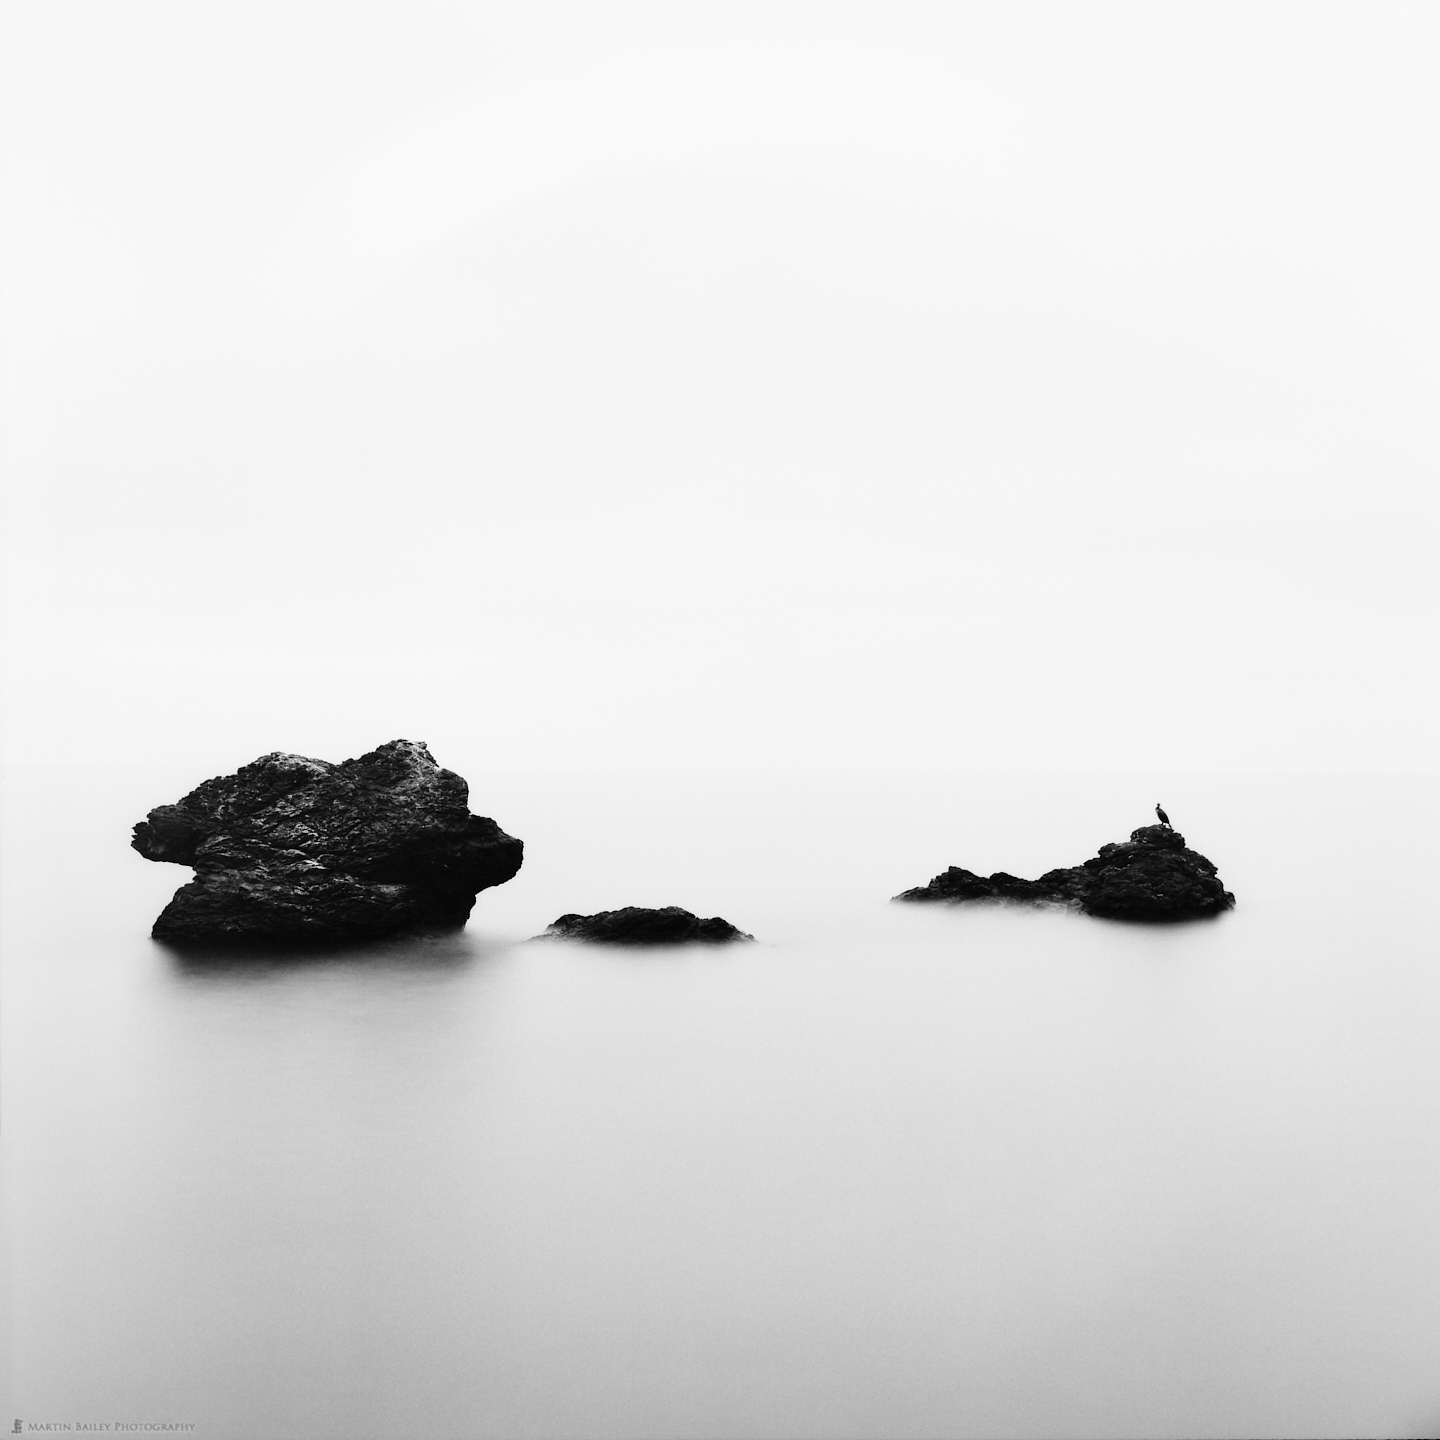
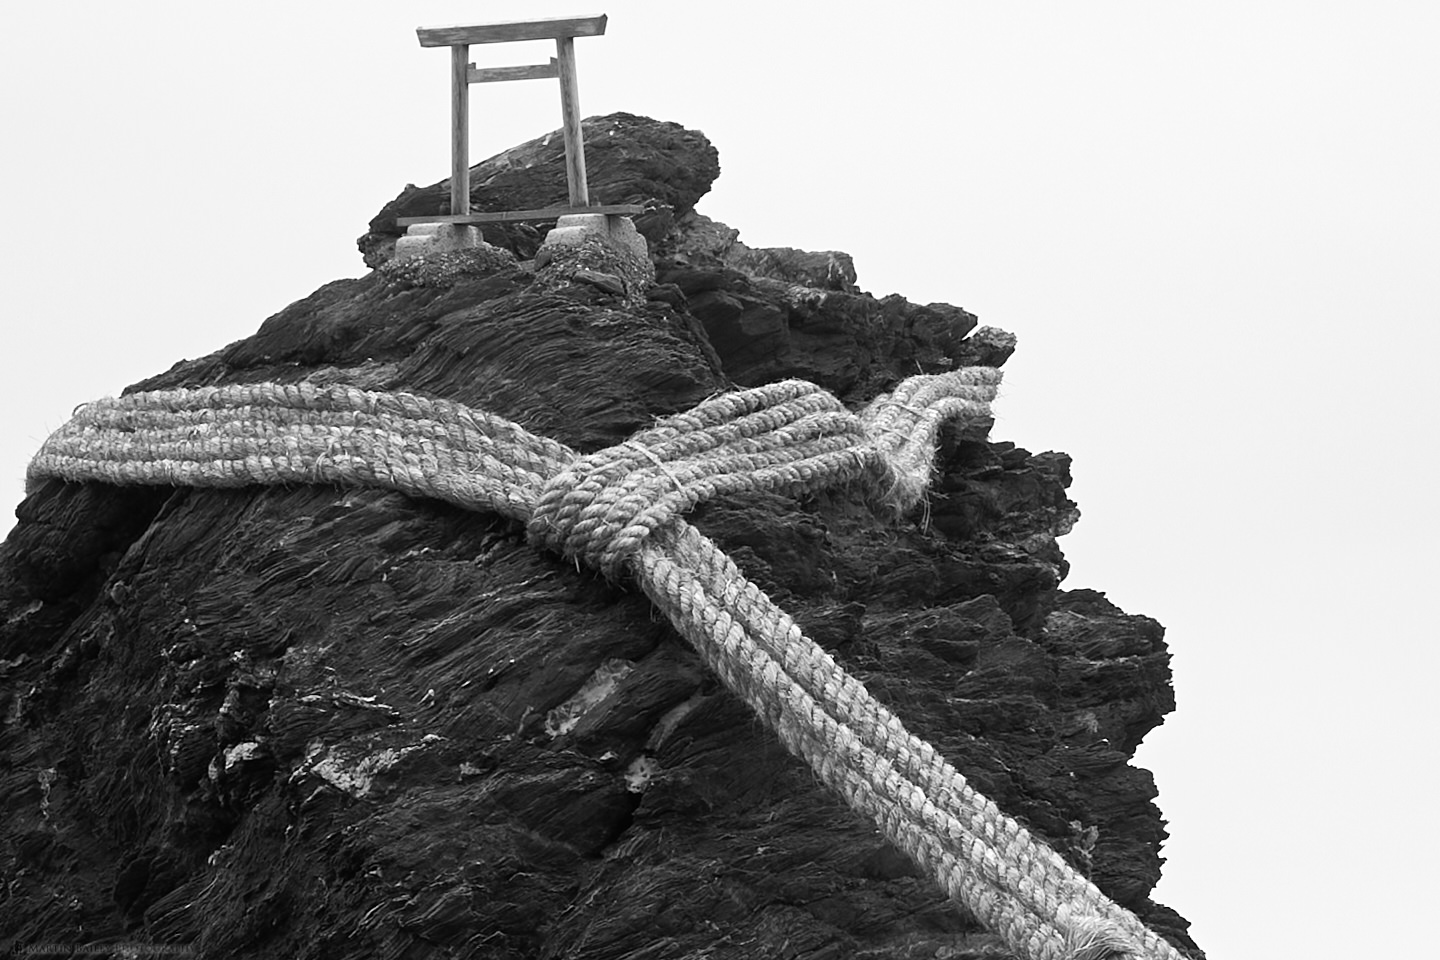
You'll also note that the corner of my circular ND filter was showing in the top right corner of these images. I have since found a place that does custom made filters that should fit the Rolleiflex, but for a recent trip to photograph the rocks that you see in this screenshot, I had simply taped an ND to my lens hood, and because you don't look through the shooting lens on a Twin Lens Reflex camera, I didn't notice until after I'd shot these three images. I corrected this and continued to reshoot the rocks using an ISO 25 film from Rollei, but unfortunately, it looks like I got a bad batch. All of the images I shot on the following roll had a really strong mottling, almost like a leopard fur pattern. I ran more tests when I got home and found it to be that particular film, which was disappointing. Anyway, a bit of deftly cloning was enough to get rid of the filter ring in the corner, so I still came away with the photos I was looking for.
I am generally turning on the checkbox for all three images, and scanning them all at once. If there is a frame that you obviously don't need to scan, you can do this by leaving the checkbox turned off. The software will only scan the images with a checkbox enabled. At the resolution and settings I've chosen, it takes about two to three minutes per frame to scan the images, so six to nine minutes to scan all three. I sometimes also find that the autodetection of the images doesn't work every time, and I have to jiggle the film around a little to get the software to recognize them. One thing I have noticed though is that it helps to slide in the strip of plastic that comes with the scanner to effectively show the scanner where the start of the first frame is, as you can see in this photo.
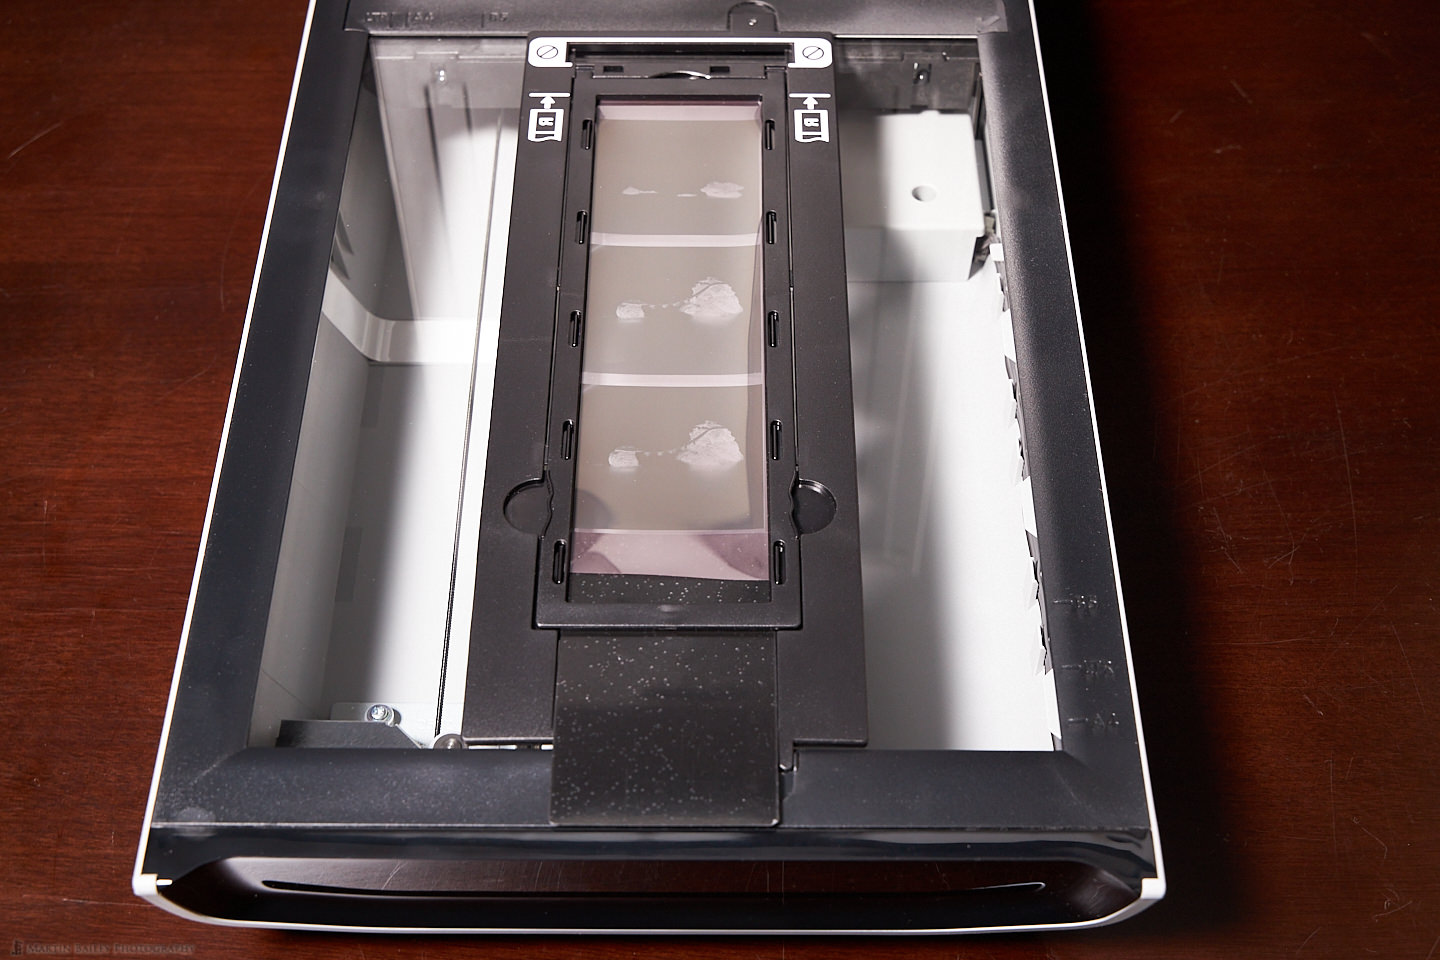
Once you have the film set like this, you close the lid and start up the ScanGear software. If you already have the software open from a previous scan, just hit the Preview button again to take a look at your next three images. If you shoot 35mm film, by the way, you can also use this scanner. A film guide for mounted 35mm slides and 35mm film strips is included.
Change Color Space
One other thing that I have found is that the color space Dot Gain 20% does not seem to be supported by Capture One Pro, my photo editing software of choice. I have to open the files up in Photoshop and convert the color profile to ProPhoto RGB before I can edit the images in Capture One Pro. Of course, Adobe RGB or sRGB would also work, but I prefer to work in ProPhoto RGB. And, I have not yet found a way to automatically open the images in Photoshop or Affinity Photo after scanning with the ScanGear software. You can specify an app in other modules, but not when using the ScanGear drivers. These options are grayed out, so that adds a few extra clicks to the workflow, but it's not a big deal.
Example Images
Here are two of these images that I scanned so that you can take a look at the end result. The film, by the way, is the recently rereleased FujiFilm Neopan Acros Mark II. I'm finding it really nice to work with, and the tones are great, but I have noticed a larger number of flaws in the emulsion that I would rather not see in a film. There are patches of white flakes, which I guess would be black flakes on the negative, on most frames that require a bit of cloning to remove. I haven't really noticed these on the Rollei RPX 100 or the ILFORD DELTA 100 films that I've also been using.
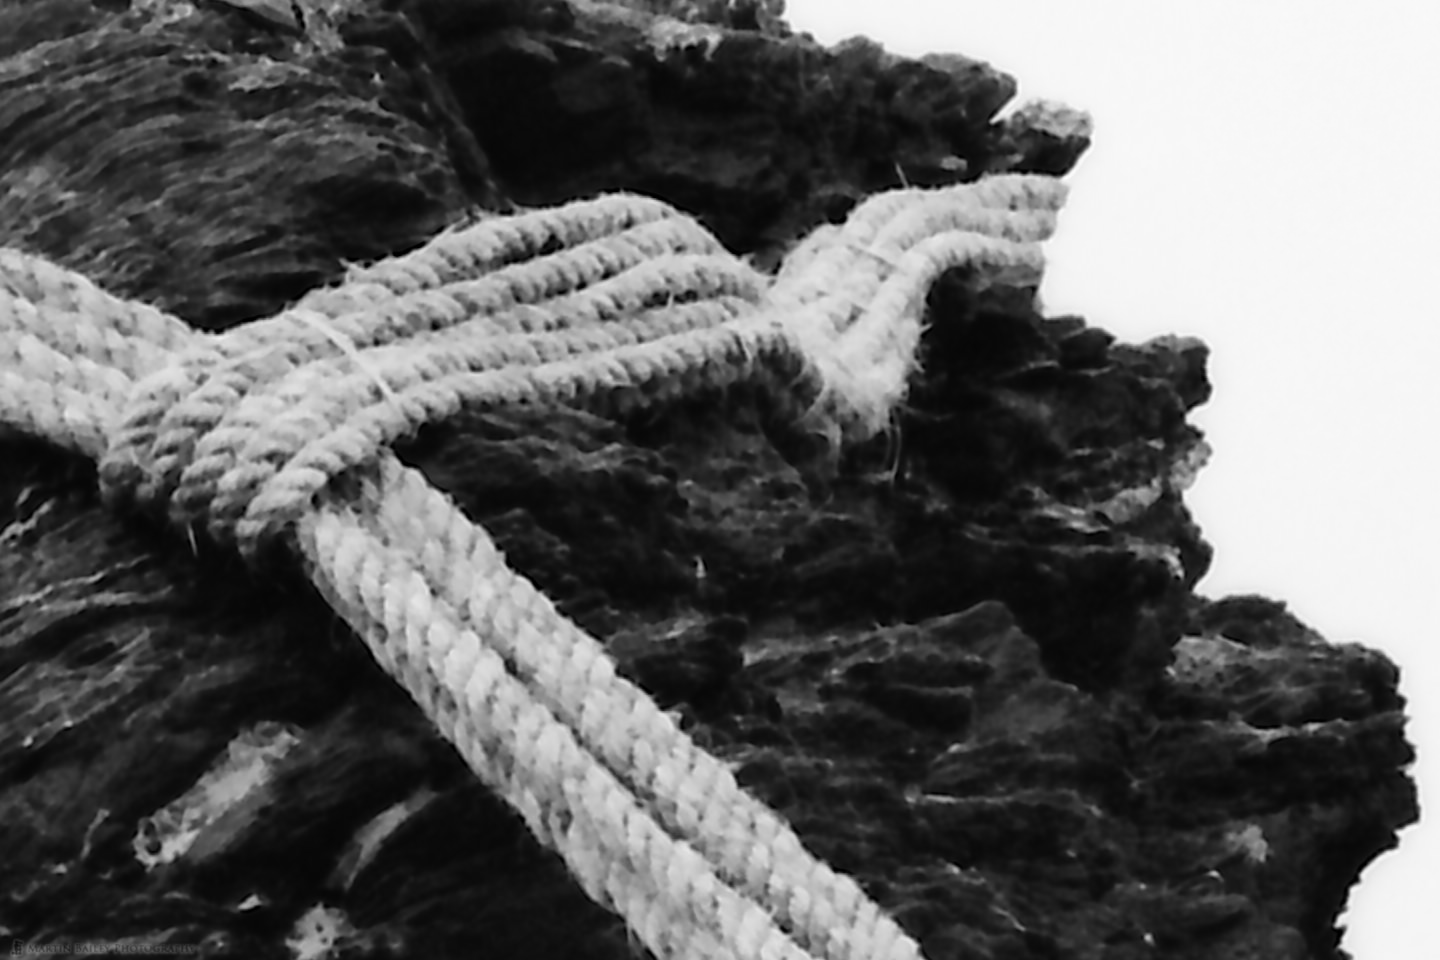
Here also is a 100% crop of the first of the two images above, to show you the image quality at this resolution. As you can see, there is plenty of detail, but it's bordering on getting a little soft. I'm at the top limit of useful resolution for sure.
Here too is a 100% crop from the same scene shot with my EOS R. The image is obviously sharper at 100%, partly because I'm pushing the resolution on my scans, but also because the Rollei is more organic with it being film.
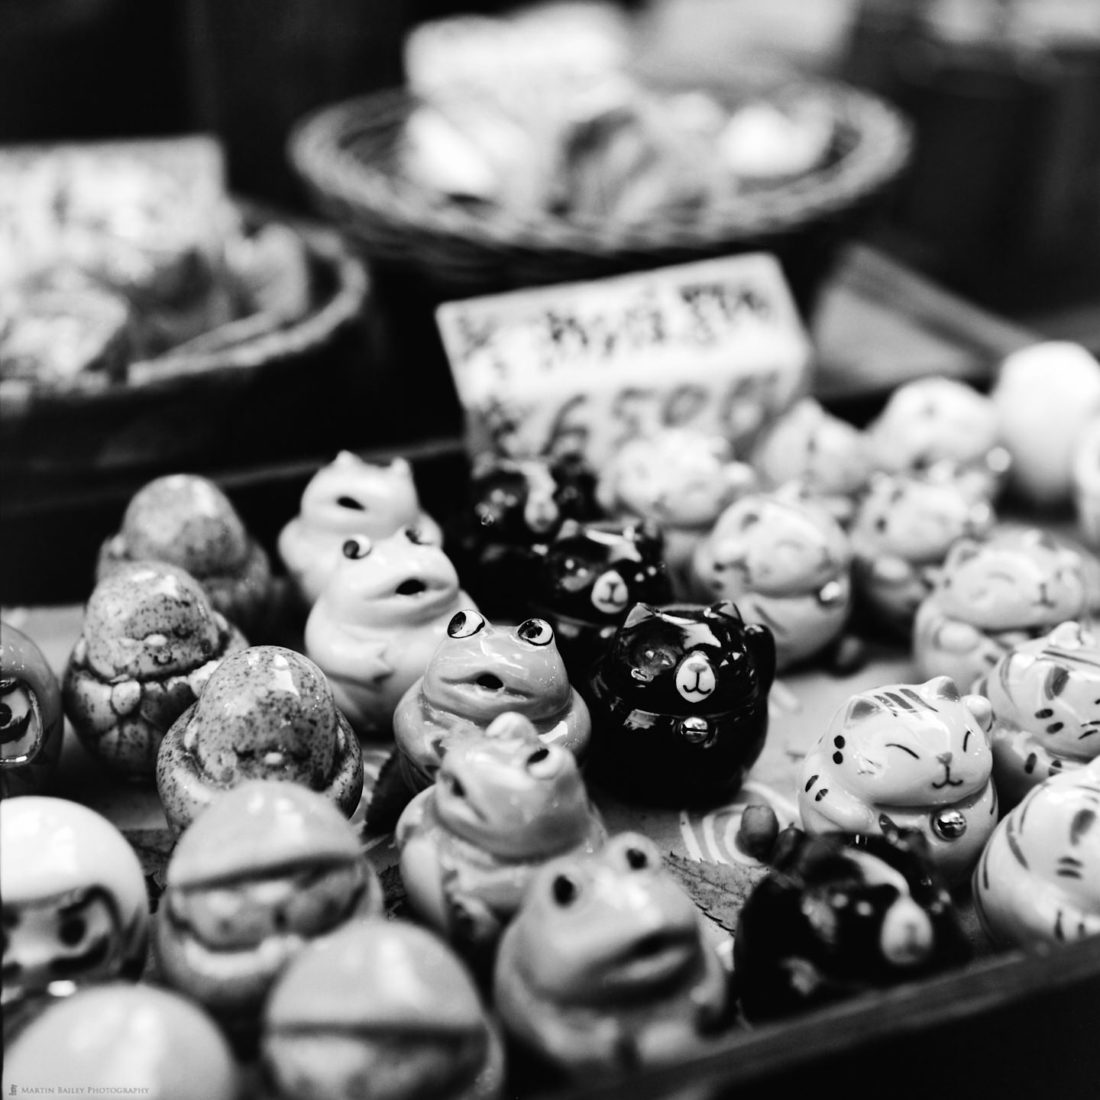
Before we move on, here is one other example image shot with the FujiFilm Neopan Acros MarkII 100 ISO film, really to illustrate that this film really does have beautiful tones, and in true Neopan form, the blacks are beautifully rich, as you can see in the glossy black cat ornament here.
Storing Processed Film
I was also asked in the comments on one of my recent posts how I am storing my processed film, so let's take a look at that, but unfortunately, I have not been able to find a similar product on B&H Photo or Amazon. If anyone knows of something similar to this on sale online anywhere, maybe you could share a link in the comments below.
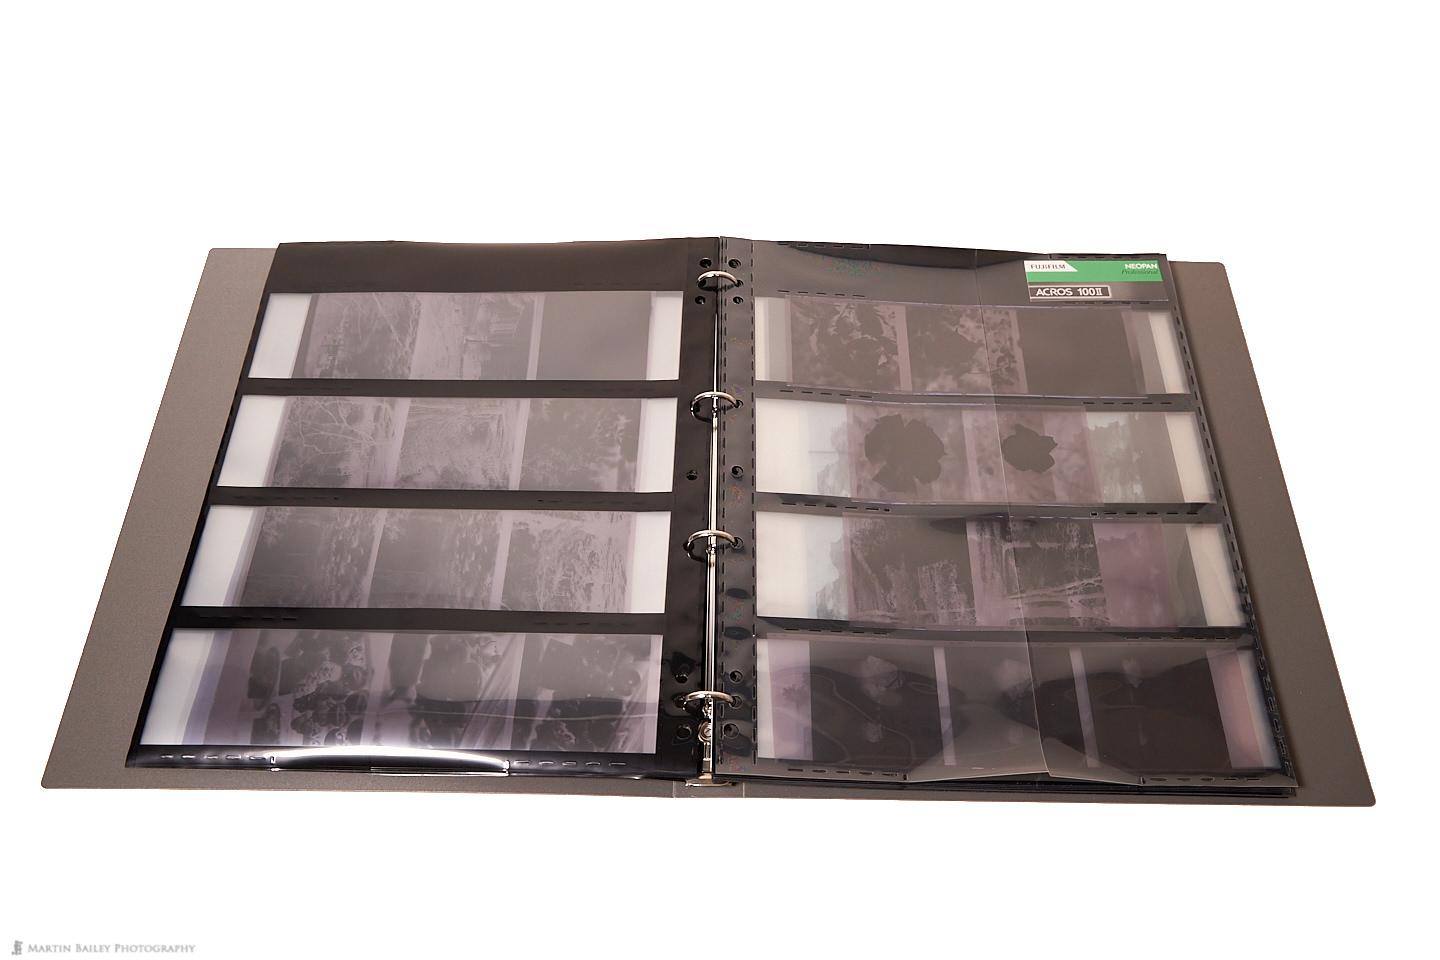
Also, as you can see here, even just placing the loose pages on white paper enables you to see the negatives pretty well, but you can also drop this onto a lightbox and view the images with a loupe if you prefer because the polypropylene is perfectly clear. There are also iPad apps that provide a bright white screen so that you can use them as a Lightbox as well.

OK, so we'll leave it there for today. I hope this has helped some if you were looking for information on scanning film, but with the products not being readily available everywhere, I'm sure I've left you with a job to find something available in your market. This will hopefully point you in the right direction though. I guess this is a sign of the overall interest levels in shooting film, but I am encouraged by the fact that FujiFilm just rereleased Neopan Acros. Hopefully, there are enough people still shooting, or starting to shoot film with its resurgence, that it compels more manufacturers to follow suit.
Thanks very much for listening today. If you enjoy this podcast please consider supporting us on Patreon, which comes with various tiers of benefits depending on your contribution, although all tiers provide access to the full blog posts for more than 780 episodes as well as access to the MBP Community. For further details check out our Patreon page at https://mbp.ac/patreon.
You can find me on Instagram, Facebook, Twitter LinkedIn, and Instagram, etc., and links to everything that I'm up to are at martinbaileyphotography.com, so do drop by and take a look. I'll be back next week, with another episode, but in the meantime, you take care and have a great week, whatever you're doing. Bye-bye.
Show Notes
SHOW NOTES HERE
Subscribe in iTunes to get Podcasts delivered automatically to your computer.
Download this Podcast as an MP3 with Chapters.
Visit this page for help on how to view the images in MP3 files.

Hello Martin
I’m surprised Canon have a 9000F Mark II. I have a 9950F which replaced the 9900F and is in its turn also superceded. Perhaps they made it the 9000F Mark II because there is no longer much demand for 5×4 scans.
Assuming it’s the same as things were, my understanding is that the 4800 resolution is theoretical rather than actual and actual resolution is likely to much less. Update: I found a review in a German scanning site I had bookmarked that tested the resolution to 1700dpi though you need to scan at “4800” to get that. https://www.filmscanner.info/en/CanonCanoScan9000FMark2.html
My experience with the 9950 was that Canon’s Canoscan software was appalling and would clip the images you scanned. My preferred software was Silverfast (current version AI Studio), which is complex and expensive. However, Silverfast stopped supporting the 9950F after Windows XP so I went to Vuescan, which is simple, inexpensive and works.
Regards,
Murray
Hi Murray,
It’s great to hear from you. I hope all is well.
I’m not buying many of the statistics that I see on that page. Firstly, the scans for a 6 x 7 cm negative at 4800 dpi shouldn’t be taking 45 minutes with the ScanGear software. A 6 x 6 cm negative is only taking 2 to 3 minutes for me. Although this might be longer for 48bit color, I can’t imagine it taking 45 minutes.
Also, regarding resolution, they are getting their 1700 dpi from the resolution of a shot of a test chart, but I cannot find a mention anywhere of what camera/lens or film, developers they have used. As I mentioned in this post, the Yashica-D shot much lower “resolution” images than the Rolleiflex does. I have also noticed that ILFORD XP5 film is lower resolution than their DELTA film. I might be missing this information on their page, but stating the resolution of the scanner without taking this into consideration is a bit of a slippery slope.
The resulting images that I’m seeing at 4800 dpi scans are sharper than at 4200 dpi and 3800 in similar steps, which is why I’ve settled on 4800 dpi for scanning images on good quality film from a good quality vintage camera. It’s slightly overkill, as I mentioned, but not much. Note though that everything I’m talking about is related to scanning 6 x 6 medium format images, and the post you linked to focusses more (though not entirely) on the results of 35mm film scans, where their findings are more relevant.
The ScanGear software that comes with the printer does a fine job, and you can set how much cropping you want it to do. I’ve found that the standard cropping works perfectly, and in fact, occasionally leaves a bit of the actual frame showing. If I increase this to less cropping, all four edges of the negatives are visible, unnecessarily leaving more work to do later. Maybe the software has improved since you used it, but I am very happy with the software I’m currently using, which is why I mentioned that I’m not really looking at other options at the moment. I’d be happy to evaluate software if someone provides me with it, but there is no incentive for me to buy anything because I have no problems to fix.
Regards,
Martin.
Hi Martin, yes, all is well.
It makes sense that things have changed since 12 to 15 years ago so Scangear is probably significantly improved. It was clipping especially of the highlights I was referring to though rather than cropping. And when I was scanning 5×4 slides on my 9950, I found I got as good results on 2400dpi as 4800 but once again that may have been the older scanner.
Coincidentally, I am in the middle of a slide scanning job using my 9000F Mark II. I debated getting a newer scanner before I started this project however I decided the slides did not justify a better scanner. I am scanning about 800 family slides taken from 1948 to 1975. I decided to purchase the SilverFast SE Plus software to perform the scanning. My main attraction to the SilverFast software was the scratch and dust corrections. I think the software performs this task very well. I am also scanning at 4800 dpi and with the software settings I am using, each slide takes about 5 minutes to complete.
Thank you for the podcast.
Thanks for the information William. I have been spending quite a lot of time removing dust from some nagatives, so if that works well, it might be a reason to give SilverFast a try. I’ll check it out.
I’m curious as to what you considered better than the CanoScan 9000F MkII. Even $2,000+ film scanners are only scanning up to 3200 DPI.
Regards,
Martin.
Hi
https://www.amazon.com/Archival-Negative-Pages-Strips-Frames/dp/B00009R8ZP/ref=sr_1_3?keywords=Negative+Pages+Hold&qid=1576840599&sr=8-3
Archival 120 Size Negative Pages Holds Three Strips of Four 6 x 6 Frames, Pack of 25
Regards
Excellent! Thank you for sharing that Itzik! Very much appreciated.
Regards,
Martin.
Martin – I really like you minimalist photo in the example. I was wondering if your Rollieflex work was going to make into your professional portfolio. Several comment about your process:
I believe the sensor for film scanning is actually in the lid. For three reasons. One, given that you place the film in the holder with the emulsion side up, if you are scanning downward you are scanning through the film base. In a traditional wet darkroom you always place the negative with the emulsion side down toward the paper. Otherwise you end up with a softer photo and any printed items in the image backwards. Two, the resolution required for scanning documents or photographs is much lower. Typically 300 to 600 dpi. Three, it would be cheaper to manufacture a relatively short sensor to put in the lid for film scanning. A relatively more inexpensive longer sensor for document and photographs in the base.
Have you ever had or considered having the photos drum scanned? This is supposedly a much higher quality. it might be an interesting experiment.
With respect to scanners. I’m using the original 9000F. Canon doesn’t support negative scanning with this scanner anymore. It forced me to move on to SilverFast 8 SE. It works but it is cumbersome and somewhat quirky. I won’t go into all the faults. I can get useable scans from it though. Each 120 negative frame takes about 5 minutes. Part of this is due to my geriatric 2010 17″ MacBook Pro. I plan to replace it after the first of the year. Hopefully a new significantly faster processor will help.
With respect to other scanners the Epson V600 has been recommended to my a couple of different people. It does have fairly high resolution. The price is reasonable.
You might find it cheaper for filters to buy a step up ring for Rollieflex Bay 1 to a conventional screw filter. They are available on ebay for a reasonable price. As a side note I finally figured out that Bay was an abbreviation for bayonet.
Finally, You might want to look at some Youtuber Nick Carvers videos on scanning. He is using an Epson V750 (expensive) but does introduce some interesting concepts. When I first saw the videos on the buildings he was photographing I was sort of put off. However, They have grown on me and I like them.
Sorry for this relatively long comment.
Hi Rich,
Thanks for the comments, and for the kind words about the work. I do intend to include some of this work in my portfolio as time allows.
Regarding your comment about the sensor being in the lid, this is incorrect. The lid contains an LED light unit that moves over the film during the scan. The images come out back to front when you accidentally load the film shiny side up, so I’m pretty sure my comment here is correct.
Also, while I agree that resolution required for scanning documents or “printed” photographs is typically 300 to 600 dpi, the comment is irrelevant in the context of scanning negatives or positive film. As you’ve included this in your list of three reasons for believing the scan unit is in the lid, I guess you are hinting on it being a different unit because the resolution is different, but that’s not necessary. One sensor can be used for all resolutions. Finally, on this, the plastic over the light slit in the lid is not clear, it contains a diffuser. You could not perform an optical scan through it.
I have considered drum scanning, but I am not going that route for two main reasons. 1) I prefer to scan myself, rather than send images out for scanning, and 2) I’m getting incredibly good quality scans this way. It doesn’t seem necessary.
I may have checked out Nick Carvers videos, but don’t remember the names of the people I watched. I’ll check him out at some point, but right now, I’m happy with the results I’m getting,
Regards,
Martin.
My Epson scanner died on me recently too so I’ve been looking around Amazon Japan and Yodobashi for a replacement. It doesn’t look like there’s a a lot of choice out there nowadays (for quality scanners). I’ve been tempted to buy one of those dedicated film scanners (Kenko etc.) you can find online for ¥12,000 or so but they look so cheap that I’m not sure how long they’ll last.
What made you go with the Canon over the Epson? I’m thinking of buying an Epson GTX-830 as a replacement for the GTX-980 I used to have.
Hi Sean,
Sorry for the delayed reply. Just catching up on comments etc.
I can’t remember exactly why I went with Canon over the Epson, but seem to recall it being easier access to higher resolutions or something like that. I didn’t go for a cheap dedicated scanner for the same reason. None of them have high enough scanning resolution to do a medium format negative justice. I’ve been happy with the Canon so far, although it would be have been nice to have more choice in this space, as you say.
Regards,
Martin.
Hello Martin,
Although it has taken a while for me to get to it, I have just applied your suggestions to my scanning with the Canon 9000F Mark 2 and I am super happy, many thanks.
Only sorry I cannot use the FARE (Remove Dust and Scratches) software in Monochrome Negative mode, why is that do you think?
Cheers,
Baz
Whoops! I don’t know how I missed this for two years. Sorry about that Baz!
I don’t recall the details, but there was something to do with requiring the color information to identify the dust as dust. In black and white, there is no way for them to differentiate between dust and photographic elements in the image.
Regards,
Martin.
Do you know if there is a way to scan 120mm medium format transparencies with this 9000f scanner? I don’t think you could use the included 120 film holder.
Hi Joe,
I assume you mean 120 film, which is not 120mm. If that’s the case, then yes, you can scan them with this scanner. The format you see me scanning in this post is 120. I’m scanning negatives, but you can scan them as positives/transparencies as well.
Regards,
Martin.
I used Epson V500 for a long time, but then I bumped into a Canon 9000F Mark II and found it to be much better than the Epson! Better I use it with VueScan. Note that you should use the Mark II, as the Mark I is not as good…
I buy my film sleeves in Germany, and I like to use the paper ones, as they don’t attract dust (they also have one for 135 film):
https://www.fotoimpex.com/archival/fotoimpex-negative-pages-paper-4-strips-6×7-6×6-6×9-100-sheets.html?cache=1671093280
Thanks for the information Hai!
Is there a way to scan mounted 120 (2.75×2.75inch, or 7x7cm) slides? I’m not seeing it so far, and my father left behind thousands of mounted slides that he took with his Hasselblad.