

Visit Library for MBP Pro eBooks |
This week we're going to take a look at Exposure Value or EV, and I'll explain what it is, why it's useful, and why I've spent almost every waking minute for the last 17 days building a new Exposure Shift Calculator for our Photographer's Friend app, which we'll use for some of my explanations.
When we talk about exposure, we generally use aperture, shutter speed, and ISO settings to relay the absolute values of our exposure, but then if you want to change one of the values while maintaining the same exposure, you have to change one or both of the other settings in the opposite direction. For example, if you are using an aperture of f/8, with a shutter speed of 1/250 of a second, at ISO 200, and I recommend that you change your aperture to f/11, which is one stop smaller than f/8, and therefore lets in half the light, you would need to adjust the other settings to counter that change.
You might change your shutter speed from 1/250 of a second to 1/125, which is twice as long, and therefore lets in twice as much light, so you maintain the same exposure. If though, for example, 1/125 of a second might be too slow and you don't want to risk your subject moving during the exposure, making them blurry, you might decide to increase your ISO from 200 to 400, which makes it twice as sensitive, and brings your exposure back in line.
This can get a little bit confusing, especially if for example, you don't want to change your aperture from f/8, because it provides just the right amount of depth of field for the photograph you are making, you then have to think about how you could make the same change with the other settings. If you are happy with your shutter speed, you could of course just change your ISO from 200 to 100, making it one stop less sensitive, and you'd have the same exposure as you would if you'd changed your aperture from f/8 to f/11.
Stops Explained
Although people sometimes refer to the changes made to exposure as steps, it's more common to use the term "stop". Before we go on, although this is pretty basic photography theory, let's just recap that by aperture stops from say f/1.0 counting in full stops would go from f/1.0 through f/1.4, f/2, f/2.8, f/4, f/5.6, f/8, f/11, f/16 and higher. Depending on how you have your camera set up you might have half stops between these, but generally, most cameras and light meters use third stops, so for example, between f/5.6 and f/8 you will have f/6.3 and f/7.1, though this varies slightly sometimes with different manufacturers. It's also worth noting that the smaller the number, the larger the aperture, so a lens set to f/5.6 lets in twice as much light as when it's set to f/8, and f/11 lets in half as much light as f/8.
Stops in shutter speed terms are calculated by doubling or halving the time. For example, if your shutter speed is 1/250 of a second, making it one stop slower would be 1/125 of a second, and that is also one stop lighter because the light hits the sensor for twice as long. Making 1/250 of a second one stop faster takes it to 1/500 of a second, which is also one stop darker because the shutter is open half the time. This continues even when we're doing long exposures of more than a second. One stop longer than 5 seconds is of course 10 seconds, and 20 seconds is one stop longer again.
ISO stops can be a bit confusing again, but similar to shutter speeds, you just keep doubling or halving the value for each stop. ISO 200 is one stop more sensitive or brighter than ISO 100. ISO 400 is one stop brighter than 200, and two stops brighter than 100. If we keep going, we'll work through ISOs 800, 1600, 3200 and 6400 etc. The thing to be careful with of course is that very high ISOs can start to introduce noise or grain to your images, but I'll regularly shoot at ISO 5000 or 6400 if necessary to get the shot. It comes down to testing your camera to see how much noise is introduced in various conditions and how comfortable you are with it.
Exposure Value Stops
So, following that recap, let's talk about Exposure Values, which are also referred to as stops, but they can be more useful because when you refer to exposure in EV or Exposure Values, it's not tied to any one setting. According to Wikipedia, the Exposure Value system was invented in the 1950s and uses a relatively simple formula to calculate a value that can be used to represent any combination of our camera settings.
The EV scale can also be mapped to various lighting conditions, for example, if you've heard of the "Sunny Sixteen" rule, which is a basic guideline to set your camera aperture to f/16 and use your ISO as the shutter speed, so at ISO 100, you'd set your shutter speed to either 1/100 or 1/125 of a second. This will get you a relatively good exposure on a sunny day, hence the name, sunny sixteen.
Well, on the EV scale, the sunny sixteen rule equates to 15 EV. On a slightly overcast day, you might open up your aperture from f/16 to f/11, one-stop wider, and this would mean you were shooting at 14 EV. For an overcast day, you might go to f/8, another stop wider, and that is EV 13. Conversely, you might increase your ISO from 100 to 200 for a slightly overcast day or from 200 to 400 for an overcast day, and of course, you could change your shutter speed, but if you have an Exposure Value to work to, it's pretty easy to recalculate your settings.
EV zero
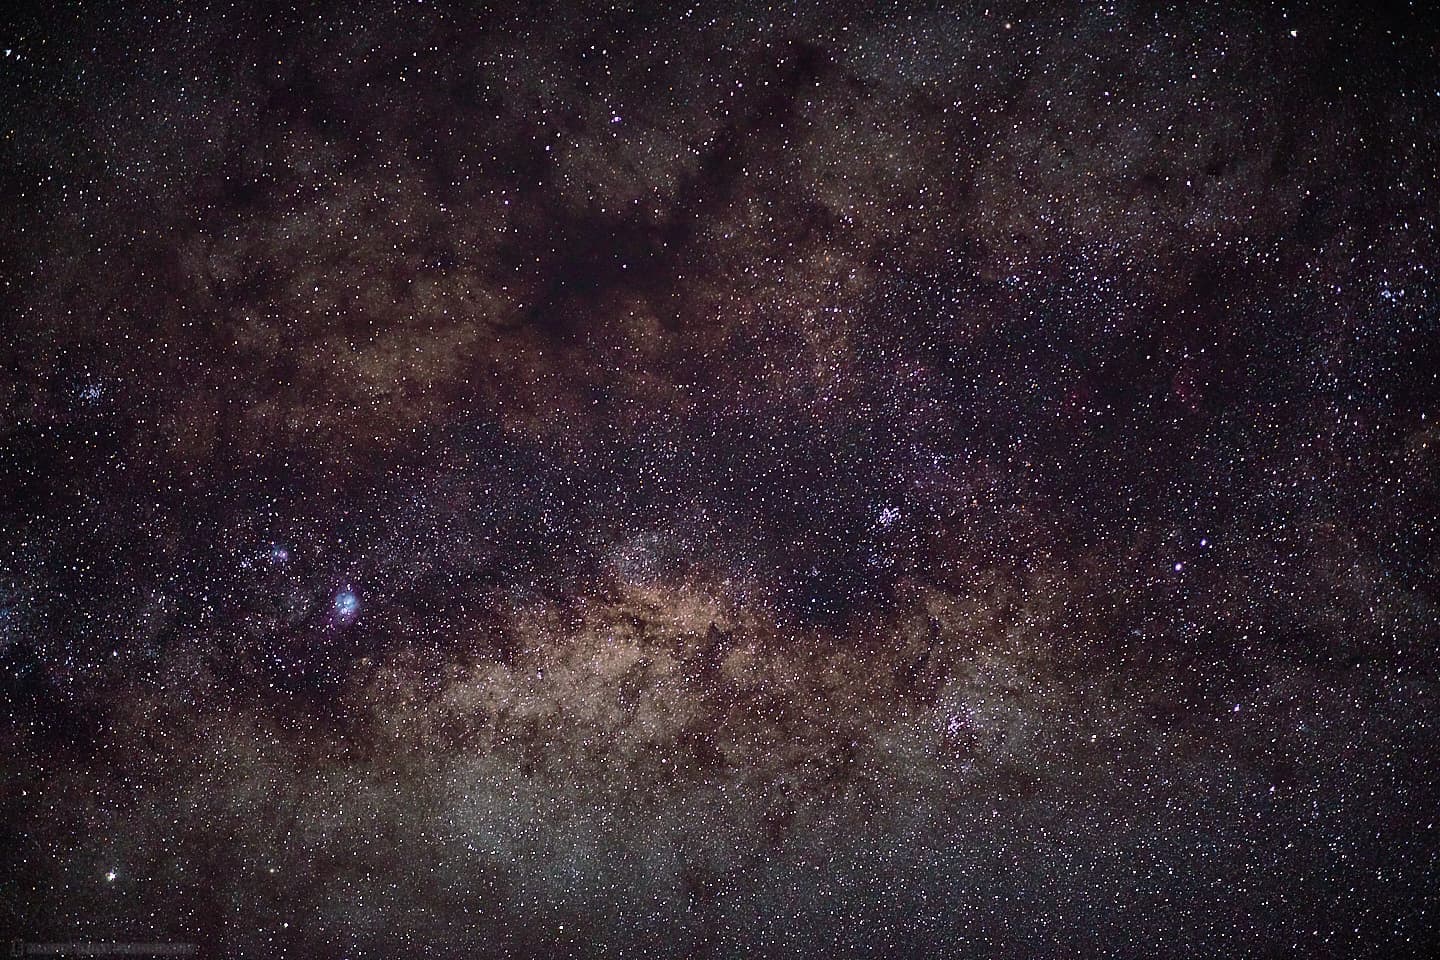
If we keep going back, the zero base for our scale can be represented as an aperture of f/1.0 for one second at ISO 100. This is EV o (zero). We can go darker, using negative numbers. For example, on the EV scale we have the Aurora Borealis at between -3 and -6 EV, and the Milky Way and Galactic Core at between -11 and -9 EV. I actually found these old values to be a little bit too dark if I compare them to my own images, such as for example, the settings I used for this photograph of the Galactic Core that I shot on my Namibia Tour this year.
I shot this at f/1.4 which is one EV more than f/1.0, putting me at EV 1. I was using a shutter speed of 5 seconds, so to continue with our mental arithmetic to see how this changes our Exposure Value number, first I double the exposure from one second to two, which takes the EV back to zero, then double the exposure again to four seconds, which takes us to -1 EV. Another second to 5 is one-third of a full stop, so that takes our EV to -1 ⅓.
I also changed my ISO from 100 to 3200, so let's see how this affects the Exposure Value. First, changing from ISO 100 to 200 makes my sensor twice as sensitive, so my Exposure Value goes up by one stop to -0 ⅓. Doubling the ISO again to 400 is another stop, so we're back into positive numbers with 0 ⅔. 400 to 800 ISO gives us 1 ⅔ EV and 800 to 1600 is 2 ⅔ EV, then finally 1600 t0 3200 is 3 ⅔ EV.
EV Increases as ISO Increases
You might have noticed there that calculating ISO changes can be a bit confusing. For me at least, it seems as though the scale is going the wrong way, but because the EV represents our cameras ability to capture an exposure based on how sensitive the film is, the Exposure Value goes up as we make the sensor more sensitive. Before I started to really look into how to calculate Exposure Value, I would certainly have guessed the opposite way, so this has taken some getting used to.
I guess it's easier to think of EV as the target, as in the Exposure Value of the subject, not the base, which is the settings on the camera. For example, I've just used a Light Meter to take an incident reading of the light on this very slightly hazy summer's day in Tokyo, and my reading was EV 14 ⅓. We can actually adjust the sunny sixteen rule to understand that I'd get a good exposure at the moment by reducing my exposure by two-thirds of a stop from 1/125 of a second to 1/80 of a second at f/16. We'll come back to some more examples that will make this clearer, but for now, let's talk a little more about why using the absolute values of aperture and shutter speed etc. isn't ideal.
Exposure Shifts
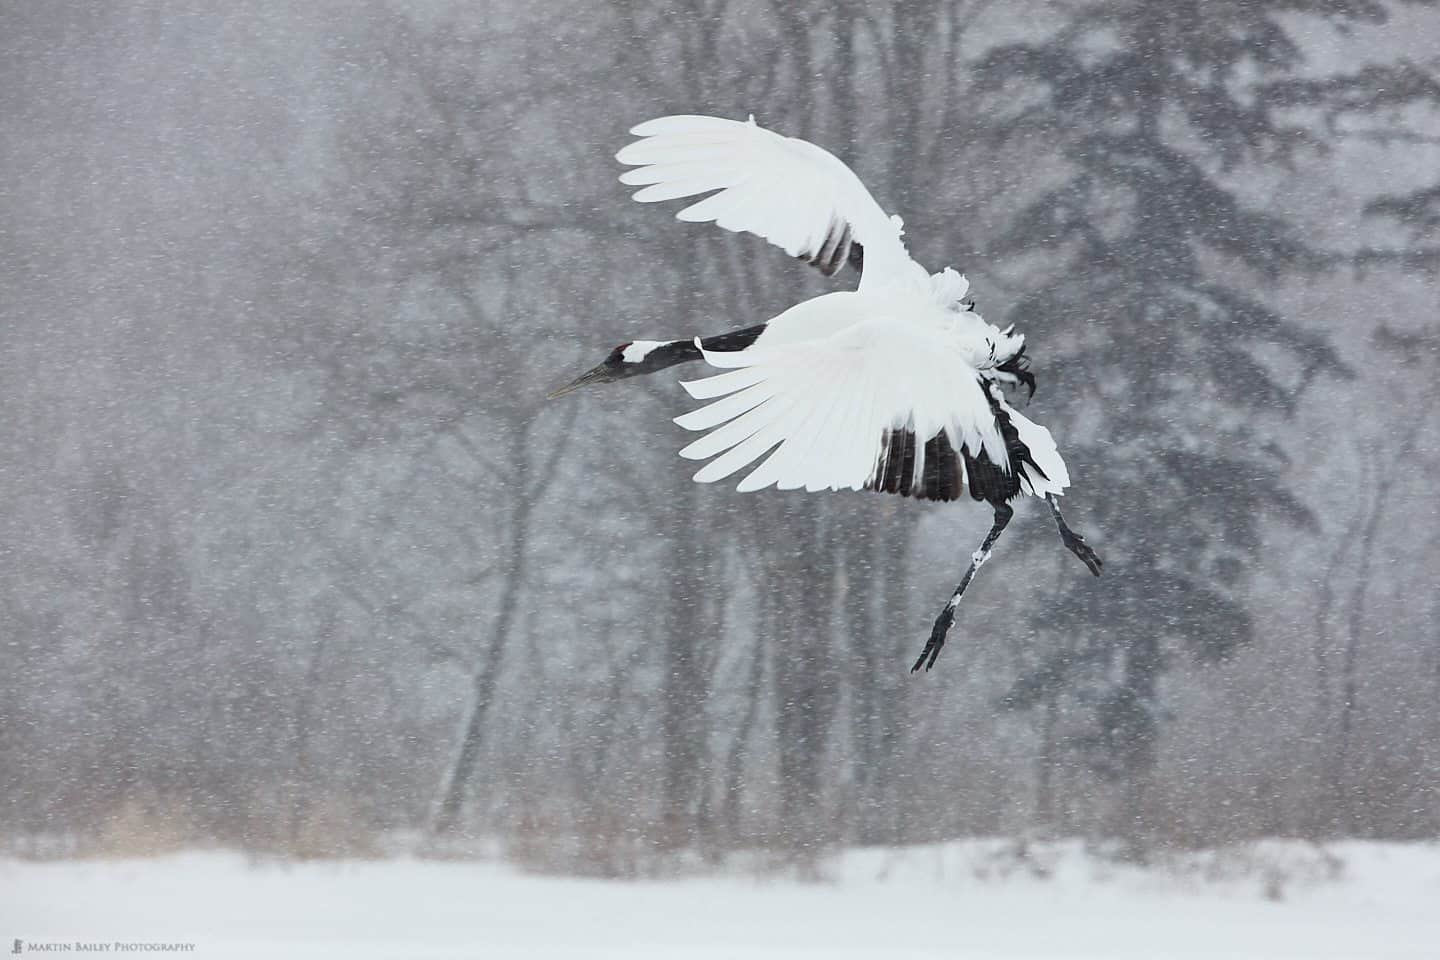
When we're shooting on my Japan Winter Wildlife tours, we are generally using Manual Exposure, to ensure that our subjects stay well exposed whether they are over a white snowy background or a darker background like trees or the sky. This works great when the light is constant, but if there are patchy clouds, we have to change our settings quite regularly, so I shout out that I'm changing my settings to the group.
If I simply shout out that I'm increasing my exposure by one stop, which is the same as saying I'm increasing my exposure by one EV, someone will invariably ask for actual settings in aperture, shutter speed, and ISO form. Then, if for example, I say f/11 for 1/1000 of a second at ISO 800, I often get asked, what would that be if I'm at ISO 400, or what if I'm at f/8, and it's understandable because this can be a bit confusing.
Exposure Shift Calculator
To help with this kind of exposure shift, I received an idea from listener Steve Jarrel last year, for me to add a third calculator to our Photographer's Friend app for iOS. The implementation I've come up with is slightly different, but the idea is basically the same, so I've just this morning finished some very complicated development to create a third calculator called the Exposure Shift Calculator. This has taken so much extra work, and is such a big change that I'm actually going to make this a paid upgrade to a new version of our app, but I'm currently looking into a way to provide a pseudo upgrade price for current version 2 owners, and more details of that will follow over the next week or so.
Today though, I wanted to introduce you to the new calculator to help shed a little more light on this discussion about Exposure Values. Because Exposure Values are at the core of all exposure calculations, it is at the core of my new Exposure Shift Calculator. Here's a screenshot from an iPad Air, showing the calculator set at zero EV, which as I mentioned is the value you get with an aperture of f/1.0 for one second with ISO 100 (below).
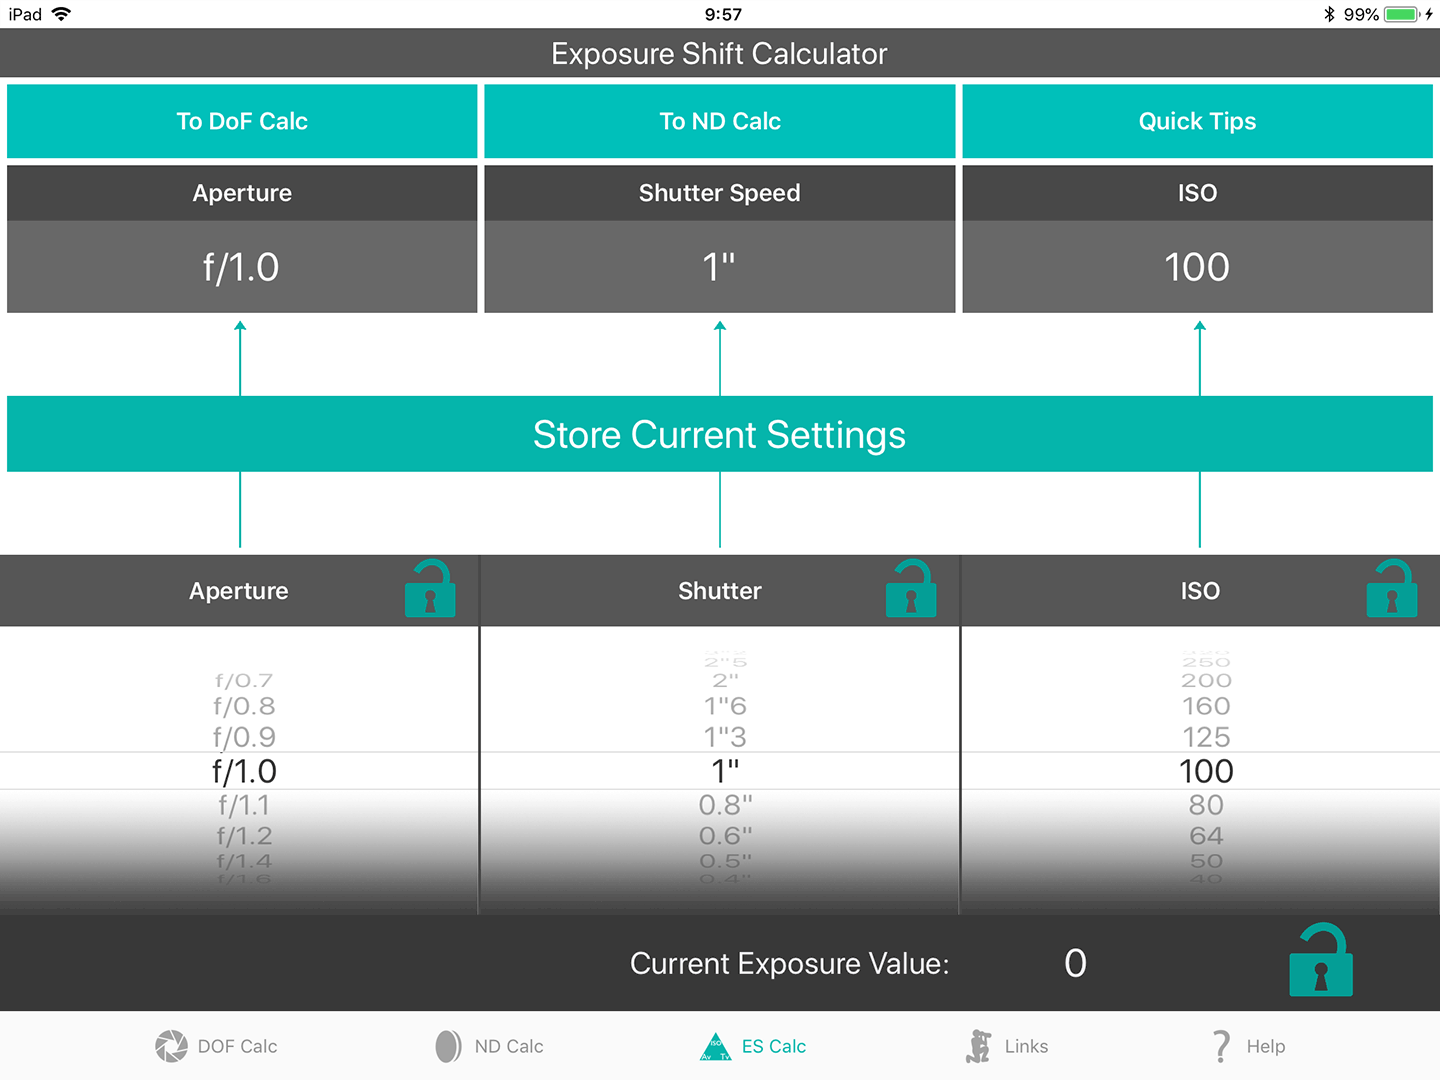
When you first start using the calculator, you can of course dial in any combination of camera settings, but we'll work from EV zero, for now, to show you how this works. If you want to store your original settings for later reference, just tap the large Store Current Settings button in the middle of the screen, and your settings will be displayed there until you tap the settings again, which clears them and brings back the Store Current Settings button.
I might, for example, use the calculator to find some settings to give me a good exposure at 14 ⅓ EV on this sunny day in Tokyo, and as we can see if I select an aperture of f/5.6, and leave my ISO at 100, I would need to set my shutter speed to 1/640 of a second. In this next screenshot (below) I've stored my EV zero settings for reference, and dialed in my new settings so that you can see how the store function works.
There are two ways to experiment with your settings after this though, starting with locking a single dial. If you tap the Aperture, Shutter or ISO dial labels, that label turns into my teal blue color and the padlock shows that it is locked, and now when you turn one of the unlocked dials, the other unlocked dial will automatically update to a value that maintains the same exposure. I've locked the original settings in the middle of the screen for reference, and then locked the ISO dial, which would be useful say if you were shooting with film and literally could not change the ISO until the end of the roll, or for example if your ISO was already very high and you don't want it to go any higher.
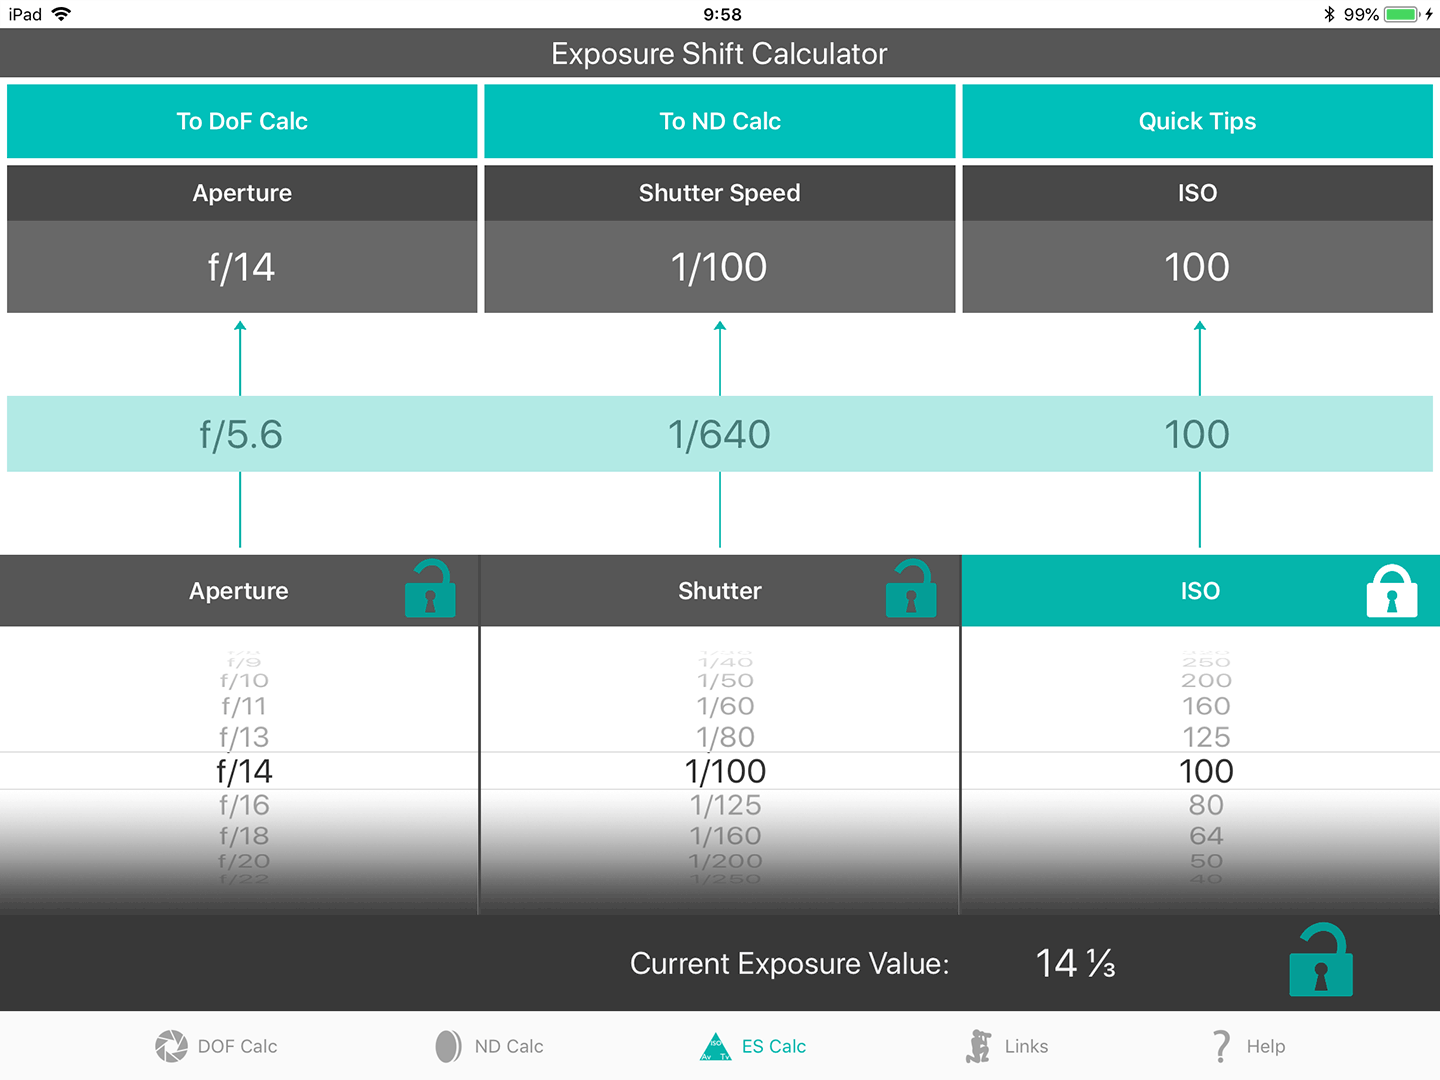
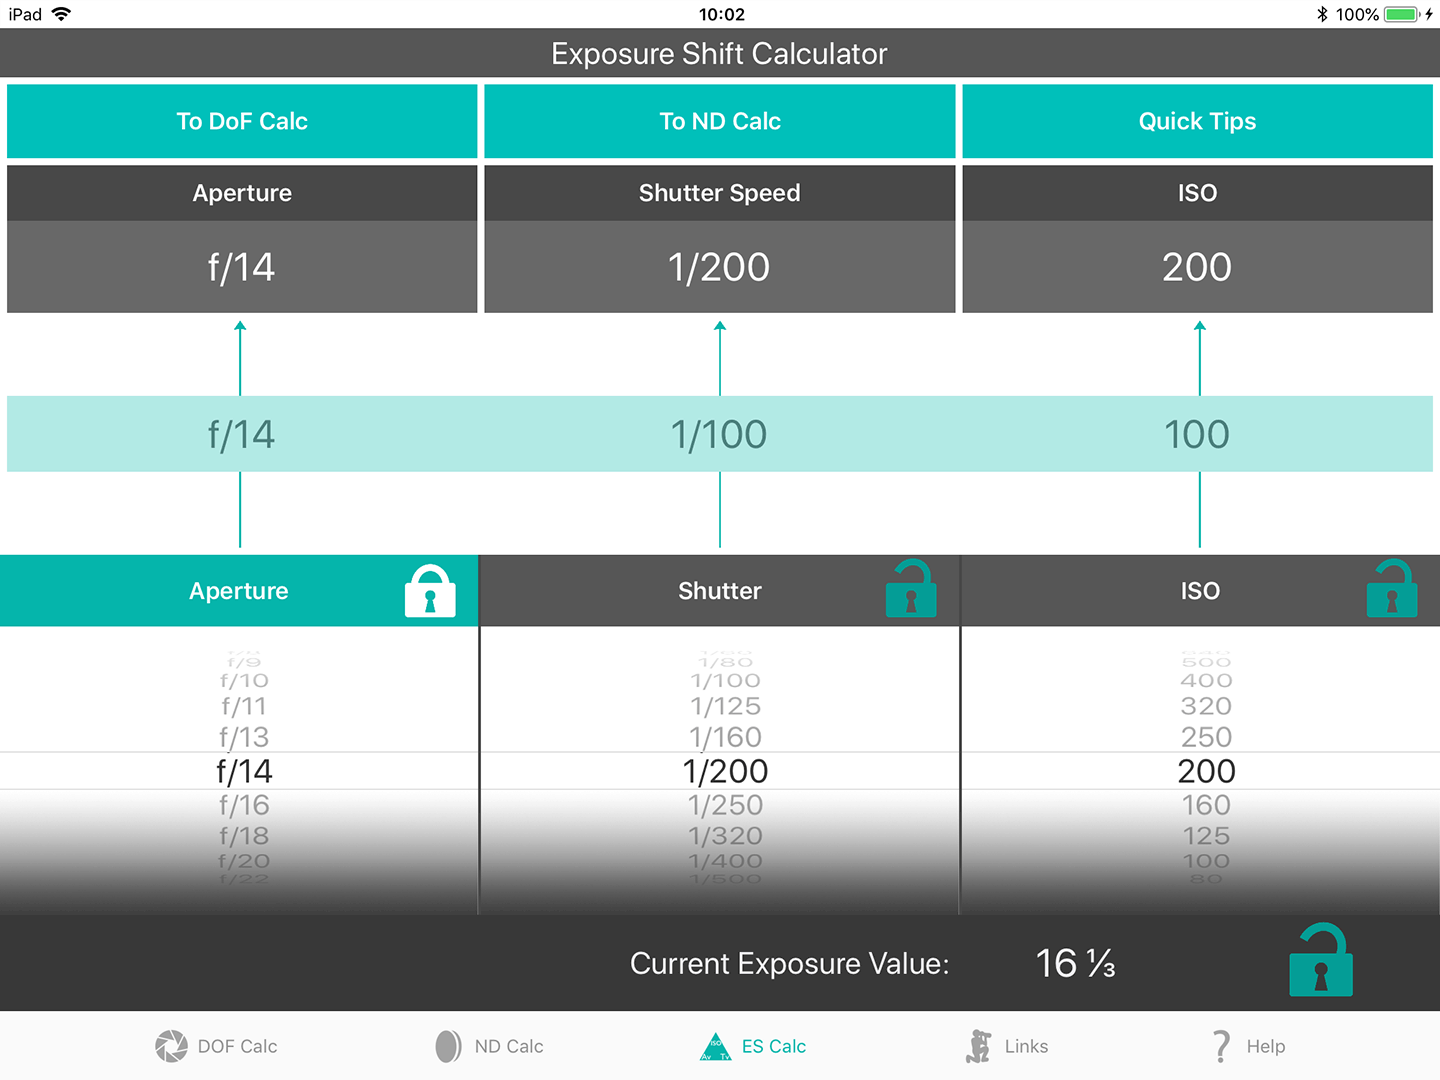
I decided that I wanted to change my aperture to f/14, my go-to aperture for most of my landscape work, and you can see that the calculator automatically calculated that I would need to change my shutter speed to 1/100 of a second to maintain my Exposure Value of 14 ⅓. I can of course then tap the aperture dial to lock that at f/14, and if I change the shutter speed dial, it will give me a new ISO to use, to maintain the same exposure. Note though, that when you lock an individual dial that enables the ISO value to be recalculated, the EV will change, because increasing the sensitivity of the ISO increases your EV, so the other unlocked dial has to move in the opposite direction to maintain the exposure.
The Challenge
That concept led me to what turned out to be the most difficult feature to code, the Exposure Value Lock. If you tap on the Exposure Value number or the padlock to its right, any individually locked dials will be unlocked, but now when you spin any dial, the other two dials will automatically update to maintain the same Exposure Value. This was particularly difficult because not only did I have to calculate two other dials simultaneously, the ISO dial has to turn in reverse to maintain the Exposure Value.
For example, if I lock the aperture dial at f/14 and change the shutter speed from 1/100 of second to a 1/200 of a second, the ISO would change from 100 to 200, to counter the shutter speed change to maintain the same exposure, but because increasing the shutter speed increases the EV by one stop and making the ISO more sensitive also increases the Exposure Value, my EV changes from 14 ⅓ to 16 ⅓.
Exposure Value Lock
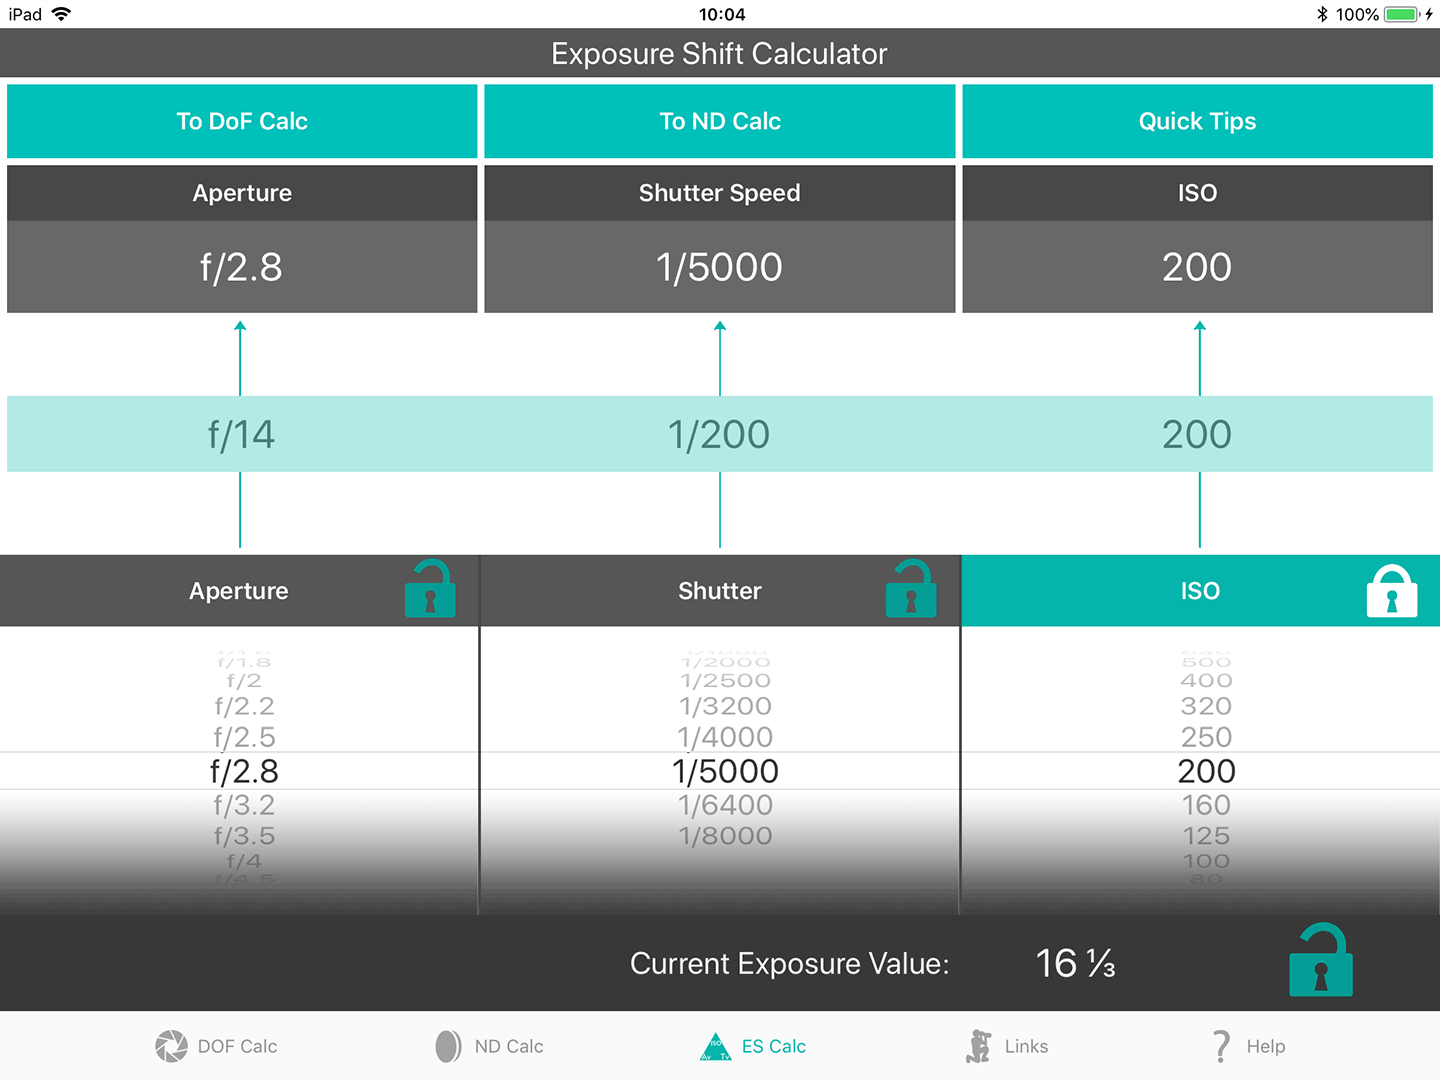
So, to lock the EV, I actually have to rotate the ISO dial in the opposite direction to ensure that the Exposure Value is maintained, rather than the Exposure. I know that sounds weird, but that's what this took to achieve and actually provide a useful EV Lock feature. If for example I have a meter reading of 16 ⅓ wanted to EV, and I wanted to open up my aperture to f/2.8 for some nice shallow depth of field, by locking the EV and selecting f/2.8 on the aperture dial, the calculator gives me a shutter speed of 1/1000 of a second at ISO of 1000.

That's useful to see your options while maintaining the EV, but in this case, if you know that you want an aperture of f/2.8 and because you know that you have plenty of light, rather than locking the EV and going fully automatic, it would be better to simply lock the ISO and move your aperture dial to f/2.8 and then you'll get your new shutter speed of 1/5000 of a second, for a great outdoor exposure on a theoretically very bright sunny day.
Send To Buttons
If, for example, you don't want the water in the fountain behind your model to be completely frozen by a shutter speed of 1/5000 of a second, you might decide to apply some neutral density filters, and to save you the trouble of remembering your shutter speed, I've also added a To ND Calc button at the top of the screen, above your calculated shutter speed, which, as you might imagine, will send your new shutter speed directly to the ND calculator and open it for you. This is also useful if you have calculated a shutter speed of five seconds or more and need a timer. Just jump over to the ND Calculator and hit the timer button.
Likewise, the To DoF Calc button will send your aperture to the Depth of Field calculator so that you can see how much depth of field you have at the currently selected or calculated aperture.
So, I hope this has helped a little if the concept of Exposure Values wasn't something that you are familiar with. As with the other two calculators, as well as actually helping you to work in the field, they are great for learning the theory behind exposure and depth of field, as well as teaching it. Even if you have all this down, there's nothing like being able to turn dials and show the effects of your changes to help people understand this stuff. Then hopefully when you are advised to increase your exposure by one or two stops, you'll be better equipped to calculate the difference in your head, or reach for your iPhone and open the Photographer's Friend.
Photographer's Friend 3 Coming Soon!
As I said, my current plan is to make this a paid upgrade, so if you like what you see, but don't already own version two, then please wait for a few days until I release version three. If you are reading or listening after more than a few days into September 2018 though, version three should already be available. And for those of you that have version two, I will try to provide a reasonable upgrade path, details of which will be provided in an update to version two of the app. If you don't need the Exposure Shift calculator, you are more than welcome to continue to use version two, and I have a few improvements for version two that will be released very soon as well, so you won't be left out to dry.
Freebie Post
This post is unlocked for non-Patrons as it is a sponsored post or advertising Martin Bailey Photography products. If you found it useful and would like to unlock all other posts please click the button below. Thank you for your support!
Become a Patron!
Show Notes
You can get Photographer's Friend in the Apple App Store here: https://mbp.ac/pf
I'll update this post with a link to version three soon! If I forget, see the ad below. 🙂
Subscribe in iTunes for Enhanced Podcasts delivered automatically to your computer.
Download this Podcast in MP3 format (Audio Only).
Download this Podcast in Enhanced Podcast M4A format. This requires Apple iTunes or Quicktime to view/listen.

Hi Martin
Any plans to make an Android version of your Photographer’s Friend app?
I’d love to purchase and use but I’m not an iPhone owner
Kent
Hi Kent,
Yes, I have my eye on some technology that will help me to port my iOS code to Android and hope to give that a try soon. If it works I’d love to release an Android version, so please stay tuned.
Regards,
Martin.
For what it’s worth, I aim for about -7EV when shooting the Milky Way and night sky under Bortle 1 to 2 for dark skies and a new moon. Any further (-9 to -11EV) will tend to blow out bright stars like Arcturus and lose their natural color, making them totally white instead of yellow or orange. Less than -6EV on the other hand will tend to increase noise in post-production, even with rather ISO invarient sensors if you push your edits too far. The signal to noise ratio just gets too low. That’s going to vary of course based on geolocation, amount of atmosphere you are shooting through, and local light pollution, so this is just my own experience where I live.
That’s good to know Aaron. I’m still a relative novice when it comes to shooting the Milky Way. I do keep my eye on the bright stars and try to avoid blowing them out, although I often fail slightly trying to get a nice bright image to work with. 🙂
Hi Martin Bailey
Martin Nicely Explain every details and points and very informative this artical and please release Android version fast as soon as possible.
changing the ISO does not change sensitivity of the sensor
Hi Ted,
Of course, the sensor itself does not actually change, but it affects the light sensitivity through image processing. As a way of thinking about the effect, I don’t think it’s a bad way to explain this. How would you describe this better?
Regards,
Martin.