
Today we’re going to explore an exciting way to use a MIDI controller that you might have lying around to controller Capture One Pro. You could, in fact, use this method to control pretty much any application that accepts keyboard shortcuts, but I love speeding up my workflow, so let’s take a look at my findings.
There are dedicated controller systems such as Pallete Gear and Tangent that I am aware of. I bought the Pallete Gear system and to be honest, for what it is, it took up too much space on my desk, so it found its way into my storeroom and didn’t get back out again. The Tangent system looks amazing, and probably works great too, but the price is a little out of my comfort zone, and that’s saying something.
Tangent does have an iOS app that enables you to control Capture One Pro with an iPad for $74.99, but at this point, I’m on the fence about that too. I’m going to give the trial version a good try and see what I think and I’ll report back on that later. For now, let’s look at what I’ve been working on this week.
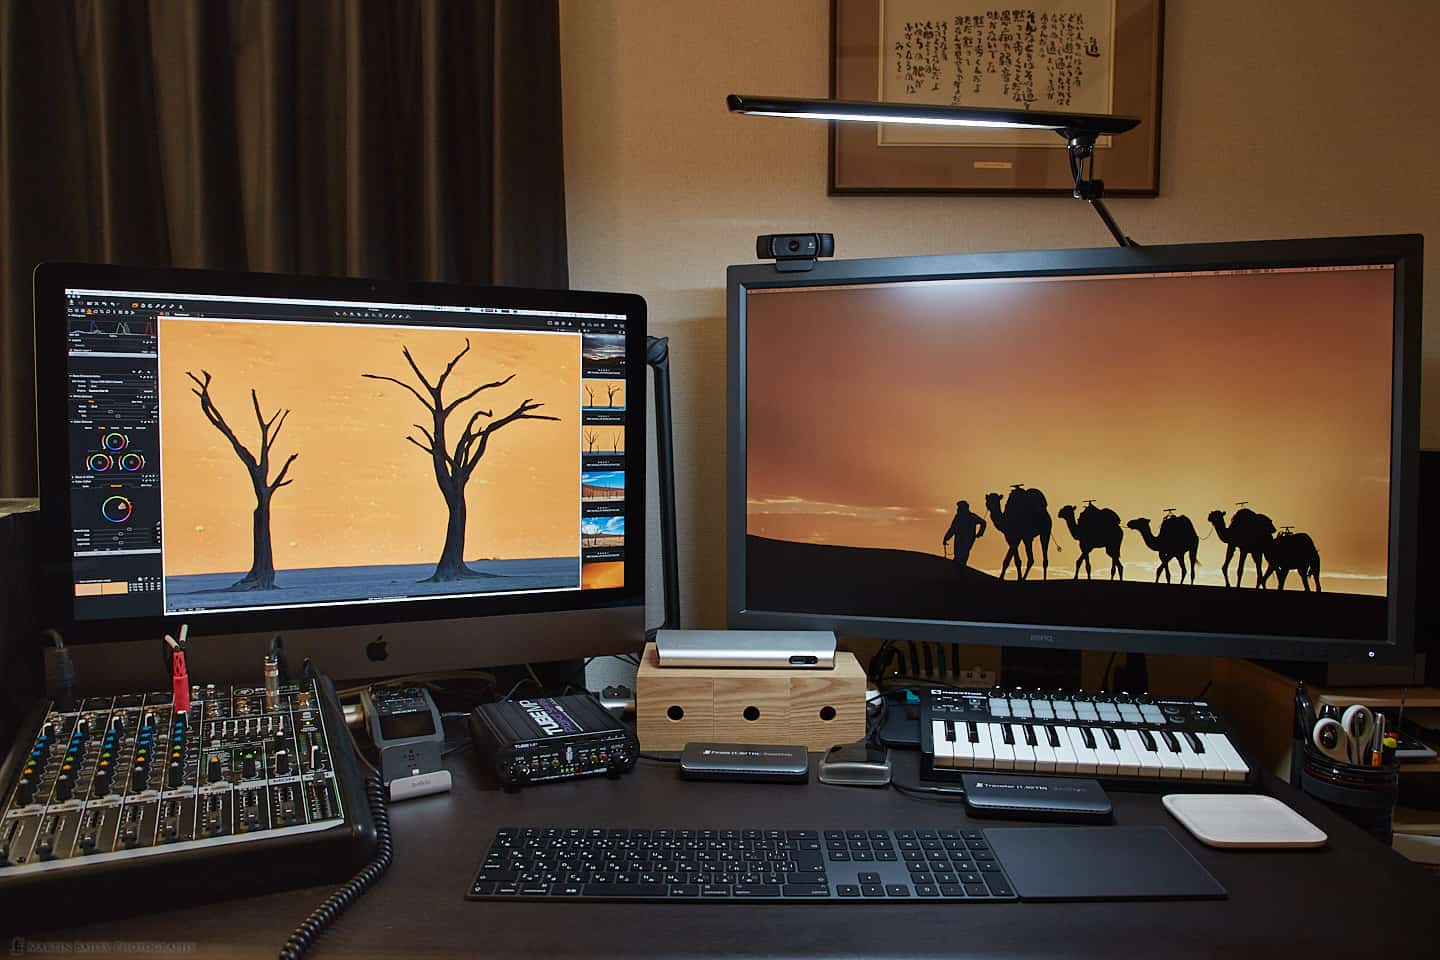
I have a small MIDI keyboard and controller on my main desk the whole time so that I can tap out tunes and try music-related software quickly from my main workstation. My particular controller is a Novation Launchkey Mini MkII and retails for around $100, but you can get cheaper. I’m not sure I would recommend this method to someone that doesn’t already have a MIDI controller mind. For me, it’s already sitting on my desk, so in essence, it takes up no extra space. Other possibilities include but are in no way limited to keyboards from companies such as Arturia and Native Instruments.
As the name implies though, a MIDI keyboard communicates with the computer using MIDI or Musical Instrument Digital Interface signals, so I needed a way to convert these signals to something that Capture One Pro understands. Last year, I had a challenge when setting up my main music workstation, because one of my piano keyboards was sending low velocity signals, and I wanted to boost them. I found a software package called MIDI Translation Pro from Bome Software, that I’m pretty sure a listener pointed me too in relation to what we’re talking about today, but I can’t for the life of me find that email to thank them.
Although it’s a little complicated to use at first, MIDI Translation Pro does exactly what I needed, among other things, so a few days ago I set about the task of mapping my MIDI controller to Capture One Pro.
Creating a New Project
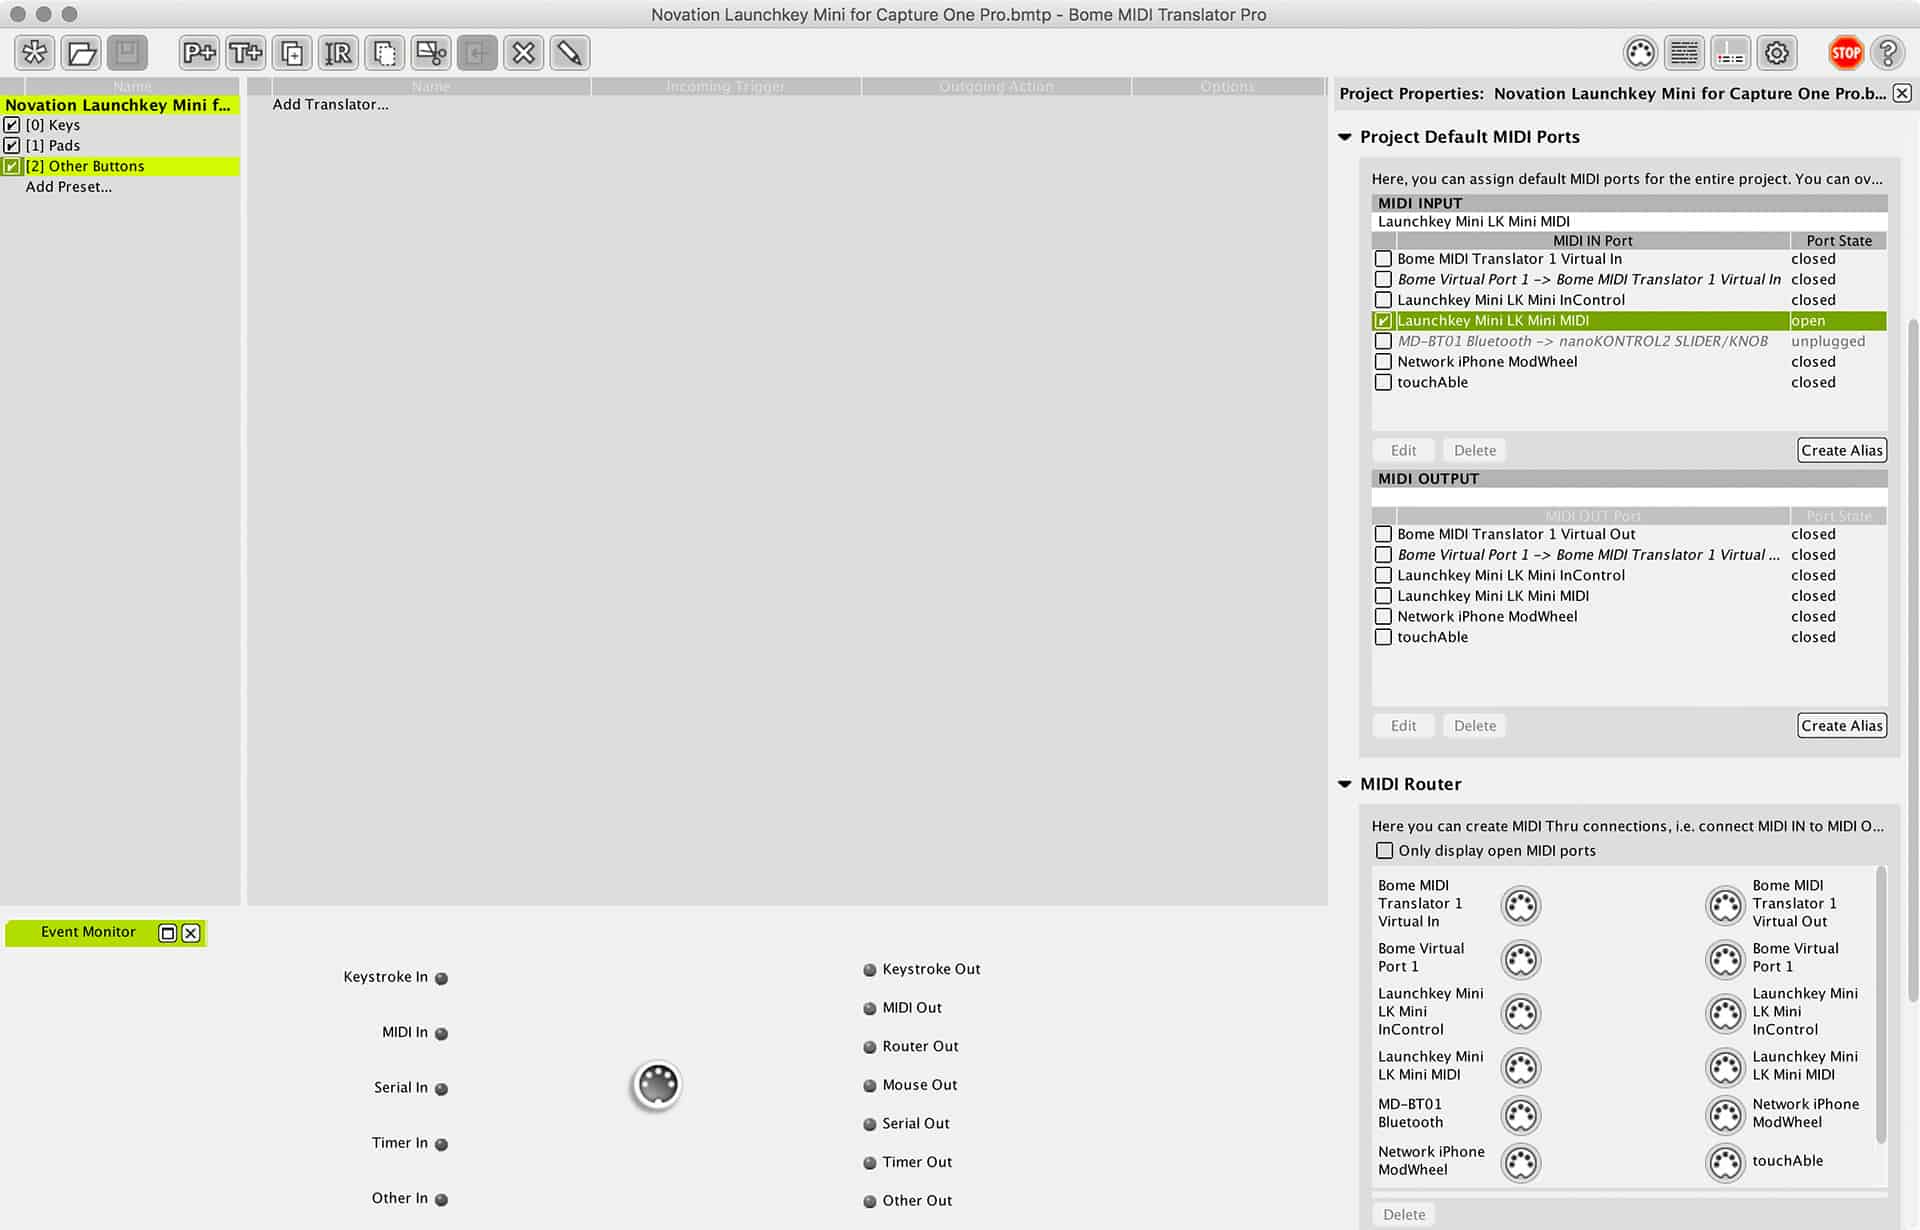
With my Novation MIDI controller attached to my computer with a USB cable, I opened MIDI Translator Pro and created a new project then selected the Launchkey Mini LK Mini MIDI device from the Project Default MIDI Ports MIDI Input panel. We don’t need to output any MIDI for this project, so there’s no need to select any devices under the MIDI Output section. Then I saved my project as Novation Launchkey Mini for Capture One Pro and renamed the default new preset as Keys and created two more presets; one called Pads and the last one called Other Buttons. This is really just to help me keep the project organized.
Creating the MIDI Mappings
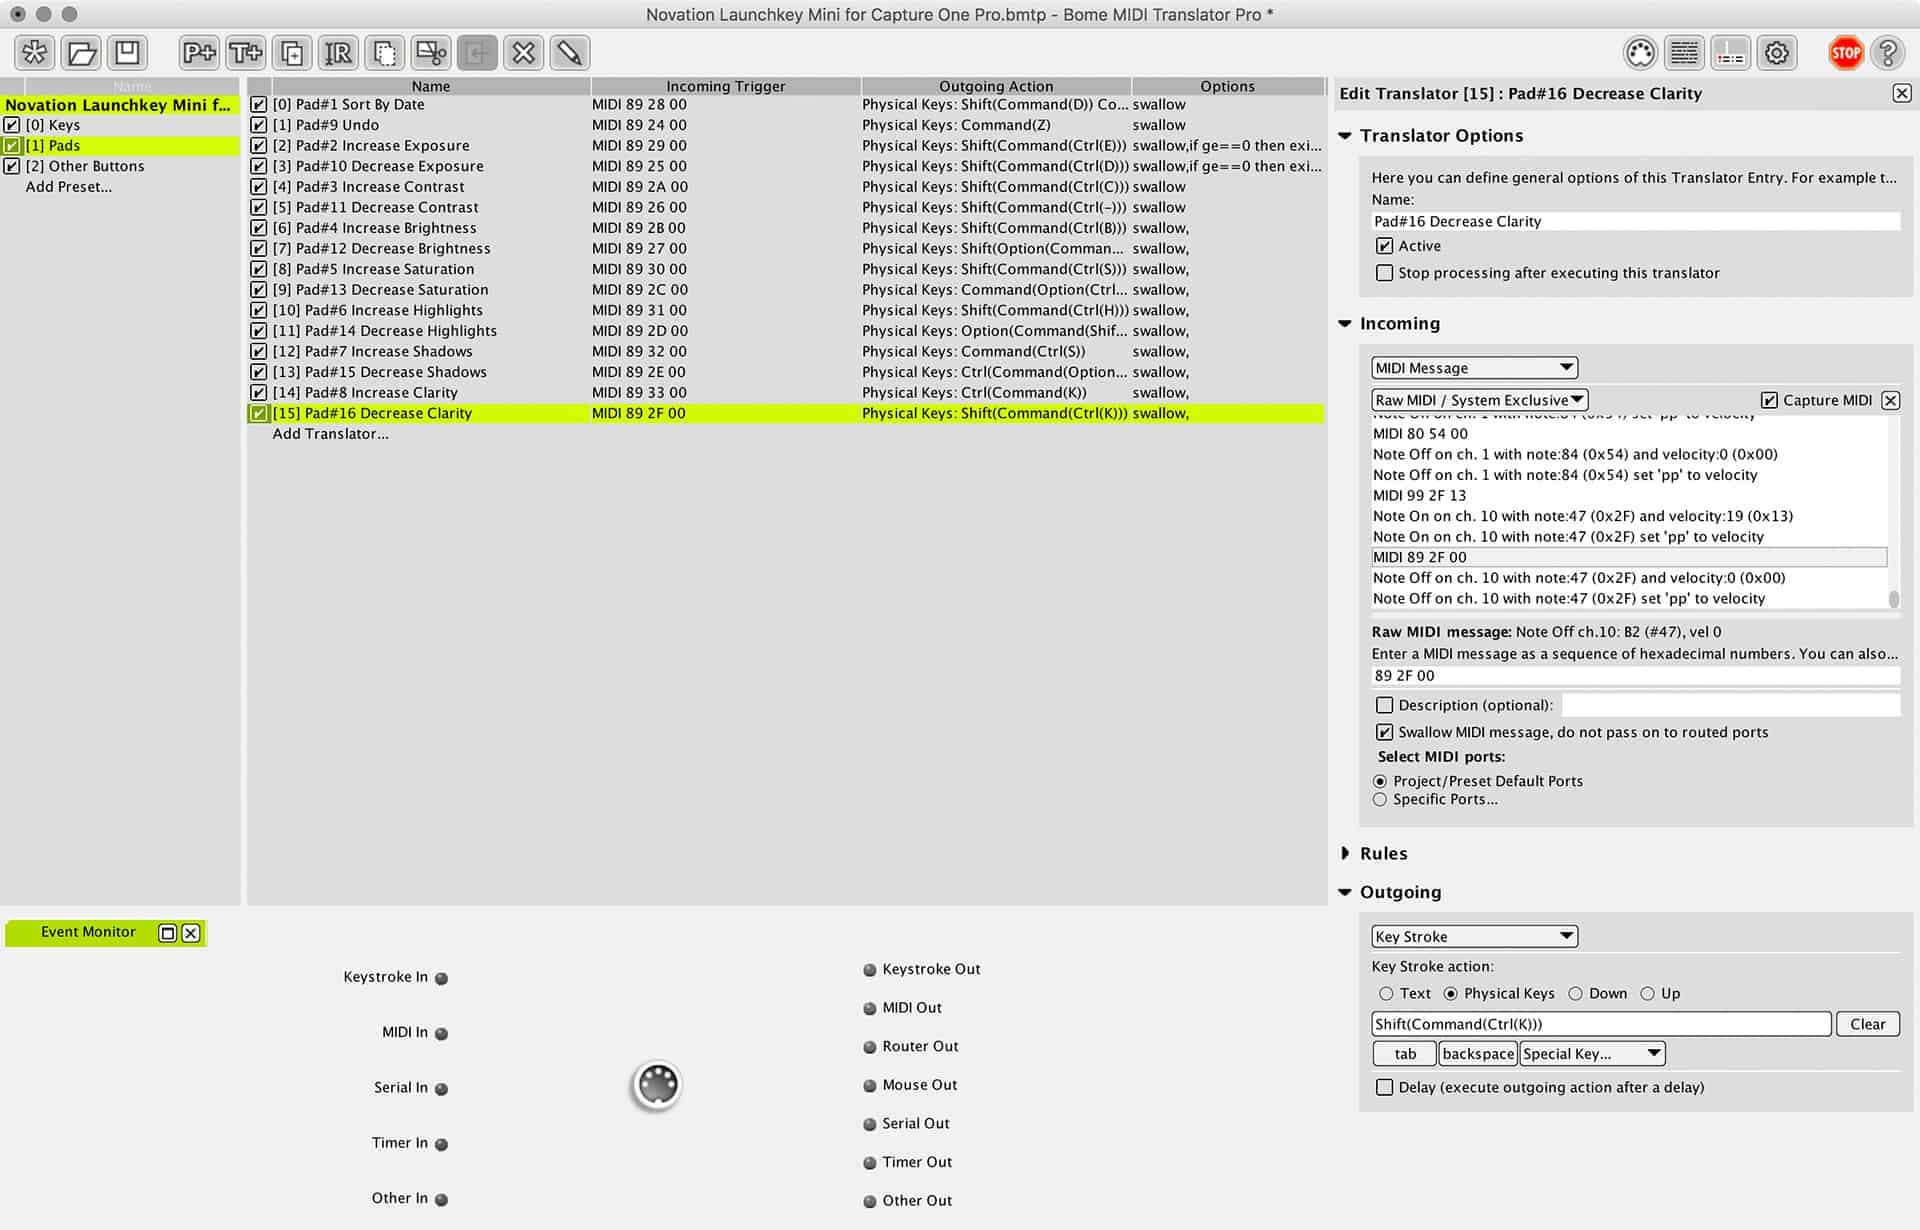
I then clicked on the Add Translator text in the main panel, and gave it the name Copy Adjustments, because this is the shortcut I want to trigger with the left-most white key on the keyboard. The panels on the right change when you select the new Translator, and to find which MIDI signals you will change, turn on the Capture MIDI checkbox under the Incoming panel and if it isn’t already selected, choose MIDI Message under the top pulldown. Then when you press and release a key, pad or button on your keyboard, you’ll see two sets of data appear.
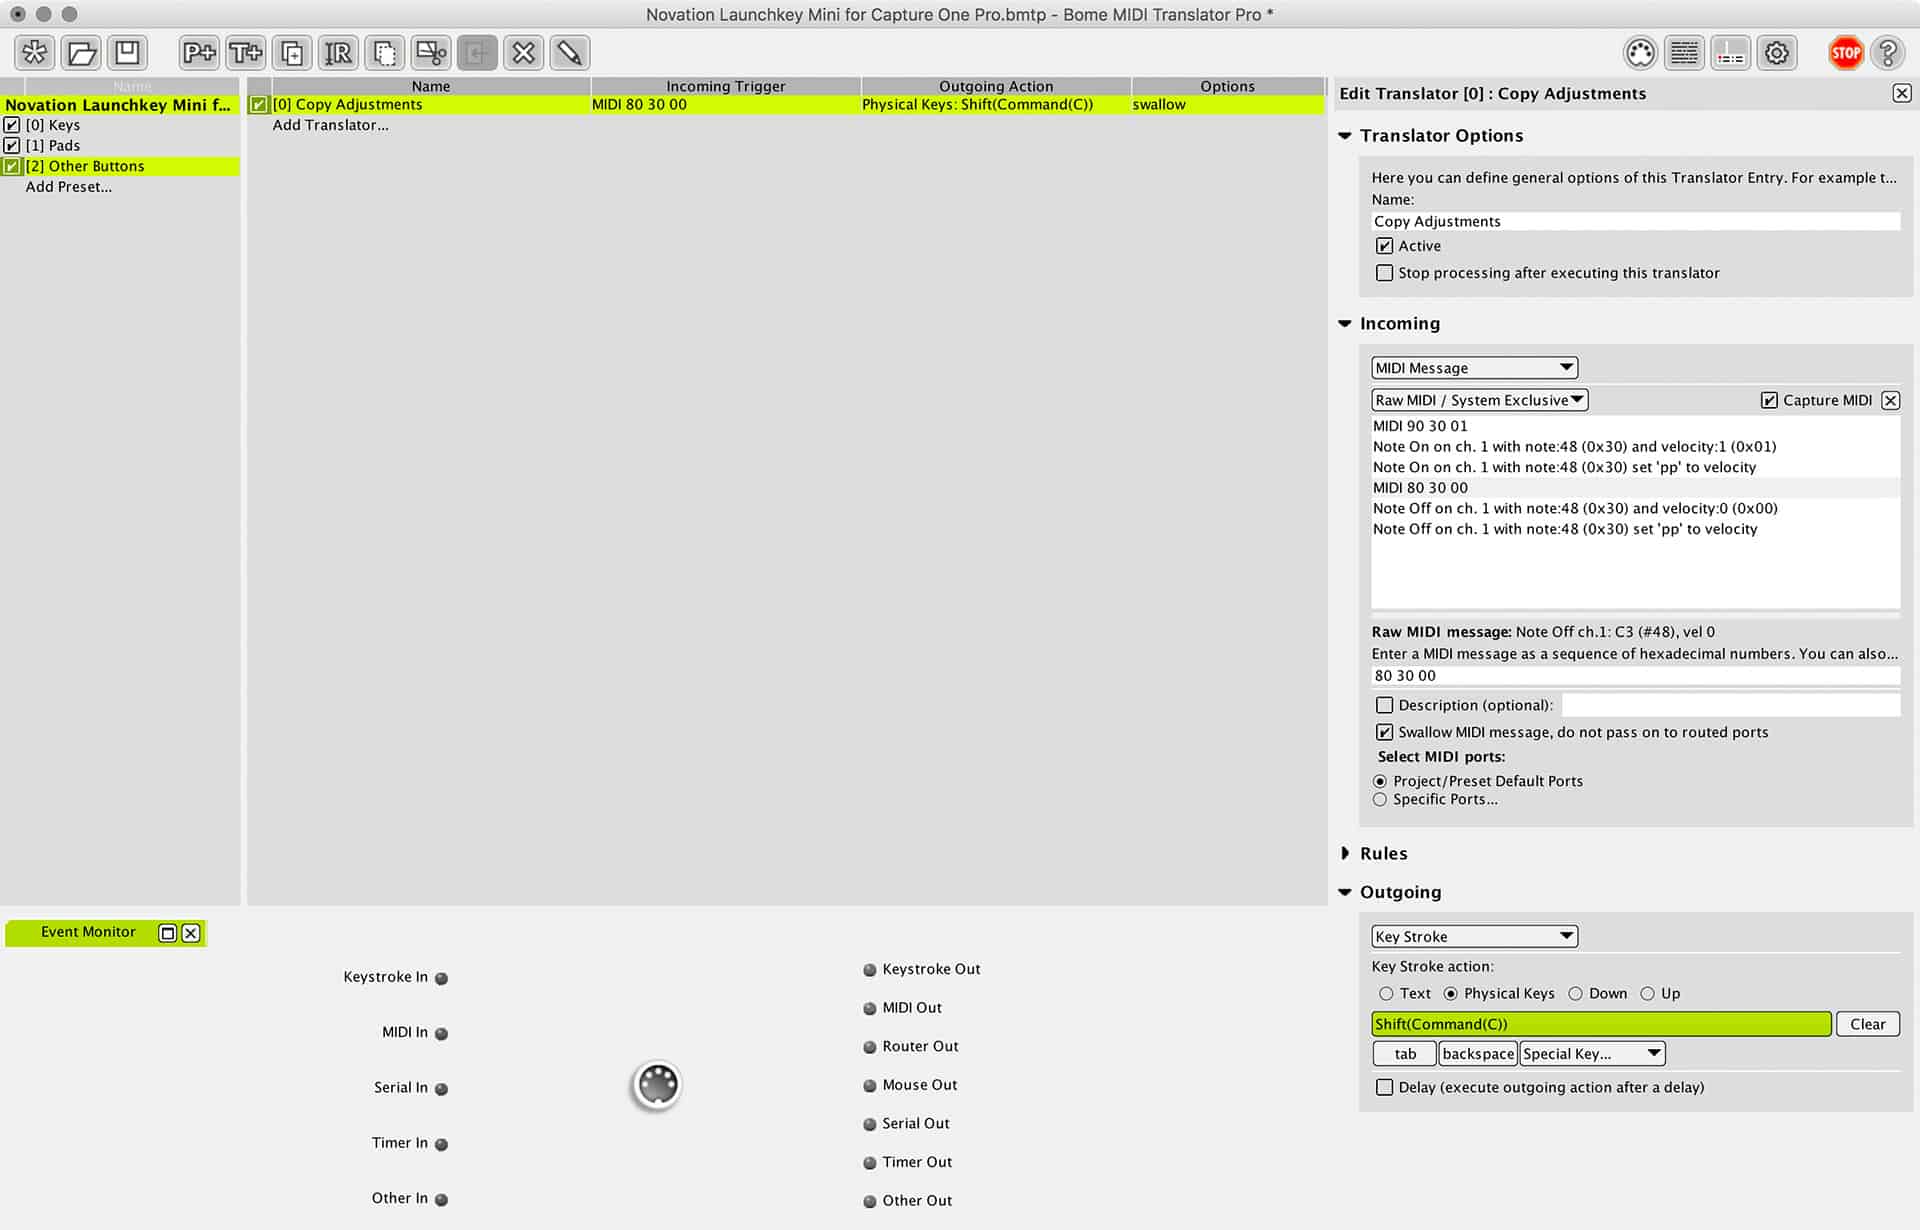
In this screenshot (above) you can see that I selected the top Raw MIDI / System Exclusive string MIDI 80 30. This is the raw MIDI received from my keyboard when I release the first white key on the left. I am choosing the release action as this seems to work better most of the time, but there may at times be reasons for you to select the top press action or any of the longer strings from which you can populate variables etc. For what I’m showing you today, we won’t use these strings.
Assign Your Shortcuts
The last thing we need to do to create the mapping is to select Physical Keys under the Outgoing > Key Stroke options, then click on the field next to the Clear button and actually press the keys that make up the shortcut that you want to assign. I have assigned COMMAND + SHIFT + C to the Copy Adjustments command in Capture One Pro. You may have something different or nothing at all.
Editing Your Shortcuts
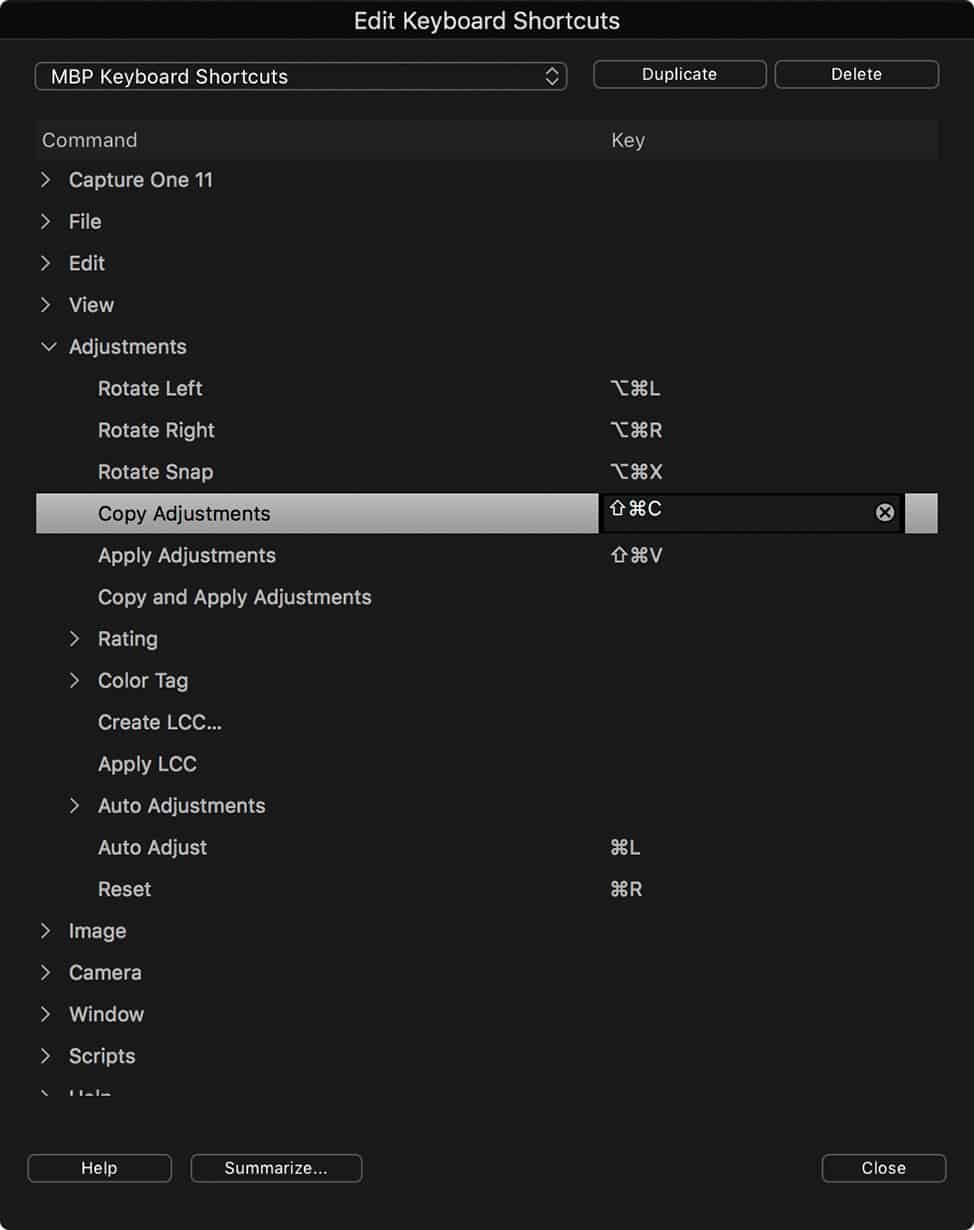
To check your shortcuts, and to create some new ones, select Edit Keyboard Shortcuts from the Capture One Pro menu. Here (right) you can see my Copy Adjustments and Paste Adjustments shortcuts.
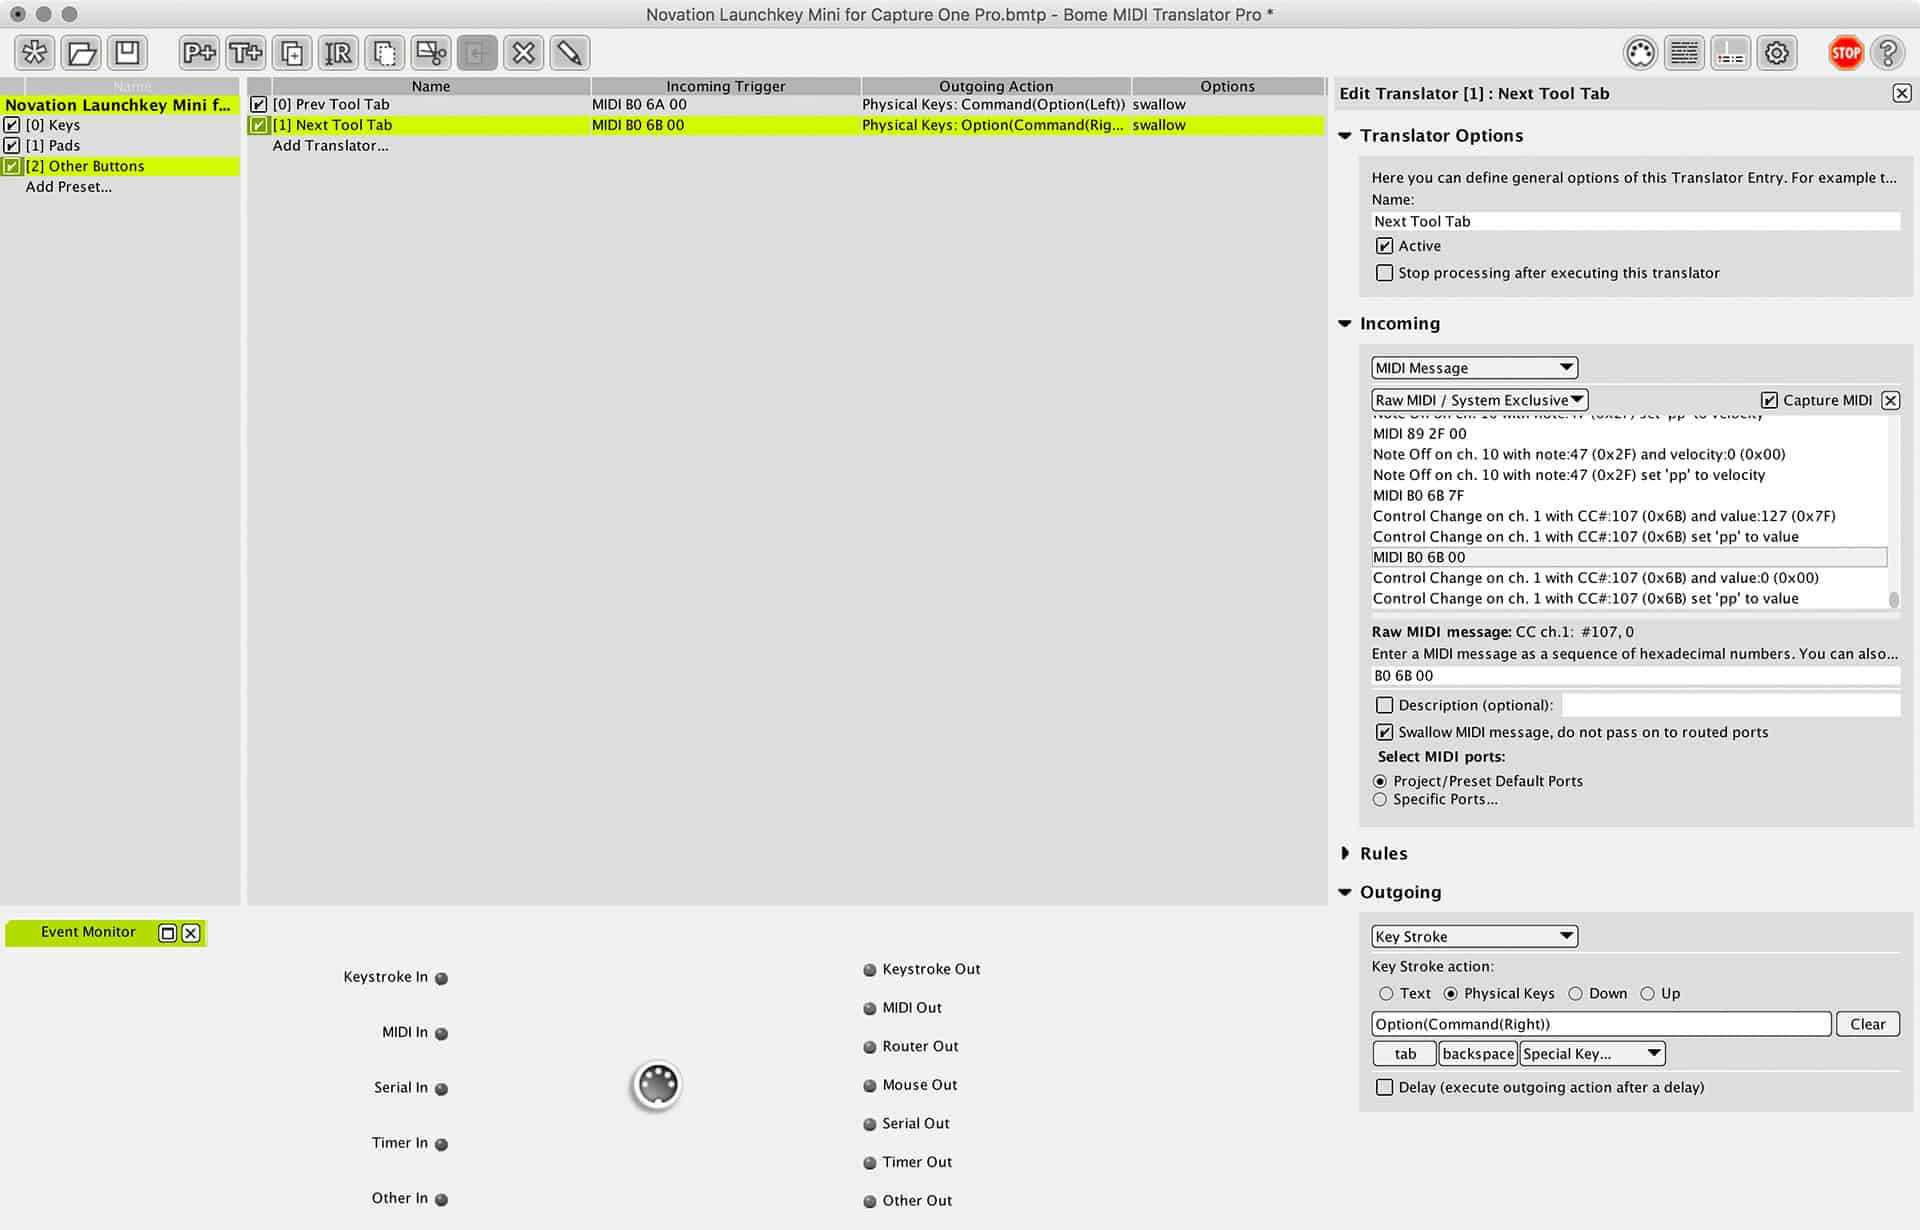
Then, back in MIDI Translator Pro, I clicked Add Translator option in the main panel again, and mapped the first black key from the left to the left arrow key on my keyboard, which will navigate left, selecting the previous image in Capture One Pro, and I mapped the second black key to the right arrow to navigate to the next image.
I made the second white key Paste Adjustments so that I can paste the adjustments that I copied with the first white key.
I found it useful to grab the marketing image of my keyboard from the Novation Web site and added labels in Photoshop. This helped me to keep track of which shortcuts I’d mapped but also helped me to visualize how I’d actually use the keys depending on their position on the keyboard. Here (below) is what I mapped initially using all 25 keys, all sixteen pads, and the Track keys, which I mapped to navigate back and forth between the Tool Tabs in Capture One Pro.
You can see that I went on to set up the third to eighth white keys as number zero through five, which enables me to assign star ratings to my images or remove the star rating with the zero key. This means I can hit the first two black keys to navigate through my images and these number keys to rate my images. I also mapped the third black key from the left to enter an X, which is the shortcut I use to add a purple label to an image. This is my Reject flag. I mapped the fourth black key to remove the color label, as I sometimes change my mind about whether or not I want to reject an image.
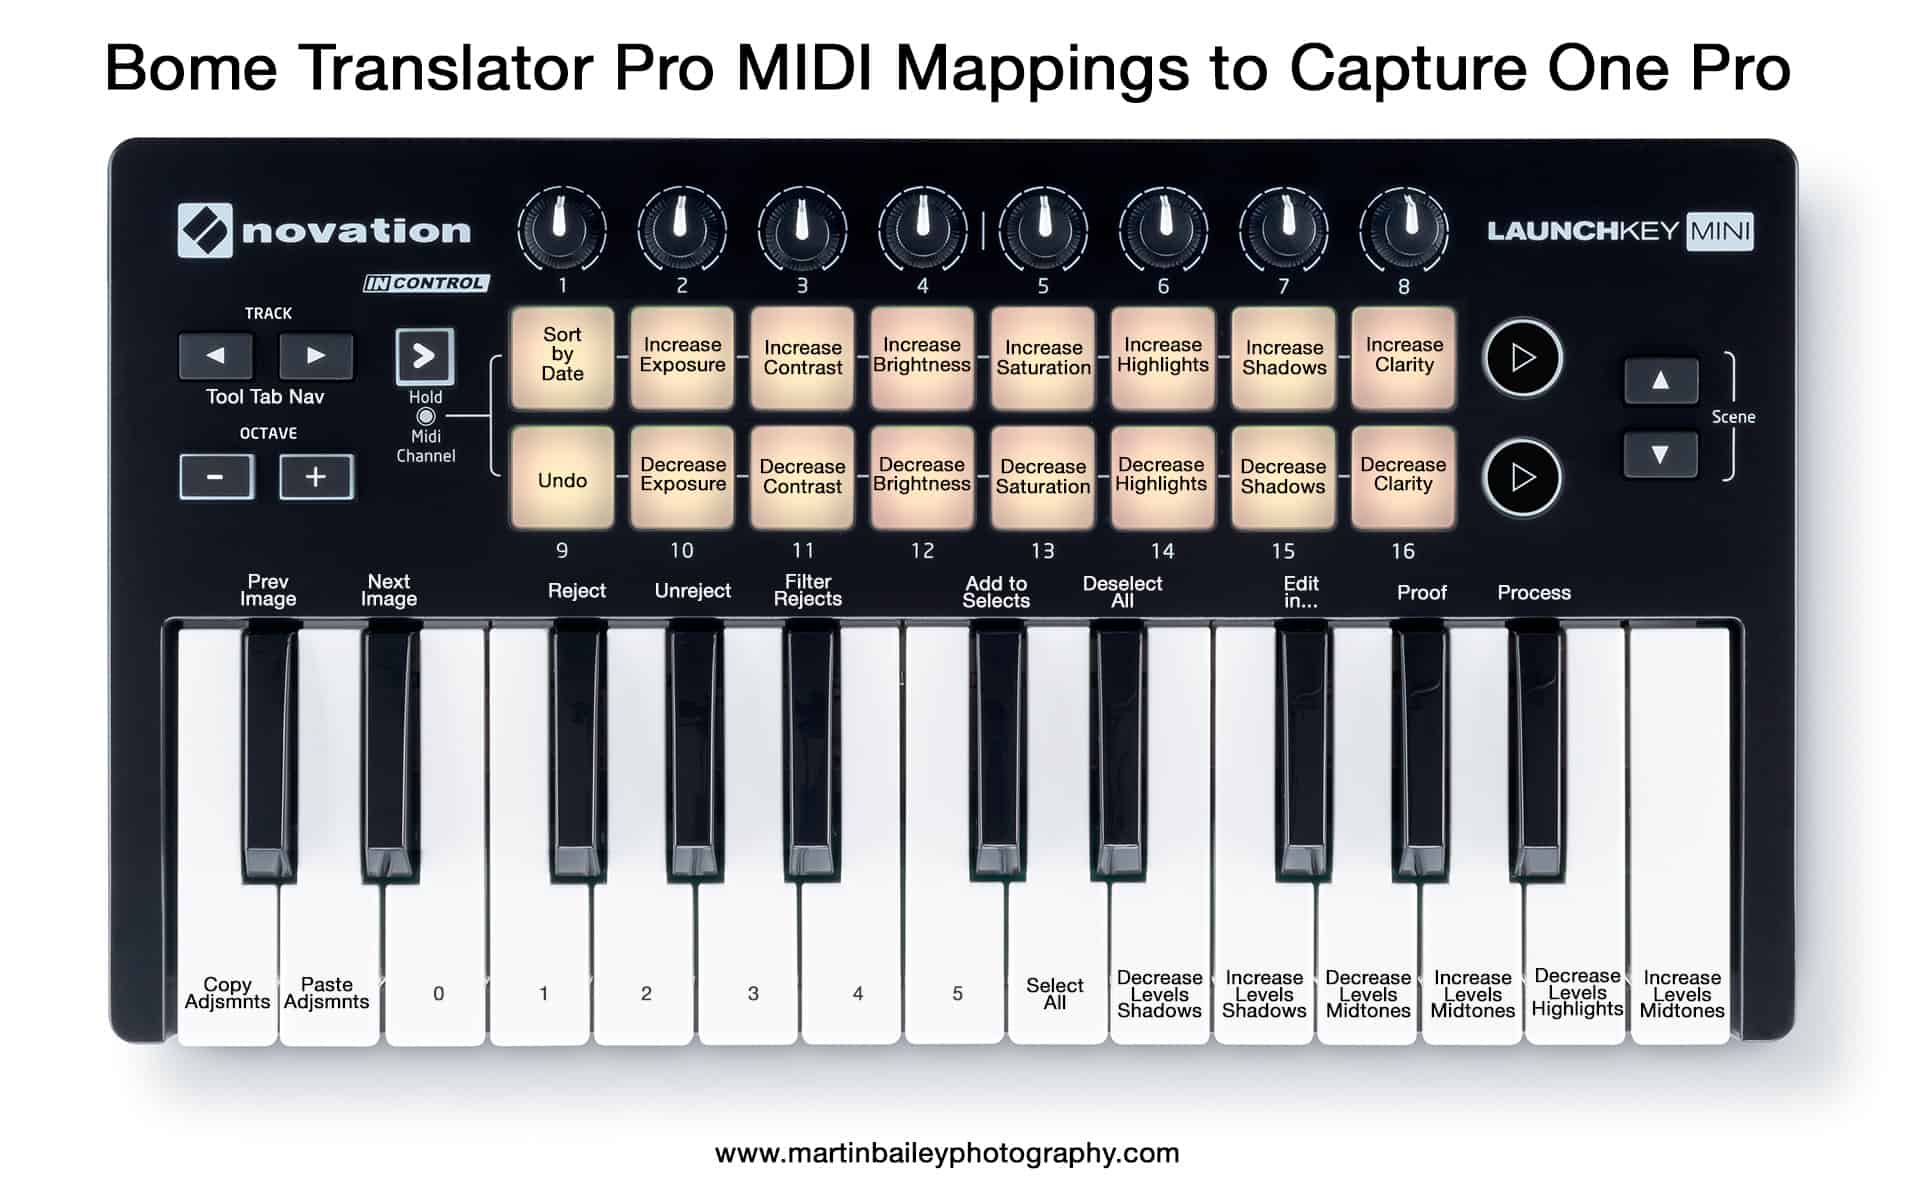
Then I mapped the fifth black key to enter SHIFT + X which selects all of my Rejects, or images with a purple label assigned. I toyed with the idea of creating a condition that would check to see if both the third and fifth black keys were being pressed simultaneously and if so, delete all of the Rejects, but I am a little too concerned that I might hit these keys inadvertently, and I don’t want to be deleting images by mistake. I made the next white key along COMMAND + A which selects all, so I can Filter my Rejects and Select them all with these two keys, then if I really want to delete them, for now, I’ll go to my computer keyboard and hit the delete key there.
I won’t go through all of these mappings, but I basically mapped many of the commands that I use a lot to the keys. Here (below) is a screenshot of all of my mappings for the keys on my MIDI controller. As you can see, I ordered all of my Translators in the order of the actual keys from left to right. You don’t have to do this, but I figured it would make managing the mappings easier if I decide to change them in the future.

Mapping the Pads
For the pads, I started by adding a Sort By Date option. This is something that I have to do every time I import images, and I wish I could set this as the default sort option, but failing that, I assigned the shortcut SHIFT + COMMAND + D and assigned that to Pad #1.
There are of course limited shortcuts combinations that we can assign that actually make sense to use from the computer keyboard, but because we will be calling many of these shortcuts by tapping a pad or pressing a key, it’s OK to assign long, complex shortcuts to commands. Some of the obscure commands I mapped for these pads use all four of my modifier keys, COMMAND + ALT/OPT + SHIFT + CONTROL and then a regular letter. I’ll never remember these, but it doesn’t really matter.
I went on to map Exposure, Contrast, Brightness, and Saturation, as well as the Highlights, Shadows and Clarity sliders so that I can tap the top pad to Increase and the bottom pad to Decrease these settings. Unfortunately, at this time there is no keyboard shortcut to reset these sliders to zero, so if you change your mind, you have to either double-click the slider handle with your mouse or use the other pad to knock the slider back to zero.
Octave Shift for More Options
Another great thing about using a MIDI keyboard is that they usually come with Octave Shift buttons. As you can see in this screenshot (below) if you shift up by one octave the keys move twelve keys to the left, and we can then map more keys. I chose to map the Target Shadows and Highlights on the Levels to these keys because the main Levels options are on these same keys one octave lower, so I can switch between these easily with the Octave buttons.
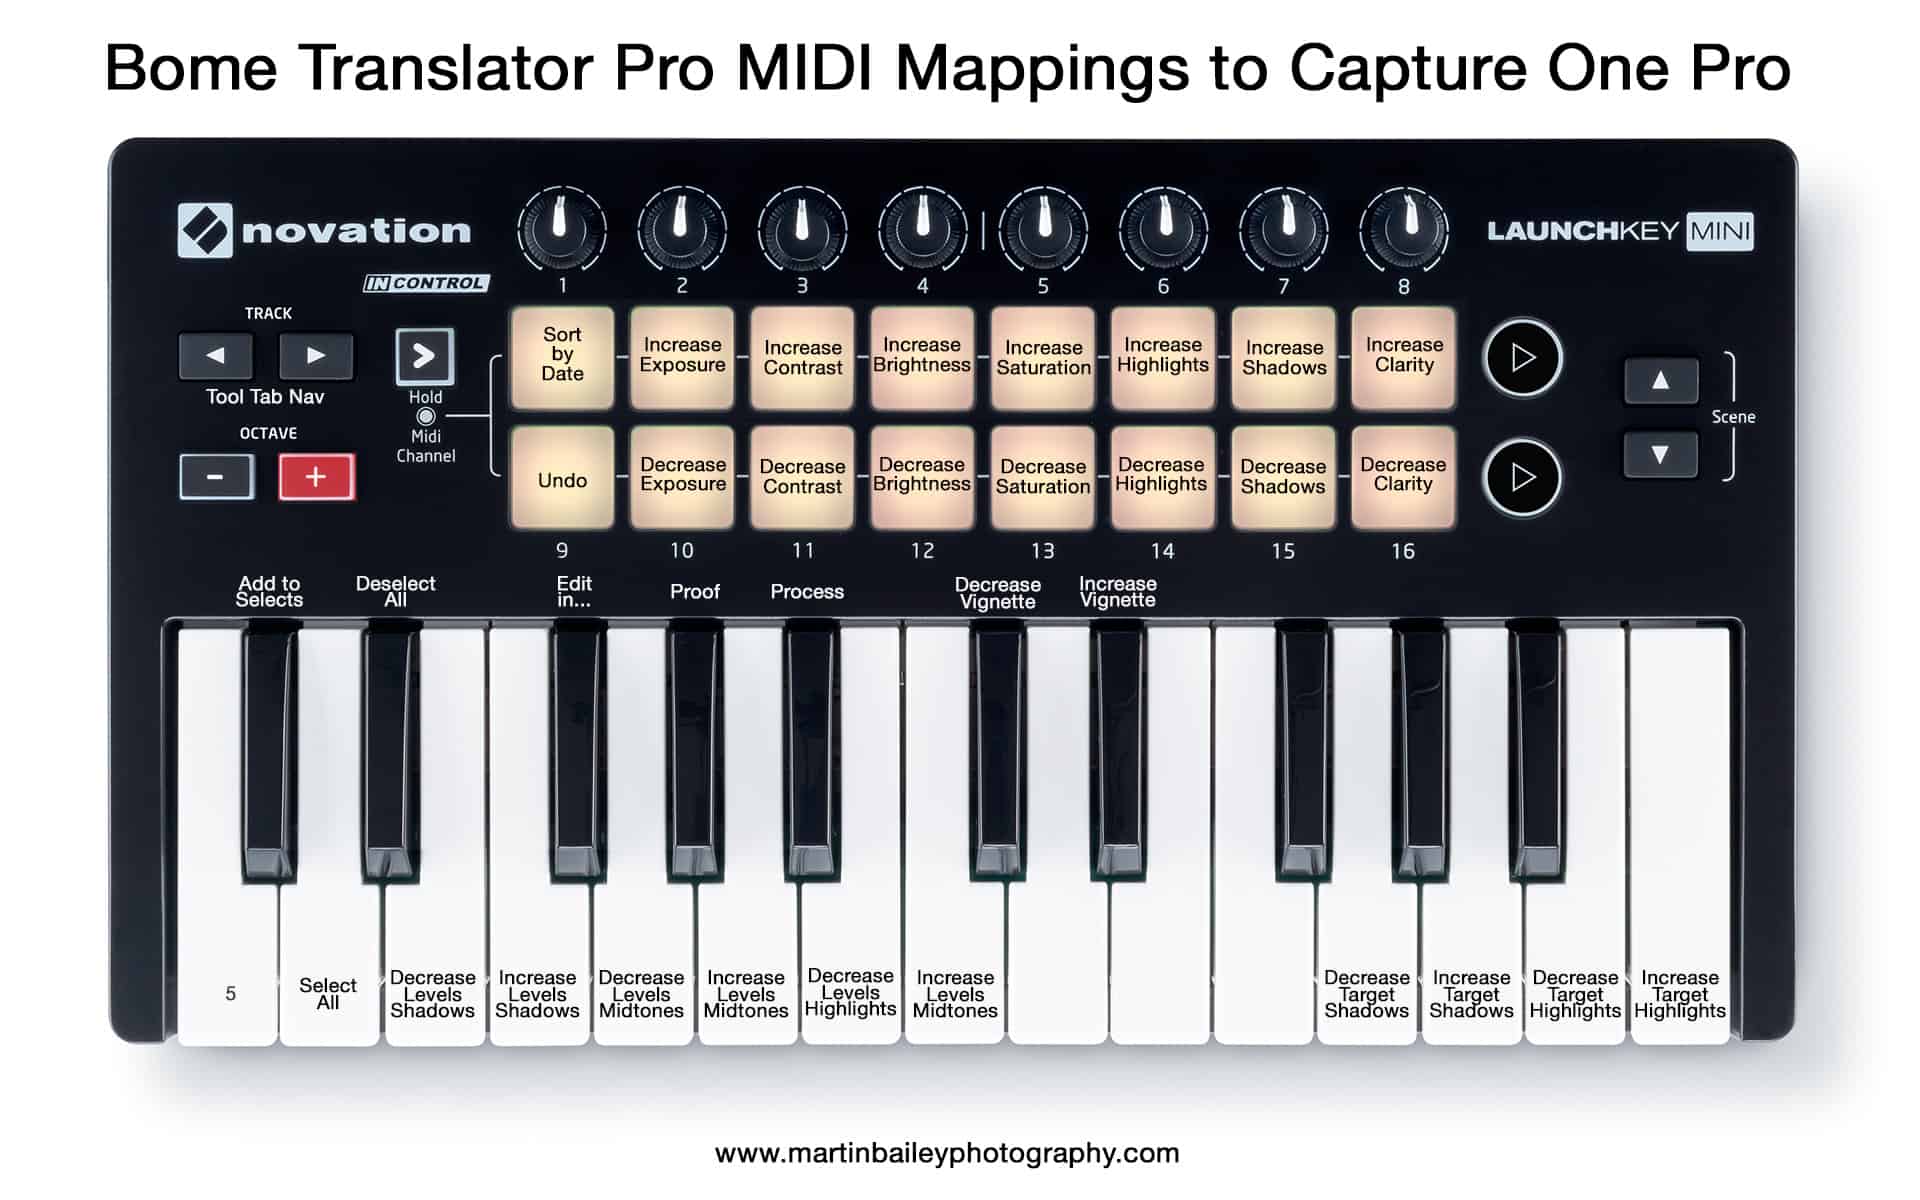
I’ve not mapped all of these third-octave keys, because I’m still thinking through my strategy. I haven’t really used these options yet, as I’ve literally just got into this kind of mapping this week, so it may well be in flux for a while.
For good measure, here too are screenshots of my Pads and Other Buttons sets…
Note that although it’s probably possible to map the knobs to sliders as well, I’m currently avoiding doing that, because this particular controller has a set value for each location of the knobs, so it will always take over the position on the slider when you start to turn it, and I don’t want to do that. There may be a way to program that differently, but I wasn’t able to do that with the time I assigned to this task this week. If I figure this out later, I’ll let you know.
Note that to use Bome Software’s MIDI Translator Pro is has to be running in the background with your project open. It can be configured to start minimized and to minimize to the menu bar so it doesn’t get in the way.
Remembering the Mappings
Of course, I highly doubt that it will be possible to simply remember all of these shortcuts. This is another reason why I created the Photoshop files with the mappings included. I actually have a Brother Label Printer that I could use to print out labels to physically stick on the MIDI controller, but as I actually use it for making music too, I don’t think I’ll go that route. I have a lot of screen real-estate, so I will either bring up the images I created as a reference or print them out to reference on my desk when necessary. Some of these mappings are pretty easy to remember though, and I already found myself hitting the navigations keys and Process key as I prepared for this post.
Your Turn!
So, I’m going to leave it there for now, as this has probably given you plenty of ideas as to how you might map a MIDI device that you might have lying around. MIDI Translator Pro costs €59 to buy, which might feel a little on the expensive side if you have no other use for it. As I said, I use this software now in a number of ways for my music creation, so along with the MIDI controller that already sits on my desk, this solution essentially cost me nothing, both financially and space-wise.
If you do have a go at mapping your own device to Capture One Pro or any other application, please share your findings in the comments below. I’d love to hear how you are using this. As I mentioned, I’ll perhaps also give Tangent Element-Vs a try on the iPad too, although it seems to be pretty color-grading centric. Either way, I’ll let you know what I find on that later.
Show Notes
Get Bome Software’s MIDI Translator Pro here: https://www.bome.com/products/miditranslator
See Tangent Wave’s Element-Vs here: http://www.tangentwave.co.uk/products/#element-vs
Pallete Gear is also worth checking out: https://palettegear.com
Arturia: https://www.arturia.com/products
Native Instruments: https://www.native-instruments.com/en/catalog/komplete/keyboards/
Subscribe in iTunes for Enhanced Podcasts delivered automatically to your computer.
Download this Podcast in MP3 format (Audio Only).
Download this Podcast in Enhanced Podcast M4A format. This requires Apple iTunes or Quicktime to view/listen.

Interesting idea Martin.
Would be great if you could get those MIDI rotary knobs working to control C1’s sliders but I assume this is not possible?
I use a combination of a Wacom tablet (right hand) and a Contour Shuttle V2 pro (left hand).
https://www.contourdesign.com/product/shuttlepro-v2/
Very versatile. One thing I really miss using the Wacom is the loss of the mouse scroll wheel. The rotary controls on the Shuttle give this back to me.
Thanks,
Greg.
Hi Greg,
I tried for about half a day to get the dials to work with the sliders and wasn’t successful. I’ll give this more time later, but the main thing I’ve found is that it’s not easy! 🙂
Another problem is that these dials have set values for the position of the dial from 0 to 127, so if say you set Exposure to -1 on one image, when you move to the next image, as soon as you start moving the dial regardless of where the Exposure slider is positioned, it will just to -1 before it starts to move.
If the buttons were infinite, and simply sent increase and decrease increments, it would be easier. Having said that, I have progressed a little bit, by saving the starting point in a variable in one translator, then having that translator stop and comparing whether the dial is going up or down, and sending a shortcut based on that. But, it’s a huge time suck, and I can’t quite get it right.
I’ll report back if I figure it out.
Cheers,
Martin.
Hi Martin,
I now perform all my editing in Capture One using the mouse and an Arturia Beatstep. Some some light configuration is needed first using their MIDI Control Center software (mainly to put all the knobs to relative values, this gets rid of the issue of absolute values you have highlighted above, but of course only if the proprietry software allows) and then BOME MIDI Translator Pro to do the mappings to Capture One shortcuts. The reason I tried this all out in the first place is the fault of https://phodograf.com/controller-1/ who very kindly offers all his config files for free which helps tremedously in flattening the learning curve so to speak 😉
The only thing I miss now is that Capture One changes their shortcuts to behave in the same way as when you use the mouse to drag the sliders… especially Exposure, White balance (both Kelvin & Tint), HDR recovery (both Highlight and Shadow), Brightness, Saturation and Rotation (the shortcut values are not as fine as those of the mouse).
Great to see that people are looking into different ways of interfacing with the software, thereby improving their efficiency and user experience when editing images.
Cheers,
Neil…
Do you have any idea if this MIDI solution also works with the latest version of Capture One 2025 (16.x)? I can’t find any details and before I get a MIDI controller, I’d like to make sure it’s not a waste of money. Thanks for the reply.