This week, I’m going to walk you through how I add copyright information to my images in Adobe Lightroom, then export them for web with a watermark embedded.
Last week, based on a listener’s question, I showed you how you can do these things in Photoshop Elements, but honestly, as I spent way too long struggling with Elements, I realized that I simply had to follow up with an episode on how you do these simple tasks in Lightroom. I’ll go on to mention a new plugin that I’ve just started to using to optimize my images after I upload them to this WordPress based web site as well.
Adding Copyright Statement to Images
OK, so to quickly recap from last week, I mentioned that it’s possible to add the author’s (photographer’s) name and a copyright statement to images right there in the camera as you shoot them, by entering this data in the camera’s menus. At least this is possible with my Canon cameras, and I imagine it’s possible with pretty much every other camera on the market too.
I also mentioned that I can add this information more easily using Canon’s EOS Utilities application, that comes with the camera. Neither of these methods though supports adding the copyright symbol © to the text appended to images, so ultimately, I do this in Lightroom, and I’ll show you how in a moment.
Before that, I’d also like to reiterate my mantra that you save the most time in your digital workflow by doing everything that you need to do to your images as early as possible in your workflow. If you want to add or update the copyright information in your images, you can do it during import and then you never have to worry about this again for the life of your image.
Prepare Your Metadata Preset
What’s more, if we create a Metadata Preset that contains our copyright information, we can just select that and it will be automatically applied as we import our images until we change it, so let’s first look at how we create a preset.
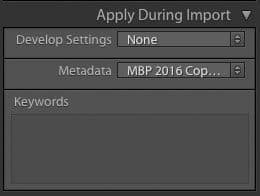
In the import dialog in Lightroom, on the right there’s a section called Apply During Import. Under that, you’ll see a Metadata pulldown. Click that pulldown, and select New from the sub-menu. If you already have a Metadata preset that you use, but don’t have copyright information included, select Edit Presets.
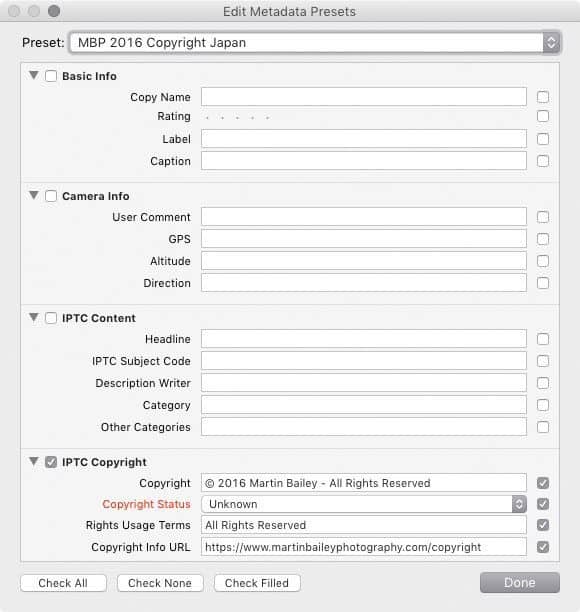
In the dialog box that appears if it’s a new preset, give it a name, and if you are updating a preset, select if from the Preset pulldown. Then add your Copyright text, and Rights Usage Terms, and a URL to your copyright information page if you have one. When you are finished, hit the Create button if it’s a new preset, or select Update Preset “your preset name” from the Preset menu, then click the Done button.
After you return to the import dialog, your new or updated preset should be selected under the Metadata pulldown, but if it isn’t select it from the list. Now, as you import your images, the copyright information we just created will be added to all images that you import or add to your library from that point on, until you deselect the preset or select a different one.
You’ll notice that I include the year in my copyright statement, so I just have to remember to change this at the start of each new year. If you think you might forget to do so, create a reminder in your calendar or perhaps just don’t include the year in the copyright text, although it’s generally better to include the year.
To apply this preset to images that are already in your Lightroom catalog, simply select all of the images that you want to tag in the Library module, then select the Metadata preset that you just created or updated from the Preset pulldown under the Metadata panel in the right sidebar. Alternatively you can just right click the selected images, and select the Preset from the Metadata Presets sub-menu.
The beauty of this as well is that only fields that are checked when you create the preset will be updated, so you won’t over-write or clear any other data, unless it was in the copyright related fields of course. Also note that I leave the Copyright status as Unknown because I use this as a flat to show me which images I have actually registered with the Library of Congress. After registering them, I change this to Registered in the Library module.
Create an Export Preset
OK, so now that we have our images copyright tagged, we’re ready to export them for Web. Again, we’re going to create a preset for this, so that we can export with a couple of clicks from this point on. Anything that you think you’ll do more than once, just create a preset for. It will always help to speed up your workflow.
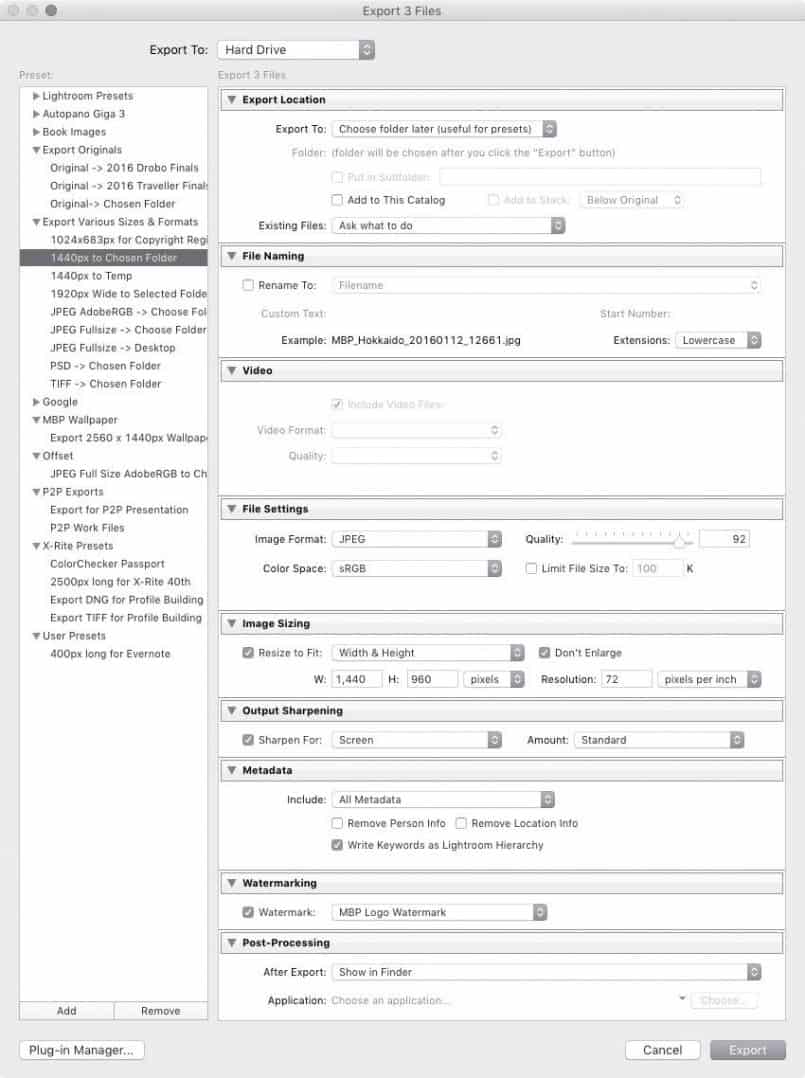
Also note that you can export as many images as you want in Lightroom. You just need to select the images that you want to export in the Library module, then for the first time, click the Export button in the bottom of the left sidebar, and you’ll see a dialog box like this. If Export To is not set to Hard Drive, select that, and then work down each pain selecting the settings that we’ll cover now.
If you have a specific location that you know you’ll want to export your images to each time you use this preset, select Specific folder under the Export Location > Export To field, then Choose your location. For my Web sized images I selected “Choose folder later (useful for presets)” and then I simply navigate to a folder to put the images in each time I do an Export. Lightroom remembers this folder as well, so it stays in that folder until you change it. For the Existing Files pulldown I tell Lightroom to ask me if I want to overwrite or not, if the same file is already in the folder.
Under the File Naming section I generally leave the filenames as they are, because I rename all of my files on import. Remember, the earlier you do something, the more time you save later.
Under the File Settings section I generally use JPEG for Web, and select sRGB for the Color Space, and I select 92 for the Quality. This tells Lightroom how much to compress the images. I’ve used 92 for many years now, as I read somewhere that it’s a good compression ratio to select if you want to reduce the file size by around a half, but have no risk of seeing any digital artifacts or crushed gradations in the image.
Now, you can often select a much heavier compression ratio, i.e. a smaller number here, but it requires that you manually continue to increase the compression while comparing your image to an uncompressed version to see if you can detect any difference. Then, once you detect some difference, increase the compression back to the previous amount and save your final copy. That is time consuming and so I’ve always just used 92. There are better ways to find the optimal compression settings automatically now though, so I’ll talk about that later.
The Image Sizing section is where we select how large or small we’re going to make our web sized images as we export them. As I mentioned last week, I use 1440 x 960 pixels. I feel this is a good size for people to still be able to enjoy the full quality of my images, but not quite big enough for people to be able to do much with. How big you make your images will depend on your comfort levels.
I must say though that I occasionally see people that are still resizing images at 640 or 480 pixels wide, and unless I have some kind of obligation to continue looking at those images, I generally just leave the site. I’d say that these days you need to have your images at least 80o pixels wide, and even then, it’s still better to include a larger image that the user can view by clicking on it if they’d like a better look at your work.
By selecting Width & Height from the pulldown, and typing in 1440 pixels wide and 960 pixels high, Lightroom will automatically make landscape orientation images 1440 pixels wide, and if they are 3:2 aspect ratio, they will also be 960 pixels wide. If it’s a panoramic image they will be 1440 pixels wide, but shorter in height.
If however, I export a portrait orientation image, it will still be exported at 960 pixels high, but the width will be 640 pixels. This is how I want it. I don’t want my portrait images to display too high, so this setting suits me fine. If you’d prefer that portrait images are exported the same hight as the width of your landscape orientation images, then select Long Edge from the pulldown, and just enter your required length. I also leave the resolution at 72 pixels per inch for now, as that’s still pretty much the standard for web use.
Under Output Sharpening, I turn on the Sharpen For checkbox, and select Screen and the amount Standard. Whenever you scale down your images they will become slightly softer after export, so it’s best to turn this option on to maintain the sharpness of your images.
Under Metadata I opt to include All Metadata. You can select just to include Copyright information, Copyright and Contact Info, or All Except Camera and Camera Raw Info. I just keep all Metadata. One important thing to keep in mind here is if you are exporting images that have been geotagged, you might want to strip that information off by turning on the Remove Location Info checkbox.
This is especially important if you have photos that you shot at home, such as with your iPhone, which automatically adds location information. If you leave that embedded in your photos, it could lead people to your home that you might not want a visit from, so keep this in mind when sharing images. It might even be better to create a second preset with this checkbox turned on, and add “Strip Location Info” or something like that in the preset name.
I also turn on the checkbox to Write Keywords as Lightroom Hierarchy, but I’m not sure if this is necessary any more. My old web site used to omit keywords if I didn’t turn this on, but I haven’t used that site for a number of years now, and have never checked if this is still necessary, that’s all.
Add Your Watermark
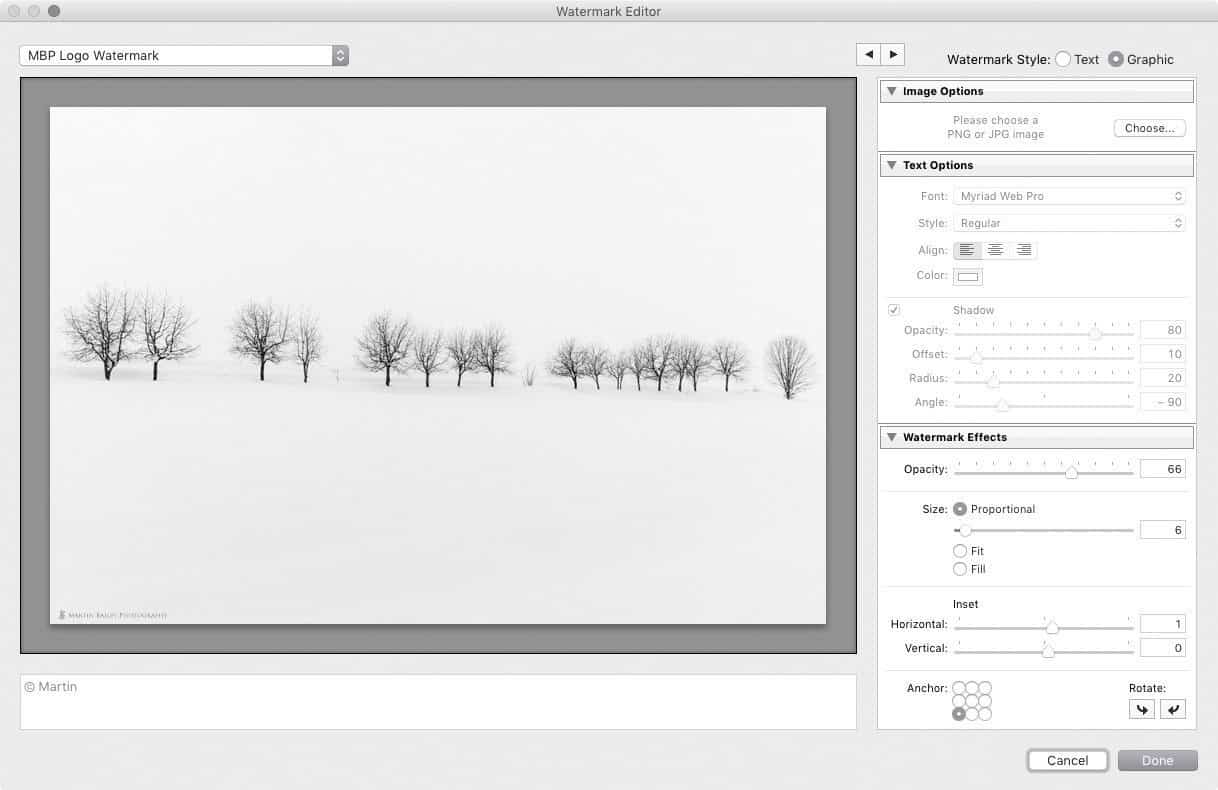
Last week I talked about the pros and cons of adding a watermark, so we won’t go into that again, but if you want to add one to your images, the Watermarking section is where we set that up. Turn on the Watermark checkbox, then from the pulldown select Edit Watermarks.
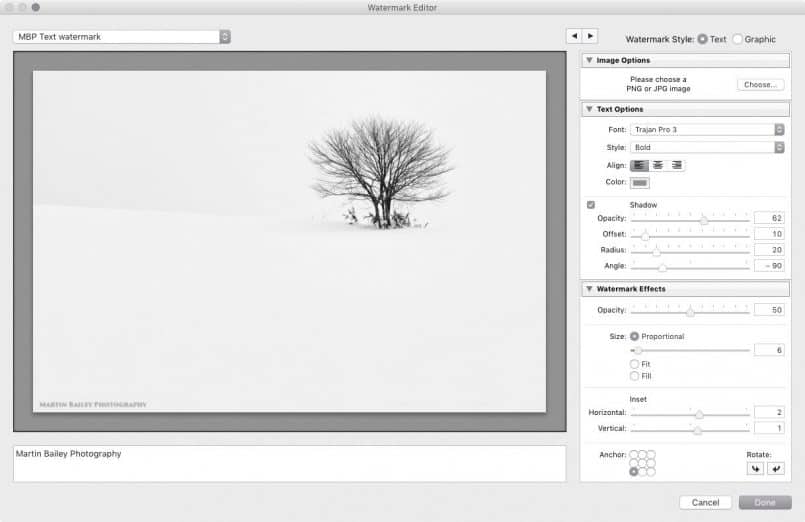
You can add a text or graphic based watermark. First, let’s look at how to create a text based watermark. These are actually now quite powerful watermark settings in Lightroom. After selecting Text as the Watermark Style, go ahead and type in the text that you want to embed in your image, in the large field at the bottom of this window (below).
You can select any text font on your system, and change the style and alignment. If you chose a mid-gray for the color, your watermark will be visible on most background colors, except the same mid-grey, although that’s unlikely to happen in nature. If you use gray text, then an opacity of 50% is probably fine. If you use black text, 30% is perhaps better, to avoid it becoming too striking. Unless striking is what you want of course.
Personally I like to add my watermark to the bottom left of the image, and inset it just a little. You get a preview of how your watermark looks right there in the dialog box, so tweak away until you like what you see, then Save or update your watermark with the pulldown menu in the top left of the window. If you want, you can of course make multiple watermarks and select them according to your images when you export, and also create various export presets as necessary. Remember, once they are created they are only a couple of clicks away.
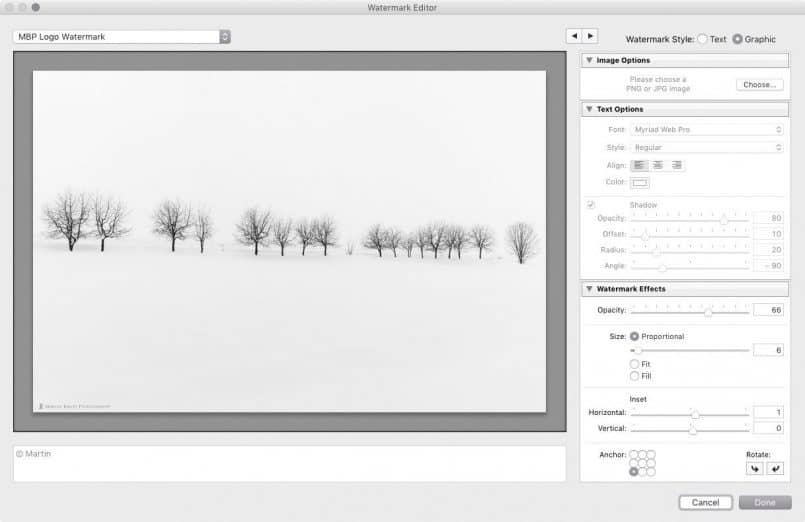
As I mentioned, you can also create a Graphic based watermark based using your logo or other image file. I’m not going to go into detail on how I made my logo, but for the watermark, placed it onto a new Photoshop file for which I’d set the Background Contents as Transparent. Then when you have added text or your logo file, if you save it as a PNG file, you will be able to maintain the transparency, so that you will be able to see your image through the gaps in your logo. I made it a mid-gray, and added a light colored drop shadow in Photoshop as well, which helps it to stand out against a gray background, because the shadow is lighter than the text.
Because my logo was quite light and because I didn’t want the shadow to become too weak, for my graphic watermark I set the Opacity to 66%, as you see in the screenshot (above). Again, once you’ve tweaked the settings, save your new watermark from the pulldown in the top left, and then click the Done button, and you’ll be sent back to the Export dialog.
The last thing to select is what you’d like Lightroom to do after it’s finished processing your image in the Post-Processing section. I generally select Show in Finder for this option, because then I get a visual clue that Lightroom has completed the export, and I also have the exported images right there in an open Finder window for me to start using. You can also select Do Nothing, or open the exported image in another application.
Once you have finished entering all of your settings, it’s time to click the Add button in the bottom left corner of the Export window, and give your preset a name that means something to you. I call my Web export “1440px to Chosen Folder”.
From that point on, whenever I want to export an image for the Web, all I have to do is right click the image or multiple selected images, then go to the Export section of the right-click menu, and select the preset from the sub-menu. Because I have selected to choose a folder on export, I do have to tell Lightroom where to put the images, but then when I click OK, my images are resized and watermarked and dropped into my selected folder for me to upload to my web site, or Facebook, Google Plus, or anywhere else I share my images.
I should mention that some sites like Flickr and 500px do provide plugins for Lightroom that can make it easier to upload images directly to online services, but I don’t use any of these, so I’m not the best person to explain them to you. Plus, they are mostly just as easy as adding images to a collection, so they are pretty self-explanatory.
JPEGmini
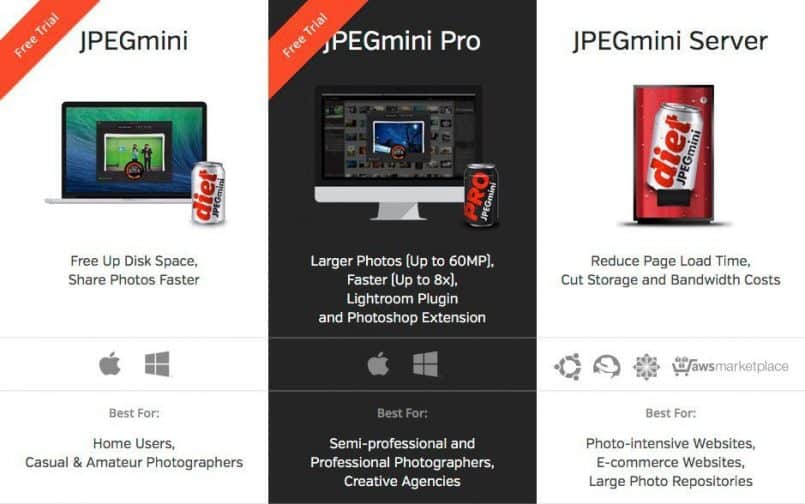
As I mentioned earlier, there are a few other ways to optimize the size of your images rather than just selecting 92 from the Quality slider in the Export window. One option that I was very close to buying, and maybe still will, is JPEGmini. You can actually optimize a JPEG image size as a test or download trial versions of this at jpegmini.com and it works really well. I hear from the developers that it basically tries increasing more aggressive compression until it sees degradation in the image, then dials it back a bit and saves a copy. This is very time consuming if you try to do it yourself, but JPEGmini does this all in a fraction of a second, so it’s worth considering. It basically just plugs right into the Export dialog that we’ve been looking at today, so it would be an add-on to this process, rather than replacing it.
So, you are probably wondering why I didn’t buy it? Well, the problem is that if I took my optimized images and upload them to WordPress, WordPress would by default automatically make a range of different sized images for various uses, and as it saves all of those new image files, it will apply a compression of 82%, and actually increase the size of the copies. This means that the only benefit from the optimization that people would see on my site would be when they click on images to view the full web sized image.
I saw some people online showing a line of code that you can add to WordPress to stop it from compressing images, but that’s misleading and doesn’t work. What it is actually doing is telling WordPress to compress images at 100%, so the images end up even larger than when they are compressed at 82%, which is the default compression. You could of course use the same line of code to increase the compression to a more aggressive percentage, but that could result in crunchy gradations and reduced quality in some images, so it’s too hit and miss.
I’ve not totally ruled out buying JPEGmini though, as I would like to use it to optimize the size of the full sized JPEG files that I export to add to Apple Photos, and then sync around all of my devices. It does look like a great way to do this, especially as it simply slots right into the Lightroom export dialog.
WP Smush Pro!
After further research, I actually decided to subscribe to WP Smush Pro which is part of the WPMU DEV team’s suite of WordPress plugins that you can find at wpmudev.org. It carries a monthly subscription fee which is currently $49 per month, although I’m currently optimizing every image on my site during their 14 day trial period. The suite contains a whole range of more than 100 other useful plugins though, so I’m pretty sure I’m going to stick around after my trial expires.
I did some tests though, and from what I saw, Smush Pro actually gets my files slightly smaller than JPEGmini, and because it works on my web server, it automatically optimizes every new image file as I upload it, including all of the new images that WordPress creates, and as I say, you can have Smush Pro go through your existing image library and optimize all of the images that you’ve already uploaded to WordPress as well.
Because it actually sends the images to the WPMU DEV web site for optimization, it’s a relatively slow process, but I started to optimize all 5,962 images on my Web site about five hours ago, and it’s already completed 1,300 of them, and saved me 760 megabytes of disk space by reducing image size by approximately 33%. I imagine at this rate, by the time the process has completed, it will have saved me around 3.5 GB of disk space.
[UPDATE: Just to let you know that the process finished fine, saving me 3GB of disk space by shrinking my images on average by 32%.]
This of course also means that the images will download faster for visitors for my site, and give me better SEO scores, because search engines like Google detect if images have been optimized or not, and rank sites higher if they have, so, it’s a great deal all round. Needless to say, I also did some pretty thorough tests to check that the images really were maintaining their quality, and so far, I’ve not been able to detect any visible degradation, so I’m pretty happy with my decision at this point. I’ll add a note right below this if that changes as the process completes.
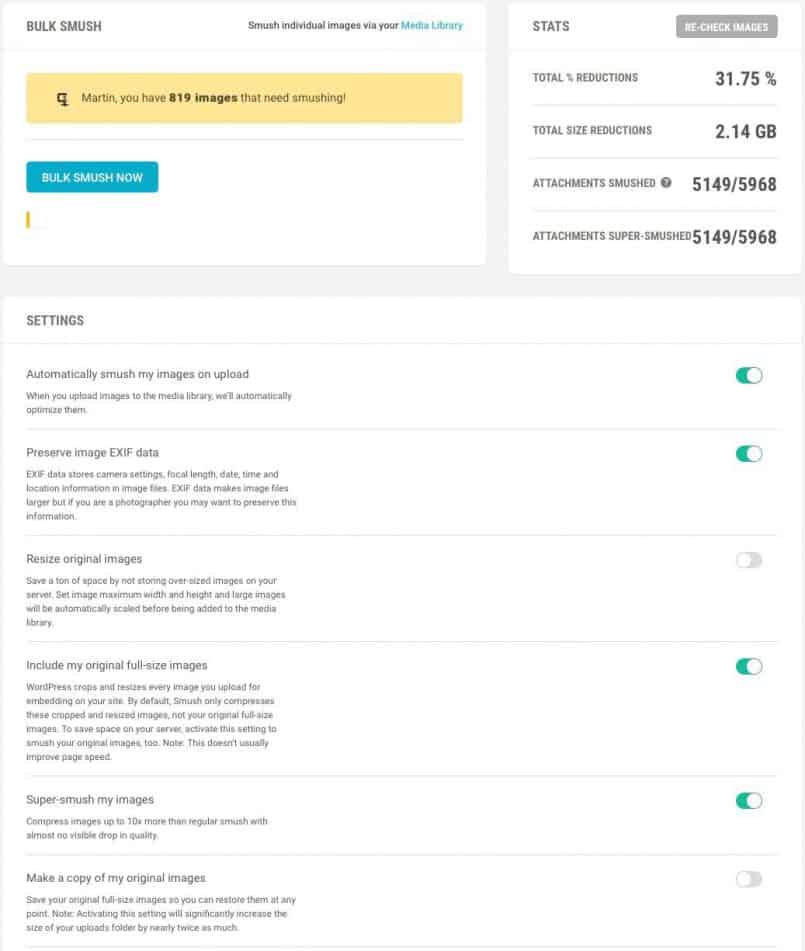
By the way, just in case you also look into using Smush Pro, here is a screenshot of the settings I chose before I started the bulk smush operation.
OK, so that’s about it for today. I hope you found that useful. I’m actually about to start recording a video version of my popular Pixels 2 Pigment optimized digital workflow workshop that I have presented around the world as well as to small group here in my Tokyo studio, so if you might be interested in that, sign up for our newsletters and be among the first to hear when it becomes available.
Show Notes
WPMU DEV Package, with WP Smush Pro: https://premium.wpmudev.org/
JPEGmini: http://www.jpegmini.com
Subscribe in iTunes for Enhanced Podcasts delivered automatically to your computer.
Download this Podcast in MP3 format (Audio Only).
Download this Podcast in Enhanced Podcast M4A format. This requires Apple iTunes or Quicktime to view/listen.


Hi Martin
Thank you for presenting another top-quality post aimed at one of the practical rather than creative processes that help save time in workflow and maintain original image quality. I particularly appreciate you sharing your real-life settings with concise reasons for why you arrived at them, it really reinforces the value of not only your Podcast but all of the work that you produce. I’m going to go and review my LR export settings now!
Best regards, Ian.
Thanks for the kind words Ian! I’m pleased you found this useful.
Thanks Martin, for sharing your insights. I have shamelessly copied your LR preset for exporting to social media.
Best Regards
Frank
Copy away Frank. That’s what it’s there for. Thanks for taking the time to comment!
Cheers,
Martin.
Martin-san,
Thank you for your Lightroom tutorial on Metadata Presets and Watermarking. I’ve updated my Lightroom presets now thanks to you!
Ken
Hi Ken,
That’s great! I’m pleased this helped. 🙂
Cheers,
Martin.