Today we’re going to take a look at how to create a fully automated scheduled printer workout to prevent printer head cleaning, after periods when the printer was not used, to avoid having the printer throw away large amounts of ink.
When I first bought my Canon imagePROGRAF iPF6350 24″ wide large format printer, I was really impressed with how seldom it had to clean its print heads. At least until Canon did some maintenance on the printer, and changed the main board, essentially upgrading it to a newer version. Since then, whenever I print after not printing for more than 7 days, my printer insists on running at least one, but often more than one print head cleaning jobs, throwing ink away, which can be an expensive deal.
To stop it from doing this, I created an image that when printed gives the print heads a workout, and I found that if I printed that file at least once a week, before the 7 day count was up, the printer would not clean its heads anywhere near as often. The problem remained though, that if I was away on a tour, or simply so busy that I forgot to print the workout image, I would still be faced with the head cleans.
So, I set about the task of automating the process. I have an iMac in my studio that is always on, so I initially tried to use the built in Automator application in the Mac OS, but it was really difficult to create something that would work without issues, and I was never able to figure out how to make the job run automatically at scheduled times.
Eventually, I bought Keyboard Maestro, and in less than an hour was able to figure out how to schedule my print job to run at 8:30am every Tuesday and Friday morning, and it’s been running flawlessly, so I’m going to share what I did with you today, in the hope that it will help if you need to do something similar.
Unfortunately, Keyboard Maestro is only available for the Mac, so if you are a Windows user, please just use this information to help build something similar, but I don’t have any recommendations on tools etc. Similar, if you don’t use Lightroom, this might not be as useful, but hopefully provide you with ideas.
The Printer Workout Image
First, let’s take a look at how I built my printer workout image, and my thinking behind it. In Photoshop, I created a file that is almost 24″ wide, so that it fills the width of my roll paper. I added both a Gamut Chart and a Granger Chart, and also flipped both charts in a second copy.
My thinking behind this is that I wanted to force every nozzle on the two print heads in my printer to actually spit out some ink. This is why I tried to use every colour, and created an image slightly larger than the height of my print heads. I don’t know exactly how this works in the printer, so I might be missing something, but it’s working for me so far.
You can download my printer workout image file by clicking on the image (above) and I left each element on their own layer, so you can use this to move them around or create a smaller version for A4 or Letter page size for example. The charts themselves can be easily generated in Photoshop. For information on how to create a Gamut chart and a Granger chart, see this excellent tutorial over on the Luminous Landscape web site.
Create a New Lightroom Catalog
Once you have your printer workout image, you’ll want to create a new Lightroom Catalog that contains only this image. I’ll also share my Keyboard Maestro macro in this post too (below) so if you use the same naming conventions that I state here, it might just work for you straight out of the box.
Go to the Lightroom File menu, and select New Catalog… To make my backups easier, I actually created my catalog inside my Lightroom catalog folder, in a subfolder called “Daily Print”. The Lightroom catalog is usually in your Pictures folder on your Mac. The path would be something like “/Users/YOUR NAME/Pictures/Lightroom/Daily Print”. Call your new Catalog “Daily Print”.
You can see that I started this project thinking that I’d run the print every day, but I later found that this isn’t necessary, and left my file names as they were, so bear with me on this. Once you have your new catalog created, import the Daily Print.psd file or your file if you created your own. You want this catalog to only contain this one file. This is important, because we need to ensure that this image is selected when we use this catalog for the automation.
Set Up Your Print
To make the automation process easier, we’re going to ensure that all of the parameters necessary to print our workout image are set and saved as a print job. Your workout image should be selected in your Daily Print catalog, so go to the Print Module, and set up your paper size. This will vary depending on the size of paper you’ll print to, and the settings will also vary from printer to printer, so you’ll have to figure out a lot of this part on your own.
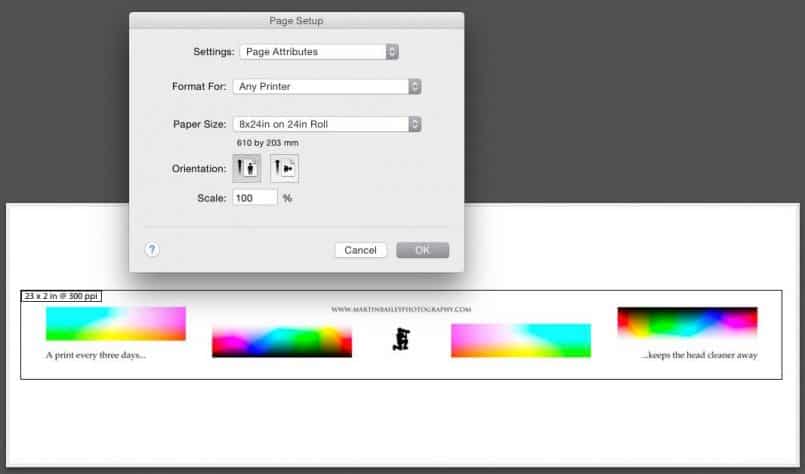
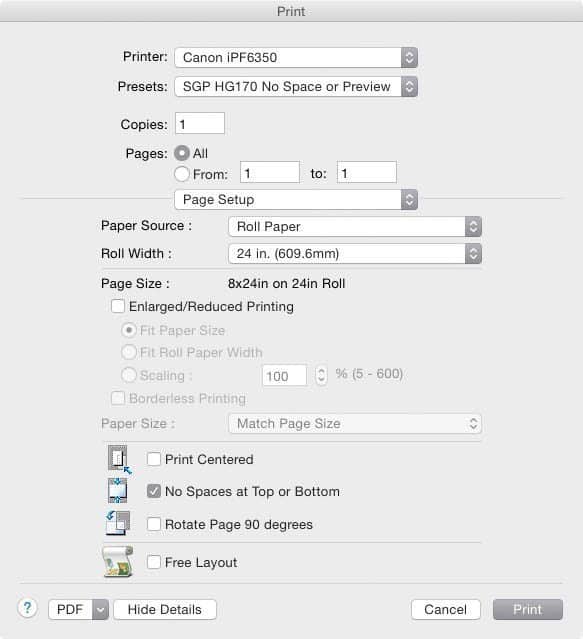
For example, under Page Setup in the Print Module, I created a custom page size of 8 x 24 inches. I actually don’t need this to be eight inches high, but that’s the smallest page size I can specify, but we’ll work around this later by telling the printer not to print the white space.
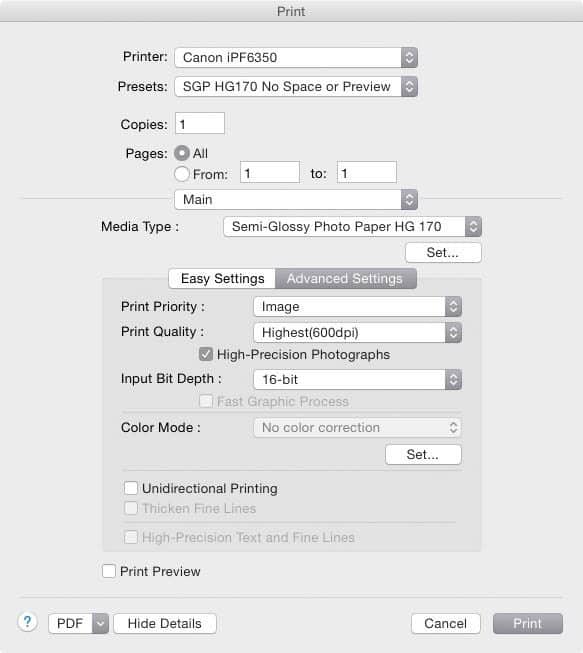
Next, under the Print Settings… I set the paper. In my case, I use very thin Canon Semi-Gloss Photo Paper HG170. I use this very thin media because it has to stay in the printer all the time. If you use thicker media, leaving it in the printer causes it to bend to the shape that it’s fed through the printer at, and then when you start printing, you can get a head strike on the edge of the paper, which can seriously damage your printer. I know this, because it’s happened to me, and I had to have both print heads replaced.
Note from this dialog (above) that I print at highest print quality, because I always do, and because I want to give the printer a good workout. I also usually turn on Print Preview in this dialog, so that I can check the print before it goes to the printer, but this will be printing while we aren’t even around, so it just makes the automation more difficult, and so I just turn it off.
In the Page Setup dialog, I selected my 24 inch roll paper, and turned on the “No Spaces at Top or Bottom” option. This way, only the areas of the page that have anything to print will actually print. The result is that my printer only uses 2 inches of paper to print this out. This is how we work around the minimum 8 inch page height that we looked at earlier.
Back in Lightroom, you’ll need to set your margins and other layout settings, and if you will be printing with an ICC profile, ensure that this is selected, and any other print settings, to match your media etc. and then hit the + button at the top of the Collections panel in the left sidebar of the Lightroom Print Module, and save a Print called “Daily Print”. Don’t put it in a collection or anything.
I actually save a preset with all of these settings in my printer driver, as you can see it’s called “SGP HG170 No Space or Preview”. I don’t think this is necessary, and the name doesn’t matter here. The important thing is that the Print we just saved in Lightroom contains all of this information, including page size and print settings, so whenever we open your Daily Print catalog and go to the print module, then send the shortcut for the print job to actually print the image, it will just work.
Finally, ensure that your print job is selected under the Collections menu, and close Lightroom. If you are going to create your Keyboard Maestro macro from scratch, I recommend that you switch back to your main Lightroom catalog before closing Lightroom, because that’s how you’ll usually be using Lightroom, and we need to cater for that in our macro.
The Keyboard Maestro Macro
I tried a few options to automate this process, but by far the most stable and easy to use is Keyboard Maestro. This is a paid product, current retailing for $36, but in my opinion it’s worth every penny. Not only for this purpose, but you can automate so much else with Keyboard Maestro too. Note that there is currently an issue if you are using Mac OS X Yosemite, and you’ll need to do a bit of a workaround to add Accessibility control to Keyboard Maestro, but easy to follow instructions are available in their forum, and this will hopefully be solved soon anyway, so this may not affect you.
Note too that as far as I can see, the trial version of Keyboard Maestro that you can download is pretty much fully functional. I created my macro entirely using an unlicensed version, and then bought a license once I was sure I could make this work.
Once you have Keyboard Maestro installed, I recommend that you watch the short tutorial to get an idea of how to build a simple macro, but then let’s take a look at how to build our Daily Print macro. I created a Group called MBP Macros to put this in, and then hit the + button at the bottom of the Macros sidebar as we see here (below).
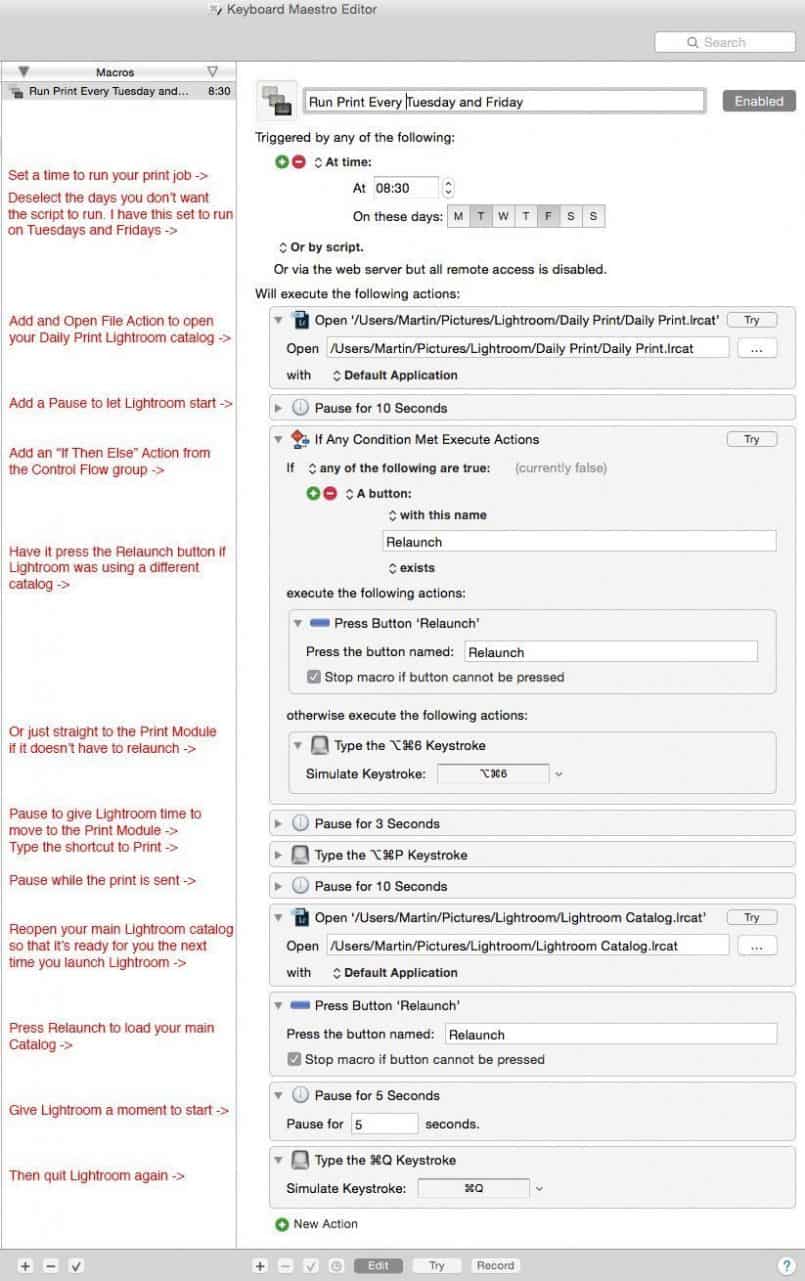
Give your new Macro a name, and hit the + button at the bottom of the right pane, and you’ll basically go through and add each Action from the various groups of Actions on the left. I’ve created this simple breakdown of what I added. I’ll quick run through this (in the audio) but it will be easier to follow these instructions with the below screenshot and instructions.
The only thing that caught me out as I got used to using Keyboard Maestro was selecting the days on which I wanted to macro to run. I tried setting a time a few minutes into the future and what I thought was selecting the day, but the macro wasn’t running. I started looking through the documentation and couldn’t find anything, and then I realised that every day is selected by default. When you click a day you are actually deselecting it. This makes the day paler than the selected days, so you can see that I have set this macro up to run at 8:30am on Tuesdays and Fridays.
I’m running it twice a week, because once a week is right on the limit of 7 days which forces my printer to run the head cleaning process. I have this run before I’m generally in my studio, so that I’m unlikely to be actually using Lightroom when it runs, and because we set our catalog back to our main catalog after printing our workout image, it doesn’t require any action when we start to work on the computer again later in the day.
A few other things to note are that I left “with” pulldown when I open the Lightroom catalogs as “Default Application” because Lightroom catalogs will usually be automatically set to open in Lightroom, so this will help to reduce the amount of tweaking that our macro will need whenever a new version of Lightroom is released.
Rename Your Main Lightroom Catalog
Similarly, it’s a good idea to name your main Lightroom catalog something more generic too. Usually Lightroom creates a catalog with the version number included, like “Lightroom 5 Catalog”, but you can name this anything you want, even an existing catalog.
Just go to the folder where your Lightroom catalog is saved, and rename the “Lightroom 5 Catalog.lrcat” file (or whatever version we’re at when you read this) and also ensure that you rename your “Lightroom Catalog Previews.lrdata” file to the same filename, but with “Previews” on the end. I have my catalog just named “Lightroom Catalog.lrcat” and my previews file is called “Lightroom Catalog Previews.lrdata”.
Because we don’t actually call Lightroom 5 by name, unless the functionality changes greatly in a future version, we should have a relatively future proofed macro here as well.
My Macro
If you would like to just download my Macro and give that a try, click here, and let me know how it goes. I will not be supporting this as such, but if my macro helps you to get started with this, that’s great. The only thing that you will definitely have to change is the path to your Lightroom catalogs. Other than this, it might just work, and I’d be grateful if you’d let me know how you get on in the comments below this post.
If you do have any questions, enter then as comments too, but again, I am not committing to provide any support for my macro or Keyboard Maestro. I’ll help if I can, as time allows, and for general Keyboard Maestro help, you’ll need to visit their web site.
Leaving Your Printer Turned On
Before we finish I should also say that this is possible because I leave my printer turned all the time. In fact, with many large format printers, you are supposed to leave them turned on, and they go into standby mode after a predetermined time. You leave them on, because they wake themselves up periodically to agitate the inks, to stop them from clogging. Because of this, when my macro sends the print job to the printer, it automatically wakes up, then an hour after it’s workout, goes back to sleep again until I use it, or until the next workout job is sent.
And it hopefully goes without saying, but unless you are having problems with your printer cleaning its heads too often, you probably don’t need to do this, and if your printer doesn’t have the ability to be left in standby mode etc. then you may not be able to use this method anyway. Please check all of these things out before spending too much time, or any money, trying to make this work.
In Closing
OK, so there you have it. I was very impressed with Keyboard Maestro, and the ease of use. If this helps you out, that’s great. If you are on Windows or don’t use Lightroom, then I hope this has at least given you some ideas if you need to do something similar. Good luck!
Namibia 2015 Date Change
Before we close, I’d also like to let you know that my Namibia Full Circle Tour next year with Jeremy Woodhouse has had a slight date change, but is going ahead, from August 10 to 26, and there are now only a few places left. If you’d like to join Jeremy and I in that magical corner of Africa, visit https://mbp.ac/namibia2015 for details, and if you book your spot, please let Jeremy know that you heard about the tour from me. Or drop me a line if you have any questions or concerns.
Show Notes
Click here to download my Printer Workout Image
Download my Keyboard Maestro Macro:
https://martinbaileyphotography.com/files/MBP_Printer_Workout_Macro.zip
Keyboard Maestro: http://www.keyboardmaestro.com/
Gamut and Granger Chart Tutorial on Luminous Landscape: http://www.luminous-landscape.com/essays/test-charts.shtml
Subscribe in iTunes for Enhanced Podcasts delivered automatically to your computer.
Download this Podcast in MP3 format (Audio Only).
Download this Podcast in Enhanced Podcast M4A format. This requires Apple iTunes or Quicktime to view/listen.




Hi Martin,
Thanks very much for sharing this great idea and also your solution. I’m sure it took you hours of work to get this done. My Epson 4880 (17″) is prone to clogs so I print a sample photo every few days. But I’ve been using ordinary photocopier paper to save cost. Is there a reason you use full width photo paper?
I’m also sorry to hear that Canon printers also have the clogged head issue. I’ve gotten so angry at my Epson that I’ve been seriously thinking of switching to Canon.
You’re very welcome Mark.
I did spend a fare amount of time initially trying to make this work with Mac OS Automator, but it was just not that easy. Once I decided to give Keyboard Maestro a try, it took me probably 90 minutes all told, so not a big deal. 🙂
The only reason I use full width paper is because I want to ensure the heads move their full distance, and give them enough colour and depth variation to really give the heads a good workout.
Note though, that the really annoying thing about this is that the heads are not actually clogging. I’ve never had problems with the heads clogging in my Canon printers. Before the main board was changed, this printer rarely ran head cleaning processes. I’m sure it’s a change Canon made to err on the safe side of over-cleaning. And of course this forces us to spend a lot more money on ink, which probably suits them nicely. 🙂
I used to use Epson, and one of the main reasons I switched is because of the nozzles clogging. Epson printers have a lot going for them, but I haven’t regretted the switch once.
Cheers,
Martin.
Oh, and I use photo paper rather than plain paper, again, simply because I want to ensure that he heads are given plenty to do. Plus, if I want to really quickly print out a photo just to look at, I don’t have to switch rolls this way. 🙂
Thanks for the info Martin. I just upgraded to an iPF6400 and am concerned about ink waste. I have a couple of questions though before I start trying your automation. The first is my iMac goes into password mode on wake up. Should I just turn off that feature when I’m on the road? Second, doesn’t this print head exercise use a similar amount of ink as a result of the process?
Regards,
Jeff
Hi Jeff,
Good point. The script won’t work when the computer is locked, even if only the screen is locked but the computer is awake. There are a few options to get around this though. One is to set your computer to login automatically, and set a schedule to have it power up on the days that you want to run the script.
You could either use the schedule option under System Preferences > Energy Saver, or probably use the pmset command in Terminal to do this only on say Tuesday and Friday. I haven’t tested this, but running the following command would probably do this:
sudo pmset repeat poweron TF 08:00:00
You could then use the Energy Saver schedule to power the computer off again 10 minutes later for example. Then, with the computer powering on and running the print job in the mornings, you could set the computer to require a password after the screen is locked during normal use, for some added security. Of course, if the computer was stolen and powered on, it would login automatically, so I’m not sure this is ideal.
On your second question, I haven’t done any detailed measurements of the ink usage, but before the main board change, and regular head cleans, I was using much less ink than I have been since these head cleans started, even when I was printing a lot. Once the regular head cleans started I could almost watch the ink going down in the admin console, even when I wasn’t doing much printing. I can’t imagine that running this job is going to use anywhere near as much ink as the head cleans.
I hope that helps!
Martin.
Perhaps the reason for the increase in cleaning frequency is related to Canon’s ink head system where it’s not that they don’t clog, but that they have thousands of nozzles available and as they clog, the printer keeps track and when a certain number have clogged, it’s time to replace the print head, which costs a lot of money and there are two of them. At least they are user replaceable! Historically, 600-700ml of each color would begin to reach the limit for a print head, but with rising costs this could be a way that Canon can increase the length of time before print heads go bad. Or it could be related to changes in the pigment based inks that make clogging of individual nozzles more likely and they wish to keep their long term customers happy. Either way, I’m glad to see your workflow in this and thanks for sharing. Based on my years
I’d like to think that you’re right Jeffrey. 🙂
Hi Martin. Thanks for the reply. I think I might just take the password off while I am traveling as I think it’s unlikely someone will break in and “look” at my data–there’s more valuable stuff nearby! I do have a couple more questions.
First–I can’t find your paper by the number–called BH and they referred me to a roll of canon premium semi-glossy photo paper 2. This seems a bit thick. Maybe you could provide the manufacture’s model number?
Second: Do you just print these and leave them until you return and cut of the strips at that time?
Third: In my printer manual it mentions more ink use when printing borderless. Seems that leaving some white space at the ends would prevent ink loss.
Thanks again
Aah, it seems that the paper I use is the Japan branding. I bought it locally.
This is the same paper on B&H: https://mbp.ac/csg170
I chose this because it’s very thin, at 170gsm, and that’s important as it will be left in the printer most of the time.
I set the printer to auto-cut, so these strips just fall to the floor after printing. I throw them away anyway, so I don’t pull out the print cradle.
Borderless printing is different to what we’re doing here. We’re just not printing any white space that it there because of the paper size. When you print true borderless, you actually print over the edges of the paper, allowing ink to be picked up by the sponges inside the printer.
Cheers,
Martin.
Martin – This was a really helpful post. It took me a while to get this to work with my Epson 4900 just right, but your tip to Jeff Fisher is what finally made it work for me. I didn’t realize that just because the screen went to sleep (but not the hard drive) on my Macbook Pro it wouldn’t work. I couldn’t figure out why when I hit the “try” button in Keyboard Maestro it worked flawlessly, but not when I left it to run automatically. So it was great to come back to the comments to pick this one up. BTW, I had intermittent problems with clogging on my 4900 and I’m hopeful this will end that, so I think this will really solve that problem.
Yes, sorry about that David. I should have actually mentioned that in the Podcast. Sorry it took a while to figure out. I’m glad the podcast in general helped though. I hope all is well!
Thanks for the great post. Some printer support cloud printing (e.g. http://www.usa.canon.com/cusa/consumer/products/printers_multifunction/photo_all_in_one_inkjet_printers/pixma_mg7520 ) It might be possible to schedule a cloud printing job automatically without requiring a local computer to be turned on.
Related to power and standby mode. This printer has an auto power on documented as “turning on the machine when printing data is sent to the machine”
I’d be interested in hearing anyone taking advantage of these to schedule a weekly print job as to save ink waste due to unconfigureable printer head cleaning.
The printer head and the printer cartridge should be managed well for that they can achieve the possible goal for the print to generate our best service provider to provide the actual service or the update of the machine for more contact the Canon Driver Support for the best service.
i personally used cannon driver. the printer working so except able. Canon provide you best result if you can generate it. Thanks MARTIN
Use damp cloth and wipe the chip on the head. This will do the work. One can also use ip solution to clean it. Still if there is no ink flow then best to replace the print head.