
I received a question recently from listener Derek Bezuidenhout asking about condensation issues in cold weather. I’m asked this a lot and usually have one main bit of advice and that is to ensure you put your gear back into your camera bag before going indoors. There are a few other things to consider though, so I thought we’d go over this today, especially as many of us in the northern hemisphere are getting well and truly into our winter seasons now.
Viewfinder Misting Up
Derek’s question was actually in two parts. The first asking if I had problems with my viewfinder misting up in the cold, and if so, what do I do about it. Yes, I do sometimes get a misted up viewfinder. It’s actually usually only when the temperature is floating around freezing point and when it’s either raining or snowing. Once it gets much below freezing, I don’t see this.
When it happens, my methods for cleaning the viewfinder are very basic. I often find that it happens just as I’m trying to capture something where timing is important, so I simply stick my finger into the viewfinder and wipe it. If I’m wearing gloves, the cloth of the gloves helps to remove the moisture, but if it’s my finger, it really just smears the water across the glass.
This generally clears the viewfinder enough for me to continue shooting and I might then use a lens cloth to give the viewfinder a wipe to clean it up some later, but if it’s misting up a lot I just keep wiping it with my finger until I get home or back to a hotel later in the day, when I might clean the viewfinder with a lens cloth again just to get rid of any smearing that might be left behind.
Derek also mentioned in his email that Scuba divers often spit in their masks to prevent them from misting up, and I have tried licking the viewfinder, but I honestly didn’t find this very effective, so my main method remains a mixture of wiping with my fingertip and cleaning with a lens cloth as time allows. I believe there are anti-misting sprays that you can use too, but I’m not sure how effective these are. I guess I have not felt this to be a big enough issue to try to work around it.
Preventing Condensation on Cameras
The second part of Derek’s question was about preventing condensation on cameras when you come indoors out of the cold. Specifically, you hear a lot of people talking about the need to put your gear into plastic ziplock bags or your camera will be struck by lightening the moment you walk into a warm environment. Derek wanted to know if that’s what I do and if this is really necessary. Derek also mentioned that I probably didn’t need to worry about this because I use a Canon EOS 1D X, which is a weatherproof body.
Firstly, we should talk about the fact that weatherproof cameras are still susceptible to condensation, because the problem is really about condensation forming inside the camera and lenses, although it can affect non-weatherproofing cameras more, because the moisture can get into the top LCD or the preview LCD on the back of the camera more easily. Generally though, you still have to be careful with weatherproof cameras, to prevent condensation from forming inside the camera.
Put it into Your Camera Bag
So, are ziplock bags really necessary? The short answer is, no. I never put my gear in plastic bags or ziplock bags to prevent condensation forming on them when I go in from the cold. I find that just ensuring that you put your gear into your camera bag before going inside, and then leaving it there for a few hours to warm up gradually, is enough to prevent condensation forming.
The only time I break this practice is when my gear is covered in moisture when I put it away. If I have snow on my gear, I will blow it off as I put it into the bag, but say if the snow is wet or I’d been shooting in the rain, and there is actually moisture on the gear when I put it away, I try to find somewhere cold to take the gear out and wipe it off before going into the warm. This might be the doorway to my house or hotel, which is generally going to be cooler than the main rooms of the building. If that’s not possible, then I take it out of the bag one item at a time, give it a wipe, then put it back into the bag and get the next piece of gear out, zipping the bag back up each time.
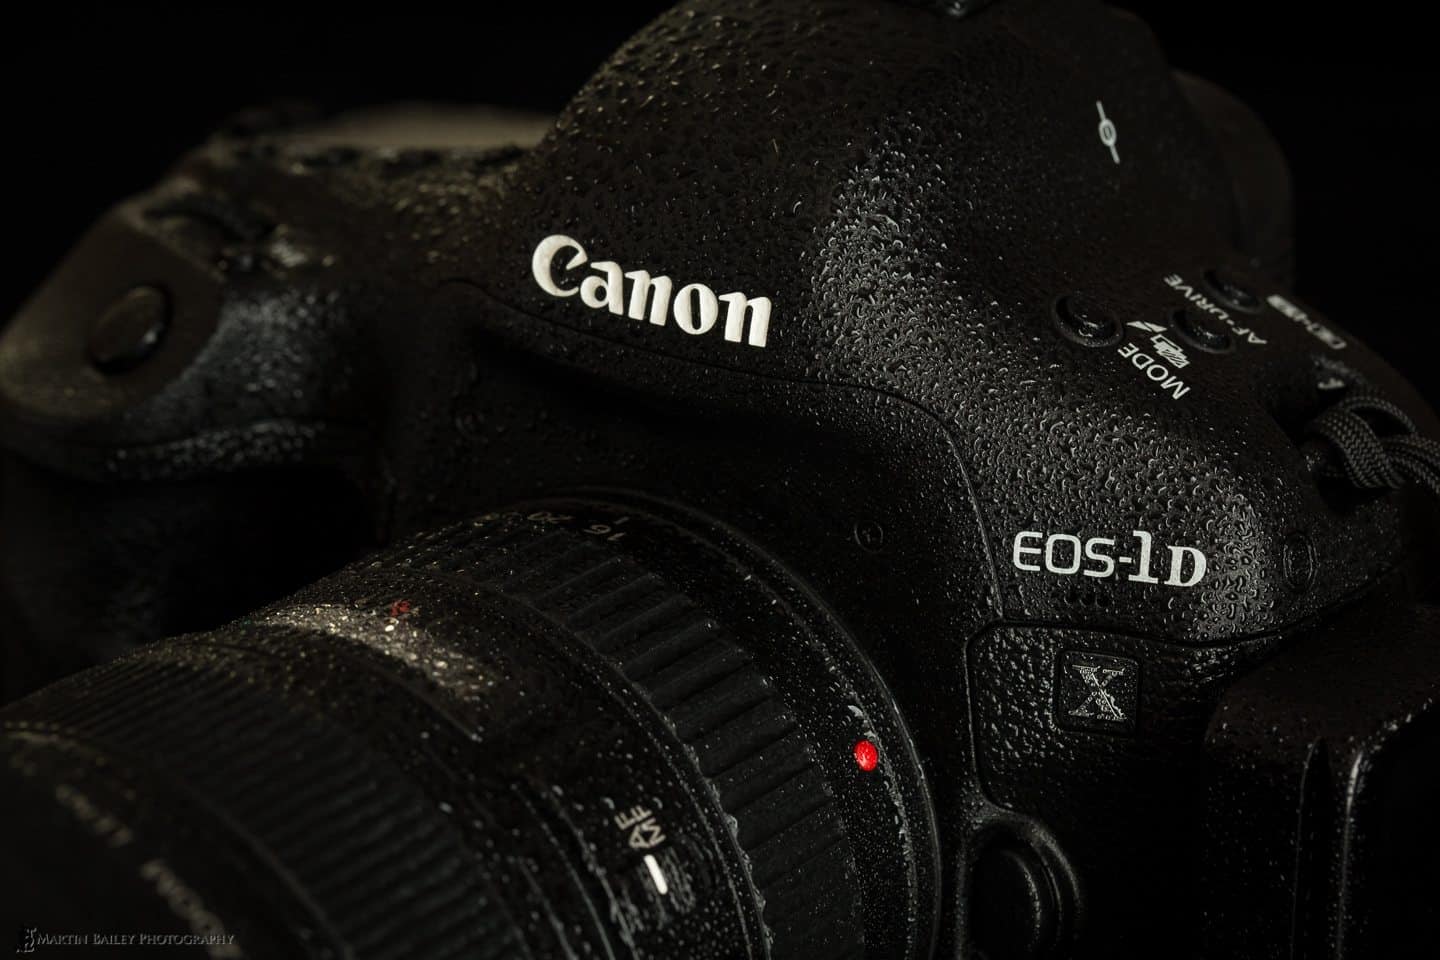
Condensation on Canon EOS 1D X
Of course, if the inside of the camera bag is also wet, we’ll want to dry that out at some point, but first, we need to get the gear acclimatised. Depending on how cold it was outside, you may need to leave your gear in the bag for two or three hours, but then once it’s warmed up some, take it out and lay it out on the floor and leave the bag open for a while too, so that it can all dry overnight, if possible.
This is important because if you allow wet gear to warm up after a certain point, especially if the room is quite warm, you will essentially start to steam your gear. Once this happens you may find that condensation will form inside the lenses and camera bodies. If you get condensation inside a lens, you’ll see a patch of cloudiness as you look through the lens either directly by holding it up the light or when it’s attached to the camera. I’ve had this happen, and the lens was unusable until I had a chance to let it totally dry out.
Just How Cold Does it Need to Be?
How cold it needs to be to cause condensation to form varies, depending on how much moisture is in the air in the room you enter. A good rule of thumb though is the freezing point. If it’s 0°C (32°F) and you’ve been outside long enough for your camera to get down close to this temperature, you should be careful when going indoors.
Sometimes though, for example when we’re photographing the Snow Monkeys, it can be as warm as 2-3°C ( around 36°F) outside but because they warm the rest area hut up quite a lot, and there are a lot of wet people in their, the humidity gets quite high, so condensation forms easily on the cameras. To prevent this we either put the camera in our bags or leave them outside.
Note though that I don’t get too paranoid about this. If it’s close to freezing, I will often go inside and watch to see if condensation starts to form before taking any action. Your camera isn’t going to die the moment condensation starts to form, so just keeping an eye on it and taking action if you see the condensation start to form is often enough. And really here, I’m talking about when it is close to freezing point, and you aren’t sure. Once it goes below freezing point, you really just need to put the camera in your bag before going in doors for any length of time.
Taking the Memory Card/Batteries Out
At the end of your day, if the gear was cold but not wet when you put it away, it is generally still a good idea to just ensure that it’s all zipped up in your camera bag, and leave it zipped up for a few hours. If you need to get at your memory card to transfer your images or you want your batteries out to recharge them, there’s usually not an issue with opening the bag long enough to take out the memory card and batteries, but put the camera back into the bag and zip it up quickly.
I used to suggest taking memory cards out before putting the camera into your bag so that you don’t have to open it until the gear has warmed up, but I stopped doing that, because the risk of misplacing a memory card between the lobby of a hotel and your room is greater than the risk of condensation forming on your gear in the few seconds that it takes to remove it from your bag, take out the batteries and memory card, and put it back into your bag.
If you need to clean your gear and aren’t sure if it’s warmed up enough yet, just open the bag, and keep your eye on the gear. You will be able to see condensation start to form if it’s not, so just give your gear a quick wipe without taking it out of the bag, and close it again, and leave it for another hour or so.
When I need to rush the warming up process, I’ve also opened the zip but left the bag closed, to let in warmer air gradually, and that worked fine too. I’ve also come inside after a number of hours in -35°C (-31°F) and the gear was so cold that I just had to leave it in the bag until I went back outside again. If the only reason you need to get your camera bag out is to clean it, then don’t bother. It’s more important to keep your gear working than to clean it.
Salt Water
The only time I would break that advice is if your gear has been exposed to salt water. In Antarctica for example, it is often not only below freezing point, but because we travel on Zodiacs, we sometimes take some sea water spray, if you had your camera out in that, wipe it down with a damp towel before you put it into your bag and start to allow it to warm up. There’s usually enough time to get back to your cabin, wet a towel, ring it out and then wipe the camera and lens down before you put it into your camera bag. Then allow it warm up inside the bag as usual.
General Weatherproofing Considerations
Before we finish, let’s just quickly talk about some general weatherproofing considerations. As Derek mentioned in his mail, I use a Canon EOS 1D X for some of my photography, especially when I know that I’m going to be getting it wet.
I also shoot with a 5D Mark III too, and although Canon marketed this camera as having “better” weatherproofing than the 5D Mark II, neither are supposed to be weatherproof. In the Canon line up, the only camera in production that is fully weatherproof as of Dec 2013 is the 1D X. That doesn’t mean that I never get the 5D Mark III wet though. These camera generally take a bit of rain, and if you drape a handkerchief over them the wicking effect usually keeps them dry in light rain. I’ve shot like that for years with my old D30, 10D, 20D and then the 5D and 5D Mark II before the Mark III. I just don’t like using rain covers, and have found a cloth to be enough for light to medium amounts of rainfall.
I actually killed my 5D Mark III in Iceland this year by pushing the “better” weatherproofing a bit too far. I was kind of testing the camera, and it did better than I expected, but after a number of hours in the cold rain, it died. It did come back to life two days later, but it took two full days. Some people carry desiccants, and I kind of wished I had some in Iceland, but what I did was wrap the camera in some dry clothes and left it in my suit case for a while. I took it out and checked it a few times, and when I looked in the morning two days after it broke, it was back, and stayed back for the rest of the tour.
This wasn’t a problem from a shooting perspective, as I would never go anywhere without two bodies. I continued shooting with the 1D X while the 5D Mark III was down. If you are wondering why I didn’t just shoot with the 1D X from the start if I had it with me, the answer is resolution. I’d rather have 22 megapixel files than 18 megapixel files. It just gives you more options and enables me to print the images larger without having to increase the resolution or take other steps. The 1D X is an incredible camera of course, but it’s in my bag for its ultimate weatherproofing, and for when when I need those 12 frames per second shooting speeds.
I guess I should mention for good measure is that the 1D X is only weatherproof when you are using a weatherproof L lens. Most L lenses are weatherproof, although you need to check the specs of your lenses before you trust them in some nasty weather. As long as they are weatherproof, you’re fine in some pretty nasty conditions. You can’t dunk them in water of course, they’re weatherproof not waterproof, but I’ve walked through forests in a rain storm for hours with a 1Ds Mark III and the old 70-200mm f/2.8 Lens and my 16-35mm f/2.8 lens on the camera and they didn’t batter an aperture leaf.
From Warm to Cold
Note too that I have rarely had issues going from warm to cold locations. On one occasion I did have ice form on my sensor, probably caused by the camera coming from a warm hotel room into -25°C (-13°F) conditions. You can see a black spot in the top right corner of this photo (click on it to view larger). This was ice on the sensor, that appeared after a few hours of shooting, and disappeared later when the camera warmed up a bit. It didn’t harm the camera at all.

Bihoro Pass
A Few Caveats
There are a few caveats that I should mention too. Firstly, this advice is only valid if your camera bag is relatively airtight when zipped up. If you use a shoulder bag for example with just a flap over your gear, and warm air can easily get in from the sides, you might need to put the entire bag in a large plastic bag for a while. You’ll need to experiment yourself to see how careful you need to be.
Also, if for example you are not working from a camera bag, you may still need to carry a plastic bag or two and put your gear inside before entering a warm vehicle or building, to keep condensation from forming until you can put your gear into your bag later.
And, at the end of the day, all of this is based on my experiences shooting in temperatures down to -38°C (-36°F) and then going into a warm bus or hotel etc. I use Gura Gear Bataflae Camera Backpacks which have pretty good zips on them, and I’ve seen over a hundred people with various bag types use this method on my winter workshops without issues. But, at the end of the day, you need to ensure that his works for you at your own risk.
Conclusion
So, in summary, even weatherproof cameras need protection against condensation when you go inside from the cold, because the condensation can form inside the camera, not just outside. Lenses are a risk too. Keep everything inside your back until it warms up to room temperature. The only time you might need to use a plastic bag is if you need to prevent condensation on gear that you cannot get back into your camera bag for a while.
So, thanks for the questions Derek! I hope this helps as we dive into the winter in the northern hemisphere, or as a future reference for any listeners/readers venturing into cold climbs.
Hokkaido Winter Landscape Photography Adventure
And talking of photographing in cold climbs, I’m really excited to announce that I’ve team up with David duChemin again for a Winter Landscape Photography Tour in Hokkaido from January 5 t0 16, 2015.
Some of you might remember a reconnaissance trip that I did in Hokkaido in January 2011, and I’ve put together an excellent Winter Landscape tour based on that, and some of the locations that we used to visit in my old format Winter Wonderland Tours when we used to do both a wildlife and landscape leg. We’re visiting the far north of Japan though, including Souya Misaki, the northern most point of Japan from where you can see the Russian island of Sakhalin to the north and that far-eastern Russian coast weather really beats down on the northern coast of Hokkaido making for some really harsh and yet incredibly beautiful landscape photography opportunities.
This Landscape specific tour has been a long time in the making, but it’s going to be a lot of fun. Plus, David has pretty much stopped doing his own tours for the time being, so this guest spot that he’s doing with me in 2015 is one of the only chances people will have to travel with David for a while, so we expect this tour to sell quickly. If you would like to join us, check the tour page for details.

Show Notes
Gura Gear Bataflae Camera Backpacks
The Hokkaido Winter Landscape Photography Adventure tour page
Music by UniqueTracks
Subscribe in iTunes for Enhanced Podcasts delivered automatically to your computer.
Download this Podcast in MP3 format (Audio Only).
Download this Podcast in Enhanced Podcast M4A format. This requires Apple iTunes or Quicktime to view/listen.

Great podcast, Martin. One conclusion I draw from this that isn’t really stated is that a ziplock bag is not only rarely necessary but won’t protect your DSLR from internal condensation at all. The insulating properties of your camera bag seem to make it a much a better solution for this.
Hi Tim,
I do state that zip locks aren’t necessary near the beginning.
>So, are ziplock bags really necessary? The short answer is, no.
But, that isn’t to say they are not effective. The moisture if drawn from the air, so if you put your gear in ziplock bags and stop air getting to them, you’ll stop condensation forming. The reason the bag works though, is as you say, because of the insulation. It allows the gear to warm up slowly, so condensation doesn’t form. In my mind, it’s just easier than messing around with ziplock bags.
I hope this makes sense!
Cheers,
Martin.
Yes, my comment wasn’t very clear. You definitely made it clear that a ziplock wasn’t necessary. You also suggested (if memory serves) that weatherproof DSLRs can still experience internal condensation because the moisture that condenses is moisture that is already present in the air inside the DSLR. Makes perfect sense. What I was trying to suggest is that an insulated camera bag should be far more effective at preventing internal condensation because it would limit the rate of change in temperature far better than a ziplock.bag.
Absolutely Tim.
Hi Martin
I remembered this podcast today when I had a particular problem with moisture and looked back to it. My problem is slightly different though and I would welcome your thoughts. I was shooting in a tropical house today – very humid – and took my camera in in the camera bag (lowepro weather sealed). The camera (1dX) must have still got cold in the bag in my car as when I took it out moisture formed on the lenses and I guess inside too. Now I guess I could have left it to warm up in the bag but that would have taken quite a long time and delayed my shooting. Unlike you I am taking the camera into a warmer humid area where I want to shoot rather than back into my hotel room at the end of the day. Now I am about to try putting the camera in a ziplock bag which is sealed in a dry warm area – my house – taking into the car and then into the humid hothouse still in the bag. It should warm up quite quickly I guess, just in the ziplock bag, hopefully any condensation will form on the outside not inside of the bag and thus when I remove it all will be well. What do you think an have you ever faced this situation ?
Keep up the great podcasts.
Bob
Hi Martin,
I plan on going to Alaska during winter and I will be going on tours (presumably in heated vans) with some stops for photo ops. Will condensation be avoided if i put my camera inside the bag before i go back into the heated van, and then take it out again at the next stop, repeating the process til the tour is over?
Thanks!
Cheers,
Ace
Hi Ace,
That is a good plan. When it’s cold, put your camera in your bag, even just quickly after entering the warm vehicle, is usually enough. Then leave it in the bag until the next stop. This always works for me with a zipped bag. They aren’t air tight but good enough to let the temperature of the gear change slowly over time.
Hope that helps!