
I’m not sure if Canon is using this marketing worldwide, but in Japan, they are calling the 7D the Image Monster! On the same day as the 7D release, Canon also released their new EF 100mm F2.8 L MACRO IS USM and having tested it both in the field and under more controlled conditions, I’m dubbing it the Bokeh Monster! I have been looking forward to this for the last month or so, since Canon announced it.
I ordered mine as soon as I saw the announcement on the Canon Web site, and was one of the first people to get my grubby little mits on one. Due to the simultaneous release of the 7D, the store was pretty crowded with people picking up their gear in what I think are some pretty revolutionary additions to the Canon line-up.
Along with my lens, I also bought the new tripod ring so that I can mount the lens directly to my tripod and not the camera. This really helps to balance the whole setup, which you really need when shooting at 1:1 or life-size. Just to recap what shooting at life-size means — basically if you shoot something that is 1cm long in real life, at life-size, the object take up 1cm on the image as well, by comparison to the 35mm film or digital sensor. If you use a crop factor camera however, the 1cm object will take up 16mm, or 13mm for a 1.3X crop factor camera. You can get larger than this though with extension tubes. I also picked up a Macrolite Adapter 67, which is an adapter ring to enable you to use the new 100mm macro lens with the Macro Ring Lite MR-14EX or the Macro Twin Lite MT-24EX, which is what I have. We’ll take a quick look at a shot I made on Sunday morning of a house spider later, for which I used the 25mm Extension Tube and Macro Twin Lite shortly.
So, the first thing I did on Friday when I got the new lens was to set up a test shot. I haven’t done the test chart shots yet, though I’ll try to do that within the next week or so. What I did was lined up nine billiard balls, and shot them with both the new 100mm F2.8 IS macro, and my old 100mm F2.8 non-IS and non-L macro.
My tests basically confirmed that the lens has slightly smoother bokeh than the original Canon EF 100mm F2.8 USM Macro lens. We’ll get to some real world examples from the field later, but first, let’s look at the billiard ball shots to illustrate my point. The first image here is shot with the original 100mm Macro lens, wide open at F2.8. We can see that it is a nice crisp image, even wide open, and has pleasing bokeh. The original 100mm was definitely no slouch when it came to sharpness and nice smooth bokeh.
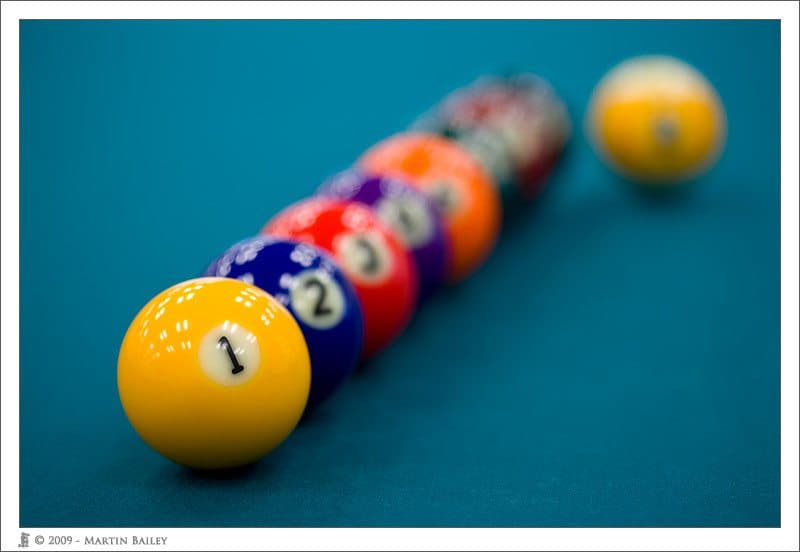
Billiard Balls @ F2.8 with Original 100mm Macro Lens
As we look at the same shot from the new 100mm Hybrid IS Macro lens though, we can see that the bokeh is definitely smoother, especially if you look at the gradation of the yellow nine-ball to the top right of the image. Also, the highlights in all of the balls from the florescent lighting in the room seem smoother to me too.
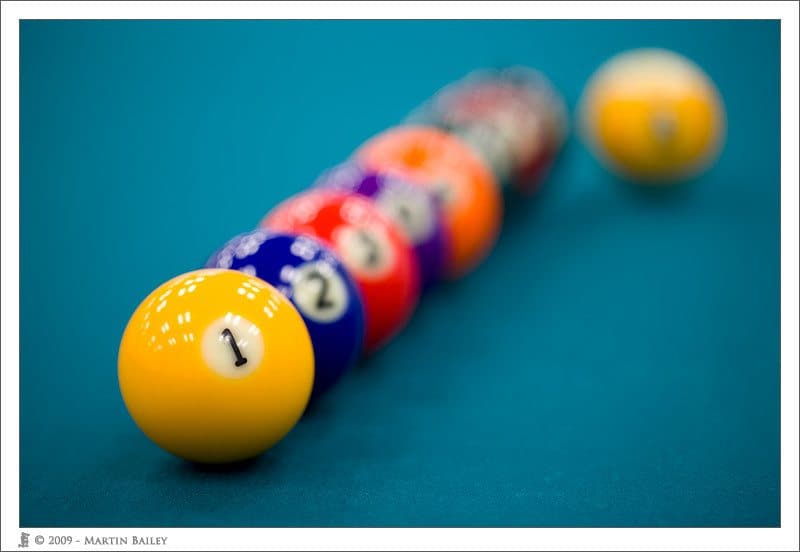
Billiard Balls @ F2.8 with new 100mm Hybrid IS Macro Lens
You are probably also wondering how sharp the lens is as well, and I’m pleased to say that it does appear to be a little sharper than the original, already very sharp, 100mm Macro lens. Here we see an almost life-size close-up of the two-ball, again, first with the original version of this lens, and the second with the new L version.

Two-Ball with Original 100mm Macro @ F2.8
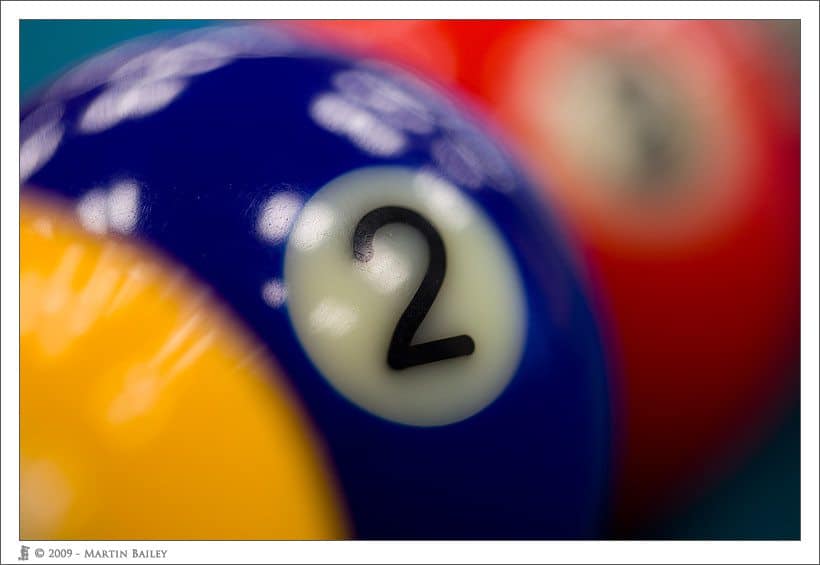
Two-Ball with New EF 100mm F2.8 L MACRO IS USM lens
Below we see a 100% crop from each of the above images. I think you’ll agree that the new L version is just a tad sharper than the original version. The scratches on the two-ball are more defined than in the shot from the original lens.
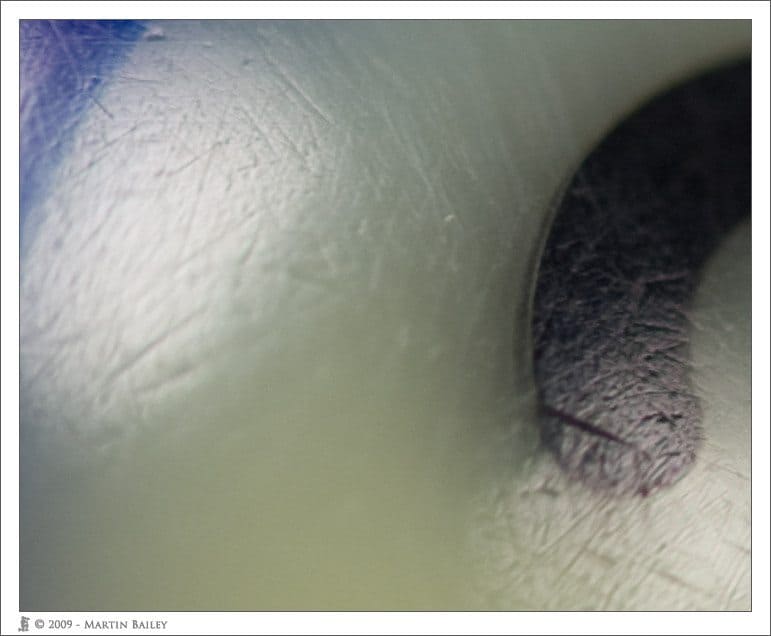
100% Crop of Two-Ball with Original 100mm Macro @ F2.8

100% Crop of Two-Ball with New EF 100mm F2.8 L MACRO IS USM lens
So, I got up on Sunday morning, and after spending a few more hours completing the provider switch to a new provider for these Podcast audio files, I started to get ready to go out and shoot with the new lens. As I did so, I noticed a house spider on the wall and so grabbed the lens and the 1Ds Mark III, and started to shoot it. I first started with high ISO and a relatively slow shutter speed, but these spiders have amazing eye-sight, and so quickly run away as you draw near.

Cute Little Spider @ F11 with Macro Twin-Lite Strobe
I ended up shooting the little critter on the ceiling in the hallway, as he’d ran out of the living room. It was dark up there, and even the new Hybrid IS was not enough to enable me to get a shot, so I reached for the Macro Twin Lite. I took a moment to figure out that the adapter screws into the filter thread on the lens and the Twin Lite attaches to the adapter. I adjusted the strobe heads, and went back to find the spider still clinging to the ceiling in the hall.
These little guys are small, probably around 5 or 6mm across, so I wasn’t able to fill the frame with him, even by focusing at the nearest focusing distance of 1 foot or 30cms. I wanted to try the new lens with an extension tube anyway, so I fitted the 25mm tube and went back to photographing the guy that resulted in the image we see here.
Now, even with this, I’ve cropped around 50% of the image away, but you can see some great detail in the spider and even count his 10 eyes with a nice little catch-light from the strobes. The shadow is a little annoying here, I know. This is caused by the fact that it was pretty dark, and I closed the aperture down to F11 to get more of this little guy in focus at this distance, so the Twin Lite was pretty much the only light source. I raised the ISO to 200 and set the shutter speed to 1/100 of a second. Even with strobe, that’s a pretty healthy shutter speed to be able to hand-hold at, for larger than life size macro photography, especially when I recall that by this time my arms were getting a little wobbly from holding the 1Ds with the 100mm Macro lens and the Twin Lite directly above my head while on standing on tip-toes.
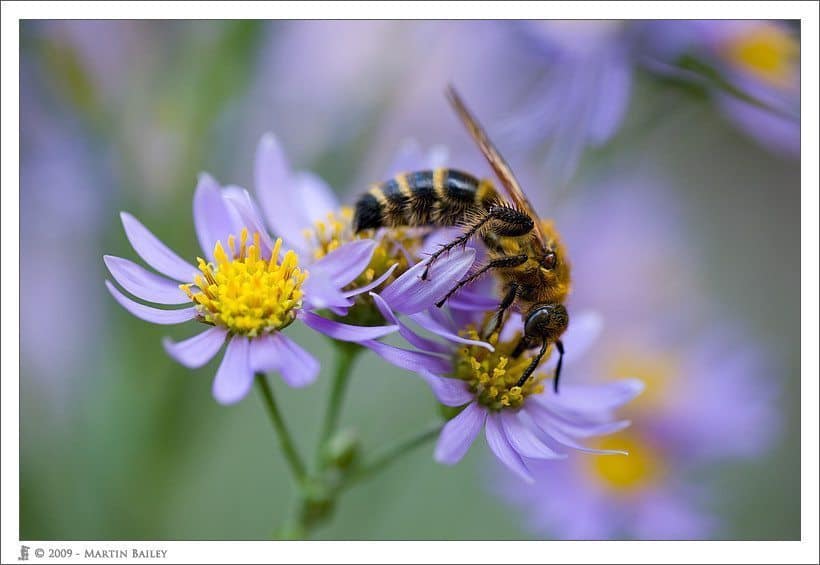
Anyway, after this, I got the rest of my gear together and headed out to the Shouwa Memorial Park, about an hour from my place by car if traffic is good. After messing around with the server again, and shooting the spider, I didn’t have as much time as I would have liked, but I did get some good example shots. First up is image number 2378 (below) which is in my online gallery. Here we can see a bee like insect, on some Shion, or Aster tataricus flowers.

Waspy Bee Fly!?
You can see that I was a little distance from the subject here, as I was also trying to capture a pleasant shot, with the flowers and a bit of bokeh. This really is the first inkling of how nice the bokeh is in a real-world example, but still, I have something better to share with you later. The patch of flowers that I was shooting these insect in has a rope around it, so I couldn’t get any closer to this particular subject anyway.
The lens is sharp and has beautiful bokeh, but one of the first slightly negative things that hit me is that this lens is not a magic bullet. It is not a cure for all Macro photography ailments. As I mentioned in the preview episode a few weeks ago, Canon recommends using AI Servo focusing, to counter the back and forth movement of your body, while Canon takes care of both angular shake or tilt and shift movement with their new Hybrid IS. As far as I could figure out on Sunday this simply doesn’t work, at least not in these conditions. Firstly, if you turn on all of the focus points, and allow automatic selection by the camera, you focus on the petals, on the flowers’ stamen, on the wrong part of the insect, but almost never the eyes. The camera is simply not intelligent enough to know where the subject’s eyes are, at least not at the end of 2009 anyway.
When you select one focus point, to take the camera’s guess work out of the equation, you end up having to use the center focus point, because if you try to guess where the fast moving insect is going to be in the frame, you limit your options, and if you try to move the focus point around while shooting you miss the chance of the shot. In this sort of macro photography things just happen too quickly, at least for me, to keep up with. Having burned through a fair few frames trying to get used to AI Servo focusing and using multiple focus points or selected focus points, I gave up, and went back to using the center focus point. I did remain in AI Servo mode, because this gave me the ability to track the insect as far as I could, but then I recomposed and adjusted the focus either manually, or by moving myself back and forth, and blasted off a few frames.
There’s no doubt that I need to refine my hand-hand macro shooting techniques still, but having done this without IS in the past, I’m definitely no beginner either. Having said that, including the spider shots and the flowers and flowerscape images that I shot later in the day, I ended up shooting some 845 frames on Sunday, of which 319 are going to be deleted. That’s a good third of the images, and that is a miss rate higher than any other type of shooting I do. Usually for landscapes or flower shots I delete less than 5 percent. Even for birds in flight I probably delete less than 10 to 20%. Here though I’ll delete 38%, which should give you an idea of the hit rate. Most of these were while shooting these bee-like insects though, I have to say.
I was working in the shade here by the way, with a clear and slightly hazy sky. I shot this image at ISO 400 with an aperture of F4 for 1/250 of a second. Had I been hand-holding with the old Macro lens, I’d have probably needed a shutter speed of around 1/400 of a second or more at this distance, so although no magic bullet, there is also no doubt IS was helping me to get these. Had I not been using the IS there would have been camera shake to contend with too, but that was not the case. The problems I was having were all down to focusing errors. I know this because pretty much every image I shot had part of the image in perfectly sharp focus. It just wasn’t the right part of the image for many of them.
I should note too that if I didn’t care about getting that nice dreamy bokeh, I would just close the aperture down to F11 or smaller, raise the ISO, to reduce the risk of focus errors considerably. I know from past experience that if I shoot macro with too much depth-of-field, I personally just don’t like the results. I’d rather have a greatly reduced hit ratio with fewer shots that I like, than nail every one of them technically, but not like the resulting images from an artistic point of view.
So, trying to pick up the pace a little here, let’s look at another shot, where I got in a little closer, maybe to around half or a third life size, and that is image number 2377 (below). The same subject here, but again, just very sharp where it’s supposed to be, and yet with some beautiful smooth bokeh in the background there. This was shot closed down by one click, to F3.2, and a shutter speed of 1/250 of a second at ISO 400 still. The torso and abdomen are slightly outside of the incredibly shallow depth-of-field, but I nailed in on the eye and legs in this shot, which I was really pleased about.
Shion Daisies with Friend @ F3.2
I’m going to share a couple of 100% crops as well, but to reduce the shock factor slightly, or at least to ease you into this, if you are not totally comfortable looking at close ups of insects, let’s look at a nice cute butterfly first, in image number 2376 (below). This I believe is a kind of Cabbage White butterfly, still in the shade, and I closed the aperture down here to F4.5 here, although I still had the shutter speed at 1/200. The exposure still looks good, as the lighter colored butterflies are brighter than the dark bee-flies that we just looked at. More exposure than this had me blowing out the white parts of the butterflies. Here again, we can check the pleasing, dreamy boke in the background, though a little harder now with the smaller aperture. From an artistic perspective, I’m not overly crazy about the composition here. As I worked this momentary scene, three frames after this I moved the camera down to align that background bokeh to create a beautiful halo around the butterfly’s wings but I didn’t quite nail the focus on the eyes as much as this.
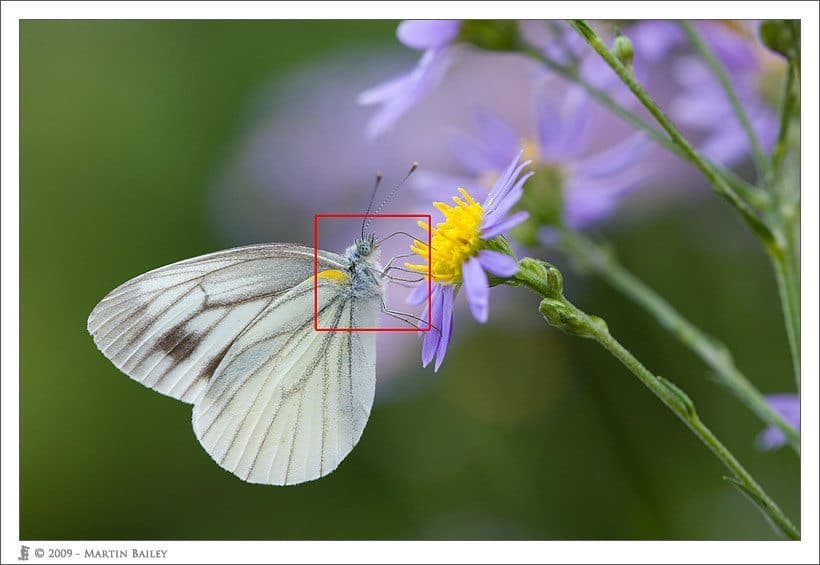
Cabbage White on Shion Daisy @F4.5
Here’s that 100% crop that I mentioned (below), including just the head and torso of the butterfly. I’m sure you’ll agree that there’s just so much sharp detail there. It’s pretty impressive.
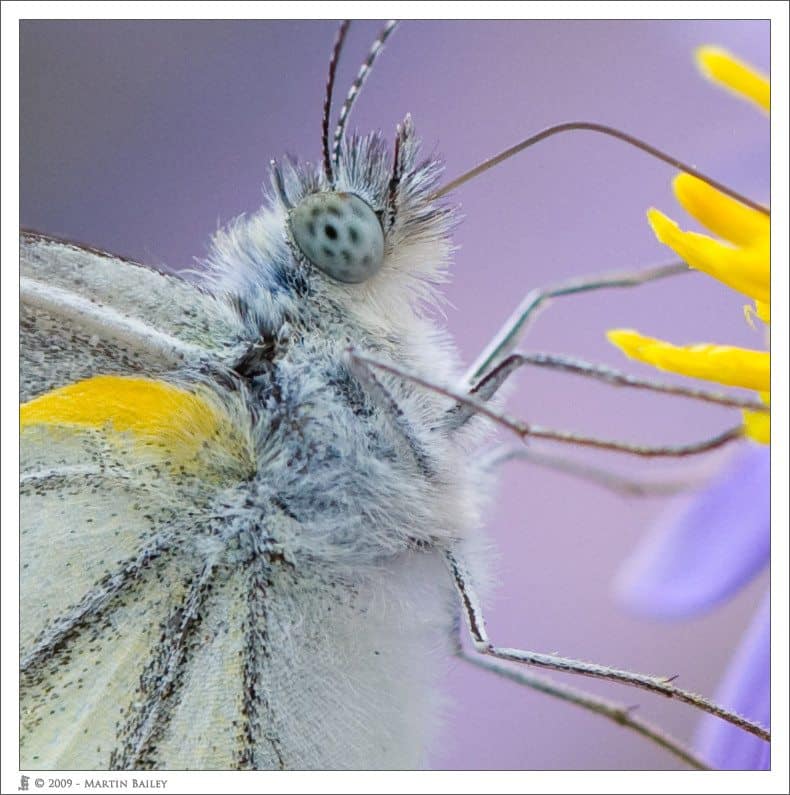
100% Crop of a Cabbage White @ F4.5

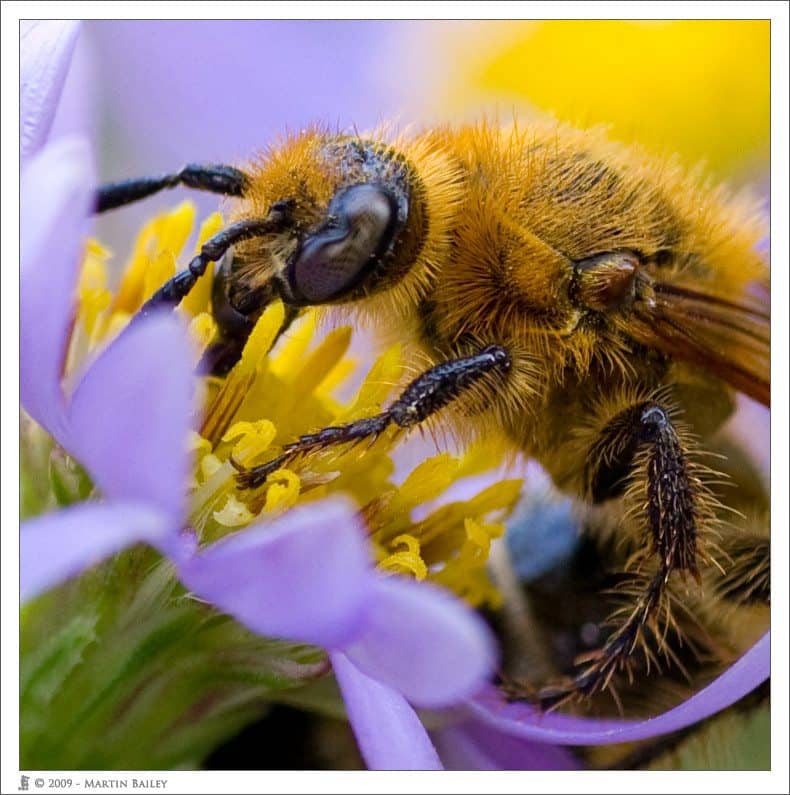
Nectar Sucker @ F4
Bear in mind that this is shot at ISO 400, and the 1Ds Mark III isn’t as good as the 5D Mark II when it comes to grain. This would have been much cleaner if I’d have been shooting at ISO 100 or 200, without a doubt. Also note that the only sharpening done here is the standard sharpening that Lightroom does to all RAW files. I haven’t done any further sharpening or any selective sharpening at all.
Before we move on to a few flower shots, let’s take a look at one last 100% crop from image number 2373 (right). First here’s the full image, and I need to tell you in the spirit of full disclosure that I cloned out a half a flower head about a third of the way up on the right side of this image. It was a rush job too, so you might be able to tell. I’ll be cleaning this up a little later. I usually try to compose to get things like that out of the side of the frame, but with me still not being totally at home with this high-paced hand-held macro work, there were things like this that I had a bit of trouble controlling. This shot again was made at F4, for 1/200 of a second with ISO 400.
And here’s the 100% crop (below), which although a little bit grotesque if you aren’t used to looking at insect this closely, I am just amazed at the amount of detail here. The eyes and the hairs around the head, and torso, as well as those spiky whisker-like hairs on the legs are pretty impressively sharp, though the legs are starting to come out of the depth-of-field very slightly.
100% Crop of Nectar Sucker @ F4

Hmmmm… Bokeh! @ F3.5
After shooting the bee-flies at the Shion flower patch, I went on to shoot some cosmos flowers at the far end of the park. I did a number of flowerscapes with my 70-200mm F2.8 and the 300mm F2.8 lens too, but we won’t look at them today. The first one is image number 2372 (right). I should mention that although you can now hand-hold this lens at much slower shutter speeds than before, I do still very much like to use a tripod and really work on the composition of the image. When there are no fast moving critters to capture, I will almost certainly continue to use a tripod, and that’s exactly what I did here. I wanted to look at this image today really just to show you that beautiful smooth bokeh. I stopped down two clicks to F3.5 for this shot, which is enough to get me a that first row of stamen and the edge of the darker pink ring around the center of the cosmos flower in sharp focus. Everything else just gets drowned in beautiful dreamy bokeh. Note that my composition here basically uses the depth of the flower for effect, as I’ve shot it from the side. If you shoot the flower head-on, it’s harder to get this dream effect in the flower itself. You really more on the background or foreground bokeh instead when shooting a flower face-on. Also note how I have centered the green V shape in the negative space to the right, at the same point as the pink V shape made by the left most tip of the flower to the left. A very tight crop here too, as seeing the edges of the flower hear would not have added anything to the image, and may have even detracted from it, as we would not have been able to see so much detail in the stamen and pink right in the center of the image.
Another beautiful dreamy bokeh cosmos shot here in image number 2368. This one actually was shot hand held, as I was trying to capture some bees that were coming to the cosmos flowers. I was basically walking along the edge of the cosmos patch, shooting across into them. The last image by the way was shot from above the flower looking down, rather than across the flower as I was here. The second cosmos flower here helps to outline the nearer flower, which I quite like. Again, working in a different style to my usual deliberate compositional style with the tripod, I worked this flower from a few different angles, getting more of that second flower in, and getting in much closer too, but I ended up uploading this one, because of all the beautiful curves that the bokeh makes, complimented by the sharper curve to the left, where the petal is within the depth-of-field. I also like those few balls of green bokeh to the right where the sun was catching the stems of some other flowers.

Curves @ F4
There are a few more things that I haven’t really touched on yet but should. The first is that this is an L lens, and therefore fully weather proofed, which is going to be very useful in foul weather or dusty conditions. The inclusion of a UD lens element, typical of an L lens, will almost certainly be adding to this lens being slightly sharper than its predecessor, and L lenses are typically less susceptible to flare when shooting into a strong light source. The other thing I haven’t mentioned yet is that the auto-focus is very fast and quiet, even in the macro range, and the manual fine tuning of the focus is very easy compared to the original lens. You have to turn the focus ring quite a way to move through the first few feet of focus, so this allows you to really fine tune it easily, which is useful when critical focus relies on sub-millimeter adjustments.
Conclusion
Let’s start to wrap it up here and draw some conclusions on the new EF 100mm F2.8 L MACRO USM lens from Canon. As I said earlier, the Hybrid Image Stabilizer isn’t a magic bullet, when it comes to capturing fast moving pollen gathering critters, but it sure does help to get shots that are simply not possible at the same shutter speeds with the standard non-L macro lens. The lens is sharp as tacks, has very nice smooth bokeh and it will almost certainly double as a great portrait lens too, as did its predecessor, but I’ll report back on this later as I do some portrait work with it.
The big question from anyone with the original Canon 100mm Macro lens is going to be, is it worth upgrading? This is a tough question. The added sharpness and smoother bokeh is nice, and could be a decision point if like me you do a lot of wide aperture work where bokeh plays a bit part in your images. Additionally, do you need the Hybrid IS? Do you need the weatherproofing? If these things are important to you, what are you waiting for? The Bokeh Monster is here!
Podcast show-notes:
Music created and produced by UniqueTracks.
Audio
Download the Enhanced Podcast M4A files directly.
Advertisement


I think you might be incorrect on your explanation of the image size on a crop-sensor camera. The image is still 1:1 on the sensor, it’s just cropped. That makes it look bigger a factor of 1.6 or 1.3, but 1:1 is 1:1. Right?
Carl,
That’s correct, but the result is a larger than life-size representation of the subject.
You are basically agreeing, so I don’t quite follow your point.
Cheers,
Martin.
Carl might mean that on a crop sensor, at life size, the image would still be 1cm long on the sensor, not 13mm or 16mm, because the crop factor doesn’t actually magnify anything.
Thanks for the quick response. I think I understand this, but I’m unclear (and maybe others are too) on what you mean when you say: “…basically if you shoot something that is 1cm long in real life, at life-size, the object take up 1cm on the image as well, by comparison to the 35mm film or digital sensor. If you use a crop factor camera however, the 1cm object will take up 16mm, or 13mm for a 1.3X crop factor camera.”
I read “on the image” as “on the sensor” (my mistake). But what does “on the image” mean? If I print this image as an 8 x 10 from my 40D (1.6 crop), where does the 16mm come in? Once I enlarge the photo to print it, measurements like that don’t seem to have any meaning. That’s where I’m confused.
Part of my issue is my engineering background; I understand things very literally, and maybe this is getting in my way…
Just finished listening to the podcast – great as usual! I’m impressed with your results with the Bokeh Monster. The bokeh is lovely and smooth, and sharpness where desired is great.
The spider looks surprisingly ‘cute’ for an arachnid, and I know this species well. It moves extraordinarily fast when it wants to as it’s a hunter rather than trap setter. It can also jump impressively. I bring this up because I thoroughly enjoyed your description of standing on tip toe and getting wobbly holding the gear up high to get a shot of the little beast. 😀
Are you going to sell your ‘old’ macro lens now?
I see what you mean now Carl. My example is misleading. The millimeters only hold out IF you convert the image back to the size of a 35mm sensor of piece of film, which is confusing.
On the image means on the image at it’s native size on the sensor or piece of film. Of course if you print this the size changes.
Thysje, I’m pleased you enjoyed this. I am also pleased the spider didn’t send you screaming and hiding behind the sofa. 🙂
They do move fast, and jump as you say. This is pretty much the only species of spider I get here in my Tokyo apartment. We generally have two or three of these in our place all year round. They have babies sometimes which freaks my wife out, but I don’t really mind. I am too happy when she can’t stand it anymore and kills the odd one, but we live together, so I have to make exceptions to keep the peace. 🙂
I will be selling the old lens. A friend up north in Japan called Pete Leong has first option.
Yes but Martin, the spider wasn’t on MY ceiling! 😀
Ah well, I should have expected that there was a market for the old lens. 🙂
I’ll look forward to seeing more of your images made with the Bokeh Monster in future, oh and by the way I alerted my brother to your podcasts and he’s now enjoying them as much as I am – I pass on his comment:
“I’m impressed with the effort that Martin puts into his podcasts (and you can tell him that ).”
Thanks Martin
I went surfing for a reveiw of this lens & definately found one
The lens will be available in Australia any day now & I will probably buy one based partially on your reveiw. I really enjoyed your podcast & appreciate the fact it came out so soon after the lens’ release
I currently have 2 Tamron macro lenses (90 & 180mm) and while they offer very sharp images, AF is not a strong feature of either one, both have noisy operation & the 180 has no focus limiter
I like to do a lot of hand held shots, so fast & quiet AF is a feature I would pursue, the bokeh really does look nice & smooth also
Just a final question: I note that the filter size is 67mm & the twin light mount obviously closes this down to around to 58-60mm, is there any ill effect from this?
Cheers
Bryan
Thanks for spreading the word Thysje! And thank your brother too. I hope he continues to enjoy the Podcast.
Bryan,
I’m glad the review was useful.
The Twin-lite fits snugly onto the 67mm adapter that was also released last week, with no ill-effects. I even left my protector filter on, and screwed the adapter into that, and could not see any vignetting.
Thanks Martin for one of the first in depth reviews on the net that I’ve found.
I’ve just come back from Hong Kong where i searched high and low for the old 100mm f/2.8 but i came back empty handed due to everyone having sold out. But I’m sort of glad as your review and finding one of the new IS 100mm at a great price, has help me make my decision to get the new IS 100mm.
I just wanted to know what you get with the lens ie. hood, pouch? I’ve heard all canon L lens come with a hood and pouch. Is this correct?
Thanks again your podcast is one of the best around.
Hi Steve,
I’m glad the review has helped you, and congratulations on not getting the old 100mm during your Hong Kong visit. The old 100mm is great, but if you are buying now, the IS is the way to go.
You are correct, that this lens comes with a hood and pouch. I suggest you also pick up the optional tripod ring as well though, unless you will be using it exclusively hand-held. It adds cost, but well worth it for tripod work.
If you use a twin-lite or ring flash from Canon, you’ll need the 67mm adapter as well.
Thanks for the kind words about the Podcast too. I’m pleased you enjoy it!
Cheers,
Martin.
Great review and some equally great sample pics!
I noticed in the review you mentioned using the 25mm extension tube – you said you wanted to try the new lens with the tube. Do you recommend using the extension tube with this lens? If my maths is correct (magnification increase = length of extension / focal length of lens) I’m looking at a .25x magnification bump with the 25mm tube?
I’m on the brink of ordering the lens and will be photographing all types of small creepy crawlies and such.. I suppose a .25x increase is a .25x increase at the end of the day?
Thanks
Hi Phil,
Thanks for the comments and kind words.
Yes, I do recommend using tubes with this lens. I often used my old 100mm macro with a 25mm and/or 12mm extension tubes, because they’re light and easy to carry around, but give you a bit of extra magnification when necessary.
The calculation of extension tubes is a little more complicated when shooting at 1:1, so I decided to do some tests to see what you really get. It seems that a 25mm tube with this lens gives you roughly .35x magnification. I just posted the results here:
https://martinbaileyphotography.com/2009/11/15/an-exercise-in-magnification-with-extension-tubes/
I hope this is useful.
Cheers,
Martin.
Hi Martin…I have just found your site here and really~really enjoyed reading and looking at your photos…I am a novice, but LOVE Macro, and want to get those close up pics of the eyes etc. It was so great that you mention all the information you used, for someone like me that is learning, it’s wonderful! I am still putting together all the pieces of this wonderful world of digital! :0) I also love action, and am impatient (LOL) so have been wondering since I am a novice, should I spend the extra for the L IS model 100mm Canon…after reading and looking at your shots here, it seems I would be enthralled with that lens. I am currently looking at the 70-200mm L lens w/o IS for action. I was thinking I could get this lens and the 100mm w/o IS for about what I wanted to spend without going broke, but wonder now, if I will be sorry and wish I had gotten what I wanted in the first place…Can you give me a little advise? :0) I’m just struggling with if I need the IS 100mm..or could do with the 100mm…at this stage of my photography abilities. Hope I haven’t confused you…Thanks so much! Becca
Hi Martin,
I came across to your site while looking for some information about Canon lens EF 100mm F2.8 L IS USM . The site is very informative and your pictures are a real joy for eyes.
I was wondering if you have any thoughts about using Zeiss 100mm f/2 Macro Planar with canon 7d. Do you think Zeiss will have higher resolution than canon 100mm f2L IS USM?
Thank you,
Jerminal
Thanks for your review of the 100mm L. I currently have the “old” 100mm macro, and have really enjoyed it for close portraits, but have been very disappointed with its ability to focus in low light or at a distance for full body portraits or candids. So my question: Is the auto focus capability improved enough that can compete with the 100mm 2.0 as a telephoto for events? I would feel silly hauling around the 100mm 2.8 and 100mm 2.0 if the new L macro can do both jobs.
Woh! Sorry for not replying to the last three comments earlier. For some reason they didn’t show up in the admin dashboard.
Becca,
If you want to shoot macro shots with the 100mm, I certainly suggest you go for the new Hybrid IS version. It makes a world of difference being able to hand-hold for shots that would otherwise be impossible.
As for using the 100mm for action work, I don’t really think it’s a good idea. For action shots you have to have a fast shutter speed, unless you are doing panning shots with a blurred background, so IS won’t give you much on the 100mm. Also, being able to zoom and get in closer with the 70-200mm is probably going to help. I would suggest IS on the 70-200mm too, to make the lens more versatile, but I know it starts to get expensive.
Jerminal,
Thanks for the kind words. Unfortunately, I haven’t used the Zeiss 100mm F2 Macro Planar, so I can’t really comment. I’m sure it’s a great lens, but I can’t offer advice without first hand-knowledge. If you post the same question in our forum you might get some first hand information.
https://martinbaileyphotography.com/forum/
Kyle,
I didn’t really notice the old 100mm Macro being slow, but I tried the new one focusing in my storeroom with the lights off, and it was able to get focus pretty much as well as any of my other lenses. I did have to make sure I had the focus point over a line or something with contrast, but that’s the same with all lenses.
One thing to check I guess is that you have the focus distance switch turned to not try to focus at minimum focus distance. There’s a switch on the lens barrel for this. Make sure you have it set to focus from the further out minimum distance to infinity, and that way it won’t search as much when it can’t get focus in dark conditions.
Cheers,
Martin.
Can you tell me how I can attach the new Canon EF100mm F2.8L IS USM MACRO lens to the new Canon EF 2x III converter?
It will not fit directly as the glass in the lens, extends out of the back of the lens – stopping it from locating in the EF 2x III TC.
I think you have to use an (empty-no lenses) extender TUBE between the EF 2x III TC and the Lens – but WHICH ONE?
I have been looking for hours – can you help me please?
Hi Bob,
Unfortunately that’s not a supported combination. The 1.4X and 2.0X Extenders only work with the 70-200mm L lenses and L primes over 135mm.
You can use any of the Extension Tubes with the 100mm Macro. In fact, I sometimes use two 25mm tubes, and even add the 12mm tube on occasion.
I had never tried using an Extension Tube to give me some clearance behind the lens, but I just gave it a try, and the shorter Extension Tube EF 12 II and it does enable you to attach the 2.0X Extender to the 100mm Macro lens, but autofocus goes out the window. It just continues to search for focus. That probably wouldn’t be a problem, as you often manually focus for macro work anyway.
Note too of course that you lose the ability to focus to infinity. The furthest I could focus was about one meter, maybe a little more.
I hope this helps.
Martin.
Thanks very much Martin.
I have been searching on the web for a couple of days…….
Thanks for making me to achieve new strategies about computer systems. I also have the belief that one of the best ways to help keep your mobile computer in leading condition has been a hard plastic-type case, and also shell, that suits over the top of the computer. These kinds of protective gear tend to be model targeted since they are manufactured to fit perfectly in the natural outer shell. You can buy all of them directly from the vendor, or from third party sources if they are available for your laptop computer, however not all laptop can have a cover on the market. Yet again, thanks for your suggestions.
http://mybdfriends.com/index.php?do=/blog/140828/natural-law-theory/