Today’s episode is the second of three in which we’re taking a look at three lenses that I have picked up in the last few months, and not talked about yet. Last week we looked at the 135mm F2 L prime lens. Today we’ll take a look at some shots from the Canon TS-E 90mm F2.8 Tilt-Shift Lens, and in the final episode of the series, we’ll look at the 14mm F2.8L II USM lens. Now though let’s jump right in and take a look at some shots from the 90mm F2.8 Tilt-Shift Lens.
Those of you that have been listening for a while, or have caught up on the archives, will know that I spoke about my other Tilt-Shift lens, the 24mm back in Episode number 13, which was released in at the end of November in 2005. Wow, that three years ago, now. How time flies when you’re having fun as they say. Anyway, although I still use the 24mm, when I first bought it, I was using the 20D, and then had upgraded to the 5D by the time I spoke about in episode 13. Now, on the 20D of course, you have the crop factor, which makes it basically a 38mm lens. This is closer to the 45mm TS-E lens, which is the third Tilt-Shift lens that Canon makes. I actually preferred this to the widest 24mm on the full frame, and was seriously considering going for the 45mm when I picked up the 90. I’d found more and more though that I really wanted to isolate a much smaller part of the scene than I think even the 45mm would enable me to on a full frame camera, so I went for the 90mm instead.
Like I say though, I do still use the 24mm lens. Actually, one thing that I should mention is that when using these Tilt-Shift lenses, it can be pretty difficult to see where the focus plane actually is on crop factor cameras. At least it was with the 20D, as the viewfinder was pretty dark. If this is not so bad with more modern crop-factor cameras, then it may not be an issue. Once I moved to the 5D, and the viewfinder was so much brighter, it became much easier to check the effects of the tilt mechanism, and where the focus is. Now with LiveView, focusing becomes easier again, as we can now zoom in on the LCD and fine tune the focus as necessary.
Anyway, as with last week, we have a shot of the lens, so let’s bring up image number 2018 to see the TS-E 90mm F2.8 lens on the left. Now, I actually didn’t shoot anything with the TS-E alone, so the lens to the right here is the 135mm that we looked at last week. I actually tilted the head of the TS-E lens towards the 135mm, kind of making it look like the TS-E was resting it’s head on the 135mm’s shoulder. A cute little tilt on reality I though. I does though of course let us see the tilt mechanism in action.
I went into this in Episode 13, which you may want to listen to again if you’re interested, but today I’ll just recap on what TS-E lenses are actually for, and why I bought one. So, tilt/shift lenses for 35mm cameras were originally most commonly known for their application in architecture photography. The reason for this is because the shift mechanism enables you to correct the perspective distortion or convergence where for example if you are looking up at a tall building, the building tends to get narrower as it reaches up into the sky. This is because the subject plane is not parallel to the image plane or your film or digital sensor. If we shift the lens though, basically moving the lens upwards in the mount, we can align the parallel lines, and make the building look as though it is straight, almost as though we were photographing it from further away, looking directly at it. In my opinion though, if you make the lines perfectly straight, it looks a little unnatural, as we’re used to seeing photographs of building tapering off with this convergence. Still, that’s probably more a matter of taste.
When you are pretty close to a building though, even if you shift the lens to remove convergence, you may also find that your depth of field is too shallow to get the building in focus without a small aperture, and so you can also use the Tilt mechanism with the shift mechanism, to adjust the focus plane so that it is in line with the face of the building, and therefore have the entire building in focus, with a relatively wide aperture, or shallow depth of field.
It seems that Tile-Shift lenses are available for pretty much all makes of 35mm camera. This is of course a mechanism that is kind of par for the course for medium and large format camera’s that have the ability to adjust the height and angle of the lens on the front of the bellows to get exactly the same results as with the 35mm camera equivalents. I have never used a medium or large format camera myself mind, just seen this in photos of the gear.
Anyway, the tilt mechanism refers to the action of angling the lens relative to the film or image plane so that they are no longer parallel and the optical axis of the lens is no longer at right angles to the film plane. With a tilt angle of zero, the image is focused parallel to the subject plane, which of course makes it the same as the film plane so there’s no tilt effect. If you want to make an image containing objects that are say at an angle to the film plane, such as the face of a tall building, but you don’t want to, or you simply can’t achieve a wide enough depth of field to get all the subjects in focus, you can tilt the lens so that the focus plane is the same as that of the angle of the subject. This is not necessarily useful just when you are looking up at a building. You might be looking across the front of a building from one side. By rotating the lens by 90 degrees clockwise or anti-clockwise, you can tilt the focus plane across the front of the building from right to left or visa-versa, as well as upwards.
Anyway, photographing architecture is just one of the uses for these lenses, and not really the reason I own them. I’m more interested in getting that miniature look, as though we’re looking at the model of something, than architecture photography, although I’ve used the 24mm lens for both. Basically, if you use the tilt mechanism of these lenses to lay the focus plane across the scene in a place that we would not normally see it, apparently our eyes think we are looking at a macro photograph, with their shallow depth-of-field, and so we automatically think we’re looking at a micro-world, not the real one. This effect is best achieved when you are looking down on the scene from a height, and I haven’t really gotten anywhere very high yet, so the shots we’ll look at today aren’t really great examples of that. Also, I am using the focus plane in a different way in many of these shots, again, not really emphasizing that miniature world look. Still, I’m having lots of fun with this lens, so let’s take a look at what I’ve been up to.
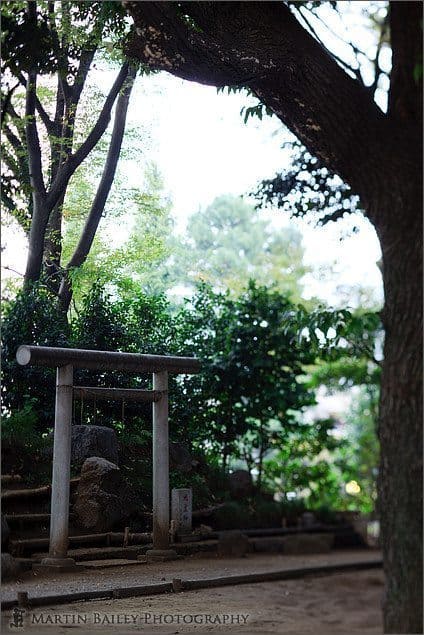
First let’s look at image number 1970. This was shot behind the Meguro Fudouson temple. I was literally out trying out the lens, but ended up here with a shot that I really quite like. The light was low, at the end of the day, but also there was a lot of contrast between the shade from the buildings to my left, as the sun had dropped down behind them at this point. The trees and buildings in the distance though were still quite bright, as the sun was still hitting them. What this meant is that I was able to expose for the shaded foreground areas, with the torii, or gate that we see in the bottom left quadrant, but everything in the background is very bright. So bright that apart from some very pail trees, there is no trace of the building behind the trees. This area is actually quite built up, but the exposure has totally removed the buildings from the shot. You can see that I placed a tree along the right side of the frame too, to frame the image, not only along the right, but also with that bow that is reaching across the top of the frame. I have tilted the lens with the tilt mechanism so that the focus is vertical in this portrait aspect image, so the gate and the tree along the left side is in focus, with the right side of the image not in focus. So that I can get most of the gate in focus, I have closed the aperture down to F5, which is actually quite deep here, because the focus is running almost at right angles to the image plane.
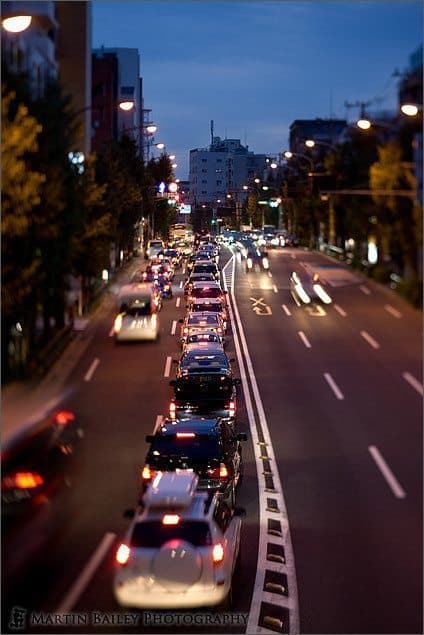
Let’s look next at image 1971. Here I stood on a footbridge, looking along the road at twilight. Once again a vertical composition, with the focus at around 90 degrees to the image plane, running along the line of cars. Basically you should be able to see that the line of cars is sharply focused, with the exception of the last white car, as that was moving during the exposure. If you follow the line of cars all along the road and to the building in the distance, you can see that the building is also in sharp focus, despite the buildings either side of the road being blurred. This was shot with an aperture of F4, so it is would of course not have been possible to focus this deep into the shot with F4 had I not tilted the lens.
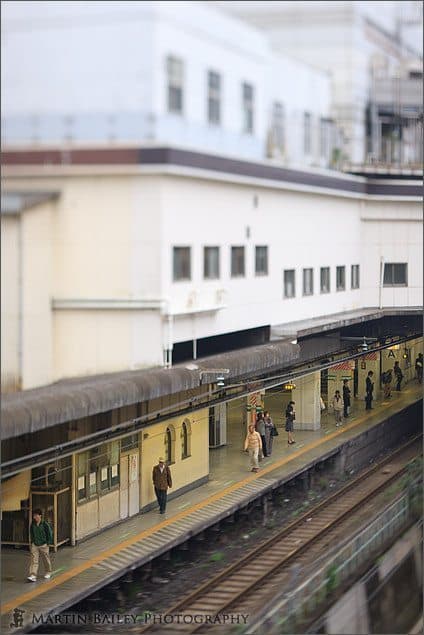
I’m not sure if it is conventional, but I have also been playing with moving the focus to a line other than vertical or horizontal, as we can see in image number 1972. Here I was on the road, looking down into the JR station at Meguro here in Tokyo. For this I again fully tilted the lens, but then rotated it so that the focus ran along the platform, instead of horizontally. I waited a while until I got some people walking along to this end of the platform, and basically this gives us a bit of that miniature world feel that I spoke about earlier. Again at F4, this gives me just enough depth-of-field to get all of the people in focus, but the edge of the platform and the top of some of their heads is actually starting to head out of the depth-of-field.
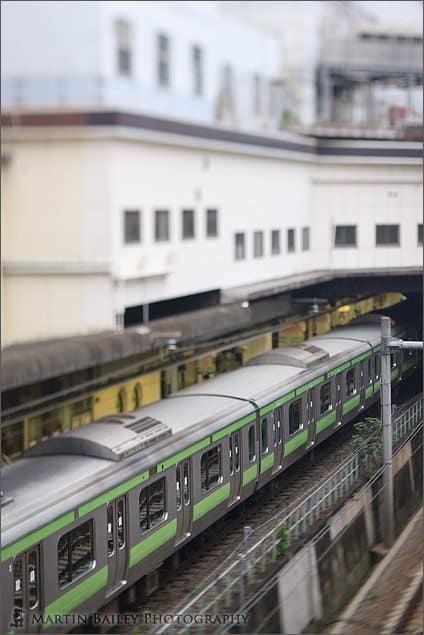
In the next image, number 1973, we see a train at the platform a minute later. Here I adjust the focus slightly to get this side of the train sharply focused. The model effect is still there, so I’m relatively happy with the results, but really want to reshoot this with the train half way out of the platform, with some people on this end of the platform. I’ll go back one afternoon to see if I can get this. On the day that I shot this particular shot, I ran out of patience points, with my wife pressuring me to move on, so I couldn’t get that shot. It will probably take a visit alone.
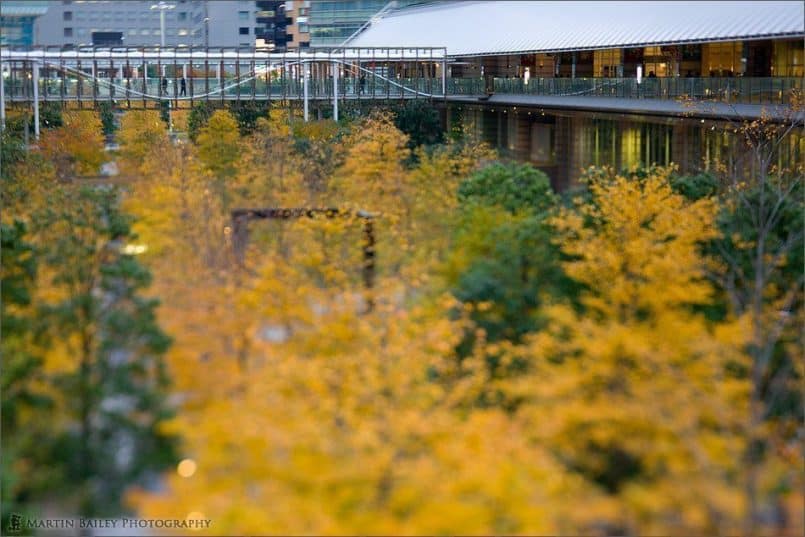
In image number 2005, we see a view just outside the Canon S Tower in Shinagawa, with the yellow gingko leaves on the lower level. Here what I’ve done is tilted the lens horizontally, and focused so that the plane of focus runs along the walkway and footbridge, that runs along the top of the frame. Again this gives us a little bit of the miniature world look, with the small people on the footbridge, and the blurred trees below. This one I shot at F3.2, to get a shallower depth-of-field, and avoid getting the tops of the trees in focus.
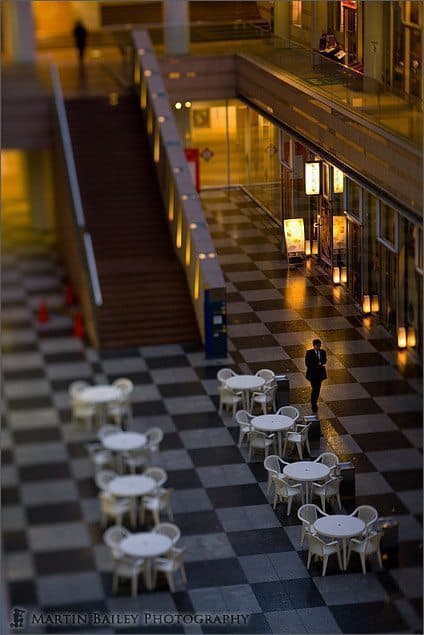
Back at F4, in image number 2006, I’d composed the shot, and put the focus along the right side, lined up the reflection of the lights outside the café, then waited for someone to walk into the reflection. I’d also shot a mother walking up the stairs with her small daughter, but preferred this shot. I was actually hand-holding all of these, which makes it slightly more difficult to compose, and you have to focus through the viewfinder, not using LiveView as I said earlier. Still, with a full frame camera you can see where the focus is falling and turning the focus ring moves that focus from right to left, so the effect is not difficult to control.
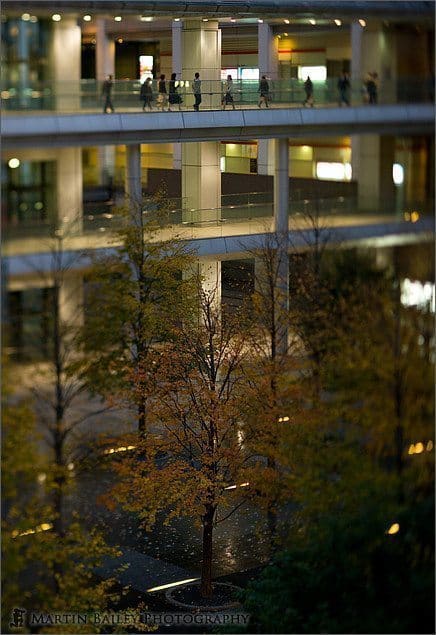
In the final image for today, also shot near the Canon S Tower, image number 2007, we can see that I have again tilted the focus vertically, and I’d purposefully positioned myself to align the tree in the bottom of the frame with the pillar in the building in the back of the shot. I was really pushing the ISO, up at 1,250 for this image, as it was quite dark by this point, but this meant that the lights on the ground below were all on and nice and bright, and the lights on the buildings were now pretty much the only other source of light. Once composed, I again waited for people to populate the shot, along that top walkway, and also waited until they were relatively evenly spaced. While doing this I will of course shoot something to make sure I don’t walk away empty handed, but my vision was to have people evenly spaced across the top, and this is as close as I got. Thinking about it, it also helped that it was a little drizzly on this day, because that helped to get a little more contrast and reflection from the paved area around the trees, probably helping those lights to pop a little too.
So, that’s it for the example images. I have to say, I’m looking forward to revisiting some of the locations that I’ve visited and wished I had a longer TS lens. I’ll probably bring you some more shots later as I manage to shoot them. In fact, I’ll put a link in the show-notes that will always show all the images that I have shot with this lens to date. Remember that you can list all images shot with any camera or lens by clicking on the links on my profile page at martinbaileyphotography.com. Just select “Photographer and Equipment Profile” from the Gallery menu.
Anyway, again I’m very happy with this lens for what it is. I should mention that sharpness does take a bit of a hit when you start twisting this lens around. It can get pretty soft when you reach the limits of the tilt. Unlike the 24mm, this is not an L lens, so I can live with that, and in all fairness, even with the 24mm being an L lens, once you start to tilt it to the extreme, it can be a little soft sometimes too. All said and done though, they are both a lot of fun, and well worth sticking in the camera bag when you know you’ll be somewhere that you may be able to use them. Of course, there are other practical uses for these lenses that I also explored in Episode 13, other than for this miniature look or for architecture shots.
Even for nature or landscape shooting, you can sometimes need pan focus, that is, where the scene is in focus from front to back, but cannot achieve this with a wide aperture, and you can use these tilt-shift lenses to achieve that, by laying the focus down across your scene. You can also use this for example to shoot a waterfall from the bottom, and correct the convergence, much the same as a tall building. You can of course also adjust the plane of focus or the subject plane, so that it runs across the face of the waterfall if necessary, if say you wanted a faster shutter speed with a wider aperture to freeze the motion of the water. There are many ways in which to use the tilt and shift mechanisms, and remember they can be used together as well, not just one at a time.
Let’s start to wrap it up for today though and there are just a couple of bits of housekeeping before we finish. Firstly, I mentioned last week that I had put a book together on Blurb.com with 12 photos from each of the participants in the 2008 Hokkaido Workshop, and there are some snaps of the group. I was waiting for my first copy to arrive to check the quality and luckily it arrived earlier today in time for this week’s Podcast. I have to say I am really pleased with the results. I need a few copies for some other people, so I wanted to check the quality before I ordered in bulk, but I will be placing my follow up order right after this. I actually made a few changes last week after this first copy that came today, and now I’m sure we have a great book to offer you, if you are interested in taking a look.
Also, finally, I have put together a Cooliris feed on my Web site, to show all of the photos in my online gallery with the Cooliris plugin. If you haven’t heard of Cooliris, it is amazing technology. It’s basically a browser plugin, but when you click on a link for Cooliris content, you get a full screen viewer that displays what they call a Wall. Basically it is a wall of images in a virtual space that you can move along by dragging it with your mouse to the left or right. The faster you move the mouse, the more acute an angle the wall becomes and the faster the images whoosh by. If you click on an image it displays larger, and if you press enter or hit the full screen icon in the bottom left, it displays full screen. Both of these larger viewing modes actually display the image larger than my originals, but I’m really impressed with the algorithms that they are using to embiggen the images. When viewed full screen on a large display most images look acceptable, despite the originals only being 700 pixels wide. Pretty cool stuff. Anyway, grab the Cooliris plugin from cooliris.com, and then go to the top page at martinbaileyphotography.com and click on the Cooliris Wall link. Especially if this is the first time you play with this technology, I know that you’ll like what you see.
I’m going to sign off for now though, and catch you next week. For now, have a great week, whatever you’re doing. Bye-bye.
Show Notes
Here’s a nice article on Tilt-Shift photography in Wikipedia: http://en.wikipedia.org/wiki/Tilt-shift
Here’s another link from the above article to an explanation of the Scheimpflug principle: http://en.wikipedia.org/wiki/Scheimpflug_principle
The music in this episode is from the PodShow Podsafe Music Network at http://music.podshow.com/
Subscribe in iTunes for Enhanced Podcasts delivered automatically to your computer.
Download this Podcast in MP3 format (Audio Only).
Download this Podcast in Enhanced Podcast M4A format. This requires Apple iTunes or Quicktime to view/listen.



0 Comments