
So, this week, we wrap up our three part virtual tour of Yachiho Kougen, or the Yachiho Highlands, in the Nagano Prefecture, a couple of hundred kilometers north-west of Tokyo. Before we get into the main topics today, and take a look at some photos of the Big Falls, among other things, I wanted to correct what I said at the end of last week’s Podcast. If you downloaded the Podcast more than a few days after it was released, then you will have heard the new version, in which I’d updated what I said, so this won’t really matter to you. Anyway, I spoke a little about Diffraction at the end of the last Podcast, and got my terms mixed up. Much of what I said was accurate, but I also spoke about Diffraction being what helps to bend the light as it passes through our lenses, which is of course not Diffraction, but Refraction. It had felt strange when I said it, but I couldn’t recall the word Refraction, and things got a bit messy. Then on Tuesday night, I received an email from a kind listener, Roger Walton, pointing out a mistake in what I’d said. Having seen the word Refraction, it all came back to me and I felt a little stupid, so I updated the episode and now things should be fine. I explained this a bit in the forum too, but having been in Japan for most of the last 18 years now, English is really becoming like a second language to me, and I find that I am really forgetting lots of words too, and it gets worse when I’m tired, so this was a good reminder that I need to be a little more careful when I prepare and record my Podcasts. So, thanks to Roger for pointing this out. Let’s get into the rest of the Podcast now.
Ootaki (Big FOotaki (Big Falls) #3alls) #3
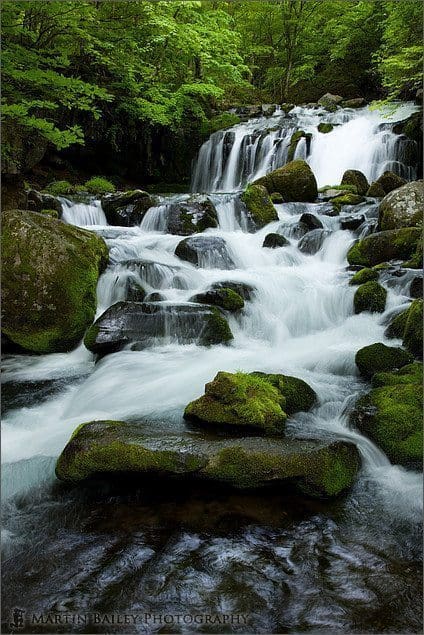
So, at the end of last week’s episode, we were looking at some shots looking up the hillside, across a forest where the trees were literally growing over and around numerous large rocks, forming some pretty cool shapes as they straightened up to grow skyward. I was walking along this path to get to a waterfall called Ootaki, which literally translates as Big Waterfall. The falls were beautiful, and I spend a little while here shooting them, and want to look at five of the resulting shots first off today. I won’t go into too much detail about all of them, as we have a number of other shots to look at too, so let’s try to get through them relatively quickly. The first shot, is number 1815. Here we can see much of the falls, with many rocks, like the ones the trees were growing around, kind of laying in the river, with the water flowing around them. I have used my 24-105mm F4 lens at 40mm to crop out a fair amount of the surroundings to enable us to inspect the falls in their full, but without much other distraction. There are a number of other shots that we won’t look at today by the way, including some pretty wide angle shots, in which you can get a much better feeling for the place, but photographically, I don’t like them as much as these ones that we’ll look at in this episode. I will put a link to all the images I shot in the area in the show-notes though, in case you are interested in checking them out. You can see here that I’ve left a pretty large rock with a smaller rock on top of it across the bottom third of the frame. The water flowing around this side of the large rock is calm enough to not be white water, like most of the rest of the falls, but still has lots of ripples, giving it some nice texture. We can see lots going off, as the water makes its way through the scene, across and around the rocks, and in the top to the right we see the largest drop, which is probably only around 2.5 to three meters max. I imagine these are called the Big Falls, more because of the area they cover than the height of the falls, but I guess everything is subjective. If the people that named these falls had never seen anything bigger these could have seemed positively Niagran. I think they’re beautiful all the same. This was shot with an exposure of 1/5 of a second at F11, with ISO 100 by the way. The 1/5 of a second exposure is enough for getting that nice dreamy flowing effective in the water. Much slower than 1/5 of a second and you can start to struggle, but we’re fine here.
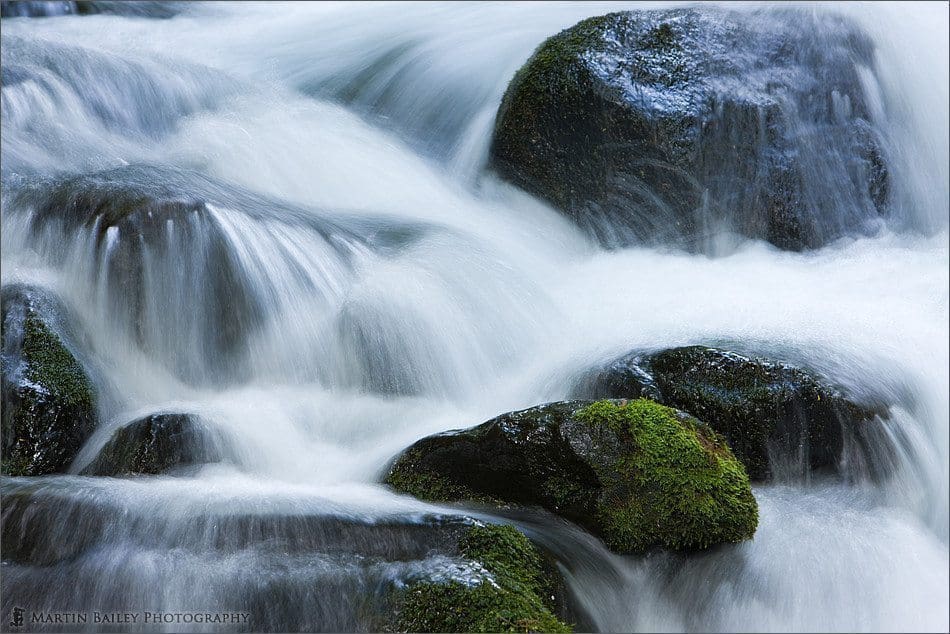
One other thing I like to do at waterfalls is to get out a telephoto lens, and single out a few small parts of the falls as I’ve done in image number 1817. Here I’ve founds various rocks of which some were pretty much submerged, some were half submerged and one just off center towards the bottom right that did not have water running over the front. This has mean that moss has been able to grow on this rock, and part of the one below it, which really helps to add a little colour to the shot. The other rocks also have some moss, but not as much, and not as vivid. Here I’ve selected a shutter speed of 4/10ths of a second, which is slow enough to give us that flowing water effect, but because we are zoomed in on a smaller portion of the falls, it also allows us to see a certain amount of texture in the water too. We can not only get a feel for the water flowing, but we can see some trails of the water, as it has splashed up around the rocks, which I think is quite effective. Again at ISO 100 with an aperture of F11, and shot with my 70-200mm F2.8 lens at 170mm. Note too how I’ve composed this shot to allow the water areas to both flow into and out of the frame.
Ootaki (Big Falls) #5
Ootaki (Big Falls) #7
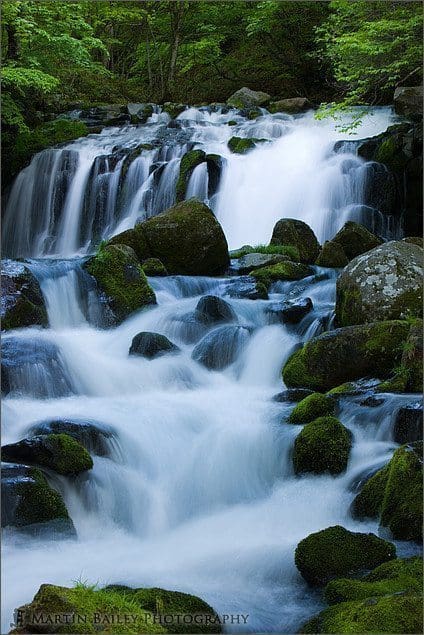
In the next shot, image number 1819, I’ve kind of purposefully not given the water a passage out of the frame. You can see here that I’ve cropped in a little tighter than the first image we looked at today, now shooting with my 70-200mm, set to wide open at 70mm. As we trace the water through, we can see that there are gaps for it to flow out of, and obviously, we know that the water has somewhere to go, so we don’t necessarily have to see that, but I was conscious of placing these rocks along the bottom when I made this image, and think it works like this. With a shutter speed of 6/10 of a second, now I’m making that water seem to flow even more. I was shooting at F11 still, but this time I’ve reduced the ISO to 50, to enable me to get an even slower shutter speed. For overall composition I really like this, with the main falls taking up most of the top third of the frame, with a nice slice of green at the top, but also the rocks kind of outline the larger expanse of water that occupies most of the bottom of the frame, making a kind of loose border around the flowing water.
Balance is important, and in the next two shots I want to explore the difference between having something at the bottom of the frame to anchor is down, as opposed to a shot that does not have that. I like both, but there is definitely a difference that I think we can learn from. Let’s first look at image number 1820. Now I’ve moved up a lot closer to the main falls, and positions myself so that there are four rocks running across the bottom left to the center of the frame. I have also placed a fifth rock in the bottom right hand corner. I feel that these rocks really help to put things into perspective, and if anything, I’d have perhaps liked a few more along the right side too, but I’m not sure how that would have looked. I also like being able to see the quality and texture of the water in the basin which having the right side open allows us to do. I’ve placed the green on the leaves at the top right, which I feel adds a secondary focal point, and I kind of was lucky to have another patch of green in the top left corner, which helps to balance this out as well. Still at ISO 50, I shot this at F11 for 1/2 a second, so again, we have lots of nice dreamy running water, but not overdone, in my opinion.
Ootaki (Big Falls) #8
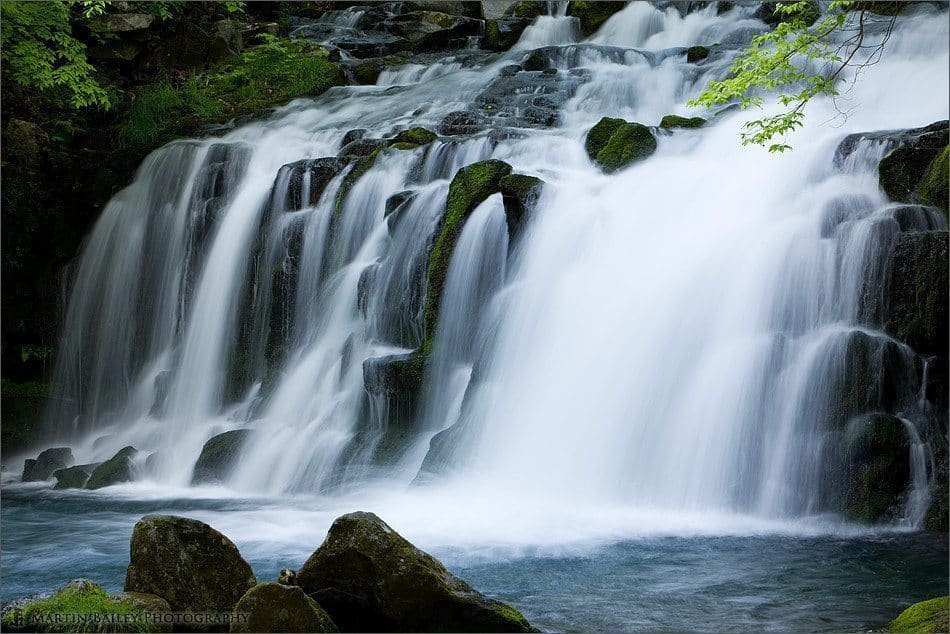
Let’s now look at image number 1821, in which we can see pretty much the same shot, but I’ve stepped a pace or two forwards, to get a different look at the falls. Although the two patches of green leaves are in almost exactly the same place as in the last shot, I’ve actually zoomed from 70mm to 120mm, to get pretty much the same framing in both shots. The only difference is that I’m looking down on the falls slight now, which has of course enabled me to not include the rocks. Now, although I like this shot too, as we can see the effect of the flowing water as it spreads out in the basin of the falls, I really feel that it is not as well composed overall as the last shot, with the rocks. The really help to anchor the shot, and provide a lot of overall balance. It does force the question as to whether or not I’d have liked this second version better if I’d never seen the first, but I guess I’ll never know now. I would certainly have not thought about just how different adding something like those rocks in the foreground changes the image, without having tried, so I’m glad that I did.

Ootaki (Big Falls) #9
One last thing that I want to mention before we move away from the falls is that you’ll notice how there are very few bright highlights in these falls. I often try to get to falls when they will be in the shade, either on an overcast day, or when the sun is low enough in the sky for the surrounding hills and mountains to stop the sun from hitting the water directly. I’d come here late afternoon, and as I arrived, the sun was still catching a number of areas, though literally just a few small patches. As I explored the falls, the sun dropped still further in the sky, and the conditions were just right for these shots. Of course, sometimes you are going to want to shoot the falls in full sun too, but my advice would be to make sure that if you are going to do that, try to get the entire falls lit by sunlight. White water is very reflective, so there is a lot of contrast between the sunlight water and shaded water, and really takes a lot of working around in post processing, if it is even possible to do without making the falls look unnatural. This is just something to bear in mind.
So, with a soggy right foot, as I’d managed to step into the water at the falls, we walked back along through the rocky forest and having scared another deer along the way, we walked back to the car and drove back towards the hotel, so 20km away. We drove through the place where I’d shot those first couple of black and white landscapes the previous day, hoping that there might be something nice there again today, but there was no cloud in the valley, and the sky was relatively uneventful today, so we only stopped for a few minutes to take in the mountain air before going back to the hotel.
On the morning of June the 2nd, we got up relatively early, and headed out again before breakfast to see if there was any mist around that Rhododendron that had been surrounded by lots of photographers the previous day. Although I wasn’t that interested in shooting something that everyone else was shooting, you can’t really deny that it’s a nice spot, and I’d have been kicking myself if I’d chosen to stay in bed instead of getting up and getting out there seeing if my luck was in with the mist. Anyway, we can see in image 1823 that I was not lucky, and the mist was not there. There’s always next year, so I’ll come back again, on a rainy day, like the first afternoon when we arrived out here this year too. I selected a wider angle for this shot, using my 24-105mm F4 lens, at 32mm, again at F11, for 1/6 of a second at ISO 100. Again, I’d just like to note a few things that I had kept my eye on while framing up this shot. Firstly, I wanted to give us just a bit of green below the Rhody bush. I didn’t want to crop that off along the bottom, or it would have seemed sloppy. I also made sure that the white birch that runs along the right of the frame as totally in the frame, not cut off. I always use a spirit level that fits into my flash shoe, to ensure my shots are straight, and this is no exception. It means that many of the trees are leaning to the right, but in real life, they are leaning to the right. Also, there are some brown tree that creep into the scene at the very left of the frame, and I was trying hard to minimize the extent to which they did so, without cutting of the bottom of the white birch along the left of the frame, or the Rhododendron for that matter. I was shooting in Manual mode, so I have no record of exactly how much over zero this exposure was, but I’d say I was shooting at around +1 or at least +2/3 of a stop here, to make sure our whites are white, and our greens are nice and fresh, as well as the pink flowers being nice and bright too. This is one of those times when the histogram is well and truly hitting the right shoulder, as the sky was blown out pretty badly, but I was not too worried about that. It was a white uneventful sky anyway. The problem that happens when you allow this to happen is of course the white of the sky starts to bleed into the green of the leaves, but this is really not a big deal, and when viewed large, I actually quite like the effect, so did not try to underexpose and bring out the white and other colours in post processing. As you know, I try to do as little in post as possible, always preferring to get it as good in the field as it can be.
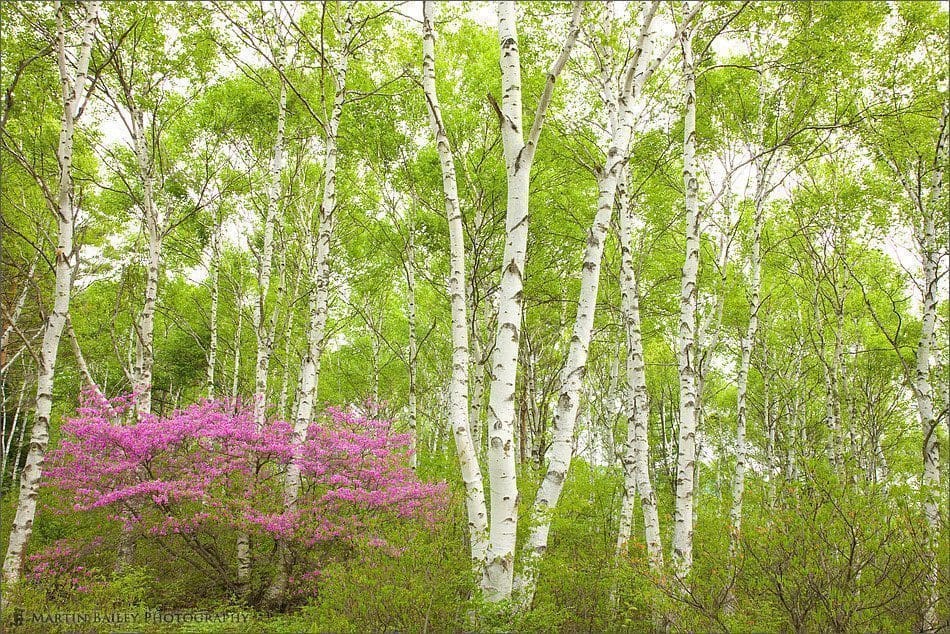
Rhododendron in White Birch #3
So, a fun shot now, as we take a look at image number 1824. As I’d said last week, when I came to this tree on the previous day, I’d found it because of all the cars parked at the side of the road. It was not like the red Rhody that I’d found further around this road and we looked at over the first few episodes of this series. I had that one all to myself for as long as I wanted. Here though, when I came the previous day I had to wait a while to get a spot, pretty much where the guy in the off-white jacket is, second from the right in this shot, and I really wasn’t that interested in hanging around to wait for another spot to free up. I actually shot the last image that we looked at from a little further around from where the guy on the far left is in this shot. Another reason why I’d come back here on this last morning of our stay is because it was a Monday, and I figured that the Sunday crowds were there because of just that, it was a Sunday. Still, some of the over sixty white-lens brigade were here, doing their stuff. I actually felt happy that despite my day job keeping me pretty busy most of the time back in Tokyo, I at least can get away like this and be out here myself on a week day, enjoying the mountain air and the wonder art of photography that we all love so much. This is the only image from this series of three episodes that was not shot with a tripod by the way. Everything else was, regardless of the shutter speeds I was using.
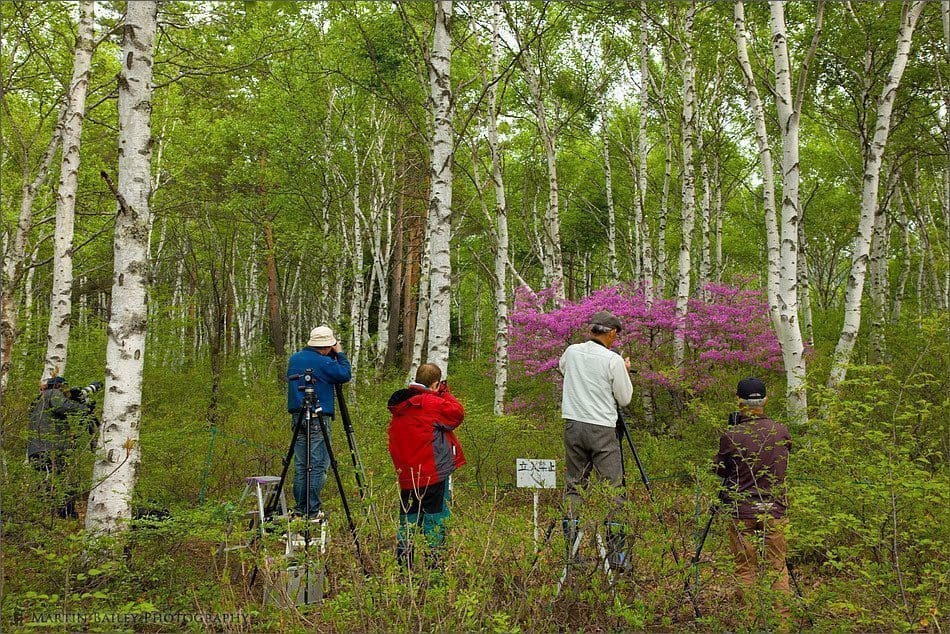
Rhododendron Hunters
So, again, after a little pre-breakfast shooting, we went back to the hotel and ate, then packed our stuff away and checked out before heading back out before making our way back to Tokyo. We’d decided to go down and take a look at the lake Matsubarako, which I’d thought might have possibly been what we saw as we rounded the corner in the mountains two days before, to see what turned out to be a valley full of clouds below us. I’d seen the lake on the map, and as I said, it should have been much smaller than that, and I was not wrong. We drove down to the lake, and really it was pretty uneventful. It was actually typical of many lakes in Japan in that it has the obligatory white swan paddle-boats that you can hire, and like many, they were all just tied up until the next weekend, when a few people might take them out for a spin around the lake.
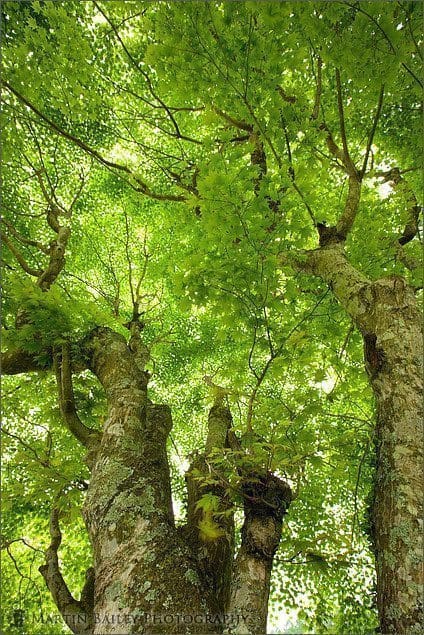
Look up into Maple
We had a walk around and I decided to shoot some simple scenes of the bright green fresh leaves and grasses, and we just had a relaxing hour poking around. There was beautiful Japanese maple tree in a field near the lake, which we can see in image 1828. Here once again, I’d set my 16-35mm F2.8 lens up very low on my un-extended tripod, looking up into the tree. This was shot wide open at 16mm, with an aperture of F11, again, and a shutter speed of 1/4 of a second, with ISO 100. Again, I’m metering for the underside of the leaves, so the pieces of sky poking through were over-exposed, but again, a white overcast sky, so I’m really not too worried about it. If it had been a clear sky, the contrast would have been too great to get this shot in this way anyway, so nothing to pull myself to pieces over here. You can see how the wide angle has given an effect that this is a pretty big tree that we are looking up into, but we’ll see shortly that this really isn’t the case.
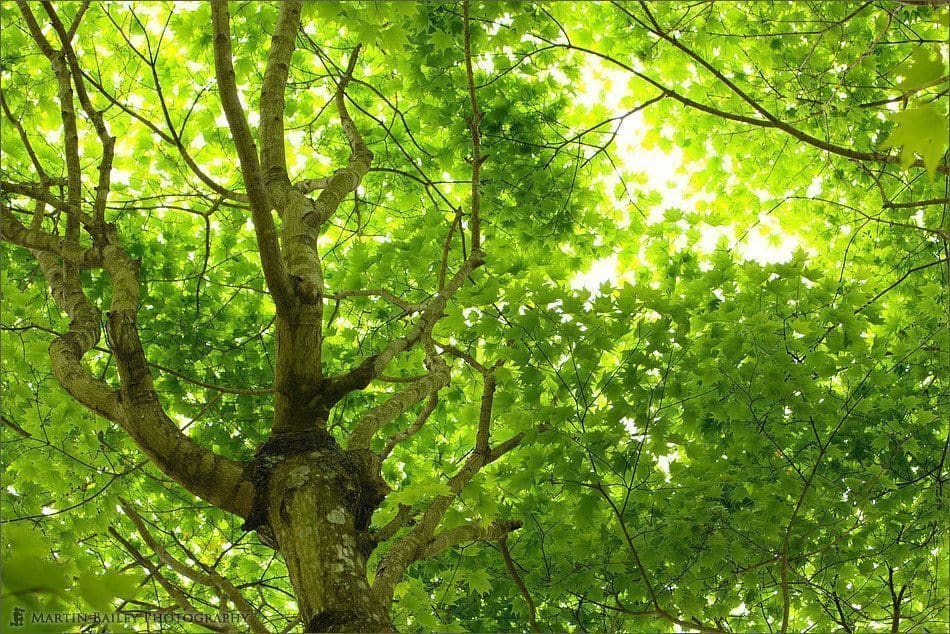
Let’s quickly look at another angle first though, which is image number 1829. Here I have switched my 16-35mm for the 70-200mm F2.8, and looking up into the underside of the tree in much the same way, but now with my camera flipped around to a landscape aspect rather than portrait. Again with an aperture of F11, now shooting at 1/6, still of a second with ISO 100. We can see the shape of the leaves more now, and how the leaves close to the opening in the tree are starting to blow out with the sky. Again, I’m not worried about this, and actually think it might add to the shot. The thing I don’t like about this image is that there are two patches of leaves creeping in, in the bottom left and top right. I saw these when composing the image and tried to make them work in the frame, but I really don’t think they do. I couldn’t go much tighter though, without messing around with the overall composition. Later, I wondered why I didn’t just use a slightly shorter focal length, and shoot from a little closer. I think this was because there were other branches in the way, but I at least had a clear shot, so maybe I just didn’t think of it at the time, as we weren’t really in 100% photography mode by this time, and my other half was ready to go back to the Tokyo which we’d so happily fled a couple of days before this time.
To get some idea of just how small this tree really is, take a look at image number 1825. Actually shot before that last few, but I wanted you to see the effect of the wide angle lens and of looking up into the tree, before seeing that it really is a small tree, and that the perspectives we choose can really change how we see something. There were a couple of flowering Rhododendron tree in the background here, which I’d played on a little, but still here, the bright green of those fresh maple leaves had really grabbed my attention much more. I used F11 again here, and separated the foreground from the background with the depth of field, though allowing the Rhody to at least have some form, giving it a place in the shot. I was conscious here of position those grass seeds in the bottom left just there. A few inches further left was a post, which I didn’t want to include, and to the right, was another lamppost or something, so I was working in very tight parameters for this, but still quite like it. I is a nice reminder of our last hour in the area before we made our way back to the big city, relaxed, refreshed, and read to face the grindstone again.
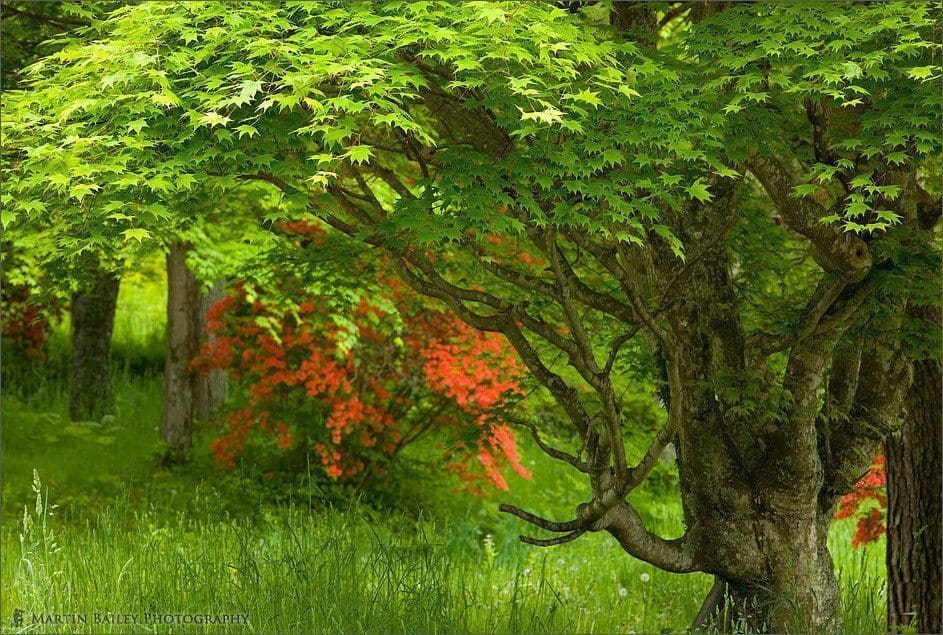
Maple with Azalea
So, that’s it for this series in which we visited the Yachiho Highlands. I hope you enjoyed it. I certainly enjoyed actually getting out there photographing the area. I dare say I’ll be going back again, maybe next year, or at some point in the future. Although I’m relatively happy with the shot I brought back with me, I still really want a good shot of the flowering Rhodys in the mist.
There is just one more thing that I wanted to run by you before we finish. Many moons ago, I was asked by a number of listeners to reduce the size of the audio files of this Podcast. This I did, but it means that the audio suffers just a little, because of the compression. The audio that you listen to is not quite as good as I can record it. As I really don’t have a problem with the downloads, I’d like to know if you, the listener would prefer small files, or better quality audio, at the cost of somewhat larger files? I’ve started a poll in our Forum to find out how you feel about this. Please come along and check out the poll in the MBP Podcasts Forum at martinbaileyphotography.com and let me know what you think. If you can’t find the poll, check the show-notes. I’ll put a link in there too.
And that’s it for this week. You just have a great week, whatever you do. Bye bye.
Show Notes
The music in this episode is from the PodShow Podsafe Music Network at http://music.podshow.com/
Subscribe in iTunes for Enhanced Podcasts delivered automatically to your computer.
Download this Podcast in MP3 format (Audio Only).
Download this Podcast in Enhanced Podcast M4A format. This requires Apple iTunes or Quicktime to view/listen.


0 Comments