
Following on from last week, today we continue to trace my steps from a recent trip to the Yachiho Highlands as I share some of the images I brought back with me, intermingling tips on decisions I made while photographing the area. As I mentioned last week, some of the focus of this series is on achieving a lot of depth-of-field, something that I don’t do a lot in much of my work, but for landscapes and the sort of photography I did during these few days it’s pretty important. If you didn’t listen to last week’s episode, number 141, I suggest you go back to that one first before listening to this, just so that you can get an idea of where we are and what I did at the end of the first day out here.
The weather forecast for this weekend had been rain on Saturday, but clear on Sunday, which is one of the reasons why I came out here. The rain on the Saturday was going to give me some nice mist which we saw last week, but also, a nice blue sky can be nice sometimes, as we’ll see in a moment. We got up at the crack of dawn on Sunday the 1st of June, and heading back up the road towards where we’d photographed at the end of the first day. As we climbed the mountain, we stopped a couple of times to take in the fresh air and just have a look around. As I mentioned last week, part of the reason for this trip was just to really get away from Tokyo with my significant other, and just relax. The mountain air was as sweet as ever, and as we stood at the same place that I’d shot the landscape shots that we looked at at the end of episode 141, we could see all of the houses and everything in the valley that had been covered with cloud the previous day, looking more like a lake than a valley. I shot a few images on the way up, but as the sun rose, even though it had only just risen above the horizon, it was very strong, and didn’t make for much of a shot. I wanted to get back to the place that I’d shot the previous day before the sun got too high in the sky, so bearing in mind that we had to stop to take in the mountain air from time to time, I was also trying not to spend too much time getting up here.
As I turned off onto the smaller road that took us down to where the Rhododendron that I’d photographed the previous day was, almost immediately we saw a long line of cars parked at the side of the road. I’ve seen this before, and on a Sunday morning in the mountains, it could mean only one thing. There was something to photograph nearby. I pulled over to see what it was, and grabbed my camera, and headed along the line of cars. There was a small picket fence along the side of the road, but as I looked through the gaps, I could see a large group of photographer’s gathered around the Rhododendron tree that we can see in image number 1804. I’m not sure, but it was likely that this is the same tree that I’d seen in a magazine, and that had been the reason for my visit in May 2007. As I said last week, I’d never found it last year, despite looking through this fence as I drove around the area, because I’d come a few weeks too early. The late snows had held back the flowers, and because we’d had snow in April this year too, I came a few weeks later, and got here at just about the best time. I walked through the fence and waited a little while for someone to move, so that I can get my camera in for this shot, but wasn’t all that happy about shooting something that not only everyone else was shooting, but from a position that I really couldn’t choose myself. I wanted to get a shot of the bush framed by the white birch, which is why I waited here, for a space to free up, but it would have taken a long time to wait for a number of spaces to free up to get some other angles, and I was still hoping to get down to the tree that I’d shot the previous day, so I didn’t hang around here. I shot this with my 70-200mm F2.8 lens at 70mm with an exposure of 1/6 of a second at F11, with ISO 100.
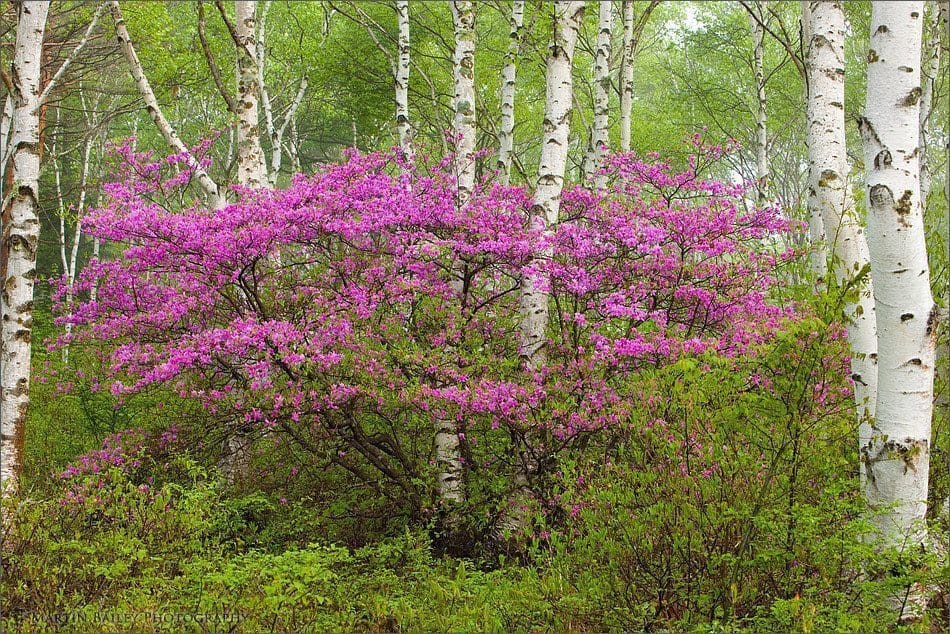
Rhododendron in White Birch
I dropped back though, allowing a patient pensioner to jump into the spot that I’d been in for a few minutes, and I got back into my car and drove down the hill a way. In image number 1805, you can see that I’d made my way back to the hillside with the bush that I’d photographed the previous day. There was a beautiful blue sky, with some nice wispy clouds blowing across, and it was really just a wonderful morning. It was just coming up to 7AM when I shot this one, so the sun had started to climb pretty high in the sky right now. The Rhododendron was in shade still though, which I was fine with. I shot this with my 16-35mm F2.8 lens, at 19mm, again with F11 for 1/10 of a second at ISO 100. As I mentioned last week, with a wide angle lens like this the hyperfocal distance is just a few meters from the lens, even with relatively wide apertures, but I decided to stop down a little more to get things really sharp from the closest grasses to the further trees and leaves that are visible in the shot. I hadn’t focused on the hyper-focal distance, as there really wasn’t anything so close the front of the shot that warranted it, and with F11, I knew I was going to be OK again. I considered using my 24mm Tilt Shift lens here too, to correct the trapezoidal effect a little, which is that leaning inwards of the tall objects that we see with wide angle lenses. I wanted to go a little wider than that though, and although I could have stepped back a little, other trees would have started to get in the way, and I was not too worried about leaning in of the trees either, so I decided not to spend the time to set up a shot with the tilt shift lens.
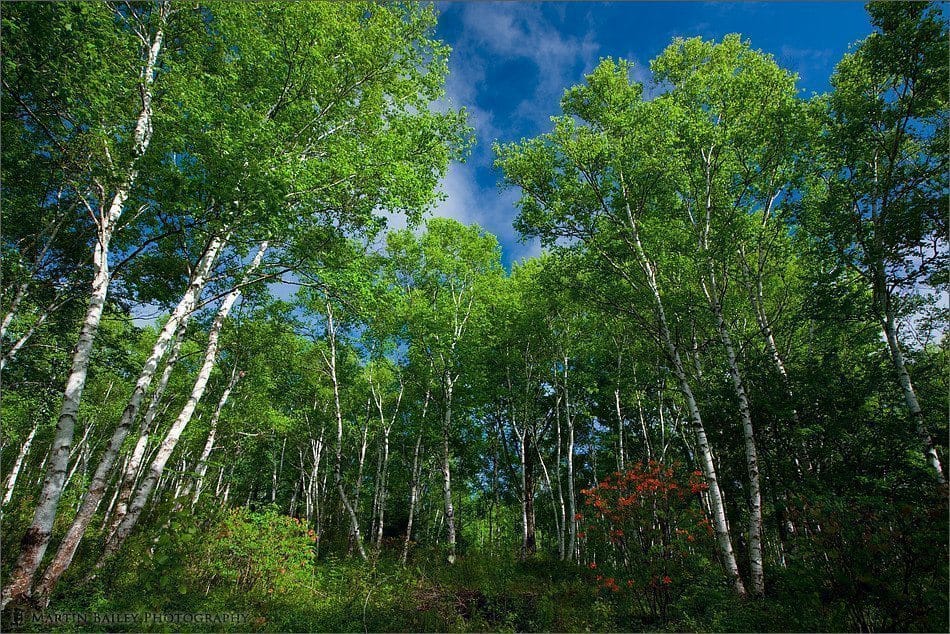
Birch, Azalea & Blue Sky
I wanted to also mention that I used my Singh-Ray ColorCombo™ filter for this shot, which basically combines an LB Warming Polarizer and LB Color intensifier in the one filter! It’s a beautiful filter, and one that although I’ve owned for more than six months now, have really not had a chance to use that much until now. The LB in the names stands for Lighter and Brighter, because these filters are literally lighter and brighter than their predecessors, by as much as one full stop. I can’t find a reference to this on the Singh-Ray web site right now, but I believe this filter is rated at just 2/3 of a stop, so it really doesn’t darken things down very much at all, although it does give a great polarizing effect as well as warming up the colors in the scene at the same time. Be warned though if this filter pricks your interest, because they are not cheap. The 82mm thin frame version that I bought for my 16-35mm F2.8 lens, which is the second version, with an 82mm filter thread, costs $450, which is about 3 times more than even the best polarizer that I can get in this size here in Japan. For the extra light though, and image quality, I think it’s worth it. It’s a beautiful filter.
Before we move to the next image, I want you to quickly note how bent the tree is in the left of the frame here. There are four trees growing almost from the same spot, but the one on the left here is not bending inwards from the trapezoidal effect than the other three here. Keep that in mind, and now let’s look at image number 1806. Here we see three trees that appear to be growing almost straight up, but in actually fact they are all growing outwards slightly, including the one on the left, which is growing out at quite an angle. This is working against the effect of the wide angle lens looking up at the tree though, so it all has basically straightened itself out, which I thought was pretty cool. For this shot, to emphasize the feel of the height of the trees, I set my camera on my tripod at its lowest height, with none of the leg extensions extended. I used my angle finder to look down into the camera from above, so that I didn’t have to lie down on the still wet and very thorny forest floor. I used an aperture of F11 for 1/15 of a second, at ISO 200 this time. I was using ISO 200 because I had turned on the Highlight Priority feature of the 1Ds, because as you can see there was shadow on some part of the bark of the white birch trees, but some parts was fully little by the sun, and I wanted to keep as much detail in the bright areas as possible. I was shooting at 16mm for maximum looking up at tall objects effect. Again, the Singh-Ray Color Combo filter helped to give me a lovely blue sky, but also with nice rich greens. I angled the camera so that I could see the trees starting to spread out at the top of the frame, but I also wanted to include the line of tree that ran across the bottom of the frame in the distance, to kind of anchor the shot, giving it more balance. I’d focused on the tree trunk in front of me, which was about a meter from the camera, again, being aware that with an F11 aperture, the hyperfocal distance at 16mm is about one meter, or three feet. This allows me to focus quickly, but also know that everything from the bark of the trees at the bottom of the frame to the furthest leaves in the distance will be in focus.
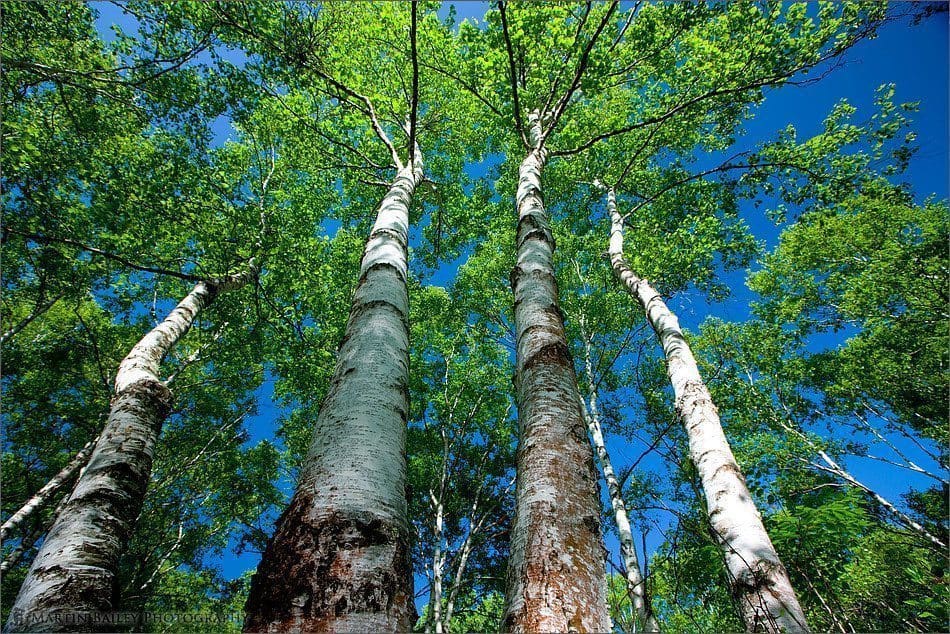
White Birch & Blue Sky
Shortly after this, we decided to go back to the hotel for breakfast. I love being able to get out and photograph for a few hours from dawn, then going back to the hotel for breakfast before eight and then setting out again. It feels like you really make the most of a day when you do this. One problem that I had though was that I’d had too little sleep the few nights before coming away, and then getting up at around 4:30AM on this day too, was starting to take its toll. After a steady breakfast, as the sun was already well and truly up, and pretty harsh, I decided that I’d have another hour’s sleep before heading back out, which is exactly what I did. Feeling a little better, we set out again from the hotel at around 10:30AM, and were going to take a walk around the park that I’d visited on my own the previous year. It was a nice walk, but pretty tiring. I had actually carted my 600mm F4 and 300mm F2.8 lens among others, all around the park, up and down hill, because the previous year I’d gotten some nice bird shots here, and was hoping to be in luck again. When I got to the spot where I’d seen the birds the previous year, after a relatively long wait, it seemed that I was not going to be as lucky this year. My other half was also getting a little impatient, so trying hard to keep this a relaxing and relatively stress free weekend for my wife, we decided to move on. This meant that I’d carted my 600mm around with me for nothing, but then I can do with the exercise, so I shouldn’t grumble. We picked up some snacks at the hotel and decided to sit on a bench near a pond in the park for lunch. As we approached the pond, I saw that there was some nice fresh green leaves on the hillside that ran up from the edge of the lake, that would probably make for a nice reflection shot if the breeze would let up long enough to take the edge of the water.
I chose a bench that would make it easy for me to set up my camera waiting for the breeze to die down, and still have a relaxing sit down for lunch, kind of killing two birds with one stone. After getting the exposure right, and thinking of a few possible compositions, we ate lunch, and waited. The breeze kept up though, and for a good thirty minutes or so, it didn’t look as though my luck was in again. Then, after what I knew was probably my last, just five more minutes, the breeze died, and I was able to capture image number 1808. You can see that it is not exactly a mill-pond type reflection, but the trees on the bank have reflected nicely in the slightly agitated surface of the pond, making a kind of painterly effect. This is just what I was hoping for. I shot this with my 70-200mm F2.8 lens at 90mm, again at F11. F11 seams to almost be a theme that ran through this long weekend. There’s actually a good reason for that, especially with the 70-200mm, which I’ll get to in a short while, when we look at the next picture. Anyway, on the composition of this shot. I basically as you can see have cut off all traces of the hillside itself, relying totally on its reflection to make up the image. At the very top of the shot though, I’ve included what look like some dead tree stumps, which were jutting out of the water. This gives us something in the shot to focus on that is totally sharp, and they also have their own reflections in the water, so we can see where at least some of the reflections are coming from. I shot a vertical and horizontal version of this and uploaded both to my online gallery at martinbaileyphotography.com. We won’t look at both of them today though, as they are very similar, but if you want to check it out, there’ll be a link in the show-notes to view all 31 images that I upload from this long weekend.
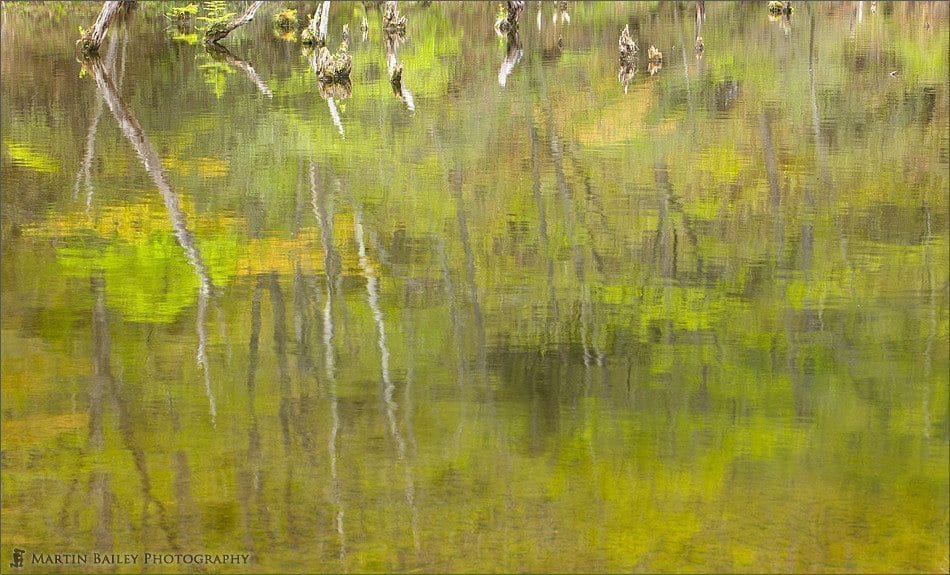
Early Summer Reflections #1
After getting the shot next to the pond, we started to climb up out of the valley that the longest track through this park takes you, and along the way kept stopping to see if we could spot any of the birds that were singing us along the trail. We saw a few, but they were too small, too far away, and too quick to really be possible to get a decent shot of, so we just kept going for the most part. I did make a quick recording of their song though, which I’ll play to you now. The sound of the water running through the park can be heard too, but take a listen to the song that accompanied us on our walk.
After our walk in the park, we decided to take a drive of about 20k to a nearby town called Tateshina. Tateshina is where many people have their weekend retreats, and quite a nice little town. It wasn’t the town that I was interested in though, it was a waterfall that basically translates as Big Waterfall, which was about a ten, fifteen minute walk from a nearby car park. Now, we’re not going to get to see the waterfall today, although the images are online if you want a sneak preview, but I wanted to look at two more images today, which are of the forest that you walk through to get to the falls. Let’s first look at image number 1810. As you walk along a path half way down the hillside, towards a river that is flowing downstream of the waterfall, there’s a wonderful forest that expands up the hillside to your right. The amazing thing about it is that all of the trees are growing over and around rocks. We can see that pretty much the whole of the forest floor is fallen rocks, covered in most, and from small gaps in the rocks, the trees are growing. They almost all seem to grow out at whatever angle they can, then start to straighten up, and head skywards. This maybe because the rocks are slowly slipping down the hill but I’m not sure.
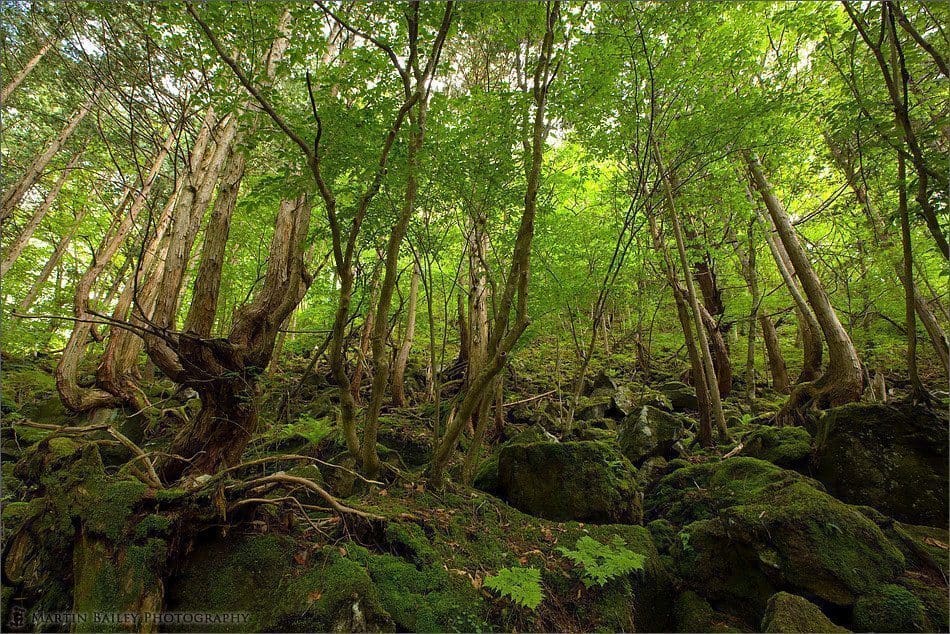
Rock Forest #1
Again here I use an aperture of F11, and got my camera down very low, looking up, across the rocks. I was always going to be looking up this hill, but getting down nice and low helps to emphasize the feeling of looking up and the steepness of the hill. The canopy of the trees and angle of the sun, now having much of this hillside in shadow, meant that the shutter speed for this shot needed to be 6/10 of a second, just over half a second.
Let’s look at one last shot for today, and I’ll explain that depth-of-field thing that I keep alluding to. The image is number 1811. I’ve mentioned hyperfocal distance a number of times last week and this week, and how we can use it to get what is called pan focus, which means that everything from the foreground to the furthest thing in the distance is in focus. In this shot, I focused on the trunk of that big tree in the foreground, maybe just over a meter from the camera. This again, with a focal length of 16mm, going to be roughly the hyperfocal distance. When I look at this image at 100%, I can litereally see all the hairs on the moss at the very bottom of the frame, the closest thing to the camera, and also see all the twigs and leaves on the branches of the furthest trees. All of it is in sharp focus. There is a little softness around the edges, caused more by the physics of the lens, than the depth-of-field. This second version of the 16-35mm F2.8 lens is sharper around the edges than the original version, but still gets a little soft when used wide open at 16mm. You are probably wondering why I don’t just stop down the aperture much further, to the minimum aperture for the lens, which should really sharpen things up, right? Wrong. This is the point that I have wanted to make. Some of you will have heard of diffraction. Diffraction is what happens when light passes through a substance, like the glass of a lens. The theoretical resolution of a lens is limited by diffraction.
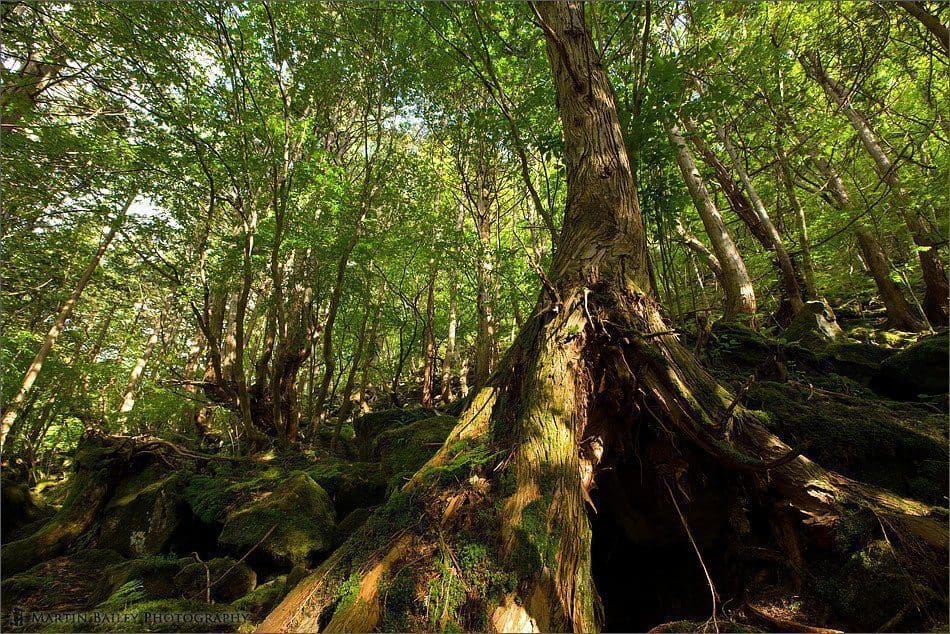
Rock Forest #2
There is a point with all lenses where stopping down the lenses aperture no longer makes the image sharper, and continuing to stop down past that point, actually can start to make the image more blurred. In my experience, the 70-200mm F2.8 lens from Canon does not get any sharper after F11, which is one of the reasons why I use F11 so much when I want a lot of depth of field. If the subjects you want to focus one are far enough away, sticking to F8 is more advisable, because many lenses are sharpest at F8, especially cheaper lenses. If I want a lot of depth of field though, with the 70-200mm I still rarely go past F11, though will on occasion go to F16, even though I understand that this is rarely going to make things any sharper. With the 16-35mm, I find that there is actually a little more sharpness that can be gained by going down to F16 over F11, but it is rarely necessary because wide angle lenses have much deeper depth of field, even at F8 and F11.
If you don’t believe me on this, or you want to find out what the optimal aperture is on your own lenses, find a scene with lots of detailed objects both close and in the distance, and take some test shots. Use a tool like Barnack which I’ll put a link to in the show notes, to find out what the hyperfocal distance is for the focal length you’ll shoot at, and manually focus your lens to that point and shoot away. If you are not too worried about the foreground, and just want to see how sharp things get, you can always just autofocus on the scene too. Stop down the aperture in full stops, from say F8, through F11, F16, F22, F32 and see what happens. If you want, you might want to do the full range, starting from wide open through F4, F5.6 and then on to F8 etc. I find that as you shoot with your various lenses, you do get a feel for their best apertures for optimum sharpness, but still, a little practice with them doesn’t hurt, and might save you messing something up in the field by having better knowledge of this beforehand.
So, once again, I hope you enjoyed this virtual tours in the Yachiho Highlands. We’ll continue next week, looking at a few more shots, including those waterfall shots that I was just talking about. If you’ve been by the forum in the last few days you’ll have no doubt noticed that I have updated the forum software to version 3 of phpBB. I have also changed the theme of the Web site a little moving away from the orange with some blue, to a predominantly blue theme. I’ve still got some graphics to update, but didn’t want to wait until I’d found time to complete all of the work to upgrade, as I was wasting too much time each day deleting spammers email addresses. I wanted to use some of the better administration tools with the latest version of the board, and also was hoping it would be better at keeping those unscrupulous spamming pond life at bay, and so far, it seems to be doing so. I’ve also decided to try the site without the full toolbar across the top of the forum, for two reasons. The first being because I am not sure it’s necessary. Once in the forum the navigation is pretty self contained and I have linked the new round logo at the top of the page back to the top of the Martin Bailey Photography site, so it’s always easy enough to get back. Also, I am trying to keep maintenance down. It takes a fair amount of messing around to get that toolbar into the forum theme, and that slows me down when upgrading, so if possible, I think I’d prefer to leave it out. If however you come by and think you’d really like it to be reinstated, please do let me know and I’ll think about.
Anyway, that’s it for today. You have a great week, whatever you’re doing. Bye bye.
Show Notes
Here’s a link to the Singh-Ray Color Combo filter: http://www.singh-ray.com/shop/lighter-brighter-lb-colorcombo-polarizer/
Here’s a link to Mikkel Stegmann’s Barnack utility that I reference so much for depth-of-field and hyperfocal distances, and mentioned in the Podcast: http://www.stegmann.dk/mikkel/barnack/
The music in this episode is from the PodShow Podsafe Music Network at http://music.podshow.com/
 Subscribe in iTunes for Enhanced Podcasts delivered automatically to your computer.
Download this Podcast in MP3 format (Audio Only).
Download this Podcast in Enhanced Podcast M4A format. This requires Apple iTunes or Quicktime to view/listen.

Posted on behalf of Martin by Michael Rammell, a Wedding Photographer based in Berkshire, England. Michael also has a long-standing passion for Nature & Landscape photography. To catch up with Michael, visit his Web site, and follow him on the following social networking services.


0 Comments