
Cropping is used for artistic reasons, to overcome technical issues in capture or restrictions of your gear, or not done at all, for ethical reasons. Today and in the next episode we’re going to take a little time to look at each of these areas, starting this week with why we crop from an artistic stand point, and go into some details on the tools available and the reasons for using them. The actual act of cropping is often thought of as making a simple selection and then selecting Crop from a menu. I suggest if that is how you have been cropping, you start using the crop tool instead. I’ll explain why in a short while. In the second part of this Podcast I’ll go into more details on cropping for printing to a certain paper size, and automating the process of cropping, although I really don’t advise you do this personally. And we’ll go into the ethical side of cropping too. To crop, or not to crop, that is the question!
Before we go on, I’d like to thank Keith Wolfe, from Florida in the U.S. and Josephine Hughes, from Dublin in Ireland for questions on this. Josephine actually wrote me about this a long, long time ago, and I never got around to doing an episode on it. Then, earlier this week, when I’d started to think about how important cropping is, and started to jot down a few notes, Keith’s mail arrived, asking about exactly the same thing. Both Josephine and Keith were interesting in standardizing their cropping, and also matching it to popular photo sizes, such as 5×7 or 8×10 etc. This is going to be pretty difficult to do as a generic crop, as many photo sizes boil down to different aspect ratios. Still, I’ll talk about this in more detail as we get into this topic. Anyway, Josephine, I’m sorry this has taken such a long time. I hope you are still listening to the Podcast! And thanks to Keith too, for reading my mind while kicking off the preparation for this two part series.
For many, one of the main reasons to crop is going to be for artistic reasons. If you are totally against cropping, and think it is unethical, bear with us for a moment, or fast forward a little. When I import an image to my computer, and start going through my selections, one of the first things I do is start to rate my images with stars, to mark the ones I’ll delete, with 1 star, and then things that I want to take through my post processing, and eventually upload to my online gallery and keep as one of my best shots, with three stars. Now, on the whole, I do no real post processing at this point, except for one thing, and that’s cropping. I don’t crop all images. It’s probably less than 5 to 10%, but I’ve never really counted. I got to wondering though, why do I crop in my selection process? My conclusion was because it is so important to the artistic success or failure of an image to me.
When I’m doing my first pass, sometimes I simply cannot go past some photos without cropping them to see how they look. From an artistic perspective, to me, some images just look better cropped. To help me explain what I’m talking about, let’s look at one of my real-world examples, which is image number 1654. As you can see, this image is very dark. For all intent and purposes, the top and bottom of this image, are totally black. When I looked at this in Lightroom, without any cropping, there was just so much black, it was overbearing. This wasn’t the main reason for the crop though. There are a few other reasons. The first one is that the black areas at the top and bottom of the image added nothing to the shot. As a subtractive art, where the act of selecting our lenses’ primary objective is to control how much of the world we leave out, it seems natural to me that the format of the camera is not always going to match the scene that I’m capturing. This is when I decide to get rid of a little more. The other reason is to enhance the composition of the image. As you can see in image number 1654, there are 5 swans flying across the scene, with a group of cormorants looking up at them. The swans make a long line. The group is broken up into 4 swans, and a straggler. By removing the top and bottom of the image, we make it obviously longer, almost panoramic, and this enhances the feeling of the line of swans also being long. In this case, it makes us feel that the straggler is lagging behind even more than we would feel he was if the shot was un-cropped. If it was un-cropped, he’d occupy a much larger slice of the image, which wouldn’t make it look as though he was lagging behind as much.
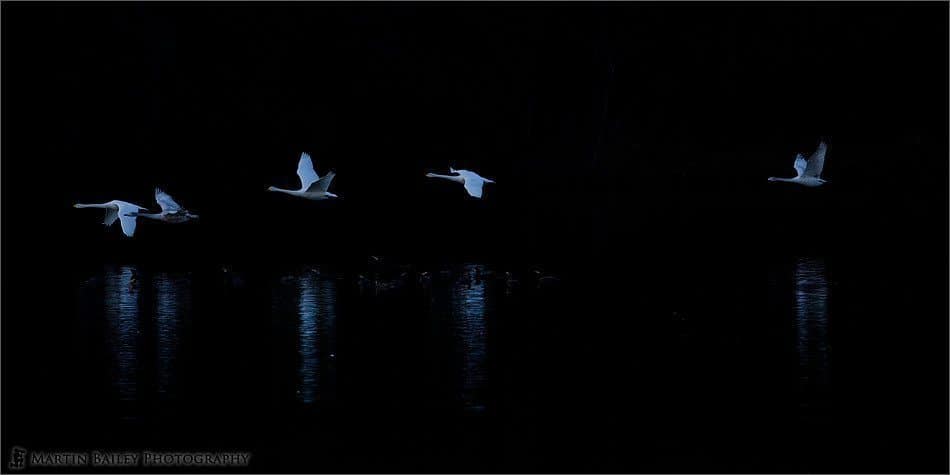
Cormorant Reverence
So, how did I decide how much to crop? Here, we can see that that the swans have cast a reflection in the surface of the pond over which they are flying. We need some space after the reflection finishes, or the shot will feel compacted and too tight. The subjects need some room to breathe. Note too that to maintain the balance of the image, the line of swans are slightly above center, and the cormorants are slightly below center. This is no accident. I purposefully made them about the same distance from the horizontal center line. By the time I’d left room for the reflections and a little room after that, this is the size of the crop that I arrived at.
![Secretary Bird #1 [C]](https://martinbaileyphotography.com/wp-content/uploads/2008/05/MBP_Ueno_Zoo_20071216_1254.jpg)
Secretary Bird #1 [C]
So, in this example, my reason for cropping was totally artistic. There was nothing wrong with the areas I cropped out, I just didn’t need them, and felt the image would be stronger without them. Let’s look at another image now, where there were both artistic, and technical reasons for my crop. The next example is image number 1646. Here we can see the pensive stare of a Secretary Bird, shot in a zoo note. I haven’t snuck off to Africa to shoot this without telling you. There was a problem with this image though. As I shot the bird in landscape mode, it stood up, higher than it had been so far, and as I moved my camera up to continue shooting, a nasty splodge of bright green had crept into the frame on the left, and it was incredibly distracting. Of course, I moved, and recomposed for further shots, but I liked the stare of the bird here so much, and didn’t get another similar shot that I liked as much. I had three options to keep this image in my selection of best shots. The first one was ignore the splodge of green, but I couldn’t do that. The second option was to clone out the splodge. Well, I guess I could do that, but A) it takes more time that a crop, and B) it feels like the worse of two evils. The third option, of course was the crop, so again, while deciding if this shot stayed in my final cut or not, I hit the R button on my keyboard to jump into the rotate and crop tool in Lightroom. A few moments later I’m thinking that getting rid of the sides of the image were actually again if anything enhancing the image, allowing us to concentrate much more on the Secretary Bird. So here, I guess the result was the same, to enhance the subject some, but the reason for my initially thinking about cropping was different. I was overcoming a technical shortcoming on my part, when I actually captured the image.
Let’s take a look at a third shot, which is image number 1625. This is an example of where the initial need to crop was not obvious to me. The image originally had two dark patches in the top right and left corners. When I selected this, I didn’t really mind the dark corners, and I actually remember framing the shot like that, thinking that it would add something to the composition. Maybe help to close of the corners, like a vignette. After I uploaded it though, our good friend Landon Michaelson pointed out that the corners were a little distracting, pulling his attention away from the abstract beauty of the shot. After further consideration, I decided to crop after all, and re-uploaded the image. I left the other image on my server though, and linked to it in the fifth comment from the top in the conversation that Landon and I had about this image. If you are interested in taking a look how it was with the dark corners, jump to the image in my gallery, from iTunes, or from the thumbnail under this episode on the Podcasts page, or just input 1625 into the field at the bottom of the Podcasts menu at my Web site, and hit enter. This example does go to show though that our own judgement is not always the best, and it can help to put things in perspective when others provide feedback. Thanks again to Landon for his help on this one. I really like the cropped version, and we can see from the other comments, most others do too.
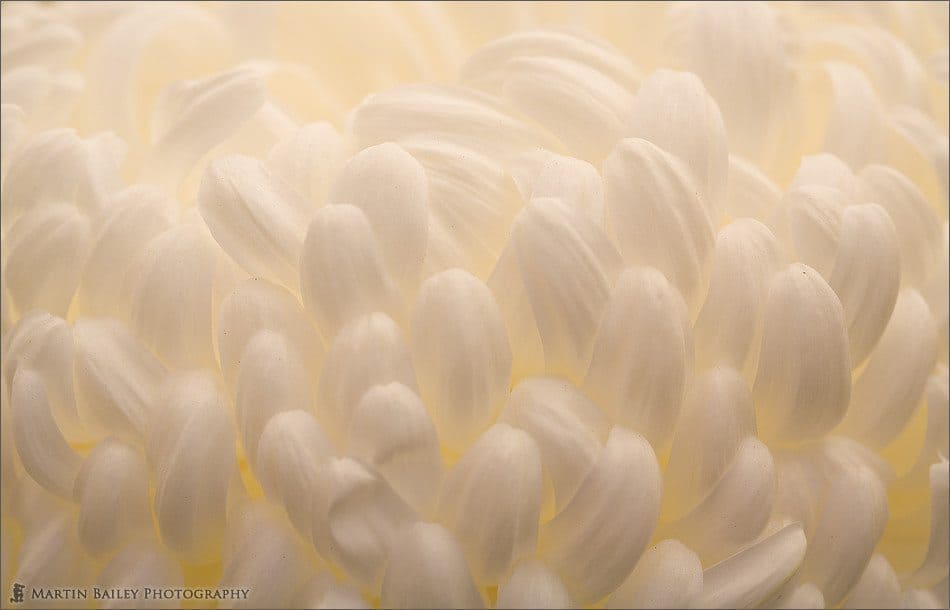
Pure Chrysanthemum
Anyway, those are artistic reasons to crop, and although related, cropping initially to overcome technical issues at the time of capturing the image, even though it can often improve the image artistically as well. While looking at another favourite image of mine that I cropped, which is number 827, let’s discuss a little about the tools available for cropping. First let’s talk about Photoshop, as I’m sure more of you use Photoshop than Lightroom. The most obvious way to crop a photo in Photoshop is to select the rectangular selection tool from the toolbar, then select Crop from the Image menu. This is fine, and achieves the result you are after, which is it cuts away the part of the image that you don’t want, or crops it. However, in doing this, you only have a little shimmering line on the image to show which part of the image will remain, and which part will go. Also, it’s a pain to adjust a selection. You can move it around, but to increase the size of the selection, the only realistic way to do so is to make a fresh selection. I say realistic because you can of course add to or subtract from a selection, but it is a pain and not really worth entertaining.
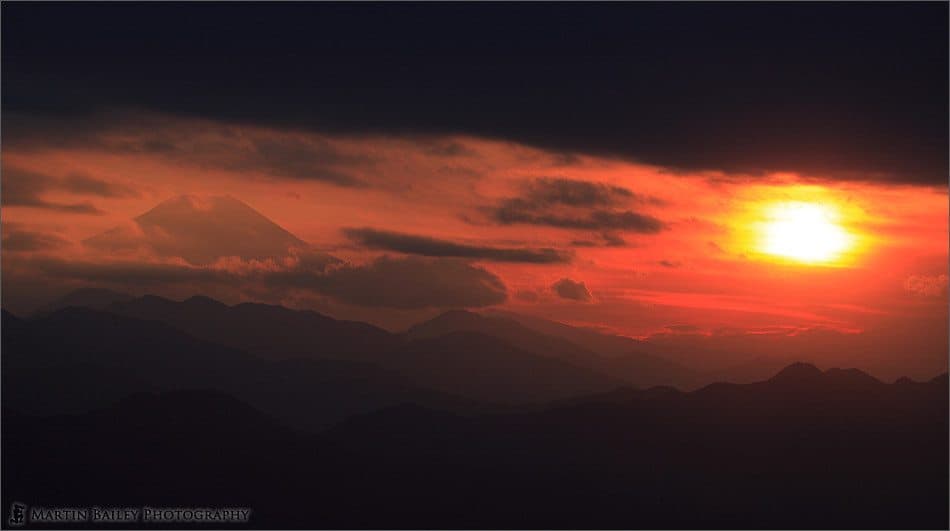
Drama through a Letterbox
If we bear in mind that there are artistic decisions that need to be made when cropping, it is much more helpful to use the Crop Tool from the toolbar. This is the tool that looks like two set square laid across each other with a diagonal line going across them. I’m sure most of you already use this tool anyway, but let’s explore the advantages of using this tool. Firstly, it allows you to move, expand and contract your selection very easily. There are little nodes at each corner of the selection, that you simple click on and drag around to change the size of the selection. You can also grab the selection anywhere and move it around. This makes controlling your selection much easier. The other and perhaps more important aspect of using the crop tool is though, the fact that it darkens the area of the photograph that will be cropped away. This is very important for seeing what the image will look like once it’s cropped. You can nice and clearly what will be left, and still see, although it’s dark enough to ignore, what you will be cutting away. If you find that the darkened area of the image to be cropped away is too bright or dark, you can change the opacity in the toolbar above the image, while the crop tool is selected. You can also uncheck the Shield checkbox, and have no difference in brightness, but this makes the tool less useful in my opinion. If necessary, you can even change the colour of the darkened area, but I have never experimented with that. I use black at 75%. This may well be the default. I don’t remember if I changed this at any time.
Another useful thing when using the crop tool is that you can also move your mouse to outside of the selection, yet still over the image, and then click and drag to rotate the selection. Whether you do that or not, once you are done, you can hit enter to apply your crop, or click on the check mark in the toolbar above the image. If you decide not to crop after all, just hit escape on your keyboard, or the circle with the diagonal line through it in the toolbar. There’s more to this tool, but we’ll come back to that in a moment.
Right now, I just want to say that Lightroom is my current preferred tool for Cropping. When you think you want to crop the image you are looking at in Lightroom, just hit the R key on the keyboard. This jumps you to the Develop module and enables the crop overlay. With the mouse, you need to navigate to the Develop module if you aren’t already there, and the click on the Crop Overlay button below the image. If you see no toolbar below the image, hit the T button to display it. Whichever way you jump into crop mode, you will now see a rectangle around the image ready for you to move around to select the area to crop. There are a few fundamental differences between Photoshop and Lightroom here. The first and biggest is that Lightroom does not actually crop your image. It rights the changes to the xml sidecar file or the database if you don’t use the sidecar files, and applies them each time you view the image. It does also update the thumbnail and preview images, so most of the time you can even forget you cropped, but then if you come back into crop mode, you’ll still see the areas of the images that you cropped away, because they still exist in the original. In Photoshop, once you apply the crop, the image is cut out and the surplus is thrown away.
The other big difference, though more cosmetic, is the fact that whereas in Photoshop you move the crop selection around, in Lightroom when you move things around, the crop selection remains static, square to the screen and the image moves around or rotates beneath it. I don’t know which is best when just cropping, but having rotated the image in Lightroom which again you can do by grabbing outside of the selection with your mouse, the image that you see remains straight, which surely makes it easier to see the results, if for nothing more than the fact that you can do so without tilting your head. In Photoshop the selection rectangle itself rotates, making it more difficult to see the results.
I should also mention I guess that when you go into crop mode, Lightroom draws two horizontal and two vertical lines across the image, to help you with composition. This is the rule of thirds lines of course. Then, when rotating, as soon as you start to rotate, a smaller grid appears, which helps to see where the vertical or horizontal lines of your image fall, helping to keep your horizons etc straight. If you want to change these grid settings by the way, you can do so with the options available in the View, under the Crop Guide Overlay submenu.
So, let’s leave it there for this week, and next week we’ll go into cropping to for certain aspect ratios, to prepare for certain print sizes. Also, although I don’t personally suggest you batch crop, I have been asked about doing this to say prepare a bunch of photos for 5×7 or 8×10 printing, so I’ll give you some advice on how to go about that. And we’ll also get into whether or not it is ethical to crop in the first place.
I hope you enjoyed this episode. It may not have been anything new to most of you, but it’s always fun to compare notes anyway. I’m looking forward to next week too, when we’ll get into a bit more detail on cropping for certain paper sizes, and the ever daunting discussion about whether or not cropping is even ethical in the first place. For now though, you just have a great week, whatever you do. Bye bye.
Show Notes
The music in this episode is from the PodShow Podsafe Music Network at http://music.podshow.com/
Subscribe in iTunes for Enhanced Podcasts delivered automatically to your computer.
Download this Podcast in MP3 format (Audio Only).
Download this Podcast in Enhanced Podcast M4A format. This requires Apple iTunes or Quicktime to view/listen.


0 Comments