
So here we go with the second part of my Digital Workflow update. If you haven’t listened to the first part in Episode 90, you might want to go back and listen to that first, but it’s not essential. Last week I covered from capture to the end of my selection process of images. We now have a list of final images that I’m going to take through the rest of my workflow. So let’s get right down to it.
One thing that I didn’t mention last week that I really should of is that most applications are riddled with keyboard shortcuts, and Adobe Photoshop Lightroom is no exception. Something that I find speeds up pretty much all of my workflow on the computer is shortcuts. We all have our favourites, and I’m not going to go into detail here, but I do suggest that when you select things via the menus, check the shortcuts that are usually displayed alongside the menu item, and remember any that you choose often. They’ll all save you time in the long run.
Something else that I should have said last week, but was really just running out of time, is that before exporting my images from Lightroom, I make any changes that are necessary in the Develop module. I mentioned that I apply a Develop Preset on import that changes the saturation of all my images. Sometimes though, this can be a little too harsh, so I have to check each image to make sure that I’m not overdoing the saturation. This is especially important if I have any skin tones or say flowers that are already highly saturated. Reds for example start to blow out quite quickly if the red saturation is on the high side. Lightroom also adds +50 Brightness to all images by default. I find that this is OK for the majority of my shots, but for some that are close to the right shoulder of the histogram, it takes them too far, so again they have to be pulled back a little. I also do any cropping and rotation that I feel necessary here in Lightroom, as it’s reversible. If I want to see how I cropped an image at any time in the future, or change that crop even, I can just go back to my raw file and do it there in Lightroom.
This is really just about the limit of my work in Lightroom before export. We’ll come back to Lightroom later though for printing. So to export, I just make sure that all the shots from my shoot are selected, and hit the export button in the Library module. Again I have a couple of presets saved in the export dialogue. They both use the same settings, which is basically to export Photoshop PSD files, with an AdobeRGB colour space profile at 300 dpi to a directory called Finals. I keep a PSD copy of all of my final selected images in this single directory. Note as I said last week, I’m currently considering changing my colour space to ProPhoto RGB, which is the one Lightroom recommends. I have used AdobeRGB until now because that’s the widest gamut my camera uses, but as I’m making changes to the colour in Lightroom I figure it’s probably going to be better to allow me to maintain as much of the color integrity as possible by switching to the larger gamut colour space ProPhoto RGB. The only thing that is different between my two presets is that the one stops there, and the other actually goes ahead and opens the images in Photoshop as they’re exported. If I have anything up to 10 or so images to export, I usually select this one. If I go much over 10, I select to just export them.
If I didn’t select to open the images in Photoshop, we come to a slight glitch in my current workflow. What I’m doing now is opening the new Bridge that comes with Photoshop CS3, which is great, but I’m not using it for anything more than a glorified file viewer because I’m doing all my RAW work in Lightroom. I have to open Bridge though so that I can go to my Finals directory into which I just exported my shots, and select which ones to start opening in Photoshop. What I want to be able to do is to able to tell Lightroom to monitor this directory to new files. Right now if I want to open my new Photoshop files from Lightroom, I have to re-import my Finals directory. If I could just say right-click that directory in the folder menu in the Library module, and select something like “watch this folder” or “dynamically update” and Lightroom automatically imports anything new in there, or removes anything I’ve already deleted for that matter, then my workflow would be just a tad smoother and I could go straight to Photoshop from Lightroom. Hopefully this is something that Adobe already has in version 1.1 or later.
We’re now ready to start working on the image in Photoshop. As I mentioned last week, there is one thing that needs to be done in Photoshop after installing it to ensure that you don’t mess up the colour profile of your images. To do this, from the Edit menu select Color Settings and in the Working Spaces section set the RGB pull-down to AdobeRGB (1998). As the majority of my images will be coming from Lightroom with the profile already set, I generally select for Photoshop to preserve the embedded profile, but then select the option to “Ask When Opening” so that Photoshop displays a message if the profile is different to my selected workspace. As I said last week, not all monitors will display in AdobeRGB, but when you print, you’ll get the benefits of a wider colour gamut. Unless you change your workflow, like I’m considering changing to the ProPhoto RGB colour space, or you buy a new computer or reload Photoshop, once you’ve set this you can forget about it. I usually save these settings to my documents folder so that I can reload them from this dialog easily later.
Anyway, I now have a bunch of photos open in Photoshop. I mentioned last week that I do very little in Photoshop, so not to get too excited. For the majority of shots, I’m really just interested in spotting out any dust marks that I might have had on my camera sensor. If I’m shooting with a wider aperture, I find that pretty much none of the dust on my sensor will show up, but as I stop the aperture down, it will show up more and more making this task a little more tedious. Of course, once again, doing as good a job as possible during capture will help to reduce this overhead, so I tend to take a very large blower and blow out as much of the sensor dust as possible before a shoot. My preferred spotting tool in CS3 is still the Spot Healing Brush, which I resize to be just larger than size of the dust spot and then I just click on the spot itself. This is faster than cloning and works most of the time. It doesn’t work well sometimes if the dust spot is positioned on a line or something textured, so I keep my eye on the effect and switch to the clone tool when necessary. This allows me to select exactly what part of the image to use as the base for the clone. If I know I have dust, I generally scan the surface of the image at 100%. This might be overkill, but I find it easier to get the image perfect here than later when I come to print it. If you print something out at 13×19 inches with dust that is only visible at 100%, you’ll still see if most of the time, so I get rid of it now before saving the file.
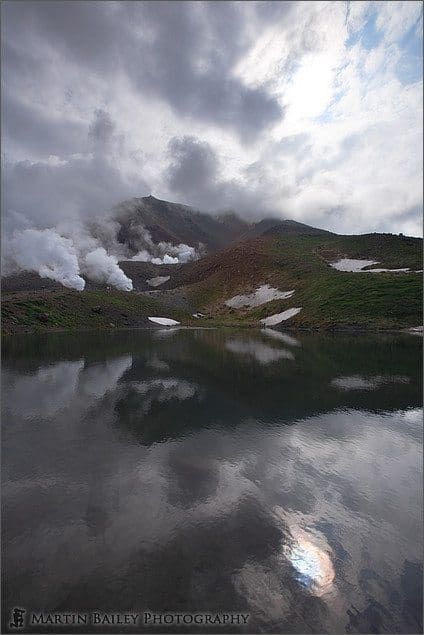
Sugatami Pond
Because I’ve done all of my global changes like saturation etc to the image in Lightroom, once I’ve spotted the image, I’m done with editing. The only time I’ll do more than this is when I want to merge two images using a mask to get over dynamic range limitations of my camera. In fact, to break the monotony here a little, I’m going to include image number 1079 of the Sugatami Pond at Mount Asahi in Hokkaido. This is a shot that I merged from two images in this way. I’ve spoken about this before, but just for completeness I’ll go through it again. Because the mountain and the pond were much darker than the bright sky, I took two shots of the scene, one with the water and mountains being one and two thirds of a stop brighter than the sky. Then I used a mask in Photoshop to merge them together. This is what I would have done with a gradual neutral density filter a few years ago, but I just find it so limiting to have to work with the straight line of the filter, however gradual it is. I end up with a couple of layers in Photoshop, which I do not merge before saving. Again, I like to keep everything I do reversible. I never know when technology is going to allow me to do these things better in the future. Of course I would quite possible want to go back and re-process the RAW images if much time has passed, but still, I want to be able to see where I merged the images and stuff like that to make the process quicker. The same would go for any change I make in Photoshop such as saturation or tonecurves if I hadn’t already done that in Lightroom. Save it all in the Photoshop file for posterity. It does bloat the file size quite a bit, but disk space is relatively cheap these days so I don’t worry too much about this.
Although I’ve updated the action having upgraded to Photoshop CS3, the next part of my workflow is very much unchanged since the first Podcast on this a year or so ago. Basically once I’ve done all the editing I want to do to my image, I save the PSD file that I just worked on, then I save off two more copies. I assign a function key to my Action for this, and when I hit it, it changes the image from 16bit to 8bit, and then saves a full size JPEG. This is the image that I use in digital slideshows. This is becoming less and less necessary as Lightroom also has a Slideshow module that allows me to create very professional customized slideshows with my logo embedded and I can save that in a number of formats as well as just display it straight out of Lightroom. This means of course that I can use the PSD files as well. So my full sized JPEGs are almost obsolete. Thinking about it, I used to also use this JPEG for printing years ago, as I used a piece of software that came with my printer that didn’t support Photoshop files. That was so long ago though. I’ve probably been using Photoshop for printing for the last five years or so until Lightroom came along. Really now the only time I use these now is for a Windows slideshow. I generally set my Windows screensaver to show a slideshow of my JPEGs when I’m not using my PC. I like to be able to do that though, so I’ll probably continue to output this JPEG for now.
The next step in the Photoshop action is to change the profile to the Web friendly sRGB colour space and resize the image, then sharpen and add a frame before saving off a final copy, which is the small JPEG that see on my Web site. I used to use PhotoKit Sharpener from Pixelgenius for the sharpening but when I changed my PC a few months ago it seems that the license I bought was tied to my old PC, and I didn’t get a reply from Pixelgenius’ support team, so I’ve give up on PhotoKit Sharpener. There were some great tools, but with Lightroom now handling sharpening for printing, the only thing I miss is the creative sharpener, which allows you to quickly create a mask for sharpening specific areas of an image, but as I rarely do this I really don’t feel the need to buy a new copy of this tool. So I’m back to using the Smart Sharpen tool in Photoshop, which I think does an excellent job too.
The last thing my Photoshop action does before saving my image is actually something destructive, but I still feel necessary, and that is to apply a Digimarc MyPictureMarc watermark. This is a digital watermark that is embedded into the face of the image that allows anyone that might save the image from my Web site to see that it is copyrighted to me in their photo-retouch program. It doesn’t stop them editing it, but it lets them know that I’m serious about my copyright. I have to say though that I’m also a little unimpressed with Digimarc’s sense of urgency around their technology. It seems that the browser plug-in that they provide to create a link to my copyright information is not yet available for IE 7 or for Windows Vista, and their Photoshop plugin is not yet fully supporting CS3, although the Digimarc plug-in does seem to work with my account code. As more people move to Vista I’m hoping to see some better compatibility here soon, or I’ll start to reconsider my use of this tool.
All of this Photoshop work apart from the dust spotting is saved in an action. Again, like the colour profile settings, I save this in an action in the My Documents directory, so that I can reload it easily later. Anything that has to be done more than a few times should go in an action. It just makes like so easy. If I’m processing images that I shot with a wide aperture, I really have to just quickly scan the image to see if there are any dust marks, and then press the function key that I assigned this action to, and that’s it. All of the Photoshop work is done and it even closes the file for me afterwards.
The three copies of my image are now saved to three separate directories, which are Finals for the Photoshop files, inside which is a directory called JPEG for the JPEGs, surprisingly enough, and then back up to the same level as my Finals directory I have a third directory called Small, for the small versions for the Web. One tiny tip here is that when you have lots of folders in your My Pictures directory, which is where I save these images, the can get lots quite easily. To keep these folders at the top of the list when sorting by filename, I put an @ mark at the start of the file name, so my Finals directory is actually @Finals and my Small director is actually @Small. This way I don’t have to dig down too far into my list of directories.
At this point, I have a Photoshop file that is spotted and exactly how I want it, which I can use for printing or in a Lightroom Slideshow. I also have my small versions that I will upload to my Web site. We’ll get to printing in a moment, but first let’s talk briefly about having your photos on the Web. Although I’ve customized the heck out of it, I use a free piece of software called Coppermine to create my Online Web Gallery. I chose Coppermine years ago as it allows for easy integration with phpBB, the other piece of free software that I use for the forum, so that members can use the same account for both parts of the site. It doesn’t easily allow for a gallery on a different site to share the same phpBB installation, so there’s still some customization left there to join the members’ gallery web site to the main one. Anyway, Coppermine also allows for a lot of customization if you are so inclined. That’s how I was able to extend it in many ways, such as adding a Shopping Cart to my gallery to allow people to buy prints, and also to do things like adding the voting system for the Assignments to the members’ gallery Web site, as well as lots of other stuff. It does require a knowledge of PHP coding though to get this indepth, so it’s definitely not for everyone. If you want to just use it to showcase your photographs though, it’s a good choice. If I was to setup another web site now though, just to show my work, and didn’t need to do all this customization, I would definitely take a closer look at the Web module in Lightroom. This allows you to create HTML and Flash based Web galleries that are going to be fine for most applications, and it even uploads them to your Web space for you. I’ve not really looked into this very much myself, as I have it covered, but I thought I’d mention this as food for thought if you are looking for some way to get your images on the Web.
One other thing that I’ve started doing, and I have to update soon, is creating my Portfolios as slideshows that can be displayed full screen on a Windows machine. I tend to put lots and lots of images into my main gallery, and really this is way too many for someone to just get a feel for my work. However, the Portfolio button on the menu at my Web site will allow you to be spoon fed what I think is my best work. As I make time to do this, I’m not only going to update my “Nature of Japan” portfolio, which is the only one available at the moment, but I intend to do more specific Portfolios such as ones just on flowers etc. For this I use a piece of software from Photodex called ProShow Producer. I went into detail on this in Episode 55 though, and nothing really has changed, so if you are interested in this, please take a listen.
OK, so let’s move on to one of my favourite parts of the digital workflow, and in many senses the most traditional end result of any photography, and that is printing. Unfortunately, as I’ve mentioned before, I don’t print anywhere near as much of my work as I’d like to. This is true for most people these days. We can view our images is such high quality on the computer screen or TVs now that it has become much less necessary to actually print a hard copy. I still though really enjoy to print out my images on large, high quality, cotton rag paper, and just hold it in my hand. I find that even taking a loupe and check out the finer details is still incredibly gratifying even though we have the ability to do a similar thing by viewing the image at 100% on our computer screens.
The major change in my workflow since my first Workflow Podcast is that I know do all my printing from Lightroom. The Printing module in Lightroom is incredibly useful. Again, making use of presets, I can save all of my layouts for any kind of paper, including not just the margin sizes and how the image is placed within the printable area, but also the profile for the paper I will be printing on, and the printer settings I choose will also be saved, so it saves so much time when getting ready to print the same combinations a second time. If I want to use the same type paper for a different sized print, I just select the preset, adjust the sizes, and save another preset, so the more I do, the more presets I create and the easier and faster the workflow gets when repeating the same actions. I’ve covered printing with profiles in the past, and much of this is still relevant. Basically I never allow the printer driver to do any adjustments to the image. I create and save a few presets in the printer driver that basically turn off all colour adjustment and bi-directional printing. I’m not sure if this is the correct English term, as my printer drivers are Japanese, but bi-directional printing is when the print heads expel ink both when moving out from its start position, and on its way back. This as you can imagine makes for much faster prints, but the quality degrades very slightly. I find I get better results when turning this off, so the ink is only applied to the paper when travelling in the same direction.
The other thing I save in the printer driver preset is the type of paper. Be it matte papers, semi-glossy or Silk papers or watercolour for when printing to the Epson Pro Matte papers. Back in Lightroom, I select the profile for my printer when printing to a specific paper under the Print Job section. I also select my print sharpening here. I find for glossy papers, just Low sharpening is fine, but when printing to matte papers, when the ink bleeds more, I choose Medium sharpening. Even if your original is incredibly sharp, I find that it’s best to apply some sharpening when printing. In my old workflow I used to do my sharpening and save a copy of the file just for printing. This is no longer necessary with Lightroom as it applies this sharpening only to the data it sends to the printer, and then discards it. As there is no noticeable time spent doing this, there simply isn’t any necessity to save a copy for print any more. What I will do if I notice that certain prints need a little more or less sharpening, is I’ll now attach a keyword to that effect, but I have not had to do this so far.
One other thing I really like about printing from Lightroom and again, this can be saved as a preset. It’s possible to create layouts where you have multiple images being printed on the same page. I rarely print out contact sheet style pages, but on occasion I receive orders for lots of small prints like 5x7s. If the paper the client wants is not available in that size though, I am of course going to have to cut a larger piece of paper. To maximize the use of that paper, I simply lay out multiple 5×7 shots on a piece of 13×19 and then trim the images as necessary. I can print cutting guides onto the paper too, so that I can trim them precisely. This is just another way in which Lightroom helps to streamline the digital workflow and another reason why it’s now at the heart of my workflow. As you will have heard, the only time I stray from Lightroom is to remove dust spots or do the odd bit of merging and run my save action in Photoshop. For pretty much all other activities I’m straight back into Lightroom.
So we’re almost to the end of the Podcast, having now output the images to Web and hard copies. The other thing that we cannot ignore though is that we now have a humongous amount of digital data now sitting on our hard drives. Keeping all those ones and zeros in just one place though is a recipe for disaster. Indeed, if disaster strikes and your hard disk should for any reason give up the ghost, or say you have a fire, flood damage or earthquake, or even a burglary, if you only have one copy of your precious images, then you would regret losing them for the rest of your life. To avoid that, we have to make regular back-ups, and preferable get that backup away from your home to protect it from localized natural disasters.
In the first workflow Podcast I mentioned that I occasionally burned all my images to DVD and gave this to my brother who lives in the UK for safe keeping. With more than 700GBs of data now though, this is just no longer a viable option. My main second back-up right now is a Terabox, which is basically an external USB hard disk case, with space for up to 4 250GB hard drives. I have all four filled and use the internal hard disk controller to configure these as a single one terabyte hard drive. Since upgrading to Windows Vista I was pleasantly surprised to see that a file copy tool called ROBOCOPY is now included with Windows by default. Robocopy is incredibly powerful and can be used to mirror the contents of one location to another. You have to be careful when using the mirror feature, as it will, without warning, delete anything in the target location that is not in your base location. I have some scripts that I created in simply text files with a cmd extension, and these just kick off a series of Robocopy synchronizations. The first one goes and gets all of the new Podcast audio files from my Mac Mini and copies them to my Windows machine. The next copies all of my new downloaded files and Outlook mail archives, and anything new in the My Pictures folder, and the last one copies all of my new RAW files from my main photo hard drives. It only recopies anything that is new or updated since the last time I ran the script. Every few weeks, when I’ve got a few more shoots worth of images to backup, I take this Terabox home from my office a few blocks away, and run the scripts, then take it back the next day. This way my files are protected from anything that might happen to my apartment.
The problem with this though, is that unlike the DVD solution where the back-up was in a different country, it’s still relatively local. If an earthquake struck, which is very possible here in Japan, and both my apartment and office building falls down, then I’ve lost both copies. Of course, if I’m in either one at the time, I personally probably won’t care, but hopefully someone will. Because of this, I’ve started to look into paid online storage. I found a few places but many were looking relatively expensive, especially when we’re talking almost a terabyte of data in total. A few weeks ago though, a member of the MBP Forum, Rick Phenicie from California posted a link to a company called Mozy, who I am seriously considering signing up with for online backups. I was hoping to actually get signed up this week so that I could report on my initial experiences, but something else kind of grabbed me for a few days. More on that in the housekeeping later, but with regards to Mozy — anyone can sign up for a free account with 2GB of space. If you have more than 2GB of files to backup though, as most of us do, there is just one account that will cost you $4.95 per month, but that allows unlimited storage for personal, non-commercial use, and a professional account for commercial use. I’ll let you know later what I think of the service, but after doing some searching online and seeing a good spread of comments, in general it seems well worth giving a try, so thanks for putting us on to this Rick.
 Subscribe in iTunes for Enhanced Podcasts delivered automatically to your computer.
Download this Podcast in MP3 format (Audio Only).
Download this Podcast in Enhanced Podcast M4A format. This requires Apple iTunes or Quicktime to view/listen.

Posted on behalf of Martin by Michael Rammell, a Wedding Photographer based in Berkshire, England. Michael also has a long-standing passion for Nature & Landscape photography. To catch up with Michael, visit his Web site, and follow him on the following social networking services.


0 Comments