
Visit Library for MBP Pro eBooks |
It would seem that Canon got their hands on some transistors, as I took possession of my new Canon RF100mm F2.8 L MACRO IS USM Lens last week, and have started to put it through its paces. With Adobe breaking my FAB Tools plugin with their Photoshop 2022 update, I'm running short on time, but wanted to push this out during October, so here goes with my review.
I've been a huge fan of Canon macro lenses over the years. My first was their old EF 100mm lens, then I upgraded to the 100mm L Macro lens when it was released in October 2009 and it absolutely blew me away in terms of image quality and build. I'd hankered after their old 180mm Macro L lens for a number of years, but it was expensive for a niche lens, so I never pulled the trigger on that one. My previous 100mm EF Macro lens being an L lens was great, and it has never let me down in 12 years of use. The image quality has kept up with the increased resolution of our 45 and 50-megapixel cameras too, so if you own an EF Macro lens you are still getting great shots with the RF Mount Adapter, so unless you use it a lot, there isn't a lot of incentive to switch.
Having said that, I am trying to covert my entire system to RF lenses, and if you've followed my antics as I've moved to the Canon RF system, you may recall that I've been able to pay for the entire switch by selling my old gear to Map Camera, a wonderful camera store here in Tokyo where I live. Granted, I had some big-ticket items, like the 200-400mm 1.4X EXT lens, which brought in a decent amount, and two Canon 5Ds R bodies went into the pot, along with most of my old EF lenses. Map gives a good price for used gear though, and if you put the proceeds onto a point card for future use with them, you get an extra 10% on the price, resulting in me literally converting everything I own to RF, with the latest addition in the RF 100mm Macro lens being the first item that I've had to add funds to, albeit just $100, with the rest being paid in points. The pandemic halted all of my tours for the last 18 months, so I've been more grateful than ever for being able to migrate to the Canon RF mirrorless system for a grand total of just $100.
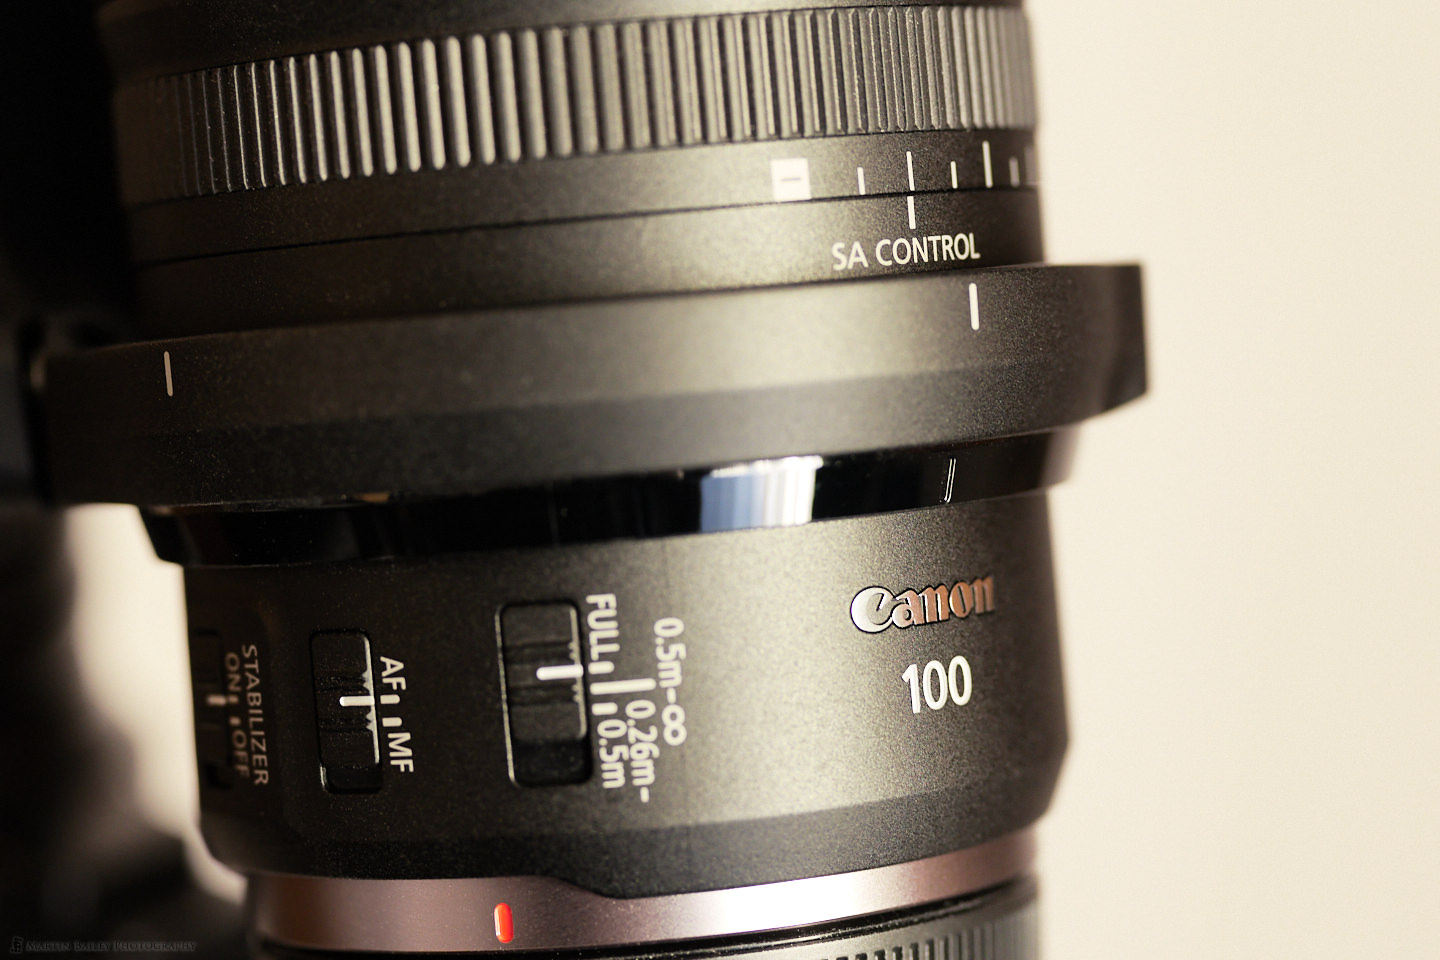
There are a few features of the new RF 100mm Macro lens though that may be important enough to make you also want to make the switch, so we'll cover these first. Perhaps one of the most important changes is that the new RF Macro lens has what's called an SA Control Ring, and the SA stands for Spherical Aberration. This ring adds a type of soft focus to the images while maintaining a core of sharpness to anchor your images visually. To demonstrate, I asked my neighbors, who grow Bonsai trees commercially, if I could photograph their chrysanthemum bushes that they have lined our car park with, as they are in full bloom right now, and being at the foot of the stairs to our apartment made them an easy subject as I struggled to make time to do this.
Now, I have to admit, the difference between the images is not all that easy to see. Through the lens, the difference seems more pronounced, but it didn't make it into the images as much as I'd thought it would. I'll explain why that happens shortly. I've created an animation though that will move through the images without any transitions so that you can see the difference as the images switch.


Here too is a gallery of the five images, so that you can look at them at your own pace. For the first image, I have adjusted the SA Control Ring to minus 2, which is all the way to the left. As you'll see, this is perhaps the softest looking image. You'll also notice that moving the SA Control Ring in the negative zooms the image out slightly. I had the camera on a tripod and was focusing on the flower in the center, so apart from a slight breeze moving the flowers around, the framing between shots is unchanged, and of course, the focal length for all of these is 100mm.
Another element to watch is the tiny bug near the edge of the frame in the bottom left quadrant. In the first of the images at minus 2 Spherical Aberration, it's quite soft, along with the flowers, of course. It gets gradually sharper though as I adjust the SA Control Ring into the positive, at Plus 1 SA. This tells us that the bug was slightly out of the plane of focus when I was focused on the center flower, but the SA Control Ring actually brought this into focus more, which is interesting.
I do like the soft dreamy look of the Spherical Aberration though, perhaps with a slight preference for the positive values. Canon says "A minus setting creates a dreamy, soft-focused look, while a plus setting creates a bubble-bokeh-type look."


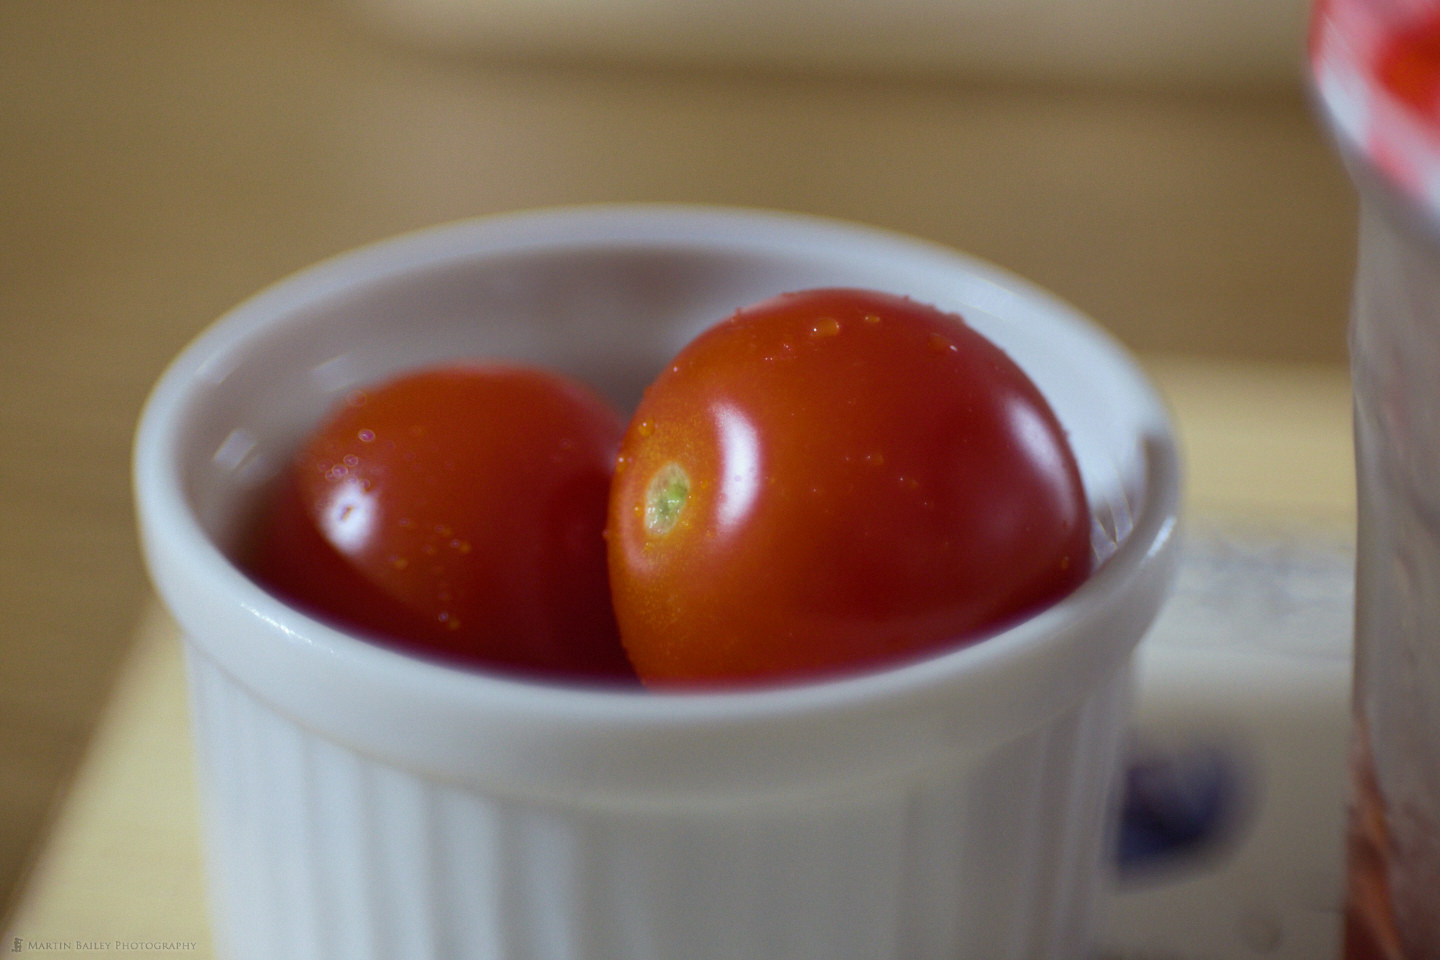
It actually will be easier for you to see the difference between the extremes of the SA Control Ring by taking a look at some photos that I shot of our breakfast tomatoes the morning after picking up the lens. These were hand-held so not all that well aligned, but the effect is much easier to see. This first image is with the SA Control Ring set to zero, so it has no effect on the image. I opened up the aperture to ƒ/2.8 for these, and I imagine that therein lies the reason for not being able to really see the effect in the chrysanthemum images, which I shot at ƒ/5.6. The effect is much more noticeable at wide apertures. which makes sense because it's designed to affect the bokeh, so the less bokeh there is in the image the less you'll see the effect.
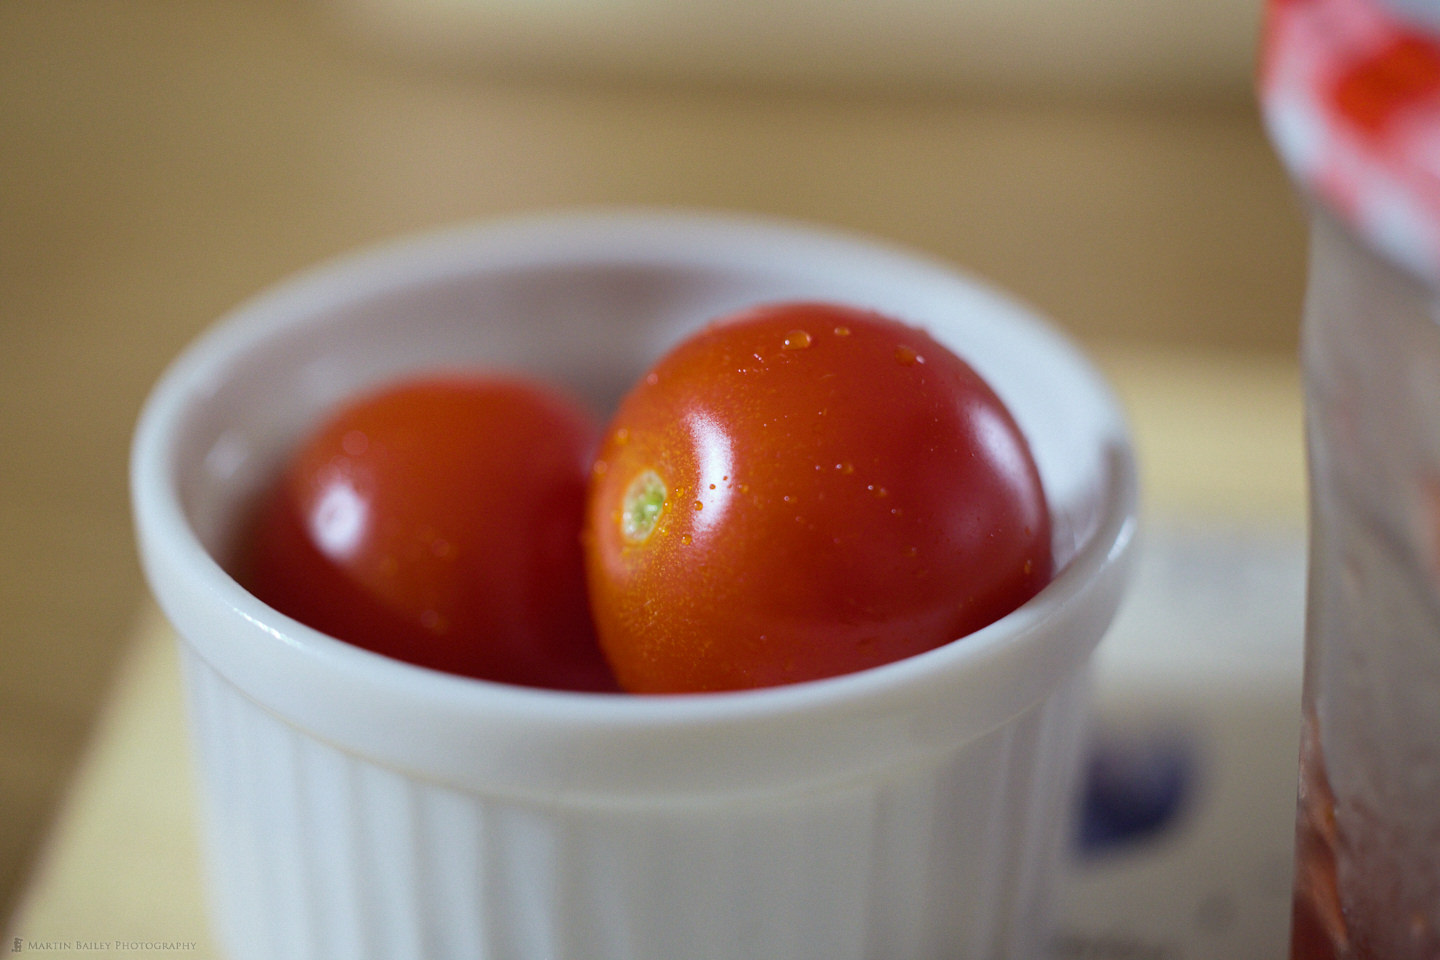
This is important to keep in mind because the camera always shows you an image with the widest aperture unless you press the depth-of-field preview button, and this is why the test shots of the flowers looked dreamier to me when I shot them, compared to the actual stopped down ƒ/5.6 images. Next, here is a shot with the SA Control Ring set to minus 2, so you'll see that it's zoomed out slightly, but much softer from the Spherical Aberration applied to the bokeh.
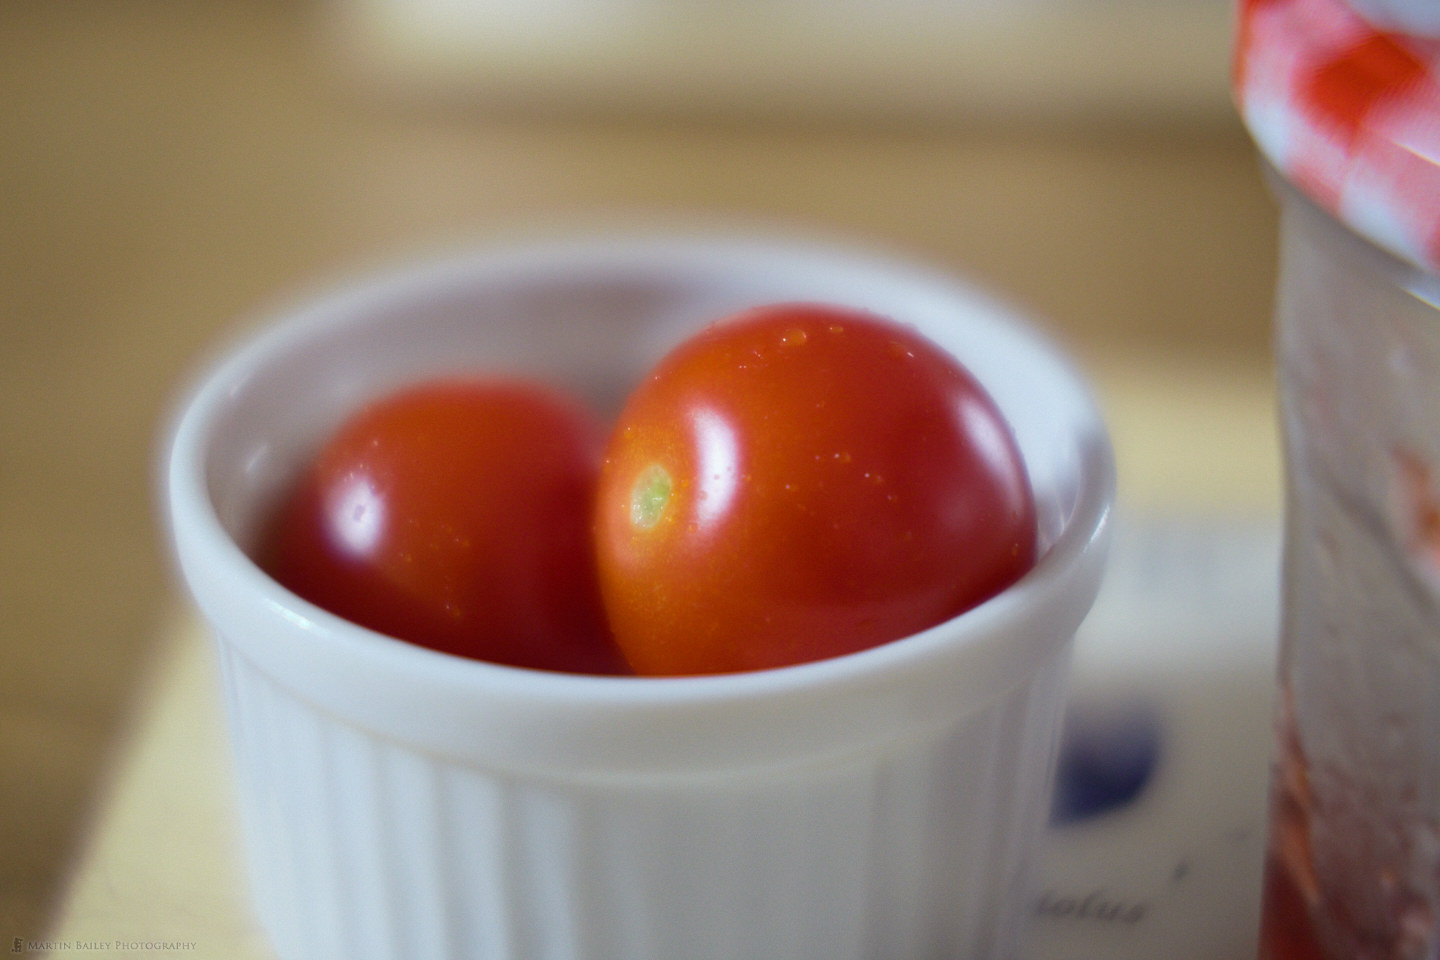
And here now is the other extreme, with the SA Control Ring set to plus 2. Notice the little rings that have formed around the tiny specular highlights in the water on the lower tomato. This shows us more of what Canon is talking about when they say that a positive value gives us a bubble-bokeh type look. I imagine this lens will be a lot of fun to use on Christmas tree lights or cityscapes at night, with lots of lights to turn into little bubbles. It's a nice focal length for picking out details in a nightscape too, so I will venture into the city with it as the Christmas illuminations are turned on this year.
All in all, I think I'm happy with the Spherical Aberration control. Keep in mind that it works best at wide apertures, and it should be lots of fun. It will work great as a soft-focus portrait lens as well. As I was preparing for this Podcast, I shot a few images of the new lens and the light from my window hit the front of the lens for a while in a way that enabled me to get a good view of the aperture diaphragm as you can see in this image.
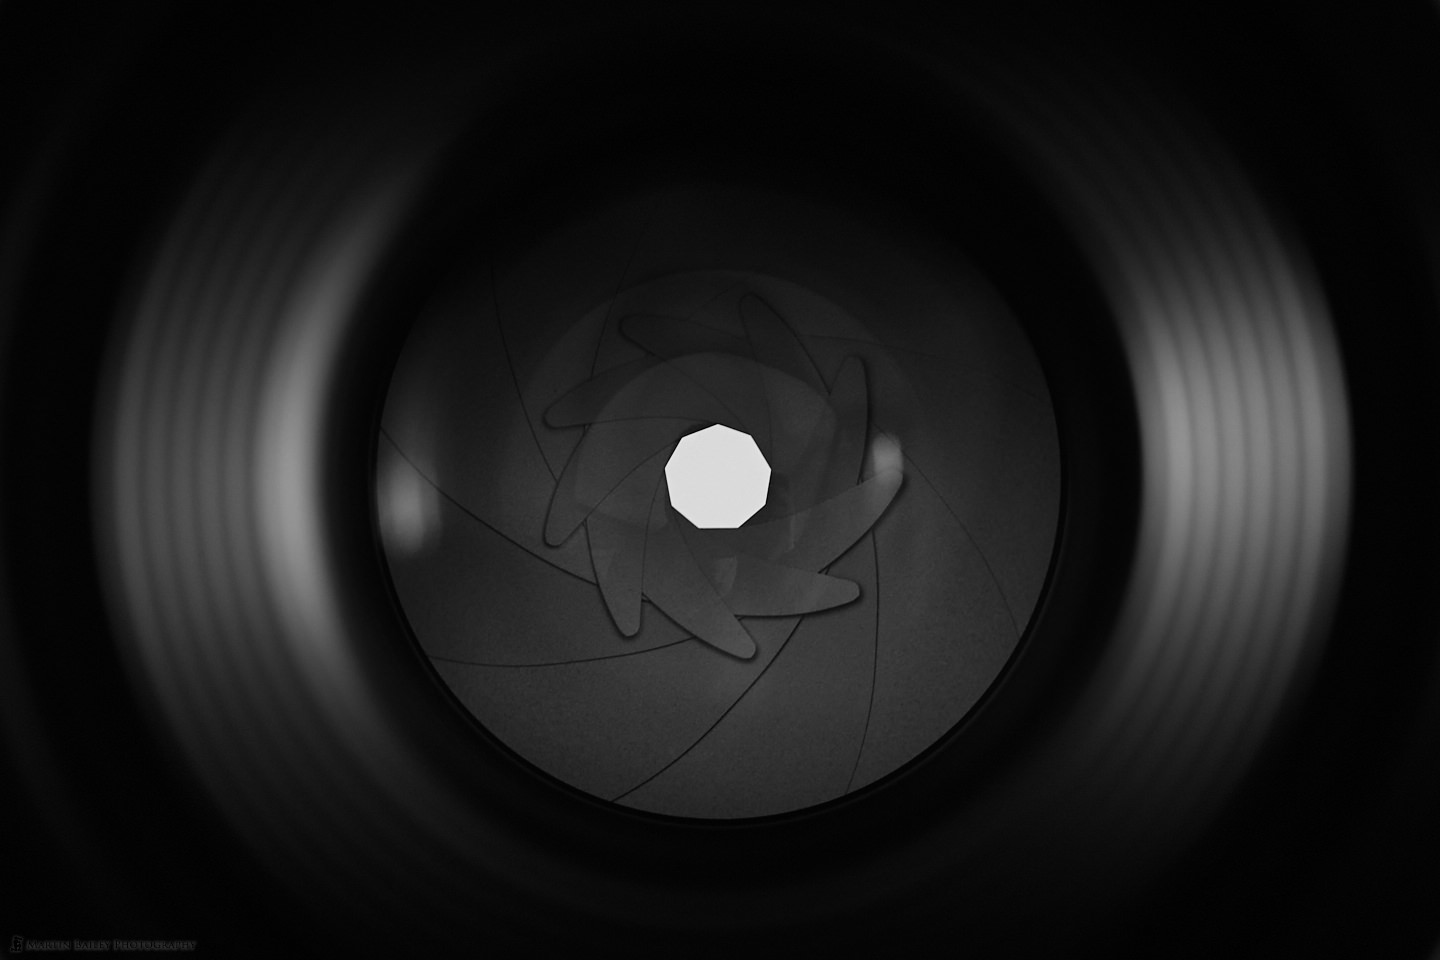
We can count the clearer visible nine aperture blades, and also see the nonagon shape that the aperture makes, which, incidentally, is the same as the EF L Macro lens. The RF version has 17 elements in 13 groups, compared to 15 elements in 12 groups for the EF lens. The Image Stabilization is now said to work for up to 5 stops of stabilization, meaning that in theory, whereas you'd usually need a shutter speed of 1/100 of a second for a steady shot, based on the 100mm focal length, with 5 stops of IS, you could decrease that shutter speed to a 1/3 of a second. If you are hand-holding for a 1/3 of a second though you're more likely to have focusing issues as you move back and forth, so I generally like to keep a relatively high shutter speed, especially in the field, where even a slight breeze can introduce subject movement.
1.4X Lifesize Magnification
So, the other thing that may make this lens more interesting to owners of the EF 100mm Macro lens, or to anyone for that matter, is that compared to a maximum magnification of 1:1 with the EF lens, the RF 100mm Macro lens now gives us 1.4X lifesize magnification. That means if you were to photograph something 36 millimeters wide and 24 millimeters high with the old lens and move your camera to the closest focus distance, your subject will fill the frame perfectly, with a 1:1 ratio.
At 1.4X magnification though, you'd appear to be closer to your subject, and fill the frame with just 25.7 x 17.1 millimeters of the same subject at the closest focus distance. This is a great improvement, as I often wanted to get slightly more magnification with my EF Macro lens, and Canon is featuring this strongly in their marketing. Amusingly though, this was more of a lucky side-effect of the shorter distance from the lens to the sensor than anything else.
EF lenses required a gap of 44 millimeters between the back of the lens and the sensor, as they had to accommodate the mirror, but in the RF system lenses are only 20 millimeters from the sensor, so there is a 24-millimeter difference. Curiosity got the better of me, so I opened Omnigraffle, a technical drawing application that I use when I have to draw things to scale. I set the scale to 10 pixels per millimeter and locked it to the canvas so that when I drew, for example, a line that was 3000 pixels long, it represents 300 mm or 30 cm which is the minimum focus distance of the EF 100mm macro lens.
I proceeded to map out the minimum focus distance for the RF 100mm macro lens which is 26 cm and drew the sensor sizes and subject sizes as boxes to scale. I also drew a frame of 25.7 x 17.1 mm to represent the 1.4X magnified subject size that would fill the frame and drew two lines which I set at 24 degrees apart to represent the field of view of the RF Macro lens, and 23.4 degrees to represent the field of view of the EF Macro lens.
With everything laid out to scale, I drew one last line that I made 24 mm long and laughed out loud as I dropped it into place between the 1.4X magnified image and the 1:1 magnification image, to find that the difference is exactly 24 millimeters. I'm so pleased that Canon decided to cash in on this happy accident rather than false keeping the maximum magnification at 1:1. Now I just wish they'd accidentally leave a GPS unit in the bodies that I buy, as it keeps dropping out and crashing to their lab floor.

For the curious among you that are wondering how I calculated the angle of the lines from the start of the field of view to the sensor, I didn't have to. The angle of the field of view is understood from the specifications of the lens, so working back from what we know to be the minimum focus, we can easily find the point at which the field of view starts, in other words, the distance of the nodal point of the lens. We also know that the image is projected to fill the size of the sensor, so I simply drew two more lines from the nodal point to the sensor to illustrate that angle as well. Cool! These little exercises are fun to work through.
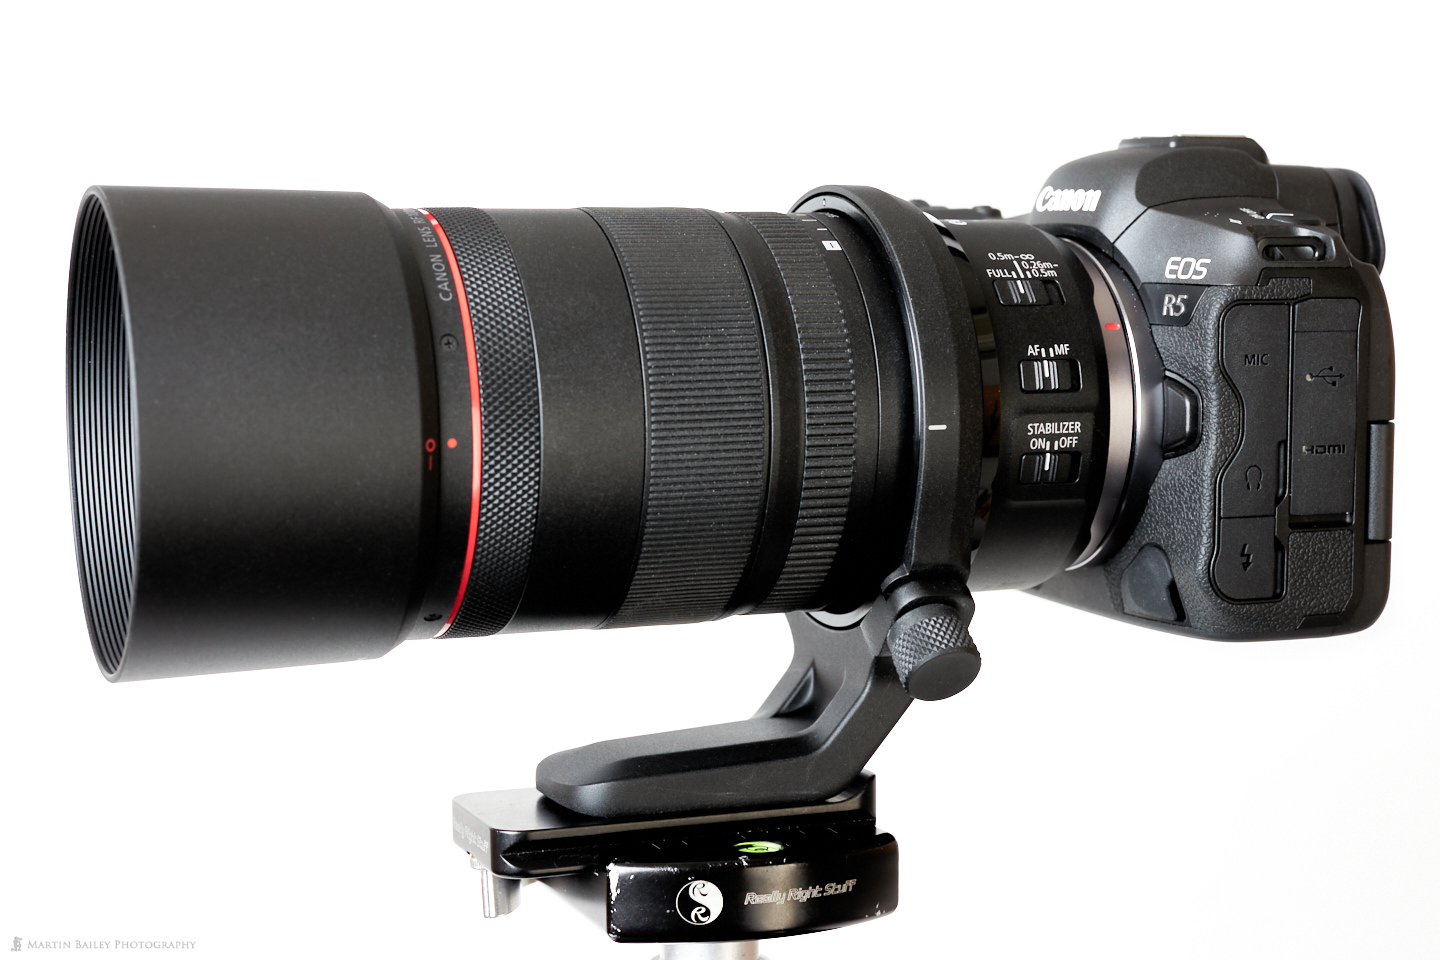
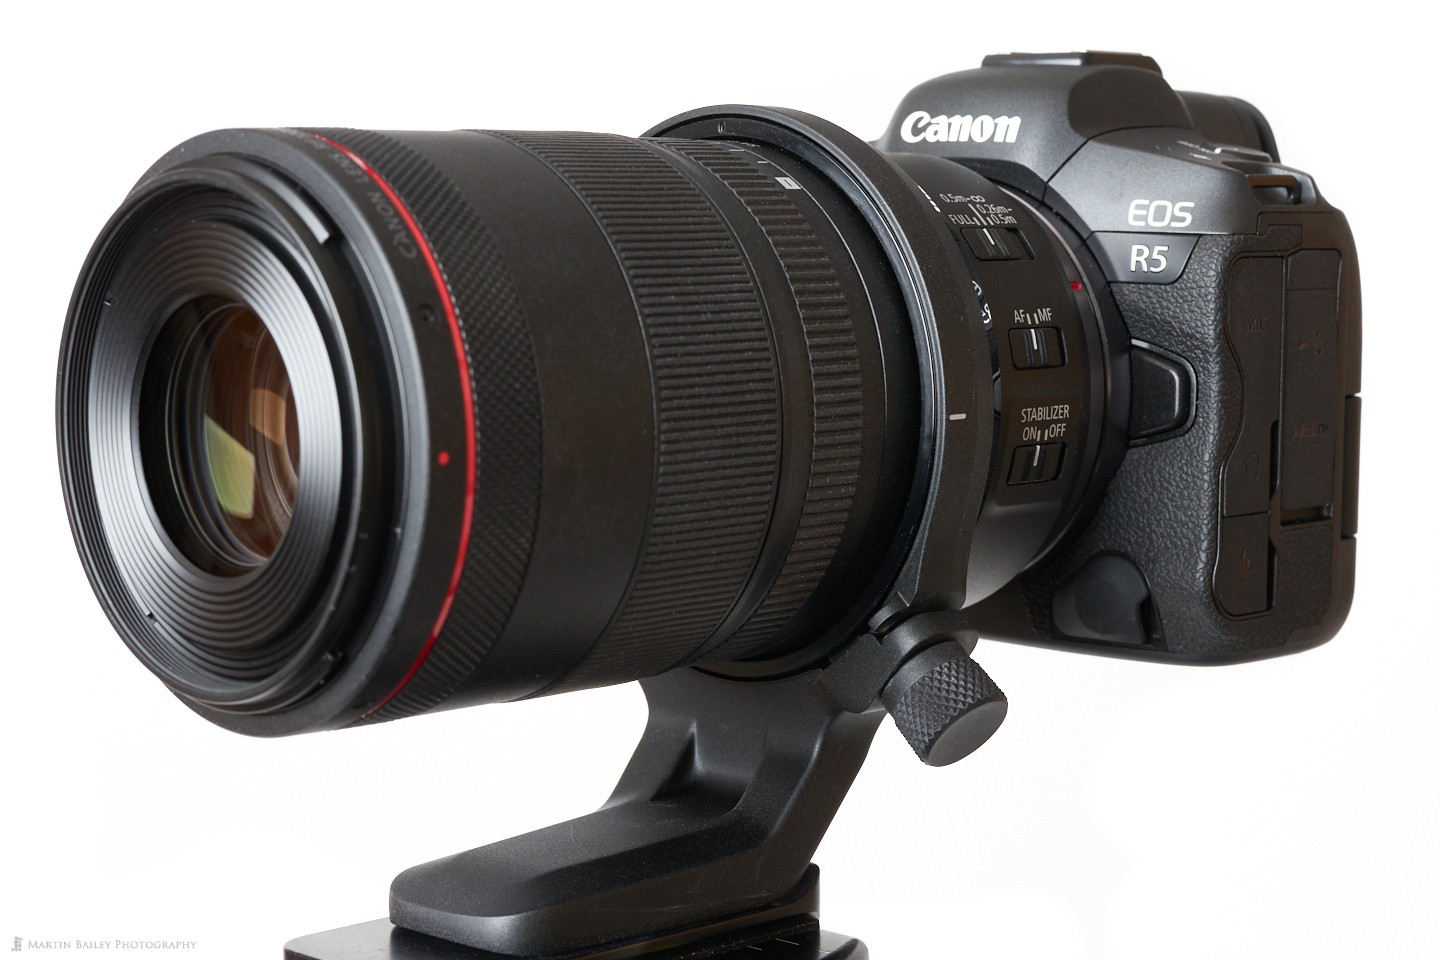
As you can see in this side view photo of the new RF 100mm Macro lens, we have the regular set of buttons at the base of the barrel, to control the Autofocus, Focus Range, and Image Stabilization. I have to admit, I rarely change any of my lenses from the FULL position for the autofocus range, although if I was to use this setting, a Macro lens would be one of the better uses, by limiting the range to from 26 cm to 50 cm, to prevent it from zooming all the way out to infinity when you miss focus. Having said that, this lens does move through its entire focus range very quickly as well, so I probably still won't use this feature very much.
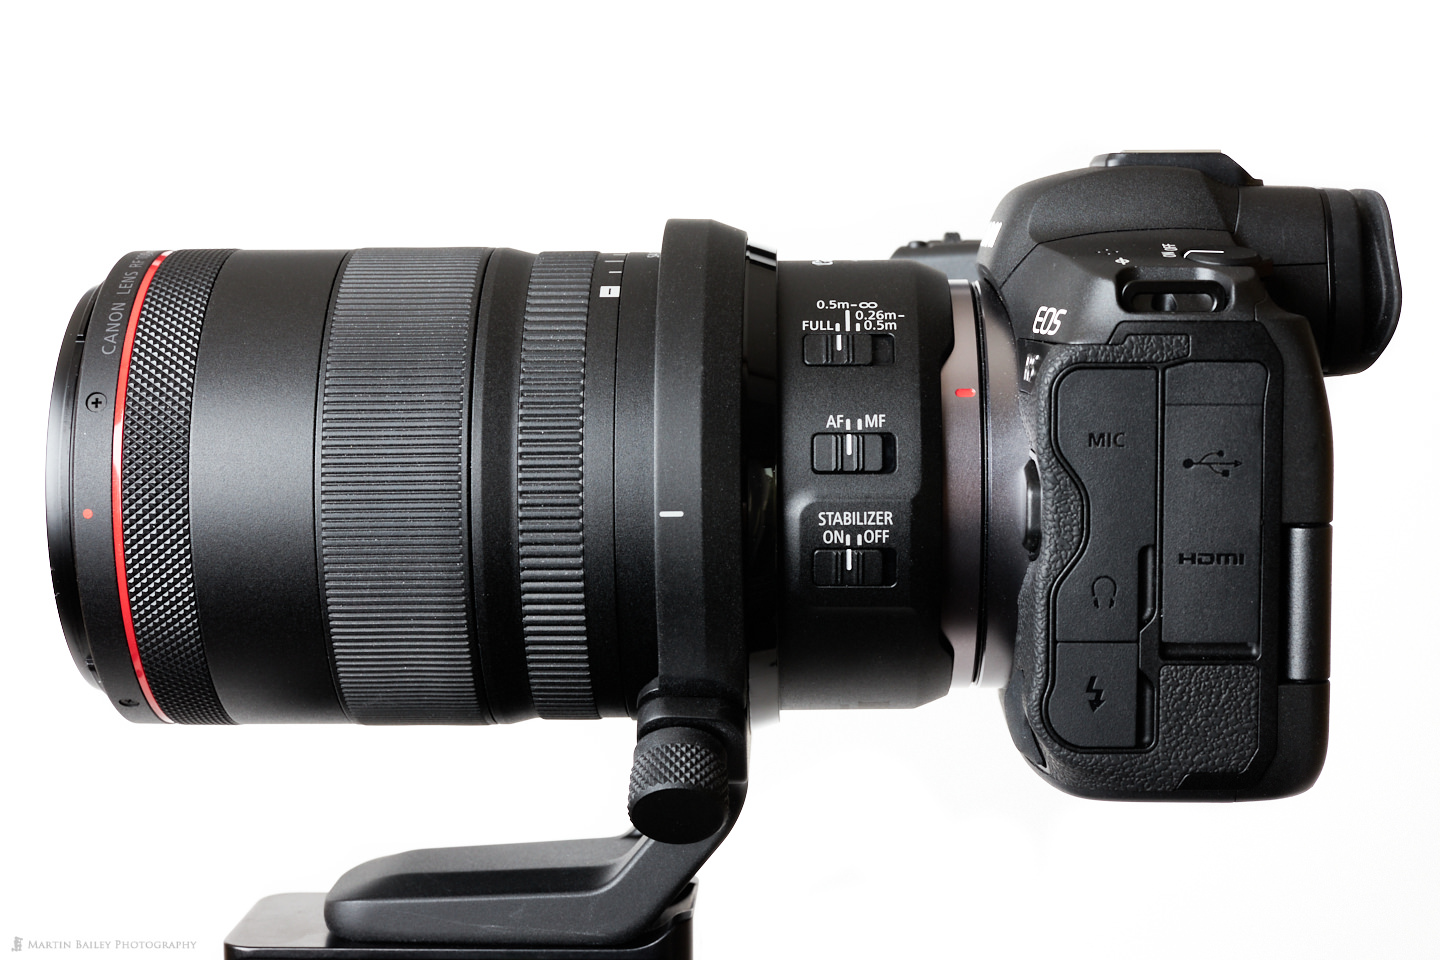
On the other side of the lens barrel, there is a Lock switch that locks the SA Control Ring in its central position, where it has no effect. I am leaving the Lock engaged at all times when not using SA Control so that I don't forget about it and end up applying the Spherical Aberration by mistake at any point.
One Minor, Possibly Major Negative Point
All in all, I am really enjoying the new RF 100mm Macro lens, and I will no doubt follow up with more images as I get out with this lens more. I also just love to go and buy some flowers and shoot with the Macro lens in my studio, so I'll share those too when I get around to it. There is just one negative aspect that I feel I should raise though before we wrap this up, and that is the design of the tripod collar.
Rather than making a collar that fits snuggly around the barrel of the lens, Canon thought it would be a good idea to sell the nicely designed collar with a plastic adapter ring that you have to put inside the collar to use the collar with this lens. Not only was it difficult to position, but I find the way it makes the collar stand away from the lens also looks pretty goofy, but it actually functions very poorly as a collar. If you've ever used a lens with a collar you'll have no doubt, at some point, loosened the collar and rotated the lens around to go into portrait orientation without flopping your camera and lens over on their side.
That's what they are usually designed to do, but when you try to do it with the collar and plastic adapter that this lens comes with, a small amount of loosening doesn't allow the system to be rotated, so you have to loosen it some more, and then some more. The point at which the lens and camera can be freely rotated is dangerously close to the point where the locking screw comes completely out of its thread, and the collar opens up on its hinge, allowing you to remove it from the lens. Needless to say, if that was to happen in the field, you'd at best end up with a scratched lens as you fumble to stop it from tumbling to the ground, and at worse, you could fail to stop it all from tumbling to the ground.
I don't know what Canon was thinking when they designed this collar, but it's a very poor design that I'm pretty sure will be a problem for at least a few people in the coming years. Personally, I would like to see a redesign for a closer snugger fit, provided free of charge to anyone that has bought this initial collar, although it's highly unlikely to happen. Apart from that though, it's a great lens, and I'm looking forward to using it more and reporting my further findings via this Podcast.
Remember if you'd like to view the full text of the accompanying post for this Podcast you'll need to be a Patreon contributor for $3 per month or more. There are lots of benefits starting now with the addition this week or access to a new private forum for all Patron tiers, and as you go up through the tiers there are more and more benefits. Check it out at https://mbp.ac/patreon.
Show Notes
Please buy with our affiliate links to support the Podcast: https://mbp.ac/rf100mm
Become a Patron and get full access to all 757 posts at https://mbp.ac/patreon
Subscribe in iTunes to get Podcasts delivered automatically to your computer.
Download this Podcast as an MP3 with Chapters.
Visit this page for help on how to view the images in MP3 files.


0 Comments