Visit Library for MBP Pro eBooks |
After another three weeks with my head stuck inside Apple’s Xcode developing environment, and then a few more days struggling with a new eCommerce system that I’ll talk a little about later, I decided to come up for air today and talk about my favorite image management and editing software, Capture One Pro, from Phase One. As a Capture One Brand Ambassador a number of years ago I was asked for a few paragraphs about why I love this software, but after using it for four years now, and with no sign of jumping ship anywhere else, I figured it was time to put down my definitive list of reasons for still being head over heels in love with Capture One Pro.
I also have an announcement about a great page that the Phase One team has put together, and the chance for you to win a Capture One Pro license, so please stay tuned for that at the end of this episode!
1 – Image Quality
First and foremost, the reason I love Capture One Pro is it’s outstanding image quality. When I first tested Capture One back in 2016 to see if I was interested in using it, I imported around 50 images into a catalog and processed them, and I was instantly amazed by the amount of detail that I saw in my images. The shot that really showed me what I’d been missing is the Japanese Red-Crowned Crane portrait that I used on the cover of my Making the Print ebook. I had processed it high-key in Lightroom originally, but I was simply not aware that there was that much detail in the feathers when I saw my original photo.
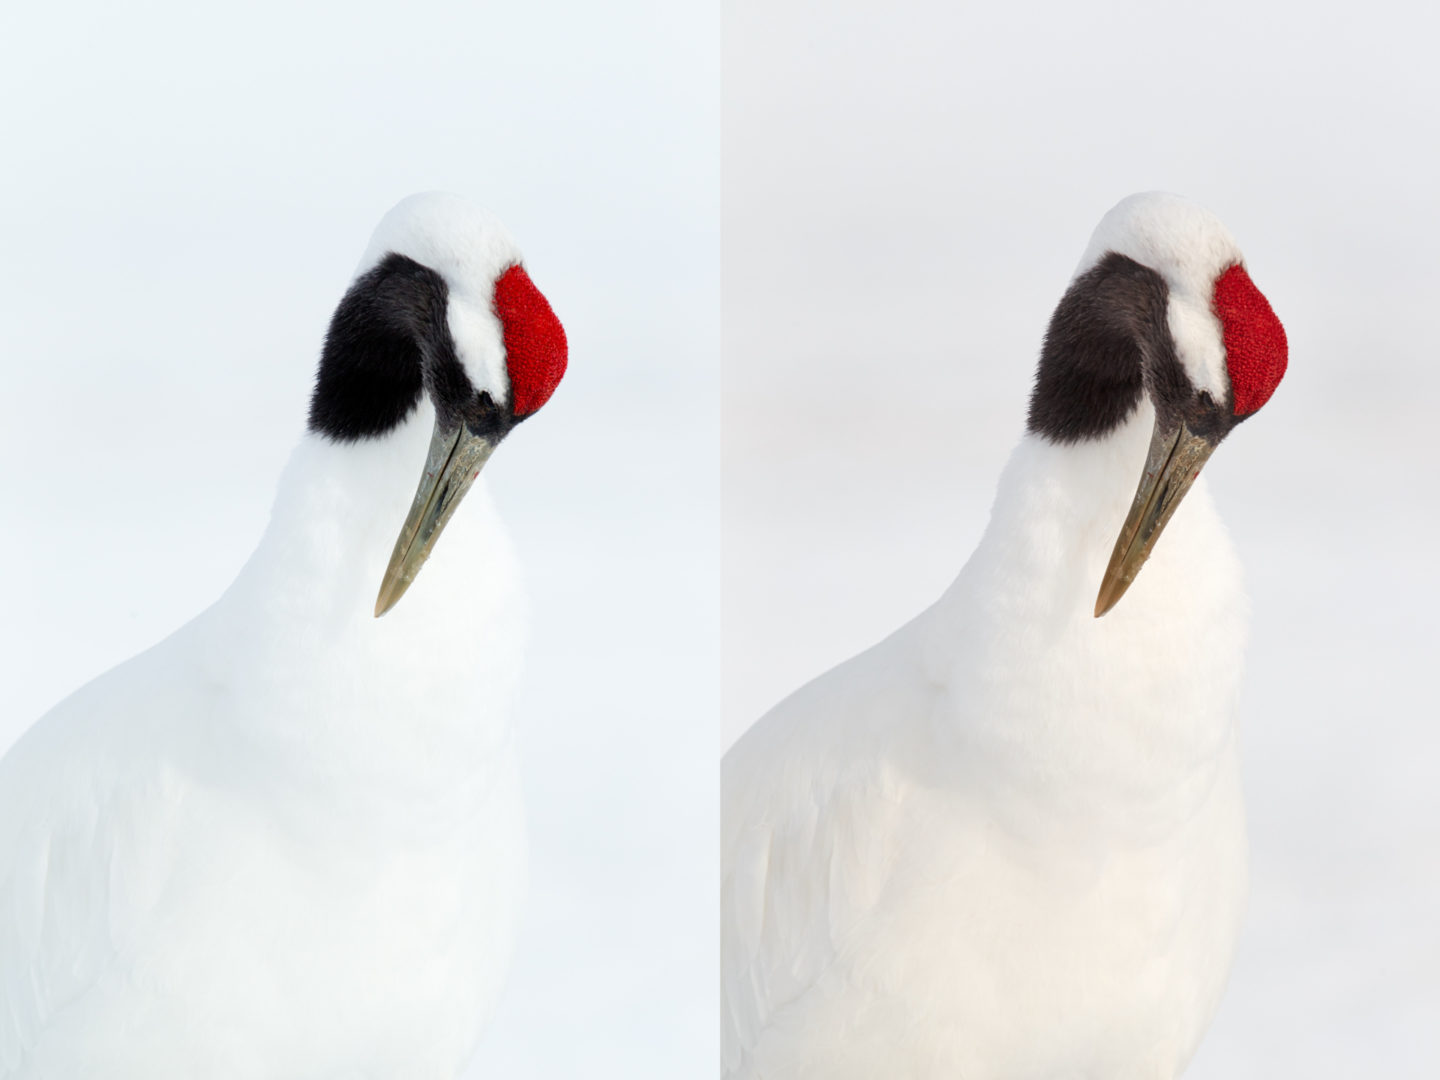
In fact, these are the two photos that I used on the cover for the original release and for my 2018 release when Craft & Vision closed their doors, and I actually toned down the detail a little in the new version, because I was so accustomed to the original image at this point. Still, though, I’m sure you’ll appreciate that the difference is significant. The moment I saw this, I realized that I had to spend more time looking at what Capture One Pro could do for my photography.
2 – Excellent Black and White Conversion
The next reason is that I am able to create quality black and white images without using a plugin or other software. I was never really happy with Lightroom’s black and white capabilities and had been using Silver Efex Pro which I really liked, but I didn’t like having to save my images as TIFF or PSD files, which we’ll also get to shortly. In Capture One Pro though, I am able to convert to black and white with the control that I want, and, in true form, the image quality that I have become accustomed to.
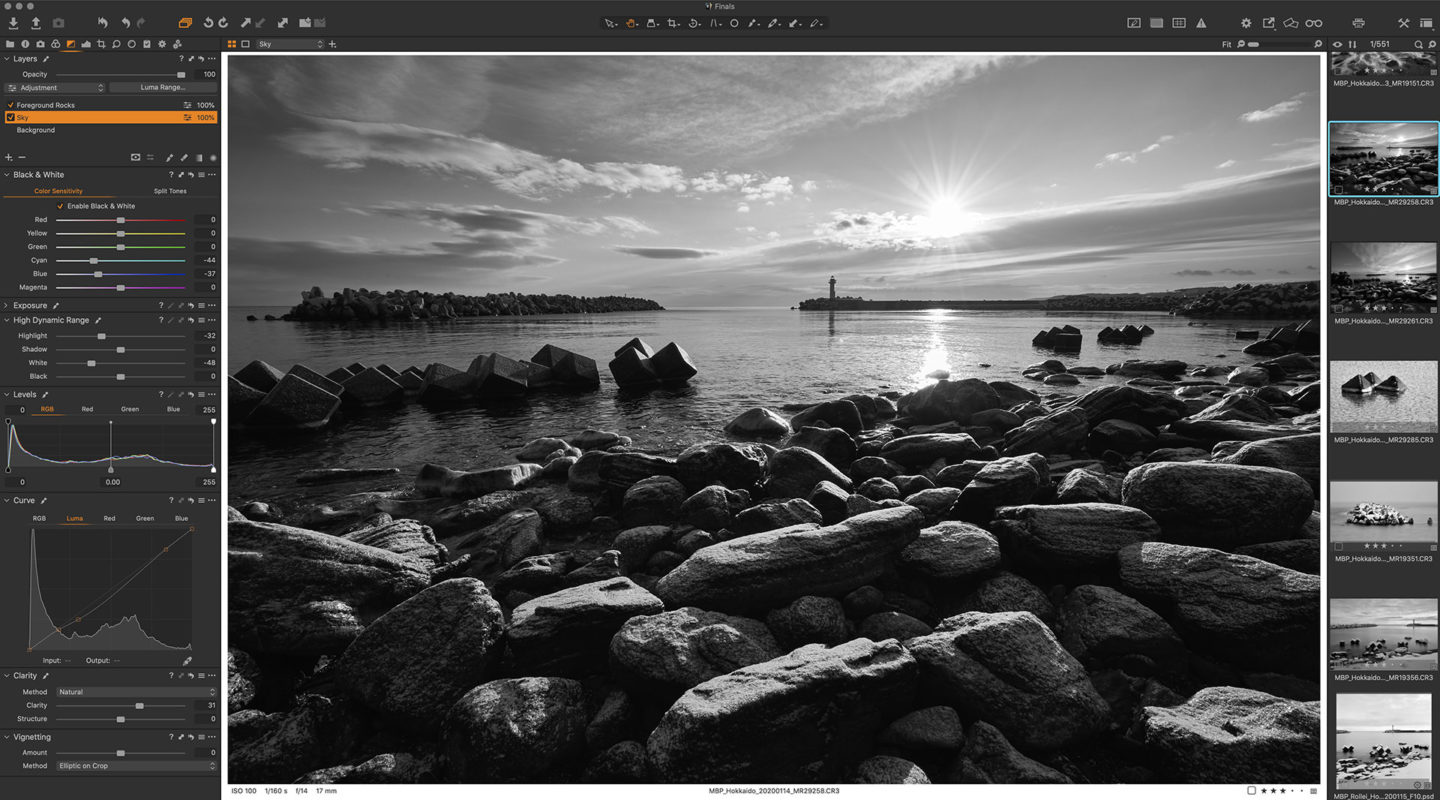
The tonal range is excellent, and when necessary, I can easily create additional masks to modify things like the foreground rocks in this image with one mask and add a second mask to adjust the sky. Of course, generic adjustments to the entire image are still possible with the background layer. I’m going to put a video together showing more about this soon, but for now, if you are interested in seeing more about some of the masking and black and white conversion capabilities, check out the videos and other posts that I’ve already released on Capture One Pro here.
3 – Highly Customizable User Interface
I am also a huge fan of the highly customizable user interface of Capture One Pro. I don’t know if this should be visible by default in the latest version, because I generally continue to build on my originally saved Workspace, but as you can see from this screenshot, you can add Tool Tabs from the predefined tabs, or create your own Custom Tool Tab, and that gives you things like the Black and White tab that you can see in the previous screenshot, which I added and customized to my liking.

For example, the Black and White Tool Tab that comes with Capture One Pro contains the film grain tool, for adding artistic grain to images, but because I never use that, I simply remove it from the Tool Tab. I do use Layers a lot though, especially on my black and white photos, so I added that to my Black and White Tool Tab, along with the High Dynamic Range sliders, which I also use a lot.
4 – Most Edits Work on Layers
The other thing that I love is that pretty much all of the edits you can make to an image can be applied just to specific layers, including masks, as well as generically to the entire image. There are a few exceptions, such as the generic Black and White sliders because, at this level, you are telling Capture One Pro how to convert the entire image, although there is very granular color edibility that we’ll look at shortly.
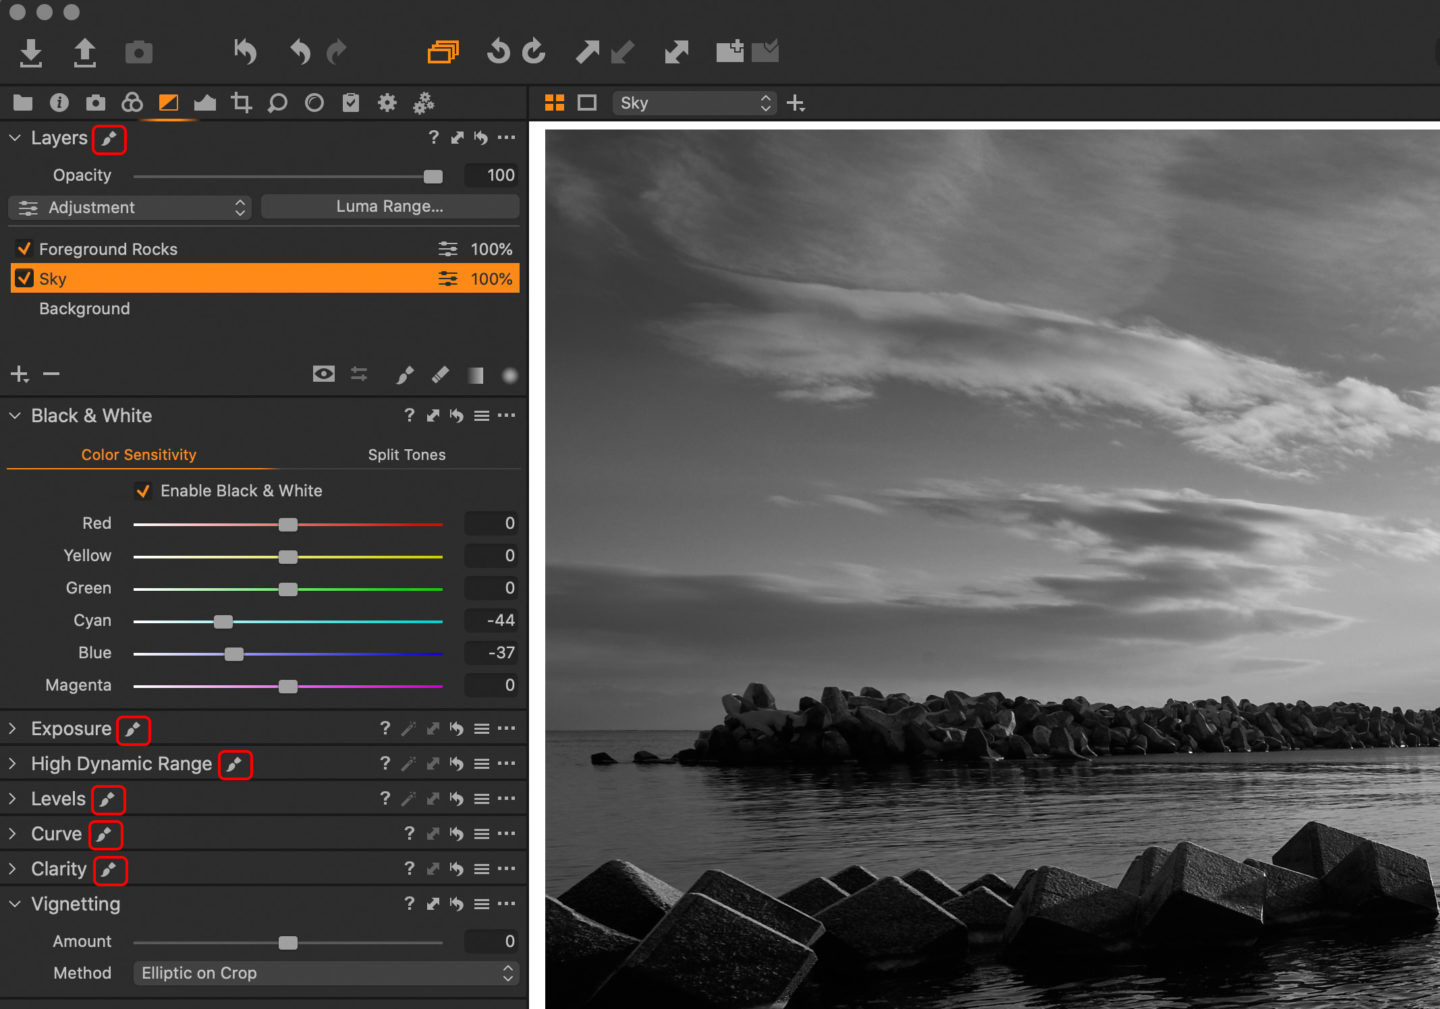
The Vignette tool also works on the entire image or the crop, depending on your selection, but as you can see from this screenshot, there is a paint-brush icon next to all of the other tool headers. This indicates that the adjustments that you make with that tool can be applied to layers. These icons become visible when you select a layer in the Layers tool.
5 – Advanced Color Editor
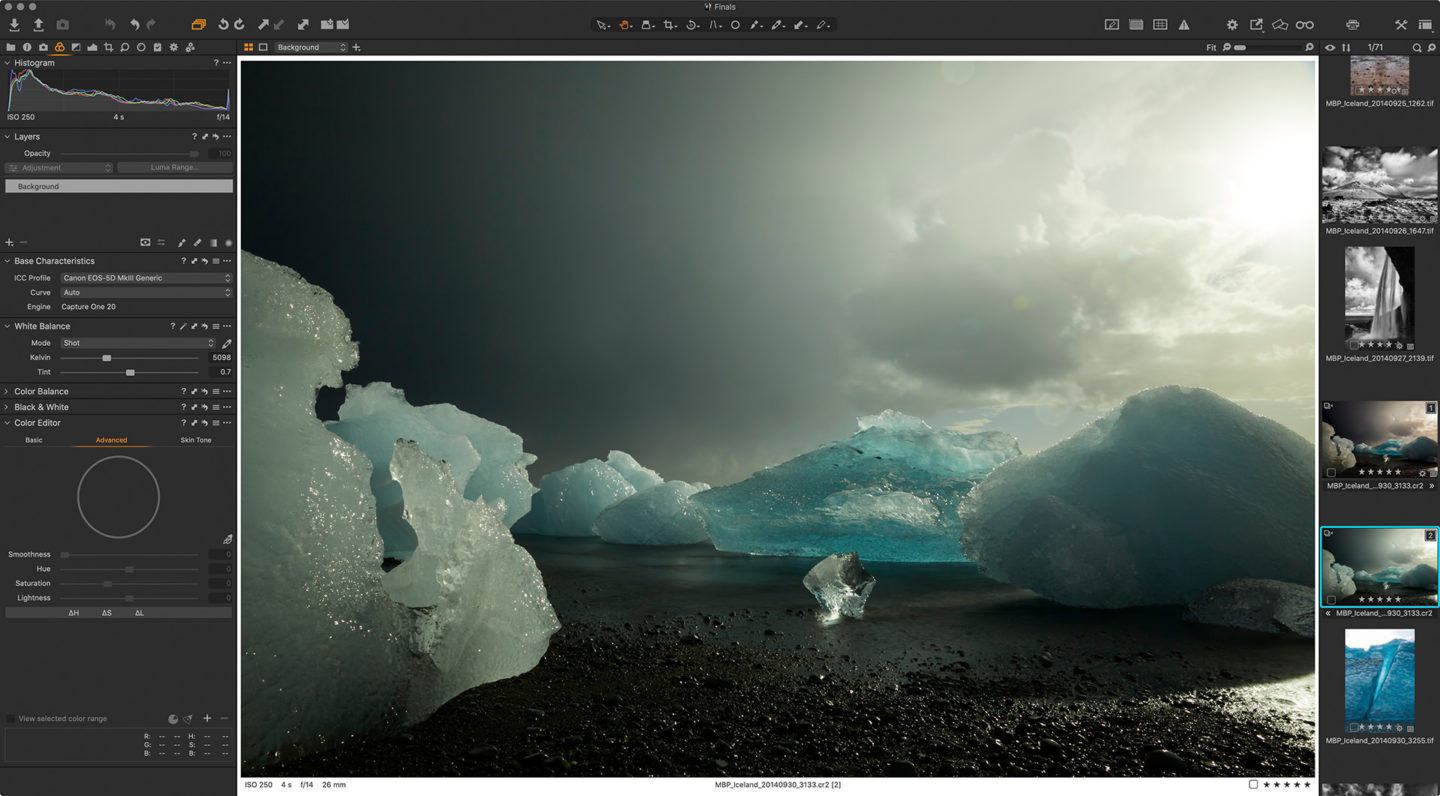
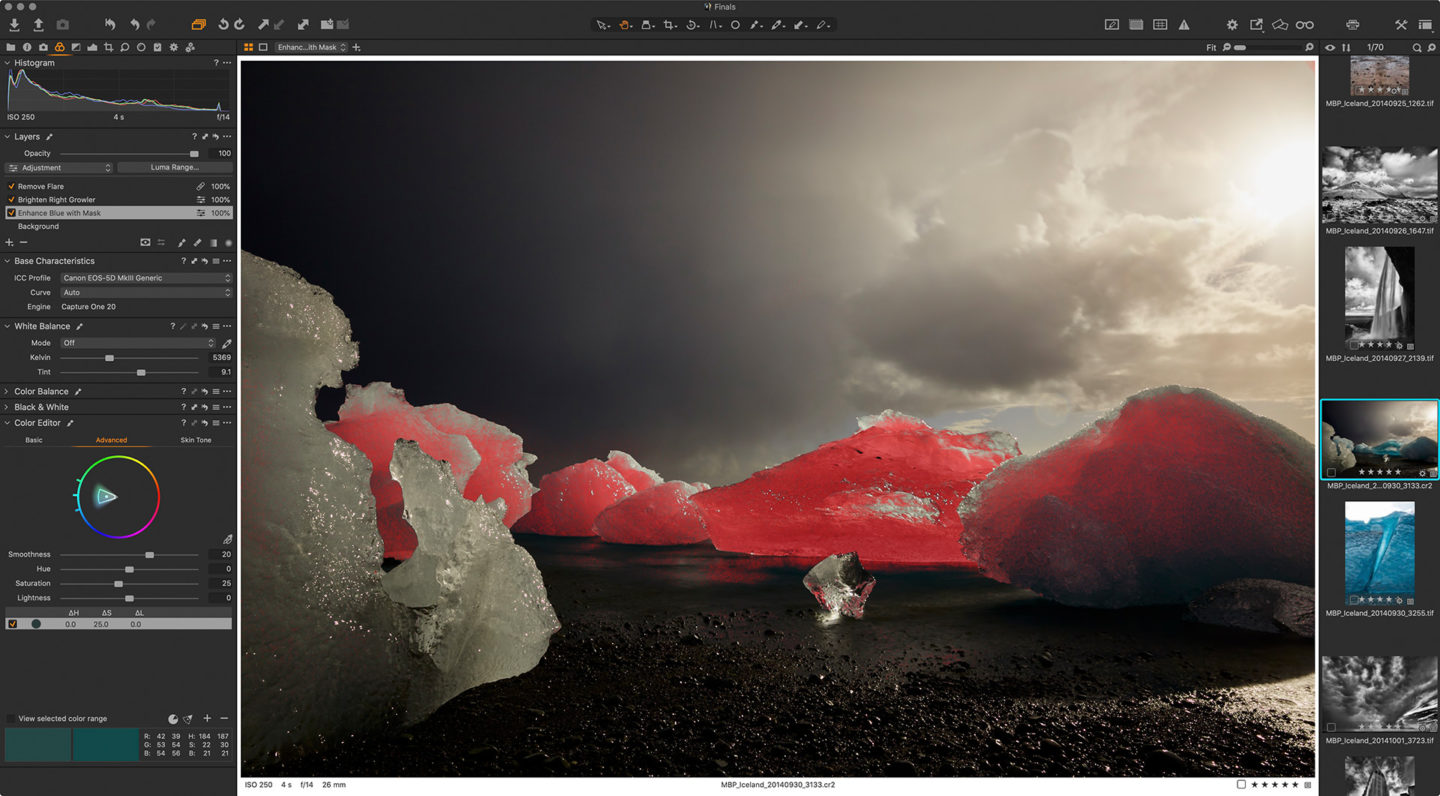
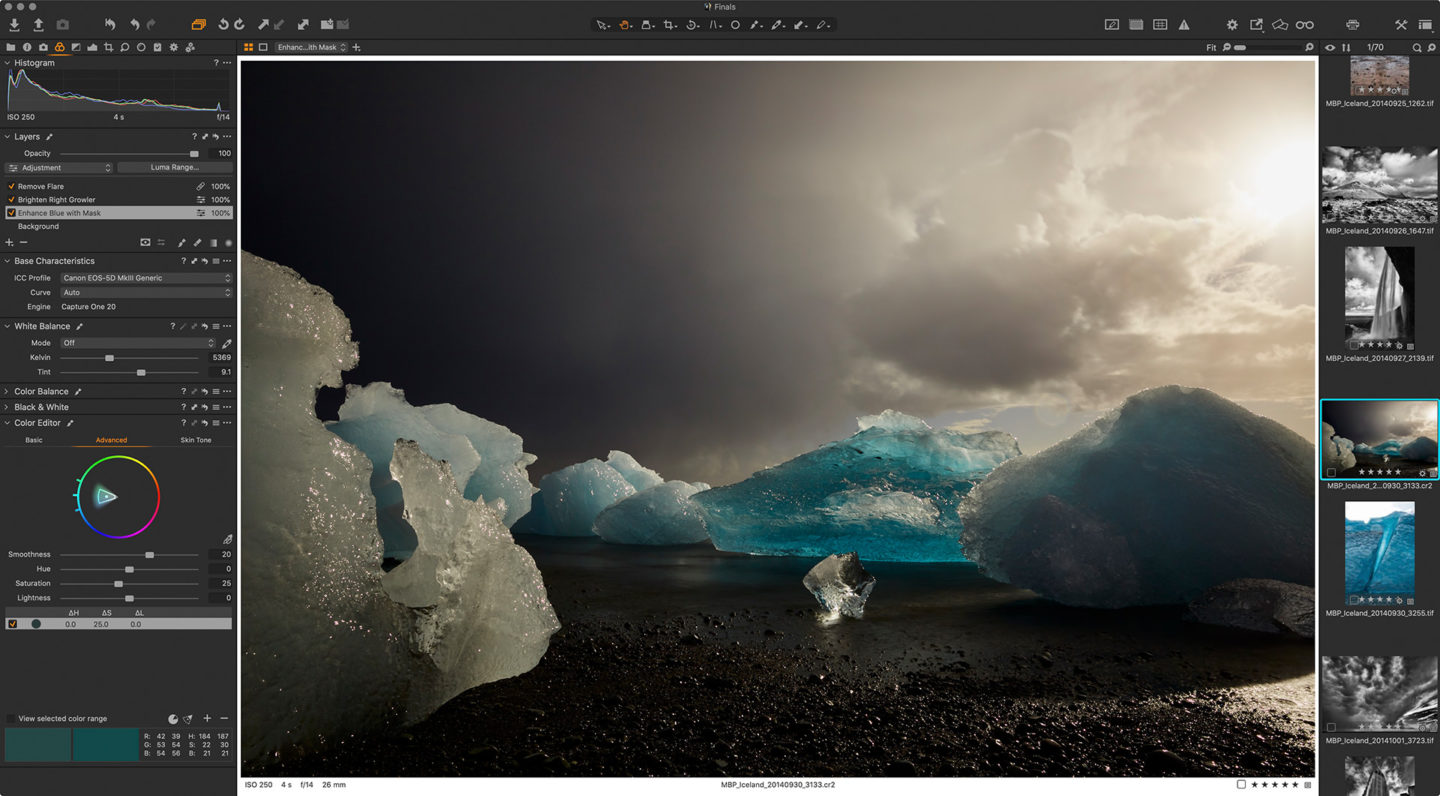
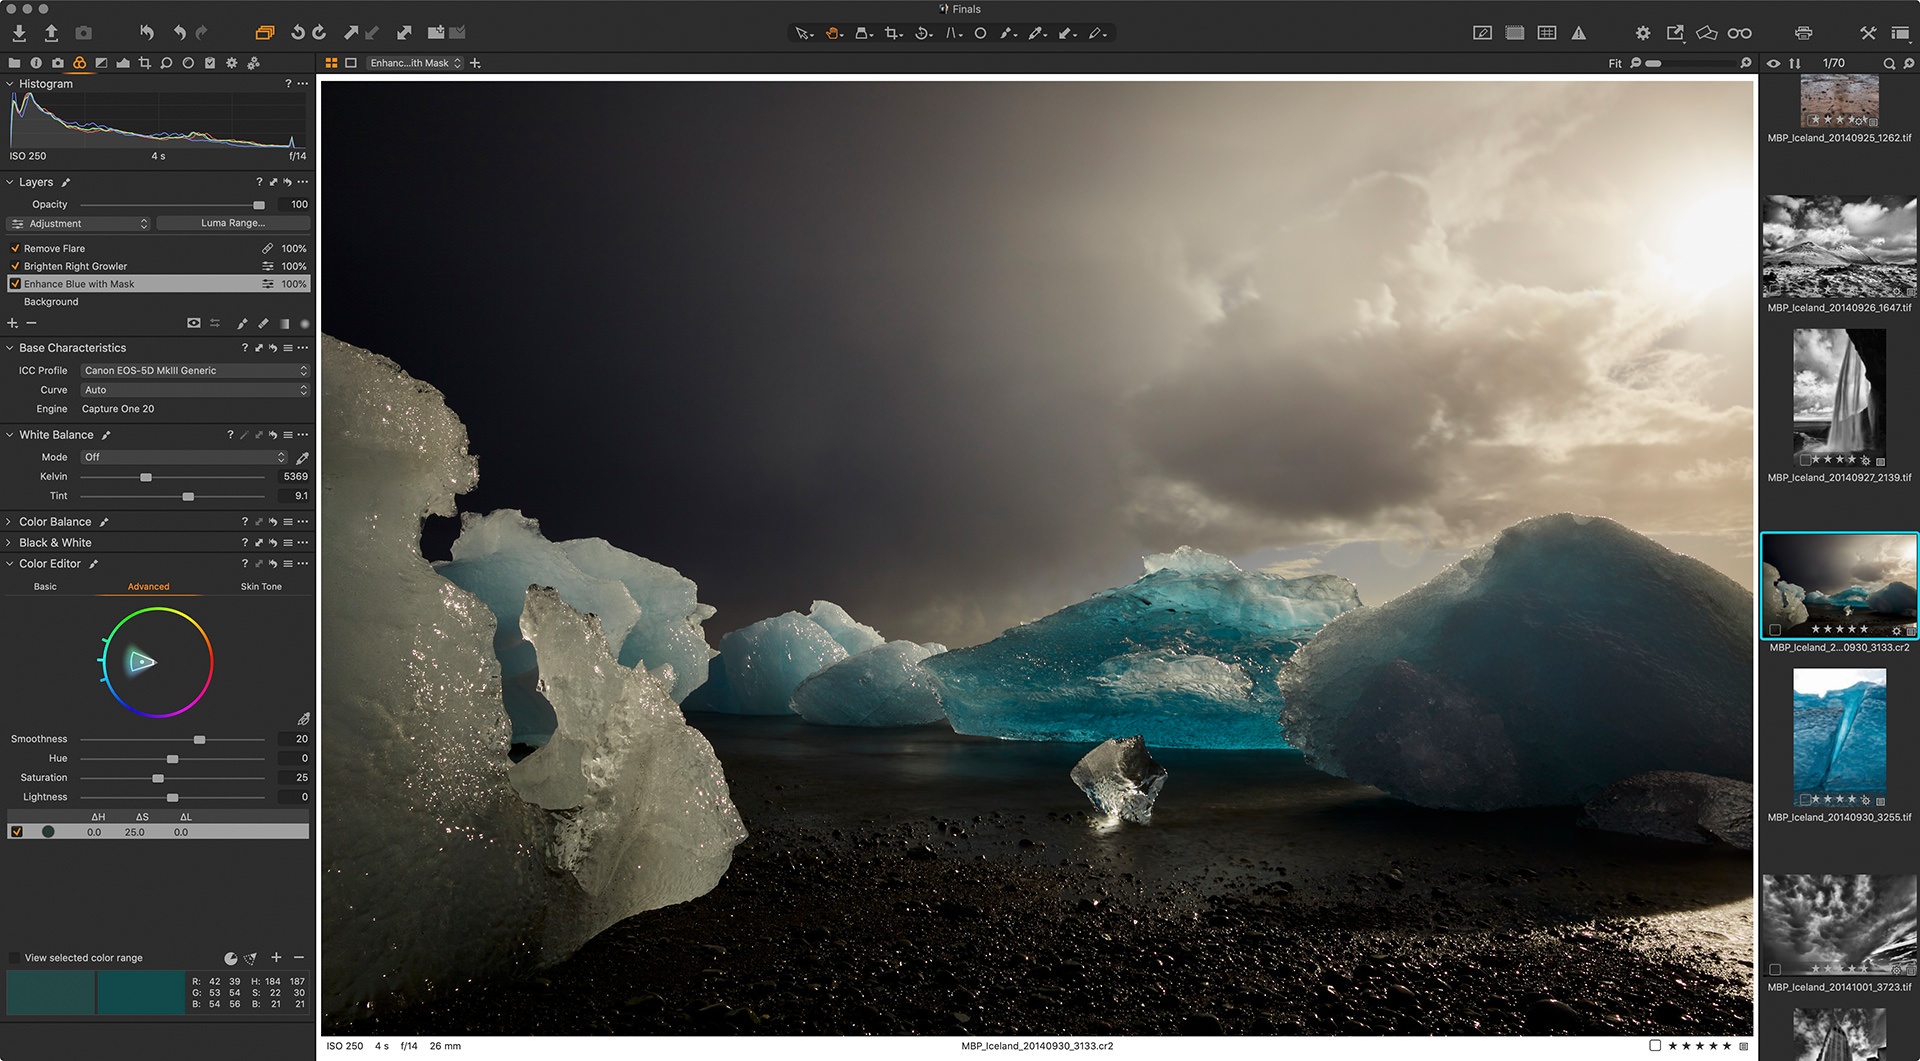
I also love to work in color, and Capture One Pro gives me complete control over the color in my images, via tools such as the Advanced Color Editor. Here I took a screenshot of the same image showing the original raw photo, but also showing the processed image with the mask that I created to enhance the blue in the ice, and the final processed image. You can move the vertical bar separating the two views as well. On the left side, I have three views, and on the right side, I have the final processed image.
I created the mask by selecting the color with the color picker from the Advanced Color Editor, and then right-clicking the ellipsis in the top-right of the Color Editor and then selected Create Masked Layer from Selection. This is a great way to select specific colors for finely tuned adjustments. Here are the three images as regular files too, so that you can see them in the Lightbox by clicking on the images.
6 – Luminosity Mask
In the previous major update, Capture One was given one of the most useful features that I can recall for a few years, and that is Luminosity Masks. This enables us to select specific areas of the image based on a very fine-tunable luminosity range. I covered this in the following video that I release as episode 658.
7 – Keep My Images in Raw Format
As I mentioned earlier, removing my dependence on third-party plugins and programs meant that the vast majority of my images, and I’m talking pretty much 100%, are kept in their original raw image format. I also find that the editing tools, including cloning and healing, are good enough that I can avoid jumping into Photoshop or Affinity Photo to make larger changes for the vast majority of my images. Seriously, I save maybe one or two files each year in a format other than the original raw file, and this is huge for me. I really dislike having to round-trip to other software to work on my original image as keeping them in their original raw format gives us the ability to benefit from all future processing engine updates.
Phase One isn’t just sitting on their thumbs, they release a major update to Capture One Pro pretty much every year, and each time they upgrade, there is potential to see even better image quality in my photographs. If my images are stored as a TIFF or PSD, or any other third-party file format, I have to go back and redo any work that I did on my original because that was baked-in to my copy. Because all of the changes I make to my images are stored as instructions and mask files etc. when I never leave Capture One Pro, nothing has to be redone when the processing engine gets updated. I can usually simply press a button to update the image to the latest processing, and I’m done.
This also, of course, saves on disk space, as third-party file formats are generally much larger than the original raw files unless you are saving as JPEG, which should never be the case for the main archive version of your images anyway.
8 – Organization and Filtering Images
Although I initially wasn’t overly happy that I had to split my one huge Lightroom catalog into multiple yearly catalogs when I jumped ship to Capture One Pro, I have become accustomed to my current workflow, and feel very comfortable to move between my yearly catalogs, as well as accessing all of my Final selects in a master catalog, as I explained in my previous post.
When I need to find images, the filters section provides pretty much everything I need to find specific images, based on my star ratings, gear selection or searching for the keywords that I add to my images as I archive them, or any EXIF data, including that which I added myself to scanned film photographs.
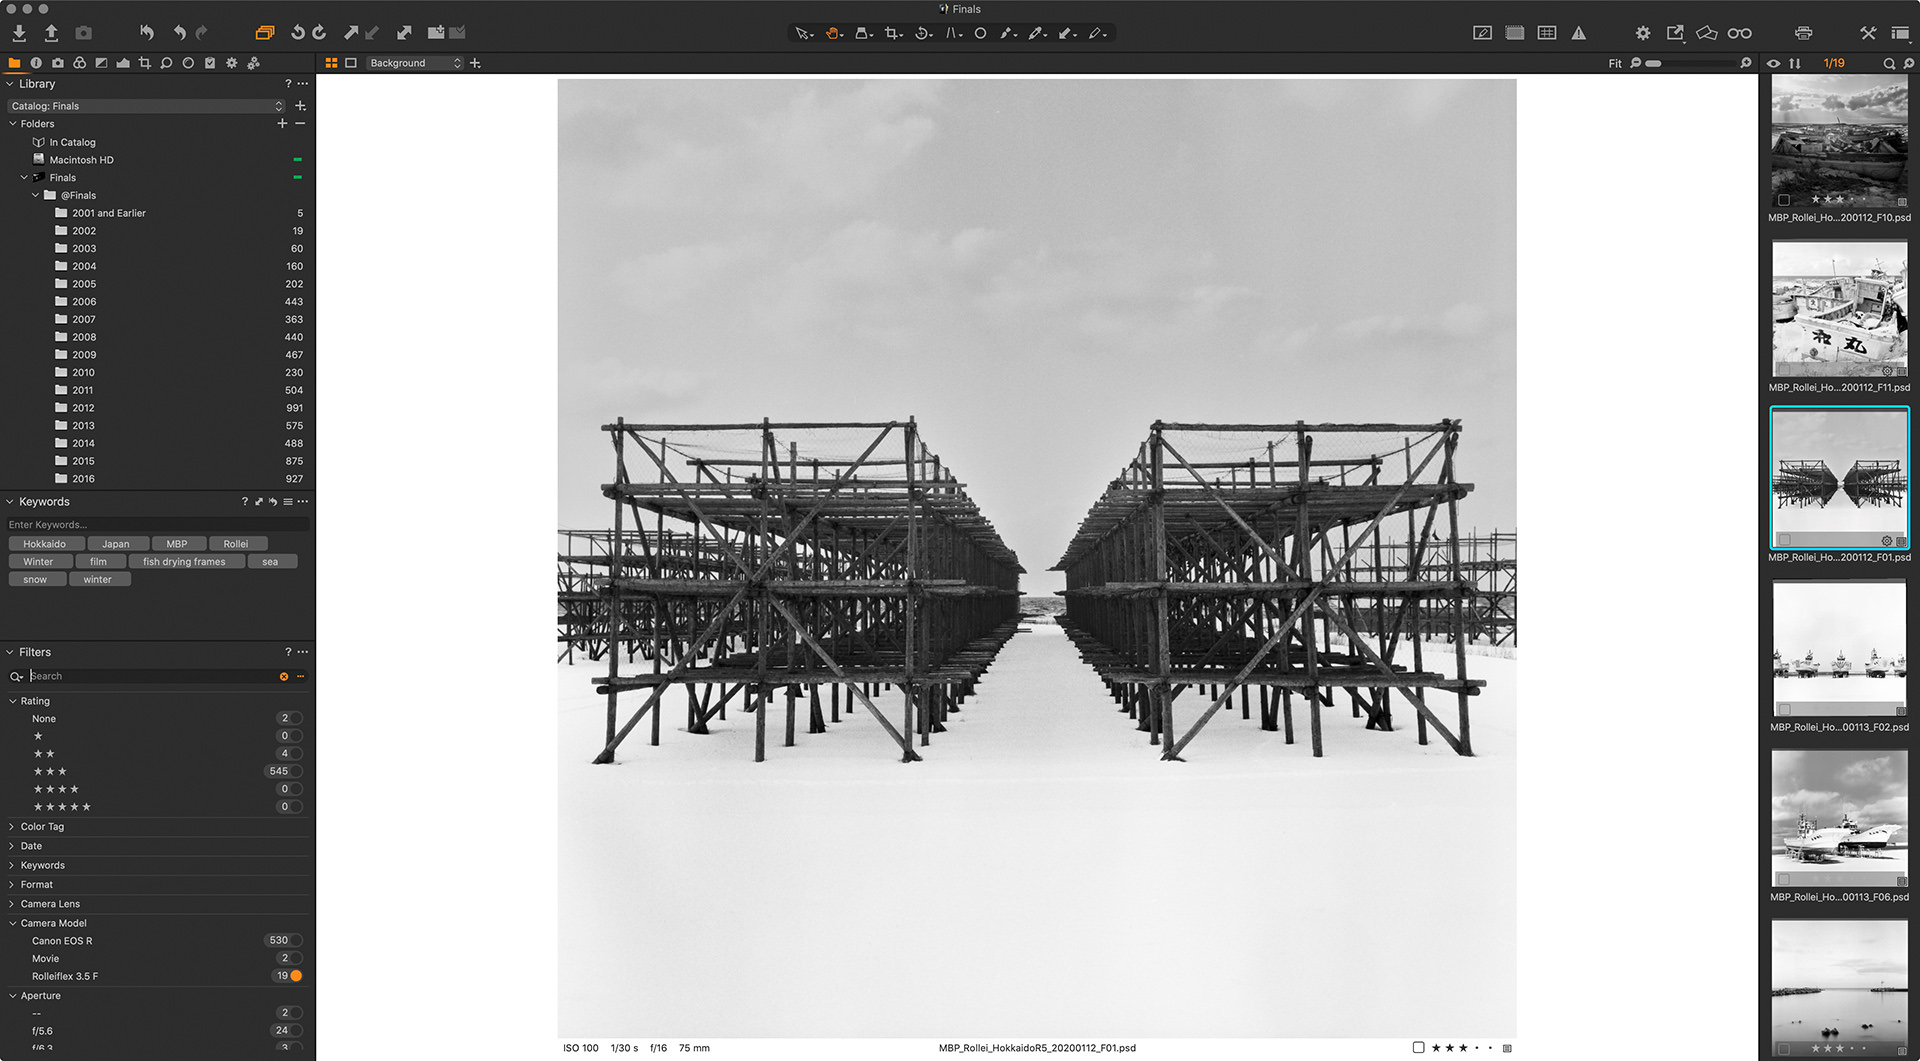
Note that in this screenshot, I’m showing medium format film that I tagged with Phil Harvey’s ExifTool and my own custom script that I use for walking through a folder of images tagging each as I go. There is no way that I’m aware of to enter data into the camera EXIF field with Capture One Pro alone, but it uses data that you add like any other camera.
9 – Workflow Speed
It’s also possible to customize the keyboard shortcuts for most of the commands in Capture One Pro. This helps us to tailor our workflow to our own needs and allows us to really streamline the workflow, which leads me to one of the largest benefits I’ve found after improved image quality, and that is the overall speed with which I’m now able to work through my images.
In the past I would leave my location workshops with at least a number of days of images unprocessed because I simply didn’t have time to process and select my images each day. Now though, I leave every tour with every day except the last completely processed. I go through and make tweaks to my selection before saving my final selects, but I’m generally caught up by the time the tour finishes.
As an example, one of the biggest time savers for me has been the ability to create a keyboard shortcut that copies all of the changes I’ve made to an image to the clipboard, and then apply them to future images with a second shortcut. I use SHIFT + COMMAND + C to copy my adjustments, and SHIFT + COMMAND + V to apply them to other images. As I go through similar images this saves me heaps of time, and as the image content changes requiring changes to my copied adjustments I simply update the copied adjustments and continuing pasting until it needs changing again.
10 – Tethered Shooting
The last thing that I wanted to mention is the ability to shoot tethered. I left this until last because I don’t do it often, but when I need to, I really enjoy having the ability to do this right there in Capture One Pro. When you first connect a supported camera, you get one dialog that asks if you’d like to register your camera with Capture One Pro and literally it’s just one click, and you get access to all of the controls that you see on the left side in the Capture Tool’s Live View Window here.
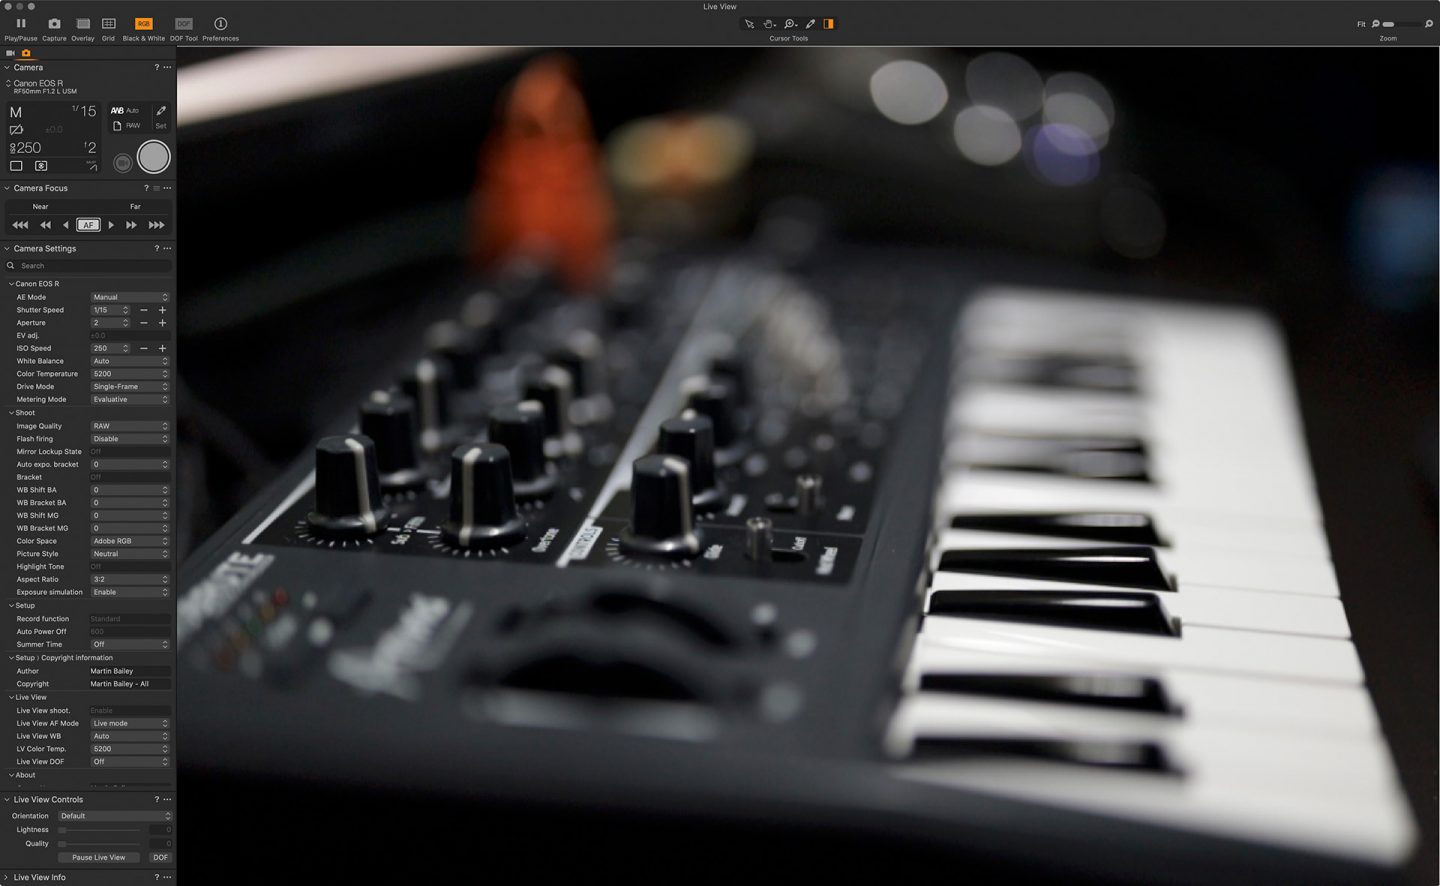
As you can see, you can control most of the aspects of the camera right from the Live View window, including even making very fine adjustments to the focus, and, of course, releasing the shutter, so if you do focus stacking, this is a great way to work. I’ve also found it very useful when doing portrait work, as being able to see the images on the computer as we shoot makes for a very dynamic shoot, and once again, really speeds up the workflow.
Essentially, Capture One Pro is just that, a Professional image editing package that provides the tools and image quality required to satisfy even the most discerning professional photographer, but these benefits are available for anyone that forks out for a license.
Win a Capture One Pro License!
On that note though, as I mentioned at the beginning of this episode, I have a Capture One Pro license to give away and wanted to invite you to take a look at an amazing resource that the Capture One Pro creators have put together, called the 30 Day Challenge. I’m not going to ask you to watch every video, but do take a look and watch the videos on areas that you are interested in. If you are new to Capture One Pro, this really is an invaluable resource.
If this all whets your appetite enough to give Capture One Pro a try, please do download the fully functional 30 day trial version, with no credit card required, and take it for a spin yourself. I had been meaning to try Capture One for years, and finally set an afternoon aside to do it in the summer of 2016, and from that first photo that we looked at earlier, I was hooked. My photography is simply better and I enjoy my photography more now that I use Capture One Pro, and that is why I’m happy to recommend it to you.
To enter for your chance to win the license that I have, I would like you to do two things, in addition to downloading the trial, and that is to write one paragraph describing what you liked about Capture One Pro, and link to one photograph or blog post that you can share based on your experience. Please post these below in the comments, and make sure that you use a valid email address for your comment, so that I can contact you if I select you as the winner. Your mail address will not be visible to anyone else, and I will not share any of the email address with anyone, including the folks at Phase One, the makers of Capture One Pro. We aren’t harvesting addresses, we just want you to have fun, and get the most out of your photography.
The deadline for entries is May 25, 2020, and I’ll announce the winner shortly after that. Also, please only enter if you do not already own a current Capture One Pro license. Let’s give people that haven’t already got one a chance to win.
Show Notes
Check out the Capture One Pro 30 Day Challenge here: https://www.captureone.com/en/explore/30-day-challenge
New FastSpring store: https://mbpkk.onfastspring.com/
Audio
Subscribe in iTunes to get Podcasts delivered automatically to your computer.
Download this Podcast as an MP3 with Chapters.
Visit this page for help on how to view the images in MP3 files.


That’s a very useful article, Martin.
I’m currently using both Lightroom and Capture One (and FastRawViewer for culling for that matter). Images I process in Capture One I export back to Lightroom as ProPhoto JPEGs so I maintain an overall catalogue in Lightroom.
Your section on Workflow Speed reminds me I need to do some more research on image selection and assessment in Capture One, to see whether I should be spending more time there.
But the main takeaway for me is tethered shooting which I’ve never done in Capture One and only a couple of times in Lightroom, clearly a more primitive interface for this purpose. I’m likely to be digitising old slides before too long and testing whether to scan them or copy them. If I take the copying route, tethering to Capture One is the obvious choice.
Hi Murray,
It’s great to hear from you. I personally wouldn’t be able to work between two applications as you do, simply from a personal character/trait perspective. Not a right/wrong thing. I am too binary. Often to my detriment, I’m either in, or out. If your workflow is working for you, that’s all that matters, and I understand, because I did miss the ability to keep more images in a larger catalog when I used Lightroom, but I got used to working with my yearly folders and my separate Finals catalog for all of my selects from over the years.
Shooting tethered in Capture One Pro is a huge benefit, and one that I think is often overlooked. That’s another reason I included it. I don’t do it often enough, but when I do, it’s a solid feature that is in my opinion without rival. Even the Canon tethering software is clunky and not very stable. It takes many more steps to set up and then can freeze the camera up etc. Capture One Pro tethering is one click to connect, and I’ve never known it to fail.
Regards,
Martin.
HI Martin, thanks for your thoughts on Capture One.
I have also been using Capture One Pro since I started using Fujifilm gear a few years ago and saw a marked improvement in raw conversion relative to Lightroom. Given photography is a hobby rather than a profession, I struggle with the cost of having a licence for Capture One as well as Lightroom/Photoshop simply so I have access to Photoshop for things like focus stacking, exposure blending etc., – essentially image blending. Do foresee anytime in the future that Capture One would consider including this functionality? I have tried alternatives such as ON1 PhotoRaw and Affinity Pro, but neither really were at the same standard as Capture One or LR/PS.
Cheers
Hi Wade,
Thanks for the comment. I have no inside information on the future of Capture One Pro, so this is purely my personal opinion, but at this point, based on the trends I’ve seen over the years, I don’t think we’ll see things like focus stacking and exposure blending any time soon, but I would love to be wrong. I didn’t expect them to implement Luminosity Masking, so let’s keep our fingers crossed that I am. 🙂
I am using Affinity Photo instead of Photoshop for some things at the moment, but for me, it falls apart because there is no JPEGmini plugin for Affinity Photo and Affinity do not yet support these Photoshop plugins. From both Capture One Pro and Photoshop, when I’m ready to export a JPEG, I just hit the JPEGmini button, or build it into my Capture One Pro export recipe, and it gives me a high-quality JPEG file with just the right amount of compression applied for web use, etc.
If Affinity Photo can use this plugin, or use the Photoshop plugin at some point, I will stop my yearly Adobe Photoshop/Lightroom subscription. Even now I am paying for Lightroom, despite not installing it for four years now, because the Photoshop/Lightroom subscription is cheaper than Photoshop alone. Just one plugin is holding me back. Otherwise, while there is a learning curve, I believe that Affinity Photo is the only editor that can replace Photoshop, and the fact that they have a feature parity app for iPad that uses the same files, and the Serif Affinity inter-app compatability, in my opinion, put them years ahead of the competition. But, to avoid confusion, I should add that this is all for image editing and illustration, publication work. Capture One Pro is my go-to asset management and raw processing app of choice.
Regards,
Martin.
Thanks for this post. If you ever have time, could you post your process for B&W conversion using Capture One? I’m relatively new to the software and would greatly appreciate a bit of a tutorial as you like to use it. Also, like you, I also use JPEGmini plugin as an export recipe. I think it’s a terrific addition to C1.
Thanks in advance
Hi Peter,
Absolutely, I intend to release an updated version of my black and white conversion process very soon, but please check out the tutorials that I have already done, as much of it is already covered in there, it’s just a bit outdated now. https://mbp.ac/cotutorials
I’m pleased you have found JPEGmini too. I couldn’t agree more. It’s a great addition and I’m really pleased that they have a Capture One Pro plugin available for it.
Regards,
Martin.
I have been using Capture One for about 4 years. I need to make better use of the luminosity masking option. I do use layers a great deal but the main reason I switched from Adobe Camera Raw is I prefer C1s RAW editor interpretation. I also prefer the design of C1s level adjustment that allows optimization for each channel as a default setting. I use an automatic levels adjustment when importing because it helps me to pre-visualize the potential in RAW files when making initial selections for editing. I usually revisit the levels adjustment at the end of editing just to make sure I am not clipping any channels. All of this is very easy to do. I agree that the flexibility customizing the user interface is an excellent feature in this application.
Good article.
Hi Greg,
That’s about the same amount of time as me. Congrats on making the switch!
Luminosity masks in Capture One Pro was a huge update in my opinion. I don’t use it on every image, really just a small percentage, but when I need it, it’s so nice to have.
Regards,
Martin.
Hi Martin!
I really do enjoy your podcasts! And this particular one came at a time when I was seriously looking at Lightroom alternatives and not having much joy. I still use Lightroom 6 and have never gone to the subscription model. For a variety of reasons, not necessarily the subscription model itself.
I’ve listened to you talk about Capture One before of course but this time I felt ready to investigate the software for myself. I downloaded the 30 day trial and had a look at the interface, and then looked at the 30 day challenge page the CO people put together, and slowly over the period of the last few weeks have learnt a lot. I also accessed the YouTube videos, especially those by David Grover, and they were very useful.
I’ve created test catalogs and sessions, with a handful of images I just picked from my archives to play with. And right away I felt the quality was there in my images. The details are great, as you found with your crane. As I experimented with the tool set and other things, I began to feel that I can process my photos much more intuitively. I began to see that often only a fine adjustment is needed to bring out something in a photo. And I LOVE the layers!
We had a wedding in the family in March, just before New Zealand went into lockdown because of the virus. I was not the principal photographer, but our granddaughter had asked me to photograph the groom and his family getting ready for the ceremony. There was much happening in my life at that time because only the week before my mother passed. She was 92! And with everything happening, I had only given my photos of the wedding a cursory glance in Lightroom, had a little go at processing a couple and then laid them aside for a later date. I was not particularly happy with the process in LR, and it is a reflection of how I’ve felt the past year about my photography. I just didn’t feel I was getting the best out of my images. So your podcast was timely indeed!
Once I felt I got the hang of the layout of the interface etc, I created a catalog for the wedding shots. There weren’t many, but immediately I noticed the difference! In no time at all I had my picks done and I was happy with the result!
My next experiment was to take an old photo from 2008 with my entry level DSLR Canon 400D and EF-S17-85mm lens. Not the sharpest tools on the block. However, I learnt a lot back then. I now use a Canon 6D Mark II, and L lenses. I love it!
Anyway, I chose some images from back then to process in CO, and I have to say I was impressed all over again! I have a mere 10 days left on my trial, but I’ve seen and experienced enough to know that YES! I’m jumping ship!! I’m delighted with the software and it’s really boosting my enthusiasm again. We’ve just been given more freedom to move around the country in NZ and I’m already planning some photography trips.
Thank you for your podcast Martin. I wasn’t going to avail myself of the opportunity to gain a license by commenting here, but then I thought, well why not! I’m sure you would be interested in what I’m up to. It’s been a while since we’ve been in touch.
Here is a link to my Dropbox folder where you can see two images I’ve processed in CO. One of the wedding, and an old one I took in July 2008.
https://www.dropbox.com/sh/spp1xp3c201kfzj/AAC44f6mybQtdG4SqA46HTM-a?dl=0
I hope you can access that alright! Dropbox creates such weird links!
Anyway, Martin, I wish you all the best and hope that you and your wife will remain well and not get that nasty virus!
Cheers,
Thysje
Hi Thysje,
Once again, it’s lovely to hear from you. Thanks so much for taking a look at Capture One Pro, and for taking the time to write down your thoughts, and sharing your photos etc. I was able to see the two images, no problem. I can see from the beautiful tones and how you’ve controlled the exposure around the sun in your sunset shot that you have gotten the hang of Capture One Pro. Likewise with the exposure in the wedding group. Nicely done!
Sorry to hear about your mother. We lost my father-in-law too just this week. He was also in his nineties, so they both had good innings, but will be sadly missed all the same.
I’ll post a winner of the license on May 25 or shortly after. Please stay tuned!
Regards,
Martin.
Oops! Sorry Martin, I clicked too soon and forgot to do the captcha thing!
It’s absolutely lovely to hear from you Thysje! I’m going to blast this off so that you receive confirmation, but I’ve unspammed your main comment and will delete this reply and your follow up in the coming days. Now let me go and read your main comment. Thanks for getting involved!
Dear Martin,
First, I wanted to thank you for the wealth of knowledge and stories you bring into our daily walks with our pup “luna”. I was able to take Capture One out for test drive and take you up on the challenge to write a paragraph and share an image processed with Capture One:
What I like about Capture One: Nothing like being a first time user of a product and/or application to really get an appreciation for the work that goes into making it a delightful experience. By delightful I mean intuitive, powerful, and memorable. There are three things that stood out as a longtime user of the alternative products: first, the ability to finetune any edits (color, luminosity, dynamic range, black & white) with the aid of the dynamic sliders, simply makes the process a joy to watch the image come to live; second, masking has never been easier and so impactful thru the use of layer masks and selection options; third, the UI, while daunting at first look, allowed me to partition my workflow into more guided and focused activities, i.e. almost like assisting me in how to post-process an image. From my many years as a product designer and photographer, I can appreciate the art and science that goes into making a product a win in the eyes of a new user. Looking forward to enjoying the Capture One ride.
This imaged was captured during the many walks we’ve taken during this time of shelter-and-chill. Hope you enjoy it!
https://drive.google.com/open?id=10S2XGFJ_dh8KvY0M_4su-1N0sK63JiSX
Hi Juan,
Thanks a million for entering, and for providing such a beautifully written and thoughtful paragraph about your experience trying out Capture One Pro. I cannot agree more with your comments. Wonderfully put!
I’ve held off from replying for a number of reasons, but mainly because I’ve been down-periscope working on our app, and I’m just slapping myself back into action to reply here and announce a winner. Another reason though, is because I’ve been unable to decide which of you to award the license to, with just yourself and Thysje jumping to the challenge, and both submitting wonderful write-ups and images.
After almost a week of deliberation, I’ve decided to flip a coin. I haven’t yet done that, but I’m going to do it shortly after this, as I write the manuscript for this week’s episode, which I hope to release later today. Please stay tuned!
Regards,
Martin.
Martin,
Wow! I was inexplicably delighted after reading your post from earlier today announcing the winner. The Morrocan Coin Toss was the icing on the cake – luck can be a great friend in our life’s journey. Looking forward to this next chapter of exploration with Capture One Pro.
Thanks to you Martin and the team at Capture One for making my day and opening-up new creative possibilities.
P.S. Martin, it would be great to see an image of that Morrocan coin for good charm.
I’m pleased you are happy about this Juan!
I’ve just added a photo of the Moroccan coin to the top of the post in which I announced you as the winner here: https://mbp.ac/706.
It needs a bit of a clean, but it’s a great old coin.
All the best!
Martin.
I am new to Capture One. I created a session and and have 7 selects and would like to import just the selects into a finals catalogue but I cannot figure out how to do that, Would appreciate some help. Thank you.
Hi David,
Congrats on making the switch! First, create a new Catalog called Finals or whatever you want to name it, and then in your originals catalog select the images that you would like to add to the Finals catalog and right-click them, then select Export Originals from the shortcut menu. Put them in a place that you will keep all future finals and I use a single year folder for each new year. You then need to import your exported images in the new catalog. There is a more detailed explanation at the bottom of this post: https://mbp.ac/537
I hope that helps!
Regards,
Martin.