

This week, I decided to create a new portfolio, and share the process with you, in the hope that you'll find it useful. I am literally going to write this article as I work so that you can see my process blow for blow. Note that this is not at this point going to be a printed portfolio. For my thoughts on that process, check out episode 330.
Just like when we do our yearly top ten selection, I believe there is always a lot to learn about our photography, our progress,
Even if, for example, you are just going to sit down and share your work with people you've invited over for a house party, I'm sure at some point you've noticed people get bored of your work as the 300th image fades out, giving way to the 301st. People don't want to sit through hundreds of images, and depending on your goals, you may actually have to whittle down to just 10 or 20 shots from literally hundreds of thousands of images! It's a skill that enables us to be better artists and prevents us from boring our audience to death at the same time, so let's get to it.
The last time I updated my Nature of Japan portfolio was 2017, and at that time I greatly reduced the number of images from 80 to 55, which was quite a drastic change. Before that, the last update was 2015, and I believe that my 2017 change was more pruning than adding new work, so I am going to at least skim through my 2016 and 2017 Japan work again, before taking a more in-depth look at my 2018 and 2019 work. So, that's a total of 12 tours, each containing two to three-hundred images that I consider good enough to show people. That is a lot of images to go through, so we'll discuss the process a little, as well as preparing my current portfolio.
During this process, ideally, I'd like to get this selection down to around 50 images at most, but the only way I'm going to achieve that is to give up on my idea of keeping one master portfolio for all of my Japan nature work. I'm going to split my portfolios into two, starting by removing all of the Landscape images from my current portfolio, and I'm going to put them into a Japan Landscapes or Hokkaido Landscapes portfolio for now. I will decide what to do with my landscape work after this, but for now, just put them aside in a new Landscape Collection in Capture One Pro.
Actually, as I did one last run through this year's photos from my Japan tours, I started to think that I might go even more granular, and split my wildlife into snow monkeys, cranes, sea eagles, and whooper swan portfolios, but I think that might be too specific and unvaried, so for now, I'm going to try to complete a new The Wildlife of Japan portfolio, and then later do a Japan Landscape portfolio, and see where I stand after creating each of these.
Use Collections Instead of Folders
I have heard people talk about outputting all of your images into a folder, and then deleting the ones you don't like, etc. but I really do not recommend this method, because it doesn't easily allow you to leave a record of what was done, because there is no linkage between the images in your folder and original work. The software that we've had for the last ten years or so pretty much all support collections, with easy ways to add and remove images, and make copies of our selections to help us keep records.
I keep all of my portfolios in collections in Capture One Pro, so that I can easily manage and edit my selections. Occasionally as I modify images and delete copies etc. something gets removed from my portfolio collections, but in general, I can get back to the last copy of any portfolio just by selecting the collection in Capture One Pro.
Before I started work on this update, I made a copy of my Nature of Japan portfolio with the 55 images, just so that I can compare what I've done later. There are times when despite our best intentions when you get to the end of an exercise and look back, you find that you've made some really bad decisions, and need to just throw it out and start again. You can't easily do that if you don't keep a record of your changes.

Split Away the Landscape Work
I then created a Japan Landscape Portfolio collection, and made that my selects folder, so that now I can just hit the Q key on the keyboard to add new images to that for a while. That makes it easier to filter out the Landscape images, but I also have to hit the delete key in the Nature of Japan collection to remove the images from that collection. I might end up removing some of these landscape images in that update, but keeping them in a collection, for now
It was difficult to decide what to do with my cranes in the river photos, because these are both landscapes and wildlife images, although more landscape, so I moved these to the landscapes folder for now. After clearing out the landscape shots, I was left with 26 wildlife images, of which I was able to remove a further
I'll do a separate post on this at some point, but I feel that as we grow and evolve, it's natural that we fall out of love with some of our older images, but some seem to almost demand to be left in, and that is probably our strongest, most timeless work. For example, the photo of the Ezo Deer that I shot on my first visit to Hokkaido in the winter remains one of my favorite images.
Disconnect Your Emotions
What we have to be careful of is the reason for keeping these images in our portfolios. I hate to use the grandmother example because I know grandmothers are very special to most people, but when I see a photo of a grandmother in a selection of images, 9 times out of 10 I can tell that it's only there out of the love that the photographer feels for his or her grandmother. Most of the time, artistically, the grandmother shot brings nothing to the table, and more often than not, it actually reduces the overall beauty and impact of the selection.
Now, I'm not going to tell you what you should or should not do. It's your photography, your portfolio, your top ten, whatever; but I do want to reiterate the importance of removing your own emotional connection to your photographs when working on a selection. This goes for all images, not just grandmother photos. The reason I raise this at this
I have not been this close to a deer since, and I've never seen one this relaxed in the presence of humans, and I really feel that this was something special. I also though feel that to a degree, you can see that in the photograph. The sense of closeness to this animal is there, and to me at least, he looks relaxed, so despite this being one of the oldest images in my portfolio, I think I'm good to leave him in there for now at least.
To wrap up my ideas on this thought process though, my advice is to always question your reasons for having each photograph in your set. If it's because you worked hard to get the photo, or the subject is someone or something you love, anything related to your emotional response to the photo, just ask yourself if these qualities are actually visually represented in the photograph.
I'm not a big believer in the popular mantra that every photograph has to have a story. It's nice when they do, but not a prerequisite in my opinion. What I do want though, is for every image to at least change my emotional state, at least a little bit. And I'm talking about based on the visual merits of the photograph, not my memories of the shoot. Even if I just feel my heart lift slightly as I view the image, it has merit and can be considered for inclusion. The hard part is gauging which images move me more than others and ranking them accurately enough to only leave in a specific number of images that won't completely bore any audience that I put my work before. The more images we include, the greater chance we have of diluting our message to the point that it's too weak to move anybody.
Adding New Candidates
My next job is to go through and add all of the new images that I want to consider for inclusion in my Japan wildlife portfolio. I actually have a collection into which I've already dropped a few images, so I'll check that out first. Note that if you are just starting to build a fresh portfolio from scratch, this is where you start going through your images.
Note too that I keep all of my final selects from each shoot in a single Capture One Pro catalog. Whenever I finish my selection process, I not only have the ability to filter out my selection from my original image folders, using the star ratings that I
Whether you keep your final selects separate like I do, or just reference your rated images in your shoot folders, It's really important to keep track of your selects, to make this kind of process easier. I shot 16,000 images over my three Japan winter tours this year, but because I have my final selections already whittled down, I only have to skim through 500 of them to find my candidates today. The same goes for the last few years which I'm also going to check. I'll be back in a moment...
OK, so after going through the folder of candidates that I'd already been building, I ended up with 43 images in my new working folder. There were also lots of landscape shots in there, so I'm going to keep that aside for now, until I work on the new landscape portfolio. Now, I'll quickly go through my Japan work from 2016 and 2017, followed by my 2018 folder.
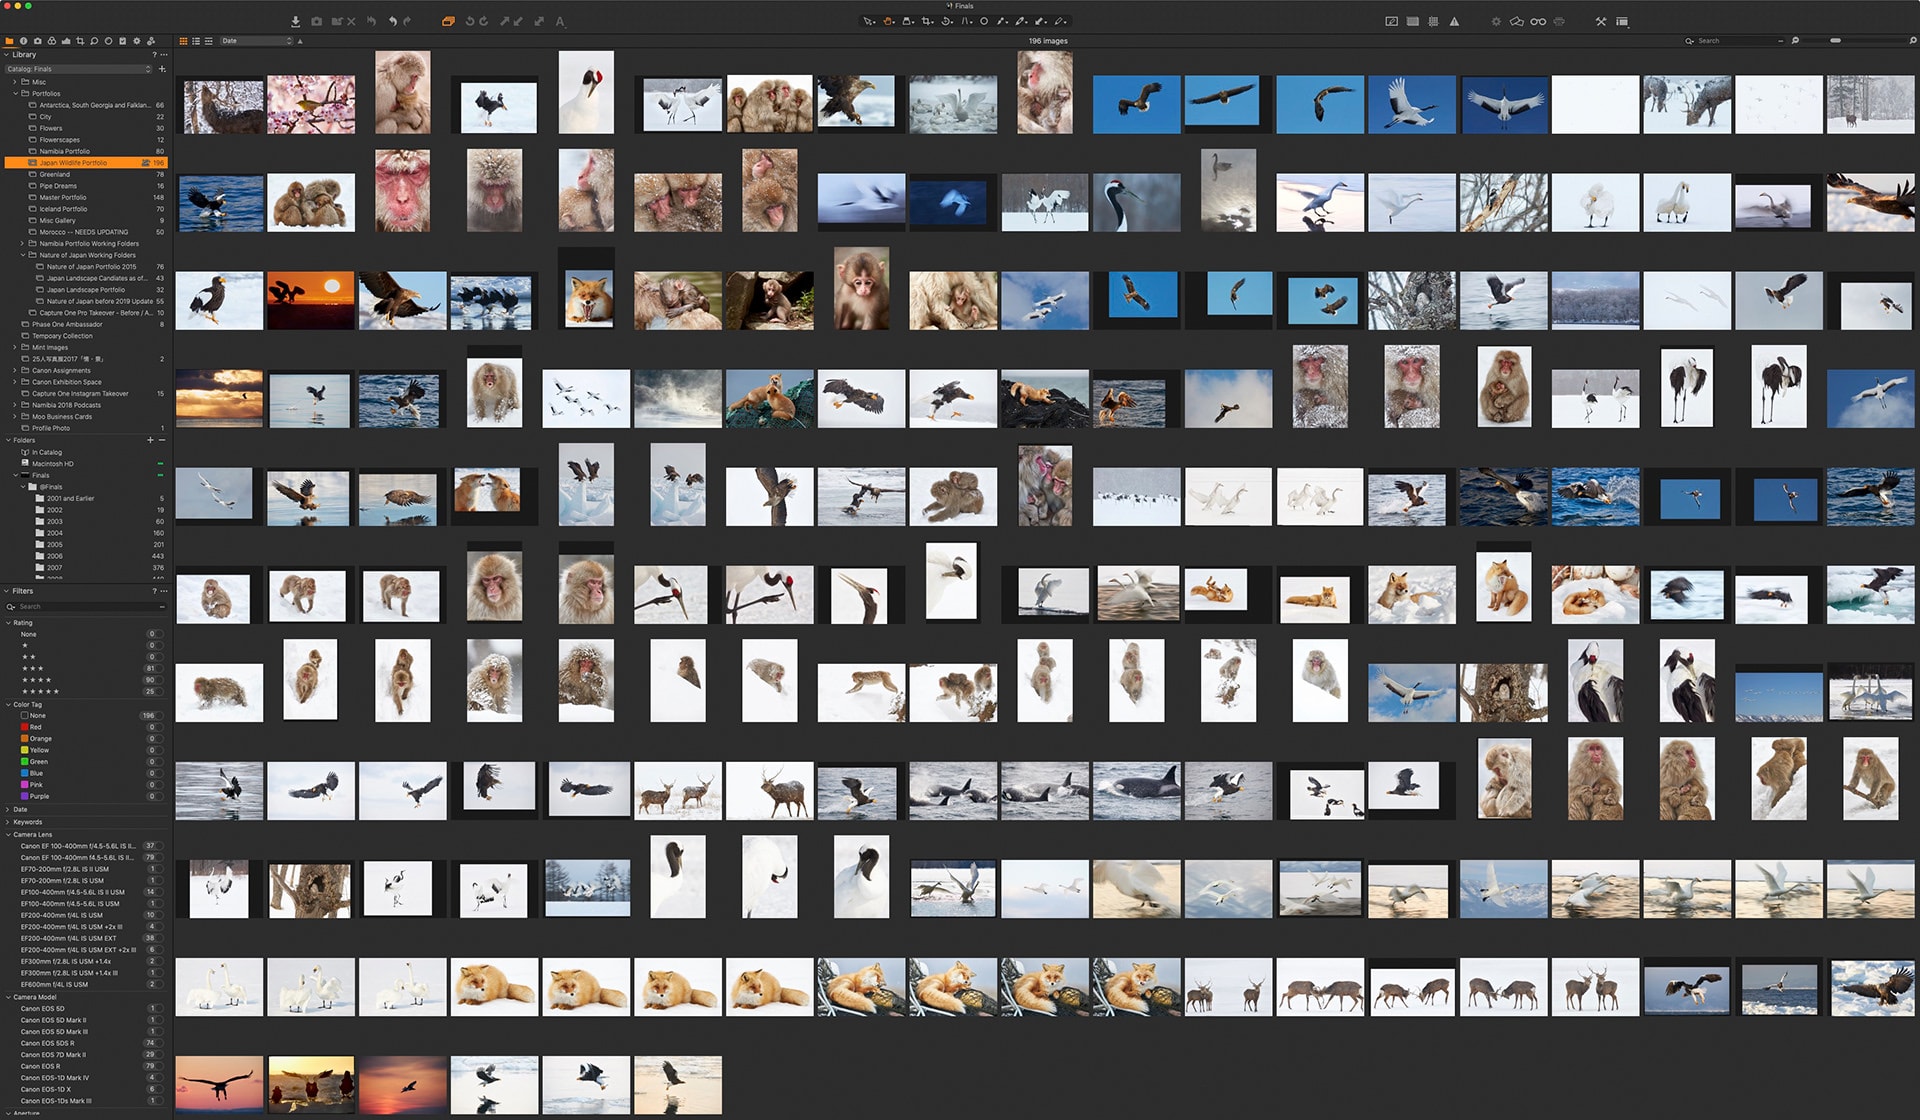
196 Candidates
I was hoping to complete this sooner, having started on Monday, but it's been a busy week, and it's now Friday, and I've just got back to this
The first thing I do when I get to this point is to hone in on those obvious groupings and remove the weaker images. There's no guarantee that the strongest of them will have a place in the portfolio, but this is the next step in condensing the set down, so let's see where that leaves us.
I should also mention that the reason I leave these small groups in until I've finished my run through my images making my selections is
135 Candidates
In a pretty short time I was able to reduce my selection down from 196 to 135, a reduction of 61 images, but these initial passes are always the easiest. I work with those groups, and also as I navigated through the entire set, could identify a number of images that I knew would not stay as I really started to cut down the numbers. It's actually more a feeling, as the image appears on the screen, that it was not as good as the last, and if I'm honest with myself, doesn't really make the grade.
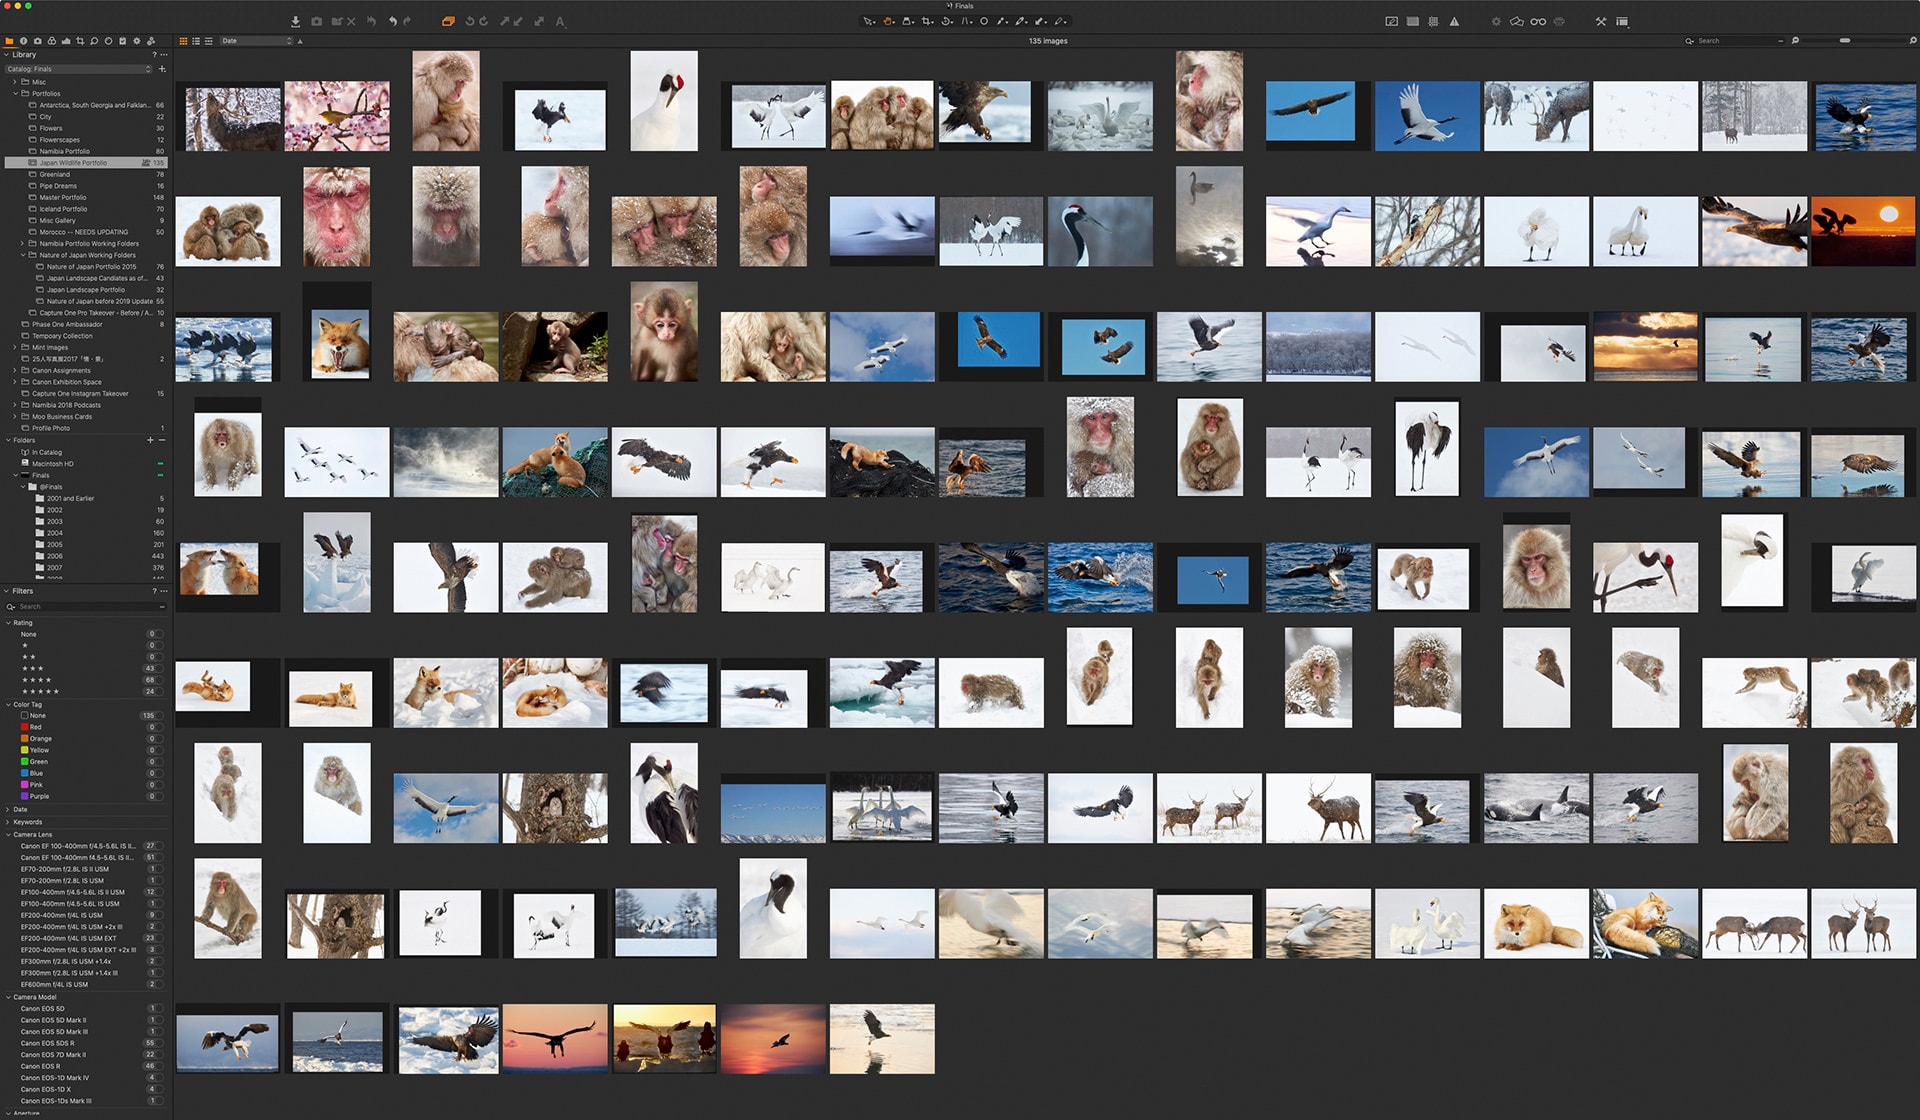
Of course, this is all my personal preference. I won't even bother my wife with looking through the images at this stage, because it's still possible for me to reduce these numbers further on my own.
Gathering Groups Together
The next thing I start to do is to gather groups together of similar images and remove the weaker candidates. For example, I still have a lot of snow monkey shots, so I gather similar images in small groups to work on those. For example, there are a
USE Shortcuts
I also recommend if you haven't already, to try to remember your photo editing software's keyboard shortcuts, to speed up your process. I use Capture One Pro as my raw editor and catalog management tool, but the same goes for any program you might use. For example, to add images to a collection, I first right click it and make it my Selects Collection, and I have specified the Q key on the keyboard as the shortcut to add images to the Selects Collection. I use Q because it reminds me of something being thrown into a pot.
I also like to switch between the large Viewer mode and the Browser mode, so that I can see my whole selection in thumbnails. To do this, I use the predefined Capture One Pro shortcut OPT + COMMAND + V. That essentially just hides the Viewer, which is the large image
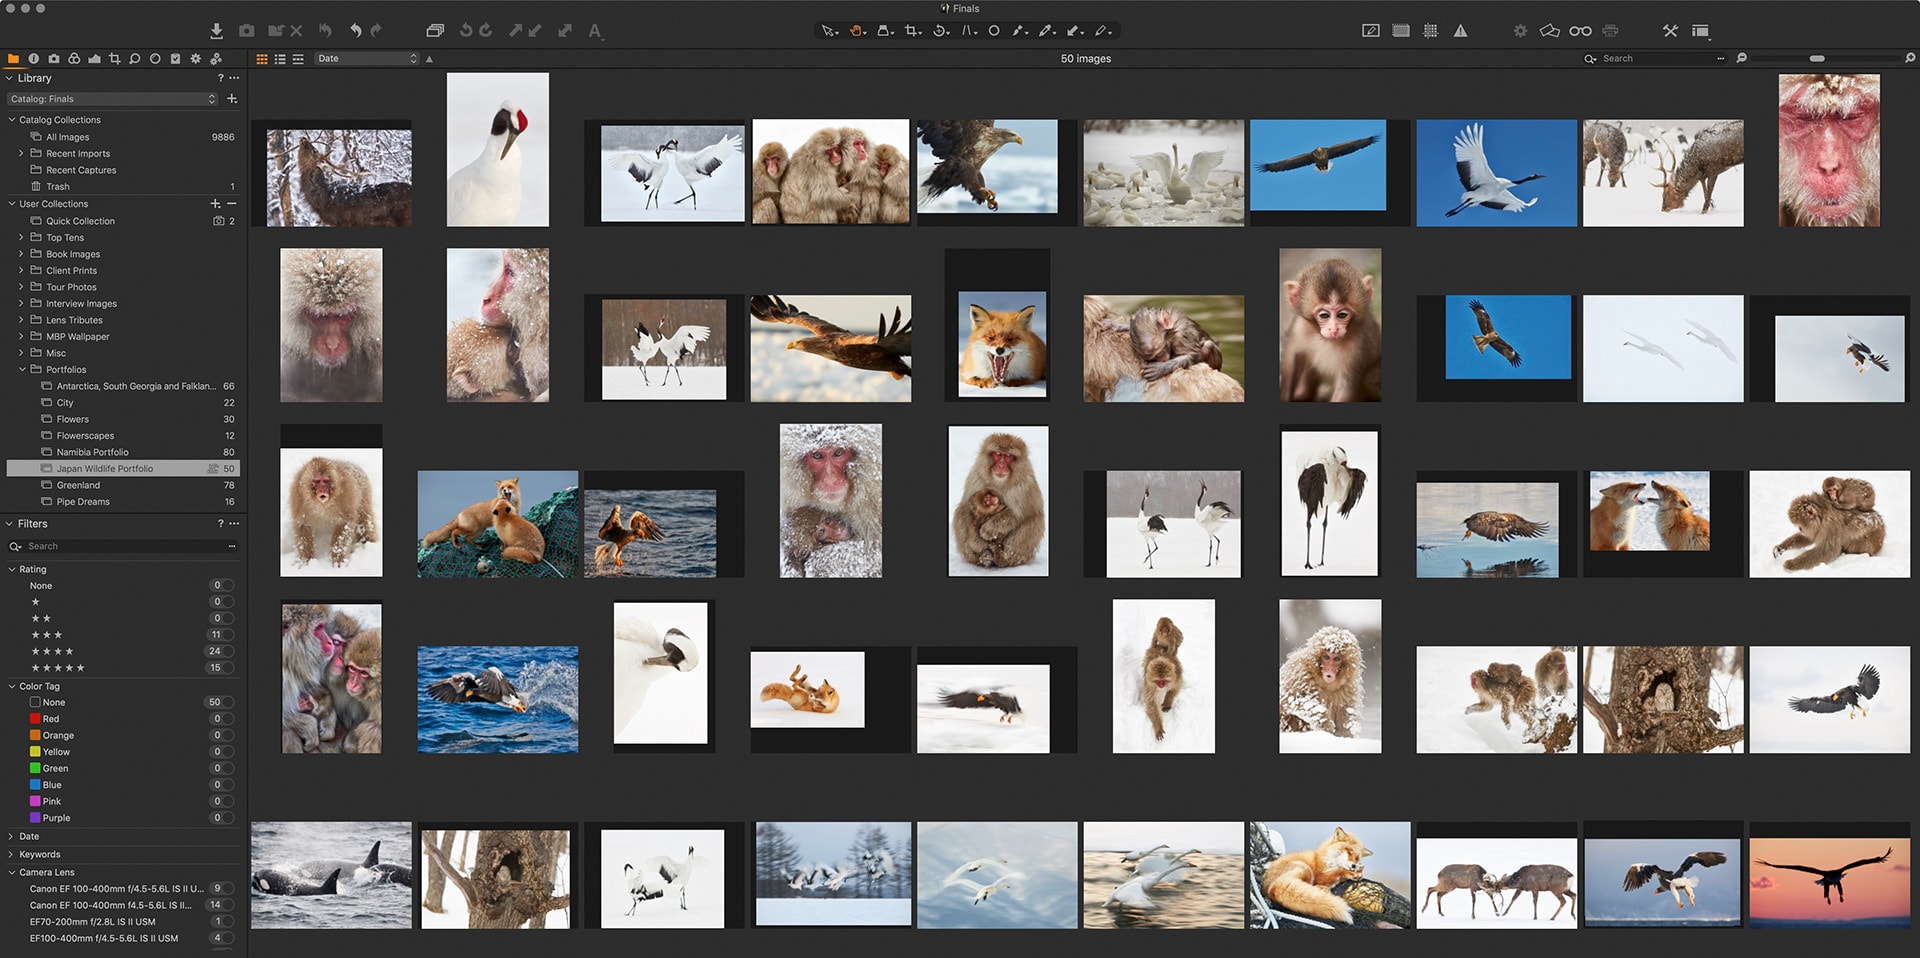
Another trick that I like to use is to select similar images that I want to compare from the full screen of thumbnails, basically clicking on the images while holding down the COMMAND key, then hit that OPT + COMMAND + V shortcut to bring back the main Viewer, and that gives me a screen with multiple images selected, as you can see in this screenshot.
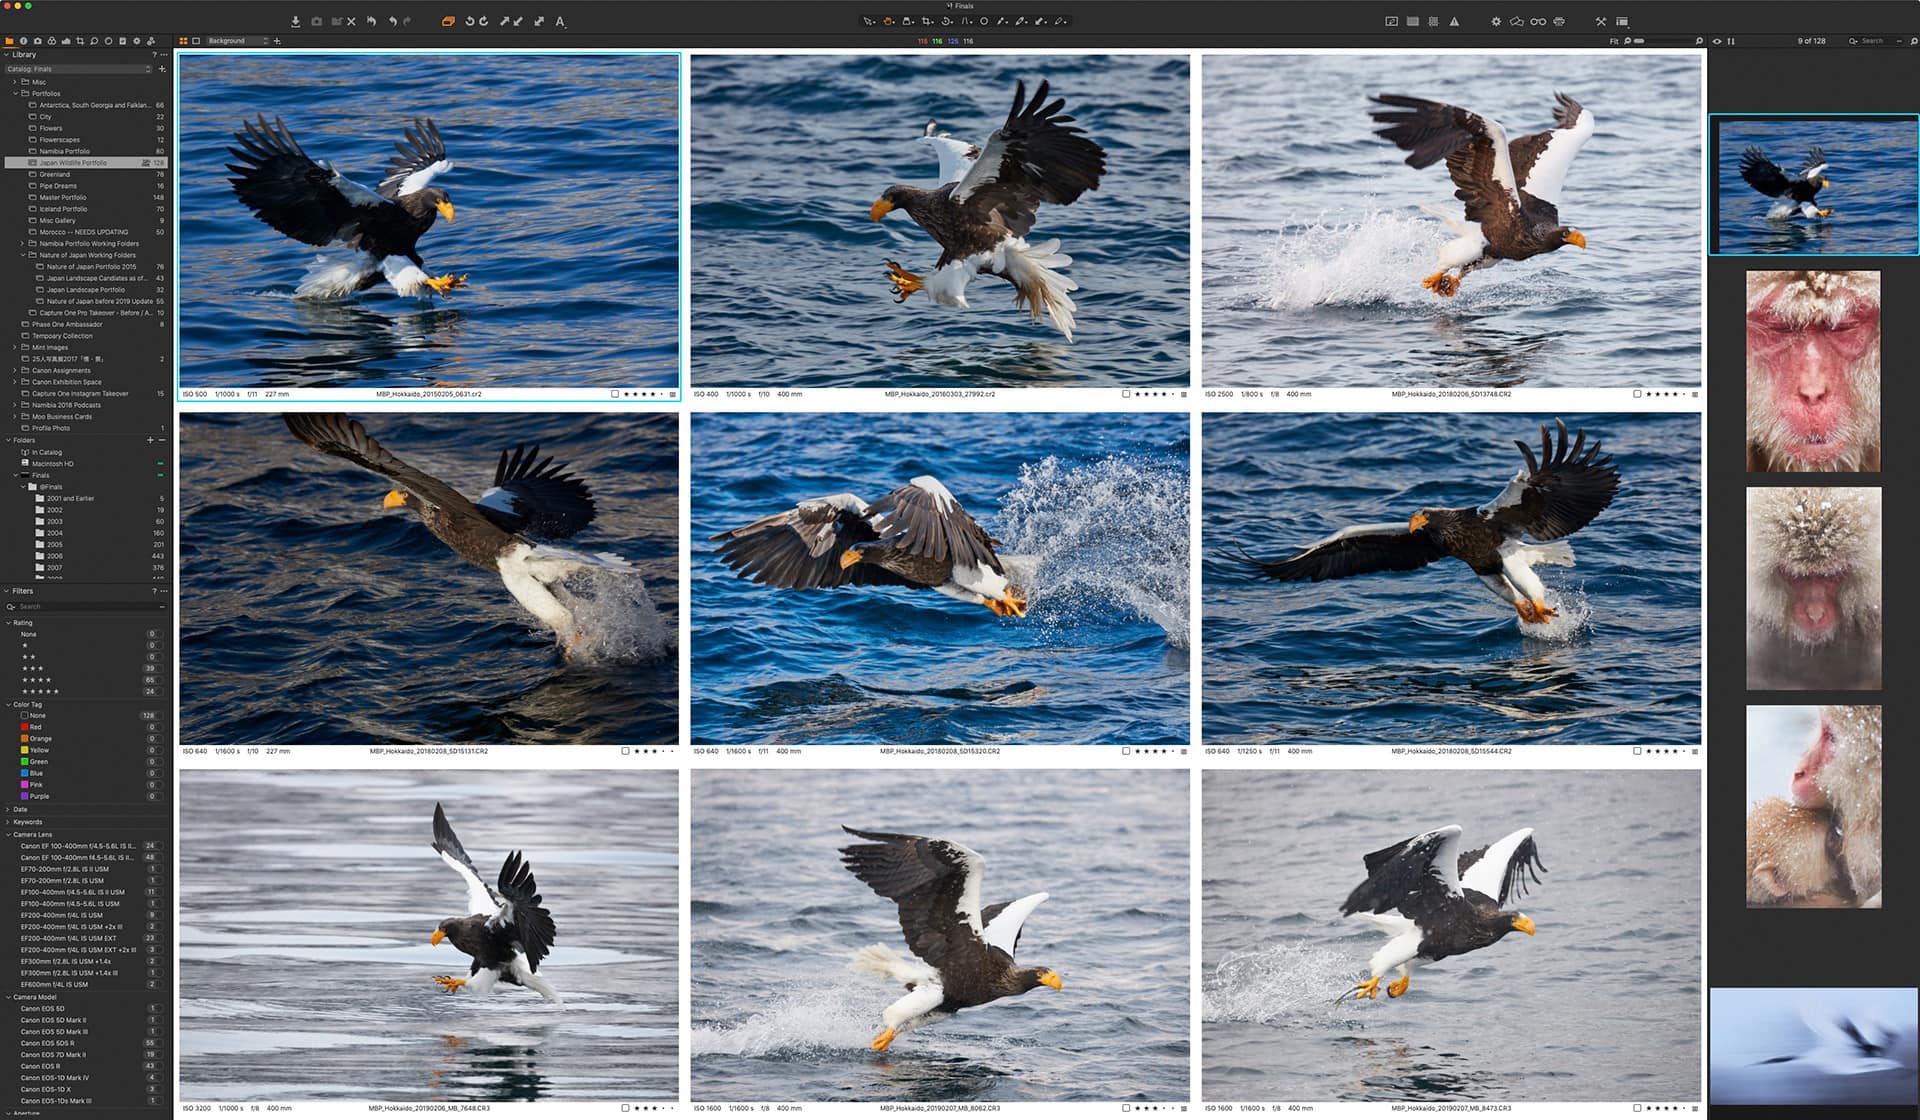
This method works best with a large display of course. I'm doing this process on a 32-inch high-resolution display, so each of these nine eagle shots is about as big as an iPad Mini image, so you can still appreciate the detail
To remove an image from a collection, I usually just hit the Delete key, but if you do that while in the multiple selection view, it removes all selected images, and that's a pain. Then I found the shortcut COMMAND + Delete, which only removes the currently selected image from the Collection, leaving the others on the screen, and that is really useful. The point here is it's important to learn your shortcuts or define new ones if you use a program that enables you to do that and use them to speed up your workflow. I got the nine eagle shots above down to three for now, then moved on to work on another grouping.
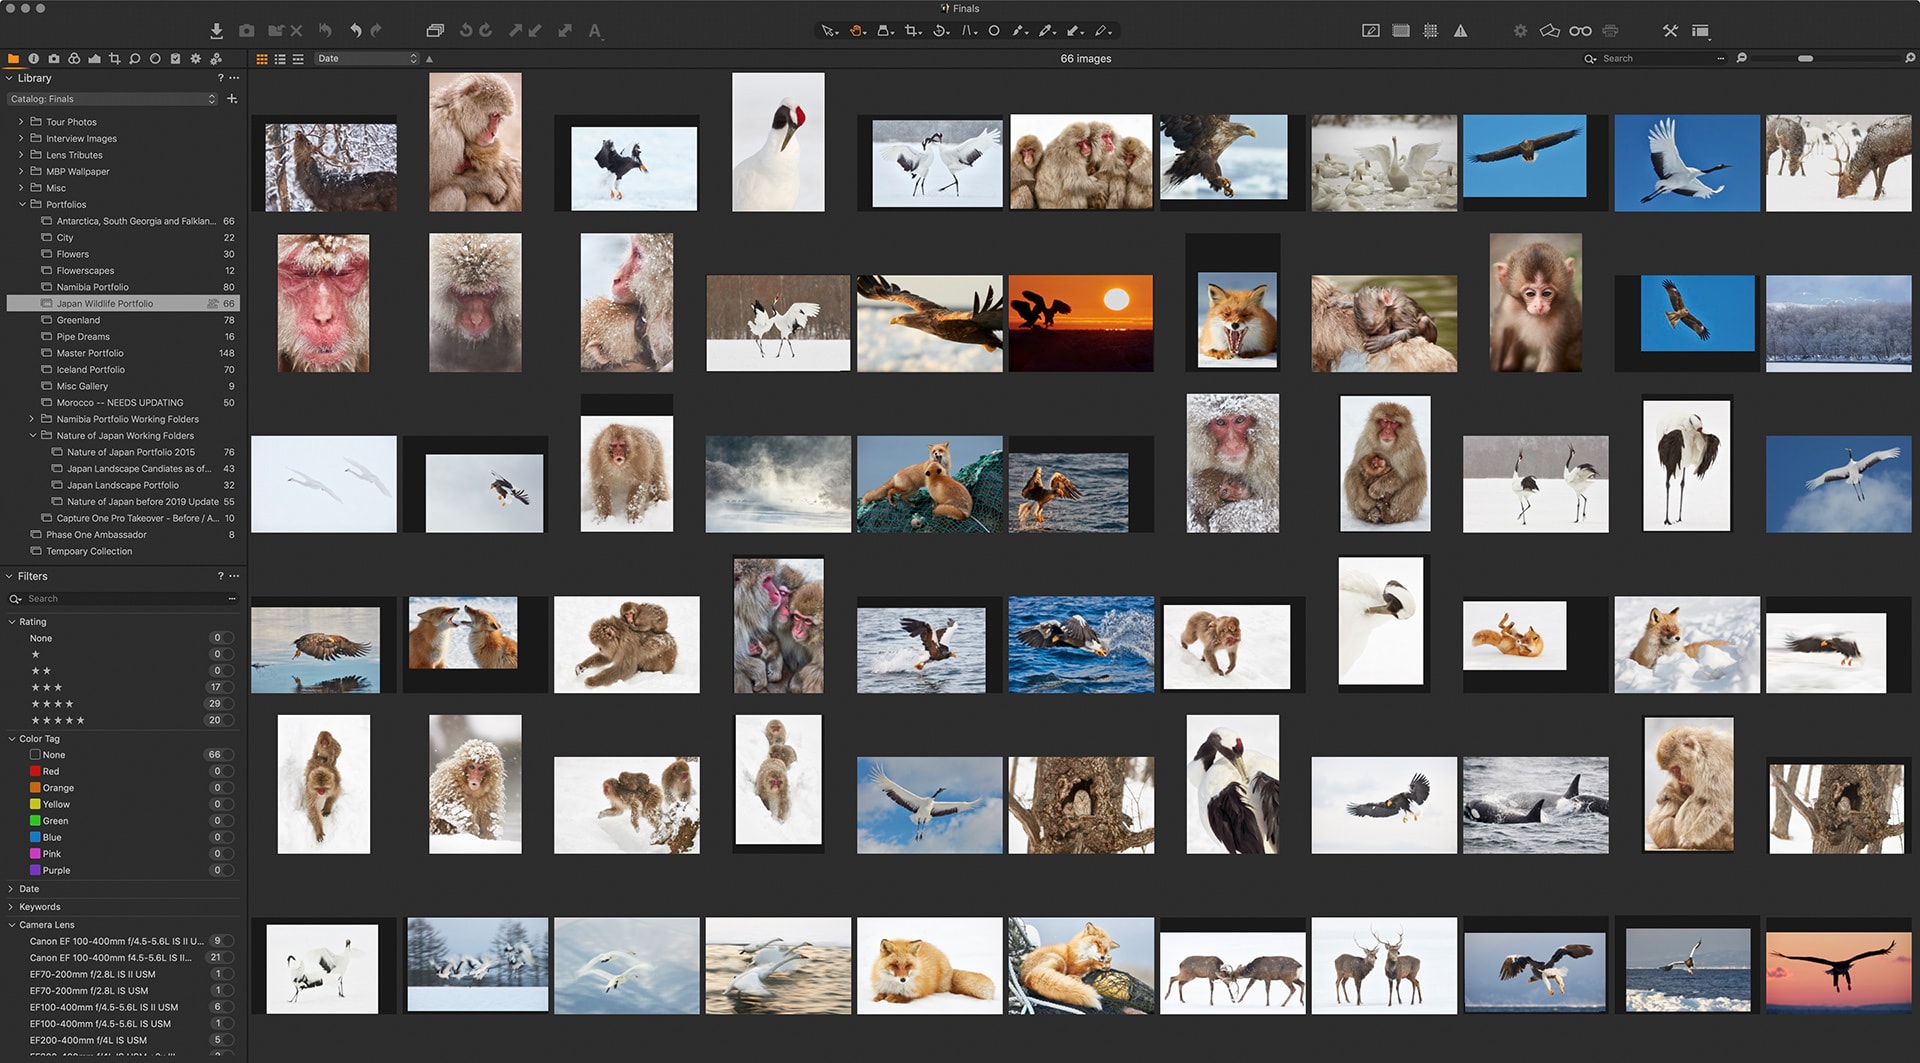
66 Candidates
After another hour or so of critical examination and decision making, I found myself down to 66 images in the selection. One thing that I struggled with, is my decision to kick out some of the images that I like, but I know won't be popular with many people. I actually really dislike doing this because as I always say, my photography is first and foremost for myself, and I'm not too concerned about what others think about it.
People buy my work on stock sites and buy prints from me, and my images help me to sell seats on future tours. This really is all the validation I need, but when push comes to shove, and I have some hard decisions to make, general acceptability, unfortunately, trumps the images that I know will be met by more shrugged shoulders than the others.
The Trusted Critique
At this point though, I decided to use my secret weapon, my trusted critique, and I can't say enough how fortunate I feel that my wife, despite not being a photographer, has a very good eye, knows what she likes and doesn't like, and most important of all, is not afraid to tell me what she thinks. If you have a partner that can help in this respect, you're a lucky person like me. If you don't, it's really important to try and find someone.
The most vital thing though is to find someone that shares your sense of the aesthetic and enjoys your work when it clicks with them, but really, I can't stress enough the importance of enabling that person to be open and frank with you when they don't like something. Having said that, quite often, by the time you get to this point, the chances are that they don't necessarily dislike any of the images, but without the need to remove their own emotional connections, they can be instantly unbiased, and I feel that just having that person sitting next to me as I look, helps me to focus my decisions as well.
We just sat together and literally in twenty minutes removed the final sixteen to get my portfolio down to the goal of fifty images, but the final decision on what to remove was a joint effort. Just with her being there, I found it easier to cut the chord on a few of my straggling doubts.
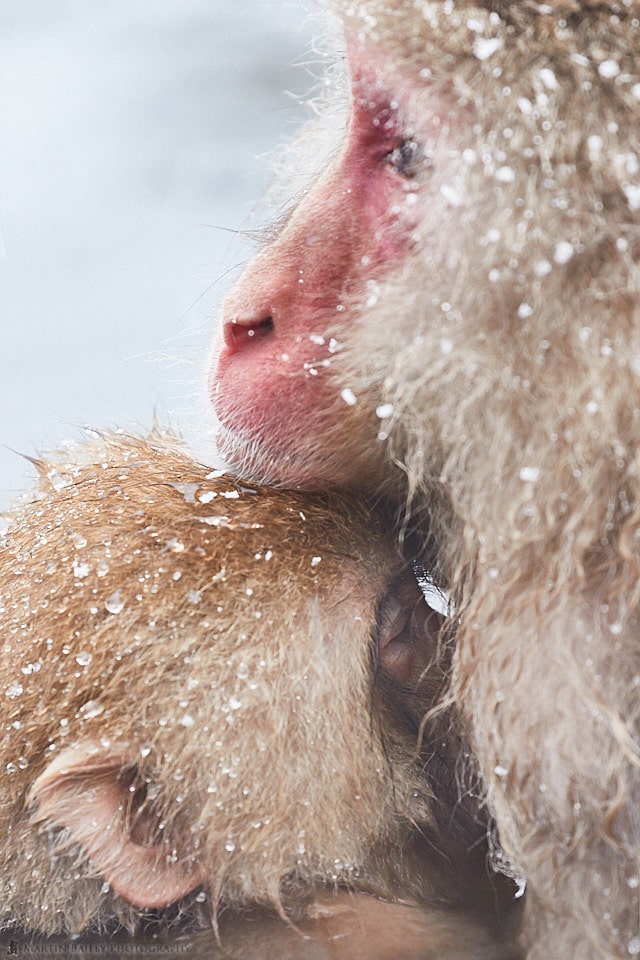
Perhaps the hardest decision was to remove the mother and baby snow monkey shot from my very first visit back in 2009. I have really enjoyed that shot over the years, but my wife and I both agree that the sentiment of the caring mother in a harsh environment is now better embodied by this image from 2015.
I then did a couple of passes on the final selection in my usual final test, which is to select all images and just watch them all go by in a slideshow. If I get a sinking feeling as any of the images are displayed on the screen, I would instantly remove them, but at this point, I'm really happy with this selection. I feel that it accurately represents where I am in my Japan-based wildlife photography as May of 2019.
Ignore the Untrusted Critique
I'd also like to advise you to try to ignore the untrusted critique. There are many ways to learn what people think of our work, but asking the wrong person for feedback can be more harmful than helpful.
My wife can literally tell me anything because I trust her. I might not always agree, but because I trust her, her words are never daggers, even when they are sharp and pointy.
There are many people that will offer their thoughts on your images, and this is fine as part of the growing process, but we must learn which voices we can trust and heed, and which we should not take so seriously.
One last word of caution on this though, is to be careful with family members that want to protect your feelings. My wife, probably my most trusted critique, will tell me when she things something sucks. If you ask a family member or friend and all you hear is that everything is beautiful and you are an amazing photographer, you may need to find a new trusted critique. Of course, you may be an amazing photographer, but in my experience, even the best of the best need some external direction from time to time, and it's vitally important to find someone that can give you that.
Update Raw Engine and Rework Images
I also wanted to quickly mention that going through this process is a great opportunity to update the development or processing engine used to process your images. Many of the images I selected during this week were processed as far back as Capture One Pro version 9, with many still at 10 or 11.
It's a great time to click on the button to upgrade the processing engine to the latest version, and although the difference is often minimal, sometimes you see a bit of additional quality that you were not aware of snap into view as the preview is updated.
I also reworked some of these images a little bit, bringing them into line with my sense of the aesthetic as of 2019. We change, and I am fine with the idea of reworking images as we use them sometimes years after we originally shot them. This is one of the core reasons that I like to work on my images in a raw editor, and in a non-destructive way.
Since switching to Capture One Pro in 2016, I have only edited a handful of images in Photoshop, requiring me to save my edits baked into the file. Everything else is still in raw format, and therefore I can continue to change it easily without losing my changes and benefit from the updates in the raw processing engine as I have done today.
Creating the Gallery
Now that I have my photos selected, it's time to prepare the portfolio gallery. I'm still using NextGEN Gallery from Imagely for my still photography galleries, although there has been a problem with their Lightbox that causes the first image in a post to display sometimes even when you click an image other than the first image. I'm finally making some progress with them on this, but this issue has been outstanding for an embarrassingly long time. I have looked for alternatives, but currently, the only thing that comes close is still not as feature rich as NextGEN, so I'm still using it.
I ran through my final selection and ensured that all of the images had titles and keywords, then exported them as full-sized JPEGs to a subfolder in my Portfolios folder in Dropbox. From there I uploaded the full-sized images to a NextGEN Gallery on my website. They have to be full sized because people can buy the full-sized image for commercial and editorial use directly from my portfolio galleries. Then they are automatically resized to my web size and watermarked by the NextGEN Gallery plugin. I then embedded the gallery in a new Wildlife of Japan Portfolio page.
Propagating the Portfolio to Devices
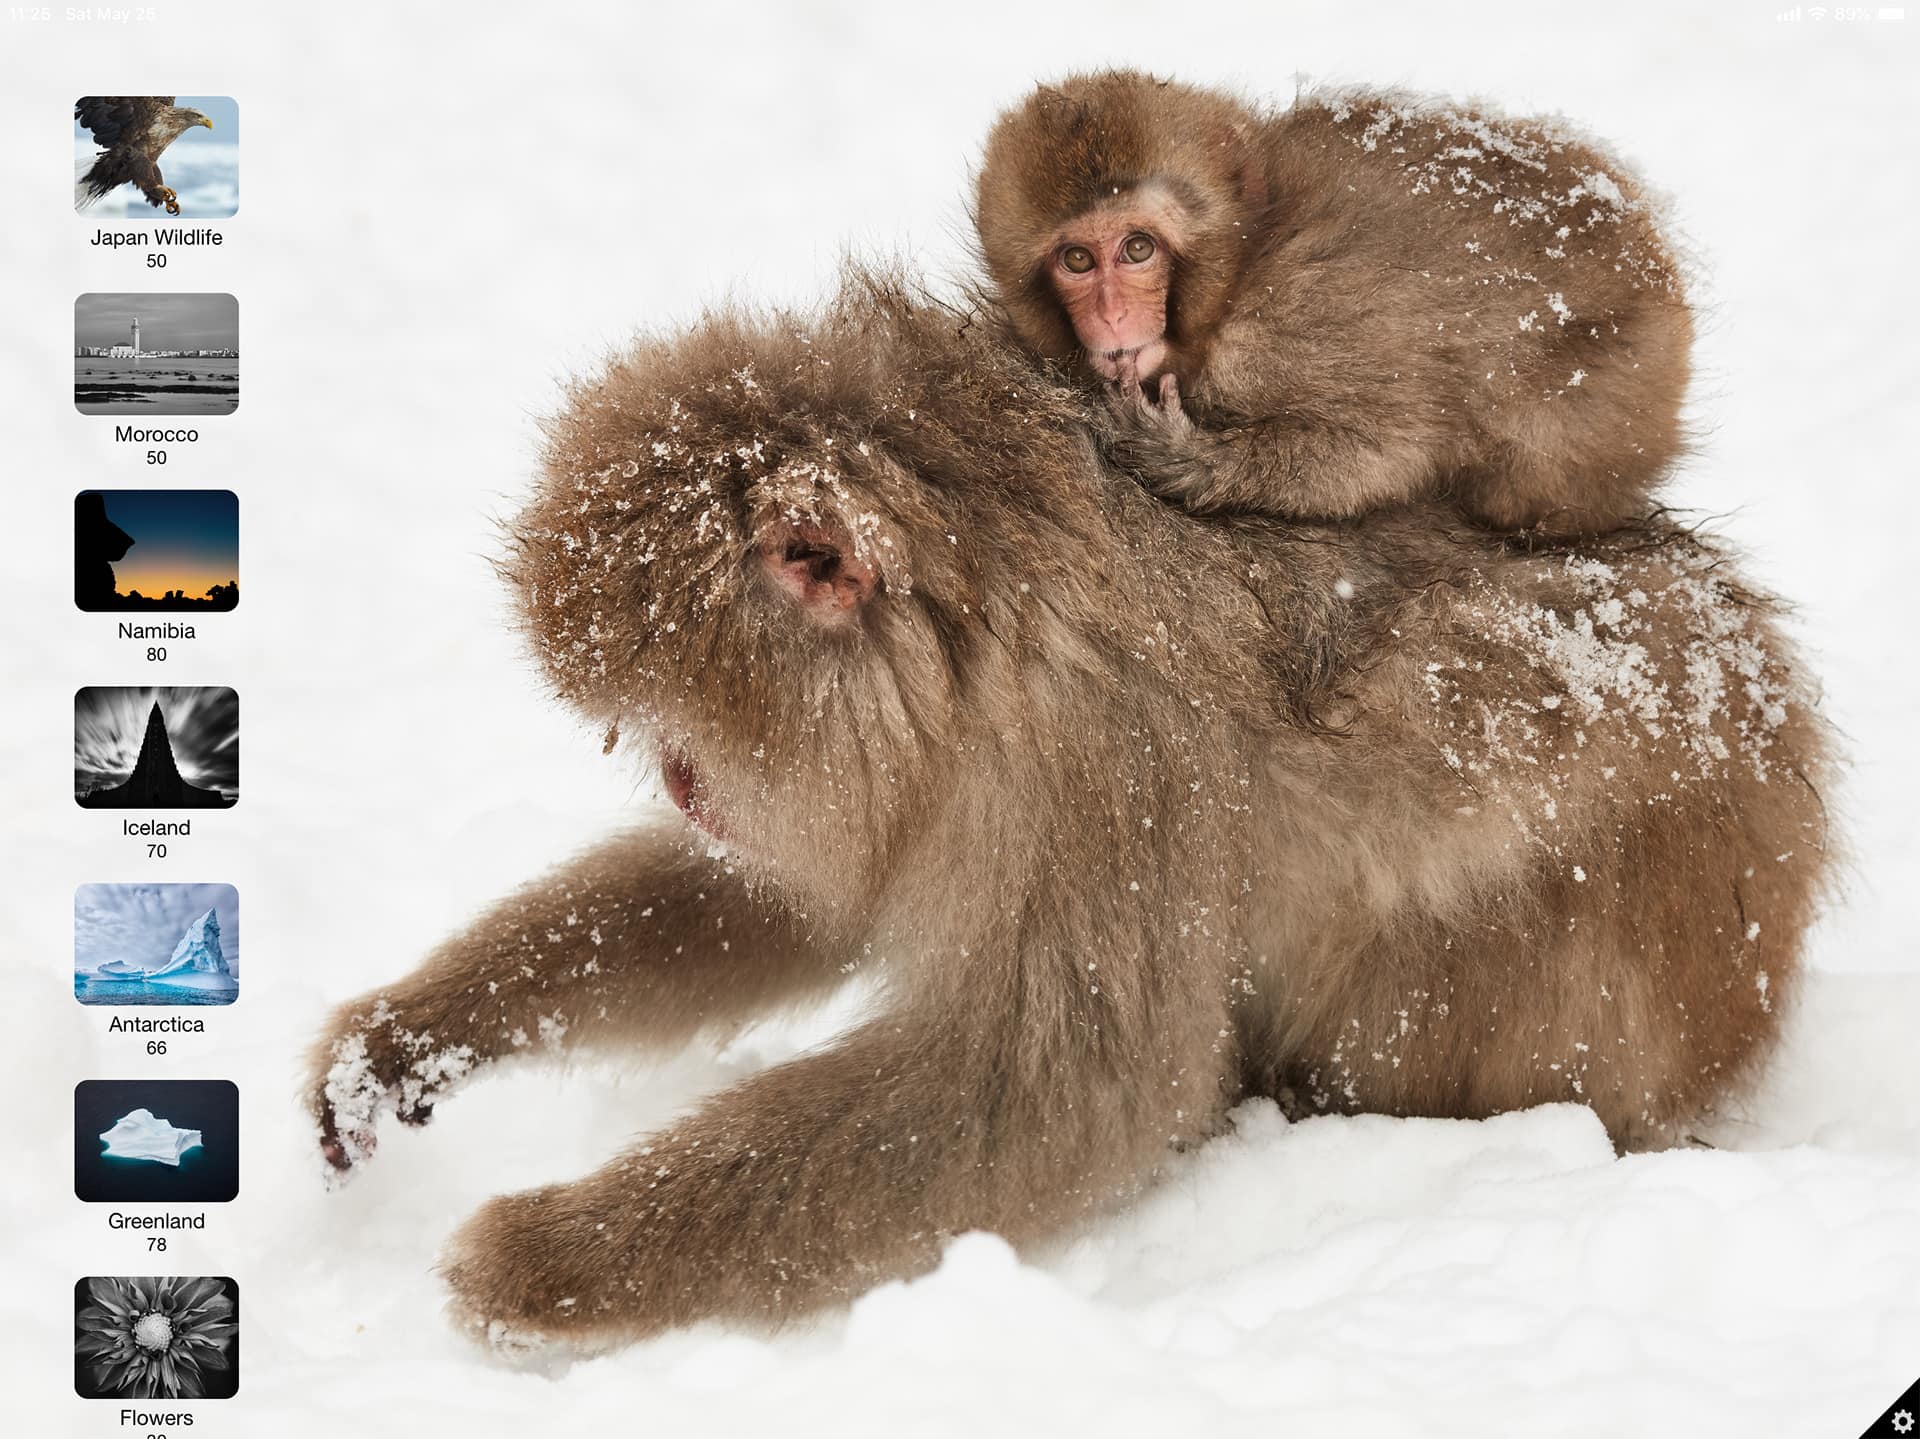
The final step is getting my portfolio onto all of my devices so that I can show people the sort of work I do. I'm still using the Portfolio for iPad App that I talked about in Episode 585, but the developer of this app is apparently nowhere to be seen, which makes it doubtful that it will be maintained or improved, which is a shame because it's a good app. Because I have it set up automatically sync with my Portfolios folders in Dropbox, when I opened the app after exporting my images, it took a few minutes to sync, but then my new Wildlife of Japan portfolio appeared in the app, and I updated the background with a shot from the new set, as you can see in this screenshot.
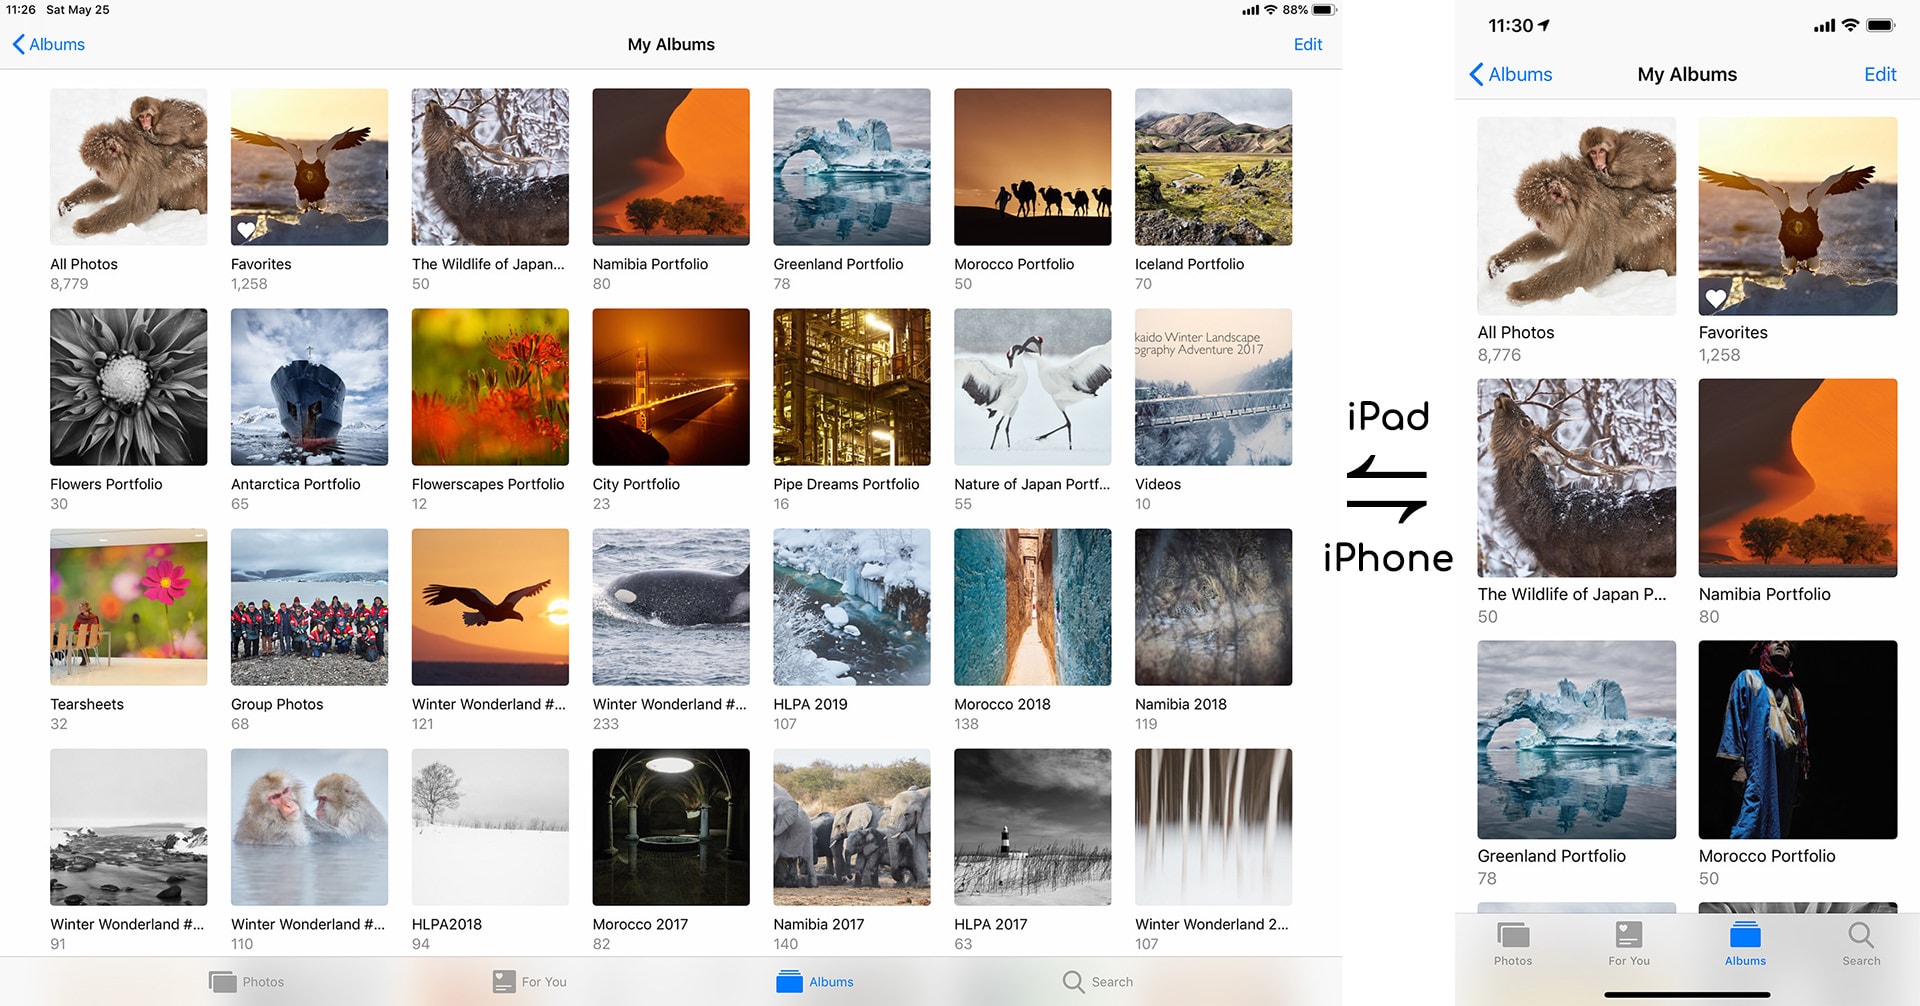
The last thing I do is import the full-sized JPEGs into the Apple Photos app, into a Wildlife of Japan Portfolio Album. This automatically then gets propagated out to all of my devices, so I not only have an easy to access way of quickly showing the images in the Photos app on my computer, but I automatically get the same album on my iPad and iPhone, as you can see in the following two screenshots.
You may not want or need your portfolios on all of your devices, but I've found over the years that as I talk to people about my work and my tours, it's very useful to be able to pull out a device and share the photos. I know I've managed to get people to sign up for tours and sold prints by doing this, and now, for example, using a Square credit card reader, I can actually process print or stock license sales, and even tour sign-ups, directly from my phone or iPad, so it's worth me doing this.
Self Doubt
To close, I'd like to talk just a little about the self-doubt and vulnerability that we face as creatives. During this week, I've come back to this project a number of times and felt pretty confident that I was moving in the right direction. Then, last night, as the fatigue of the week caught up with me, for a while I felt really negative about the results. I actually felt like deleting the new portfolio and gallery and writing a new post about something completely different.
Knowing how being tired can affect our appreciation of our own work, and that it's kind of natural to doubt your own work, I closed my laptop and watched a movie with my wife, before getting a nights sleep. When I woke up this morning, and completed the synch of my images and flicked through the work again on my iPad, a knowing smile grew on my face, and I felt happy with the set again. It's not the best portfolio in the world, but it's a good representation of where I am in my own photography with relation to Japan Wildlife work, and that's the whole point of this exercise.
It's natural to doubt our work, and being self-critical is an important part of this process, but it's important to understand how being tired can affect our emotions and try to avoid doing anything rash during those periods of doubt. I feel the portfolio has worth, and I'm happy today that I spent the time to do this during this week. I'm not sure that I'll have time to do the Japan Landscape Portfolio before I leave for Namibia in a week's time, but that's the next thing that I would like to do, then maybe when I get a little more time, compose some background music and create a new video slideshow of each set with some video clips interspersed as well.
Check Out the Wildlife Portfolio
So, that's it. We'll wrap this up here. If you are interested in checking out the new Wildlife of Japan Portfolio, or any of them for that matter, select the Portfolios menu item above and you should see a dropdown menu with thumbnails for all of my portfolios. If you have any comments about the process or the portfolio, please leave a comment below. I'd love to hear from you.
Japan Winter Wildlife Tours
And of course, if you'd like to join me on the tours on which I shot most of the images that we've looked at today, please check out my Tours & Workshops page for the latest tours with availability. At the time of writing, there are just two places left on the 2020 tours, and I have just started taking bookings for the first 2021 wildlife tour so check that out if you are interested.
Show Notes
Check out the new Wildlife of Japan portfolio here: https://mbp.ac/wojportfolio
See all of my portfolios here: https://mbp.ac/portfolios
Audio
Subscribe in iTunes to get Podcasts delivered automatically to your computer.
Download this Podcast as an MP3 with Chapters.
Visit this page for help on how to view the images in MP3 files.

Hi Martin,
Thank you for sharing the description of one more of your processes with us. Like in the past it inspires me to reflect on my onwn workflow.
Today I have a technical question regarding your use of the NextGEN Gallery plugin for you: Being a user of this plugin myself, I wonder how you manage to show a minimum black border around your images in the browser window. In my galleries the Pro Lightbox always uses the full window without border to show the image (unless the aspect ratio of the image is different from the one of the window – which results in a border either top/bottom or left/right).
I know that I could create the boarder in fullscreen mode by sizing the images accordingly, but I don’t see how to achieve the same (dynamically) for smaller sized windows. Is this achieved on your page by a setting in NextGEN Gallery that I am overlooking or a CSS customization that you can share?
Thanks for your help and regards,
Michael
Hi Michael,
You’re very welcome. Thanks for stopping by.
To add that border, I added the following CSS to the WordPress Additional CSS field, after clicking Customize in the toolbar when logged in as the adminstrator of my site.
/* Add a border around NextGen Gallery Lightbox images */
.galleria-theme-nextgen_pro_lightbox .galleria-stage {
margin: 20px !IMPORTANT;
}
I hope that helps.
Regards,
Martin.
Hi Martin,
This is exactly what I have been looking for.
Thanks,
Michael
You’re welcome, Michael. Glad to be of help.