
Today I’m going to provide some clear evidence of the benefits
I have been meaning to do this for a while, as although I’ve talked about Exposing to the Right and how increasing the ISO can help to reduce noise, I do realize that this is counterintuitive. I also received an email from listener Matthew Wells, as follows:
In several podcasts, you mention how you will shoot higher ISO levels by exposing to the right to brighten the image to reduce the visible noise. Could you put together a short video for your Youtube channel to show your methods for doing this? I have tried to play with the idea a little without success so far.
Matthew Wells via email.
Thanks very much for your suggestion Matthew. I decided to do this as a straight post rather than a video so that I can provide some examples that you can open and look at directly, and I think this format will help more for now.
Why Take Control?
So, the first thing I want to do is explain why I take control, with an example you can try for yourself really easily. All you need is something white, and something black, or a very dark color. Literally, a large piece of paper or a bedsheet is fine for the white thing, and a dark coat will work for the dark thing, and this works best if the things you find are not too glossy or shiny.
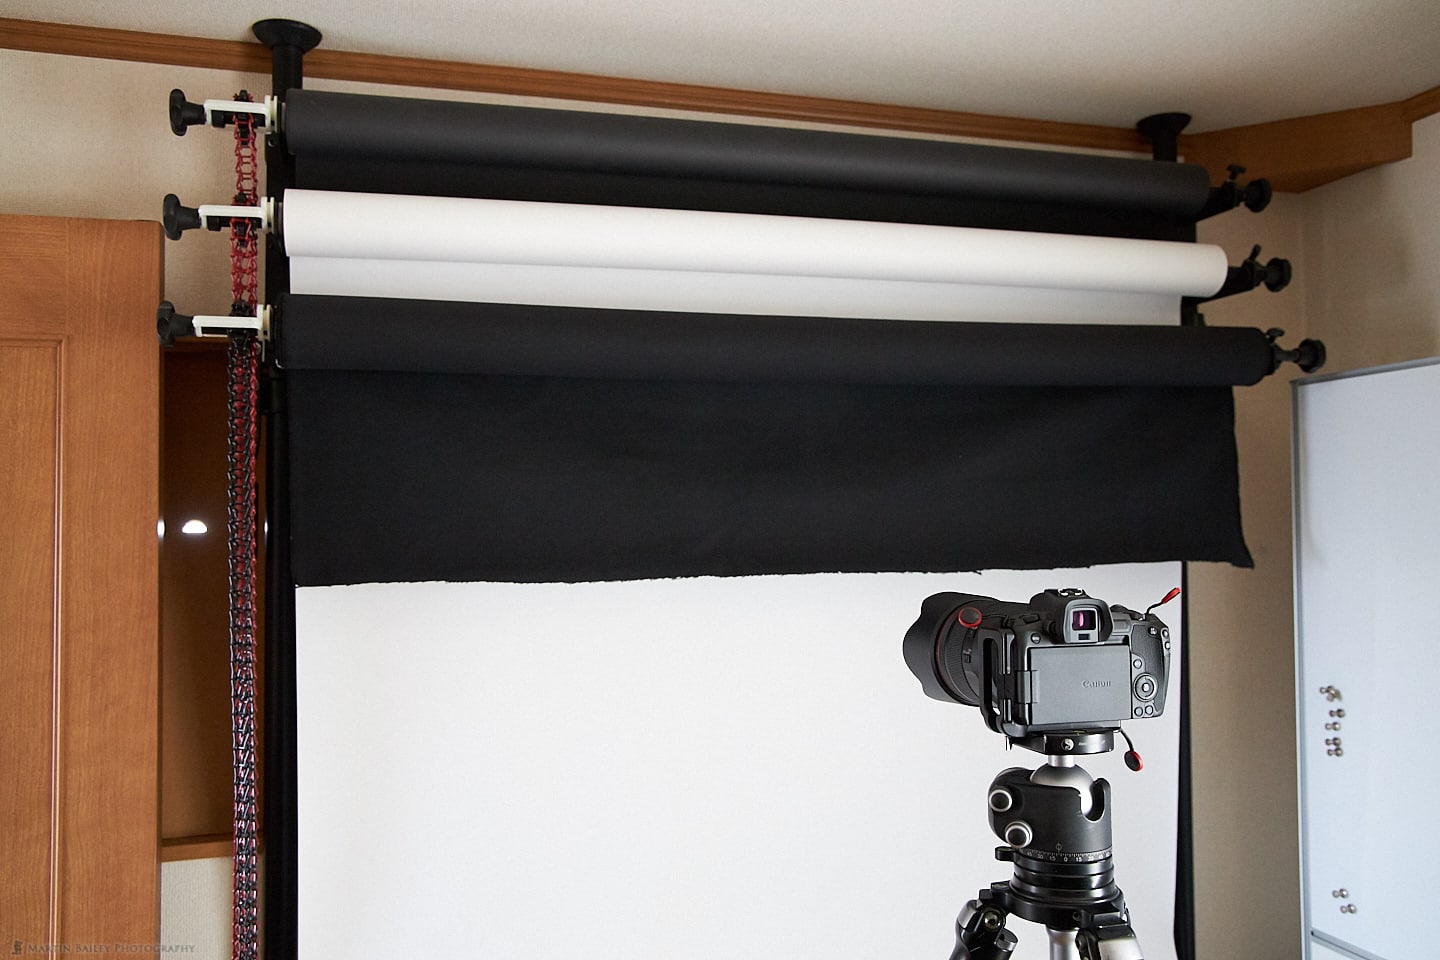
In my studio, I have both white and black backgrounds on a pulley system so that I can change the background for my photographs quickly. I have a roll of black paper that we won’t use for this, and a roll of white paper, and a roll of felt cloth, that we will use. You can see what I mean in this photograph, with the black background extended part way so that you can see them both.
White is Grey!
Here now, is a photograph of the back of my camera, in LiveView, and set in Aperture Priority mode with Auto-ISO turned on and no Exposure Compensation dialed in. There are a couple of things that I want you to look at. Firstly, while noting that I’m pointing the camera at a sheet of white paper, look where the data of the histogram is falling. All three channels are only one third from the left side. This means as you can see from the photo that the white background would be recorded as grey, not white.
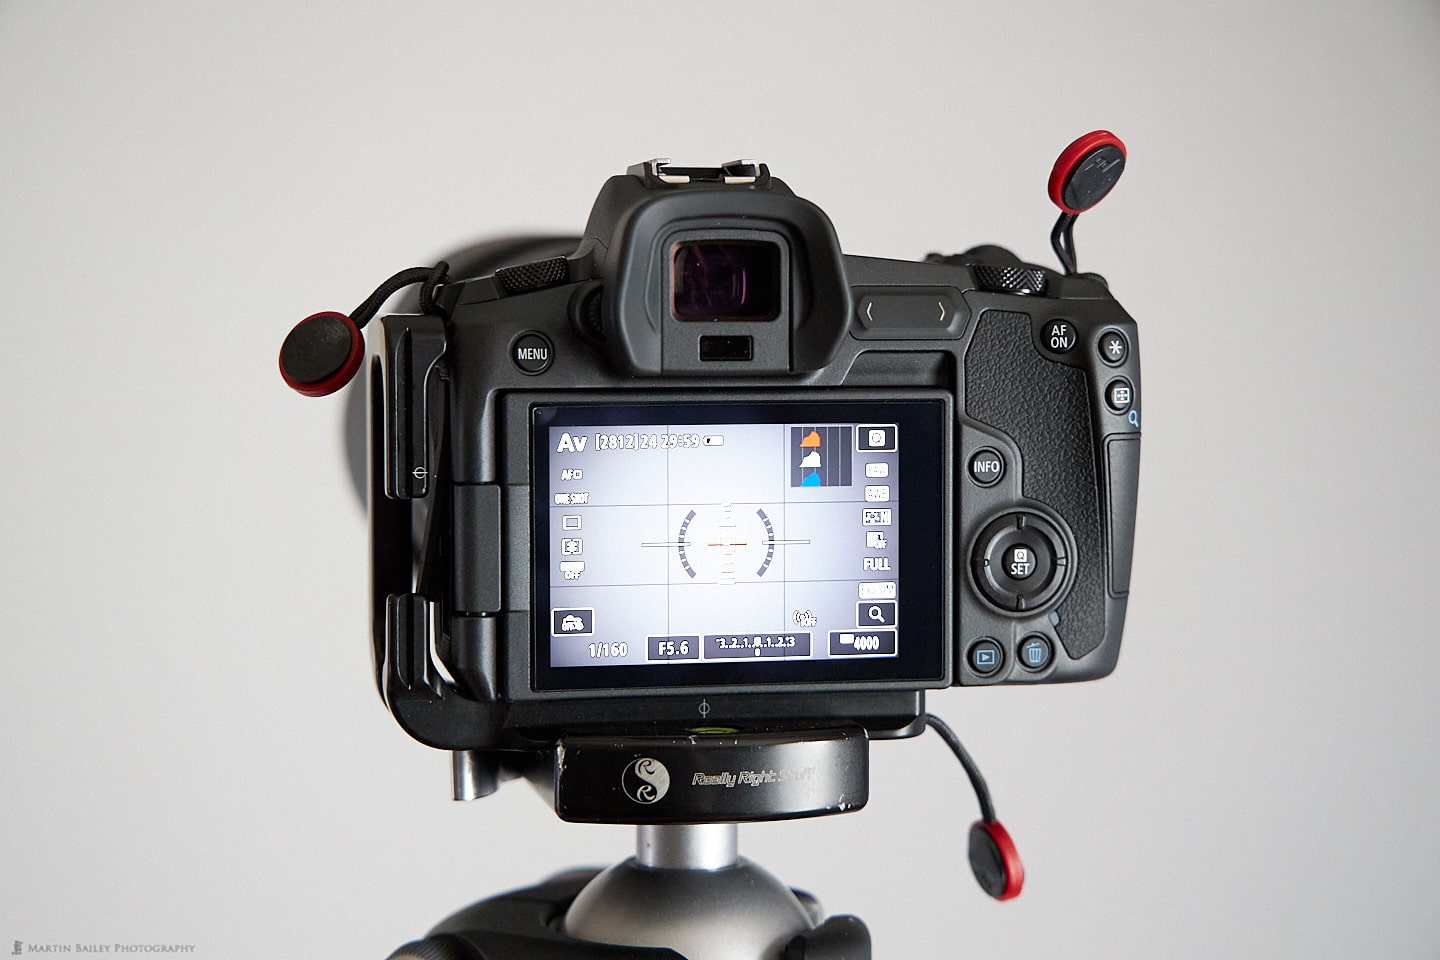
The other thing that I want you to look at is that the shutter speed has been set to 1/160 of a second and the ISO is 4000. I set the aperture to f/5.6 myself, and the camera has automatically selected the other settings.
Black is Grey Too!
Now let’s look at another photo, and the only difference between the two images is that I’ve drawn down the black felt background, as you can see in front of the camera. I didn’t touch the camera other than to half-press the shutter to display the exposure details. Look at what’s happened to the color of the background in LiveView. Nothing! The black background is also grey, and the histogram shows us that it’s very similar, if not almost identical to the grey in the photograph of the white background.
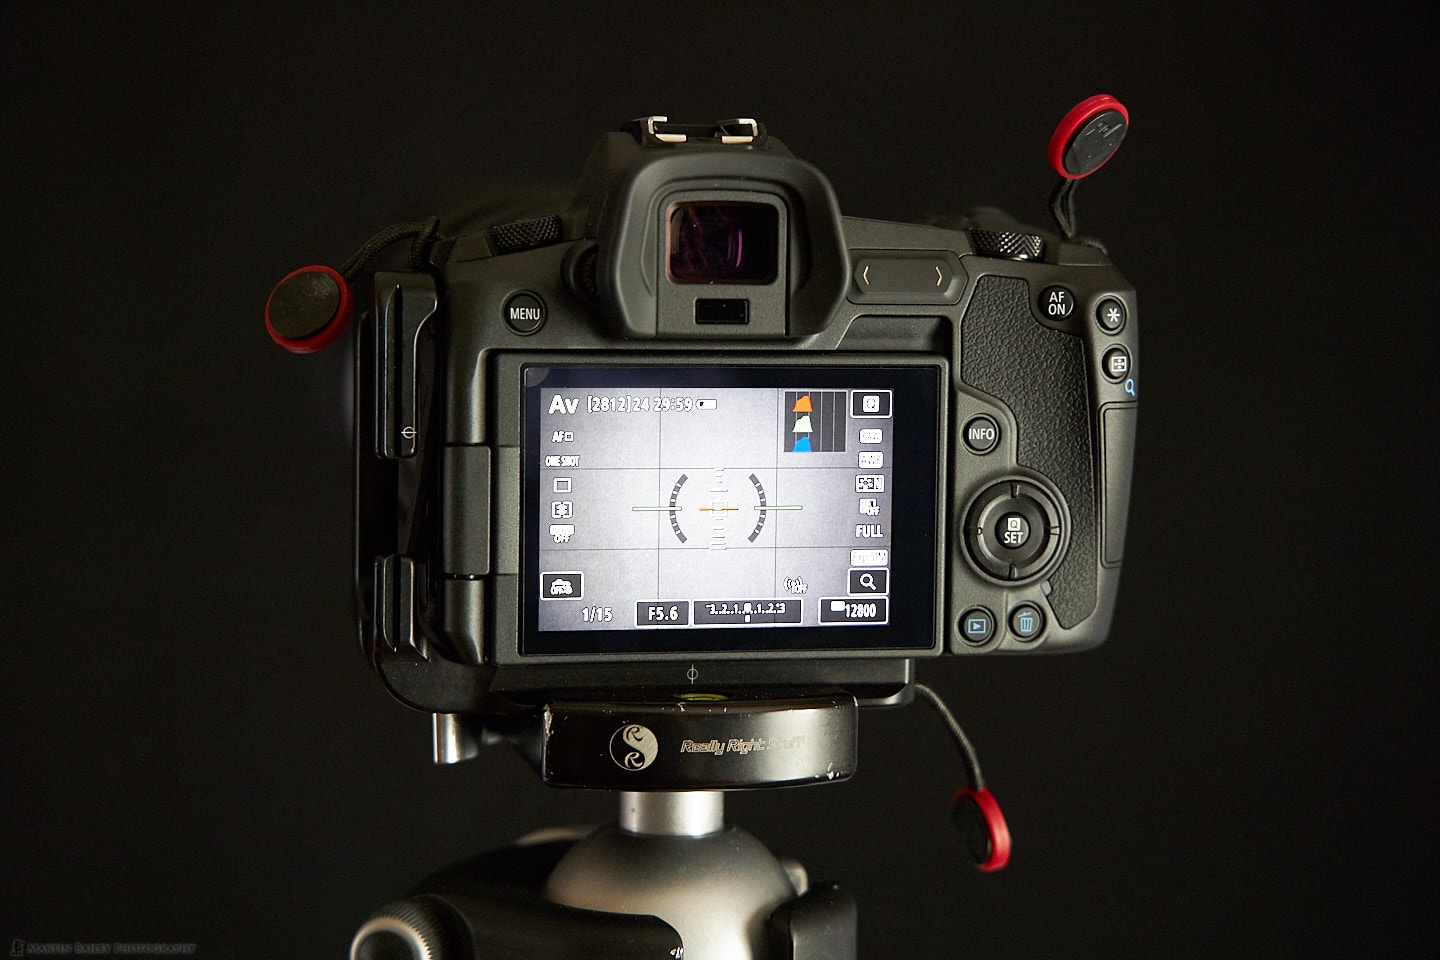
We can also see that the settings have changed. The shutter speed has been increased to 1/15 of a second from 1/160 and the ISO has gone from 4000 to 12800. Using the Exposure Calculator in my Photographer’s Friend app I can quickly see that the camera has changed the exposure from 17 2/3 EV to 16 EV, a difference of one and two-thirds of a stop. Just to quickly walk through this, the shutter speed change is 3 and a third of a stop, and the ISO change is one and two-thirds of a stop, so if we deduct the ISO change from the shutter speed change, we get one and two-thirds.
I could have left Auto-ISO off to make that easier to understand, but I also wanted to show how the camera would want to increase the ISO instead of taking the shutter speed much longer.
So, what does this tell us? Well, for one thing, it tells us that our cameras are still pretty stupid when it comes to metering certain scenes and setting its exposure. This is why I almost always shoot in Manual mode. You can use Exposure Compensation too, and which method you use is completely up to you, but I find using Manual easier, mostly because I’ve been doing it so long, but also because as the size and position of the various elements in your frame change, the exposure will also change, so you have to continuously adjust the Exposure Compensation, especially when you are Exposing to the Right, which we’ll discuss shortly.
This is extremely important when photographing things like the Red-Crowned Cranes that we shoot on my Japan Winter Wildlife Tours. These are a white bird against a white background when they are on the snow, but when they fly, the background is much darker, and as you’ve seen, the camera always tries to make a dark scene brighter and a bright scene darker.
So if you dial in up to plus two stops of Exposure Compensation, which is required to make the snow and white bird actually white, then recompose and start to include a darker background, the camera will increase its exposure to lighten the dark background, and the white bird essentially becomes completely over-exposed.
A Real-World Example
Here is a screenshot of Capture One Pro showing two photographs that I shot as I explained this to a participant on this year’s tour. To prove the point, I put the camera into Aperture Priority mode and pointed my camera down so that only white snow was in the frame. This is how I set my exposure in Manual
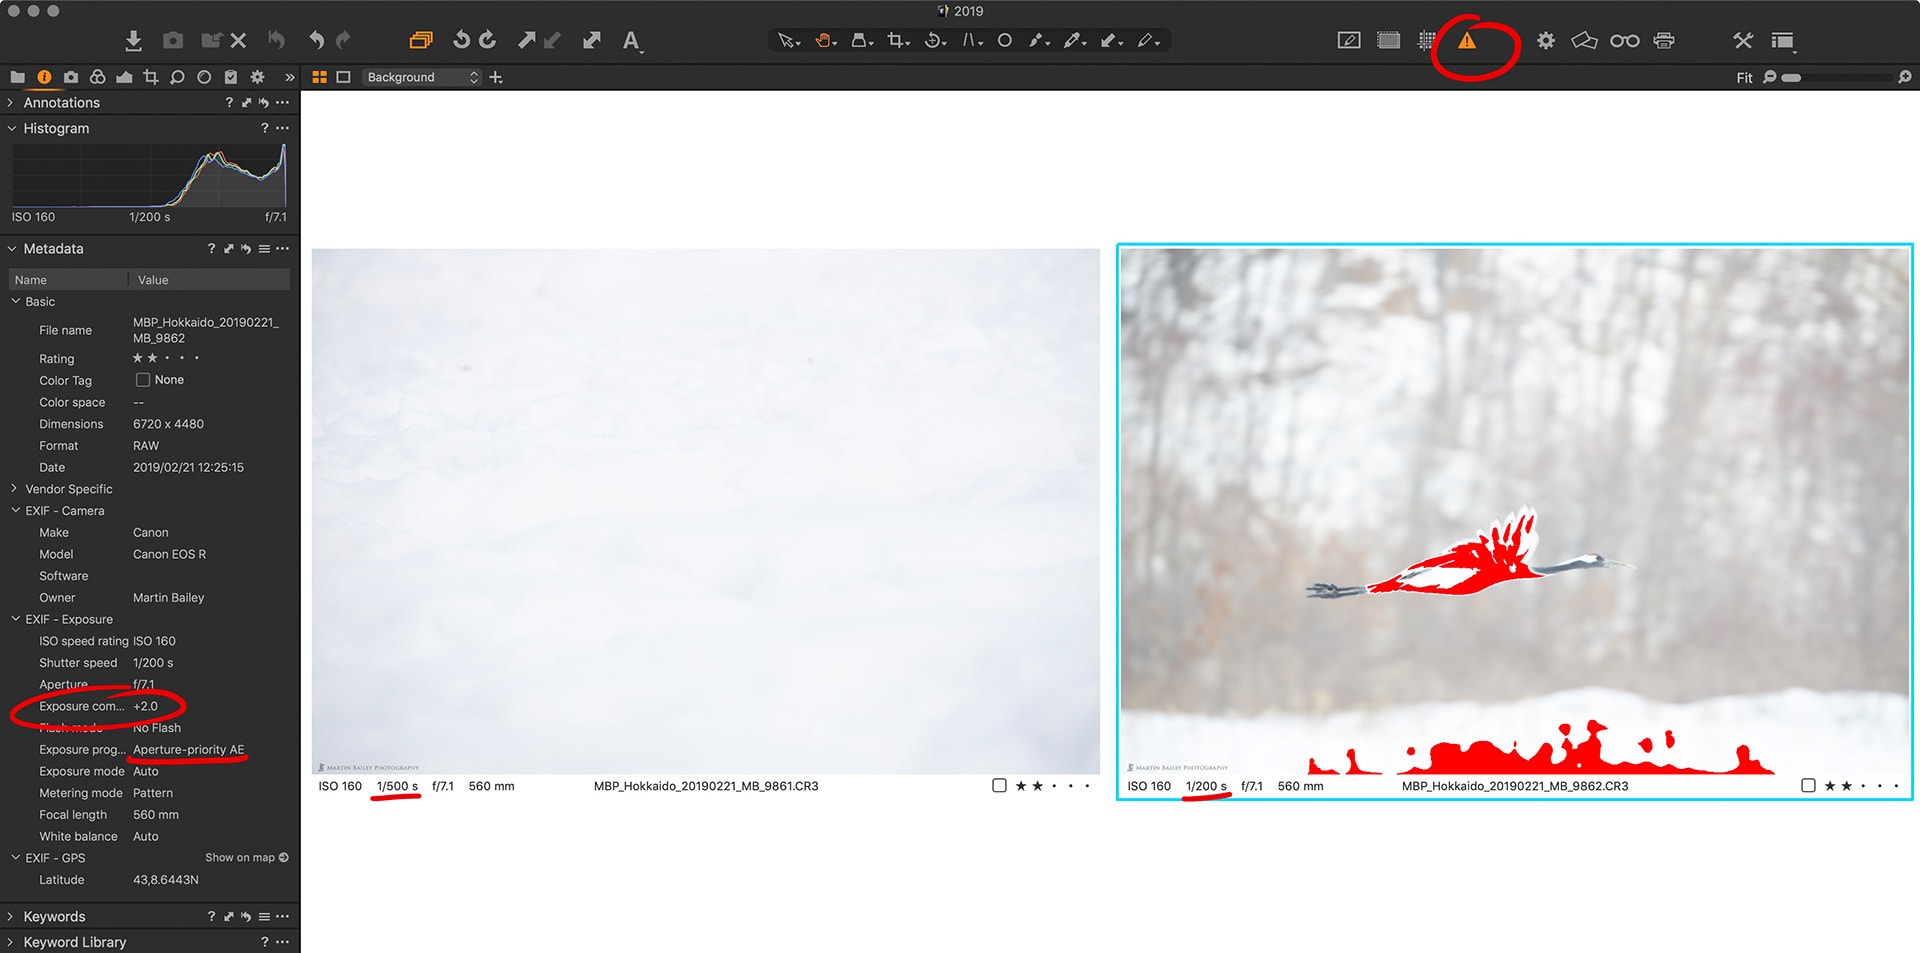
Keep in mind that to set my exposure in Manual Mode, all I do is increase my exposure while looking at the caret on the meter, until it’s between +f and+2 stops over zero. For brightly lit snow, it’s closer to +1 and for snow on an overcast day, it’s usually around +2 stops. Now that I’m shooting with the mirrorless EOS R camera, I have a live histogram and can actually just keep on increasing the exposure until the data on the histogram is almost touching the right shoulder, but without this feature, I used to just take a test photo, just like the one you see on the left here. As long as it’s white, but not over-exposed, I know that I’m then good to go, and because the bird is white, like the snow, and under the same light, I am then free to just shoot away until the light changes again.
In an automatic exposure mode though, such as Aperture Priority in our example, as you can see, as soon as I recompose to include an even slightly darker background, the camera tries to lighten up the scene, and my whites start to get over-exposed. So, if you want your whites to be white, not grey, you really must take control of the exposure by locking it down in Manual mode, or you have to change your Exposure Compensation every time you recompose.
I’ve added a few bits of markup to the screenshot to point out a few key things. First, notice on the left that I have +2 stops of Exposure Compensation dialed in, and I’m in Aperture Priority mode for this example. Also, note how the shutter speed changes from 1/500 of a second for the correctly exposed shot and drops to 1/200 of a second as the camera tries to compensate for the darker background. It would probably make more sense to use shutter priority for birds in flight, but as an example, it doesn’t really matter. The point is, the exposure runs off as we recompose.
Also note that the red that you see over the bird and the snow are not markup, that is the Exposure Warning in Capture One Pro. You can see that this is turned on also by the fact that the icon in the toolbar is yellow. This is grey when the Exposure Warnings are turned off.
Higher ISOs are Less Grainy with ETTR
So, let’s move on to the benefits of increasing the ISO rather than being afraid to, for fear of introducing grain. Most people have the idea that increasing the ISO causes grain in your images, and of course, that is true, if you leave the exposure up to the camera, because the camera is generally going to underexpose your images. Here is an example with two photos that I shot as a test, just of some ornaments and a little metal EOS R that I got as part of the release campaign here in Japan.
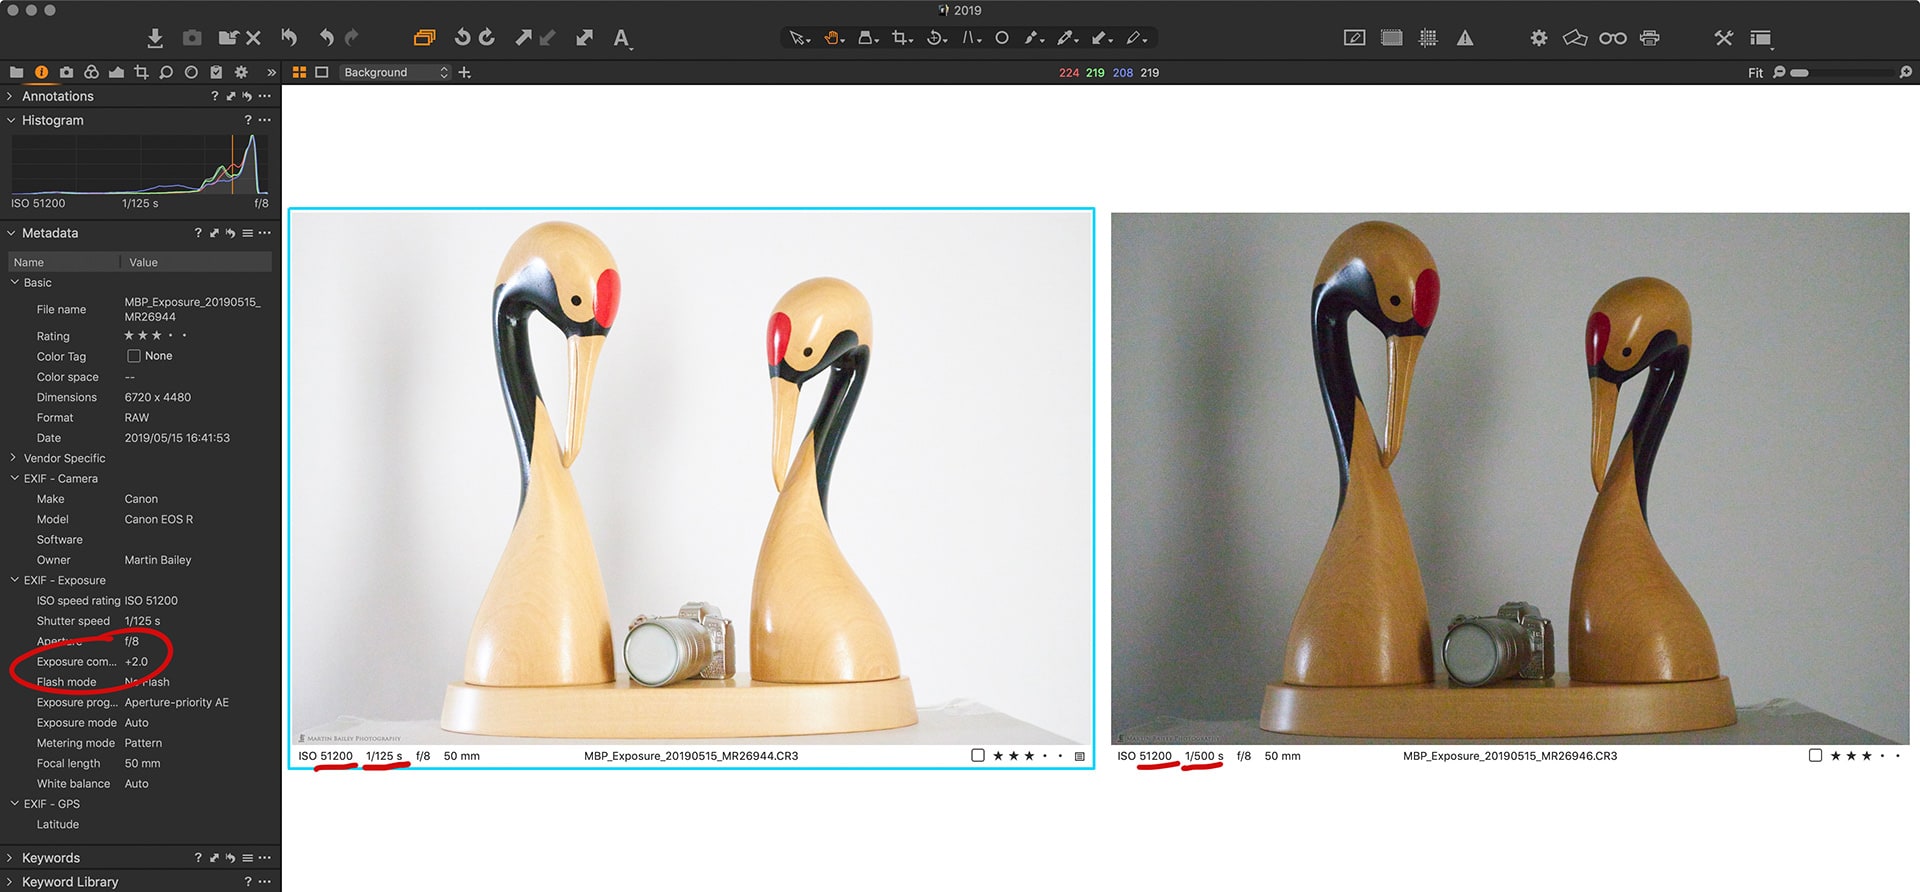
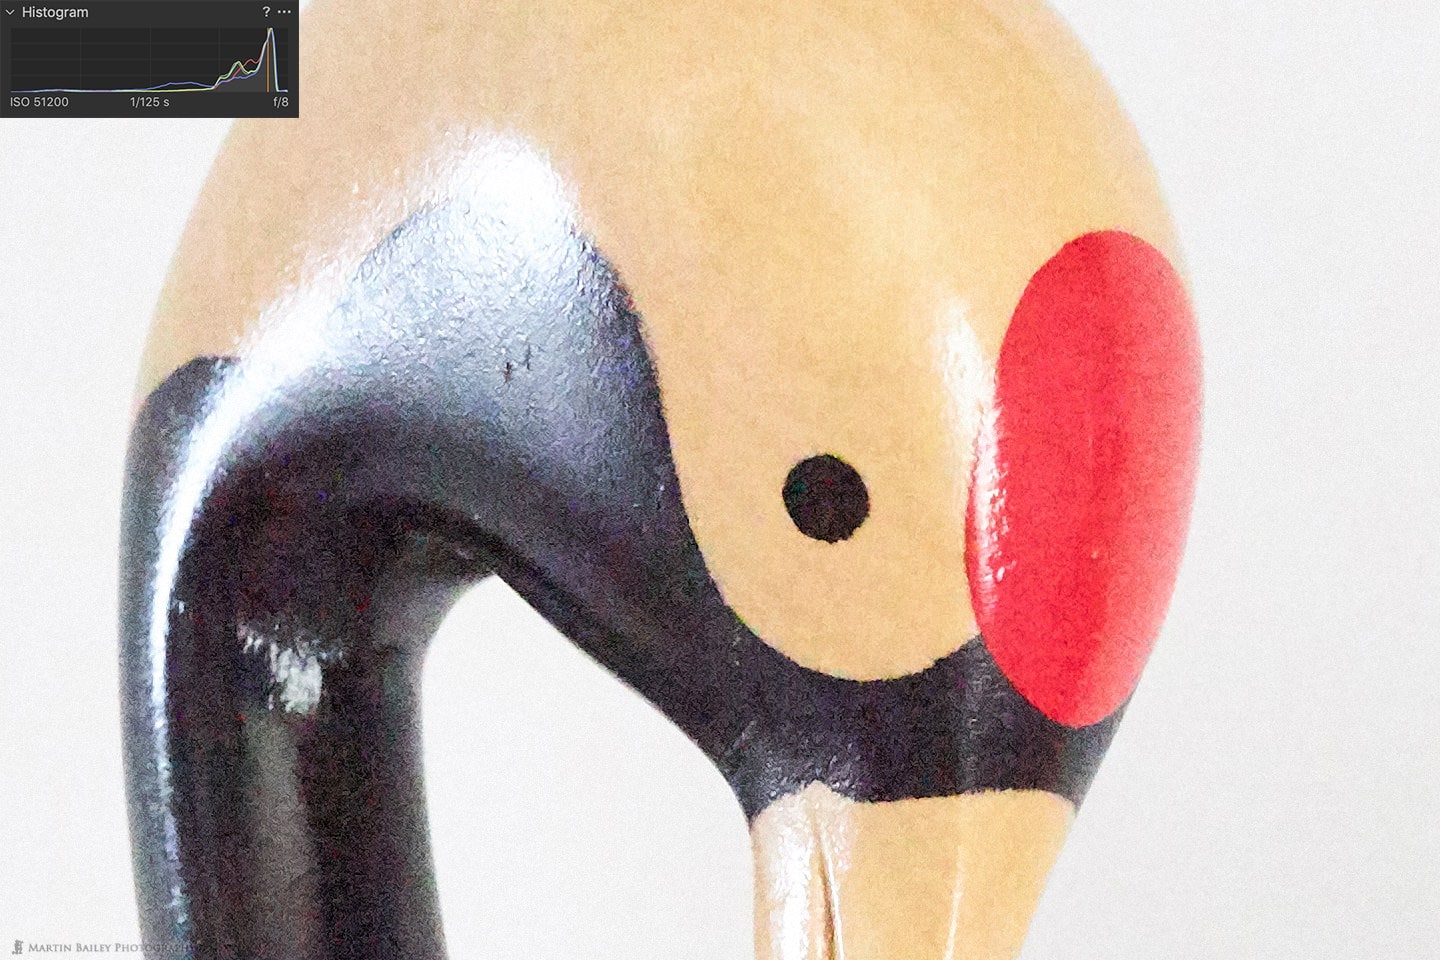
If you click on the image to open it up in the lightbox, even at the web size you’ll be able to see the visible grain in the right image, which I shot with the camera’s built-in meter at zero, exactly where the camera thought the exposure needed to be. It was indoors late afternoon, and because the ISO performance is so good on the EOS R, I had to increase it to 51200 for you to really see the grain.
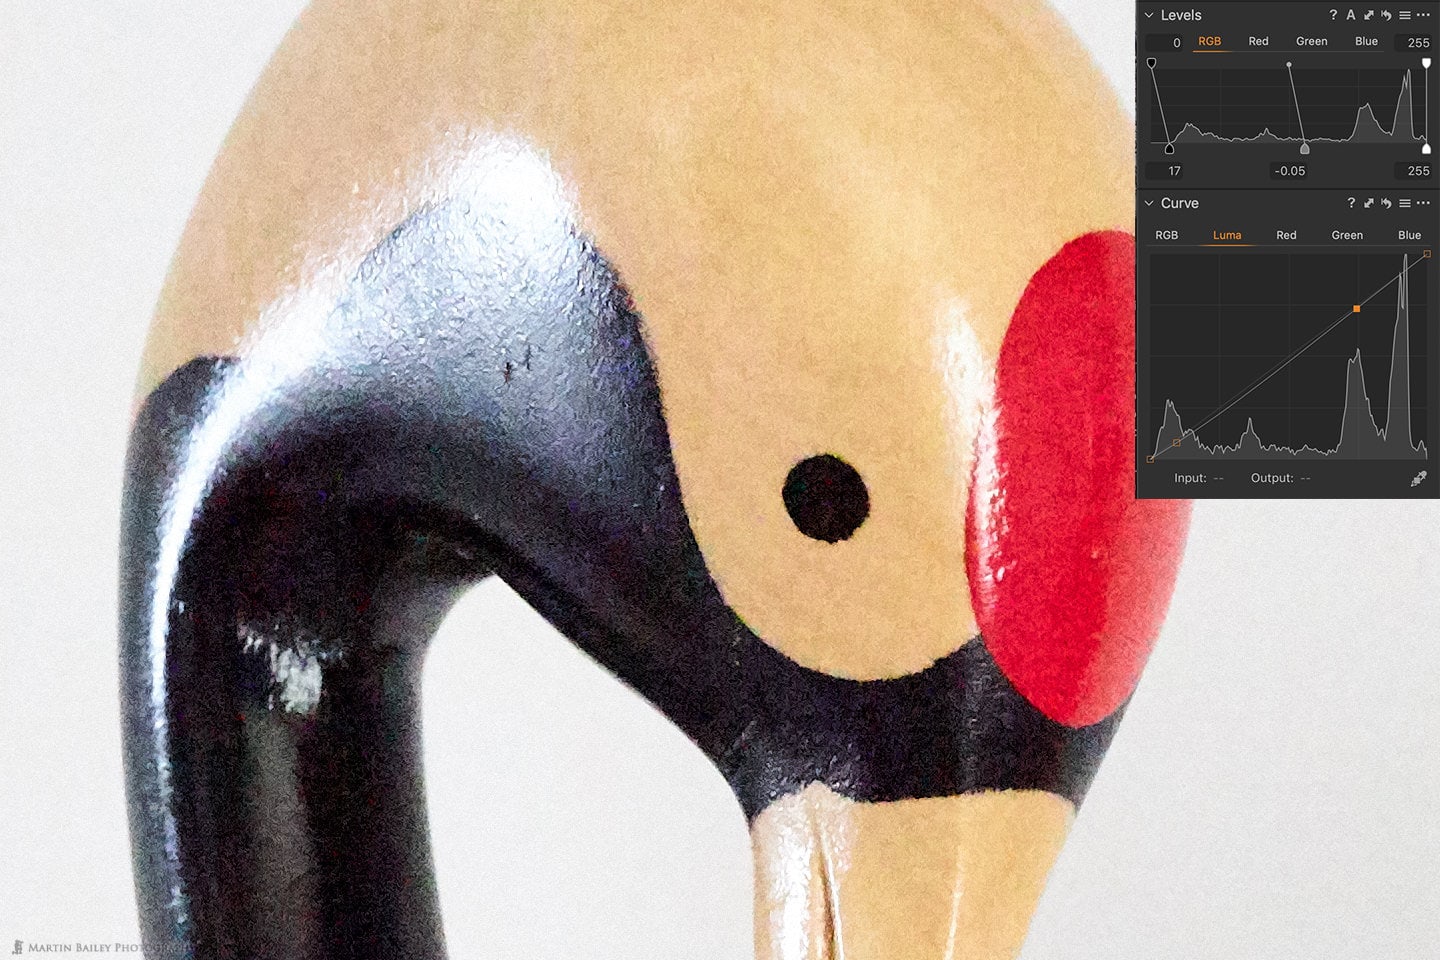
For the left image though, to prove my point, I used Aperture Priority mode again, with +2 stops of Exposure Compensation dialed in, as I’ve circled in red on the left of the screenshot. You can see underlined in red, that both images were shot at 51200 ISO and the +2 stops images shutter speed was 1/125 of a second, exactly two stops slower than the right image, which was shot at 1/500 of a second.
Comparison
Here now, is a 100% crop of each of the images from the above screenshot, so that you can check the details. As you can see, despite them both being shot at ISO 51200, the grain visible in the +2 stops version, which is I should emphasize, exposed to the right, is virtually undetectable, compared to the image at the camera’s recommended metering, which is very grainy.
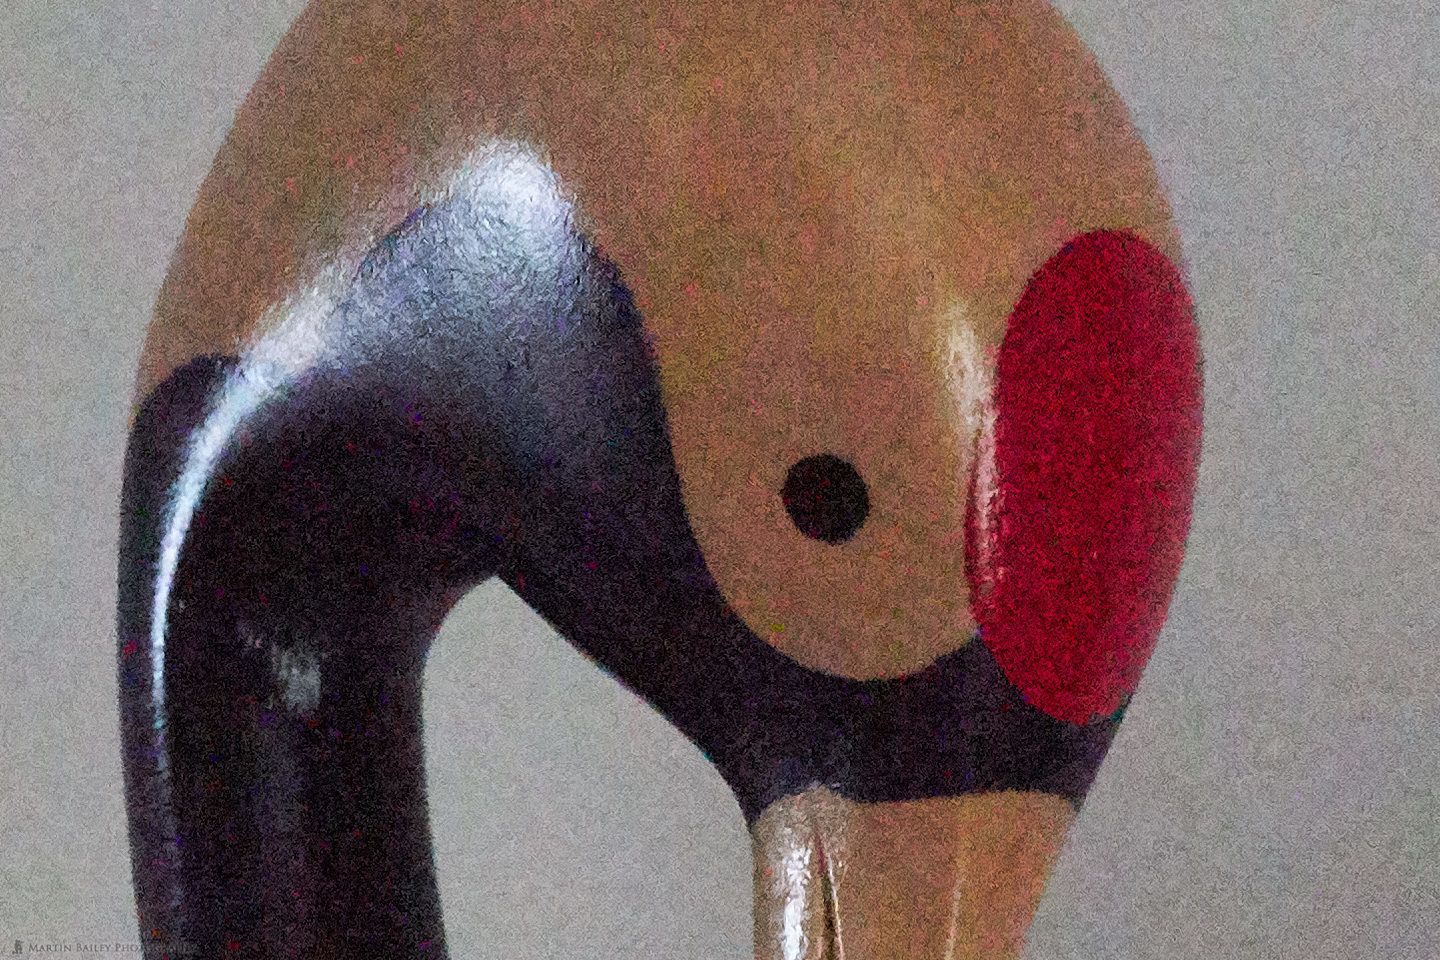
ISO 51200 Camera Zero Metering @ 100% 
ISO 51200 +2 Stops @ 100%
Again, if you click on the images to view them in the Lightbox you’ll get the best view of the detail, but the difference I’m sure you’ll agree is huge. Note too that although in comparison, the lighter image may appear too bright, it’s actually only slightly over-exposed, with the highlights just clipping slightly. If you wanted to darken it back down again, you could use the Highlights sliders or a tone curve, and you’d still get a cleaner image by exposing to the right like this, then darkening it back down to suit your needs.
Another Take On This
Another take on this, which is perhaps easier to understand from a shooting workflow perspective, is the fear element that generally prevents people from increasing the ISO. Imagine you are in a situation where the light is low, and you are already forced to shoot your image at 12800 ISO, at 1/125 of a second to avoid subject blur, and you need an aperture of f/8 for sufficient depth of field. The camera is metering at zero, with the information in the histogram way over on the center decreasing down the left side. The actual ISO will depend on your camera, but many people start to shy away from shooting higher than around 3200, some even as low as 1600. For me, as I get used to the EOS R’s ISO performance, I would probably not have gone higher than 12800 in the field, because I hadn’t yet done these tests. On my 5Ds R bodies, I tried to avoid going above 6400 ISO, based on tests.
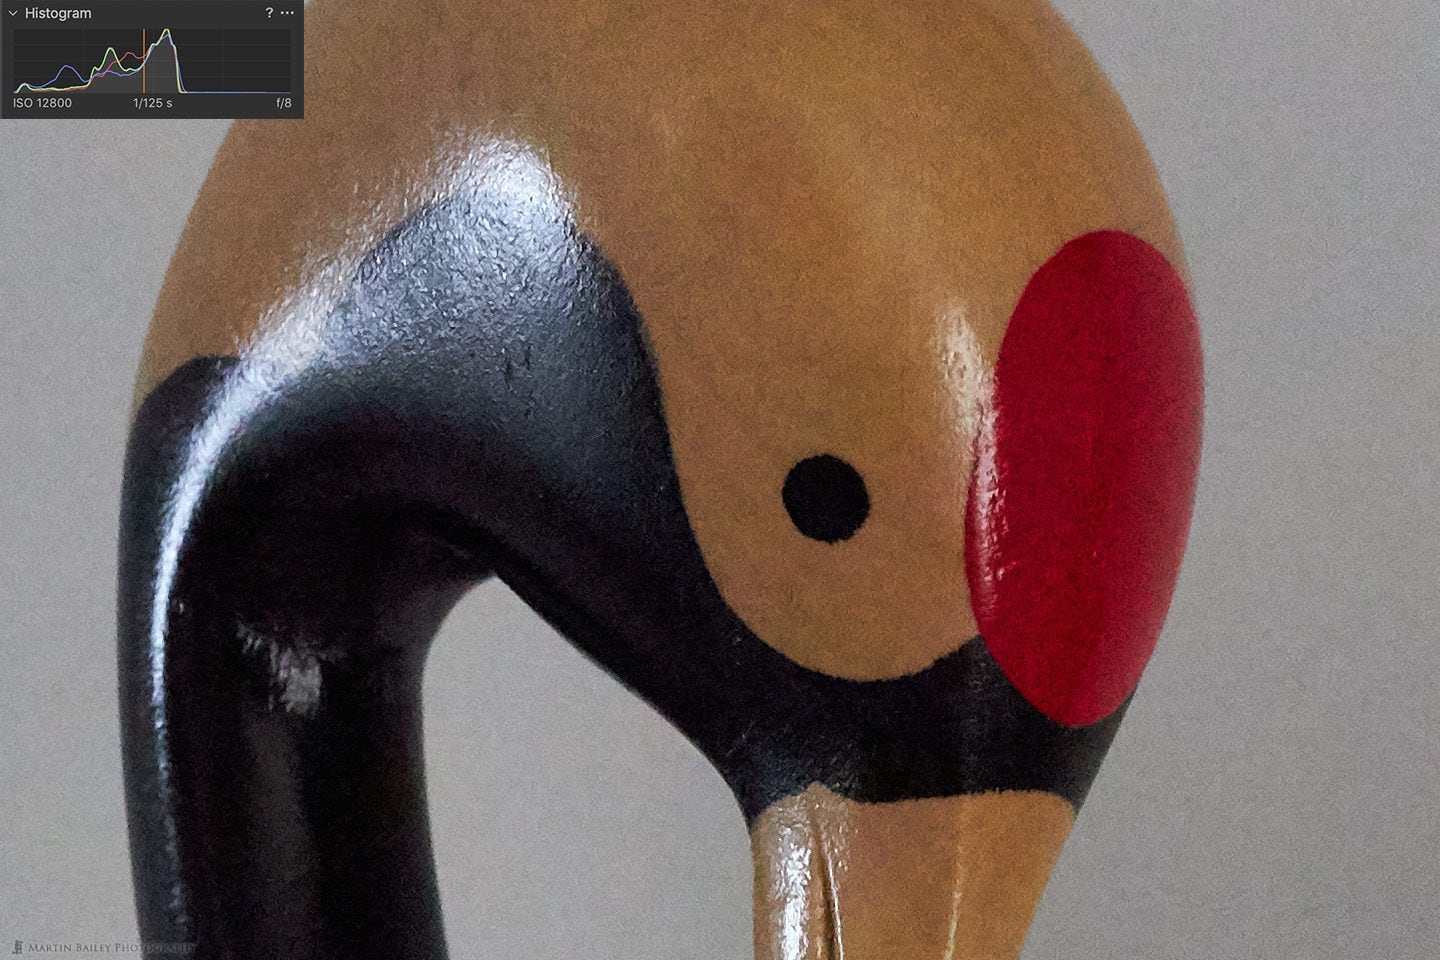
As you can see from this image, with its histogram embedded for reference, there is a little bit of grain starting to creep in. Still incredible for a 12800 ISO image at zero
+1 Stop Increase
So, what do you? Most people would shoot at 12800 or whatever your own personal soft-ceiling is, and be afraid to increase the ISO any more for fear of introducing any more grain, but wait! To get your histogram data over to the right, in this hypothetical example, our only option is to increase the ISO further. Here is another image in which I’ve increased the ISO by one stop to 25600.
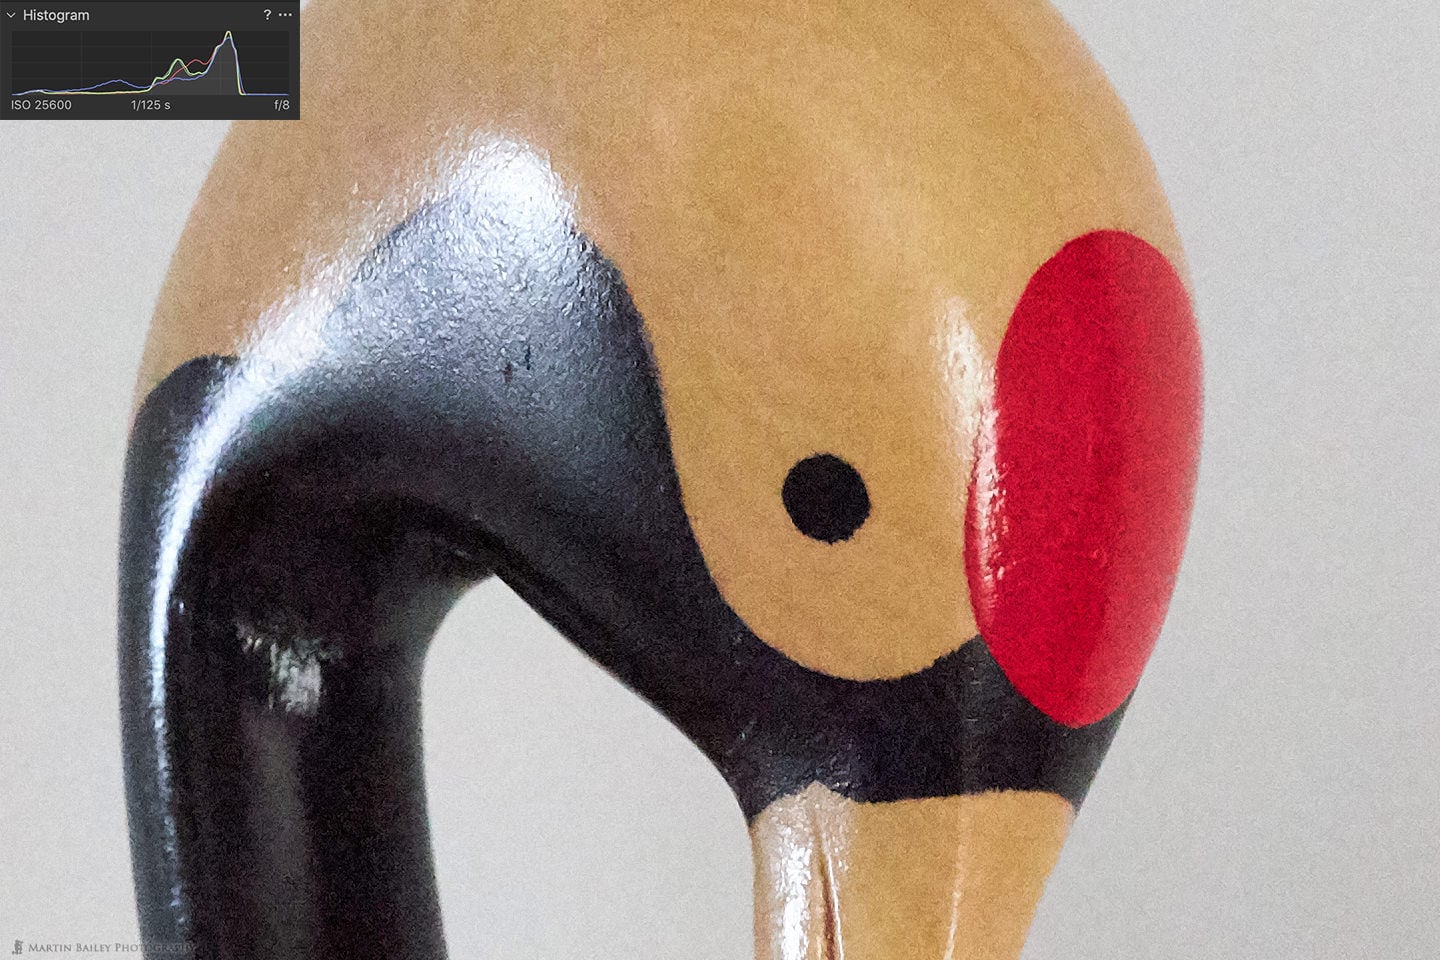
This image is double the ISO at 25600, but the grain is actually less than the 12800 ISO image because the ISO increase has made the image brighter. You can see from the histogram, which I screen-captured from the full sized image, not the cropped version, that although it’s more to the right than the previous images, there is still a gap.
One More Stop!
For this next image, I increased the ISO yet another stop, to 51200. This is actually the lighter image of the pair that we just looked at in my first example. and as you can see from the histogram, we are now exposing to the right. There is a small gap, but that’s Capture One Pro giving us a little back. In the camera, the specular highlights were just starting to over-expose, so this is as far as I would like to take this image exposure-wise.
A Few Tweaks
You can see that increasing the exposure with the ISO has actually reduced the amount of grain visible in the photograph. The darker parts of the image are now starting to suffer from a little bit more grain, but if you really had to push your ISO this far, you could do a few tweaks such as adjusting the levels and curves to darken down the dark areas a little, which helps to mask the grain that does creep in there.
And I haven’t even touched the noise removal options. They have been set at the default settings all along. So, as you can see, although I know it’s counter-intuitive and probably goes against everything you’ve been taught, if increasing the ISO helps you to expose to the right, then the brighter image will almost always have less grain in it than the lower ISO image, if the lower ISO image is already very high.
I should add at this point, that for lower ISOs, where you really can’t see any grain anyway, there is something called ISO invariance, that we looked at in Episode 520, which basically means that you can shoot according to your camera’s meter at lower ISO, and then increase the brightness in post if necessary, and you still won’t see any grain, because there is nothing in the base image for you to amplify. What I’m talking about today is more for higher ISOs, which is generally the area that starts to get people nervous. It’s that fear that I’m hoping I can help you to break through with this post.
My ETTR Workflow
I’m sure that part of Matthew’s original question was also referring to how I actually adjust my exposure, so I’d like to add a little more detail on this before we close. As I mentioned earlier, I pretty much always shoot in Manual Mode, though occasionally I do shoot in Aperture Priority and turn on Auto-ISO, and use Exposure Compensation to Expose to the Right. My thought process is similar in either shooting mode.
Aperture
I start usually by selecting my Aperture, as this directly affects my depth of field, and that is often one of my most important decisions as I start to set my exposure. Once I have set my aperture to something appropriate, i.e. a small number like f/2.8 for a wide aperture and shallow depth of field, or a larger number like f/11 for a smaller aperture, and more depth of field.
Shutter Speed
I generally then set my shutter speed in Manual Mode. I will select a faster shutter speed, like 1/500 to freeze a moving subject or a faster shutter speed of 1/1600 of for fast moving subject or birds in flight. Or I might select a slower shutter for a landscape, or even use a Neutral Density filter to slow down the shutter speed even more for some of my landscape work. If I am in Aperture Priority mode I often control the shutter speed by setting a minimum speed in the camera settings, just to help the camera to avoid going too slow, but getting faster is generally not a problem in these cases.
ISO
Finally, I adjust my ISO. It’s actually my ISO most of the time that I use to actually adjust and fine tune my exposure. This is why I am really enjoying the new Control Ring on the front of the Canon
With the live histogram I literally just adjust my ISO until I see the data on the histogram just about start touching the right side. For landscapes, even with my older DSLR bodies, I used to turn on LiveView and do this on the LCD.
Highlight Warnings
It’s also important to turn on Highlight Warnings on your camera so that you can see when you do start to get over-exposed and pull it back a little. I will often use a very small amount of flashing or the “blinkies” as an indication that I’m right where I need to be exposure-wise, but once a larger area starts to blink, I pull the exposure back a little.
RGB Histogram
And it’s also important to use the RGB histogram rather than the black and white brightness histogram, because the brightness histogram is an average of all three chan
Camera Meter in Manual Mode
Also, note that even when I am in Manual Mode, I still reference the camera’s meter reading. People often think you are flying blind in Manual Mode but that is not the case. When you half-press the shutter, the meter still kicks in and shows you where it thinks the light levels are on the meter, so for example when I am adjusting for the white snow, I can see the caret moving on the meter scale, and use that to see when my settings result in my exposure being two stops over.
If it’s not a white snow scene, I will just guess at where the caret should be on the meter scale, based on the balance of light and dark objects in the scene. If it’s literally 50/50, then the meter might be at zero, or perhaps just a little over to get my histogram data over to the right.
Note too that I’m always talking about the right-most data, not all of the histogram data. The rest of the data represents your mid-tones and shadows, and can, depending on your scene, extend all the way over to the left shoulder. Occasionally you might shoot a scene with very high contrast, and find that even when exposing your highlights to the right, your shadows can start to spike up the left side. That’s when you might consider merging multiple images in an HDR photo, but personally, I have not had to do that for many years, while using my ETTR
Thanks for the question Matthew, and I hope this was useful for all that stop by and take the time to read or listen to this episode.
Complete Namibia Tour & Workshop
Before we do finish, I’d like to mention that we’re at the time when we need to start finalizing the numbers for my 2020 Complete Namibia Tour & Workshop This is an epic trip that encompassed landscape, culture

Show Notes
Check out my ISO Invariance article here: https://mbp.ac/520
See details of my 2020 Complete Namibia Tour & Workshop here: https://mbp.ac/namibia2020
Audio
Subscribe in iTunes to get Podcasts delivered automatically to your computer.
Download this Podcast as an MP3 with Chapters.
Visit this page for help on how to view the images in MP3 files.

Thanks Martin. With my 1Dx, in manual with auto ISO, first I set aperture, then shutter, then exposure compensation to expose to the right, and I let the ISO fall where it may. Am I on track?
Hi Mike,
Anything automated, be it Aperture or Shutter priority, or auto-ISO will fall-fowl of the camera’s lack of ability to decide on the exposure, but if you are using Exposure Compensation and getting your histogram data over to the right shoulder, then yes, you’re well on track.
How you get the information over to the right is less important, as long as you don’t leave much of a gap on the right side in camera, especially when using high ISOs.
Thanks for taking the time to check out the post and to comment!
Regards,
Martin.
Hi Martin, thanks for your article, very interesting and well explained!
Thanks, Nicholas! I’m pleased you found it useful.
Thanks Martin. Mind blowing after viewing your photos with commentary. I’ve been exposing to the right for a while but never grasped the difference it would/could make to ISO and noise prior to your examples. Eye opening post indeed. Thank you!
That’s great Angela. I’m really pleased this helped.
Thanks for taking the time to let me know.
Regards,
Martin.
Great podcast Martin. Do you think part of it ISO performance of particular cameras? My 7D Mk II is pretty bad above 800 while my 5D Mk IV seems to be much better. Have not thought about the mirrorless yet. Thanks for all your great work!
Hi Tim,
Absolutely, yes. The 7D Mark II is pretty poor, but the 5D Mark IV should be very similar to my results. It’s essentially the same sensor.
You’re welcome for the work. Thanks for commenting!
Regards,
Martin.
Thank you for sharing this wonderful Podcast on How to Increasing ISO to Reduce Grain in Your Images. It’s one of the best articles I have read in recent times.
Thank you, Brandon. I’m pleased you found it useful.