
Today we’re going to look at a feature that is on most cameras but often overlooked, and that is the Custom Shooting Modes, which enable you to quickly change many of the settings of your camera with the flick of a switch.
In last week’s episode, I touched on the importance of not fumbling with your camera and overthinking the technical details in order to be more in the moment as you make your photographs. Don’t get me wrong, I believe that technical accuracy and being deliberate is important, but we have to get so comfortable with how our cameras work and how to quickly change settings that are ideally second nature to us by the time we need to start thinking about them.
If you’ve been following my antics for a while, you’ll probably recall that I’m most comfortable shooting in Manual exposure mode. I shoot using a technique called ETTR or Expose to the Right, and this requires me to fine tune the exposure, and I find exposure compensation too much work, so I generally just set my exposure manually and I’ve been doing this so long it’s much easier for me than using any of the automatic exposure modes.
Having said that, there are times when the light changes by the second, and it helps me to be able to use a certain set of automatic settings, and I find the easiest way to quickly enable all of these settings is to register them to a Custom Shooting Mode on my Canon camera, and then I can access them by rotating the Mode Dial on the top of the camera (below) literally like flicking one switch.
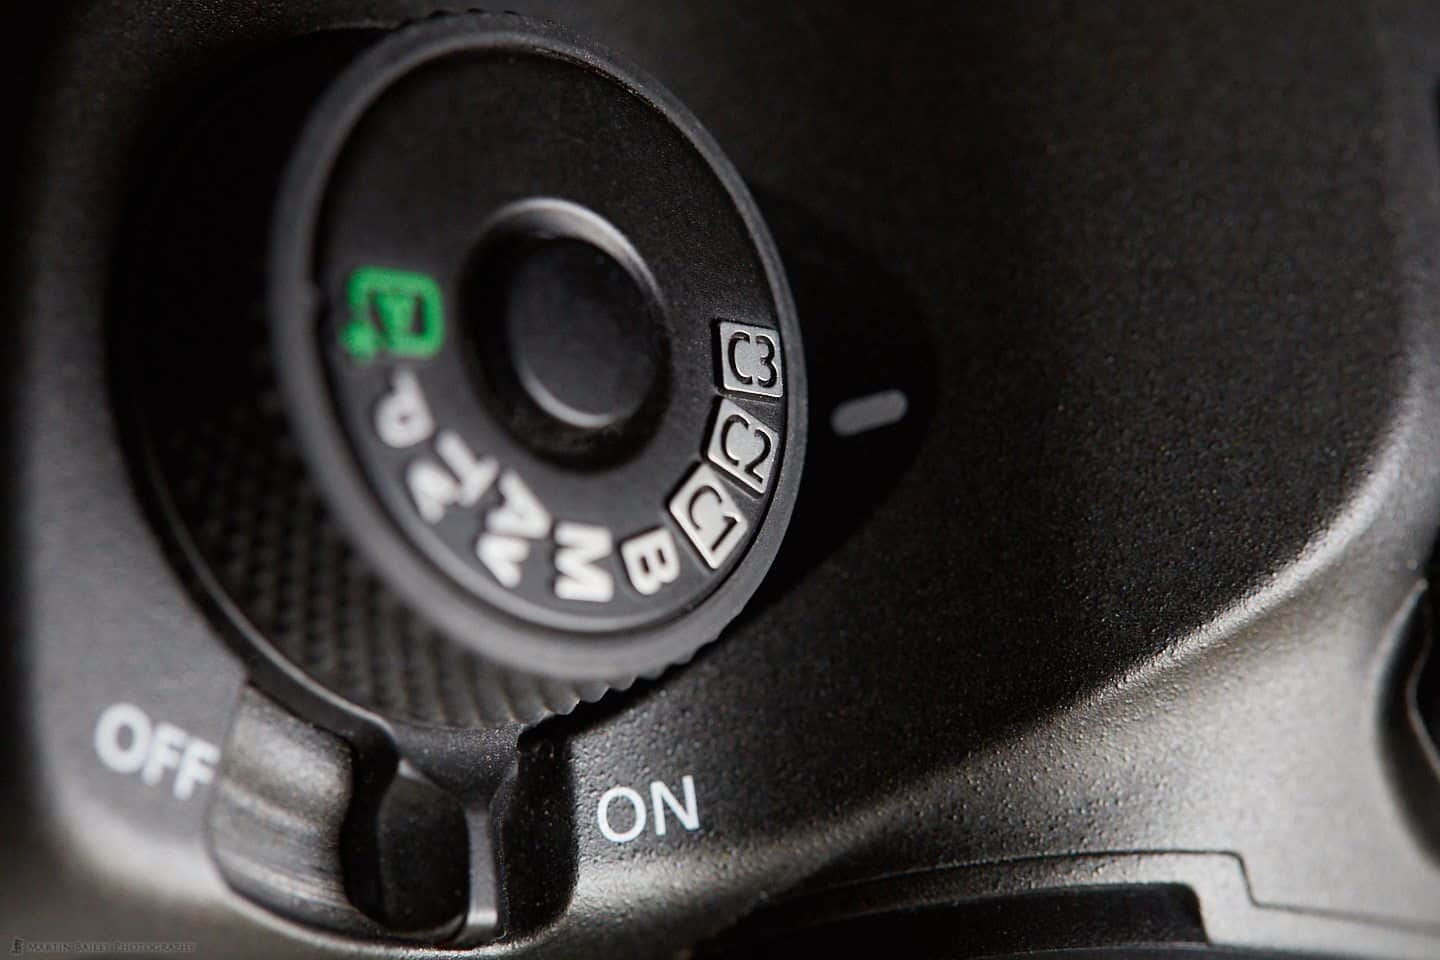
Canon EOS 5Ds R Mode Dial
This feature or something similar is available on most cameras I’ve seen, and I think it is often overlooked because people don’t realize just how many settings can be changed, and saved, and also it’s one extra thing to think about, so it’s probably one of those things that you’ll experiment with once you’ve become more comfortable with your camera.
What is Registered?
Let’s look at which settings are registered first to hopefully make it more obvious that this can be a very useful feature. This will change depending on what system you use, but my Canon 5Ds R registers the Shooting Mode, meaning Aperture Priority, Shutter Priority or Manual etc. Also, the shutter speed, aperture, ISO speed and many of the auto-focus settings, including the AF area selection modes and selected AF points are registered. The drive mode, metering mode and exposure and flash compensation amounts are also registered.
There is also a long list of customisable settings such as image quality, image review time, white balance and color space. Picture Style settings are also saved. Your interval timer and bulb time settings and live view shooting AF method, grid display, and exposure simulation settings are saved too, to name just a few. I won’t go into all of the settings, but basically, pretty much everything that you can configure that is related to shooting is registered.
Think About Your Shooting Scenarios
We’ll get into how you register the settings in a moment, but before we talk about that, let’s discuss the various scenarios that I sometimes use this neat little feature for. It’s important to think this through first so that you can set up your camera the way you want it, before committing those settings to one of your available Custom Shooting Modes. These can be easily updated though, and even automatically updated if you prefer, but we need to set the camera up how we want it to enable us to register those settings initially to get started.
As I mentioned earlier, for much of my work, I use Manual mode, but as comfortable as I am changing my exposure very quickly as the scene dictates, there are times when I do need to just jump into an automatic mode. Before Manual mode, I used Aperture Priority as my main shooting mode. For my photography I generally use my aperture setting as the base for my exposure, then I set my shutter speed depending on how much I want to freeze the subject movement, or conversely use a slower shutter to capture its movement.
Once I’ve set my aperture and shutter speed, I adjust my exposure with my ISO. In darker situations, I might compromise a little and adjust my aperture and shutter speed to get a brighter exposure, but generally, ISO is where I do most of my adjustment as it affects how the scene or subject is captured the least.
Aperture Priority Base
Because of this, for me, when I’m going to use an automated exposure mode, it’s generally Aperture Priority, even if I need to control my minimum shutter speed etc. which we’ll also touch on shortly. Keep in mind though that I’m just walking you through my thinking to help explain the process, and I’m not necessarily saying that you have to use Aperture Priority. You will need to decide what you want to register, and you have three sets of Custom Shooting modes, so you can register different settings for different scenarios.
So, my first step is selecting Av for Aperture Priority on the camera’s Mode Dial. Just being in Aperture Priority alone though won’t help me to quickly start shooting. By default, Aperture Priority enables you to set the aperture, and the camera starts to select the shutter speed by itself, but it relies only on the shutter speed, which means if the light is low, the shutter speed can get too low, and depending on what I’m shooting, that may not be what I want.
Auto ISO
For example, say I’m out and about in Tokyo, and the light is streaming down nicely on the main street, but there are side-streets in the shade that require a much lower shutter speed. If there are people walking around, they’d be all blurry if I let the shutter speed get too low.
So as this feature has become more useful over the years when I’m in Aperture Priority, I pretty much always use Auto ISO. On my Canon camera, to access Auto ISO you simply press the ISO button and continue to rotate the Main dial just behind the shutter button, down past ISO 100 and L if you have the Low ISO setting enabled until you see an A instead of the ISO number. You are now in Auto ISO mode.

Canon EOS 5Ds R in Auto ISO Mode
Set Auto ISO Range
To ensure that the ISO on my 5Ds R camera doesn’t get too high I adjust the ISO speed settings under the SHOOT2 menu. Under ISO speed settings there is an option called Auto ISO range, inside which you can select the range to use. I generally select ISO 100 as my minimum and 6400 as my maximum. I’ve no problem with going to ISO 6400 if the scene dictates, but you’ll need to set this to whatever you are comfortable with.
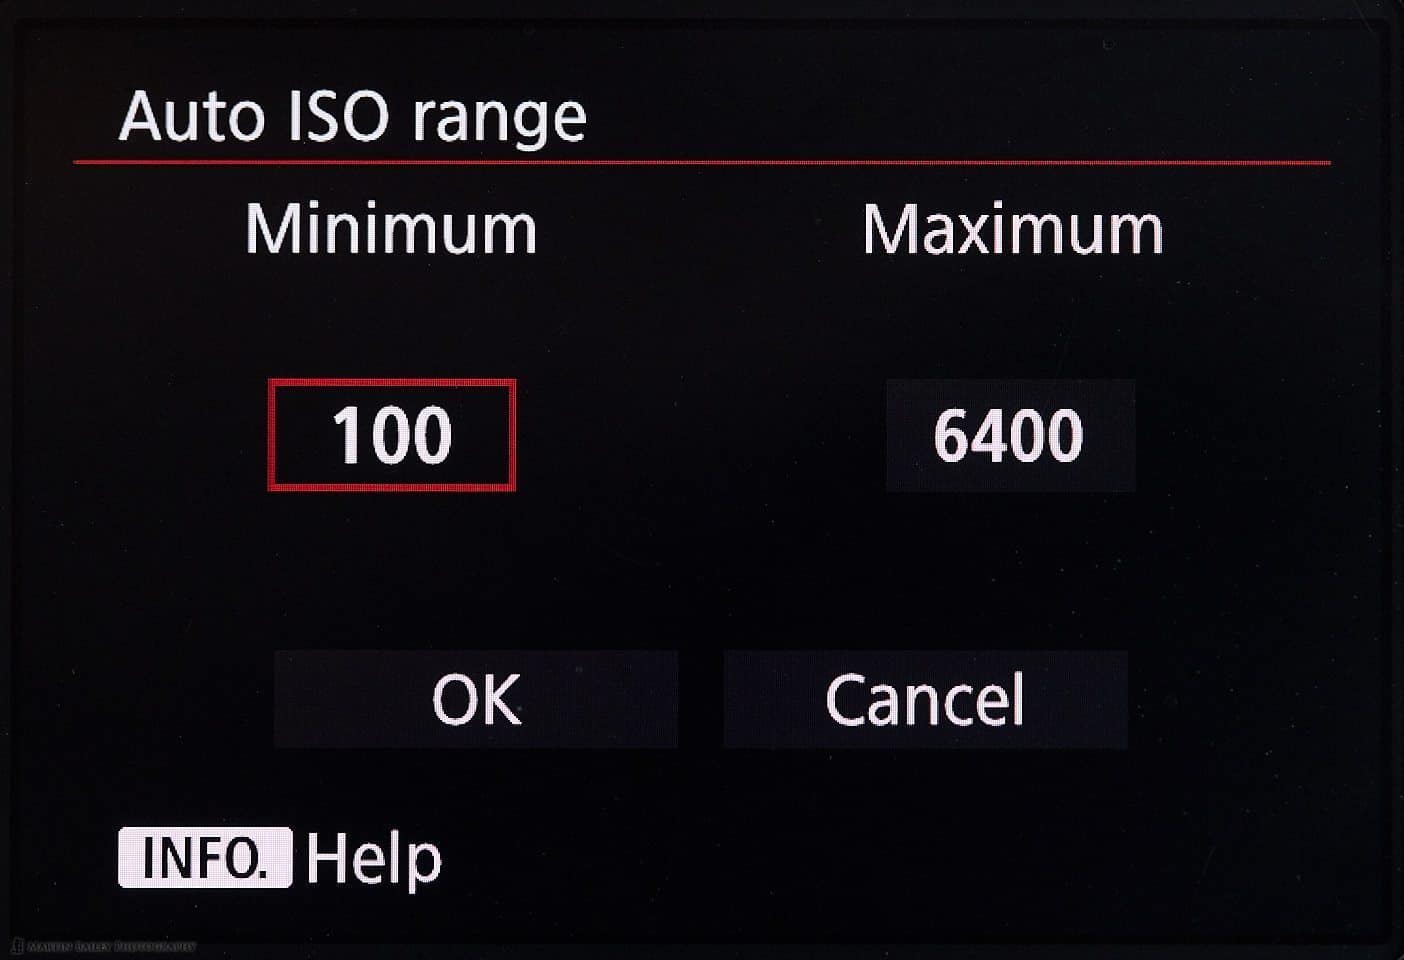
Canon EOS 5Ds R Auto ISO Range
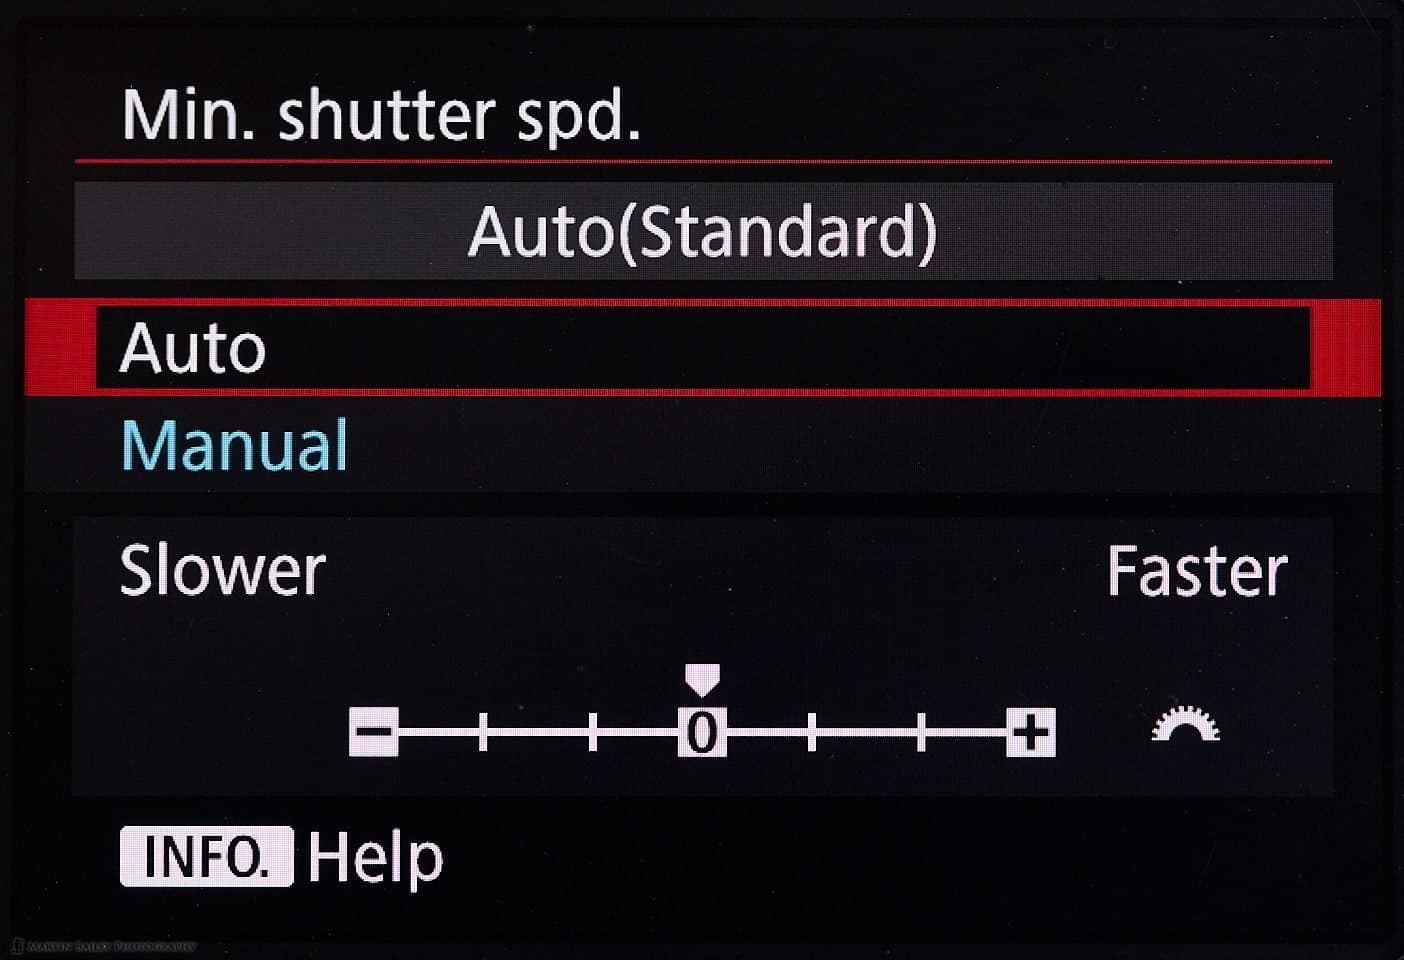
Minimum Shutter Speed
The next setting to check is Minimum shutter speed, just below the Auto ISO range setting. You can select Manual, and select a shutter speed. For example, if you just want to capture people walking around, 1/125 or 1/250 of a second is a good zone to use, but if you are shooting a fast moving subject, you might want to select 1/500 or 1/1000 of a second or even faster. Keep in mind though that to reach these faster shutter speeds the camera will start to increase your ISO, and you need to be comfortable with that.

Canon EOS 5Ds R Minimum Shutter Speed
The other option is to set the Minimum shutter speed setting to Auto, and if you leave the slider set to zero the camera will use the focal length as the denominator in the shutter speed fraction. That means if you are shooting at 50mm the camera will use 1/50 of a second as the slowest shutter speed, and if you change to 100mm, the camera will use 1/100 of a second as the slowest shutter speed.
This is the rule of thumb that I’m sure you are familiar with, just implemented automatically in the camera. If you want to rely on your image stabilization a little more, you can change the slider to slower. Each notch on the slider is equivalent to one stop of light, so if you select -1 at a focal length of 100mm the camera will use 1/50 of a second as its minimum shutter speed, not 1/100 of a second. At -2 it will use 1/25 of a second, and at -3 it will use 1/13 of a second.
Canon EOS 5Ds R Minimum Shutter Speed – Auto
Of course, increasing the slider into the positive has the reverse effect, so for +1 you’d be at 1/200 of a second, and +2 and +3 would take you to 1/400 and 1/800 of a second respectively. This is useful if you want to avoid camera shake, but again, as your shutter speed goes up, you’ll also see your ISO go up when shooting in darker environments.
Save Your Custom Shooting Mode
Because there are so many other settings that get saved, it’s worth just having a think about things such as your autofocus mode and metering settings. I generally leave my Metering mode set to Evaluative, but you could change this to Center Weighted or Spot metering if you wanted to, and this would be saved in your Custom Shooting mode.
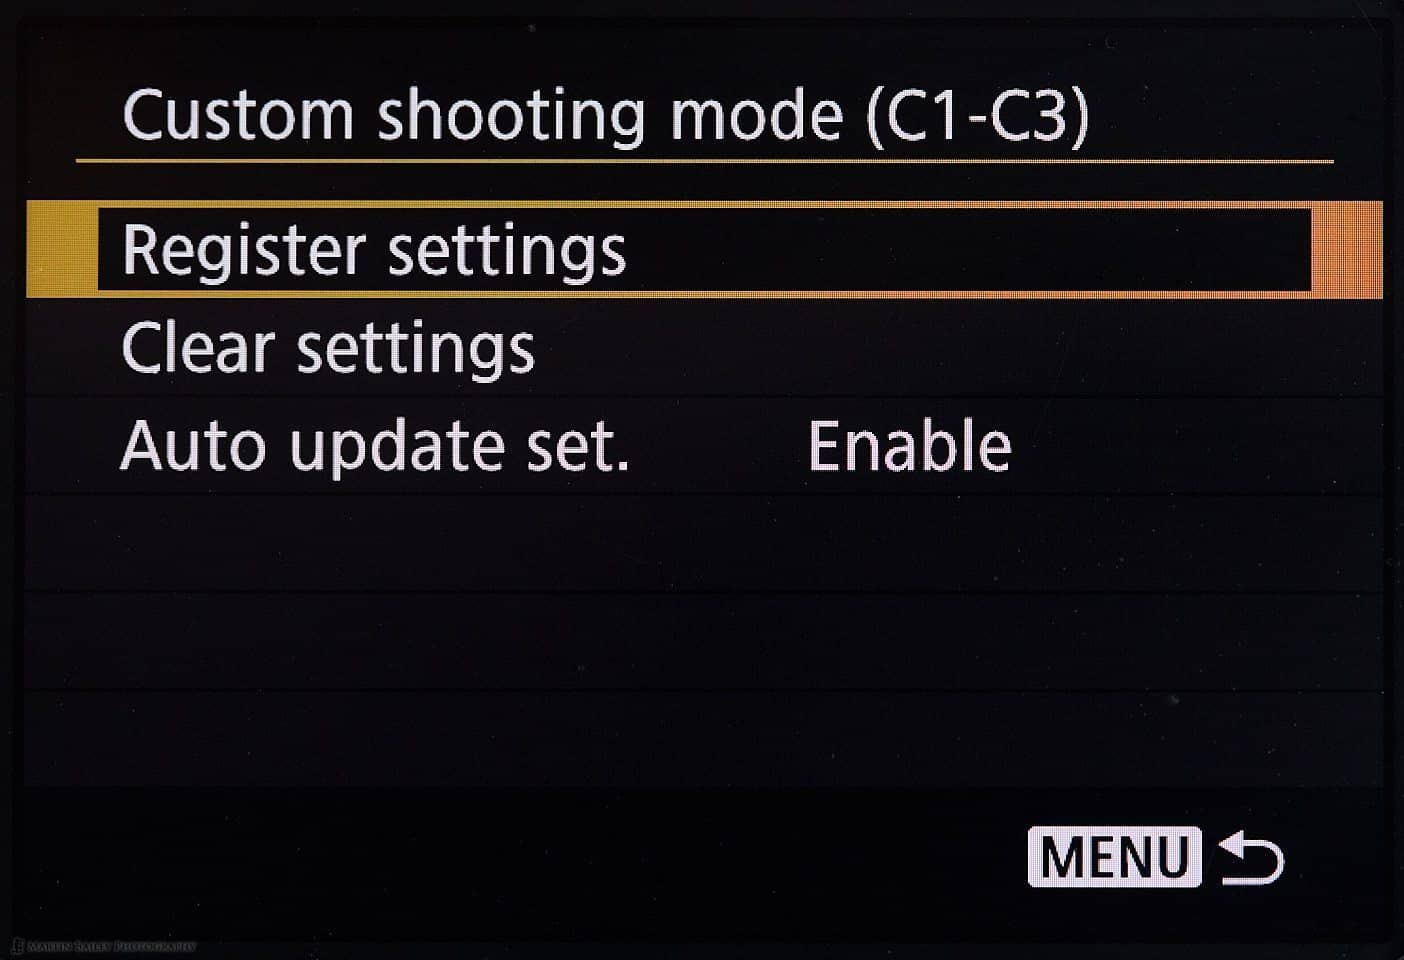
Once you are ready to save your settings, on a Canon camera, navigate to the Set Up menu and find the Custom shooting mode option. On my 5Ds R it’s under SET UP4, then select Register settings. I always register my Aperture Priority mode to C3, because this is the last mode of the dial, so if I need to quickly access my Aperture Priority and Auto ISO settings, I just crank the Mode dial all the way to the end. So, decide which mode you want to register your settings to and press OK.
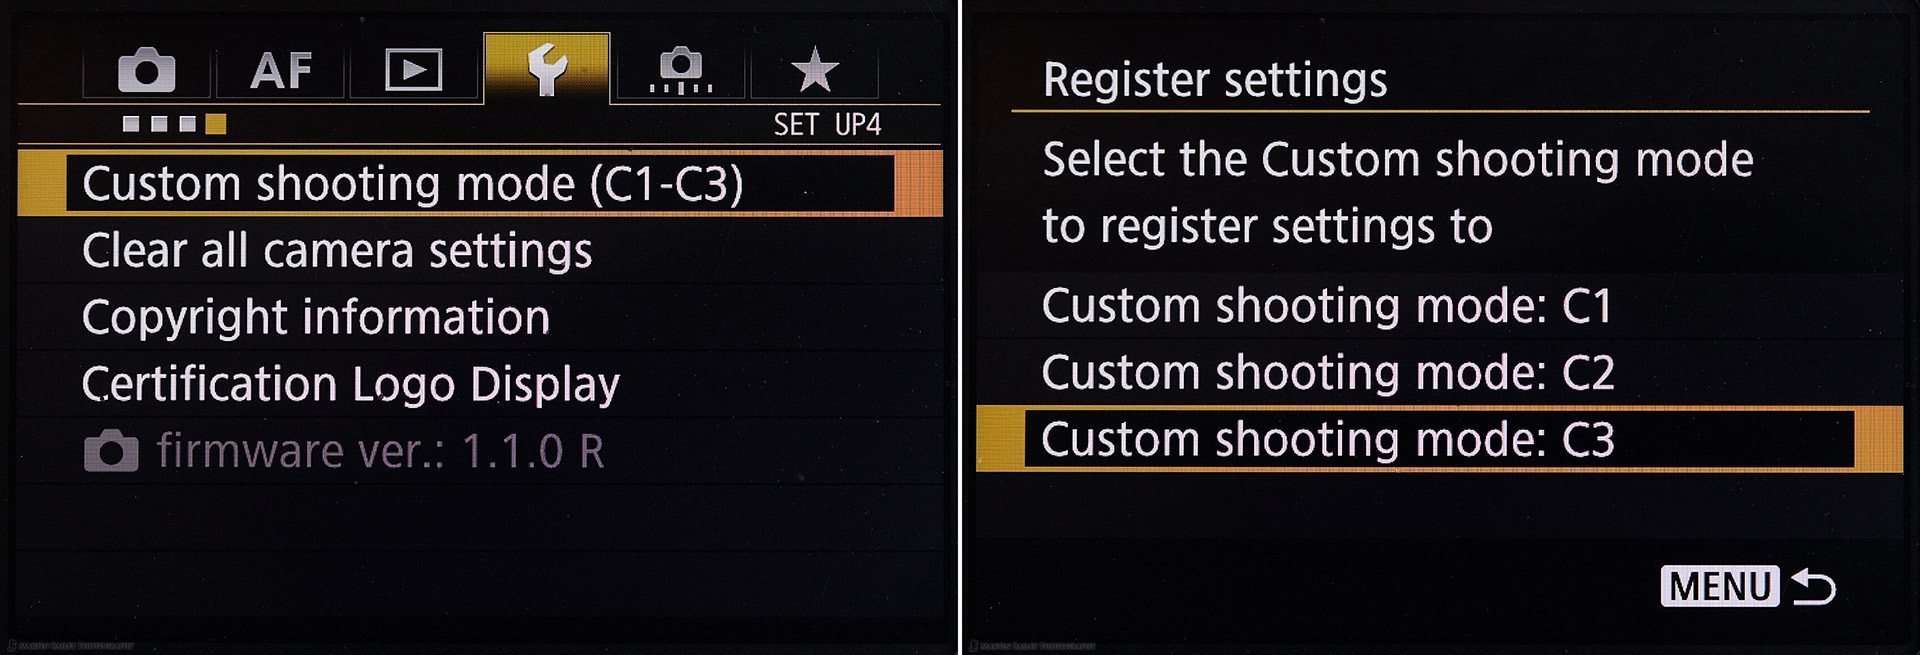
Canon EOS 5Ds R Registering Custom Settings
Auto Update
One other decision to make is whether or not to have the camera automatically update these settings as you change them while using a particular Custom Shooting mode. There are merits and demerits to consider for either scenario.
For example, say you want to automatically return your aperture setting to f/8 whenever you leave your Custom Shooting mode, you’d need to either leave the automatic update turned off, or remember to manually return your aperture setting back to f/8 whenever you leave that mode. If you leave automatic update turned off, the aperture would automatically reset to f/8 every time you leave that mode, but if you leave automatic update turned on, and change to say f/11, the next time you switch to that Custom Shooting mode, the aperture would still be set to f/11.
Canon EOS 5Ds R Custom Settings Auto Update
The same goes for any other setting if you decide to turn on auto update, so give this some thought. Of course, it’s only a setting, and you can turn it on or off with a few button presses, so you can change this later as necessary.
Quickly Switching Autofocus Settings
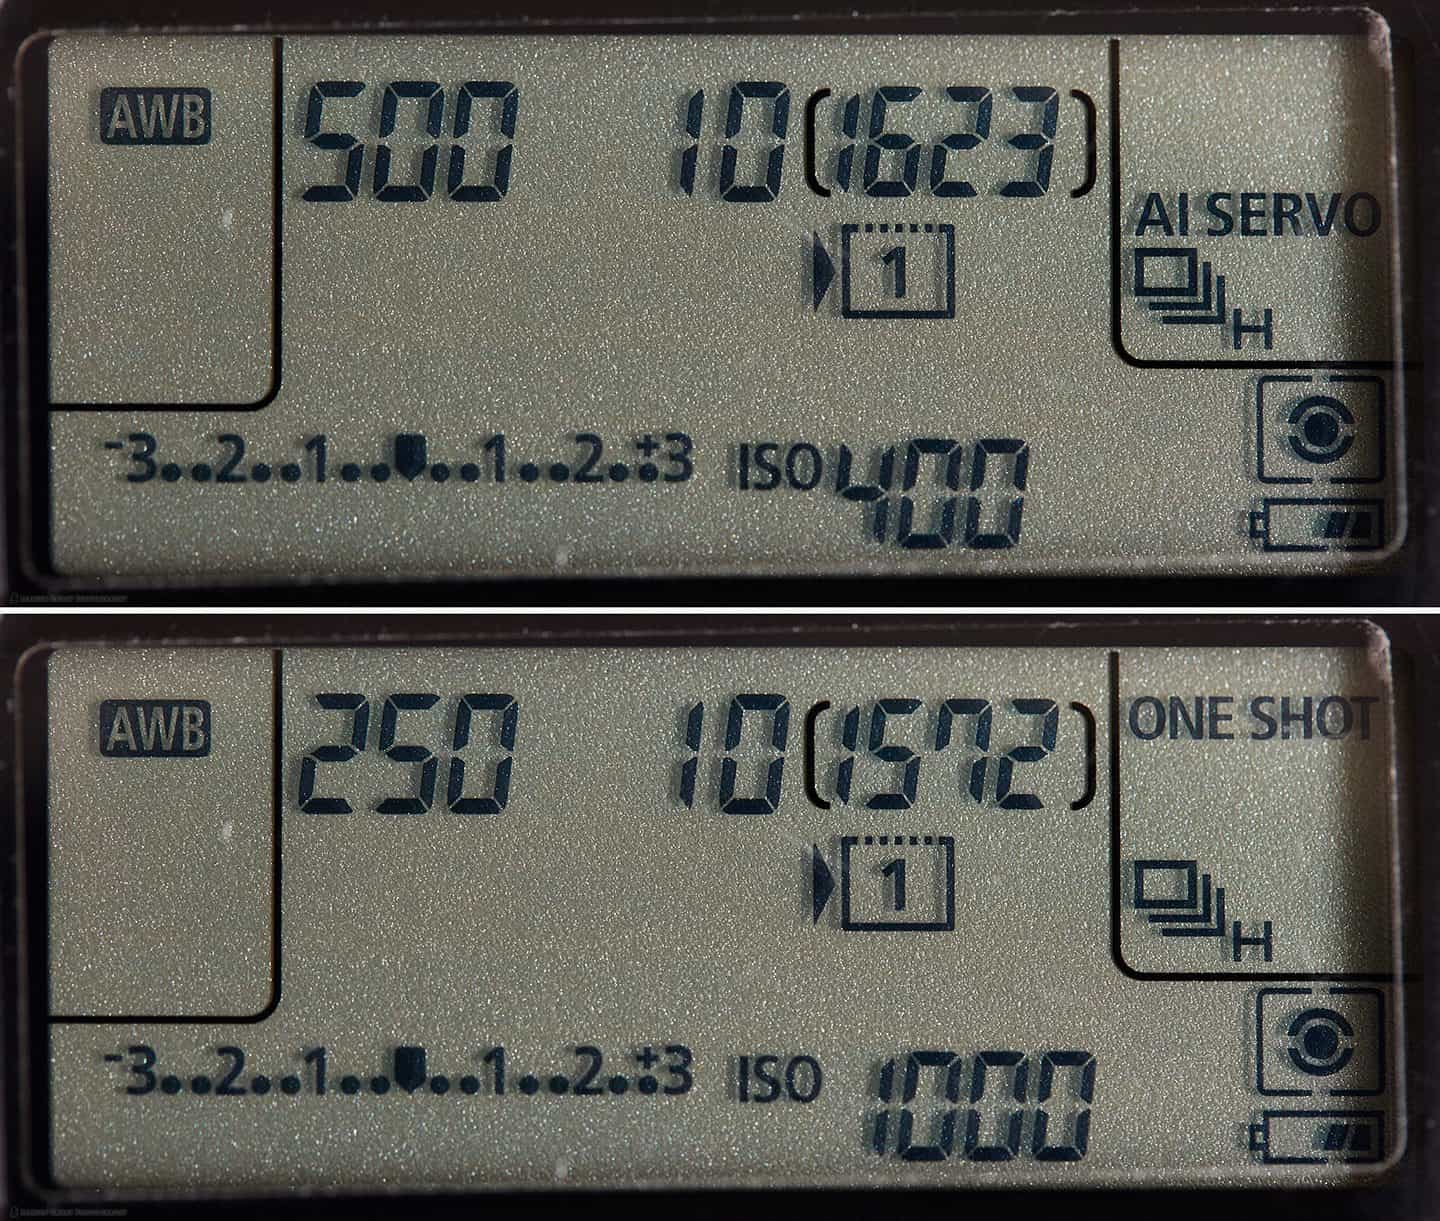
Even when using Manual mode, I register one or two Custom Shooting Modes, to enable me to quickly change my Autofocus settings if necessary. For example, I might have one set with One Shot autofocus selected and another set with AI Servo selected. I will also perhaps have my AI Servo settings set up to use all of my AF points, but for the other Manual setting Custom Shooting mode, I might have just the center focus point selected.
Another way that I use C1 and C2 is to quickly adjust between two extremes of light. Say for example when I’m photographing the Snow Monkeys if something is happening in the snow at the side of the hot spring pool, I might be using a shutter speed of say 1/800 of a second to freeze the action, and an ISO of say 400. But then when I go down to the pool, it a couple of stops darker, so might increase my ISO to say 800 or 1000, and also change my shutter speed to around 1/250 of a second. I also tend to use One Shot autofocus a little more around the pool, so I might also set that in one of my Custom Shooting modes.
Canon EOS 5Ds R Both Manual Modes
If it was just one setting to change, it would be easier to just stay in Manual mode and just change the one setting, but for multiple settings, it’s easier to just turn the Mode dial. Another thing that I often do while shooting with the Black Rapid straps, as I do at the Snow Monkeys, is to turn on the Lock switch on the back of the camera. I have this set up to lock both my Main dial and the Quick Control dial on the back of the camera.
I do this because the camera hangs upside-down on the Black Rapid strap, and I find that I sometimes catch these dials and change my aperture or shutter speed unintentionally. Although I check my settings regularly there have been times when something cool has happened and I’ve shot it way under or over exposed because my settings have changed and I didn’t notice, but locking the dials as I now do prevents this.
The great thing about the Custom Shooting modes is that they remember the two different aperture and shutter speeds that I dial in, so I can also quickly change these with the Mode dial rather than unlocking the camera to change them. It’s just a way to make life easier and prevent myself from making stupid mistakes.
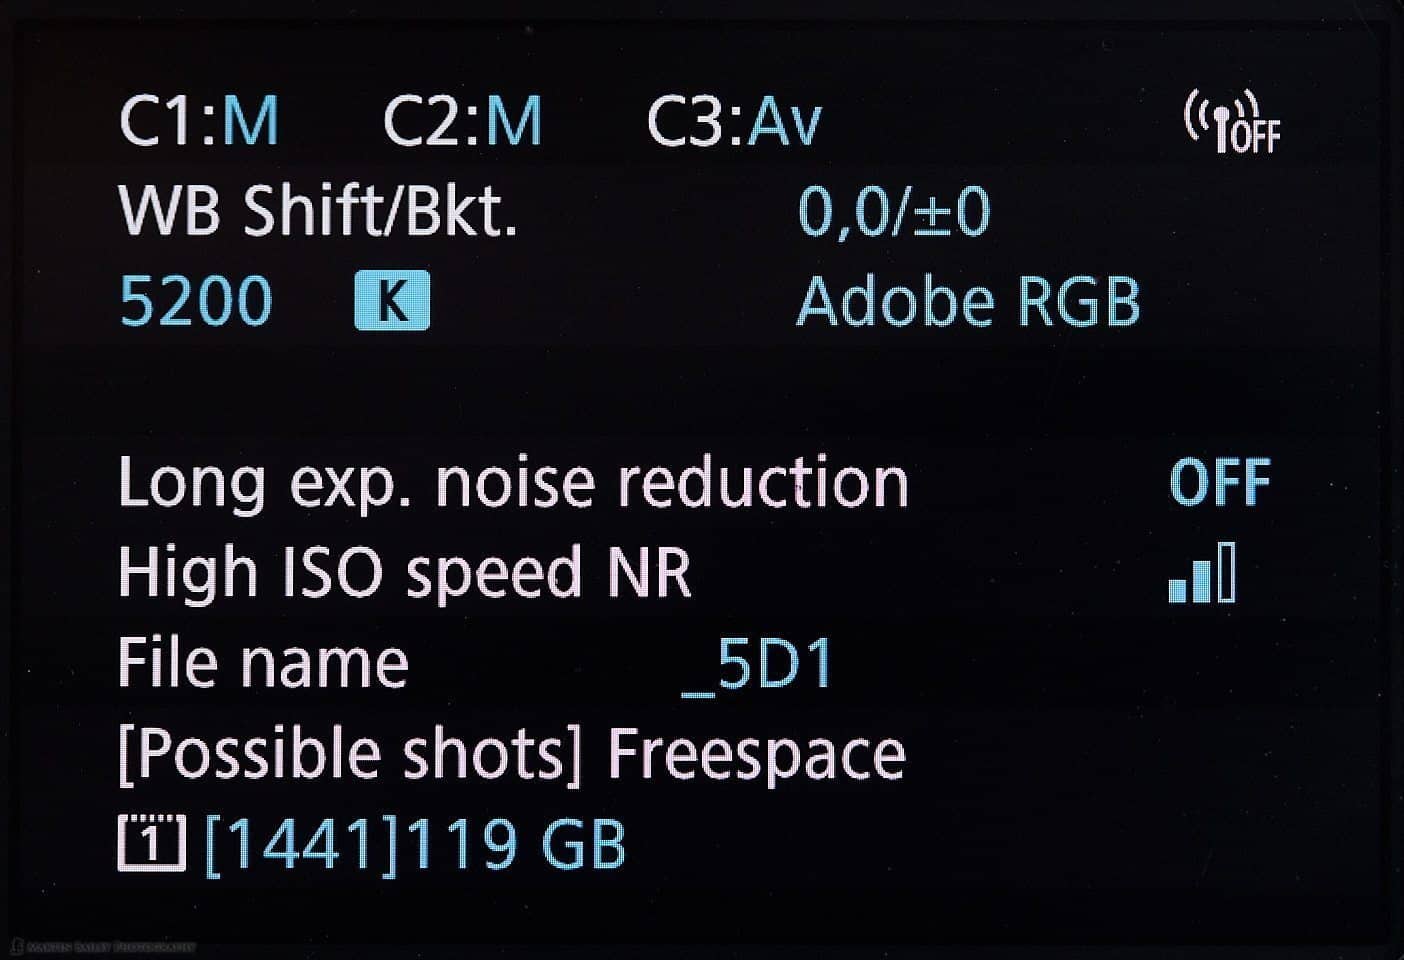
Info Button to Check Registered Modes
Another tip is that if you forget what you’ve registered to your Custom Shooting modes, you can press the Info button on the back of the camera to see a screen that displays the modes you’ve registered at the top of the LCD display. This is useful for a quick check, although you can’t see the settings for each mode, which would be nice.
Canon EOS 5Ds R Info Display
Auto ISO in Manual Mode
One last thing that I’d like to mention before we start to wrap up this episode, is that I also sometimes use Auto ISO in Manual Mode. I know that this might sound counterintuitive, but there are times when handing over the ISO controls to the camera provide just enough automation while enabling me to still have full control over both the aperture and shutter speed settings.
Although I generally like to maintain full control, for example when photographing the sea eagles at dawn on my Hokkaido Tours, one moment I can be photographing an eagle over the sea away from the sun, and the next moment shooting directly into the sunrise. To enable me to work in these extremes I will either use the Aperture Priority settings I mentioned earlier, setting a higher minimum shutter speed of say 1/500 of a second, or simply stay in Manual mode and enable Auto ISO.

Steller’s Sea Eagles at Dawn
Exposure Compensation with Auto ISO
The final setting that is sometimes useful and that has been added to the last few generations of Canon camera is being able to use Exposure Compensation with Auto ISO. Usually, in Manual exposure mode, there is no concept of Exposure Compensation, because you have full control of the exposure. However, Auto ISO hands some of that control back to the camera, and that means that it is error prone.
To overcome this, on the latest cameras, you can now set Exposure Compensation for Auto ISO in Manual mode. To set this on my 5Ds R, hit the Q button on the back of the camera, to enter the Quick Control screen. If Exposure Compensation isn’t selected, indicated by the orange border (below) use the Multi-controller to the top right of the LCD screen to select it, then press the SET button in the middle of the Quick Control dial.

Canon EOS 5Ds R Auto ISO Exposure Compensation
As long as you have the camera set to Auto ISO, you should be able to rotate the Quick Control dial to adjust the Exposure Compensation and rotating the Main dial will adjust Auto Exposure Bracketing settings.
If that’s too cumbersome and you find yourself using Exposure Compensation in Manual a lot, you could change the Set button to adjust the Expo Comp in the Custom Controls of the camera, but I don’t do that. I always use the Set button to magnify my image in Live View or when previewing an image I’ve already shot. This is because the older Canon cameras used to have the Magnify button on the right side, closer to your thumb, and I never got used to using it in the new location along the left side of the back of the camera, so I always just assign this to the Set button.
Conclusion
OK, so I hope that was useful. I don’t want to make it sound like I use these Custom Shooting modes all the time. In truth, I use them for specific purposes, and although I do switch to C3 for my fully automated Aperture Priority settings from time to time, it’s still only a very small part of my photography. I simply prefer to use Manual mode, and I’m so used to it that there aren’t that many times that I switch to these Custom Shooting modes.
Having said that, when I am in the few scenarios that I’ve touched on today, and a few others, I am happy to have this feature, and it does make life easier when the need arises, so I thought I’d share my thoughts on this with you today. If you think it might be useful for you too, do check your manual and see what comparative features your camera might have.
Podcast Reaches 12 Years Old!
Before we finish, I’d like to just mention that this podcast turned 12 years old on September 1st (2017). It’s hard to believe that we’ve been going for 12 years now. I was the third person to register a photography podcast in iTunes, beaten only by Chris Marquardt of Tips from the Top Floor and Brooks Jensen with his Lenswork podcast. These two podcasts were a great source of inspiration a s I decided to start my own podcast.
I’ve seen many podcasts come and go since, and I’ve developed some favorites of my own over the years, namely, Ibarionex Perello’s The Candid Frame, Sharky James’ Petapixel Podcast and I still love to listen to Brook’s philosophical outlook on the photography world in his Lenswork Podcast. I’m also happy to have become friend’s with Ibarionex and Sharky, as well as many other podcasters, and of course, this podcast has enabled me to totally change my life, as I incorporated Martin Bailey Photography K.K. in 2010 and started to make my living entirely from my photography related activities.
I have so much to be thankful for, but as we reach twelve years of mostly weekly episodes, I’d really like to thank each of you for continuing to listen and follow the blog. Without you listeners, none of this would mean anything, so thanks a million for being here, and I hope you’ll stick around because I certainly don’t intend to go anywhere.
Show Notes
Subscribe in iTunes for Enhanced Podcasts delivered automatically to your computer.
Download this Podcast in MP3 format (Audio Only).
Download this Podcast in Enhanced Podcast M4A format. This requires Apple iTunes or Quicktime to view/listen.

I love the custom shooting modes. I, like you, always have the C3 settings ready for anything, mainly wildlife situations.
I set it to:
manual mode
aperture 5.6
shutter 1/500
auto iso
exposure comp on the set button
Then it is just a couple flicks of the dial to raise or lower the shutter speed, or add some exposure comp if shooting in snow or at the sky. I have it set to hold these settings, that way I can always turn to C3 and know exactly where I am at.
I like having the option to use either AI servo or One Shot AF at anytime. I set the af-on button to AI Servo and set the exposure lock button beside it to One Shot. I find this very handy especially when shooting in very dark environments with a fast lens like the 35mm 1.4. It is very hard to see if the shot is in focus so I like the flash of red on the focus point when you use One Shot that lets me know it found focus.
I use ita little different for bif, instead of setting the exposure lock to One Shot I set it to AF expansion. This way I can use the single point, but then if a bird takes off, I can quickly use multiple points to track it better.
Congratulations on twelve years. Thank you for all the help you have provided me along my journey of becoming a photographer.
I am also a fan of Brooks Jensen’s Lenswork. Listening to people like him and David Duchemin really help to bring me back into focus on the real goal. Making a photograph.
Keep up the good work, I hope there are many more years to come.
Joshua
Hi Josh,
This all looks like you’ve got it figured out nicely.
I also use the Exposure Lock button to toggle between AI Servo and One Shot. That’s a handy customization too.
For birds in flight, I use all AF points, so never use expansion, but that’s a good tip too.
Of course, David is always worth listening to as well. I don’t think of him as a podcaster, but I have watched a few of his videos, and I always enjoy our chats. Great inspiration always.
Thanks for sticking around, and I hope to be conversing like this for another 12 years at least. 🙂
Cheers,
Martin.
I have just bought a Canon 5Dsr and spent 4 hours setting all the required options, etc., and have saved then as “custom shooting modes” in the camera.
There are many ways to delete or change the settings, which would be a long winded nightmare to re-create from scratch. I can’t see any way to save the “c1, C2, C3” settings to a location outside the camera. Is there a way?
Hi Bernard,
I’m not aware of a way to save the settings off camera on any Canon camera other than the 1 series bodies. It’s annoying, I know, but Canon doesn’t think it’s important enough for anyone that doesn’t own a 1 series camera. If it’s any consolation though, I’ve never had to wipe or completely reset my settings after owning two 5Ds R bodies for more than three years now.
Congratulations on your new camera. I hope you find it as wonderful a camera as I do.
Regards,
Martin.