

As I switch my digital imaging workflow to Phase One’s Capture One Pro 9, I’m learning how to bring out the most from this powerful raw image processing software, and today I’m going to share how I’m now importing and organizing my images.
You might remember from episode 534 that I have just switched to Capture One Pro from Lightroom, and so my goals are to maintain as much of the control that I had in Lightroom as possible, while making use of the powerful features now available to me in Capture One Pro. I don’t necessarily want to simply emulate my Lightroom workflow, although there are things that Lightroom does better, so I want to get as close to this as possible.
If you want help with actually migrating from Lightroom and importing your archives, take a look at episode 534 first, as I cover this in that post. Today I’m starting a more in-depth series that I’ll build on as time allows, and it makes sense to start with importing and organizing images from shoots, although I’ll start with some background on how I’ve organized my catalogs and other considerations.
Multiple Catalogs
First of all, I’d like to talk a little about my Catalogs. Although in Lightroom I used to have my entire library of images in one catalog, this really doesn’t work with Capture One Pro, because there is too much data held inside the catalog folder.

Catalog Selection Pulldown
I tried to put all of my images from 2000 to 2015 into a single catalog, and it ended up 174GB in size, and took around 3 minutes to open, then another five minutes or so before you could navigate around. Also, when I tried to select All Images under the Catalog Collections, Capture One became unusable for around 15 minutes, so I had to force quit the program, and that corrupted the catalog and it was not recoverable, so I had to throw it out. Capture One Pro just cannot handle this number of images, which incidentally was around 165,000 of them.
So I’ve split up my previous year folders. I now have an one catalog called ~2005, which has everything up to 2005, then an individual year folder for each year from 2006 to 2016.
My 2016 folder is of course work in progress at this point, but once this year is over and I’ve finished all my editing, it will simply become the archive for this year and I’ll create a new 2017 catalog for next year.
This strategy gives me more manageable catalog folder sizes. My 2016 catalog is currently about 21GB, and will probably become around 30 to 35GB by the end of the year. I can live with that.
I can also switch easily between catalogs, with the Catalog pulldown under the Library section, as you can see in this screenshot (right), and it only takes about 10 seconds to switch, so this is a workable solution.
The only thing I wish I could do but currently cannot, is to search across multiple catalogs. If I could do that, this strategy would be totally stress-free for me.
Finals Folder
Finals Folder Structure
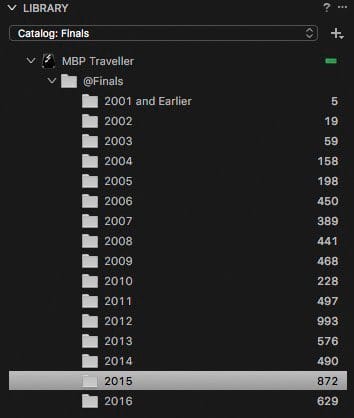
I also maintain a separate catalog called my Finals, and into this I copy all images that I consider my final selects. So, my year folders contain all images that I didn’t delete from all shoots, and I do all of my rating and keywording initially in these folders.
Then when I have completed my editing for any given shoot, I copy my final select images into my Finals catalog, separated out into year folders. I currently have 16 folders in there.
This means the year catalogs become more of an archive, and I can open just the one Finals catalog to get access to all images that I think are worth a hoot from 2000 to the present day.
I tend to open this Finals catalog more than any other as I’m working on various tasks. This also means of course that I can search across all of my final selects too, which I think is important to be able to do.
Portability
One final note on this, is that I always keep my Finals folder on an external hard rive, and it goes everywhere with me. This means that even if I’m traveling, I can plug in the external hard drive, and access every half decent image I’ve ever shot, no matter where I am.
And, my current year folder is also on that hard drive. Once I have completed my 2016 images and am working with a new 2017 folder, I’ll move the 2016 folder to my Drobo, attached to my iMac in the studio, and I’ll repeat the process until 2018. Rinse and repeat.
Organizing the Folder Structure
2016 Year Month Day Folder Structure
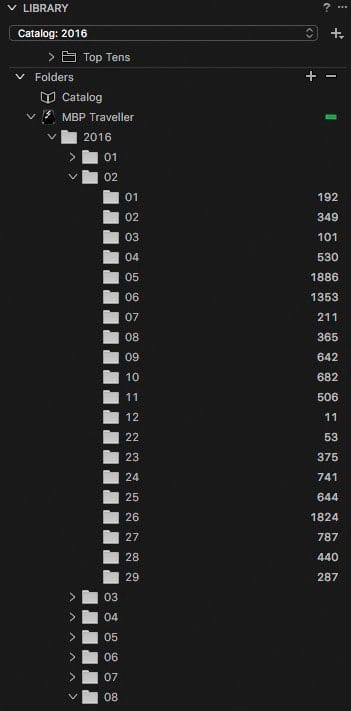
For many years now, I have organized my original shoot photographs into a Year/Month/Day folder structure, as you can see in this screenshot (right). This means that all images I shoot go into a single folder for each day that I photograph anything.
If I am shooting with multiple cameras, they still go into the same folder, and if the filename should end up with the same number, Capture One will append a new number to the end, rather than overwriting the first file with the same number.
With the way I’m now naming my files though, I have the camera include 5D1 and 5D2 in the filenames, so that I can tell which of my 5Ds R cameras was used to shoot the photograph, so the file names will never be the same.
All day folders for each month go into a single folder with the number of the month, and all month folders go into one year folder for each year.
I find having everything in day, month and year folders makes backing up images and organizing your image library easier. When I first started digital photography I did what a lot of people do, and put images into individual shoot folders, with the name of the shoot.
This quickly becomes unmanageable, as you forget what you’ve backed up, and the more folders and shoots you get the more difficult it becomes to find anything.
I find it much easier to have everything in these Year/Month/Day folders, as I personally remember quite well when I shot at any particular location, so I can generally find things quickly just by navigating to a year, and a month folder. I always use keywords to find images in my catalog, and we’ll touch on this shortly.
Show Folders Hierarchy
Also, note that by default, you will see all of your folders in a flat hierarchy, and will not be able to find anything. To make Capture One Pro display your images in the correct Year/Month/Day folder structure, right slick the folder and select Show Folders Hierarchy from the shortcut menu that is displayed.
Import Workflow
OK, so now that we have our folder structure strategy in place, let’s start to import some new images. Note that although Capture One Pro also supports Sessions instead of Catalogs, for now, we are going to cover just Catalogs because this suits how I work most of the time. We’ll talk about Sessions at a later date.
Another thing that I’d like you to bear in mind as we walk through this workflow, is that I try to do as much as I can in my workflow as early as possible. The earlier you do something, the more time you’ll save later. If for example, you change your filenames during import, it’s done and dusted. You can forget about it from that point on.
This helps in a number of ways, for example for SEO (Search Engine Optimization) if you share your images online, but it also gives you a kind of a SKU ID for each image, especially if you include the date and some other custom text, so we’ll look at how to set this up in a moment.
Also, we want to drop our images directly into the folder structure that I’ve mentioned so far, and we need that to be automatic. There is nothing more wasteful time-wise than navigating to folders and setting up your import details every time you do a shoot, so we’ll cover this too.
Create a Location Sub Folder Presets
Before you even insert your memory card into the computer, open Capture One Pro and select the Catalog that you want to import your images into. For me, this year, that Catalog is called 2016. Then, insert your memory card into your computer, or a card reader etc. and Capture One Pro should automatically display the Import dialog. If it doesn’t, click the Import button which by default is the downwards pointing arrow in the top left of the toolbar, or select Import Images from the File menu.
If it’s not selected, select your memory card from the Import From, Source pulldown, and turn on Include Subfolders if necessary to see your images in the right side of the Import Images dialog box.
Under Import To, select the Destination, where you’ll save your images, but resist the temptation to navigate right down to the Day folder in our Year/Month/Day folder structure. Remember, we want to automate this, so you don’t have to do this every time you import images.
Import to Year/Month/Day Folder Hierarchy
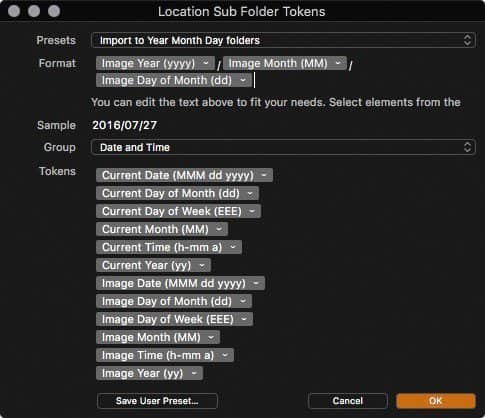
To create a preset to automatically import your images into a Year/Month/Day folder structure, click the ellipsis to the right of where is says Subfolder, under the Import To section, and you’ll see the Locate Sub Folder Tokens dialog, that you can see in this screenshot (right).
Select Date and Time from the Group pulldown, and you will then be able to add the Year, Month and Day of the Month options. Note that to create a folder hierarchy, you’ll have to type a forward slash “/” between each element.
Also, note that if the year option only has two “y” characters in parentheses, click the downwards arrow, and select the four “y” version from the pulldown.
When you’ve done that, click the Presets pulldown at the top of this dialog box, and select Save User Preset, and give your preset a meaningful name. I called my preset “Import to Year Month Day folders”. From this point on, until you change it, this preset should be automatically selected whenever you import images, but if it ever is not, come back to this dialog, and select it from the Presets pulldown.
Renaming Files on Import
As I mentioned earlier, I also think it’s better to rename your images on import, to save time later. Of course, if you need to change the filename later, you can easily do that anyway, but it’s much better to have your base file name changed to something meaningful from the start, so let’s set that up too.
Create Naming Format Preset
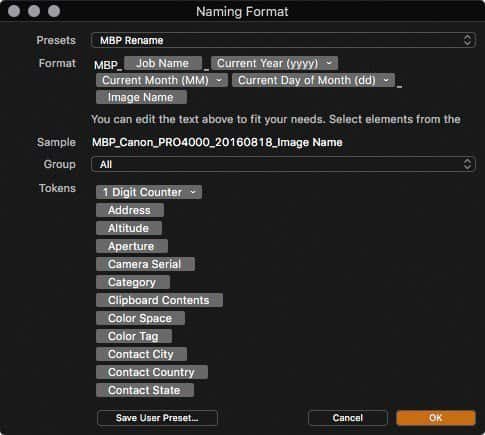
Under the Naming section, click the ellipsis to the right of the Format field, and you’ll see something similar to the following dialog box (right).
I usually prefix all my image file names with MBP, followed by an underscore “_” so you’ll need to decide what, if anything, you will use for your images.
After that I want to insert some kind of descriptive custom text. There is no Custom Text option like there is in Lightroom, but if you add something called Job Name, this enables us to do the same thing.
If you select All from the Group pulldown, you can find the Job Name option, and add that to the Format field, then type another underscore, and locate Current Year, and again, change this to (yyyy) not just (yy), for the full year number, and add that to the Format field as well as the Current Month (MM) and Current Day of Month (dd).
The next thing I added was the Image Name option, which literally just takes the image name, and appends it to the end of the new filename. Once you’ve done this, select the Presets pulldown and give your new preset a name. I called my MBP Rename. As with the location, unless you change this, it will be selected now for all future imports.
Import Images Dialog
Once you have these two presets created, and are back in the Import Images dialog box, you should see something like this screenshot (below).
You can see from the Sample Path, that our images are going to go to my external hard drive, which is called MBP Traveller, because it travels with me and travels between computers, and the images will automatically be placed into my Year/Month/Day folder structure. Under the Naming section, if you enter some meaningful text into the Job Name field, this will get picked up by our file renaming preset, and used to build our new filenames, also including the date and original filename.

Capture One Pro Import Dialog
In this example, I was importing photos of prints coming out of my new printer, so I used Canon_PRO4000 for my Job Name. This means that from now on, if necessary, I could easily search for the word PRO4000 or Canon, and get a list of images. I could do this both within Capture One Pro, or even just in the operating system search feature, and that can be useful sometimes.
Importing Multiple Shoots Simultaneously
Note that if you are importing lots of images from various shoots, and want to use a different Job Name or custom text for each, you could just select the relevant images from the right side, and import them shoot by shoot. Or you can simply import the entire memory card first, leaving the Job Name blank, so it uses Untitled, then select your various types of images, and select Batch Rename Images from the File menu.
At this point, I have found no way to use the original unique ID number that is embedded in the files, so the only way to rename files after the initial import is to use the Batch Rename Find and Replace method. If your files have Untitled as the job name, just search for Untitled and replace it with whatever Job Name or custom text you want to include in the new filename.
Renaming Individual Files
To rename any file directly, you simply click on the filename in the thumbnails view, and change it right there, which I really like.
Copyright Information
Back to the Import dialog quickly before we move on, I wanted to also mention that it’s a good idea to add your Copyright information, as you can see in the above screenshot. Again, once you’ve added this, Capture One Pro will remember what you entered until you change it, so you may only need to do this once, then you can forget about it until the following year, when you just need to update the year number accordingly.
Adjustments
If you find that you are making the same adjustments to all of your images after importing into Capture One Pro, you can create a preset of those changes, and assign that preset during import by selecting it from the Styles pulldown in the Adjustments section. You could assign other creative presets, like converting everything to black and white during import if you wanted to.
At this point, I haven’t really decided on any generic changes that I want to make on all of my images, so I’m not using this yet, and may never use it, but I have started to create presets for various looks, and I’m using them in my processing after import, so we’ll look at this in a future Capture One Pro tutorial.
Keywording
In addition to including a descriptive word or two in the filename during import, I always add keywords to my images, so for example, if I need to list all photographs that I’ve made of Japanese Red-Crowned Cranes, or Snow Monkeys, I can simply search for these keywords and find all images with the keyword assigned very easily.
In Lightroom, I used to add my main generic keywords for a shoot right there in the import dialog, but that isn’t possible in Capture One Pro at this point in time (Aug 2016) so I’m trying to get into the new habit now of adding my generic keywords straight after import. I am forgetting sometimes, which is why I really would like to be able to do this on import, but I’ll stick with it.
Just go to the Keywords section in the Library tab, and click on the field where it says Enter Keywords, and add your generic keywords for the shoot. Then, later on, after I’ve made my final selection of images, that I might share or send to OFFSET for consideration for inclusion in my stock library, I select each batch of images, and add more refined keywords.
For example, for a shoot from Hokkaido, say in the area of Akan, where we photograph the beautiful Japanese Red-Crowned Cranes, if all of the images on the card include cranes, I might include that in the first generic keyword list, but if we have some fox shots, and maybe a sunset shoot on the same card, I would probably add the keywords Winter, Japan, Hokkaido, Akan and Snow straight after import.
Then later, I’d go to just the crane shots and add Japanese Red-Crown Crane, Bird, Avian, and maybe Graceful, White, and any other descriptive keywords that it makes sense to add. I don’t go crazy with keywording, but I think it’s important to get the main keywords assigned to your images. This makes it easier to find things later, and improves SEO if you post your images online or send them to a stock agency etc.
Rating and Color Labels
Just like in Lightroom, you can rate your images as you browse through your library simply by hitting a number key, from 1 to 5, or zero to remove a star rating. You can also add a number of color tags to help with your organization, and three of the main colors also have shortcuts.
You can assign a Red tag by hitting the minus “-” key, a Yellow tag by hitting the asterisk “*” key and a Green tag by hitting the plus “+” key. You can also add color tags from the Adjustments menu, and Color Tag submenu, or click the color tag icon at the bottom left of the image thumbnails.
No Reject Flags
One thing that I miss from Lightroom is that there is no Reject flag, or Pick flags, but I rarely used the Pick flags. To Reject an image you just had to hit the X key on the keyboard in Lightroom, and then once you’ve selected all your rejects, you can hit COMMAND + DEL to filter out and delete all of your rejected images.
My Rating System
I thought of going back to my old rating system, in which 1 star means the image is to be deleted, but I like the rest of my system now, where 1 star means it was once selected, but fallen out of favor. 2 stars is an original image, for something that I made a TIFF or other format copy of the image. 3 stars is anything worth a hoot, 4 stars is stuff that I want to actively share with people, and 5 stars is portfolio class, by my standards.
While looking for a way to reject photos, I came across a Niels Knudsen post from a few years ago suggesting to use “-” to mark images with a Red tag, and then delete them. I didn’t really want to do that, because I use Red tags to mark the last frame of a series of images to be stitched into a panorama, but I think I’ll change that, and go with the minus key, Red tag for now. On a Japanese keyboard (that I use) the minus key is the only one of the three color tag shortcuts that doesn’t require you to hold down the Shift key, so it makes most sense.
Filtering Images
Filtering on Star Ratings and Labels
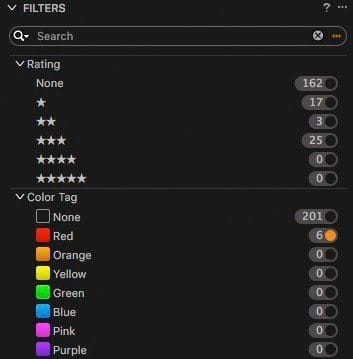
Once you have star ratings or color tags assigned, you can easily filter on these values to get a cut down view of your images. For example, when I’m ready to select just the Red tag images to delete them, I just go to the Filters section in the Library tab, and click to the color tag to filter out the images, as you see in this screenshot (right).
You can hold down the ALT or COMMAND key and click on multiple ratings and color tags to filter on more than one at a time.
Once I filter out all of my Red tagged images like this, I can hit COMMAND + A to select them all, then the Delete key, to remove them from my hard disk.
Working with Multiple Folders
Being so accustomed to simply being able to select multiple folders and see a view of everything inside all of them in Lightroom, I was stumped initially by the fact that you can’t just select a top level folder under the Folders view in Capture One Pro, and see everything in that entire folder hierarchy.
For example, if I click on my 2016 folder, or any of the month folders, I do not get a list of all images inside each of my day folders. I have to click on the actual day folder. I cannot even select multiple day folders, which I found incredibly frustrating at first.
Then I realized that if you click All Images under the Catalog Collections panel, the Date section under the Filters panel comes to life. With All Images selected, as you might imagine, you get a list of all images in the Catalog. To drill down to specific dates though, you can select the month, or multiple dates in the Date section.
Searching for Images
Search and Filter
The Search features in Capture One Pro are really quite powerful, but takes just a little bit of getting used to. You can for example search for images based on Keywords and file names, as well as pretty much any other text field assigned to or embedded in the image, and this is linked to the star and label filters.
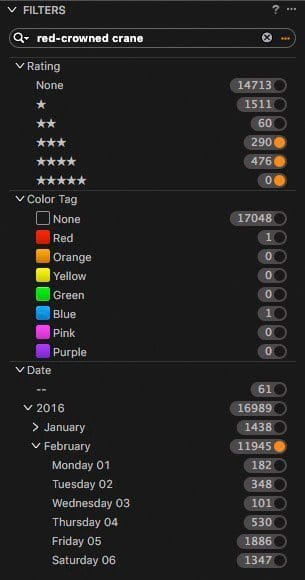
If I want to search for all red-crowned crane images that I shot in February this year, but only images that have a 3 star rating or higher, you just type the phrase to search for in the search field, and click on the criteria while holding down the COMMAND key on your keyboard.
You can also right click the ellipsis to the right of the Search field to display a more advanced search criteria dialog, or right click the ellipsis to the right of the Filters section label to opt to select which fields are included in your search.
Sticky Search and Filters
The other useful thing is, if you navigate to a different folder, or even a different catalog to look for something, and then come back to the same view, each view remembers its own search and filter criteria.
This used to drive me crazy in Lightroom, because it forgets it’s filters every time you navigate away, but Capture One Pro does not.
Clear the Filters When Finished
Conversely though, if ever you come to a folder and can’t see the images that should be in there, the first thing to check is the Filter and Search fields. It is possible that you have something set down there that you forgot about. Because of this, it’s a good idea to just hit that circle with the X in it to the right of the phrase you were searching for, and it will clear not only the search phrase, but all of your other selected criteria like star ratings, color tags and dates.
Display by Keyword or Place
There is also a Keywords and a Place section under the Filters panel. These are pretty self explanatory, but basically, when you open them up, you can see a list of keywords from all of the images in your current view, as well as Places if you have geotagged your images. If you click on any of these, you can get a view of all images with common criteria.
Collections and Selects Collection
Capture One Pro also supports Collections, very much like Lightroom. As I mentioned in my earlier post about jumping ship to Capture One, if you import your images into Capture One by importing Lightroom Catalogs, you will keep any Collections that images used to be in.
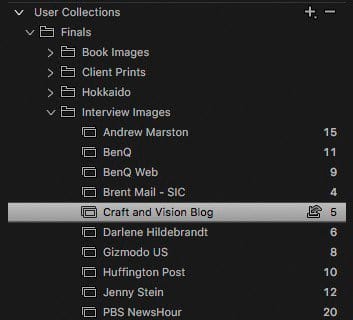
But you can of course create your own Collections from scratch to organize your images. For example, if I’m interviewed about my work, and I’m asked to provide some photos, I generally create a new Collection inside a folder called Interview Images. I was recently interviewed by Craft & Vision for their new blog, so I created a new Collection called “Craft and Vision Blog”.
Selects Collection
Although you can drag and drop images into a Collection, it’s often quicker to use a keyboard shortcut, and to enable this, you’ll first need to right click the new Collection, and select Set as Selects Collection from the shortcut menu. This is pretty much the same as making it the Target Collection, in Lightroom.
Once you’ve made a Collection the Selects Collection, you’ll see a little tray with an arrow pointing into it to the right of the Collection name, as you can see in this screenshot (right).
Then you can use the shortcut COMMAND + J on a Mac or CTRL + J on a PC to add images to the Selects Collection. To remove an image from a Collection, you can just hit the Delete key. This does not delete the photo, just removes it from the Collection.
This is powerful, because it can be used to build collections, and narrowing down images for a final selection after a shoot etc. Then, once you have your final selection, you can change the Selects Collection back to some other default Collection you might use, and you are left with a regular Collection to keep your images in.
Of course, the images themselves don’t get moved around your hard disk. They remain in their original folder. You’re just creating logical links. Images can also be in multiple Collections etc. This is just for organization purposes.
Exporting Originals
We’ll talk about exporting files and printing with Capture One Pro in a future tutorial, but to complete this discussion of my workflow today, I want to talk about how I copy my Final select images into my Finals folder and Catalog. Once I have my final selection of images from a shoot, I filter down to everything that is 2 stars or higher, because I want all of my original images for anything that I made a copy of, and everything rated 3 stars or higher.

Export Originals to Finals Folder
Then, with everything that I want to export selected, I right click one of the thumbnails, and from the shortcut menu, select Export, then Originals. You can also get to this option from the File menu. Then all I need to do is select the destination folder and I keep the image name, because that’s already changed on import, and click the Export button, as you see in this screenshot (right).
Note that this does not automatically add the image to the Finals catalog though, so I then have to switch to my Finals catalog, navigate to the folder under the Folders section in the Library tab, and right click it. In this example, I right clicked 2016. Then select Synchronize from the shortcut menu.
You will then see a dialog showing the number of images that will be synchronized, and giving you the option to show the importer as well. If you select to show the Importer, the preset that we created earlier, to import images into our Year/Month/Day folder structure will be selected, so you’ll have to select Current Location instead, and then you’d have to reselect your folder structure preset when you import your next memory card.
To avoid that, you can deselect Show Importer, and just click sync, and your new Final selects will be imported into your Finals catalog but remain in your 2016 Finals folder, which is where you want it anyway.
Please note that due to changes in Phase One, the discount code that I mentioned in the Podcast is no longer valid.
Also, note that you can download a fully working trial version of Capture One Pro from the Phase One Web site, and try it out for a full 30 days before you buy. See if you love it as much as I do.
Wrap Up
OK, so we’ll wrap it up there for today. I know that at times this might have sounded a little complicated, but in practice, it really isn’t. Sure, Capture One Pro isn’t as smooth as Lightroom in some respects, but in others, I’m finding it more powerful, so I’m still happy to have switched, and I’m happy to work around a few areas that are a little more troublesome than my old Lightroom workflow. In my opinion, the image quality and processing power of Capture One Pro is worth it.
Also note that if you are already using Capture One Pro and are happy with your import and organization workflow, I’m not necessarily saying you have to change anything. This is my workflow having used Capture One for the last month.
If everything goes according to plan, I’ll be leaving for Greenland and Iceland two days after this episode is released, and I should have an episode about Outputting images, ready for you next week. I’m going to save a conversation about processing images until I get back from my travels, as I’ll have been processing every day and expect to be able to talk about my processing better after that. Plus, I’ll hopefully have some nice new photos to share with you as well.
Show Notes
Download Capture One Pro here: https://mbp.ac/c1download
 Subscribe in iTunes for Enhanced Podcasts delivered automatically to your computer.
Download this Podcast in MP3 format (Audio Only).
Download this Podcast in Enhanced Podcast M4A format. This requires Apple iTunes or Quicktime to view/listen.


Martin,
I just moved to CaptureOne from Lightroom and I have decided to use Sessions instead of Catalogs. With Sessions it keeps every shoot organized with specific folders which you can change for your workflow. The reason to use Sessions over Catalogs is if you happen to get a corrupt file when you upload it will not effect the every image as in Catalogs. This happened to me in Lightroom.
I like the organization of Sessions over Catalogs.
Interesting point about the corruption Gigi, but do you have any evidence that a corrupt file can take the whole catalog with it in Capture One?
BTW, I make regular backups of my Catalogs, so if anything ever happened to one, I could revert easily to a previous version, so this isn’t a concern for me.
Hi Martin, well you’ve certainly given me some food for thought in terms of switching away from Lightroom. Out of interest, now that you’re well and truly an established photographic pro, would you consider doing a podcast on how your revenue streams break down? Obviously I don’t mean detailed figures, but in terms of the percentage you make from tours / stock photography / print sales etc. It’d be really interesting as an aspiring (hmm, more like daydreaming) pro.
Hi Steve,
There isn’t a full podcast in it, but my revenue, off the top of my head, is probably 60% tours, 10% from stock sales, 1o% from ebooks and articles, 10% from prints, 5% from education related activities and the last 5% from affiliate sales etc. It differs from year to year though. If I release a new ebook, it’s a larger percentage. I also made an exclusive stock sale this year that brought in a few months rent, which was nice.
Cheers,
Martin.
Hi Martin,
Thanks for your reply – that’s really interesting to know. And congratulations on the exclusive stock sale!
Cheers,
Steve
Hello Martin and Steven,
I transferred from Lightroom to Capture One ago and your conversations are very helpful. The first thing I tried to do was migrate all of my pictures to single Catalog and I had to give that up for the same reasons you did., and I to use the calendar as my Dewey Decimal system, but my process isn’t as sophisticated as mine are.
Question: I thought that Media Pro would be a good application to manage images at the “catalog level” but I couldn’t make it manage. all of the photo’s on my servers. I tried the free trial and I had several conversations with Pro Media and I wasn’t able to make it work for me, primarily because I couldn’t get Media Pro to transfer photos from my camera. I now use Nikon ViewNX 2 for importing and use Capture One in my process until I need to go to Photoshop for editing the images. Do you have recommendations on products to replace ViewNX 2 and Photoshop?
Hi Don,
I’m pleased you’ve found this helpful.
I used to use Media Pro before Lightroom came out, but haven’t used it since, and I am now doing all of my import and cataloging with Capture One, so I’m afraid I can’t really be of much use here. There are alternatives to Photoshop, but again, I don’t use them, and I prefer not to recommend products that I don’t personally use or at least have first hand experience with.
Have you considered just using multiple Capture One catalogs, as I’m now doing? It’s pretty easy to manage, and you can switch between catalogs quickly too.
Regards,
Martin.
Hi Martin
I transferred to Capture One from Aperture 12 months ago and found the transition difficult to say the least. You mention that you cannot apply generic keywords on import, they can be applied by creating a user preset then applying them with Adjustments>Styles>User Presets>Keywords and then select the required Keywords. You need to select Stack Styles for multiply Keywords, Metadata etc. You can create a user preset by selecting an image that has the required keyword already applied then in the Keyword drop down menu select save user preset in the same way that an IPTC user preset is created. This is a little long winded to set up but once all your presets are created it works well.
Regards Tony
Hi Tony,
Thanks for the hint on the keywording. The word generic may have been a little misleading. I’ll probably do what you say to add the keyword MBP, which I usually add to all of my images, but apart from that, I will need to continue to add the rest of the keywords after the event, because they are always different and I can’t really foresee what keywords I’ll need until after the shoot.
Cheers,
Martin.
Hi Martin
Looking forward to your ongoing evaluation, comments and tips on COP
Regards Tony
Very interesting and helpful blog. How do you copy a final image in, say “16′ catalog, to the “Finals” catalog?
Thanks,
Chris
Thanks Chris!
I explain how I copy my final images to my Finals > 2016 folder in the three paragraphs below the Exporting Originals header above. The thing to note is that the images are not automatically added to the Finals catalog. The files are copied with one process, then you have to Synchronize the folder in the Finals catalog.
I hope that helps!
Regards,
Martin.
Martin,
Got it. Helps a lot. Can’t wait for the blog on printing.
Chris
Hi Martin
I have just started to listen to your podcasts over the last few months and am really enjoying them. I was interested to see that you have moved to Capture One. I have been using it more consistently since Version 8, although I still tend to use PS for most of the processing after RAW conversion. I want to make comment re the importing and initial editing workflow.
With the caveat that everyones needs are different, I have found that importing into Photo Mechanic by Camera Bits initially provides the quickest way to perform preliminary culls, staring and key-wording PM is able to render full size images quicker than any other program which means that you can commence this process as soon as the card starts importing. It renames files on import and can use the cameras unique number as well as any other metadata you can think of. It can import to a backup location as well at the same time. It can create and sort into nested folders with unique names. Your IPTC metadata as well as keywords can be written on import. You can quickly add a tag which I use to mark files for deletion.
Keywords, metadata, colour and star ratings are correctly read by Capture One. Once this initial PM process is complete you can then import the remaining images into Capture One with all this extra metadata. There are several video tutorials online explaining it. I personally have no association with the company, I just think its a fantastic program.
I look forward to the next podcast.
Cheers
Mark
Hi Mark,
Sorry for the late reply. I’m still catching up after my Greenland and Iceland tours.
Thanks for your thoughts on importing and initial editing. Your method is certainly a good way to work for some people. Personally, it doesn’t work for my workflow. I make lots of initial changes to my images during my culling process, so I need to be in Capture One anyway. The same goes for refining my selection. I am constantly tweaking images as I continue to work through my set, and I change my star ratings as I do this.
Although I add some generic keywords right after import, I also don’t do my final keywording and add titles etc. until my final selection is done. There’s just too much that needs to happen to my photos before I get to the point where you would be bringing the images into Capture One.
I do miss not being able to keyword during the import, and I’d prefer to use the camera’s unique number in the image rename, but that’s really all I’m missing by staying in Capture One. The images render instantly in Capture One too, so the benefits of using Photo Mechanic aren’t really there for me.
Like you say though, we all work differently, and I’m sure your workflow works great for you, and your comment will probably give others ideas too, so thanks again!
Cheers,
Martin.
Hi Martin:
My work flow is similar to yours. I also found that Capture One worked better if I broke up my very large Aperture Library into multiple catalogs when I moved to Capture One. I have found that the only way to move file that I have worked on into a “final catalog’ is the export and import steps that you described, Do you know if Capture One is considering a process that will allow images to be moved directly between catalogs. It would make things much easier.
Hi Bob,
I’ve considered sending an enhancement request for something like this, but as I wrote my email, I realized that it’s really only a couple of mouse clicks anyway. A couple of clicks to export the original images to the Finals folder, then a couple of clicks to switch to the Finals folder and sync it.
I didn’t send the request as I tried to articulate what we would need instead, and because we would also require the ability to specify not only where we want to send the image, but which folder we want it in, the only thing we would really benefit from is not having to switch catalogs and syncing the folder, which is two or three clicks.
I guess the old software engineer part of me just thought that this would probably not be very high priority, and therefore not worth the time to raise the issue. 🙂
It would be a nice to have, but I’m picking my battles a little when it comes to changes I’m requesting.
Cheers,
Martin.
Hi, Great information. Thanks.
I just did a copy of one of each of my NEF and JPG files from several external drives and my current laptop to a single external drive in the hopes of getting one of the new Wacom MobileStudio Pro devices next month. From there I will go forward with the one copy and use your workflow for future captures.
I ended up with a mismash of keywords depending on which file Explorer picked to put on the new drive. In some cases I had eight copies of the same files. Yow. Anyway. Is there a way in Capture One to embed the keywords in my pictures so that, in the future, they will carry over to anything that I chose to use to work on them? Thanks in advance
I’m pleased this helped David!
I’m sure you will do this, but please do make sure that you don’t make that MobileStudio Pro drive your only copy of your images. Get a second drive and some software like ChronoSync to synchronize your main drive to the backup drive whenever you add new images or make lots of edits etc. The last thing you want is for all of your images to be in only one place.
To ensure that your keywords are available anywhere, open Capture One Preferences and go to the Image tab, then under Metadata, select Full Sync in the Auto Sync Sidecar XMP pulldown, uncheck Prefer Embedded XMP over Embedded IPTC and check Prefer Sidecar XMP over Embedded Metadata.
This will create XMP sidecar files if you don’t already have them, but this is the best way to keep data with your images for maximum portability and redundancy.
I hope this helps!
Cheers,
Martin.
Interesting notes about Cataloging………………..
I have been struggling with proper cataloging for a long, long time.
I like Mediapro as a Catalog tool, but it has a terrible file structure. All images seem to go into one huge CatalogDB file. Unmanageable….
I am using Capture One Sessions for all my Images, so it makes sense to use Capture One for Catalog also. CO Session is great as RAW editor and “storage container’. But CO is terrible as a Catalog. However this blog has given me an idea for the interim: I will try to make Catalogs by year and see how that works. But of course, as you pointed out, a Catalog needs to be queried and that is not possible in this structure. Maybe one day Capture One team will get their stuff together and take Cataloging seriously.
Cheers, Jozef
Thanks for your comment Jozef!
Actually, if you click All Images, as described in paragraph 3 under the Working with Multiple Folders section above, you can search across the entire catalog, if that’s what you are looking for.
I hope that helps!
Martin.
Well yes you can search across folders in a Catalog. But the issue is, that if you make multiple Catalogs, you can not search across all images. I do mainly travel photography. If I want to know all pics I took in a particular city in a particular country over the years, that is not possible in the above structure. For me a CO Session is the master copy of the data. I do all editing in Sessions (and I do not really want to change that). Then I want to have a Catalog on top of all my Sessions for search, select, display, export. So I need a layer on top of all sessions. Not difficult to make, but you need access to the previews………. CO treats its Catalog the same as CO session: an image editor, not a image management tool.
Maybe some day CO will catch up to this idea………….
Cheers, Jozef
Aah, yes. I see what you mean. That is something that I miss too.
I’d like to be able to either search across multiple catalogs that Capture One Pro knows about, or just make the structure of the catalogs more efficient, so that I can go back to having all of my images in one catalog.
Having said that, because I put all of my final selects, my best photos, in a single catalog, I can go in and search across images from the last 16 years. My problems start when I need to look for something that is not my best work.
Cheers,
Martin.
Hi There
I have my images on an external drive and my catalogue backed up. I now want o use Capture One on my desktop PC. When I connect the Ext drive – the drive is allocated the letter “I:\” and not “E:\”
This no has the effect that all my thumbnail images are marked “? Offline” Is there an easy way to solve this or do I now have to go and LOCATE each and every folder?
Hi Neels,
To avoid changing the location of the files every time you move computers, you’ll need to change the drive letters on your computers to match. If E is free on your desktop, just change the drive to E. If it is not, you might want to change both to something high, like X (for external).
Here’s an article on how to do this: http://www.pcworld.com/article/2042380/how-to-change-drive-letters-even-when-the-letter-you-want-isnt-available.html
I am about to turn in for the day right now, so I can’t check if you have to relocate every folder, but I don’t think that will be the case. You can either relocate a higher level, or once you relocate one folder, Capture One might intelligently auto-locate the others.
Let me know how you get on with the drive letters first and if you still have problems, I’ll look into this more for you.
Regards,
Martin.
Hi Martin,
Thanks for sharing your experience, migrating from Lightroom (LR) to Capture One (C1).
Your review has finally persuaded me to give C1 a serious try!
I assumed my first task after downloading and installing the free trial of C1 version 10, was to import my entire LR catalog containing 132,440 images going back to 2004.
As you described when you first tried something similar, this became impossible. Your advice to create multiple C1 catalogs makes perfect sense, since I also use the Year-Month-Day catalog structure in LR.
I can see how to create a C1 catalog and name it 2016, for example.
So my question is this; how to import the 2016 folder from my one LR catalog into the C1 catalog: 2016?
I’m guessing I have to first breakdown my LR catalog into a series of one-year catalogs and import each one of them sequentially. Would that be right?
Cheers,
Michael
Hi Michael,
I’m pleased this has helped.
I thought I’d included the method I used to break down my catalog into individual years, but it seems I only included that in my first Jumping Ship post. 🙁
Anyway, all you need to do is right-click each top level year folder and select Export This Folder as a Catalog. Select to not include the images. You just need a catalog. Once you have a catalog for each year, you can import these individually into Capture One Pro.
Let me know if that doesn’t make sense.
Have fun!
Regards,
Martin.
Hello Martin,
I’m a LR user but I’m not very happy with Adobes subscription model and additionally to that I shifted from canon to sony cameras……that’s the way I’ve found capture one. So I’ve downloaded capture one pro for sony trial version to give it a try. Your blogs are very helpful with giving advice for the first steps in that program, just started to make a new catalog in capture one and importing my photos. Luckily my library system in LR was similar organized like yours in years.
The actual problem I have is that I don’t have just photos in my library folders, there are videos, too. I don’t need the videos for capture one but they get automatically imported. Is there any easy way to delete all videos from the capture one catalog? And it would be nice if there would be a possibility that capture one in future ignore video files.
Regards,
Sascha
Hi Sascha,
I’m glad my blog posts have been helping with your migration preparation.
First of all, to filter out all of your videos (for deletion) select All Images under Catalog Collections, then click the ellipses (…) on the top right of the Filters panel, then click the Show/Hide Filters option. Under there, turn on the Format option under Basic, and you should then be able to click on Movies, to filter them out. You can then delete them, but select to only remove them from the catalog rather than deleting them from the hard drive.
Also, apparently if you select Always Hide Video Files under View > Global Filters, they will no longer be imported under you turn this off again, so this should solve your issues.
Regards,
Martin.
Hi Martin,
Thanks so much for putting all this content together on your transition from LR to Capture One Pro. I am going through the transition as well and really appreciate having your podcast and blog to help me through it.
For the most part I am loving the new workspace, however there are a couple of little quarks that are causing me to pull my hair out. The main one, and the one which is prompting me to write this comment to you, is with regards to collections. While viewing an image is there a way to see which collections an image is part of? In LR it was as simple as clicking a little square in the thumbnail and a list of tall the collections it was a part of would pop up, but for the life of me I can’t figure out how to do this in Capture One Pro.
Have you run into this and/or found a workaround? Any advice would be appreciated. ?
Hi David,
You’re very welcome. I’m pleased these Capture One Pro posts are helping.
Unfortunately, I’m not aware of any way to show which Collections any given image is in. I haven’t really missed this, but I have used that feature in the past, even during the move to Capture One, but haven’t needed it since switching.
One way you could workaround this, although it’s pretty long winded and would probably get messy, would be to add a keyword to the images in each collection. For example I might add the keywords “Nature of Japan” and “Flowerscapes” to an image, if it’s in both of these Collections. Maybe even append a C or the word Collection, to remove any possible ambiguity.
You’d need to remember to add these keywords, and remove them when removing images from Collections, so I’m sure it would become a pain, but that’s really the only workaround I can think of. Sorry!
Regards,
Martin.
That’s a great idea Martin! It is taking some time for me to shift my habitual thinking after a decade of using LR, but this will give me the functionality I’m looking for in my current catalog organization with only a small tweak in method. Thanks!
Yes, this is one of the (many) features that Phase One implemented very well in MediaPro but neglected to put in Capture One. Phase One Mediapro is a much, much better Catalog as far as functionality is concerned. But it has an impossible file structure which makes it not very practical for large Catalogs. It is not very robust and Phase One does not seem interested in updating it.
Good point Jozef. I imagine that’s because they bought Media Pro, rather than developing it themselves, unless I’m mistaken. I used to use the original Media Pro from iView years ago. Maybe I should try it again.
Ah, I did not realize it was an acquired product. I have always been wondering why they did not simply reuse some of their code.
Martin,
Thanks for this. Yep, migrated from Lighroom this year. I LOVE the idea of a Finals Catalog! I’m thinking of creating a master reference catalog – original files stored on a 16 TB G-Drive (400,000 + images and growing) WITHOUT the previews (deleting them in the Cache), but KEEPING the thumbnails. This way I can keep the catalog REALLY small on my internal laptop hard drive and at least be able to LOCATE certain images on the road. And when it’s hooked up to the hard drive in the studio I’ll have full access to everything.
Then, I’d create a FINALS catalog on the laptop WITH nice-sized previews, should I need to create a custom presentation / pitch on the road – which I actually need to do often, but only from my 4 and 5 star images.
Thoughts? 🙂
Cheers,
Mitch
Whoops! Sorry Mitch. I totally missed your comment until Jane posted another comment earlier.
I’m in a very similar situation to you, with 14TB of data on a Drobo as my main storage. I outlined my strategy in this post: https://mbp.ac/570
I’m sure you’ll all sorted already with it being so long since you asked, but if you are still interested, please take a look.
Cheers,
Martin.
Martin, Thanks so much for all your fantastic information. After Hokkaido I decided to jump from LR to Capture One. I switched cold turkey on a recent 3 week trip. I have made a bit of a mess of things at least twice but that’s how I learn – I read to find answers and they are there in your articles.
Hi Jane,
I hope you’re well. It’s nice to hear from you.
Glad you have given Capture One Pro a try and that my tutorials are proving helpful.
Let me know if there is anything else that you are still having problems with and can’t find an answer on the blog.
Regards,
Martin.
Fantastic guide, thank you.
I now have my import dialog set up the way I want it. How do I make all the images that I already imported rearrange into this structure without losing anything? Can I just click import and choose the folder they’re in?
Looking back on your Capture One posts and this made me laugh: ” My 2016 catalogue is currently about 21GB, and will probably become around 30 to 35GB”
With my Nikon Z9 and D850 I have single shoots that can push 80Gb! 🙂
Hi Richard,
I might have confused you. By my catalog, I’m talking about the catalog file itself that I open to access my images. My images for 2016 totaled 1.6TB. 🙂
Regards,
Martin.