I’ve been asked to share my Canon EOS 5Ds R camera settings a number of times, so this is just a quick post to share a list of the main changes I make. There are other changes, but I feel these are the ones that are important to my shooting as a mainly landscape and wildlife photographer.
I’ve used the menu name from the camera for reference. For example, the first item is SHOOT2 which is the second of the menus with the Camera icon, on the far left.
I’ve also added my reason for selecting this setting in parenthesis after each setting.
SHOOT2
Color space = Adobe RGB
(This gives the JPEG preview created a wider color space, and affects the histogram slightly, but because I shoot raw, it doesn’t make a difference for my final image)
SHOOT5
Grid display = 3×3+diag
(I like to have these lines visible to help me with composition and to keep horizons straight when I’m hand-holding the camera.)
AF1
Case 2, but set Tracking sensitivity to -2, Accel./decel. tracking to 1 and AF pt auto switching to 0.
(I’ve found these to be the best settings to track wildlife and birds in flight, even against a contrasty background. If you don’t shoot these subjects, you’ll need to find your own best settings.)
AF2
AI Servo 1st image priority = Focus (far right)
AI Servo 2nd image priority = Focus (far right)
(Setting both of these to Focus can slow focusing down slightly, but I don’t want a photo that isn’t in focus anyway, so I’d rather take a frame-rate hit than get a bunch of out of focus images.)
AF3
One-Shot AF release priority = Focus
(Same reason as above.)
AF5
VF display illumination = Auto
While in the screen where you select Auto, hit the Q button and select Illuminated
(This makes the focus points display when focus is achieved.)
PLAY3
Highlight alert = Enable
(Displaying blown out highlights helps you to prevent, well, er, blown out highlights.)
Histogram dis = RGB
(I use a technique called Expose to the Right or ETTR, so I look at the histogram to check that the image information is almost touching the right side of the histogram, but the single Brightness histogram can be misleading, because it’s an average of all three colors. I turn on the RGB histogram and ensure that the right-most color is almost touching the right shoulder.)
SET UP2
Viewfinder display = Electronic level = Show, Grid display = Show, Show/hide in viewfinder = Everything on
The main thing here is having the Electronic level always displaying in the viewfinder. I just like to get my images level. Everything else is optional, but I turn it all on.)
C.Fn1
Safety shit = OFF
(I don’t want the camera doing anything automatic. I just don’t.)
C.Fn3
Multi function lock = Everything on
(I use this so that I can flick the Lock switch on the back of the camera, and it will lock my dials, so I can’t accidentally change my shutter speed or aperture, especially when I’m using a Black Rapid strap, with the camera dangling upside down. You have to disengage the Lock switch to make any changes, but I find this less annoying than finding I’m accidentally changed my shutter speed from 1/1000 to 1/15 and all of my images are supernova.)
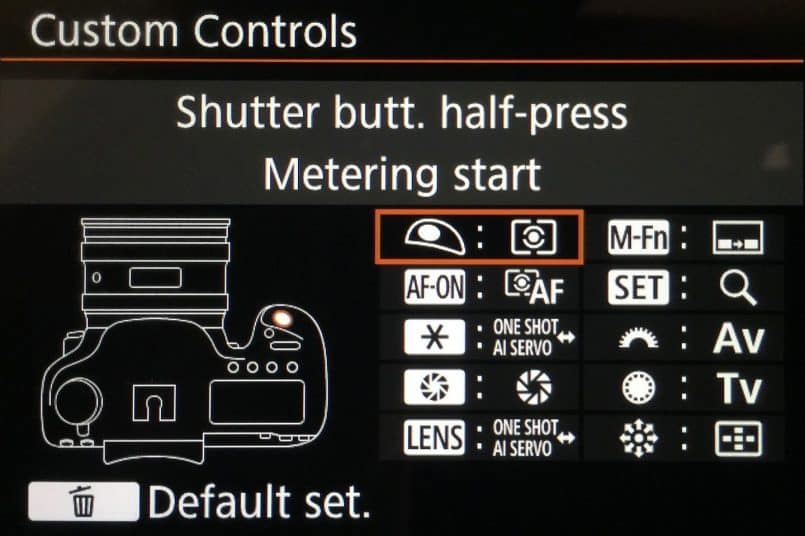
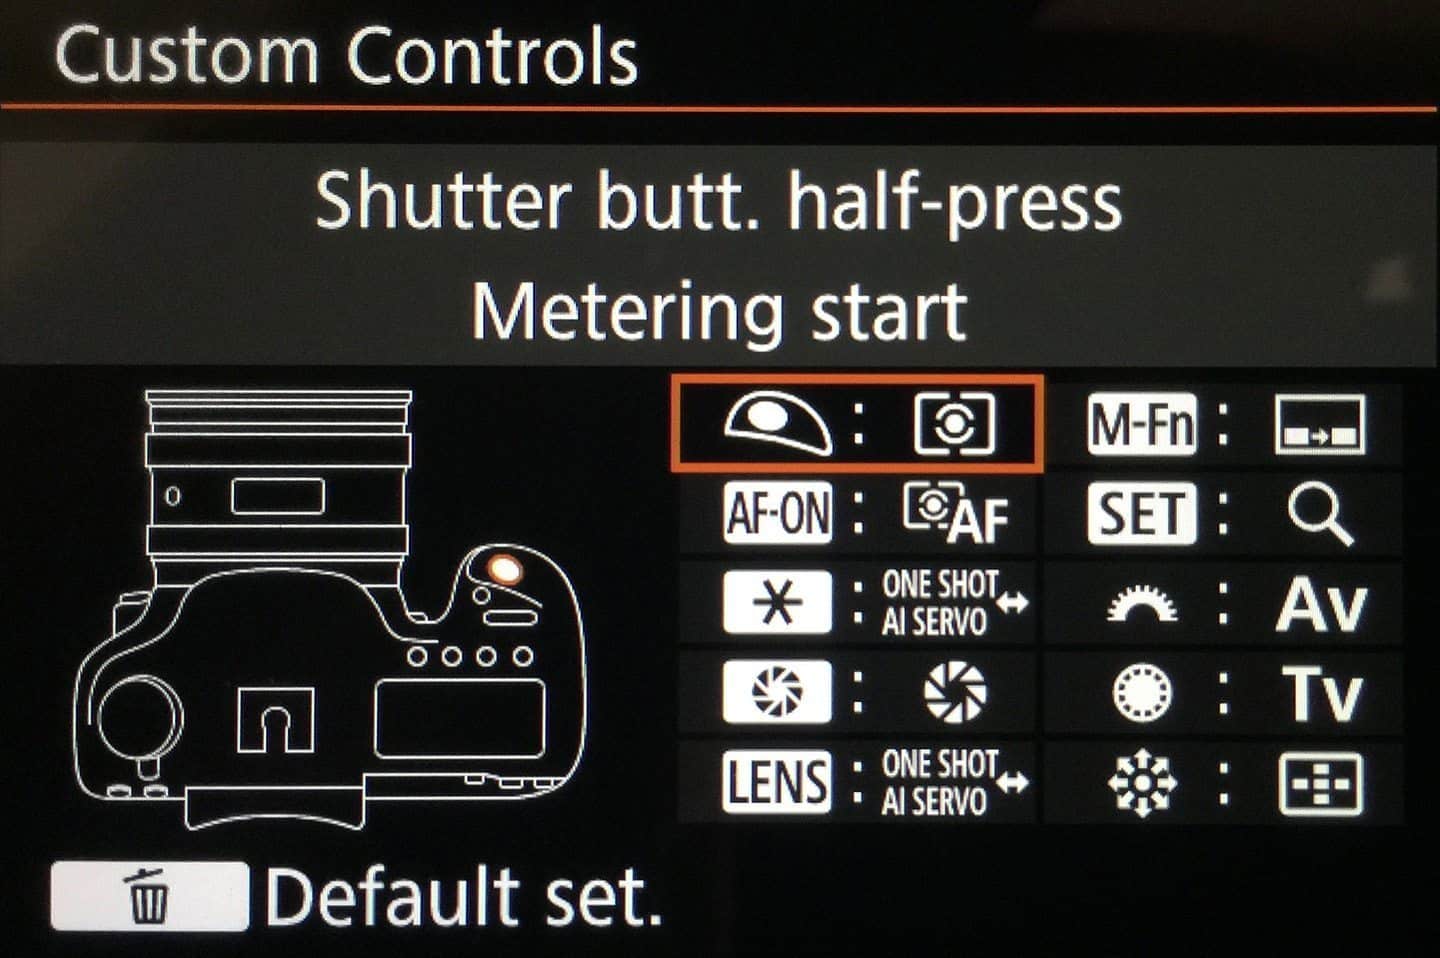
Custom Controls = I set these up as in the following image…
(Again, this is totally up to you, but I like these settings. One of the main ones is setting the SET button to magnifying the image. Canon cameras used to have Zoom buttons easily accessible with your thumb, but since they removed these buttons, I use the SET button as you see below. Note too that I set the shutter button to only meter, and not activate the autofocus. I focus only with the back focus button. If you don’t use this technique, and don’t want to try it, I don’t recommend changing this.)

Canon EOS 5Ds R Custom Controls
My Menu
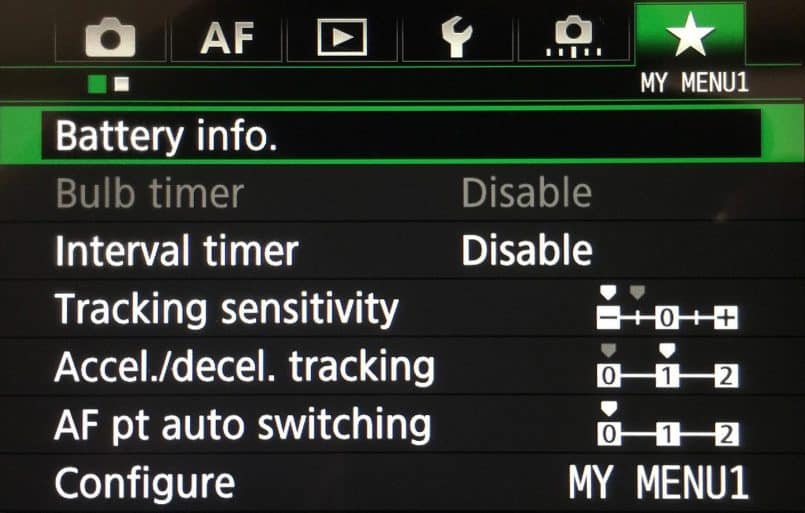
I also add the following items to My Menu. The main takeaway here is adding the Tracking sensitivity, Accel./decel. tracking and AF pt auto switching settings to this menu. This gives me easy access to these settings to tweak them as necessary for fast paces AI Servo shooting.

Canon EOS 5Ds R My Menu
Note that many of these settings are available on earlier 5D cameras and many other Canon cameras.
I hope this helps. If you have any questions, feel free to ask them in the comments below.


Martin, you might want to let readers know if you set the Color Space to Adobe RGB it kills their Custom Filename Prefix.
Hi Liam,
It doesn’t kill the prefix, it changes it and people just need to work with it. It’s been sixteen years since I figured out what was happening there, but it wasn’t difficult to figure out, so I’ll leave that to people to figure out too, but I expect most people already know.
Regards,
Martin.
FYI if it changes the custom prefix _ i cannot download the files into my computer. i need to use the srgb
Thanks for the information Uta, but I’m curious as to why this prevents you from downloading your images to your computer?
Thank you for sharing this! In addition, I’d be really curious to also see the detailed settings that you have selected for the AF-ON button auto focus options. I assume you shoot AI servo? What about the AF area selection mode?
Thanks!
Hi Nik,
I share all of those details in my post on Shooting and Focusing Techniques for Telephoto Lenses here: https://mbp.ac/584
I hope you find it useful!
Cheers,
Martin.
Thank you so much for the quick reply!
I only just found your site and podcasts, but what an incredible source of knowledge and information! I love it!
I’m pleased you found us Nik, and hope you continue to enjoy the content I share.
Hi Martin
I have a question about the use of the HighLight Tone Priority. Do you use it and if you do in what situations ( shoting birds, land cape, or other)?
In image quality maners what is your opinion about it?
Thanks in advance
Best regards
Hi Paulo,
No, I never use Highlight Tone Priority. It basically underexposes your image, then brightens it up with software algorithms, and I don’t like that. I prefer to watch the highlights myself. Also, HTP forces the lowest ISO to 200, and I don’t like that either. Plus, I have no reason to believe that it will help to improve image quality at all.
I hope that helps.
Regards,
Martin.
Hi Martin
Thanks for your reply. I was thinking some what the same but it’s always good to have feedback from one who realy knows about.
I realy apreciate your posts about techniques and the way for getting better photos..
Mry Christmas
G day
I have searched the internet a no quick and clear instruction was given. Canon do not say anything about this.
I NEED TO SET THE HISTOGRAM ON THE SCREEN FOR THE CANON 5 DSR is urgent and very difficult to fing clear and quick direction without wasting useless words regarding this.
Why the canon manual do not explain this is a mistery.
thank you marcello
Hello Martin, I have recently bought a Canon 5DS R body on ebay. I have no reason to believe that it does not work but at present the only way I can get it to autofocus is by pressing the af button on the rear of the camera. I just want to half press the shutter button and for the lens to autofocus. I think the previous owner has messed about with the settings and I would like to reset to normal autofocus so I can use the camera. Thanks in advance, Jerome 9th July 2024
Hi Jerome,
As a new (to you) camera, it would probably be best to just reset it completely. See how to here:
https://support.usa.canon.com/kb/index?page=content&id=ART178215
Regards,
Martin.
Is it possible to set my C3 settingto black & white & will my screen then revert to black & white,even if I’m shooting in RAW format?
Sorry,but I’m new!
Hi David,
Yes, you can set C3 to black and white using the R5’s Picture Style, and yes, the display will be in black and white while using that setting. If you change to a different mode that doesn’t have the monochrome Picture Style applied, the screen and viewfinder will go back to color.
Keep in mind, though, that you will only see the raw file in the black-and-white image through its embedded JPEG preview. When you open the image to process it, you’ll see a color image unless you open it in Canon’s Digital Photo Professional software, which understands the Picture Style settings and regenerates the black-and-white image for you. If you prefer not to use DPP for this, you would need to convert the image to black and white again in your raw workflow.
That doesn’t mean there is no point in using the monochrome Picture Style, though. Sometimes, it’s helpful to see the image in black and white as you are composing your shots.
I hope that helps.
Regards,
Martin.