
Over the last six months or so, many people have asked for my opinion on ISO Invariance, and I didn’t really have one, because I hadn’t done any tests for myself, so I corrected that, and today will share my results.
Let’s start with a bit of information about ISO Invariance, as this is perhaps a new term to some people. I first started to hear this term when the Sony Alpha 7R II camera was released. This camera has a very wide dynamic range, meaning it can capture a wider range of tones from total black to full white than most other cameras.
We measure dynamic range in stops, which are the measurements used to describe increases or decreases in exposure. We might talk about making our shutter speed one stop slower for example, which could be something like changing it from 1/250 of a second, to 1/125 of a second. One stop faster would mean changing 1/250 of a second to 1/500 of a second.
In terms of aperture, one stop smaller or slower than f/8 would be f/11, and one stop wider or faster than f/8 would be f/5.6. We can also use ISO to change the exposure, for example, making the sensor one stop more sensitive, by changing ISO 100 to ISO 200. We’ll use the ISO for most of our tests that I’ll share with you shortly.
DxO Mark puts the Sony Alpha 7R II at 13.9 stops of dynamic range. The Nikon D810 which also uses a Sony sensor beats that with a huge dynamic range of 14.8 stops, and my Canon 5Ds R comes in at just 12.4 stops in their tests. Compared to just a few years ago, all of these cameras are capturing enough dynamic range to give us a lot of freedom in our photography, although obviously to varying degrees.
The wide dynamic range of the Sony and Nikon cameras though raised the question of ISO Invariance and whether using Expose to the Right techniques that I use is still necessary. Exposing to the Right or ETTR is basically where we adjust our exposure for any given scene so that the highlights are on the right side of the histogram.
Basically you will see more noise in the mid-tones of a photograph compared to the lighter areas, and the shadows are even more noisy than the mid-tones. This means that we can create cleaner images by exposing them with the information in the scene as close to the less noisy right side of the histogram as possible, even if we then reduce the brightness of the image in post processing later.
In a great article published on DPReview called “Sony Alpha 7R II: Real-World ISO Invariance Study” they share some test results which show that because the noise floor is so low in the Sony Alpha 7R II and Nikon D810 with its Sony sensor, it can actually be beneficial to keep your ISO down at 100 or 200, and photograph your scene much darker, and brighten it in post. This is basically the opposite to Exposing to the Right.
The idea is that all we are doing when we increase the ISO is making the pixels more sensitive to light or amplifying the signal, but with such high dynamic range on these cameras, the noise added by increasing the ISO in camera is comparable to the noise added by pushing the exposure in post processing, but with the added benefit in the latter, of stopping highlight areas from blowing out or blooming.
This got me curious, as I know that my 5Ds R does not have such a wide dynamic range as these Sony sensor cameras, so I did a test to see if Canon EOS 5Ds users could benefit from this technique, or if it was better to continue to use ETTR techniques. Here are my results…
First of all, I shot six frames of a guitar, in my studio, with just light coming in through the lace curtain in my window. The guitar is black and shiny, so you can see the reflection of the curtains, and it has some chrome on there too, which also reflected light. I adjusted my exposure at ISO 100, so that my resulting photograph was just starting to blow out the reflection of the window in the chrome and a little bit in the reflection of the curtain on the shiny black guitar. This is probably how I would expose this photograph if I was exposing to the right (below).
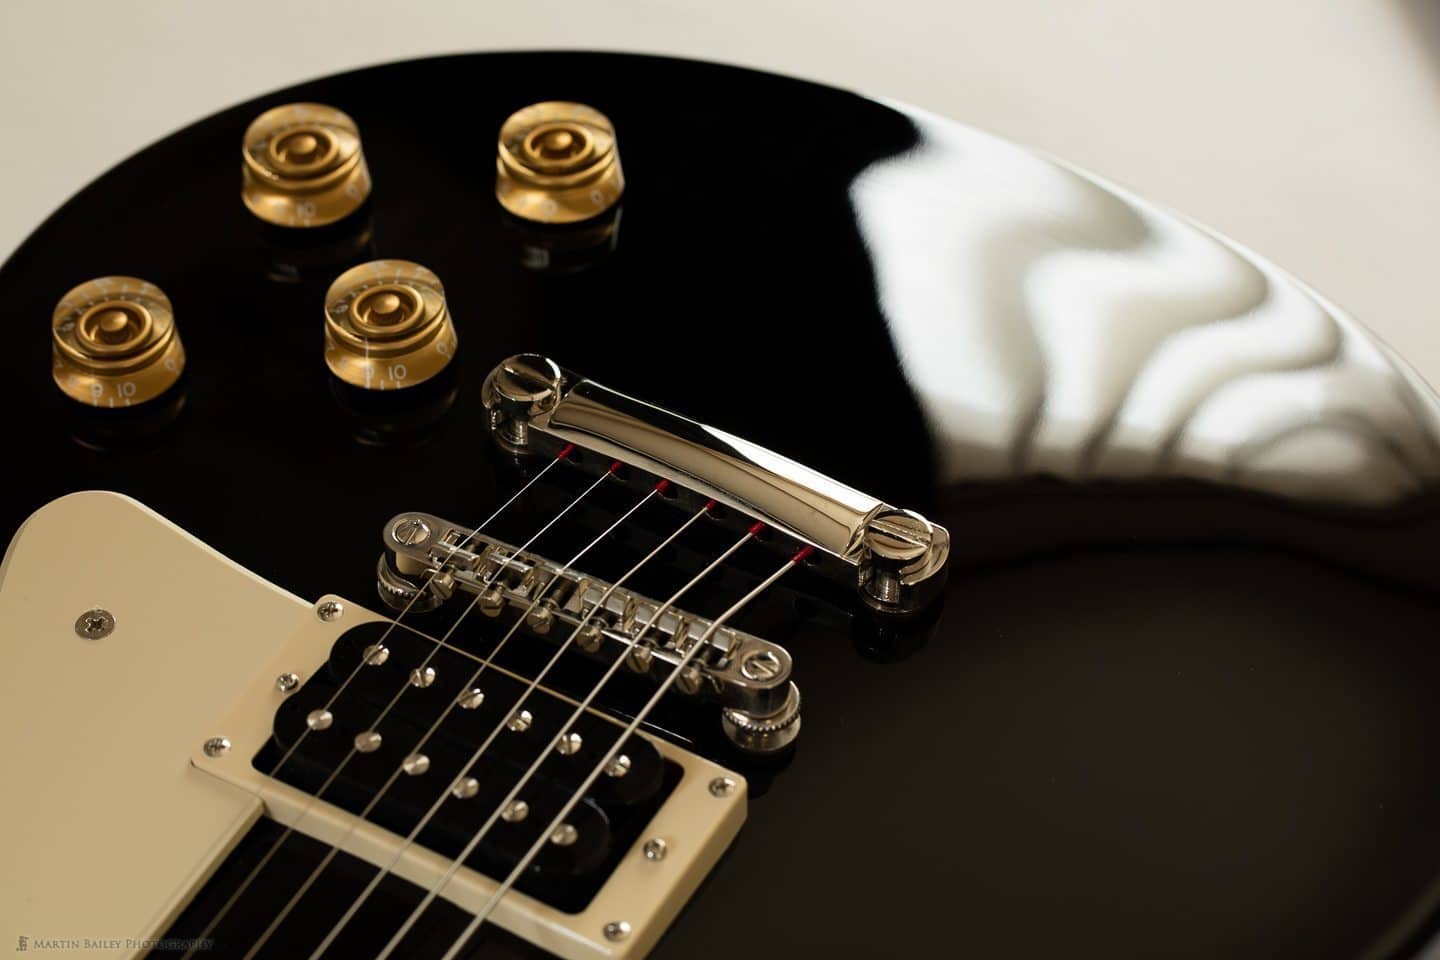
ISO 100, f/8 for 1 second
For this exposure, my shutter speed was down to 1 second at f/8, with ISO 100. In Lightroom, I can adjust the Exposure of my images up to +5 stops, buy increasing the Exposure slider all the way over to the right. So, I adjusted my 1 second exposure at ISO 100, to the same exposure at ISO 3200, which is 5 stops more sensitive than ISO 100. Just double the numbers five times to check for yourself. (100 -> 200 -> 400 -> 800 -> 1600 -> 3200)
Because I was going to be increasing the sensitivity of my sensor by five stops, I also needed to decrease my shutter speed by five stops to start my test. So that would be 1 second halved to, 0.5 seconds, then 1/4 sec, 1/8 sec, 1/15 sec to 1/30 of a second. I then shot a series of six images, starting at ISO 3200 at 1/30 of a second, and continued to shoot five more frames, decreasing the ISO by one stop for each image. In this screenshot from Lightroom (below) you can see the ISO 3200 image in the top left, going down to the ISO 100 image in the bottom right.
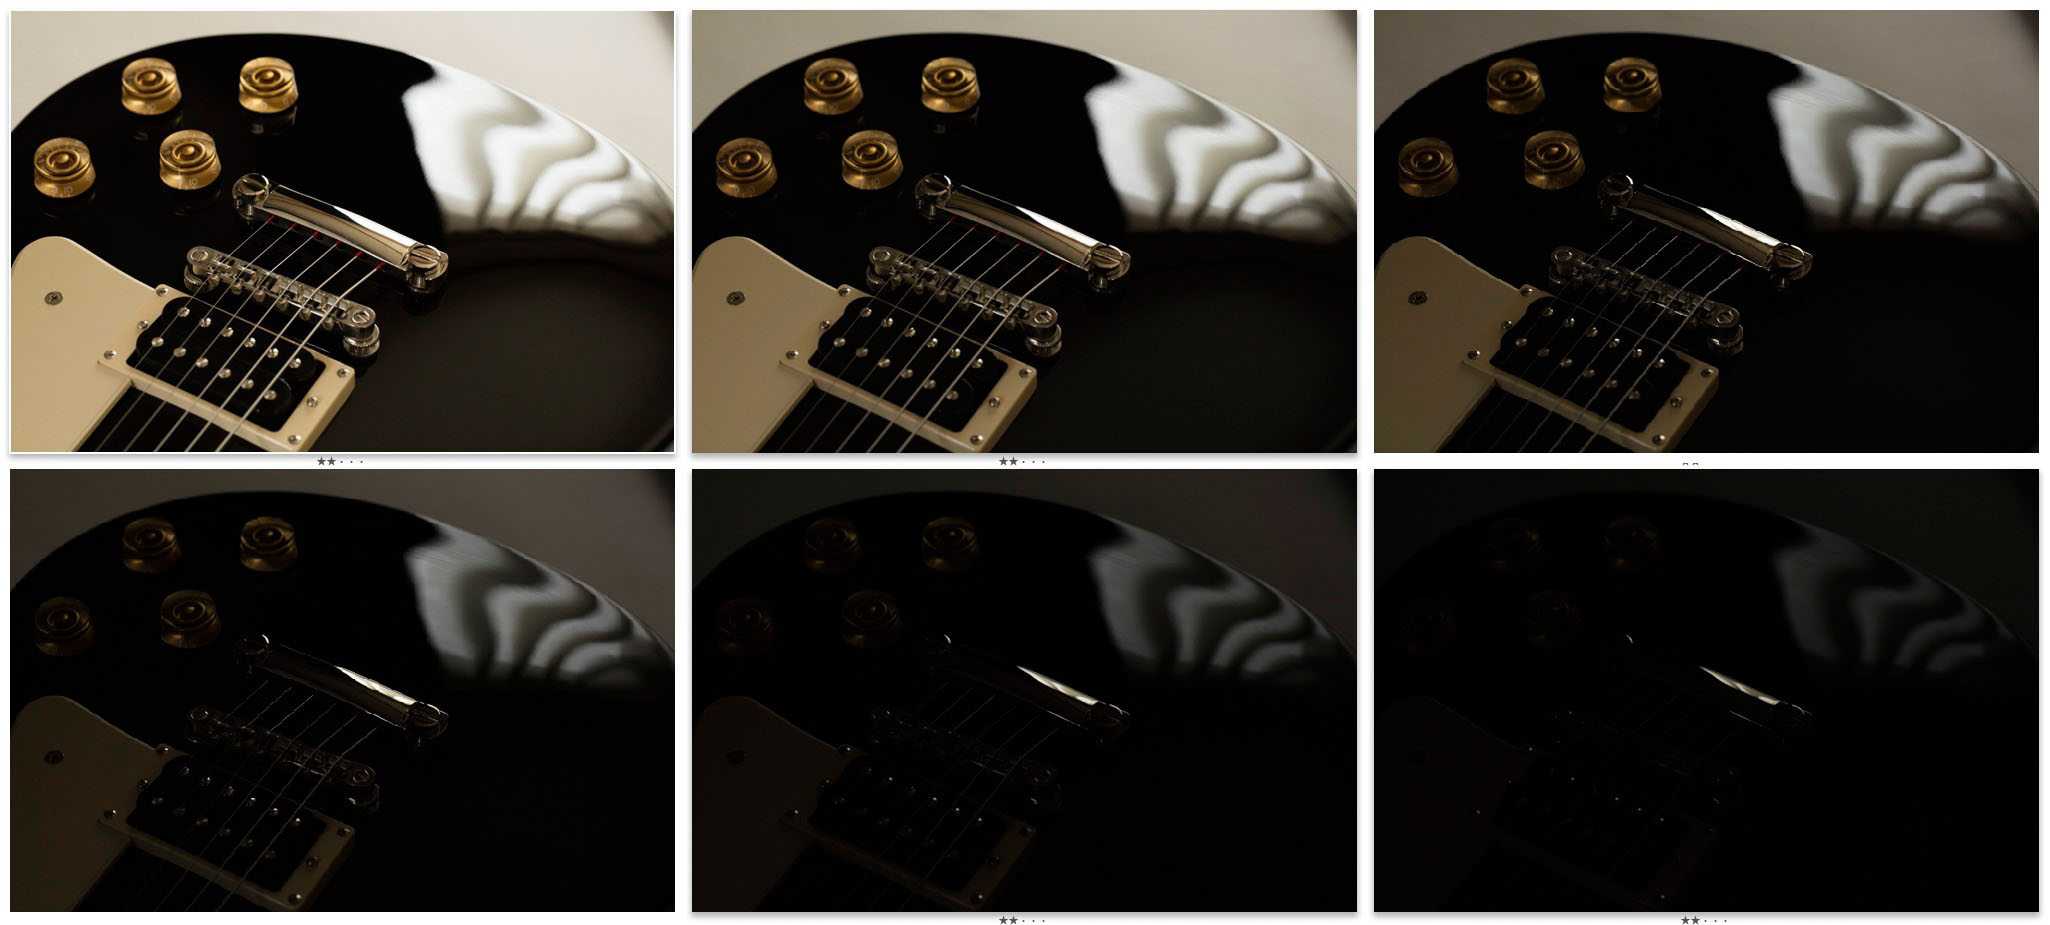
ISO 100 to 3200
Next, I went into the Develop module in Lightroom, and increased the Exposure slider for the images from ISO 1600 to 100. I increased ISO 1600 by 1 stop, making it the same brightness as the ISO 3200 image. I increased the ISO 800 image by two stops, the ISO 400 image by three stops, the ISO 200 image by four stops, and the ISO 100 image by five stops, making them all look the same brightness, as you can see in this screenshot (below). I literally just clicked the number to the right of the Exposure slider in Lightroom, and typed in 1, 2, 3, 4 and 5 against each image.
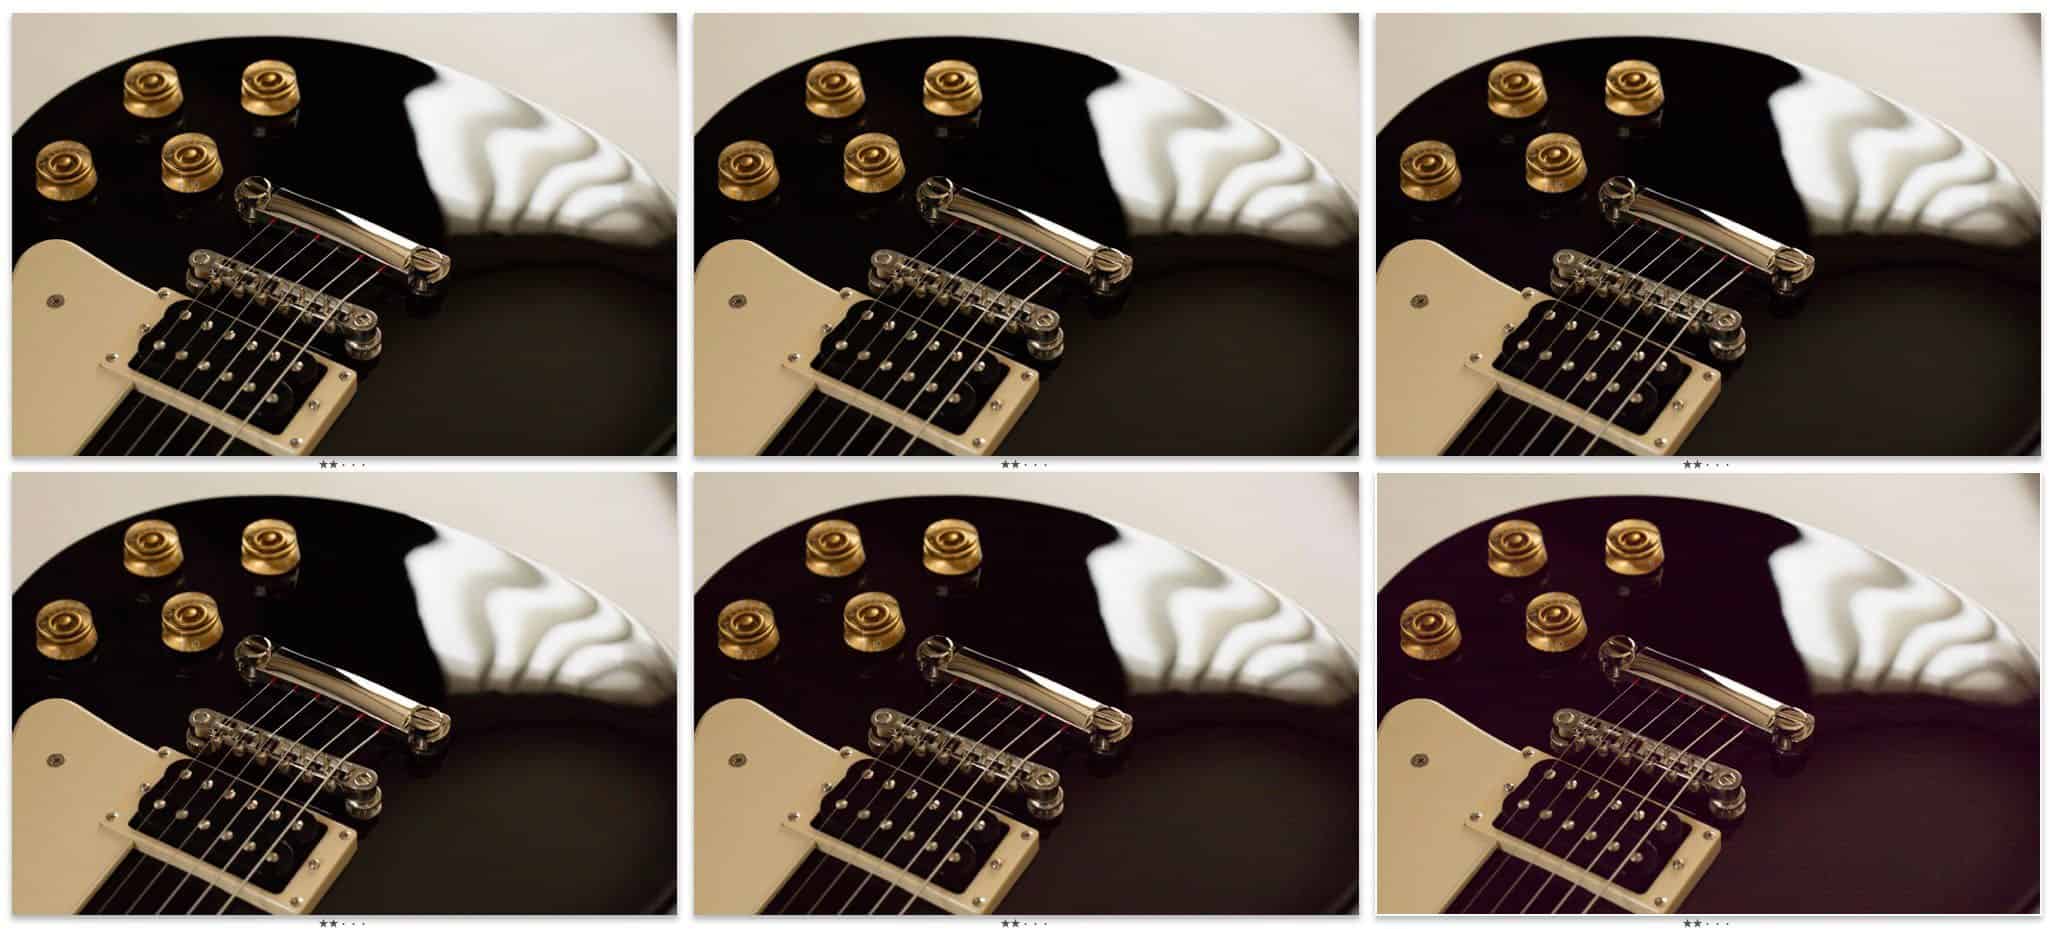
ISO Invariance Tests
As you can see, in the thumbnail view, it’s hard to tell the difference between the ISO 3200 image in the top left, and the ISO 100 image in the bottom right, with its +5 stops of Exposure applied in Lightroom. Let’s take a look at the amount of noise that is added to these images though, as we increased the ISO. Click on the image on the top left, and then navigate back and forth through these images with your mouse or arrow keys on your keyboard. Note that the images might automatically advance, but to stop that, just place your mouse over the image.


For me, I can see no real difference in the amount of noise between ISO 3200 and ISO 1600 pushed by 1 stop, and ISO 800 pushed by 2 stops. From the ISO 400 image pushed by 3 stops I can start to see a little bit more noise, and ISO 200 pushed by 4 stops gets quite bad, and ISO 100 pushed by 5 stops is really noisy.
What does this tell us?
So, what does this tell us? Well, whereas the Sony sensor cameras are showing results proving that you can push images up to 5 or 6 stops without seeing very much noise added, based on this test alone, it would seem that with the Canon 5Ds R, you could push your images by up to 3 stops without degrading the quality of the image, assuming that there was some reason for you to be using a high ISO in the first place.
For example, imagine I wanted to photograph a bird in flight in low light, which would require that I increase my ISO to get a faster shutter speed, and there was a lot of dark areas in the scene, I could shoot at say 1/1000 of a second at ISO 100, then push my exposure in post to +3 or +4 at a push, and not see any more noise than I would have seen if I shot the same scene at ISO 800 or 1600.
Keep in mind at this point, that the amount of noise that you would see at ISO 800 or 1600 is minimal anyway, and I’m not saying that either of these methods is better than the other, but it’s one technique that we could keep in our digital toolbox in case it becomes useful at some point.
High and Low ISO Comparison
I’m going to state the obvious here before we move on, but if however, you don’t need to worry about shutter speed, and can do a longer exposure, it is always going to be better to shoot at a lower ISO and increase the length of your shutter speed, for cleaner images.
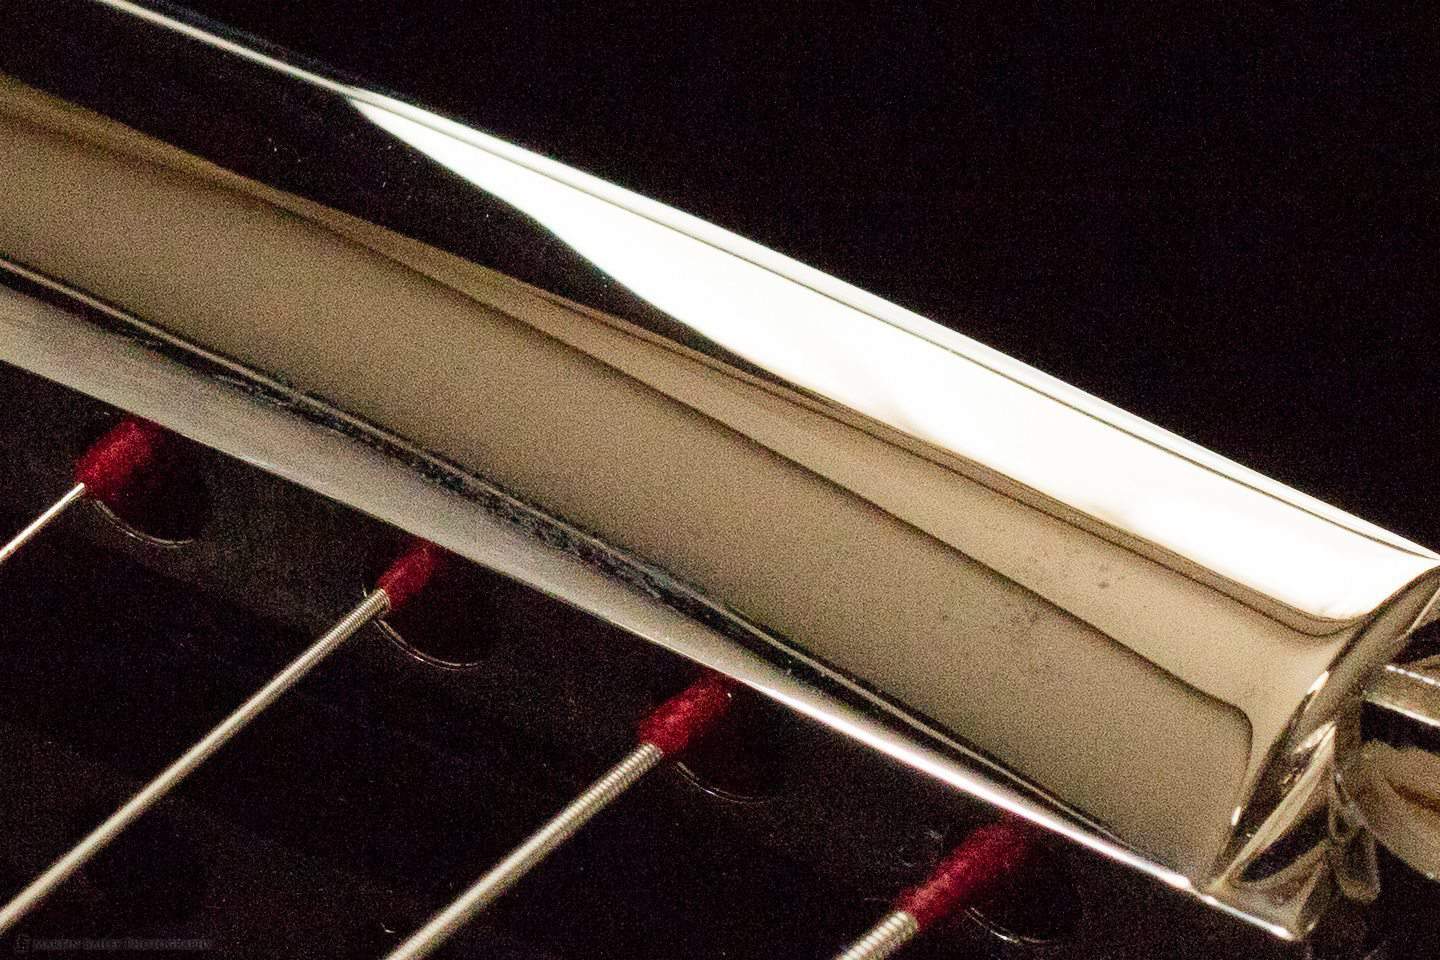
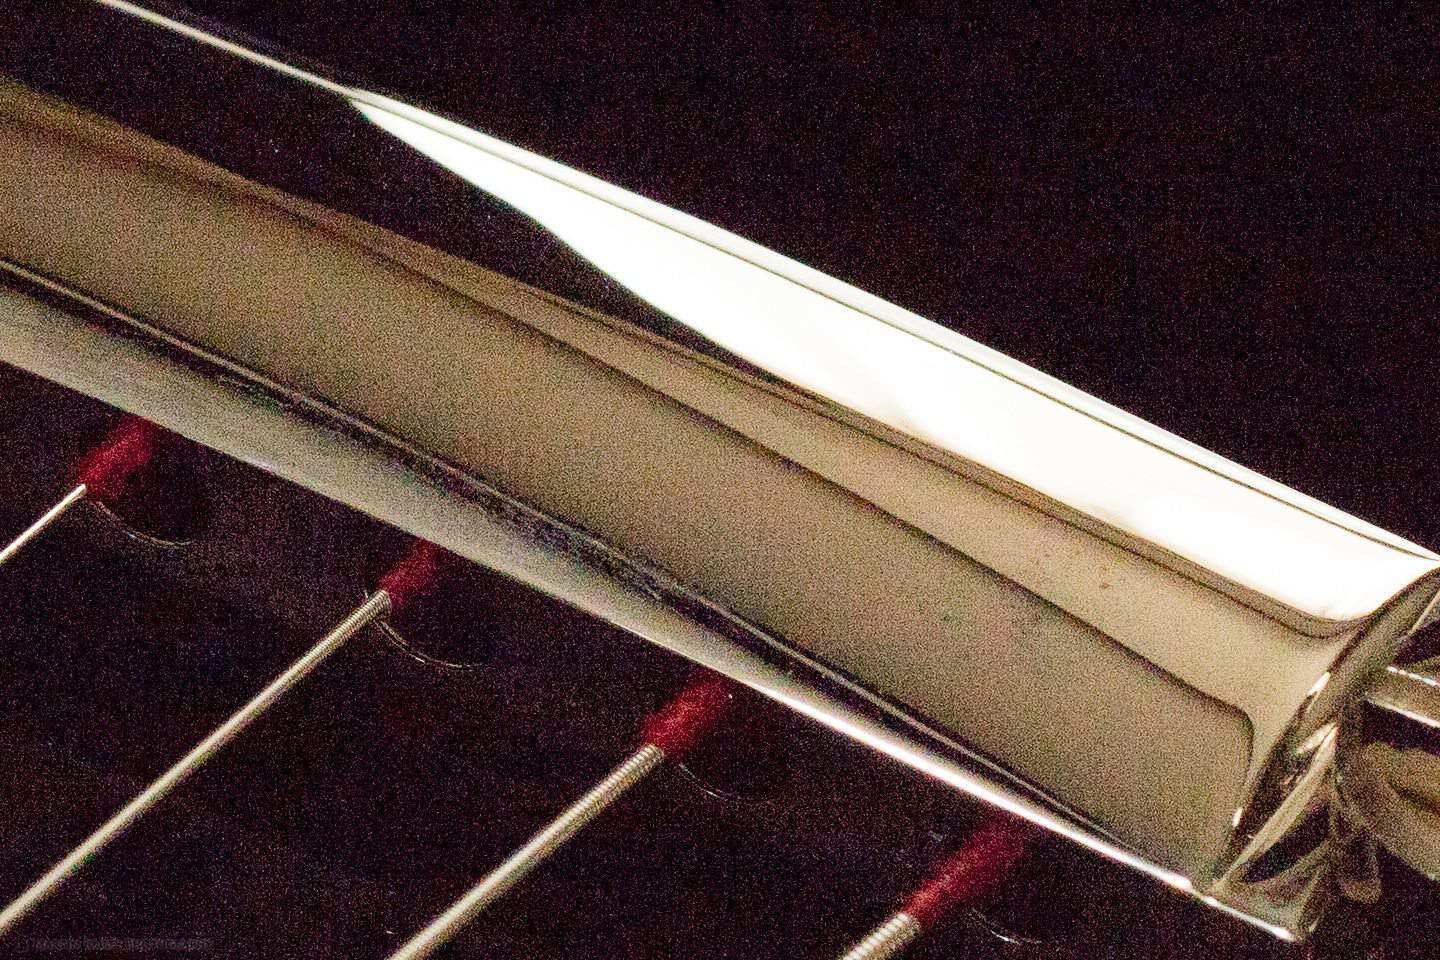
Here’s a diagonal splice of two images to illustrate (below). The top left triangle is ISO 100 for 1 second, and the bottom right triangle is ISO 1600 at 1/30 of a second. Don’t forget to open up your browser window and click on the image to view it at 100% to see the detail. The version that is embedded in the blog post has been reduced in size a little.
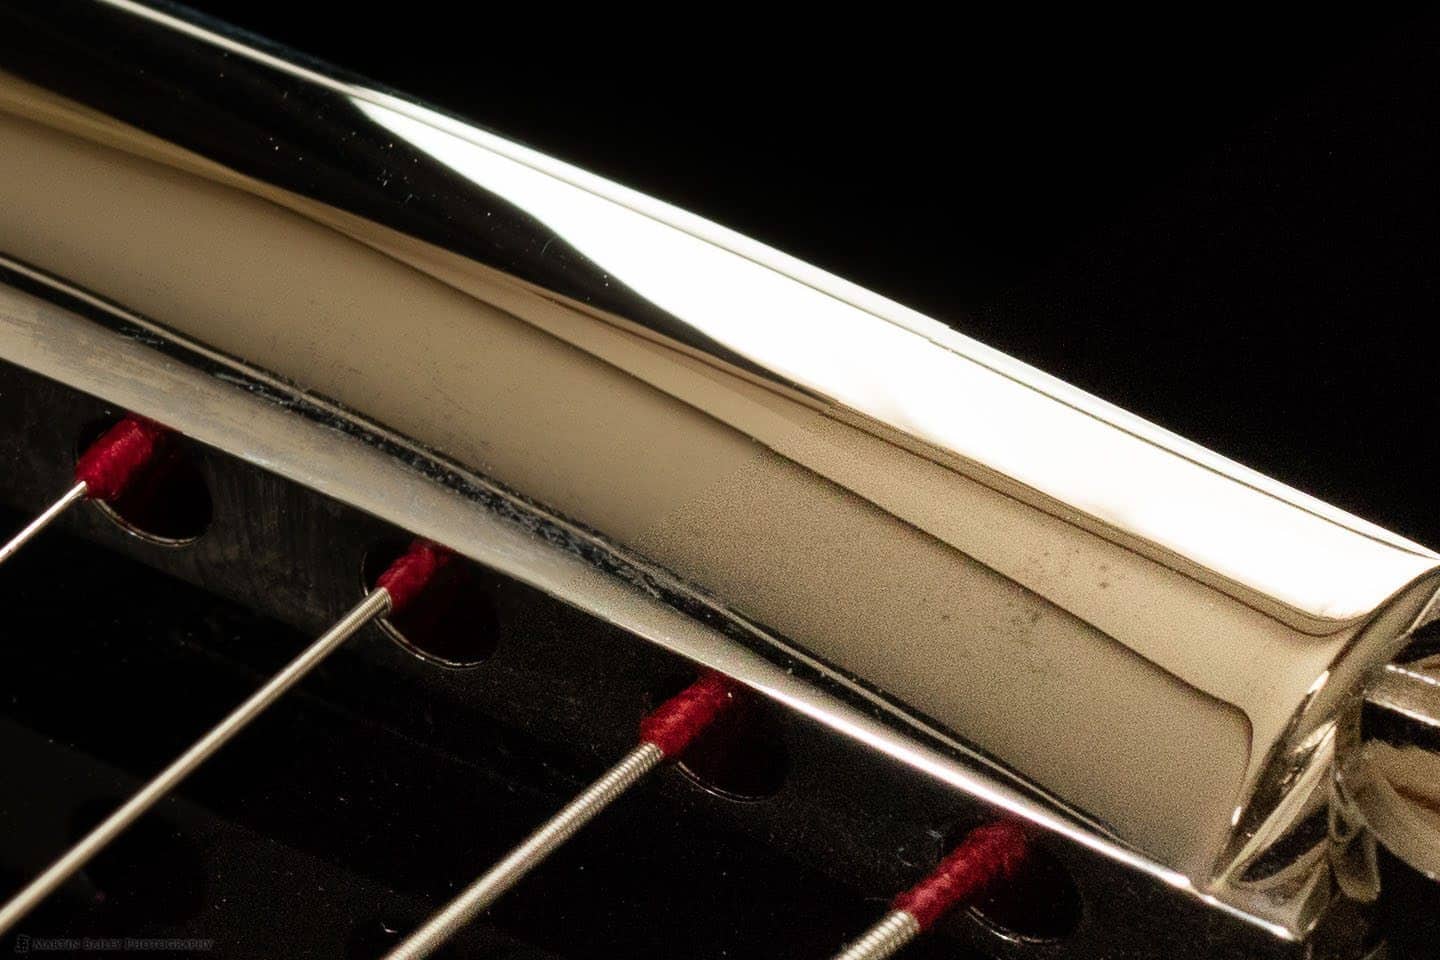
ISO 100 for 1 sec and ISO 1600 for 1/30 sec 100% Crop
From this, you can see that there is a certain amount of grain in the image, even at ISO 1600, although ISO 3200 looks very similar to this. We can even see a little bit more grain in the highlights on the chrome, and there is really no blooming to be seen in the ISO 100 image, so personally, I’d always go for the ISO 100 shot when shutter speed is not an issue.
White on White
The next question I asked myself was, does this mean that my use of the Expose to the Right technique with the 5Ds R and possibly my earlier Canon cameras a total waste of time?
The first test I did was a predominantly dark scene, with a few areas of highlights. For something like my Japanese Red-Crowned Cranes or Whooper Swans, on a white snowy background, we’re talking mostly white on white, with some dark patches on the animals. I don’t have a Red-Crowned Crane handy, or a field full of snow for that matter, but I do have this almost white cat ornament with some darks spots, and a roll of seamless, so I used these things for my next test.
Here you can see a screenshot from Lightroom of a photo of the white cat on the white background, shot in Aperture Priority mode, with Exposure Compensation set to zero on the left, and Exposure Compensation set to + 1 1/3 of a stop on the right (below).
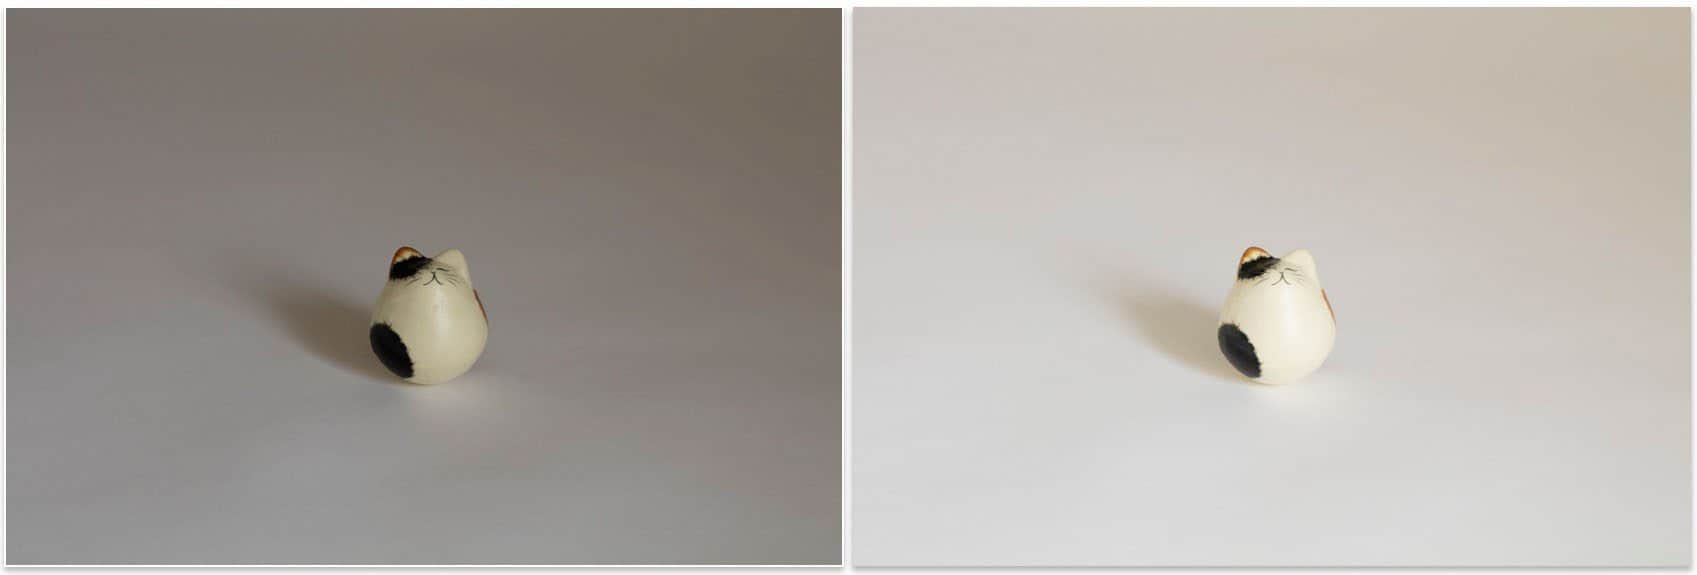
Invariance Test White Cat on White Background
The cat has a little bit more reflectivity than the cranes usually have, but I stopped increasing the exposure at 1 1/3 of a stop, to prevent a patch of his belly from blowing out. Usually for a snow scene, if it was overcast/shade, like this, I would probably be a third or two-thirds more than this, but let’s continue with this example, as it is enough to draw some conclusions. It also represents a real world scenario, where I might leave the camera in Aperture Priority mode at zero Exposure Compensation, then increase the exposure later.
Click on the top left image below and again, with your browse window opened up wide, look at the noise in the dark patch above the cat’s eye. I’m sure you’ll agree that in every case, the image that was shot with 1 1/3 of a stop in Exposure Compensation applied in camera is cleaner than the one shot at zero Exposure Compensation, then pushed by 1 1/3 of a stop in Lightroom. Also, you’ll see that as the ISO is increased, pushing the image by 1 1/3 of a stop in post introduces a lot more grain than you’d see as opposed to increasing the exposure in camera.
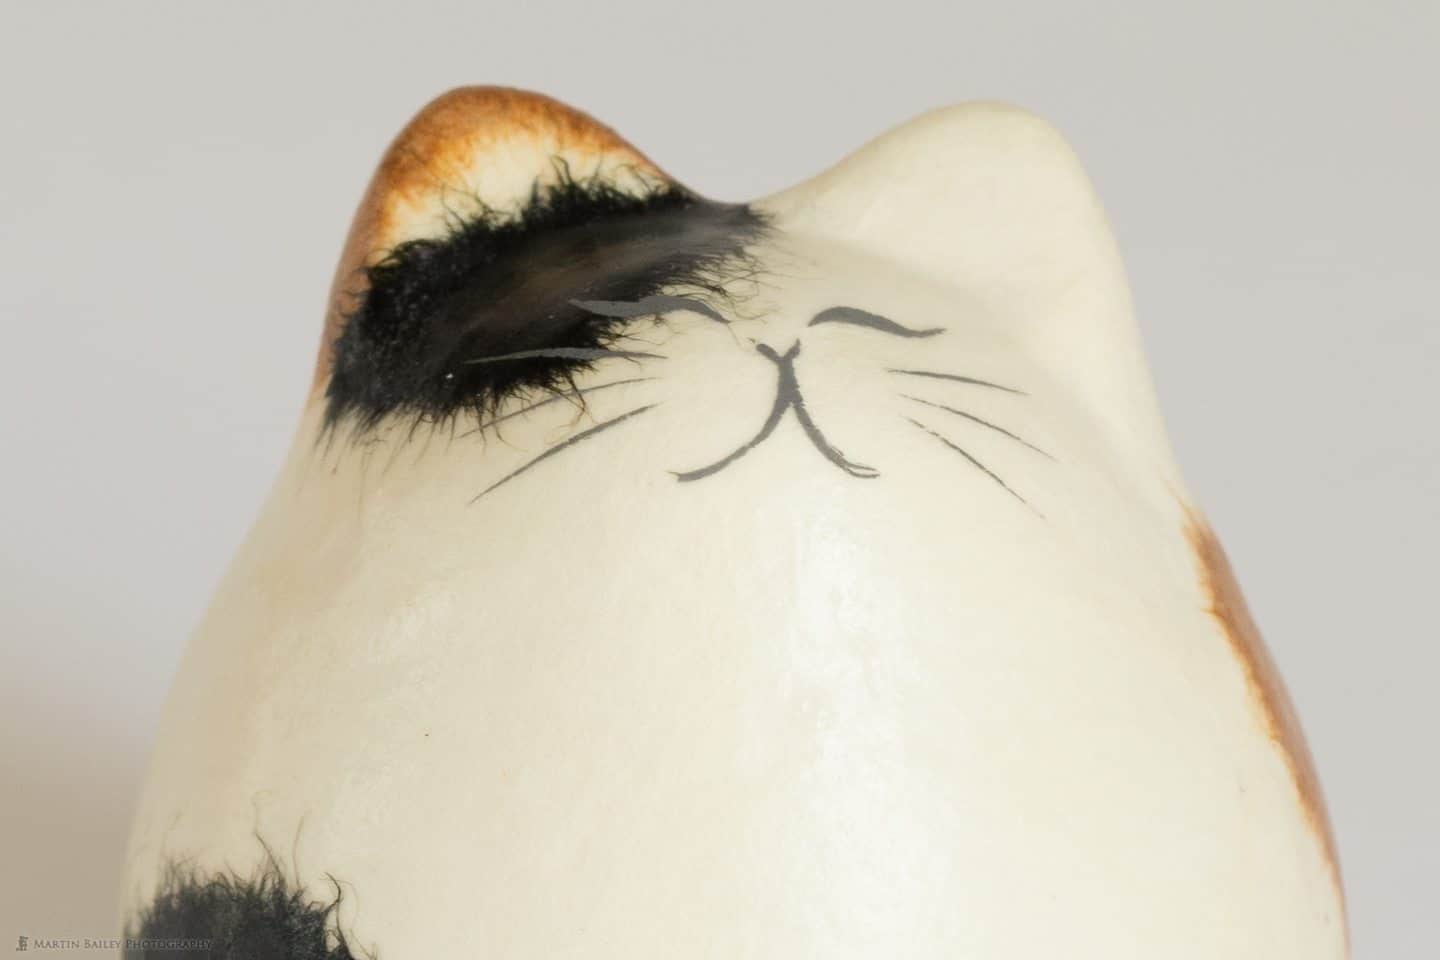
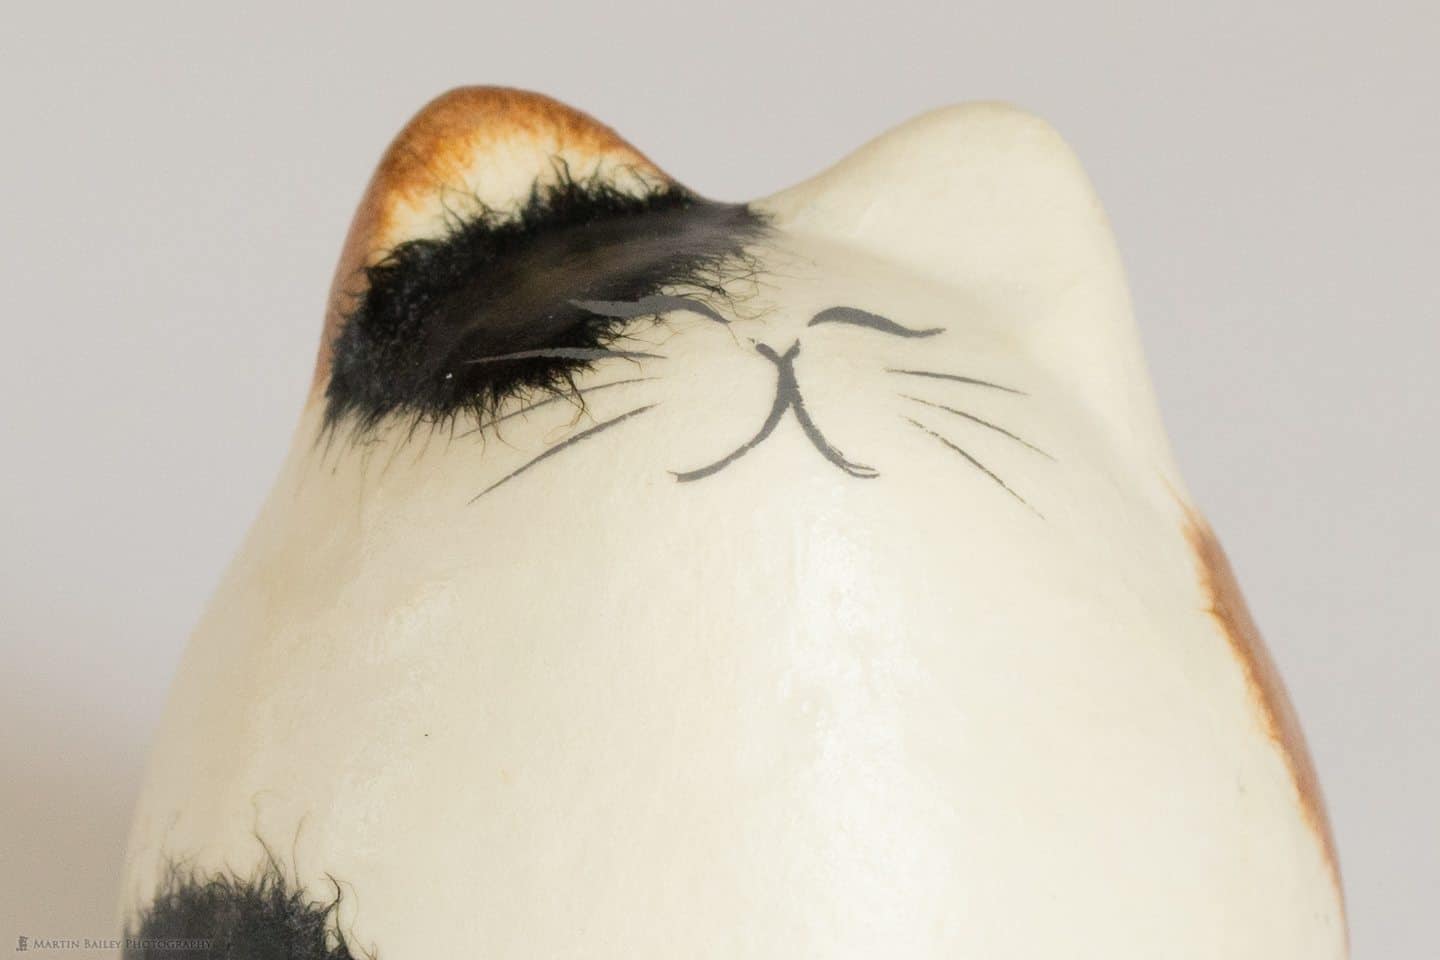
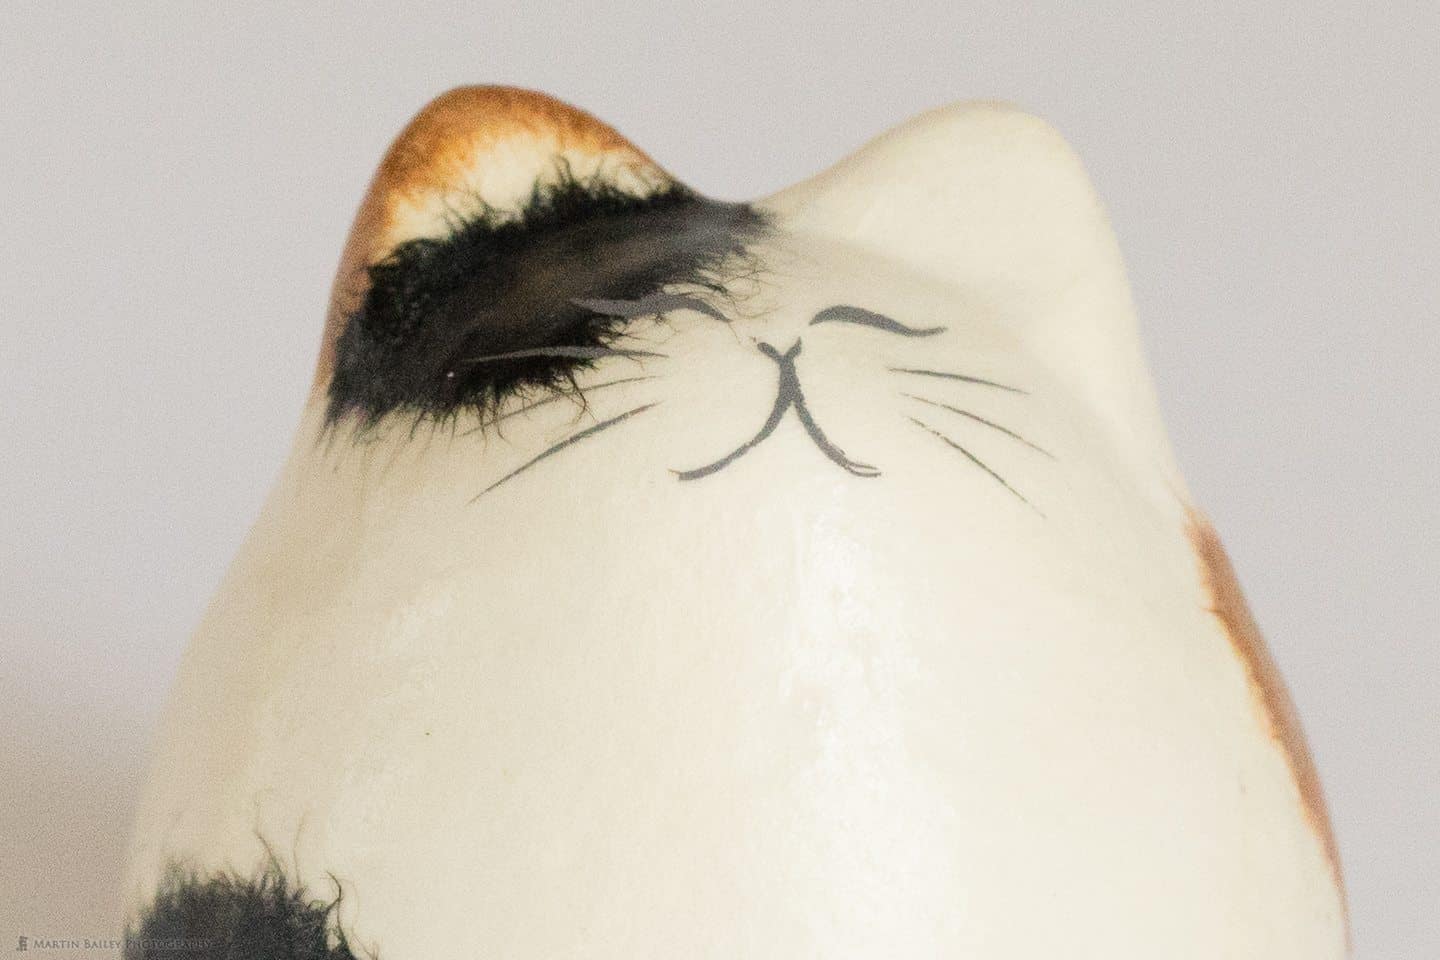

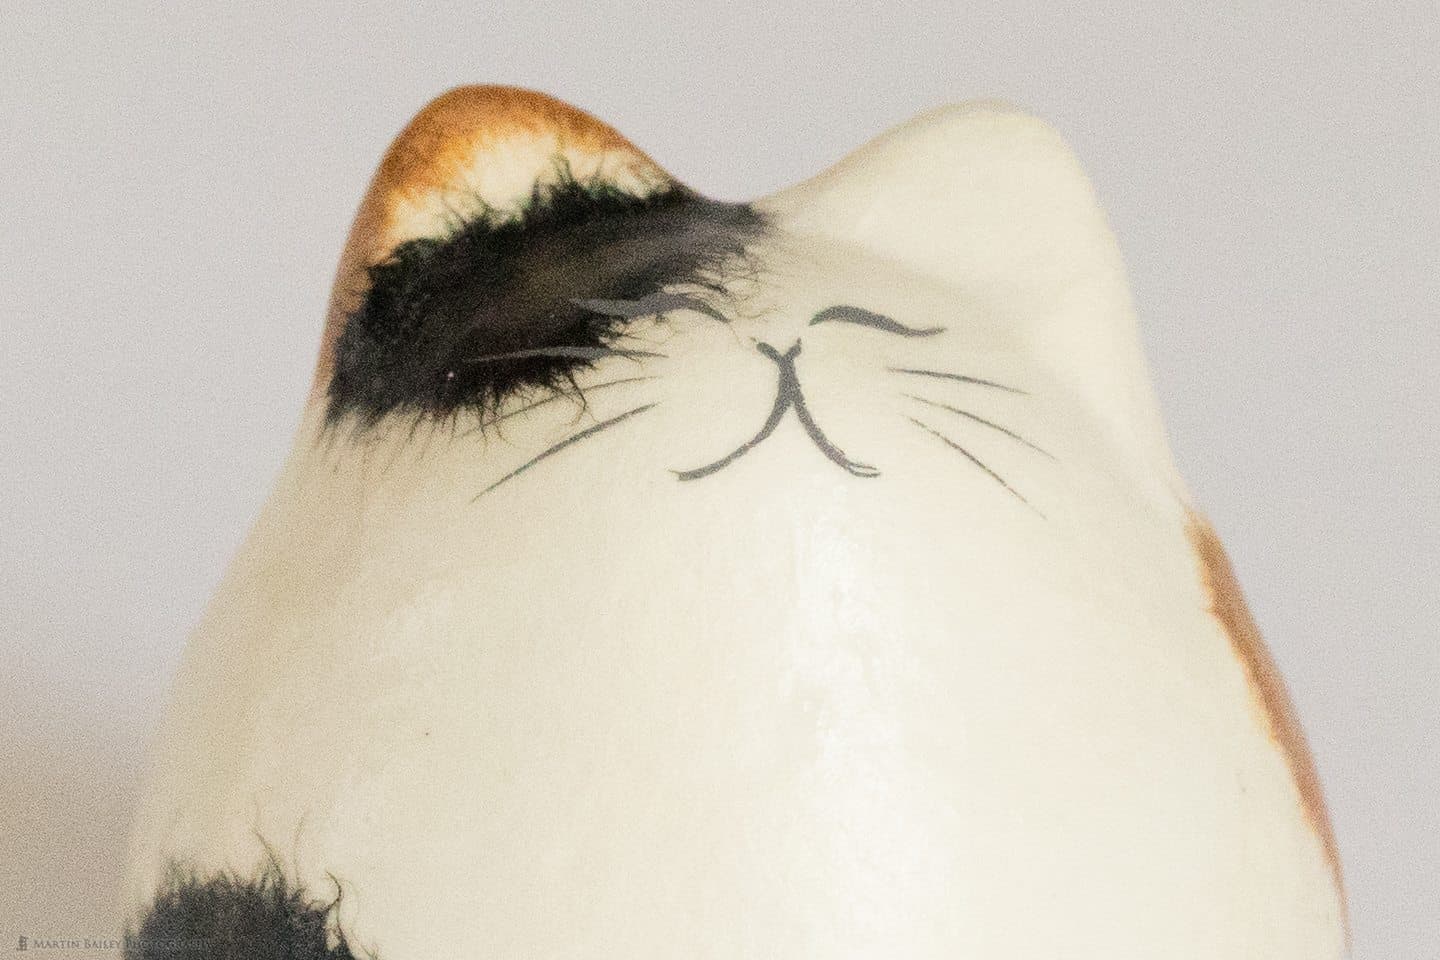
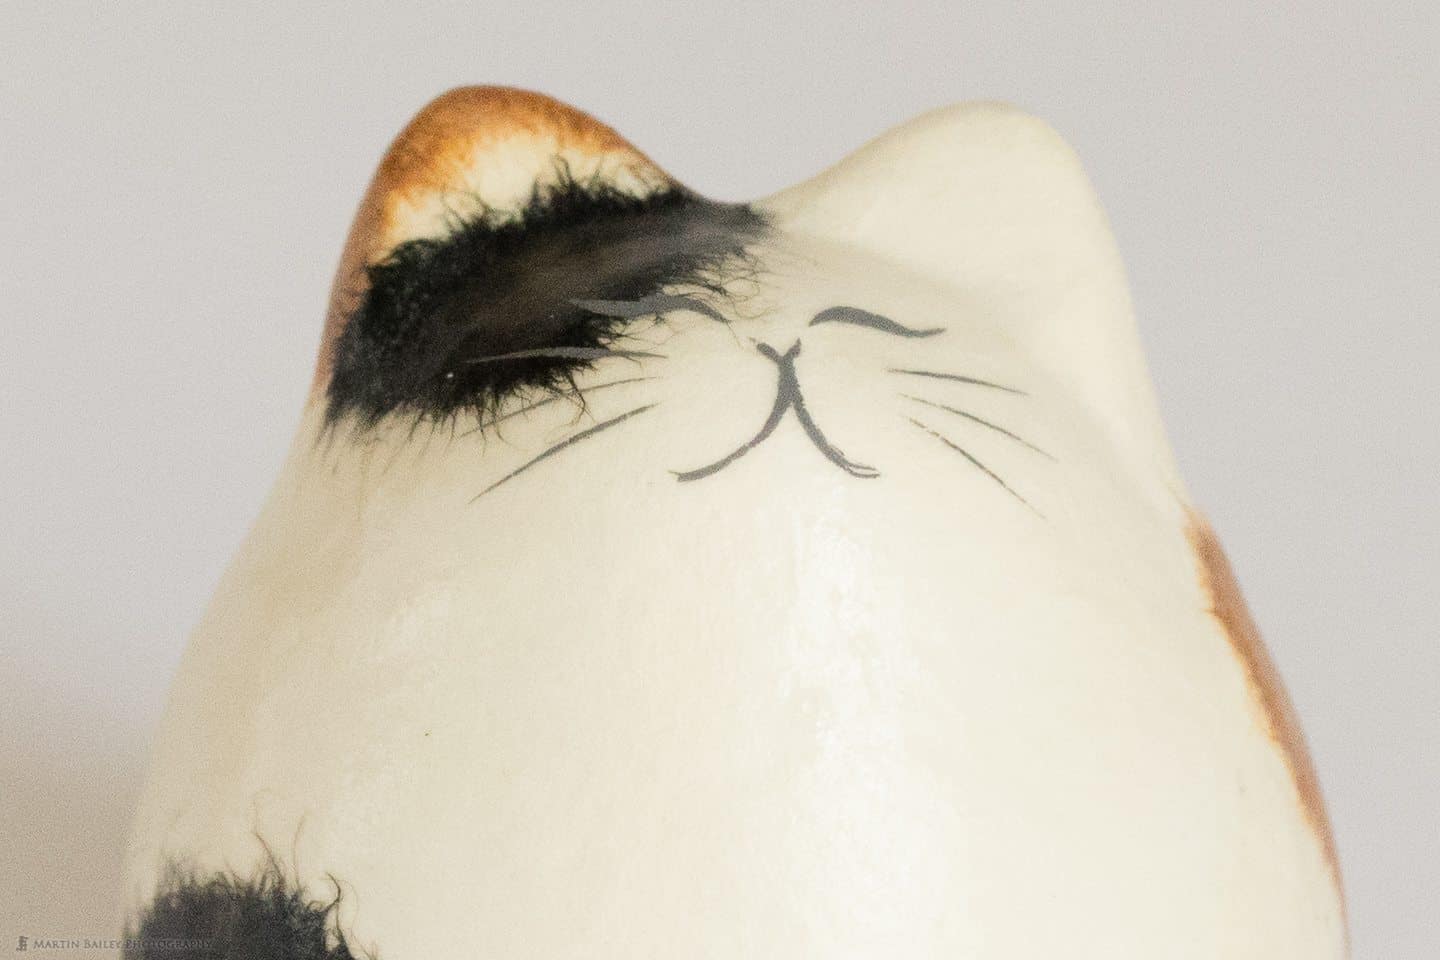
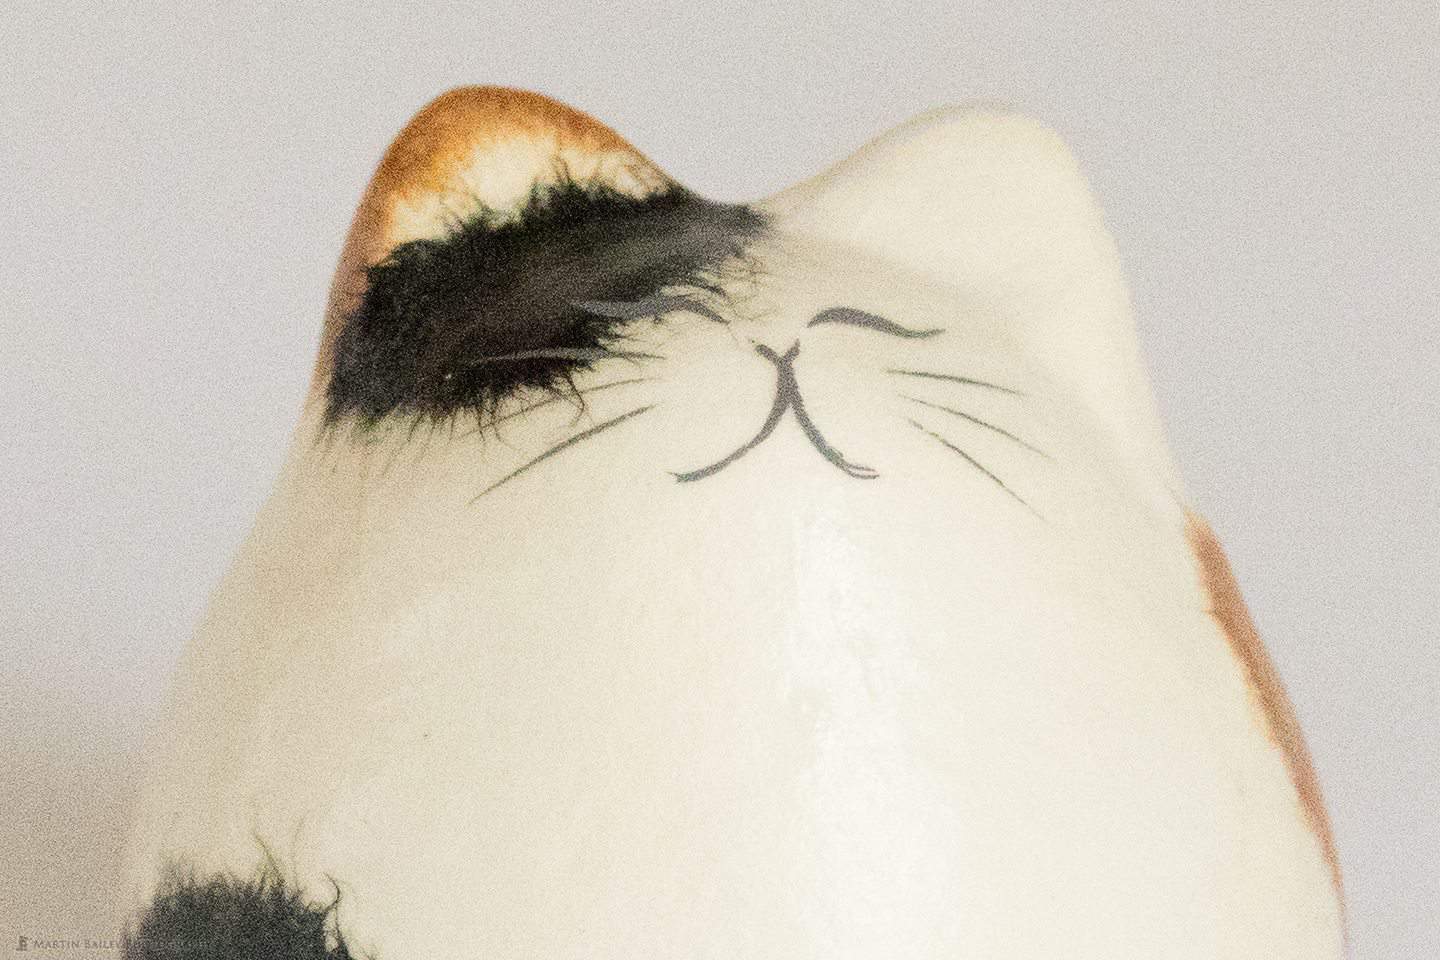
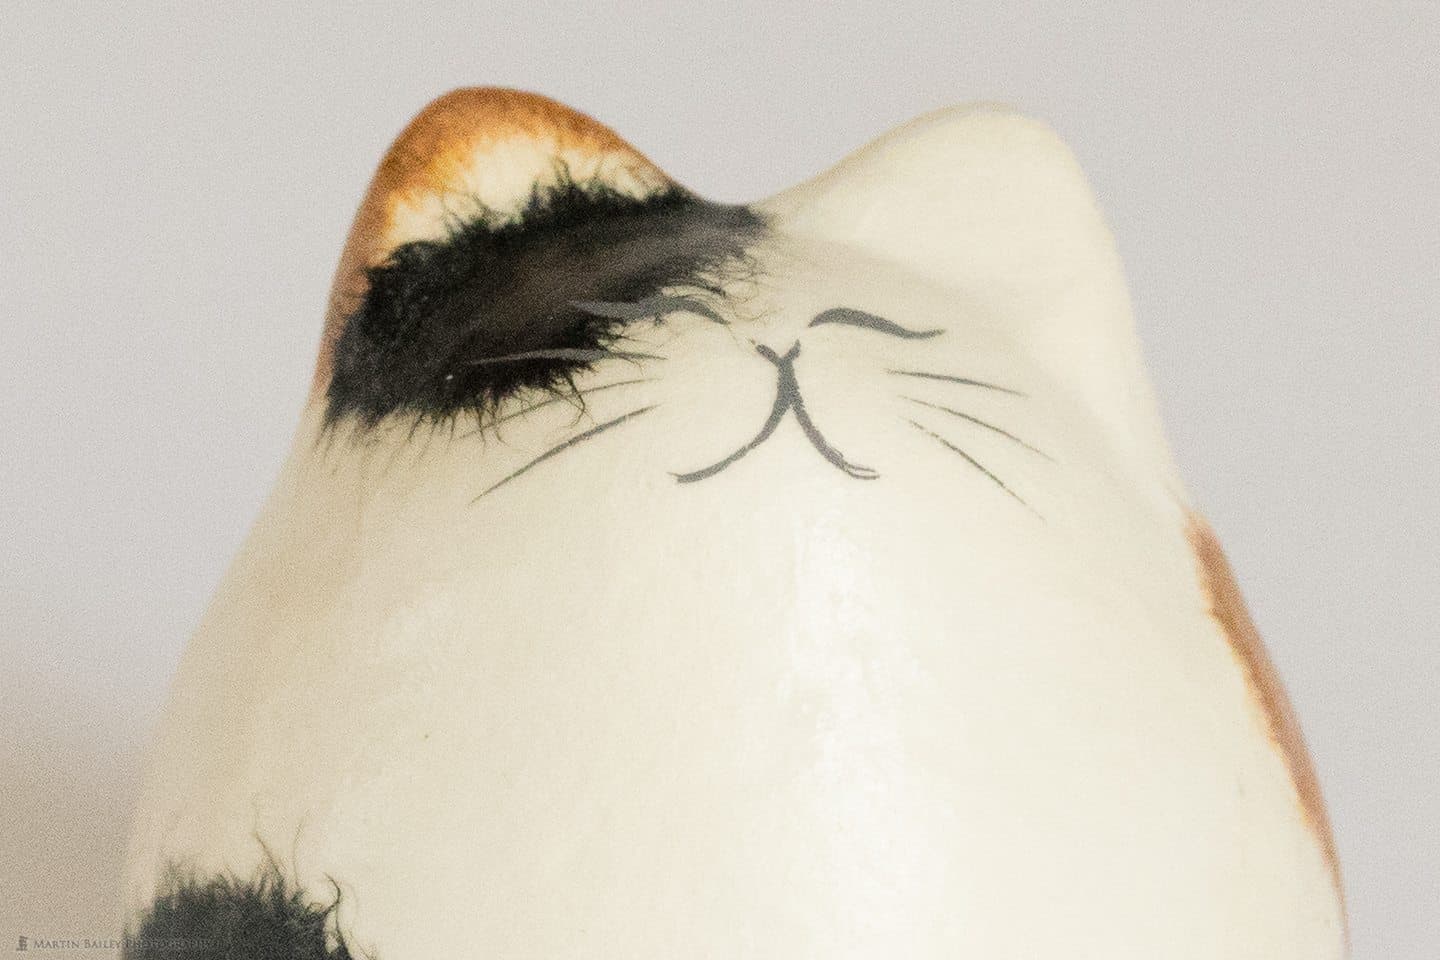
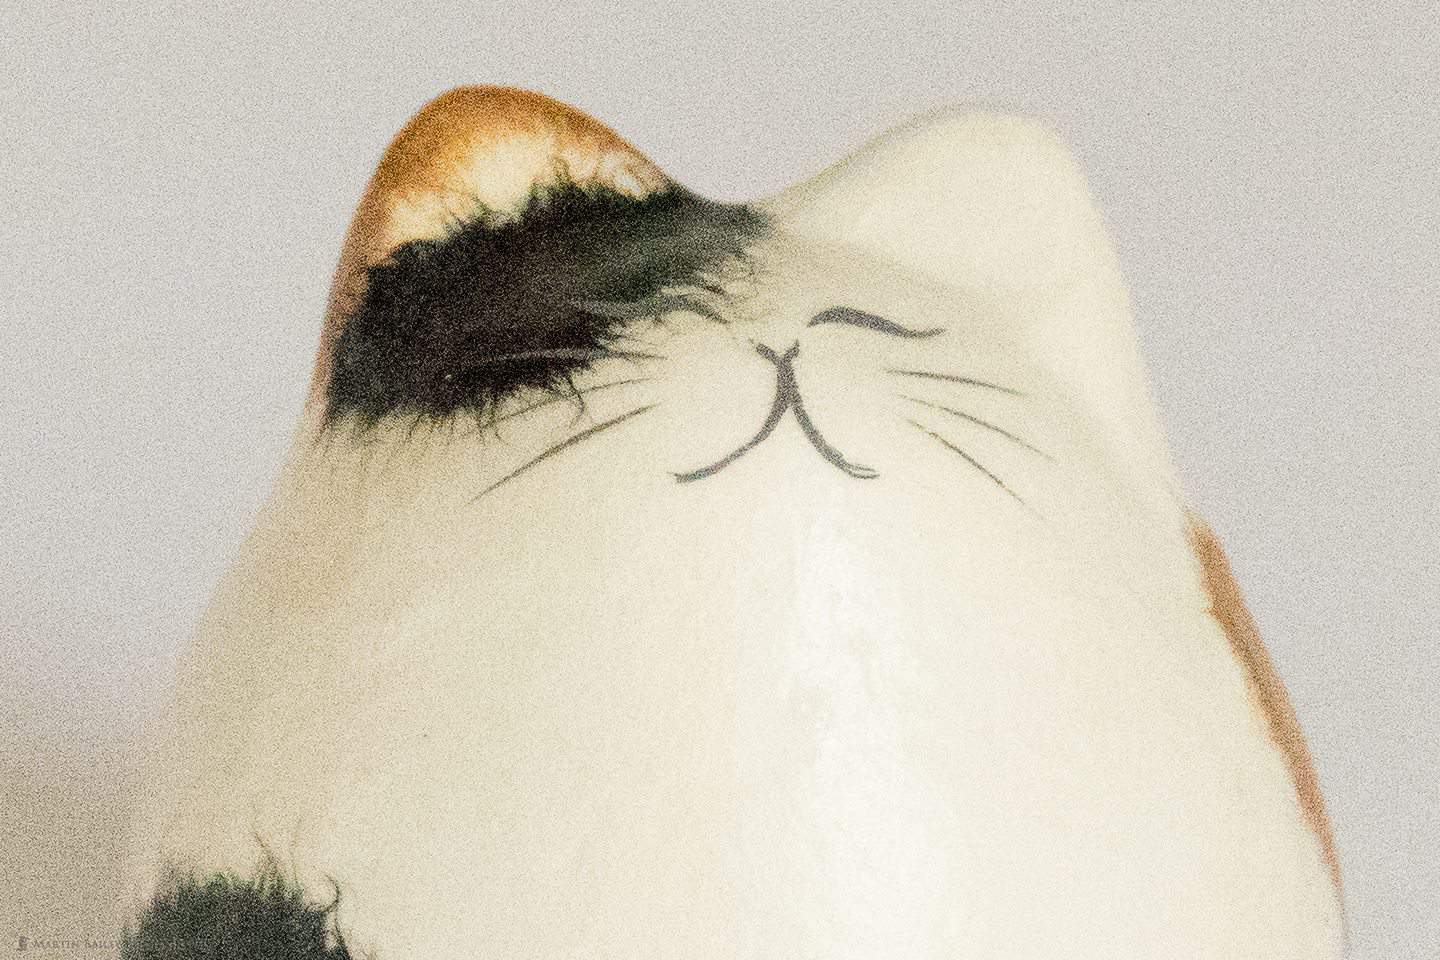

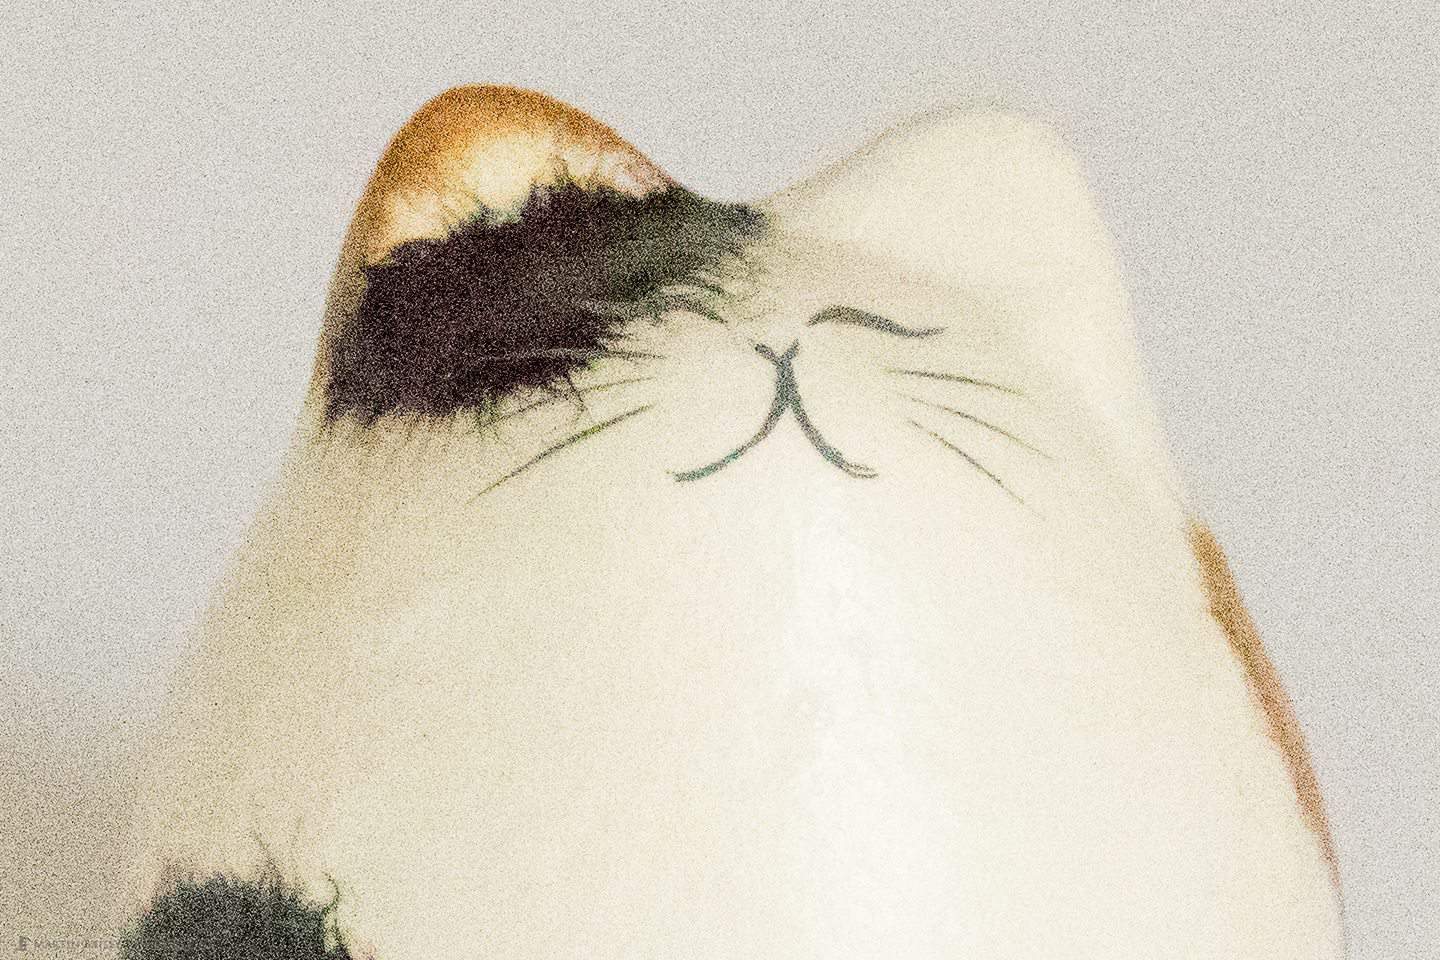

For me, this test shows that for lighter subjects, you definitely get cleaner images by adjusting the exposure, and essentially exposing to the right in camera, than you do by leaving exposure to the camera and then lightening them later. This isn’t so noticeable at ISO 100, so again, ISO invariance is at play here. The difference is less noticeable and probably more acceptable at ISO 100 than it is at the higher ISOs.
Average Scene Test
Finally, I wanted to see what happened when I photographed a scene with a variety of tones and colors that pretty much average out to a zero compensation exposure, so I shot a series of photographs of an X-Rite Digital ColorChecker SG card, at ISO 100, 400, 1600 and 6400. I then adjusted the shutter speed, making three more frames at each ISO which were minus 1, 2 and 3 stops, as you can see here (below).
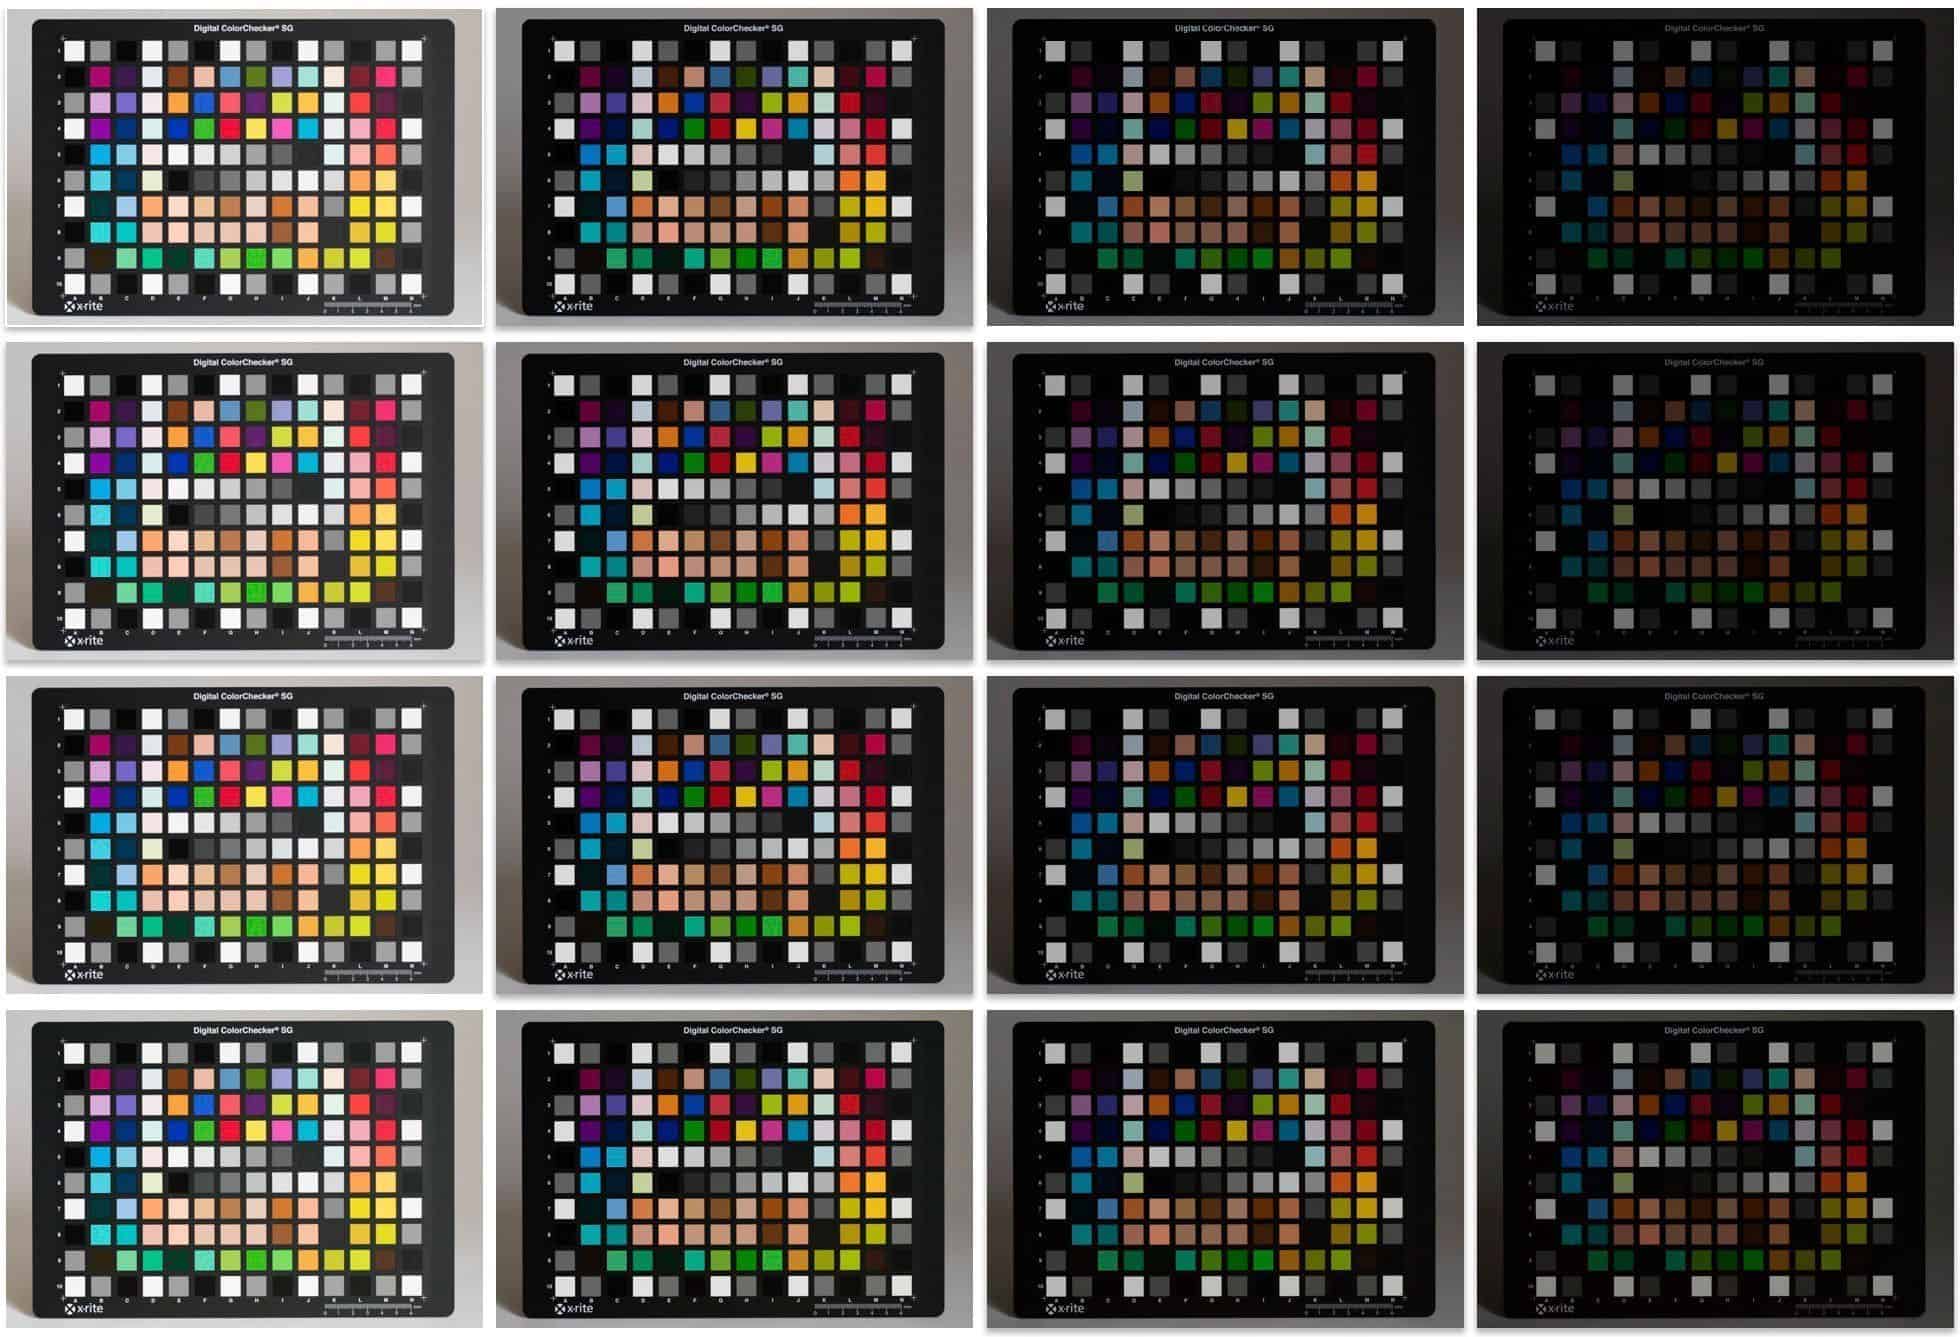
Average Scene Tests with X-Rite ColorChecker SG
Once I had these images in Lightroom, I increased the Exposure of the under exposed images by +1, +2 and +3 with the Exposure slider, making them all the same brightness. Here is a 100% crop from each image, and again, you’ll need to click on these with your browser window wide, and navigate back and forth with your mouse or arrow keys to make a comparison.


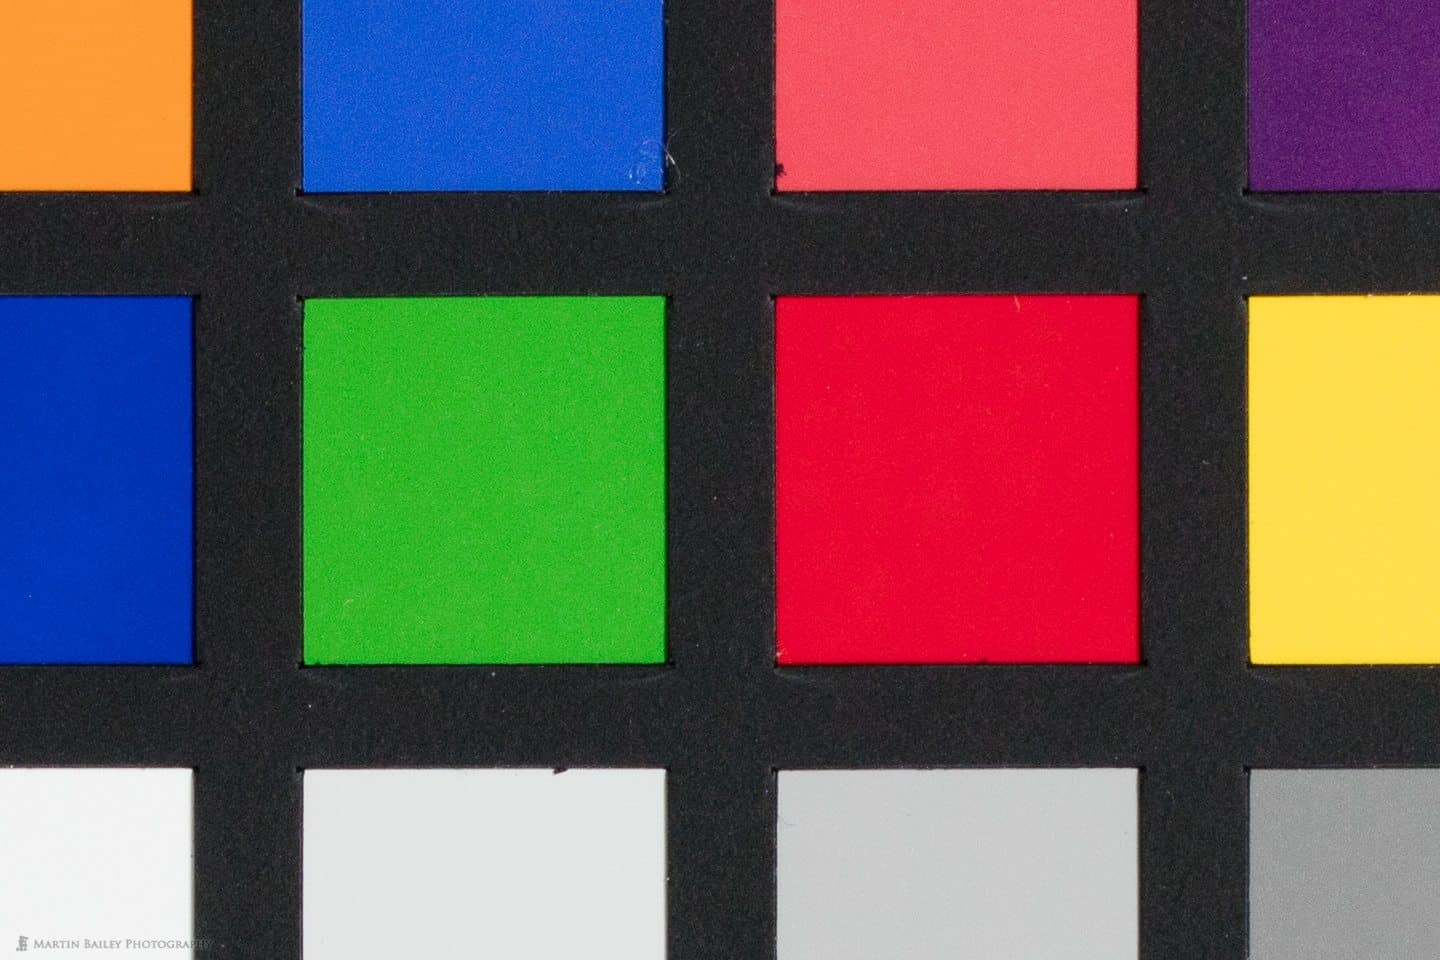
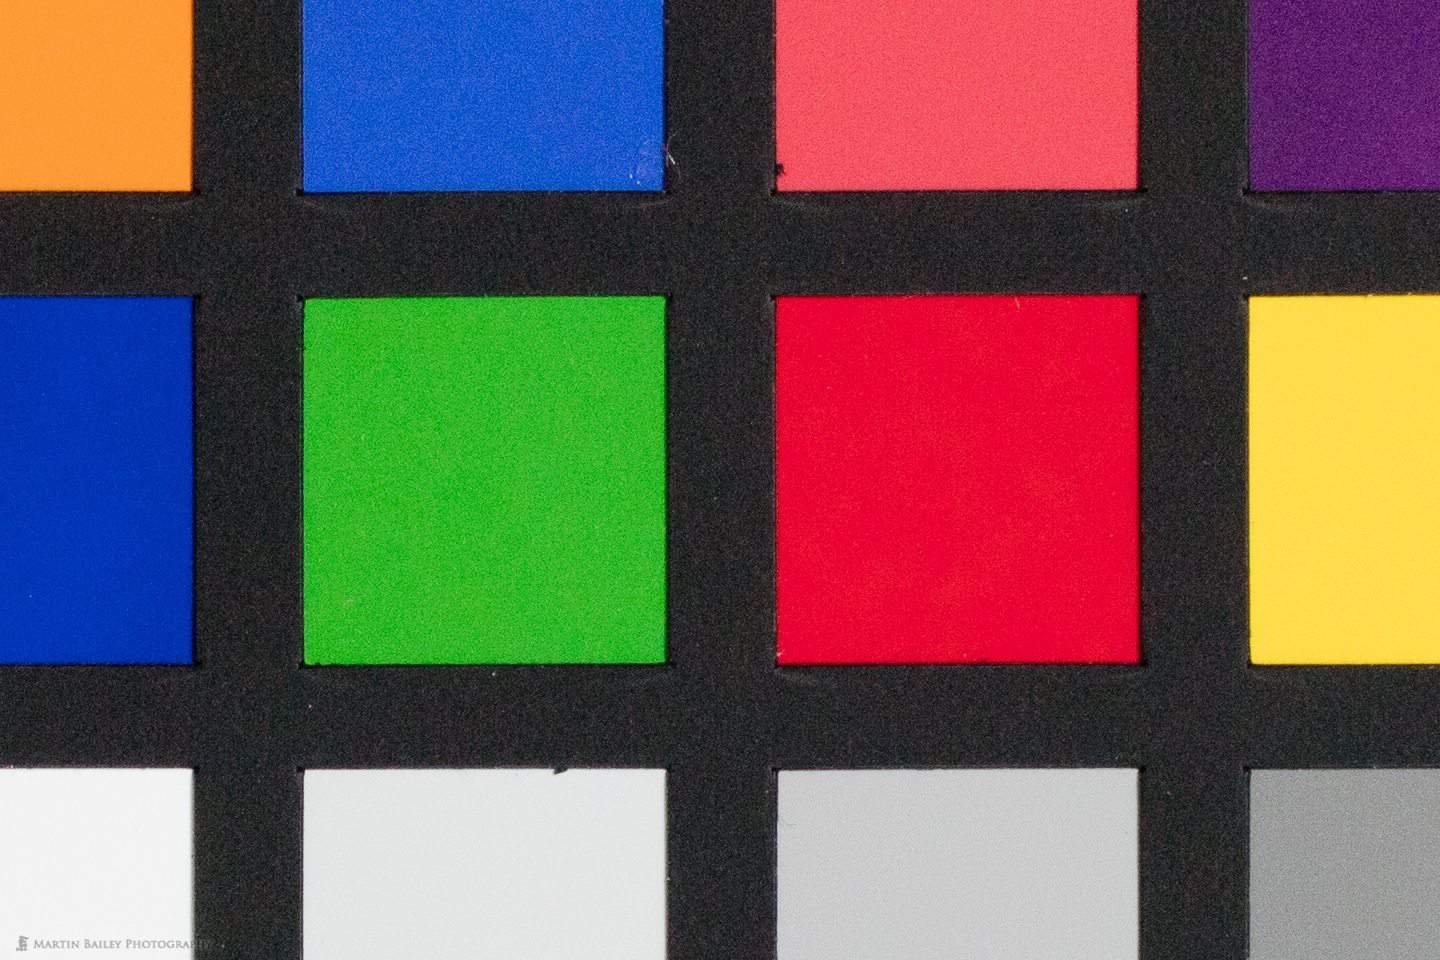

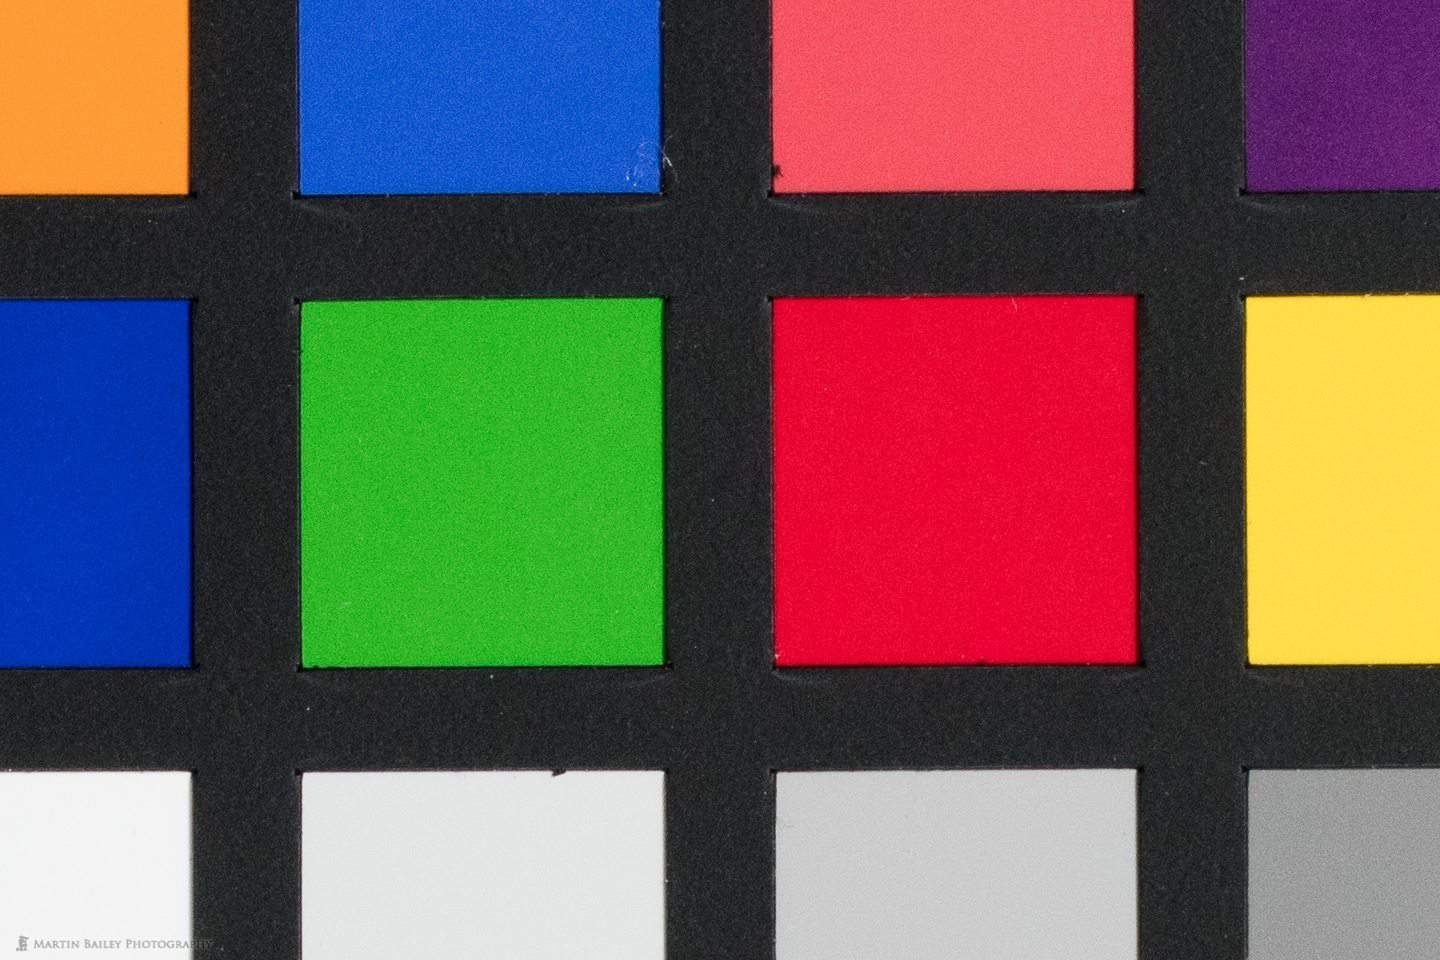


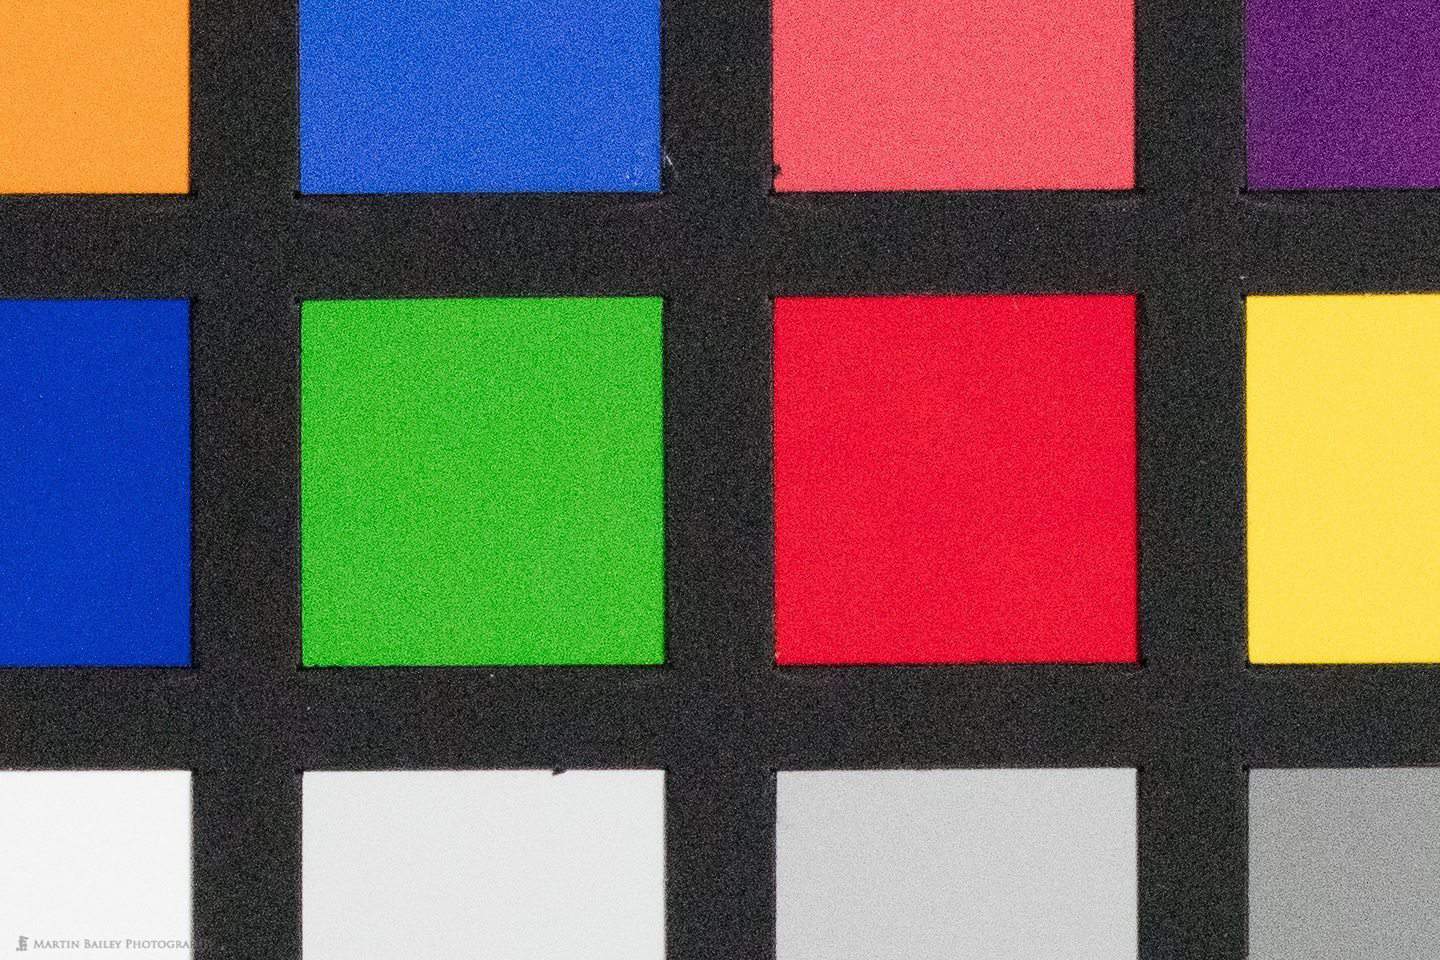
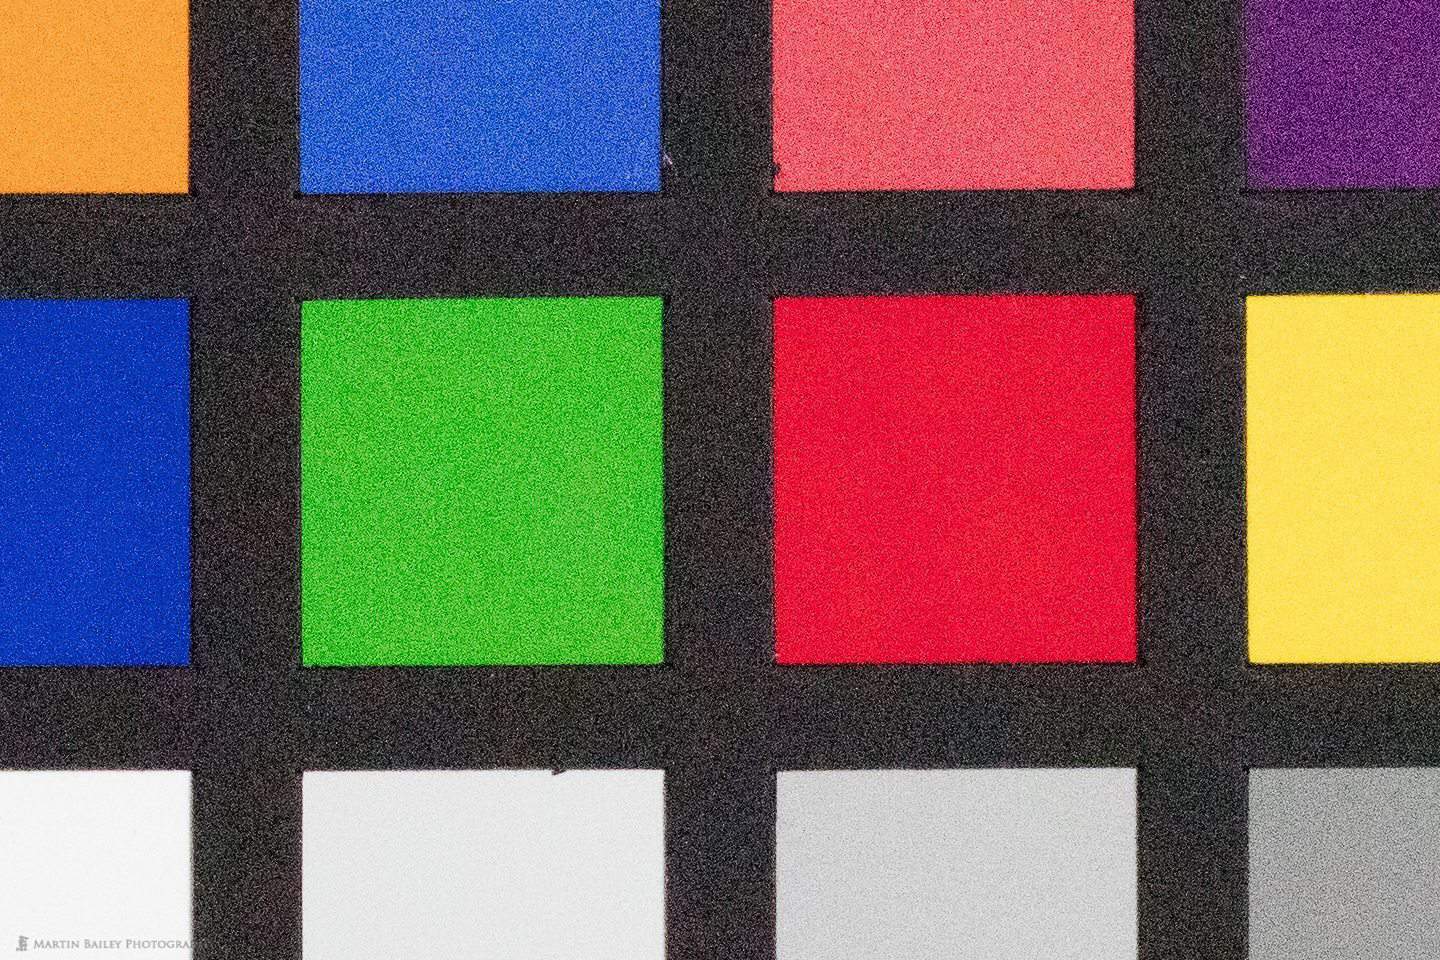

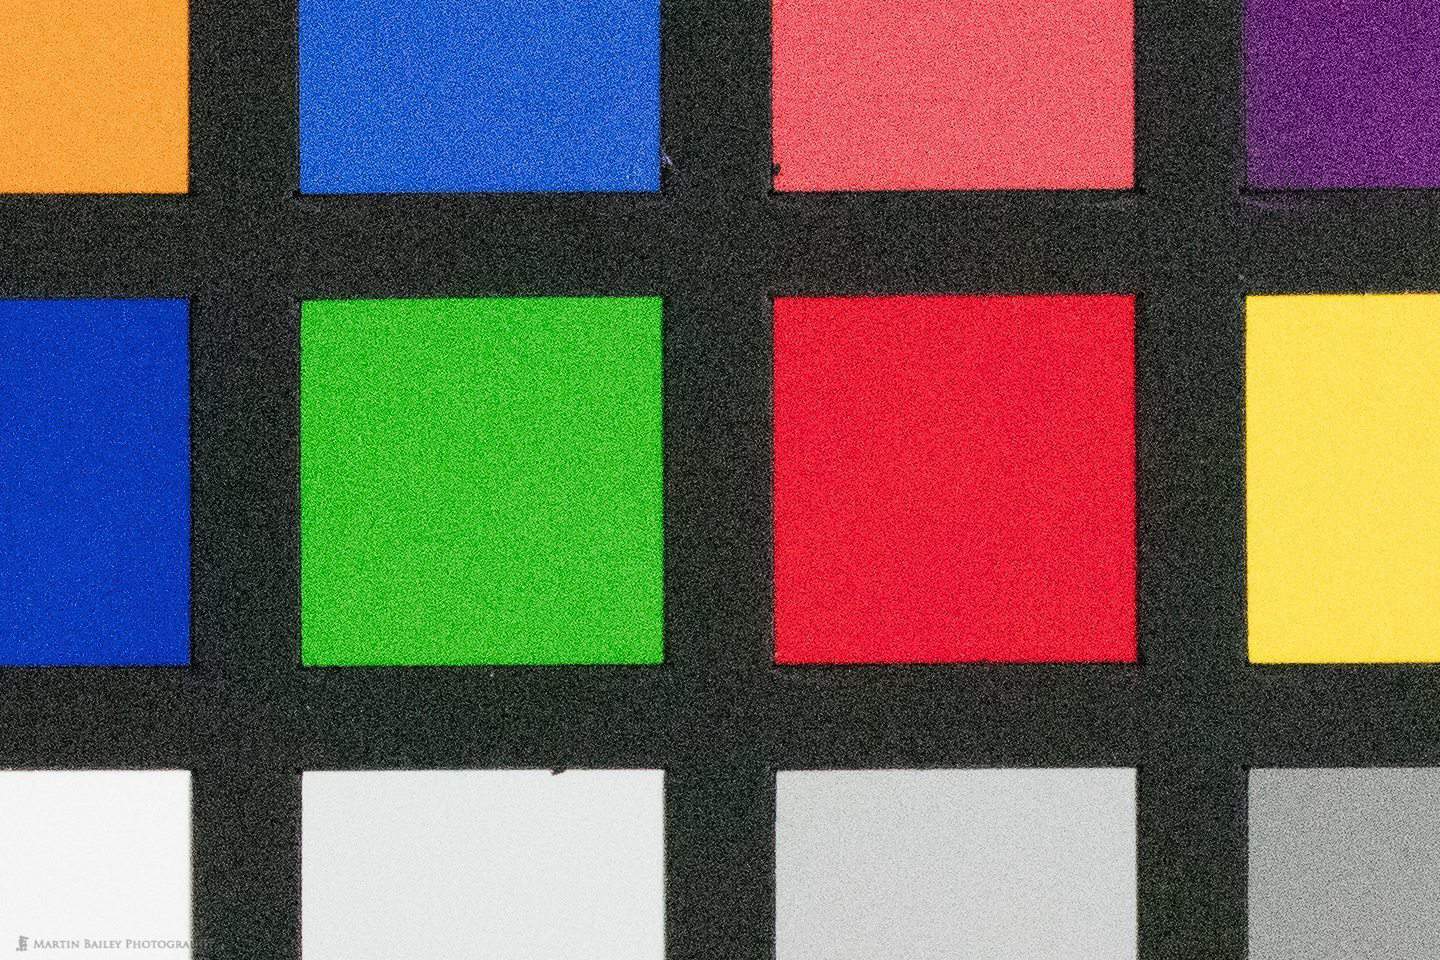
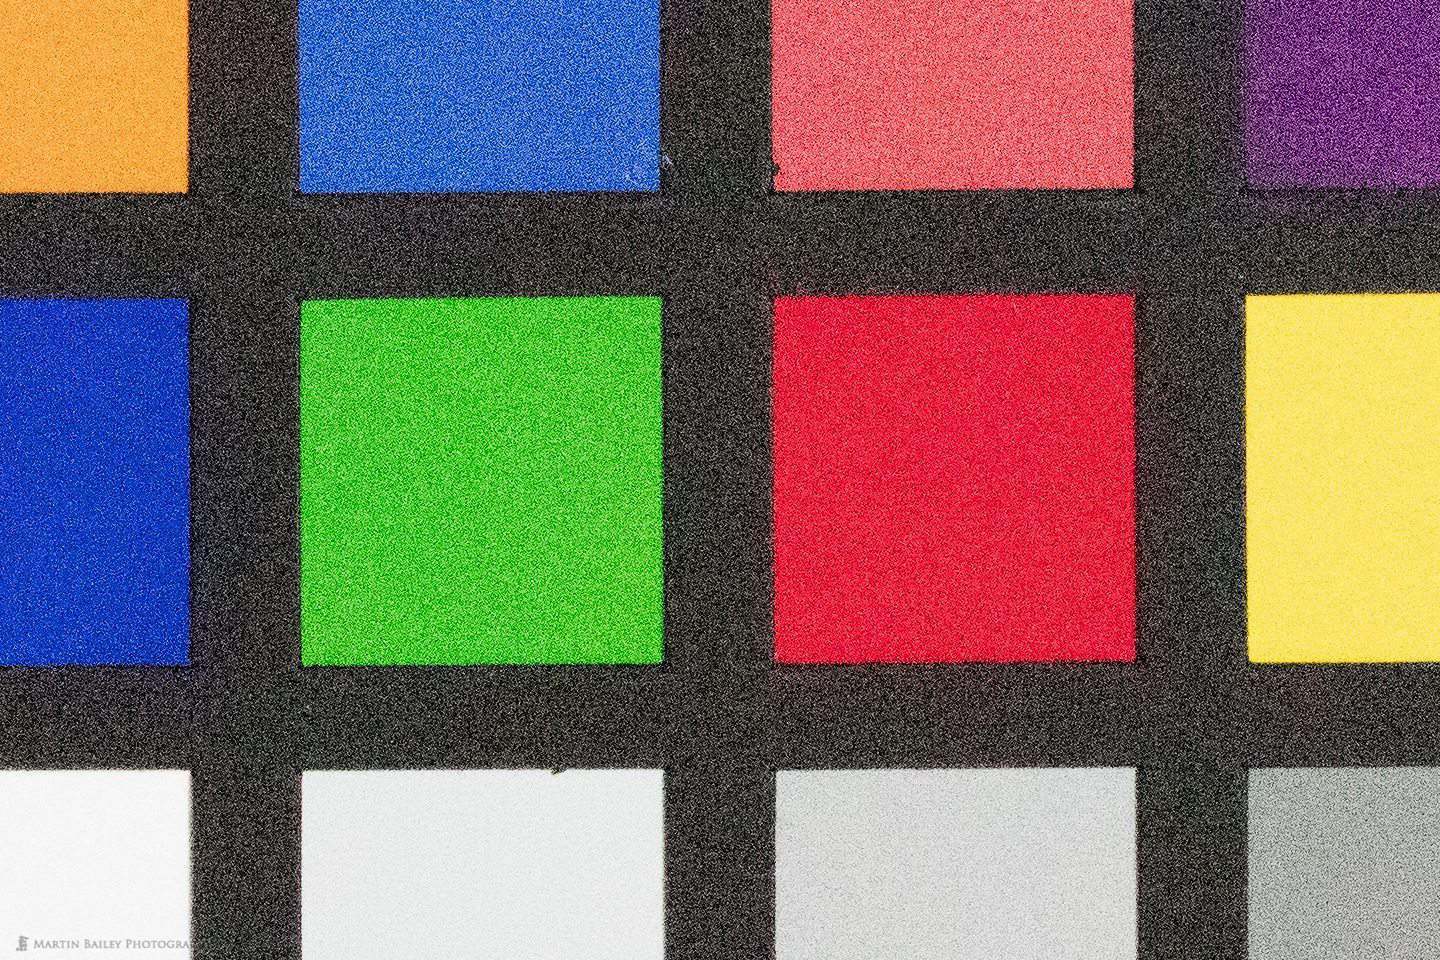

As you can see, once again, at ISO 100, you can push the image by 2 stops, even 3 if necessary, and really see very little degradation in the quality of the image. At ISO 400, we’re probably talking 2 stops, and at ISO 1600, even pushing the image 1 stop introduces a lot of grain, and at ISO 6400 pushing the image at all pretty much ruins the image. This is in line with our earlier findings though. The invariance is only really valid in the high ISOs and quickly degrades as we increase the ISO.
Conclusion
OK, so what conclusions can we draw from this? Well, with the Canon EOS 5Ds R and probably the 5Ds as well as the 5D Mark III which all had very similar dynamic range, I think we can safely say that if you are shooting in a situation where ISO 100 gets you to within 3 stops of where your exposure needs to be for an average tone or dark scene, then shooting without any kind of exposure compensation, either in an automated mode or in Manual, and then increasing the Exposure in post, you will not really see any degradation in the quality of your images.
If you are shooting a brighter scene, at least from these tests, ISO 100 does still show a slight increase in noise in the dark areas if you push in post as opposed to increasing the exposure in camera. For this reason, it’s probably still better to expose to the right, and get your whites white, when shooting winter scenes such as a white bird on white snow. Having said that, the amount of degradation is negligible at ISO 100, and if it’s a toss-up between fighting with exposure to avoid blowing out highlights, and under exposing just a little bit, this certainly does mean that we can give ourselves a little bit more wiggle-room, even for white on white winter scenes.
I can see me perhaps at least trying only going over by +1 stop, and maybe even trying zero compensation in next year’s winter tours, to at least see how the image looks with a true, real-world example. I expect that at ISO 100 this will be a valid way to shoot, as we only need to push the image up by 2 stops. It may also be fine up to ISO 400, if my tests above are anything to go by. Below ISO 400, and you really don’t want to be pushing your images in post.
I still need to get my head around applications of this in the field, but I’d say that on the Canon 5Ds R, if ISO 100 can get you to within 3 stops of the shutter speed that you need to freeze a subject, this is now a viable shooting technique. Allow the image in camera to fall dark, and increase the exposure in post. As I mentioned earlier though, the resulting images don’t look a lot different to those that you will get by increasing the ISO, so the benefits to Canon shooters at this point in time, are really minimal in terms of images quality, but if this technique helps you to avoid blowing out highlights or adjust for a certain shutter speed, it’s worth bearing in mind.
Let’s also bear in mind that during these tests, I have been looking at my images while zoomed in at 100% on 50 megapixel files. This is the level of detail that I like to work at, because I sometimes print large or need to crop my images, but if you are only shooting for web, or low resolution images, the differences that we can see will be less important to you. I’d recommend you think through this yourself or do some similar tests to make up your own mind how useful relying on ISO Invariance could be for your own shooting workflow.
If you are shooting with a Nikon D810 or the Sony Alpha 7R II, and this is the first you’ve heard of ISO Invariance, do check out that article on DPReview, as you may well be able to benefit from this more than us Canon users at this point in time. Either way, I hope this episode has been useful, and helped to shed some light on the topic of ISO Invariance. I’ll continue to update you through the blog and podcast as implement at least some parts of what I’ve found in my own shooting.
The Complete Namibia Tour & Workshop 2017
Before we finish, I’d like to mention that we have just started taking bookings for an incredible 17 day tour in Namibia from June 3 to 19, 2017. There are just a few spaces left, so they might already be gone by the time you see this post, but check out the tour page at https://mbp.ac/namibia and sign up if you’d like to join us. If it is already sold out, please contact us to be placed on the cancellation list.

Click for Details
Show Notes
DPReview Article on ISO Invariance on the Sony Alpha 7R II: http://www.dpreview.com/articles/7450523388/sony-alpha-7r-ii-real-world-iso-invariance-study
See details of my 2017 Namibia Tour here: https://mbp.ac/namibia
Subscribe in iTunes for Enhanced Podcasts delivered automatically to your computer.
Download this Podcast in MP3 format (Audio Only).
Download this Podcast in Enhanced Podcast M4A format. This requires Apple iTunes or Quicktime to view/listen.

Thanks for taking the time to explain ISO invariance. My conclusion based upon your discoveries, when using the Canon 5DSr or 5DIII, in order to keep it simple, regardless of ISO one might as well employ an ETTR strategy and then “fix” in post, Trying to maximize exposure by taking into account ISO invariance would be too complex for myself. I suspect the degree of invariance is influenced by both the amount of light and the colour of the light. In other words, each photograph would be a unique situation.
Are you planning on testing the 80D or 1DXII to see what advantages that sensor may have regarding ISO invariance and DR?
Hi Rick,
Thanks for the comment.
I’m pretty much with you. I think there will be times when I might employ some shooting techniques that make use of what I’ve learned, but in general, I’m going to continue to use ETTR. I just feel more comfortable shooting ETTR and still believe it produces the highest quality images.
I won’t be testing the 80D or 1DXII, as I don’t own these cameras, and I am not supported by Canon etc. so can’t get a loaner either.
Cheers,
Martin.
Thanks for the interesting article Martin! One (slightly unrelated) question – I have often read that larger megapixel images will inevitably look a little soft when zoomed in to 100%. However if you viewed a 50MP image compared to, say, a 24MP image at a set size (e.g. full screen but not 100%) on a good display (e.g. a MacBook Retina), would the 50MP image look ‘sharper’ due to the fact that more pixels are being viewed in the same size space?
I hope that question makes sense!
If the camera has quality pixels and the ability to resolve light through the lens to a small enough point, then there is no softness in the image, even at this size. My 50MP images from the 5Ds R are as sharp at 100% as the images from my 22MP 5D Mark III.
If the images were shot with a lower quality lens though, for example, resulting in soft images, then to a degree, yes, if you compared it to say a 24MP image at 50% magnification instead of 100%, then they’d probably look very similar. It would really depend on how soft the original is though.
The Retina screens do also make images look sharper. The pixels are so dense that it’s more difficult to see if the image is critically sharp sometimes. There have been times when I’ve thought an image was sharp on my MacBook Pro Retina screen, but then when I double check on my iMac, with less dense pixels, it can appear a little softer. If I nailed focus and there is no camera shake though, a really sharp image will look sharp as tacks on both. Some people check images at 200% on the Retina screen to get around this, but I personally don’t do that. In general you can tell if the image is sharp or not, and I always have the final check on the iMac as well, so it’s not really necessary in my workflow.
I hope that answers your question.
Interesting stuff. I haven’t thought about exposure techniques for a while now. Even though I’m sporting an older camera it’s nice to hear.
I’m pleased you found this interesting Charlie. Thanks for the comment!
Thanks Martin! “Invariance” is a new term to me, but in the past I’ve noticed I can push the shadows in my D800 files to blazes. Now I know why.
Hi Shane,
Yes, it’s a relatively new term to me too. This is one of the reasons I set some time aside to do these tests to see how my 5Ds R faired. It’s good to at least understand how these things work to help us make better decisions in the field.
Thanks for taking the time to comment!
Cheers,
Martin.
Thank Martin, another great article. This really hit home for me. I use a 7D ll and at times been confused with post processing results. I always try to ETTR, I just feel I get better results. What is a little confusing is why in post processing can sometimes I lighten a darker photo and it looks good? This has led me to think the same (why am I ETTR)? Your explaining ISO settings does influence this really helps me understand why sometimes it works and other times it’s a disaster. Pushing at lower ISO setting can work but trying to push a underexposed photo in the 3200 – 6400 range just does not get it.
That’s great Mark. I’m pleased this was useful for you.
For sure, the main benefits are when brightening dark subjects shot dark at ISO 100. In other situations there aren’t any real benefits for Canon shooters at the moment.
I was out on Friday shooting some dark night scenes with bright lights, and I could have shot darker, but I continued to shoot ETTR. I just know it better, and feel more comfortable with this method. As dynamic range increases I will probably start to rely more heavily on the benefits of ISO invariance.
Thanks for a very interesting post Martin. I had never heard of ISO variance but your explanations were very clear and I think I have grasped it now. In wildlife photography I have often heard some shooters talk about underexposing slightly to give them faster shutter speeds and avoid the risk of blowing out exposure if using ETTR. It makes sense in some regards, but I have found that depending on the amount of dark and shadow detail in the image, it would often lead to the introduction of noise when lifting that detail in post production. So, like you I have stuck with ETTR.
I have recently read quite a bit about the new 1DXII and seen some presentations by a couple of Canon sponsored photographers, who showed the results of shooting in low light and it appears that the new model is somewhat different to previous models as it deals much better with noise in the shadow and dark areas of an image. Lifting that detail in post production has shown it to be far more tolerant with cleaner results. That camera is out of my reach financially, but I am hoping that the technology will cascade into other models down the line, like the 5DIII replacement.
So maybe, there may be case for me to re consider shooting to the right in the future as the newer models role out. It’s something I hadn’t thought much about, but thanks top your article I will do in the future.
It’s certainly an interesting development Dave.
I think based on my recent tests, that I could for example shoot my white on white winter scenes a little darker, to avoid the occasional over-exposed image, and no that I could increase the exposure in post to bring the whites back. I could do the same with darker scenes too.
It will feel strange, because I’ve been exposing to the right so long it’s more natural for me, but I know the option is there now.
With the larger pixels of the 1D X Mark II I’m sure that’s going to be the case. As I mentioned on G+, I won’t be buying a 1DX2 but as dynamic range increases in all cameras it’s going to be interesting to see how this affects the way we shoot.
Very interesting post Martin. Thanks a lot for your time. I have recently listened to this and your ETTR posts. You always say that exposing to the right improves overall SNR in the images you get. It kept me thinking a lot on my way to work.
The noise in any analogue to digital capture system has always two sources: thermal noise and quantisation noise.
When using ETTR what you do is minimise the quantisation noise introduced by the ADC in the camera. Added to that, the logarithmic way the eye sees makes us more sensitive to this noise as we have a great latitude in our eye.
But, there is other very important noise in the system: the thermal noise. The thermal noise is the base noise the sensor, as an analogue system, has. It is always present. When we expose the sensor with light we have the sum of the desired signal (the light photons in the sensor) plus the thermal noise of every photodiode.
Using higher ISOs is said to be worse for noise, but in reality what it is is worse for the signal. Let’s say we are shooting in Av Mode. Asume that for a given scene we need a shutter speed of 1/100 for ISO 100. This means that we are going to have a value of say S photons at the sensor and a value of N noise. This gives an SNR of S/N. If we increase the ISo to 200 and change the shutter speed to 1/200 to maintain the aparent exposure level, what we get in the sensor is S/2 photons and the same amount of noise N. The SNR is then (S/N)/2.
If the value of N is low enough then the quantisation noise introduced by the analogue to signal converter is going to be the main source of noise, but if it is not, then the main source of noise is going to be the thermal noise.
IMHO this is why shotting with the highest possible quantity of light in the sensor is the best rule of thumb always. This usually means (but not always) using the lowest possible ISO, thus increasing real exposure (aperture and shutter time).
The truth is that the ISO is not changing the real exposure, only the apparent result.
Beautifully written explanation Iratxo!
Of course, what you say is completely accurate, and I agree one hundred percent.
In an ideal world, where we have enough light to create images that are bright enough without increasing the ISO, then creating images as you say, with “real exposure” is ideal. This is what we do when it’s bright enough.
But, there are situations when there is not enough light to capture the subject quickly enough to avoid subject movement. For example, photographing an eagle in flight on an overcast day. At ISO 100 the shutter speed might need to be lower than a 1/8 of a second, and of course even for a panning shot that’s too slow to get a sharp image.
When shooting handheld in inside a Himba hut, the only way to get a shot without you and/or the subject moving during the exposure is to increase the ISO. And, when it’s necessary to increase the ISO, in my experience, it’s still better to increase it so much that you Expose To The RIght. This results in the least amount of noise in the final image.
I hope this makes sense.
Regards,
Martin.