
Following on from my First Impressions review of the Canon EOS 7D Mark II, today we’re going to dive in a little deeper, and see how this new offering faired during my Winter Wonderland Tours here in Japan over the last few months.
Although I’ll touch on some of these areas again today, I ran through many of the great new features in that earlier First Impressions review, which was episode 453, so check that out as well to hear more about what’s new. One of my main objectives while shooting through January and February was to really try to pull the most out of the autofocus, because as we heard in my first review, I was not really impressed with how well the camera handles subjects coming towards the camera.
Another thing we’d not looked at yet was the ISO Performance of the 7D Mark II, so I’ve done some more tests and have got information regarding that to share with you as well today.
Am I Happy with the 7D Mark II?
OK, so the first thing that I’d like to get to, is really somewhat subjective, but very important, as I know that some people have not been happy with the 7D Mark II, especially because of the autofocus capabilities in certain situations. Well, if you ask me if I’m in general happy with this new camera, the answer is a resounding “YES”! It’s not perfect, and we’ll get to that shortly, but I am absolutely happy with my 7D Mark II. It’s a very worthwhile addition to my kit.
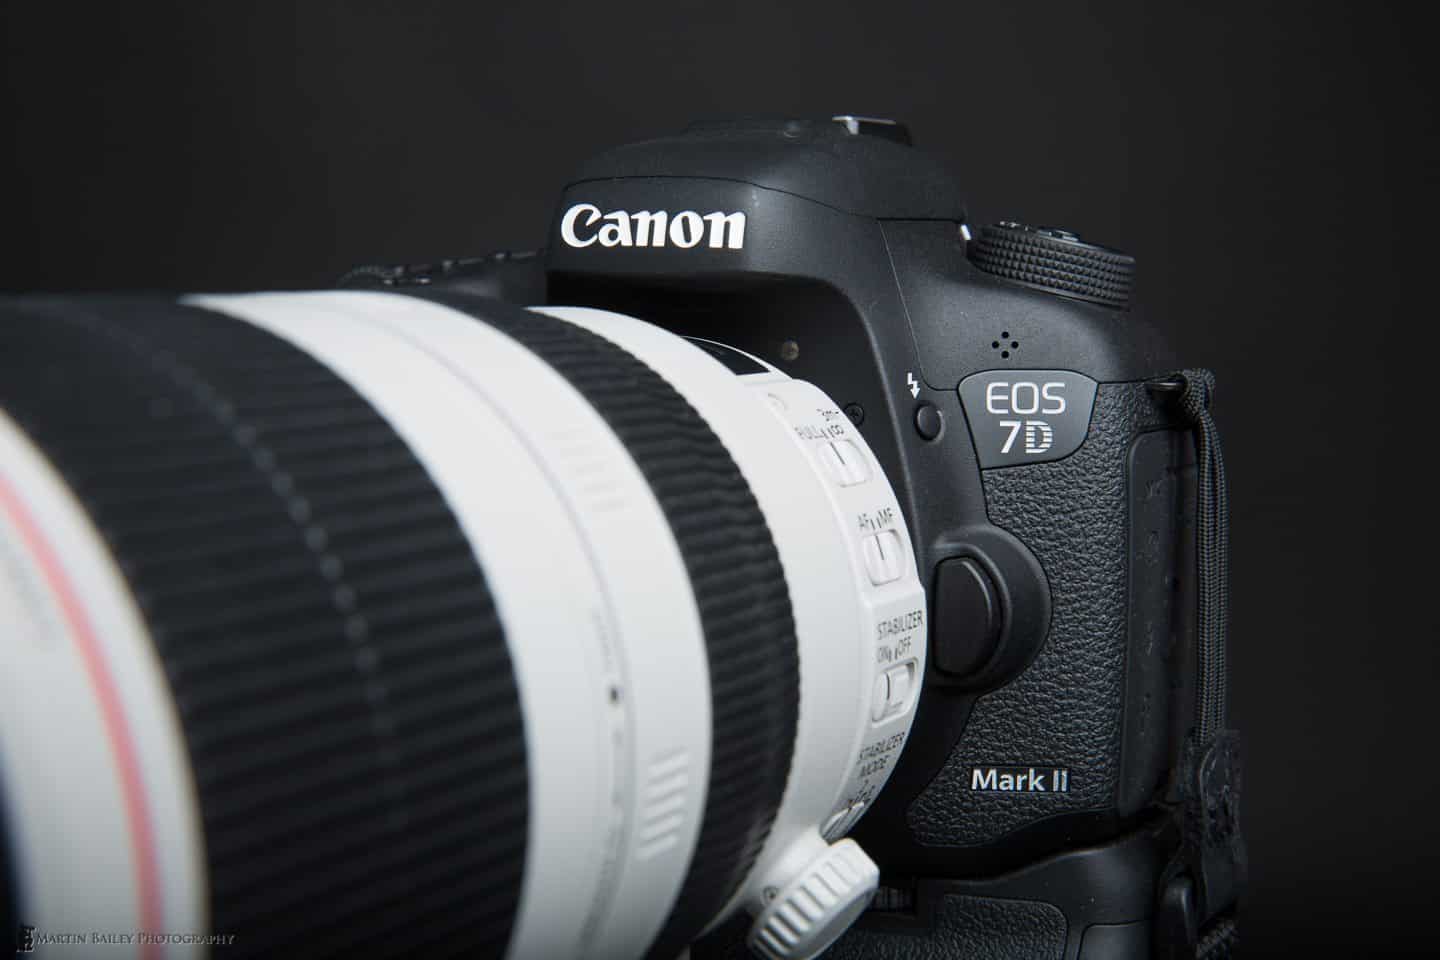
Canon EOS 7D Mark II
I mentioned in that first review that I might even consider selling my 1D X. Is that still the case? Well, no, not really. Why? Because the 7D Mark II starts to get a little noisy as you push up the ISO, and I have some images that I simply could not have got without the 1D X, so it stays, for now. However, I have to say that I’ll probably be revisiting this decision as I actually work through the rest of this year, based on just how much I really use the 1D X now that I have the 7D Mark II.
During my Winter Wonderland Tours & Workshops, I was using the 1D X basically as my second camera most of the time. After deletions during my initial run through my images, I see that from January 26 to February 26, I shot 18,931 images with the 7D Mark II, and I shot just 1,565 with my 1D X, which is less than 10% of my images for this time period.
Part of this was because I really wanted to see how well the 7D Mark II performed, and sometimes, even though I would have preferred to not have the crop factor for a wider field of view, I stuck with the 7D Mark II for test purposes. Most of the time though, I just loved having that crop factor for my wildlife work, and the extra 2 megapixels from the 7D Mark II are very welcome as well.
Intelligent Viewfinder II
I found the new Intelligent Viewfinder II a pleasure to work with, and although the 1D X is still a great camera, I just found things like having the digital level right there in the viewfinder all the time very useful. It’s also great to be able to see at a glance what shooting mode I’m in as well as other information that you can now display right there in the viewfinder.
Canon EOS 7D Mark II Intelligent Viewfinder II
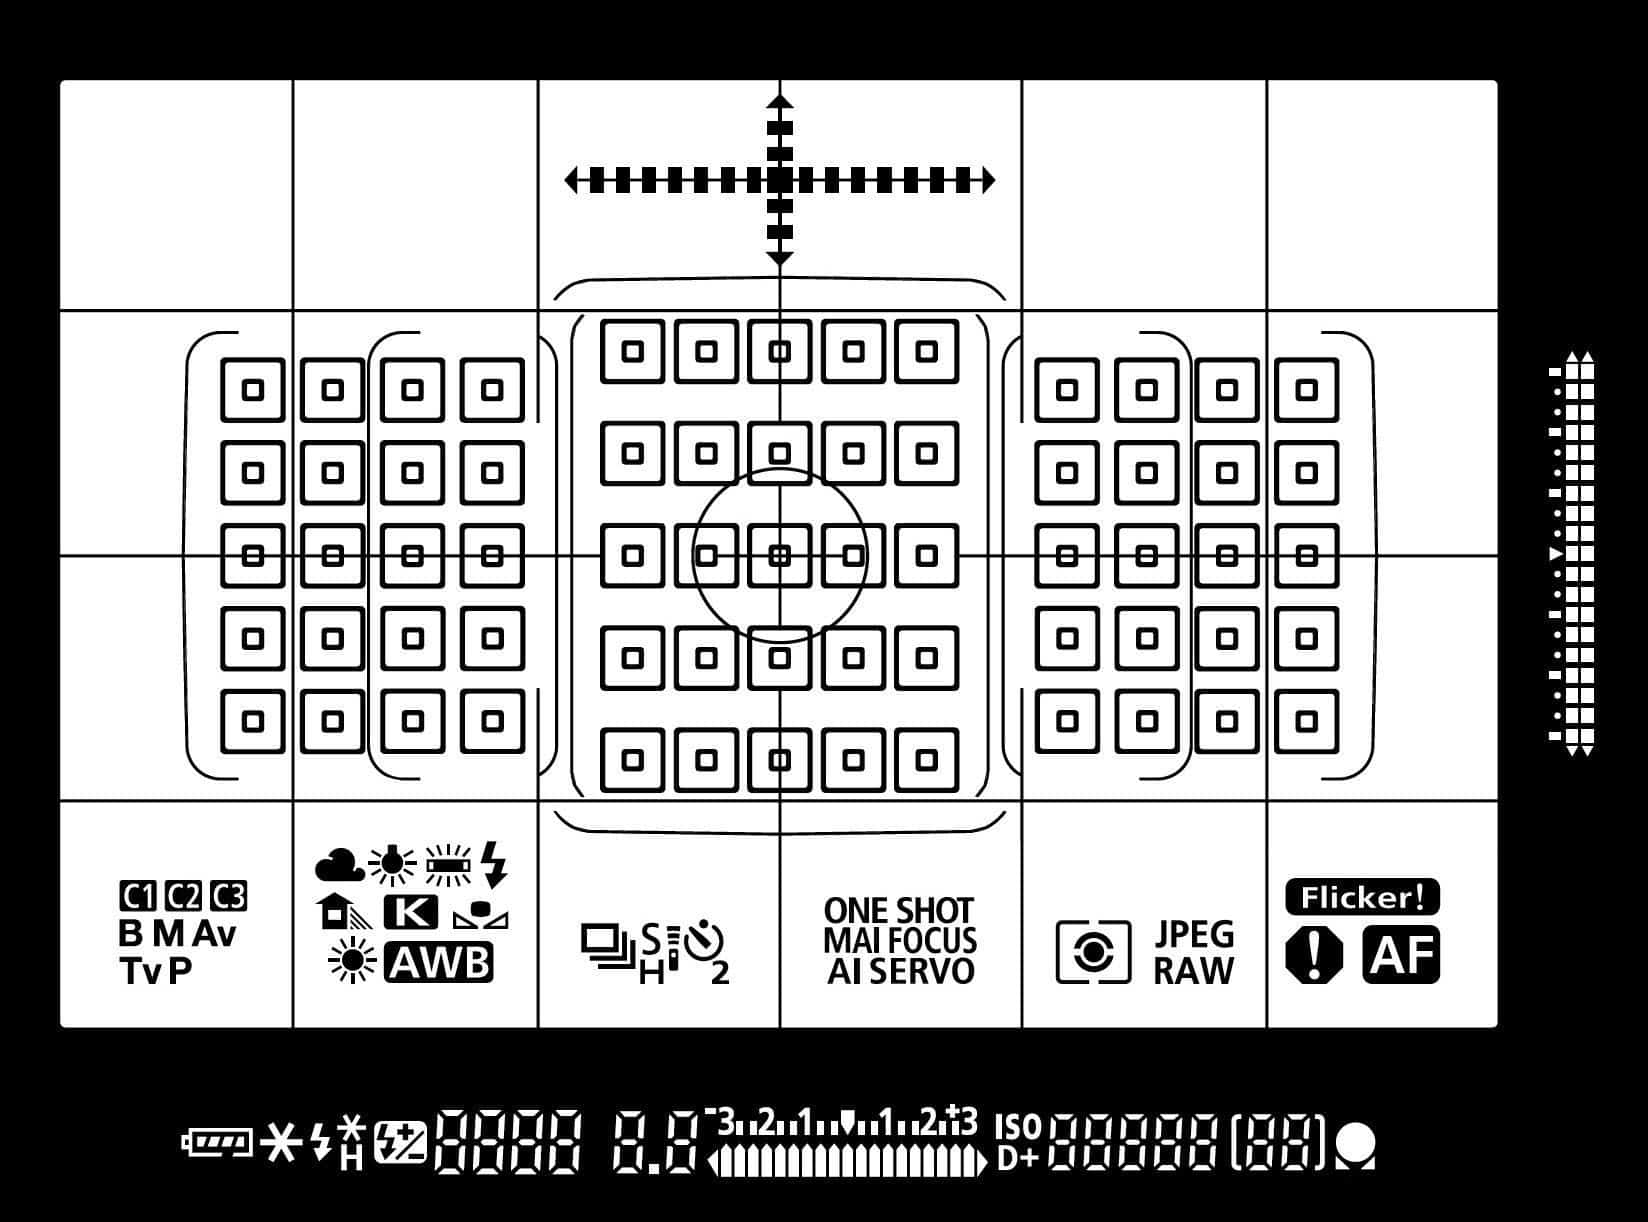
AF Point Coverage
Another thing that I really like is the wider autofocus point coverage. The 1D X seems to have all of it’s 61 AF points scrunched up in the middle of the frame, whereas the 7D Mark II’s AF points almost fill the frame! Especially for birds in flight, this gives us much more freedom as to where in the frame we can place the subject and still be able to track it with our autofocus.
Autofocus Performance
Although the 7D Mark II does have AF points across such a wide area of the frame, it did take me quite some time to really get the most out of the AI Servo tracking capability, and I mentioned the problems I was having in my earlier First Impressions review. As I’ve shot more with this camera and continued to tweak my settings, I have greatly increased my success to fail ratio for subjects moving towards the camera, which were initially the most problematic.
Although I tried lots of combinations as I tested this camera, my Tracking Sensivity, Accel./decel. tracking and AF pt auto switching settings ended up going back to pretty much what I’ve always used with the 1D X. As you can see in this photograph of my settings (below), I add these three settings to the My Menu on the camera for easy access, and I changed these a lot over the two tours trying to find my optimal settings.
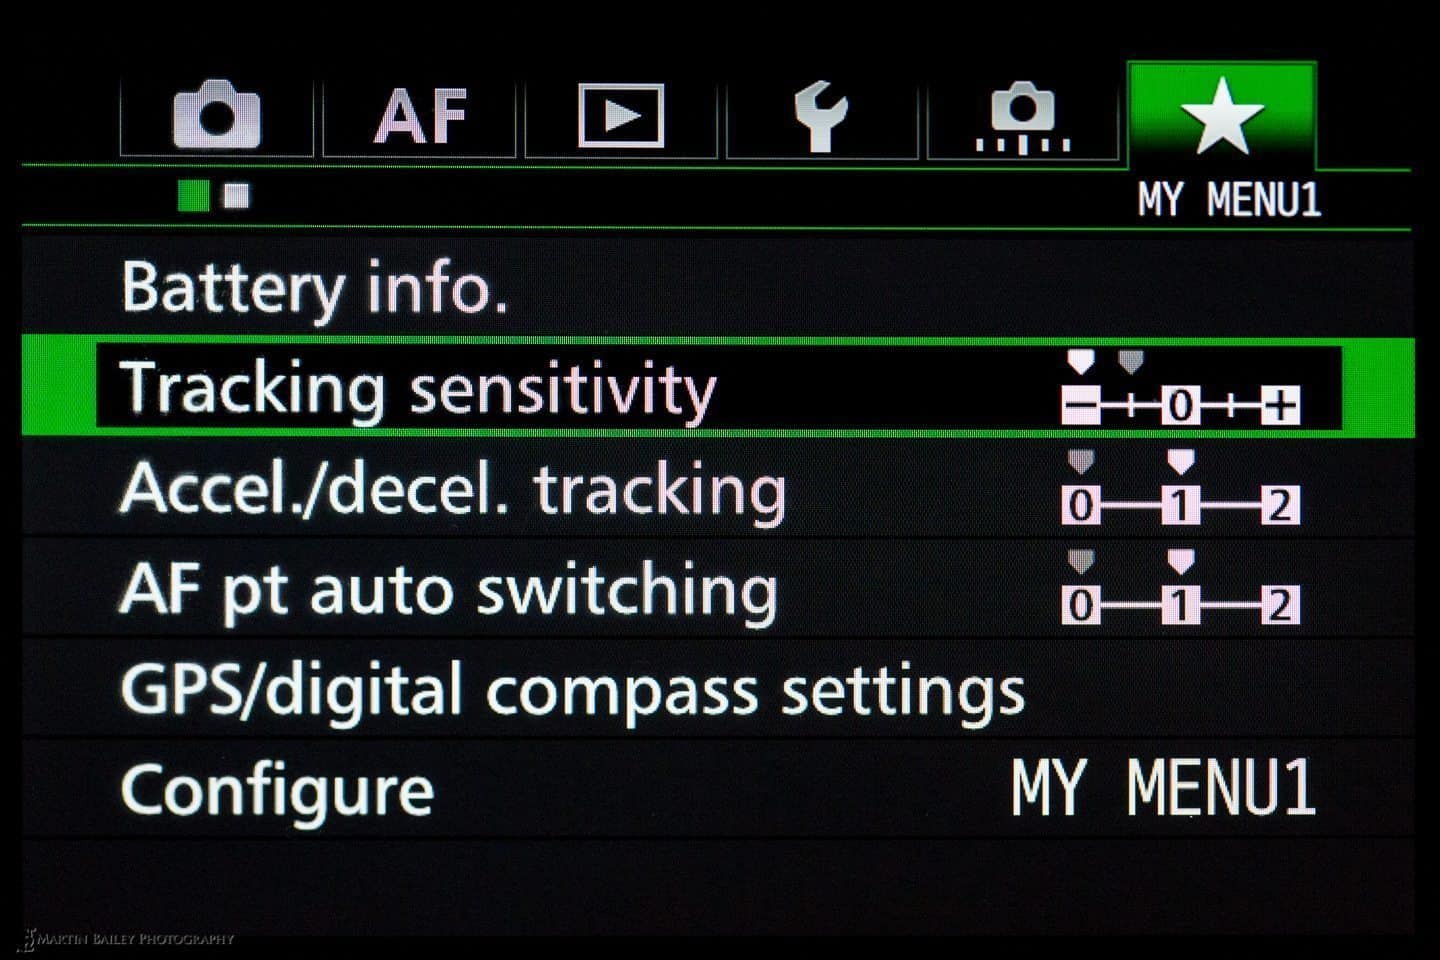
7D Mark II AI Servo Settings
For both the snow monkeys running towards me, and birds in flight, both subjects moving erratically, I found these settings to work the best. I have Tracking sensitivity set to -2, Accel./decel. tracking set to 1 and for AF pt auto switching I’ve been moving between 0 and 1 depending on the subject, depending on how accurately it’s working in a given situation.
With erratically moving subjects it’s important for the AF points to switch around quickly, so it’s tempting to increase the AF pt auto switching sensitivity, but as you increase the sensitivity, the focus often switches to an unwanted part of the scene too readily, so I found myself with AF pt auto switching set to zero most of the time.
This as I say is pretty much how I use my 1D X. As you can see in this stitch of six frames of a snow monkey coming down a snow bank towards me, screen-captured in Canon’s Digital Photo Professional with the AF Points displayed, the autofocus stayed with the face of the monkey for five of the six frames. Click on this to view larger so that you can see the active focus points, but you’ll see that the focus stays pretty much with his face for five of the six frames.
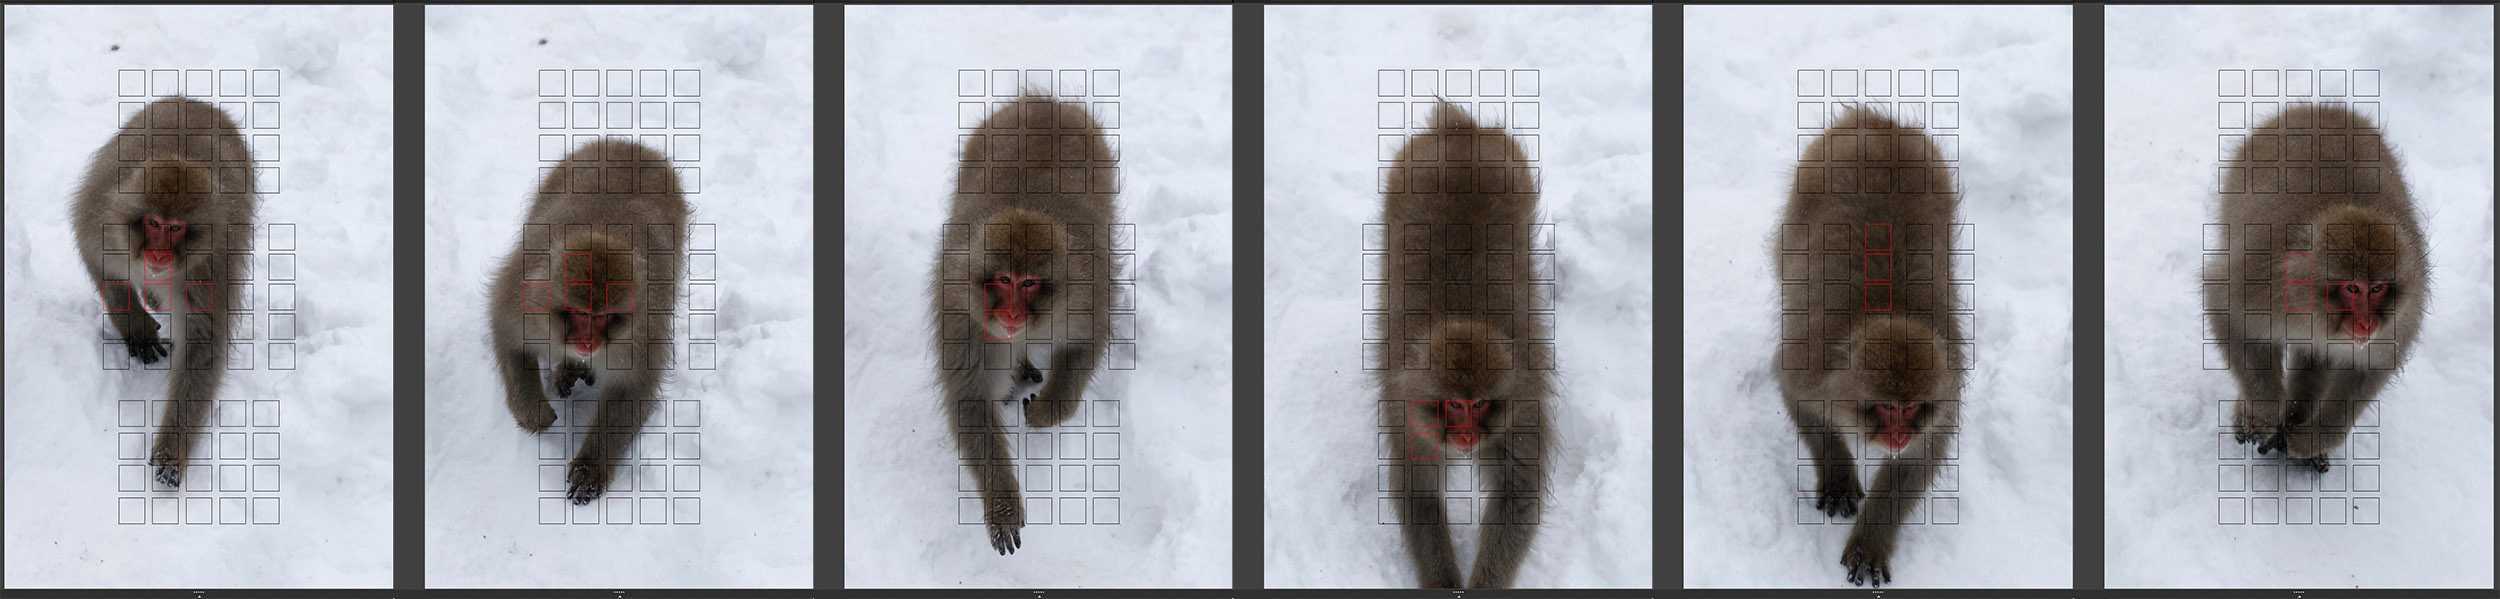
AI Servo Tracking Success (click to view larger)
This level of accuracy is what I was hoping for, and was finally able to draw from the 7D Mark II. I still get the feeling that the overall success rate for this kind of AI Servo shooting isn’t quite up to the levels that I get with the 1D X, but without shooting exactly the same subject at exactly the same moment with both cameras simultaneously, it’s hard to quantify that.
ISO Performance
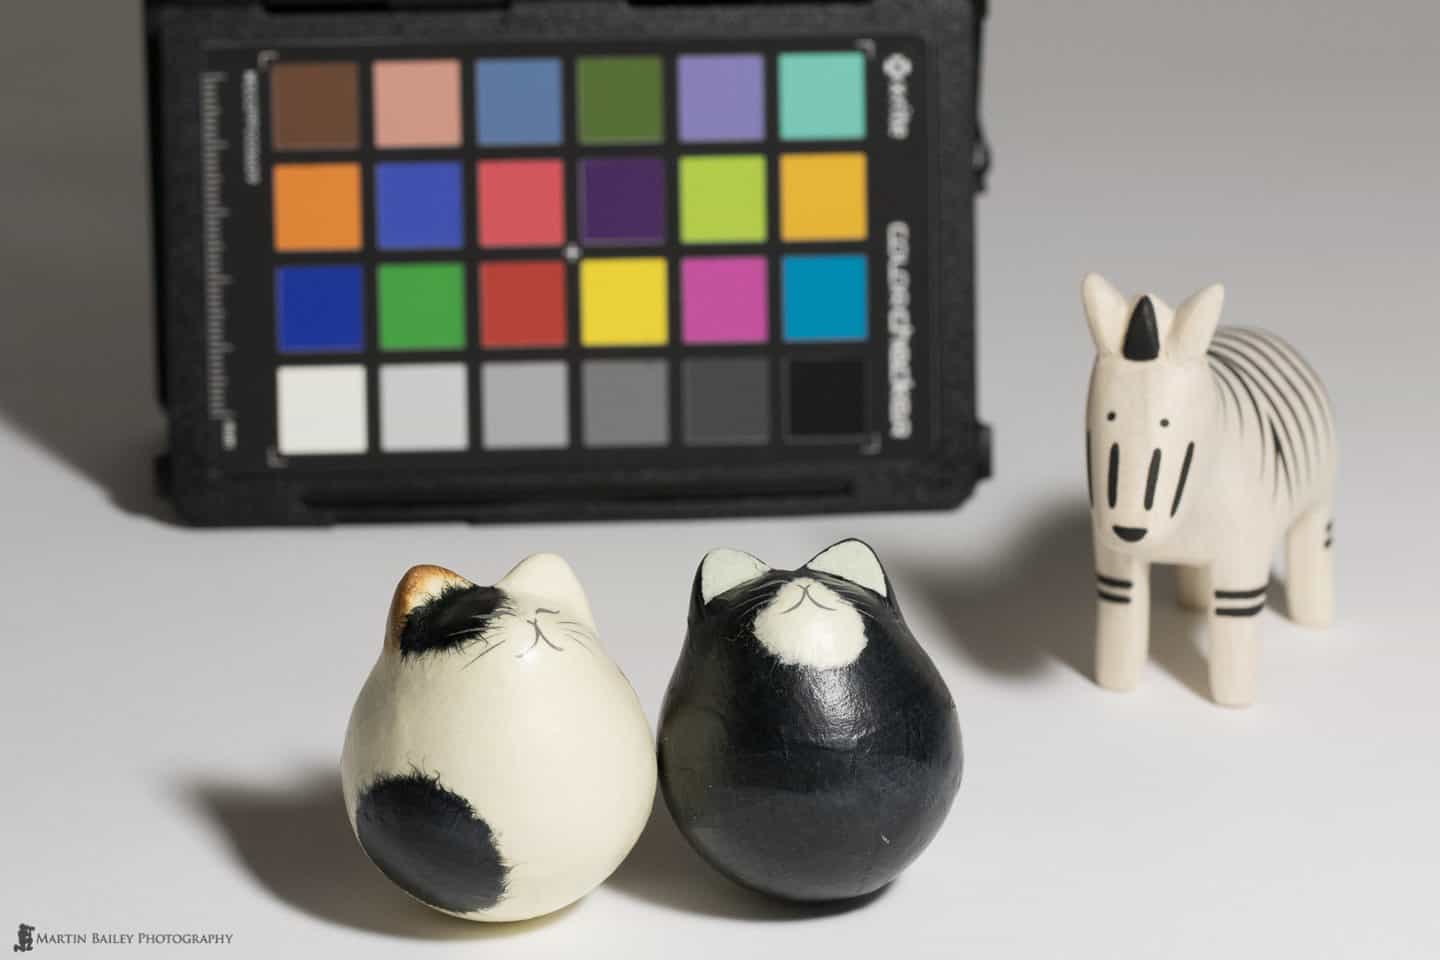
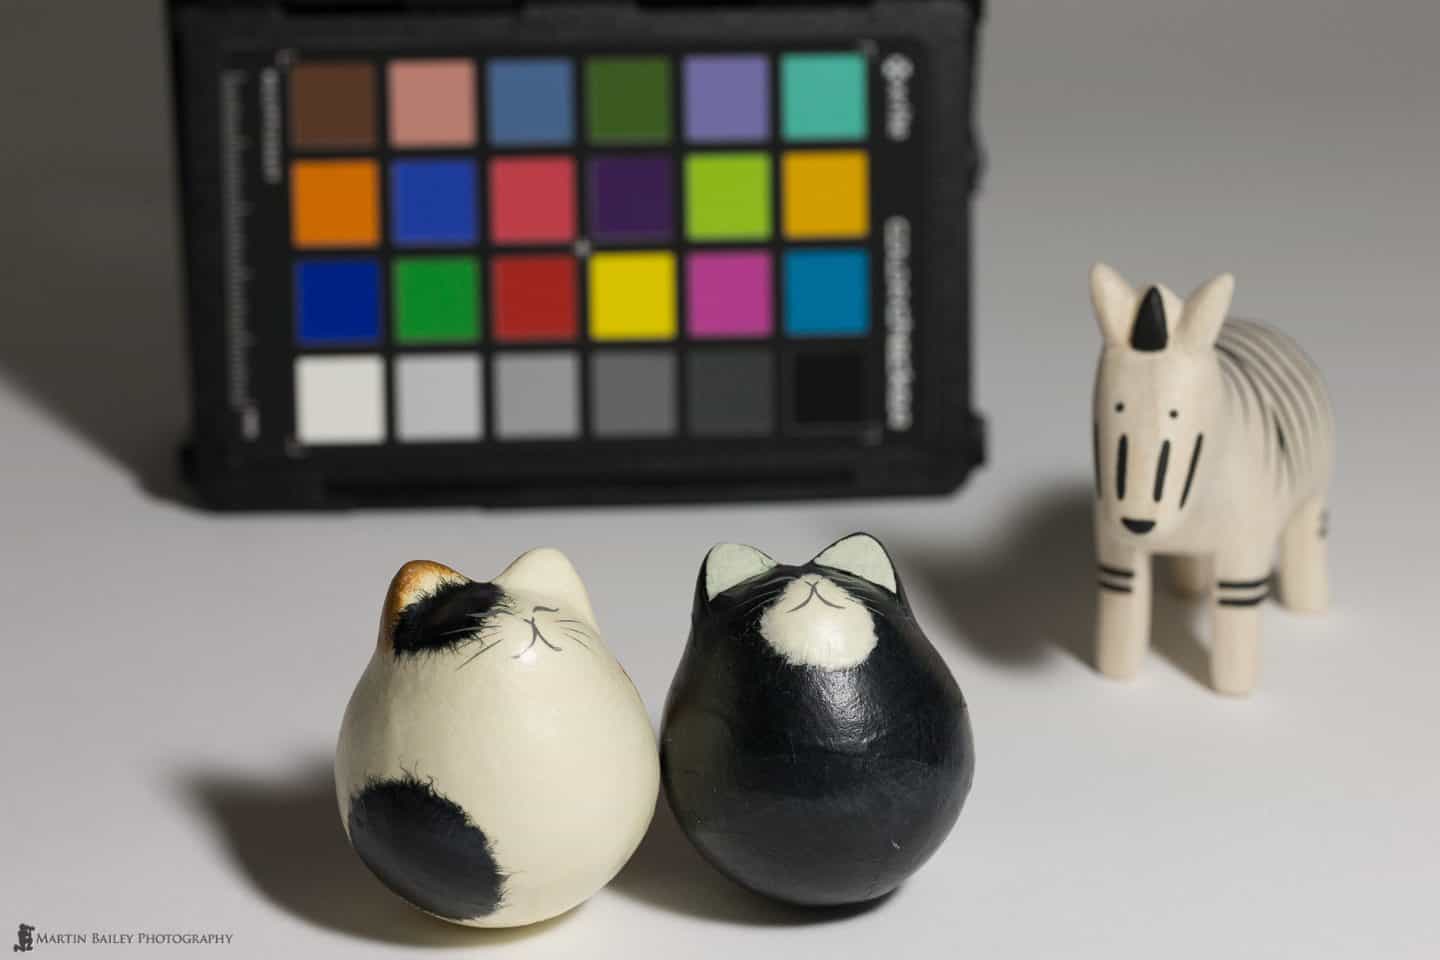
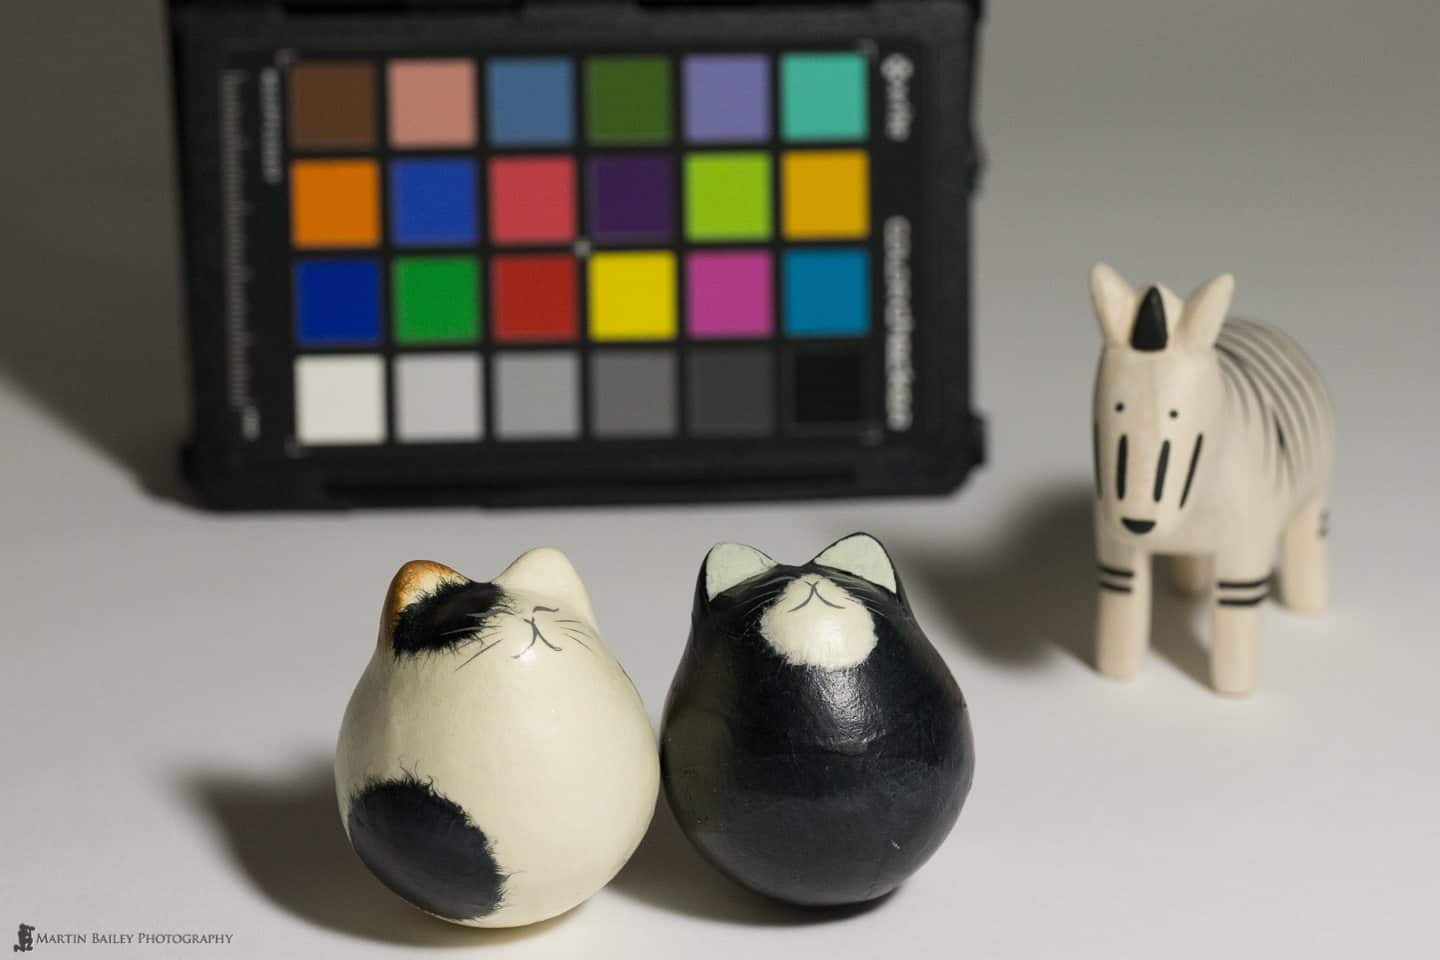
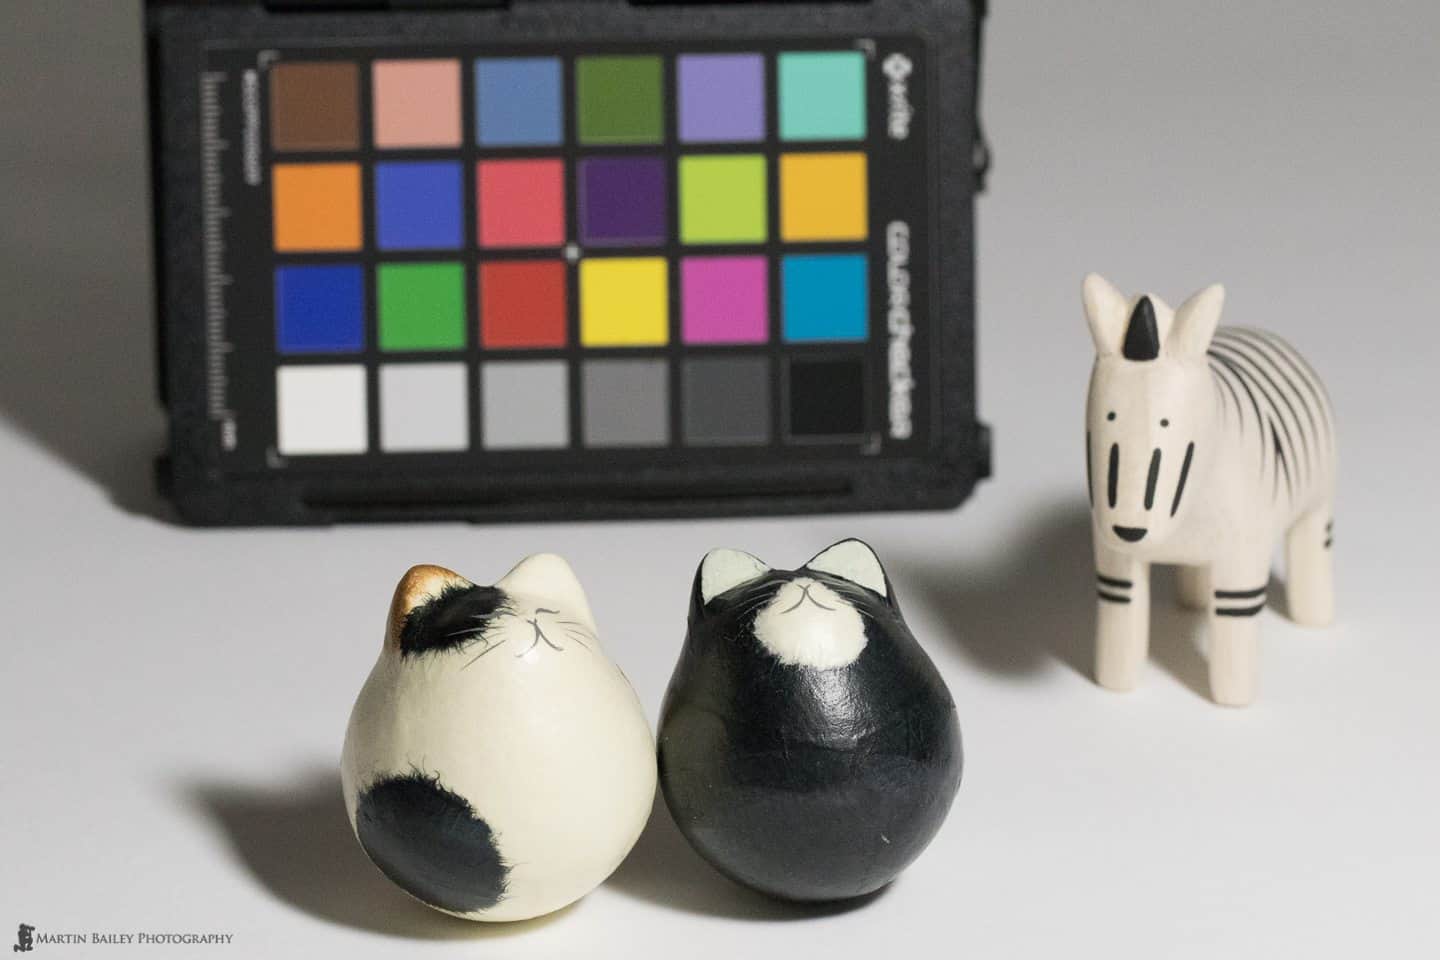
OK, so let’s move on and take a look at the image quality and ISO performance. As I’ve done in previous reviews of the 1D X and 5D Mark III, for these ISO performance tests, I simply set up a shot, with some light and shade areas, and shot a series of images going through the entire ISO range of the 7D Mark II in full stops and I’ve compared that with the 1D X. There is no ISO 50 on the 7D Mark II, so I started at ISO 100 on both cameras. The maximum ISO you can set on the 7D Mark II is 51200, but the 1D X goes up to 204800, so I included these last two ISOs for the 1D X as well, for comparison.
I used a 100mm macro lens for the tests, and set the camera’s aperture to f/10. Note that because of the 7D Mark II crop factor I did have to move the camera to try to frame both sets of images similarly, but they are not identical, and don’t really need to be to be able to appreciate the results.
First up, here is a gallery of 22 images resized to 1440 pixels wide, just so that you can get a feel for the downsized image quality at the entire ISO range. The labels below each image tell you which camera the image was shot with, and at what ISO. Don’t forget to open your browser up wide enough to see the images at their full size, or you’ll be looking at a browser generated smaller version.
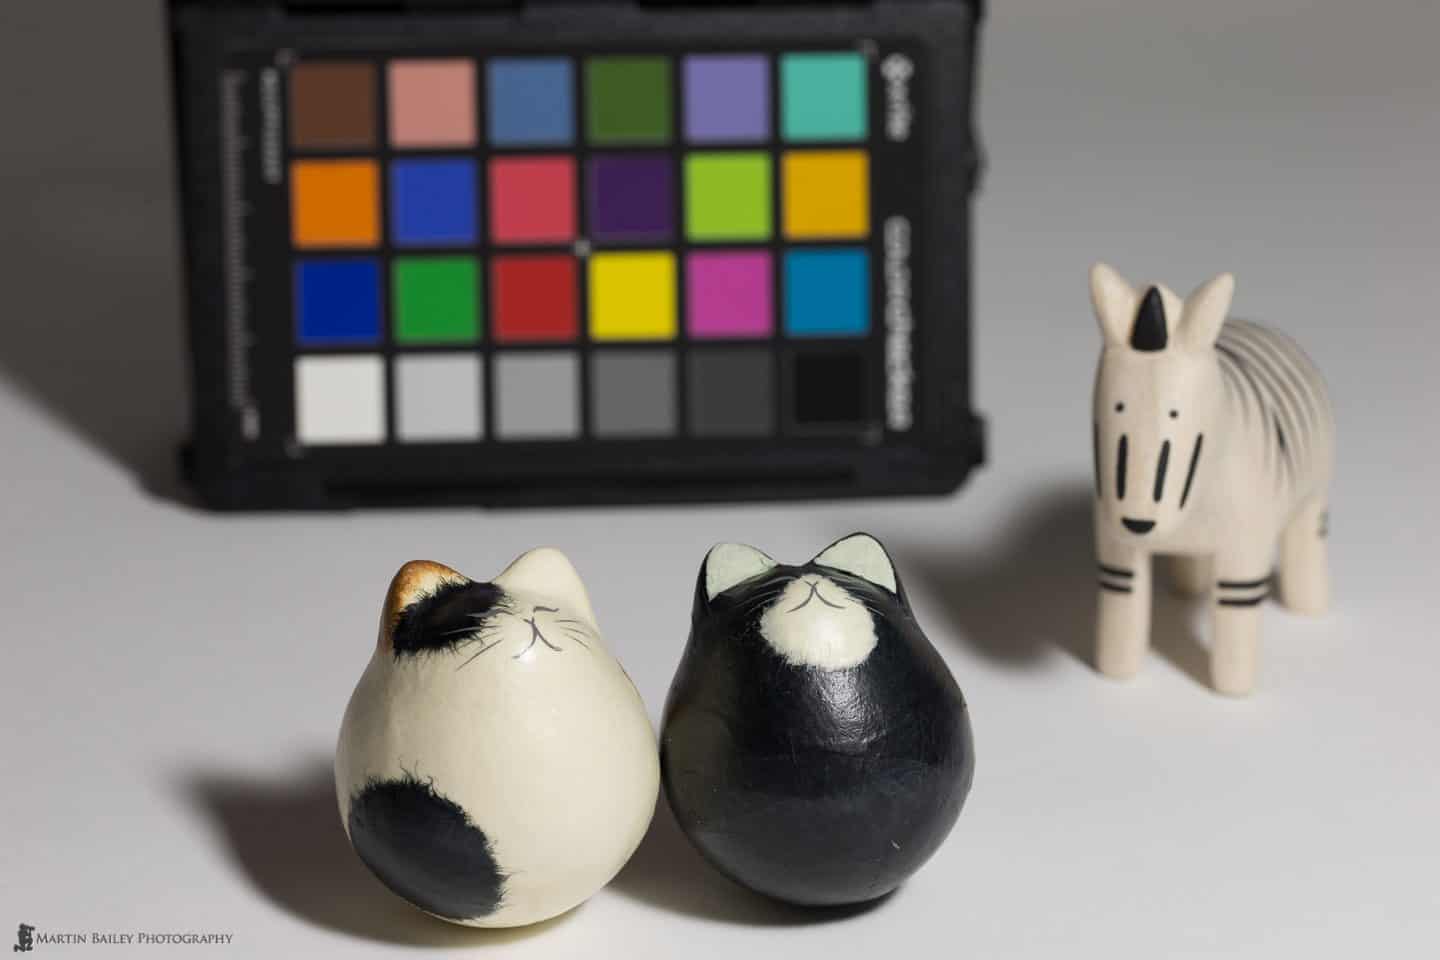
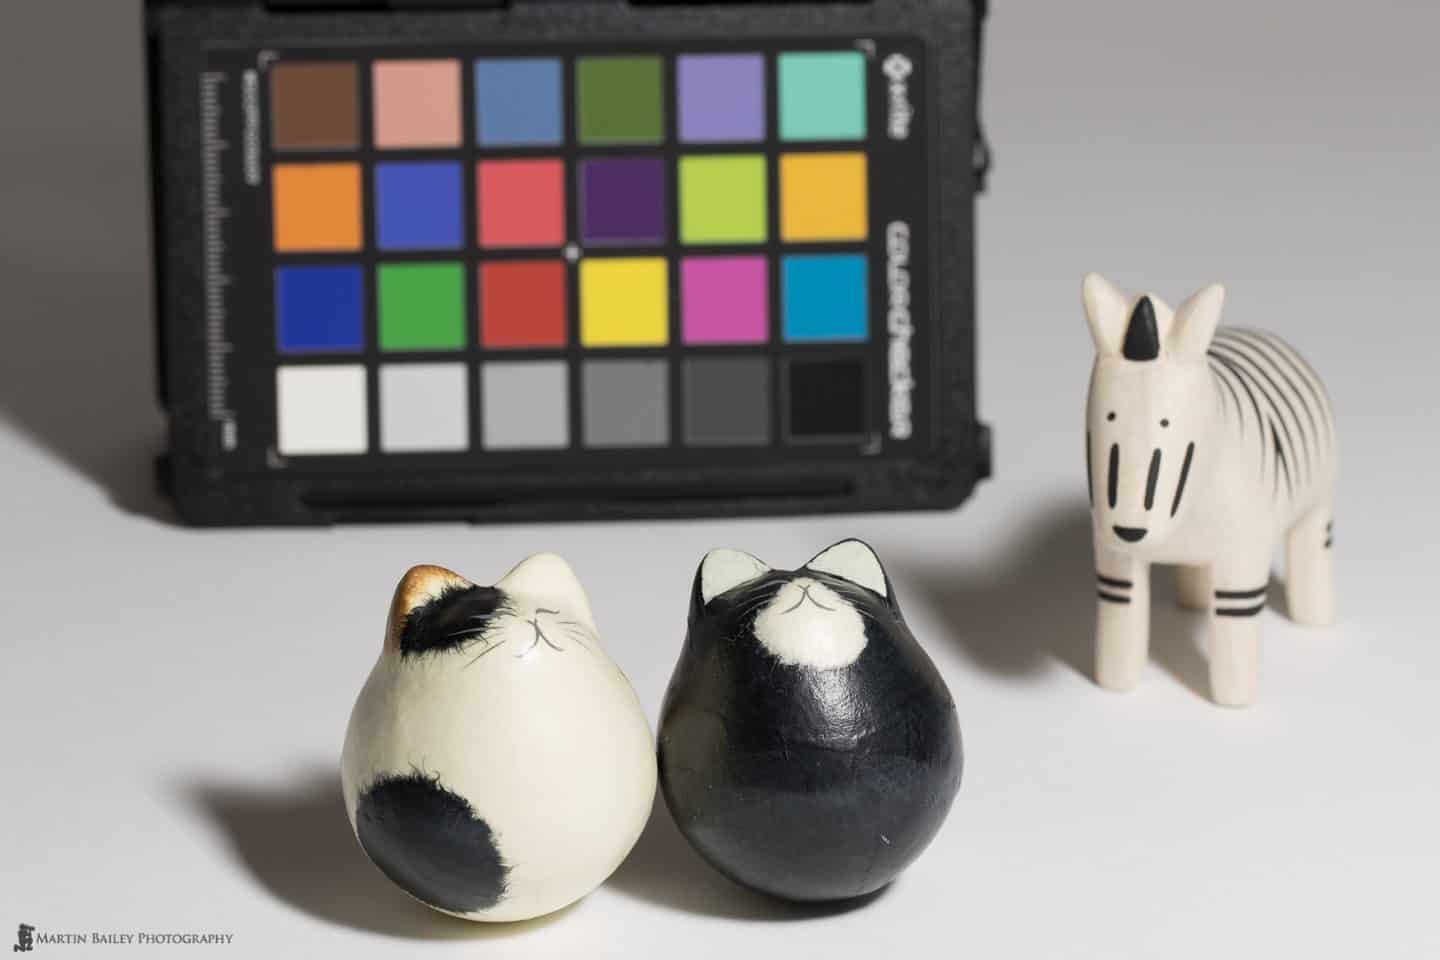
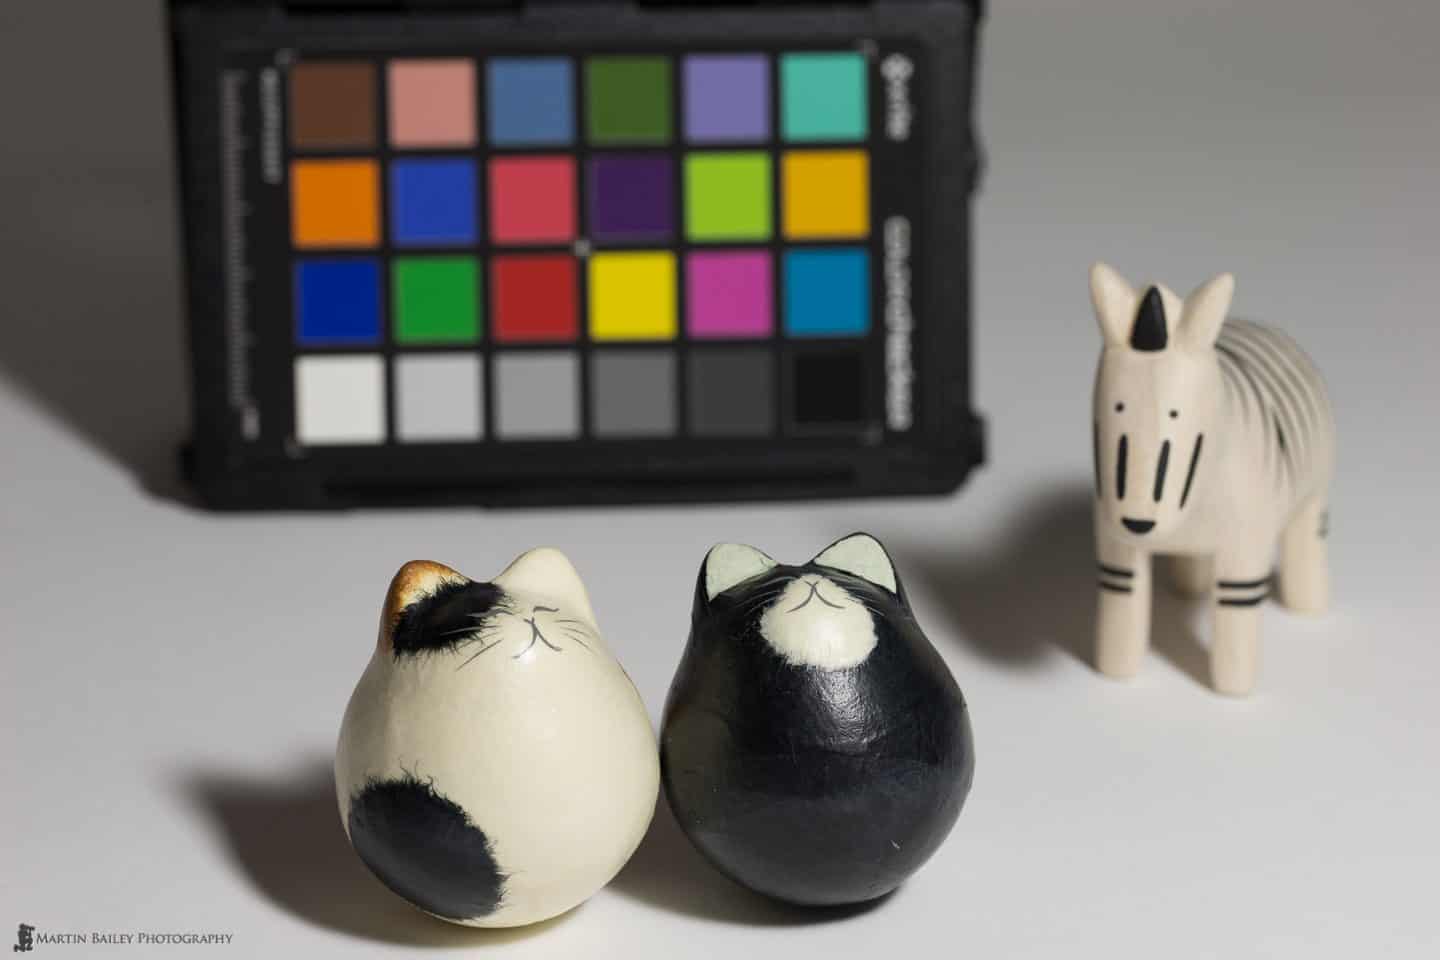

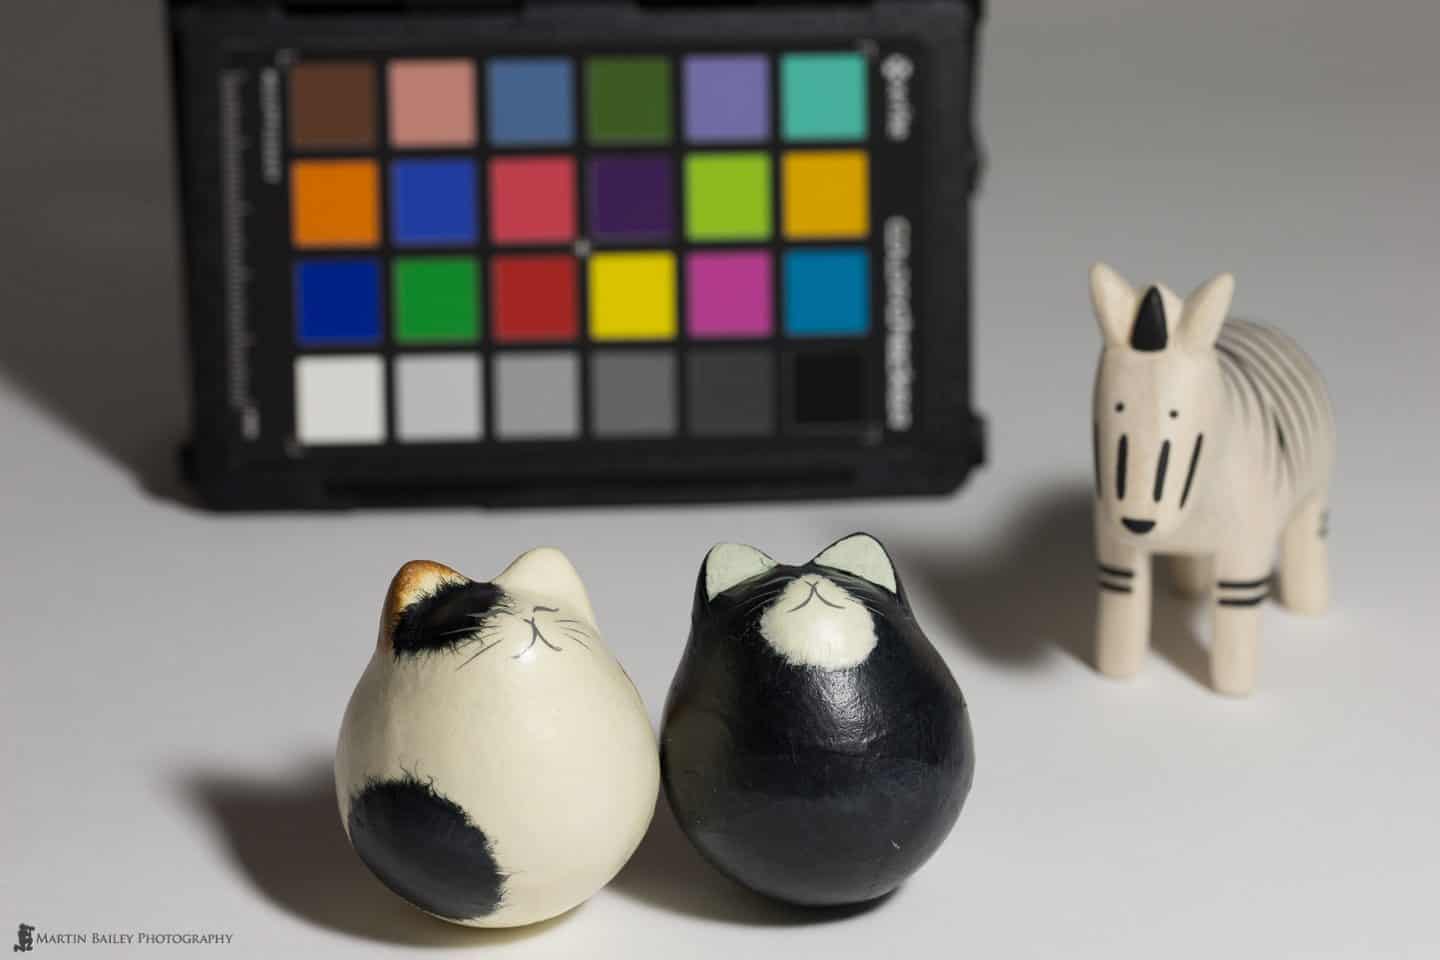


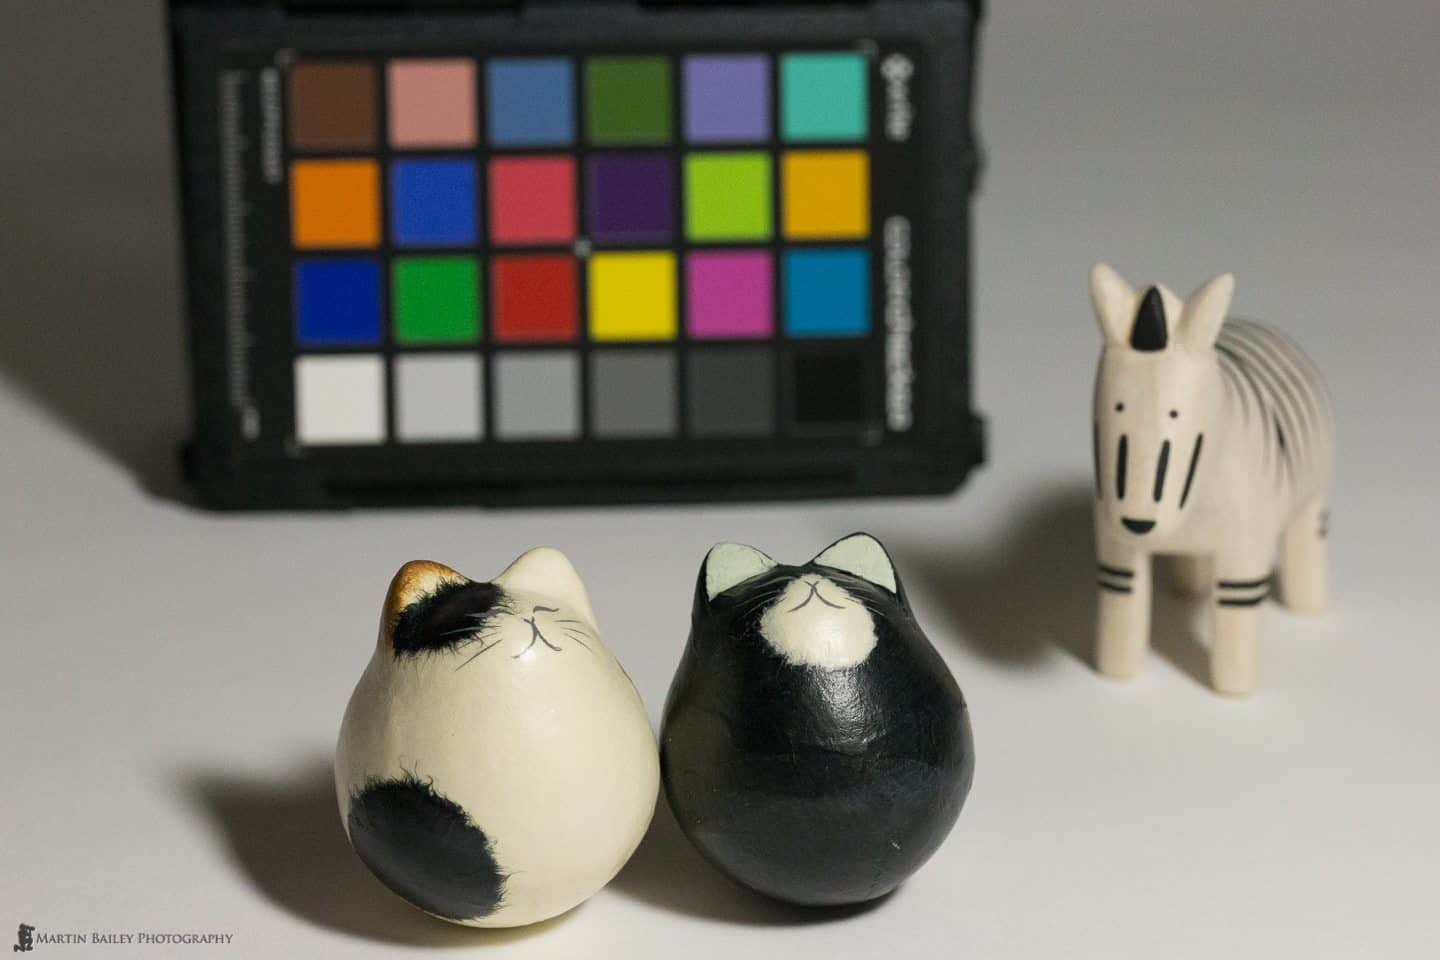

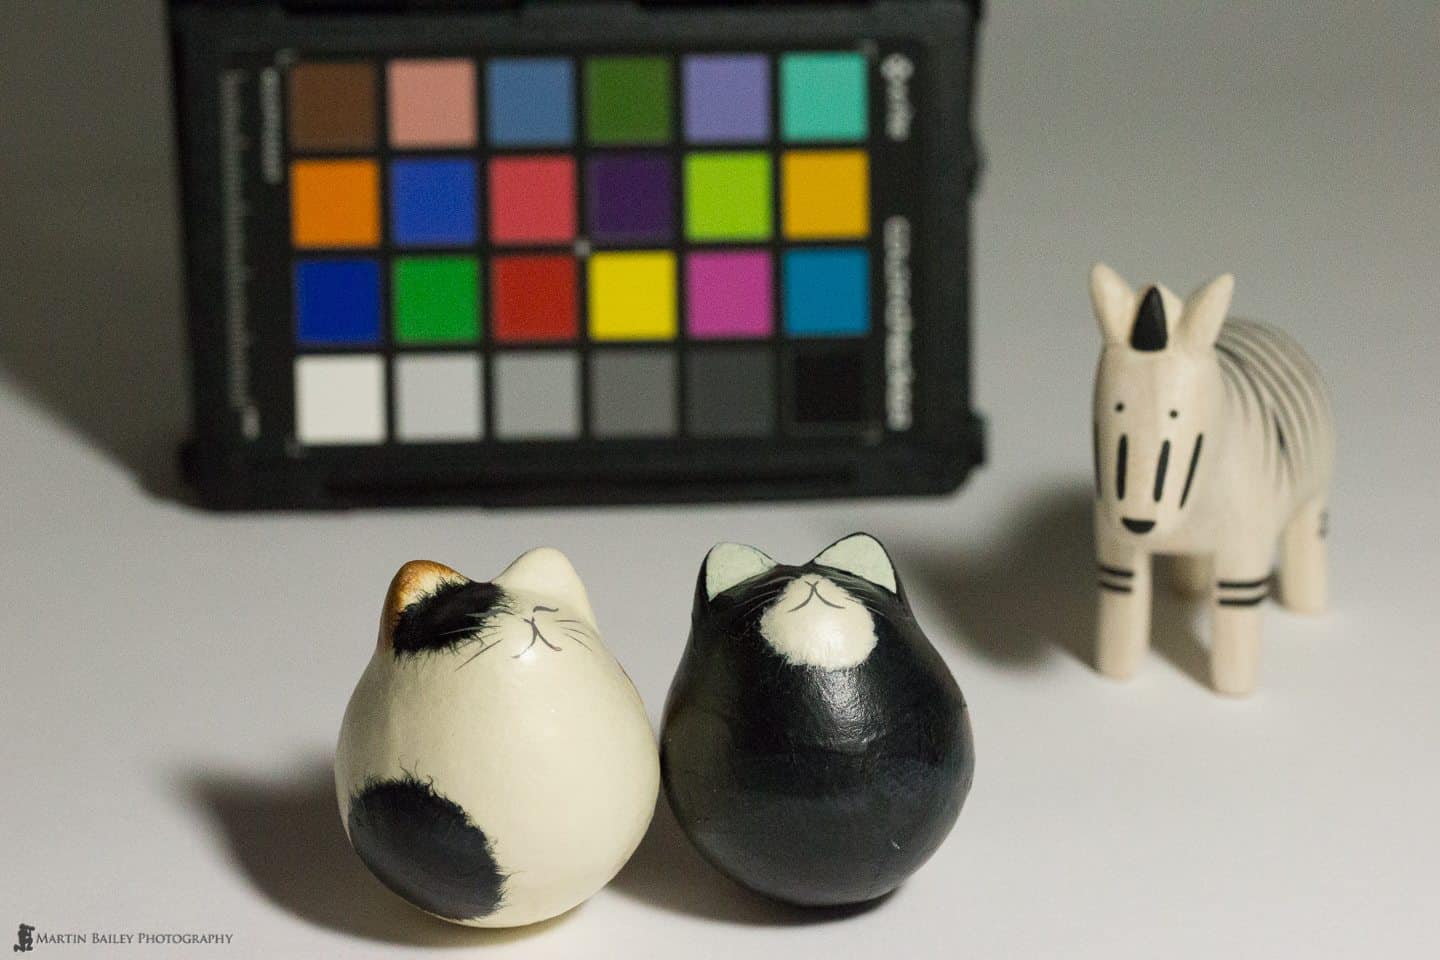
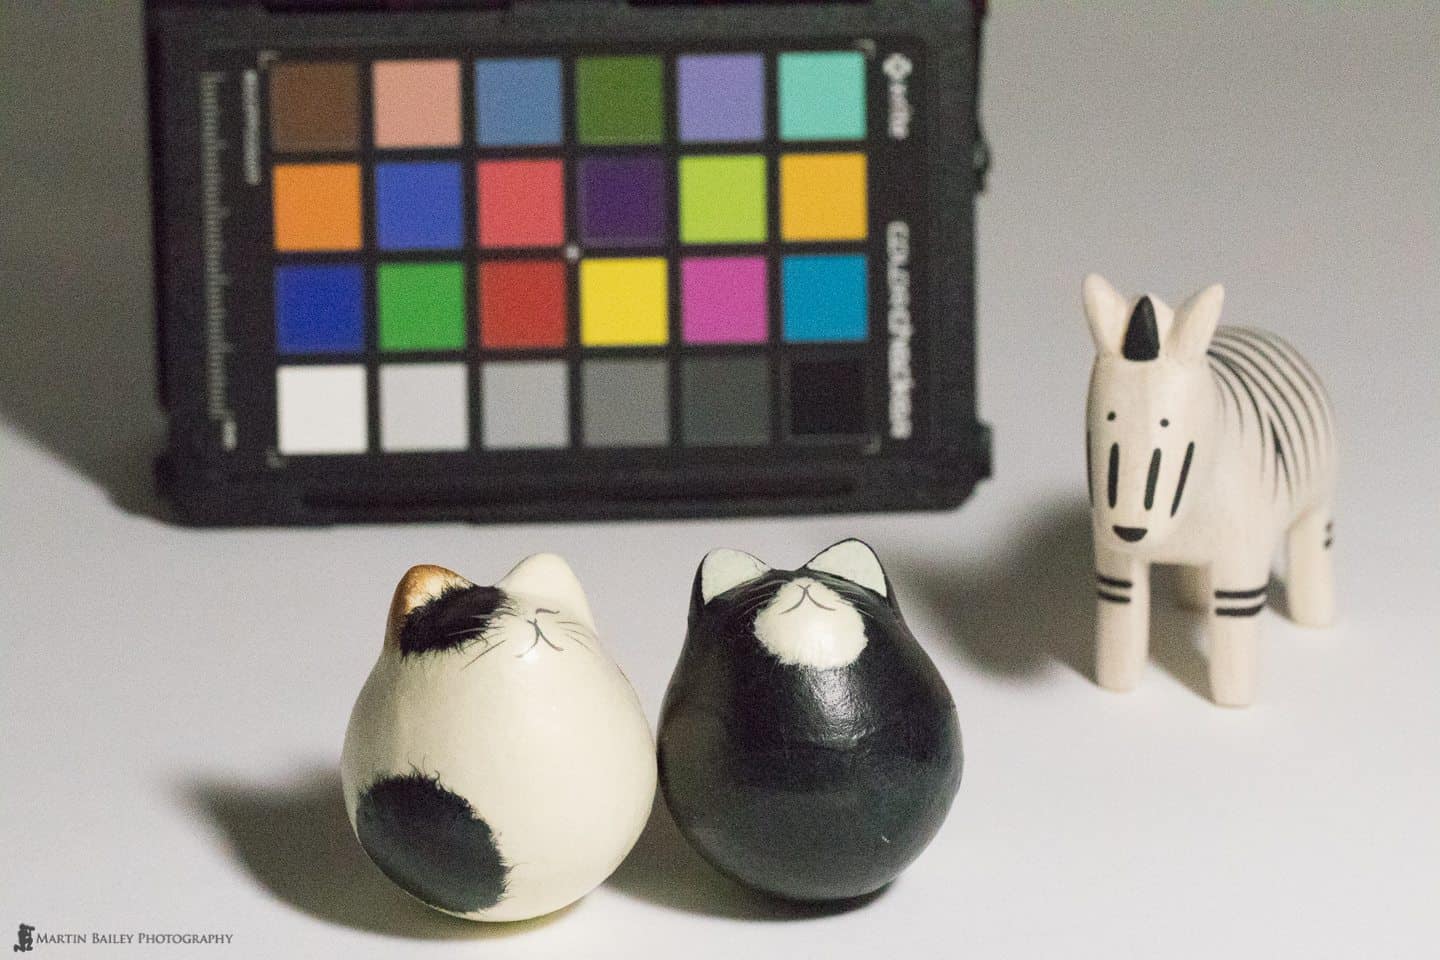


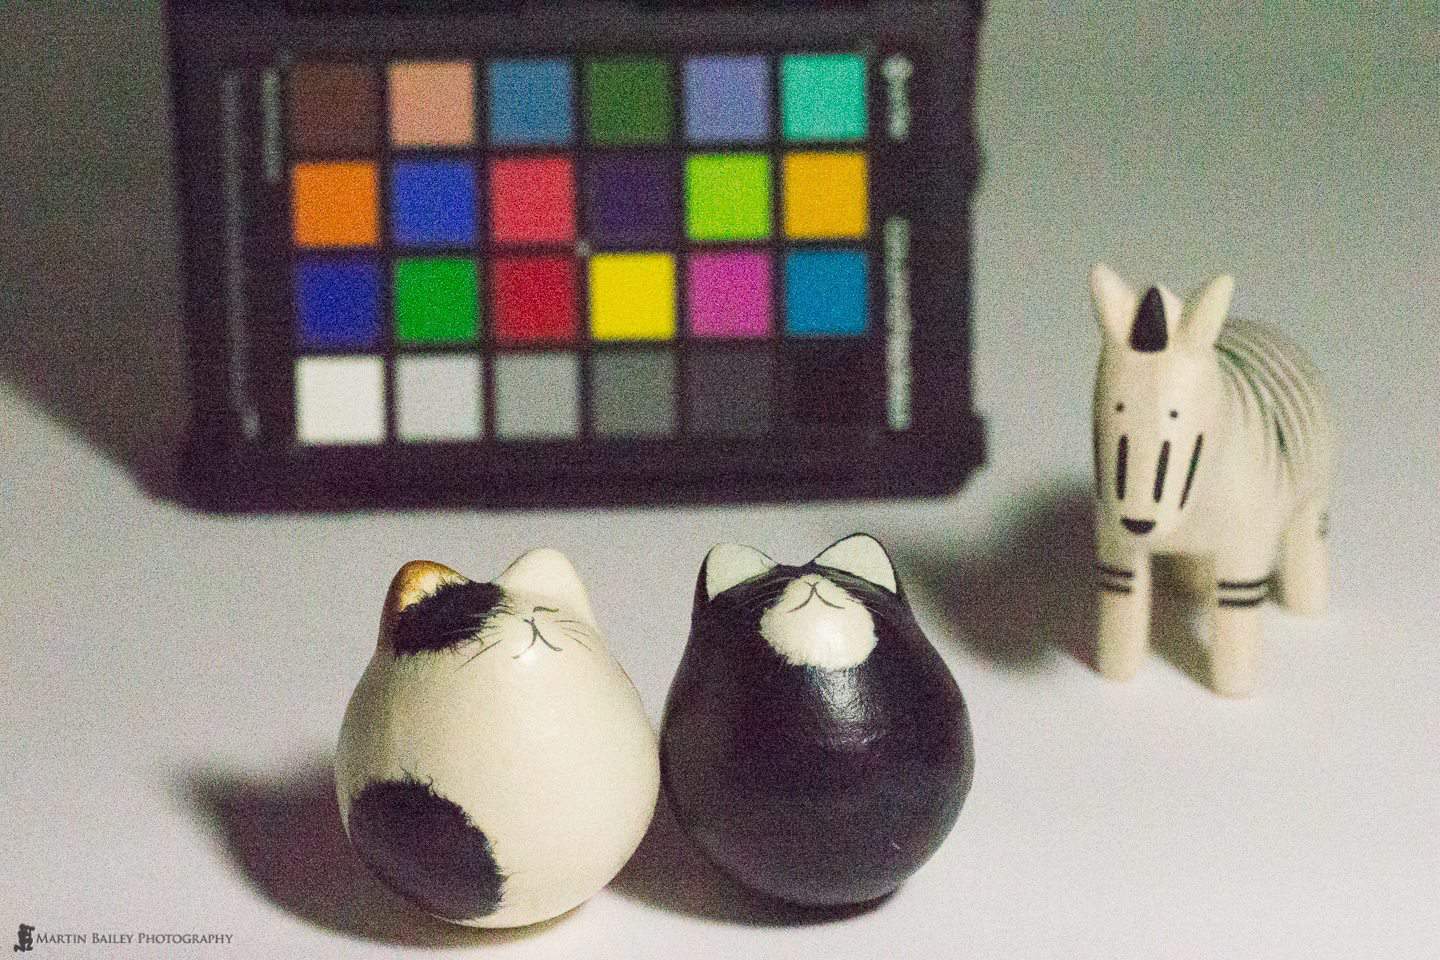
Looking at these results, I’m sure you’ll agree that if you are shooting for Web or relatively low resolution presentation, then up to 12800 ISO is perfectly acceptable, and if you are OK with a bit of noise, even up to 51200 is pretty good still.
Here is another gallery of images, this time, 100% crops of the black cat with the shadow from the zebra. This gives us a good comparison of the noise levels in both the lighter areas and the shadows, where noise is generally more obvious. Click on the images and take a look at the noise in each as you click through them, and do take a moment to compare even the first pair of images at ISO 100.
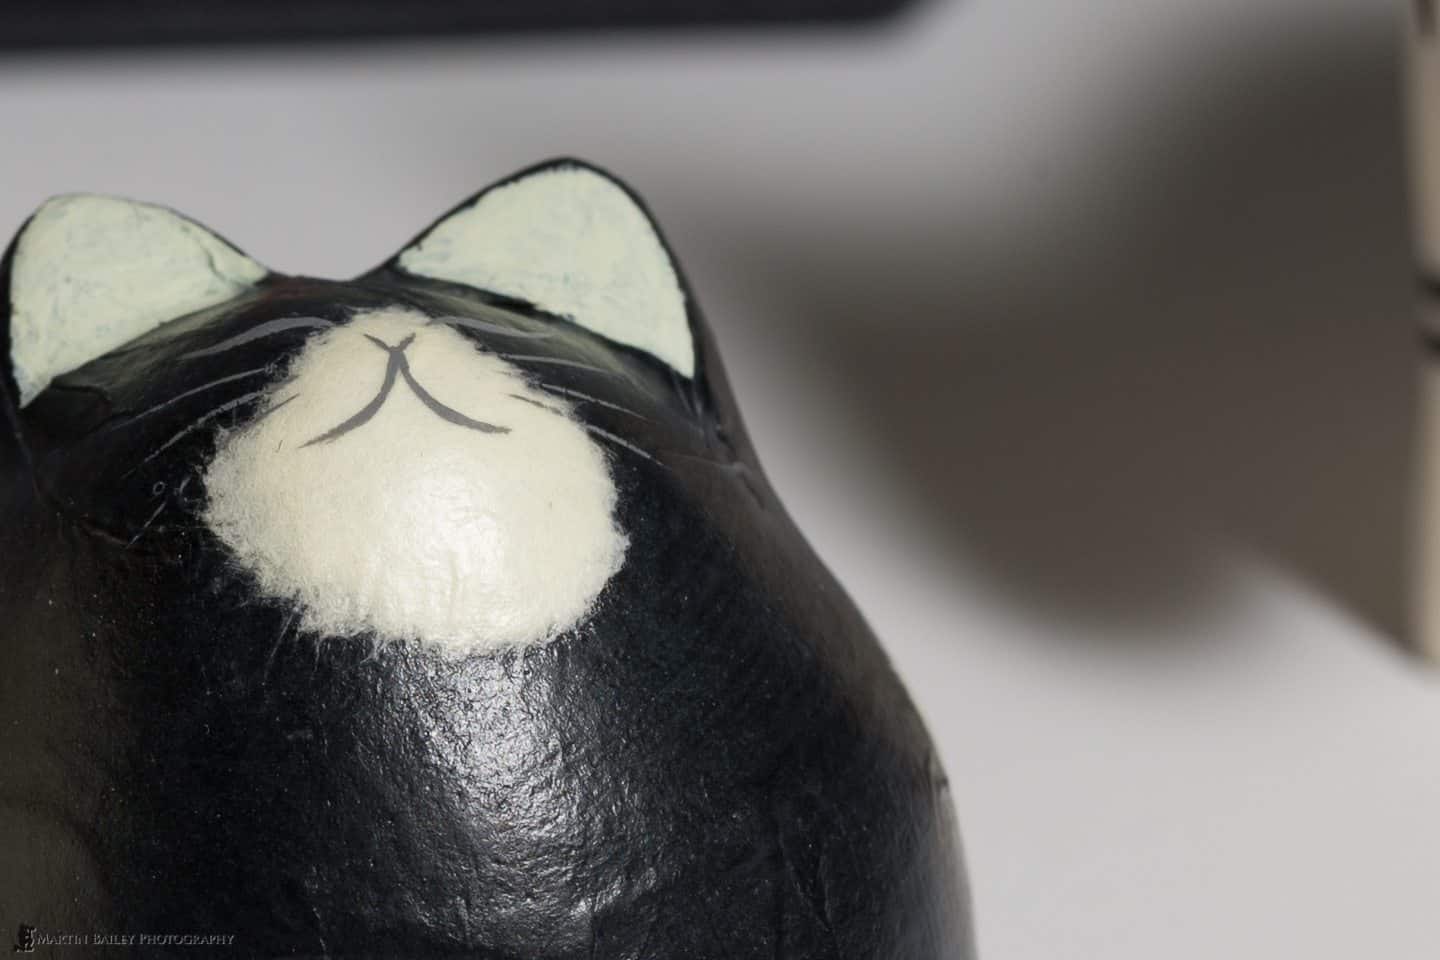
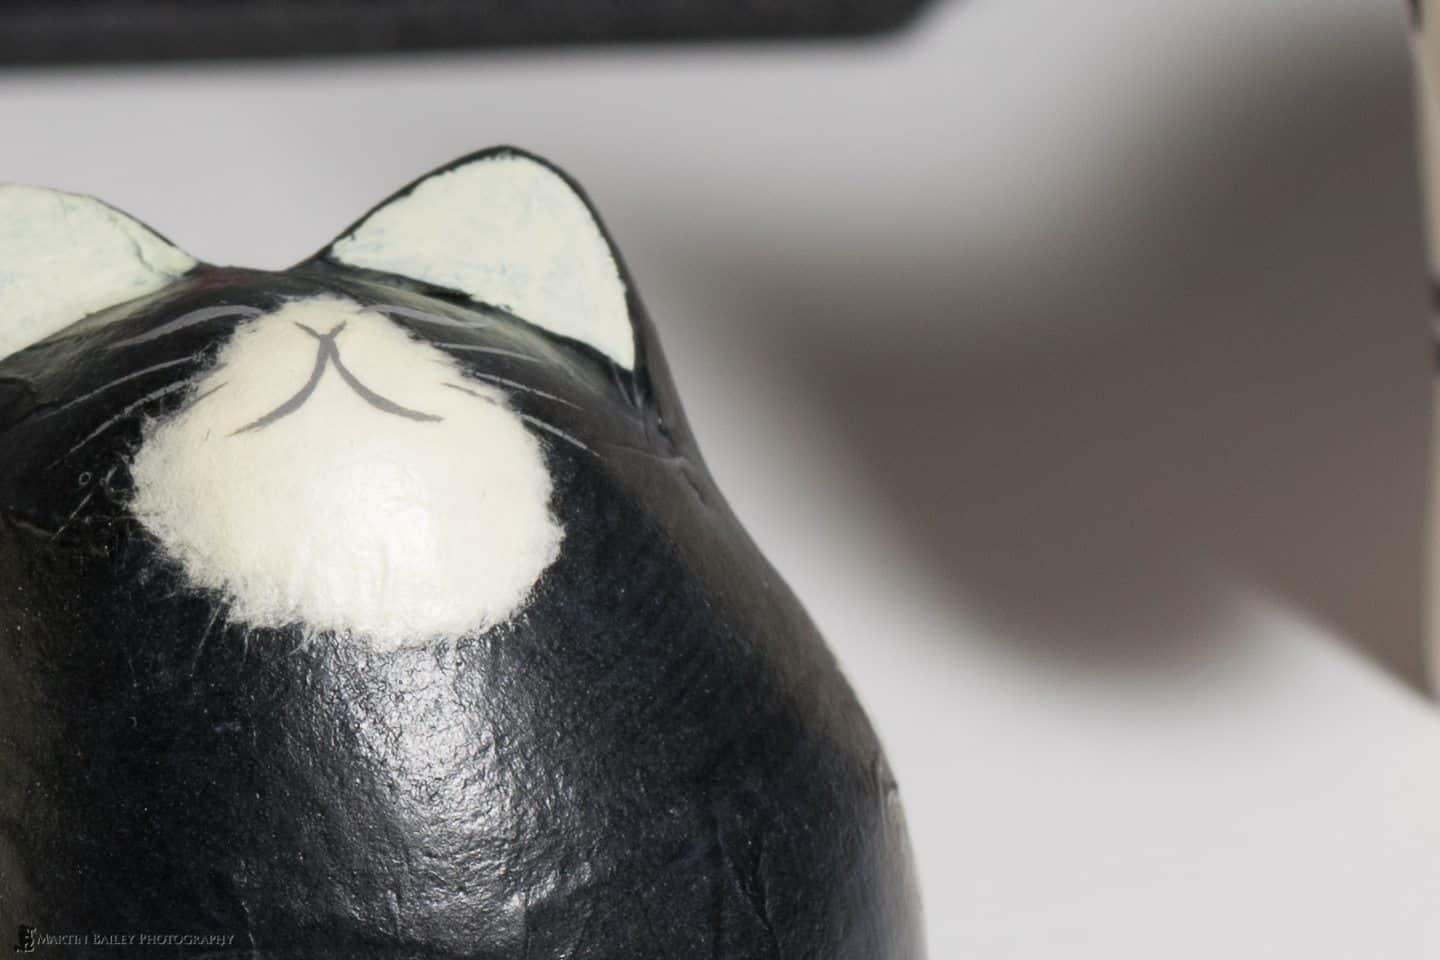
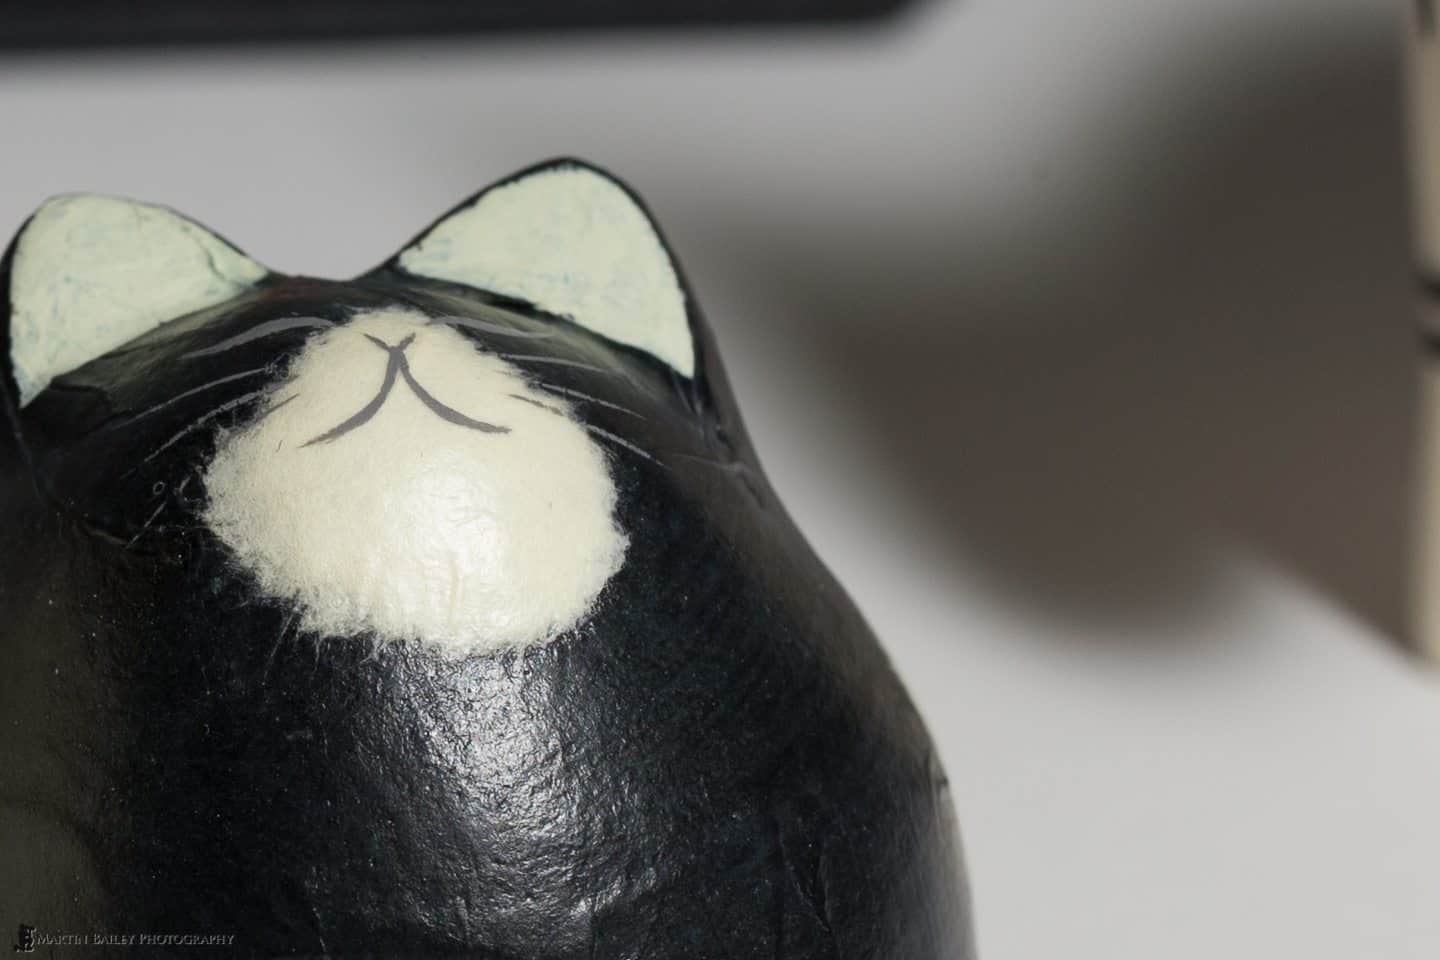
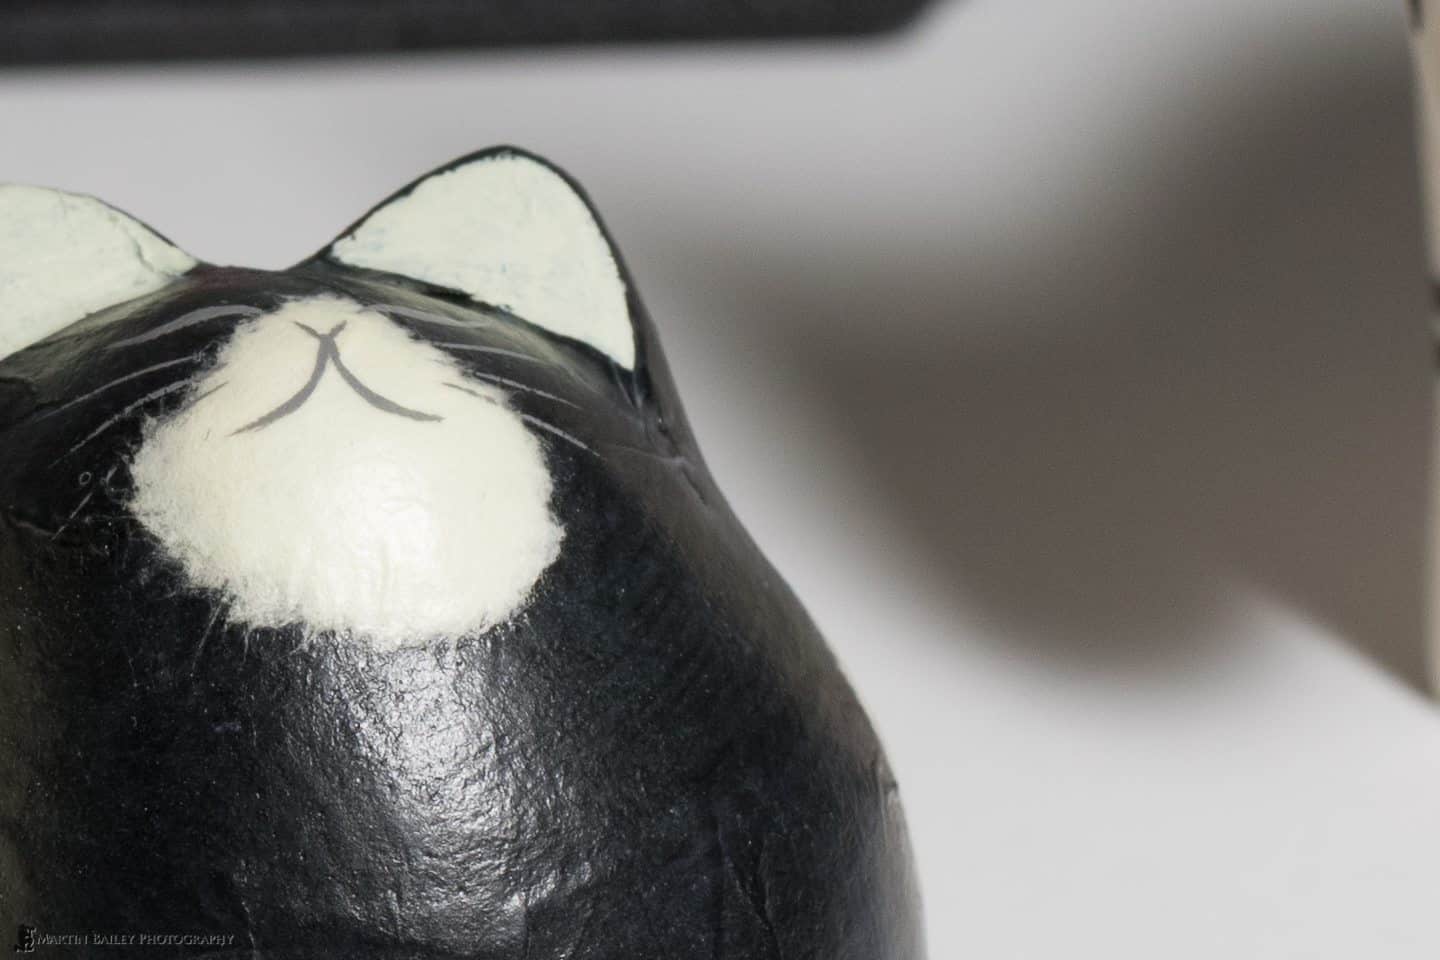

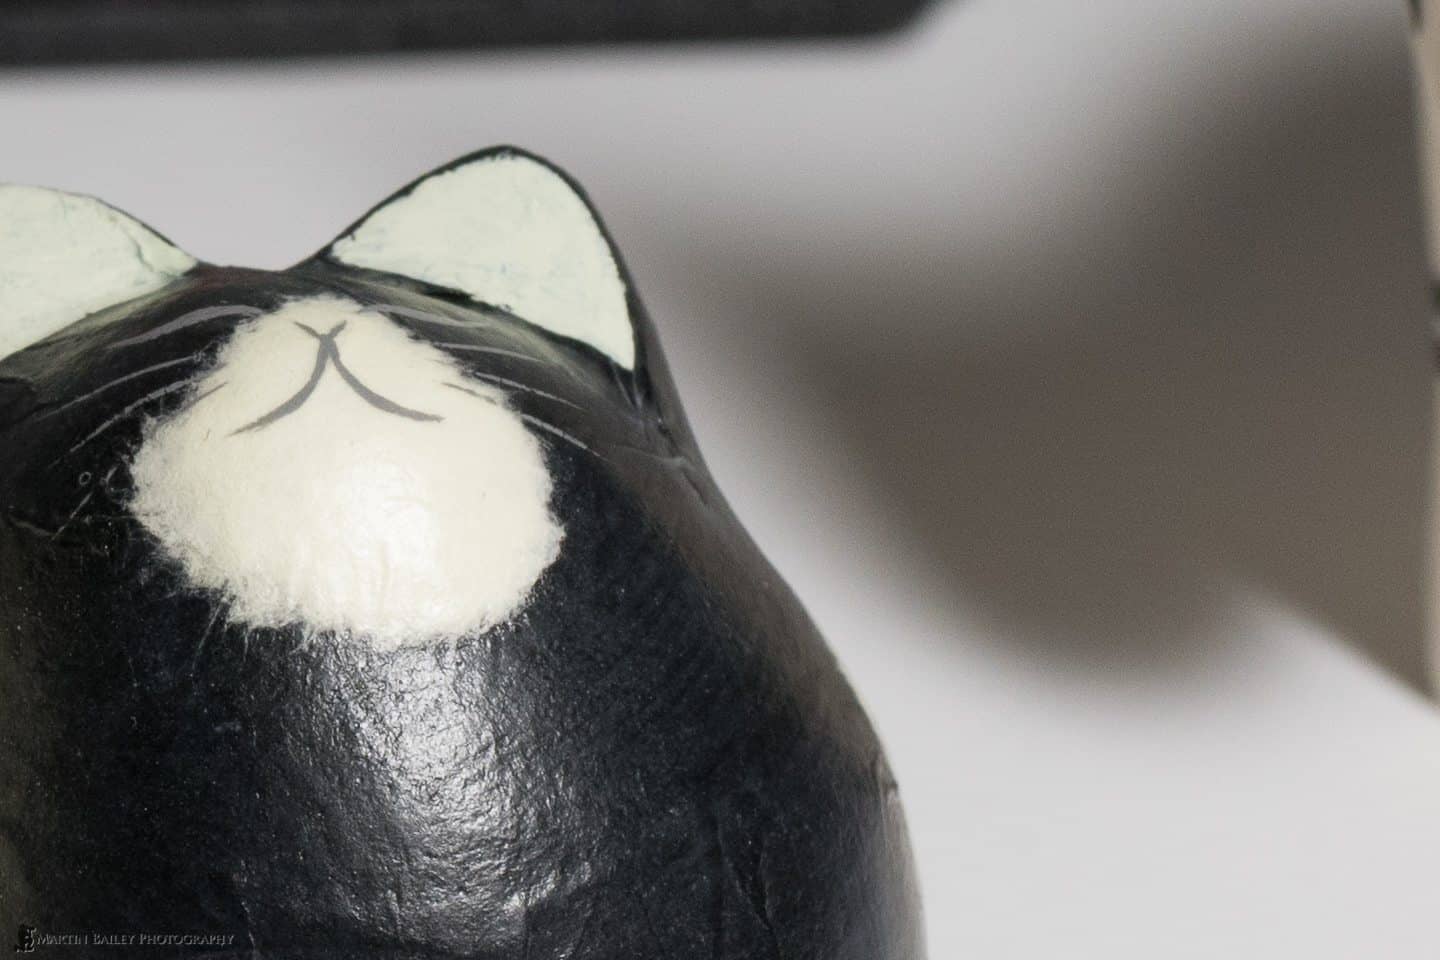

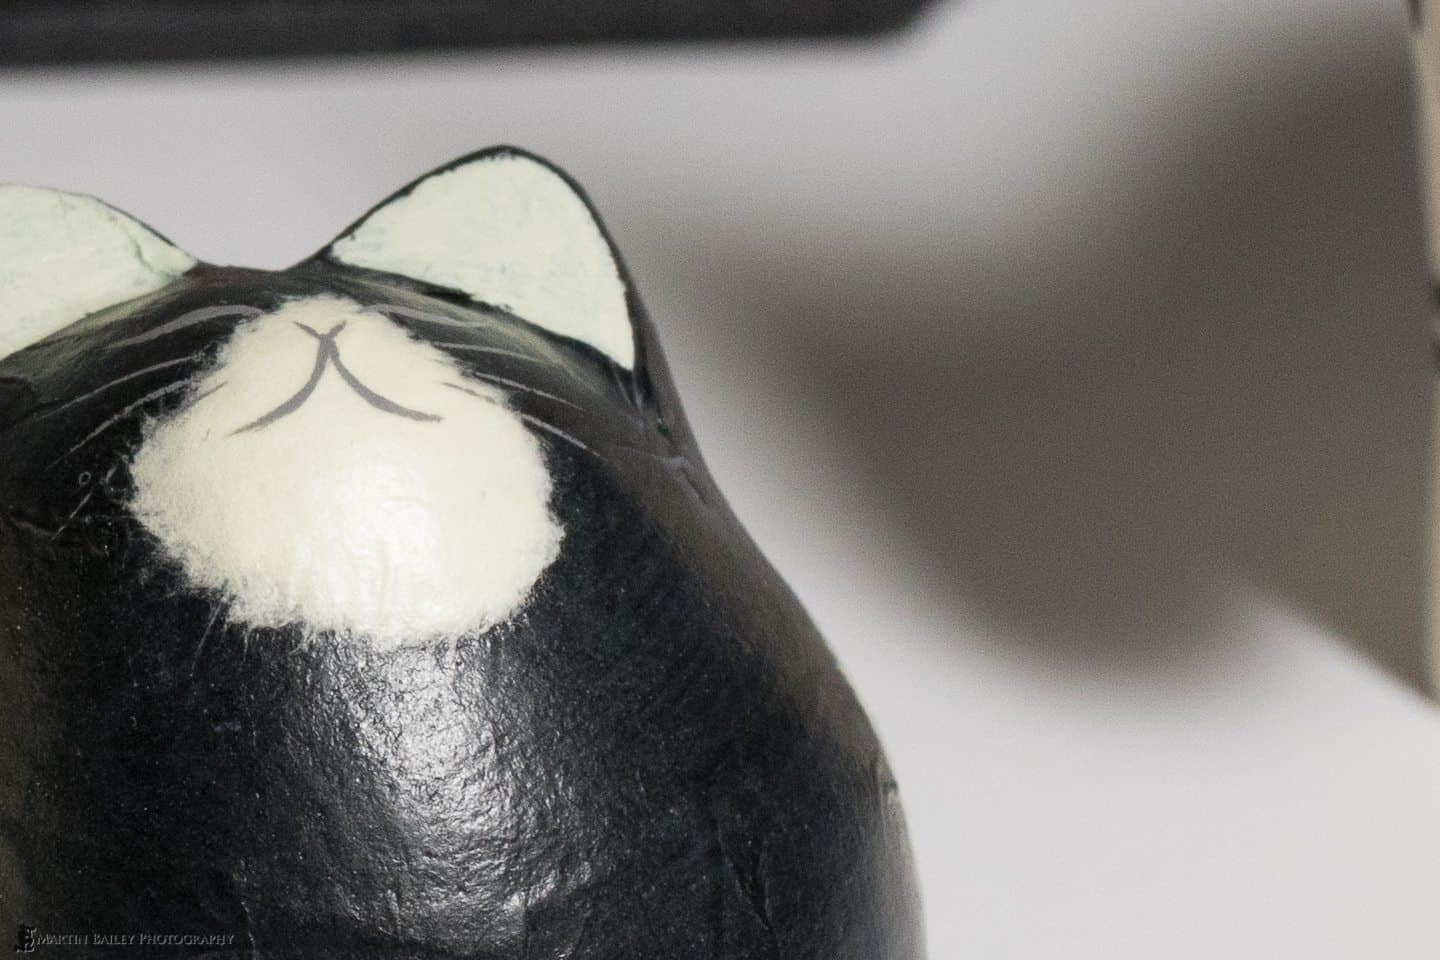

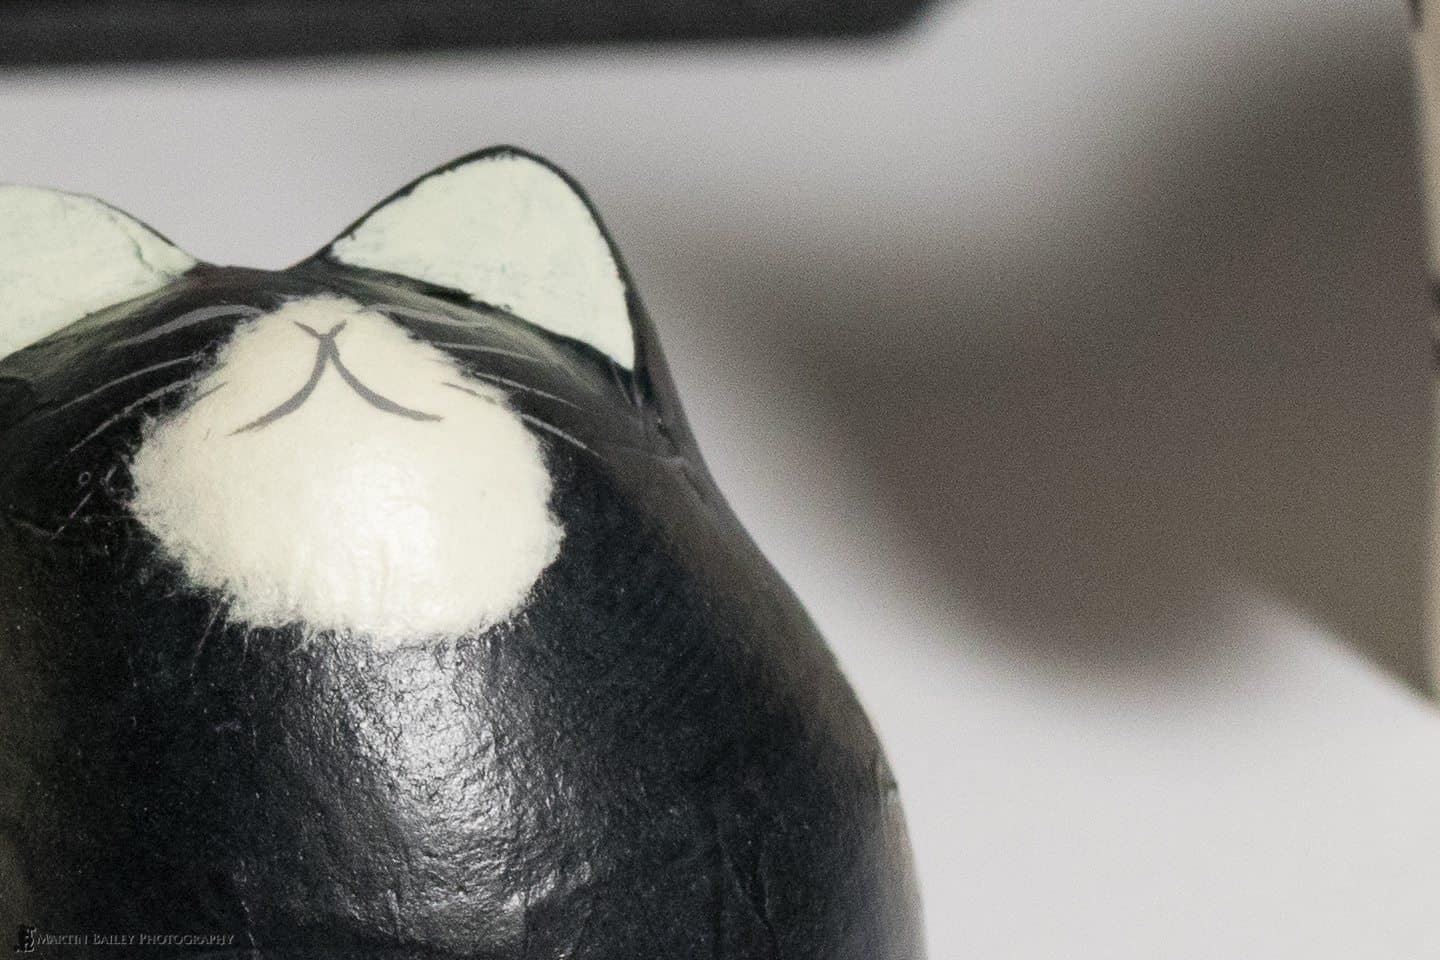

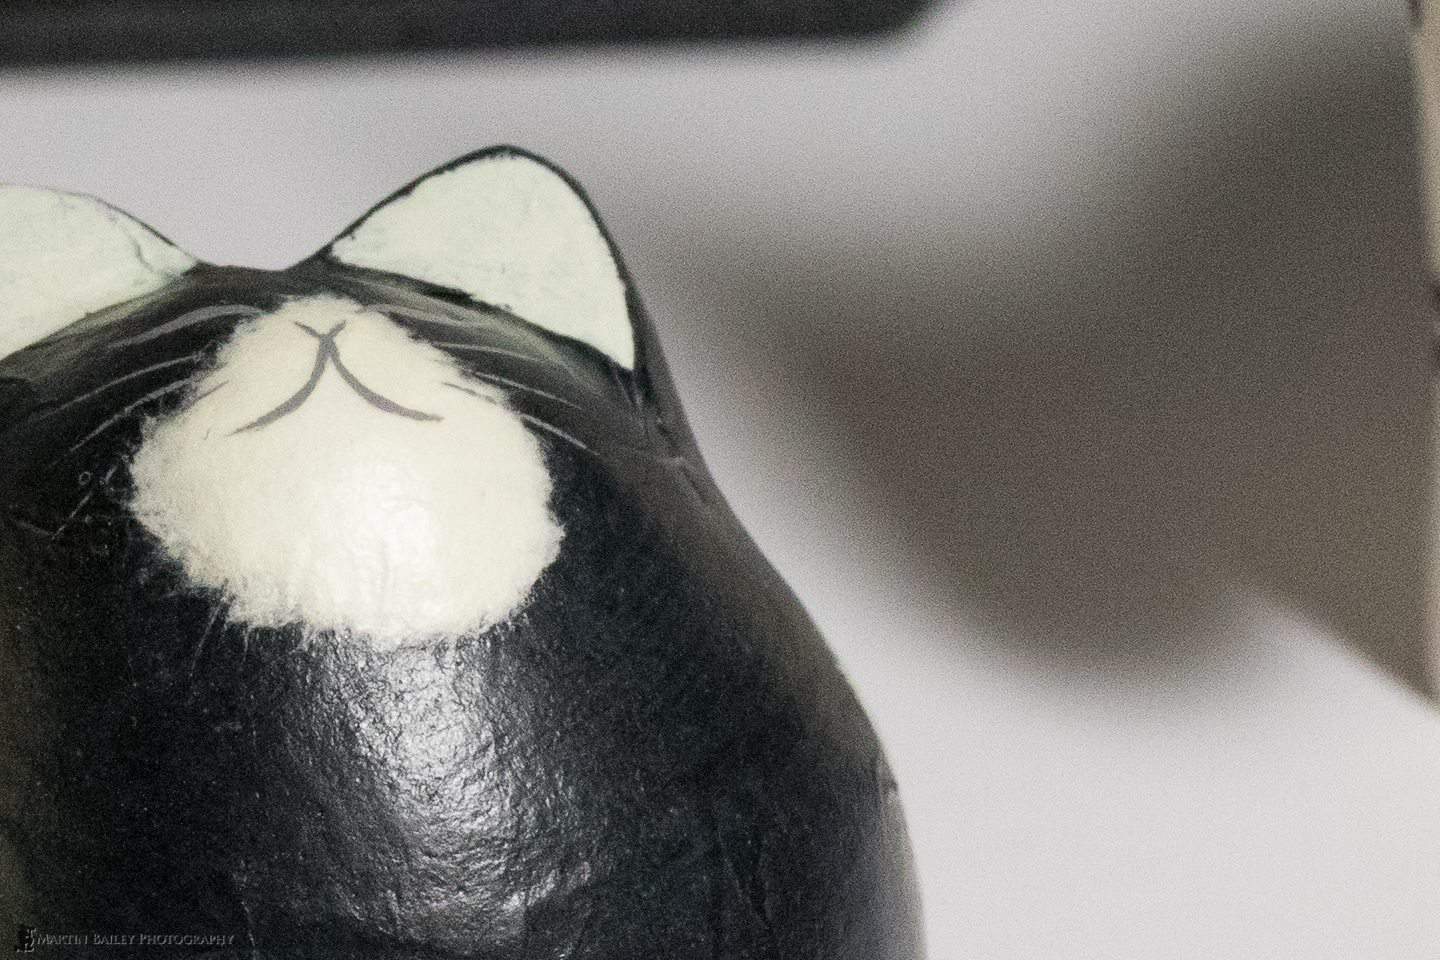
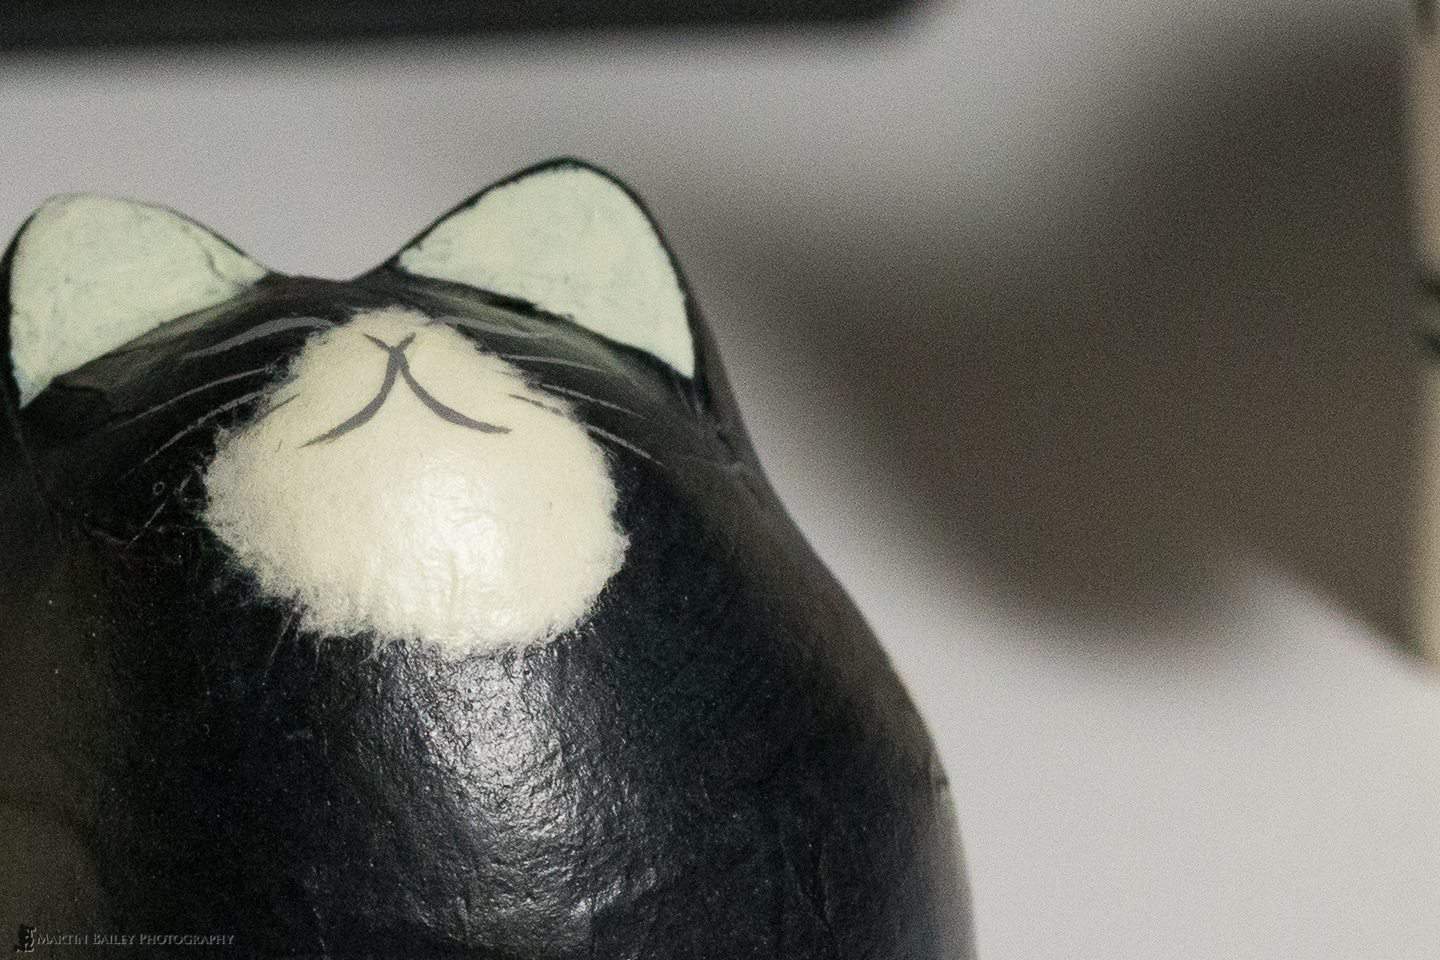

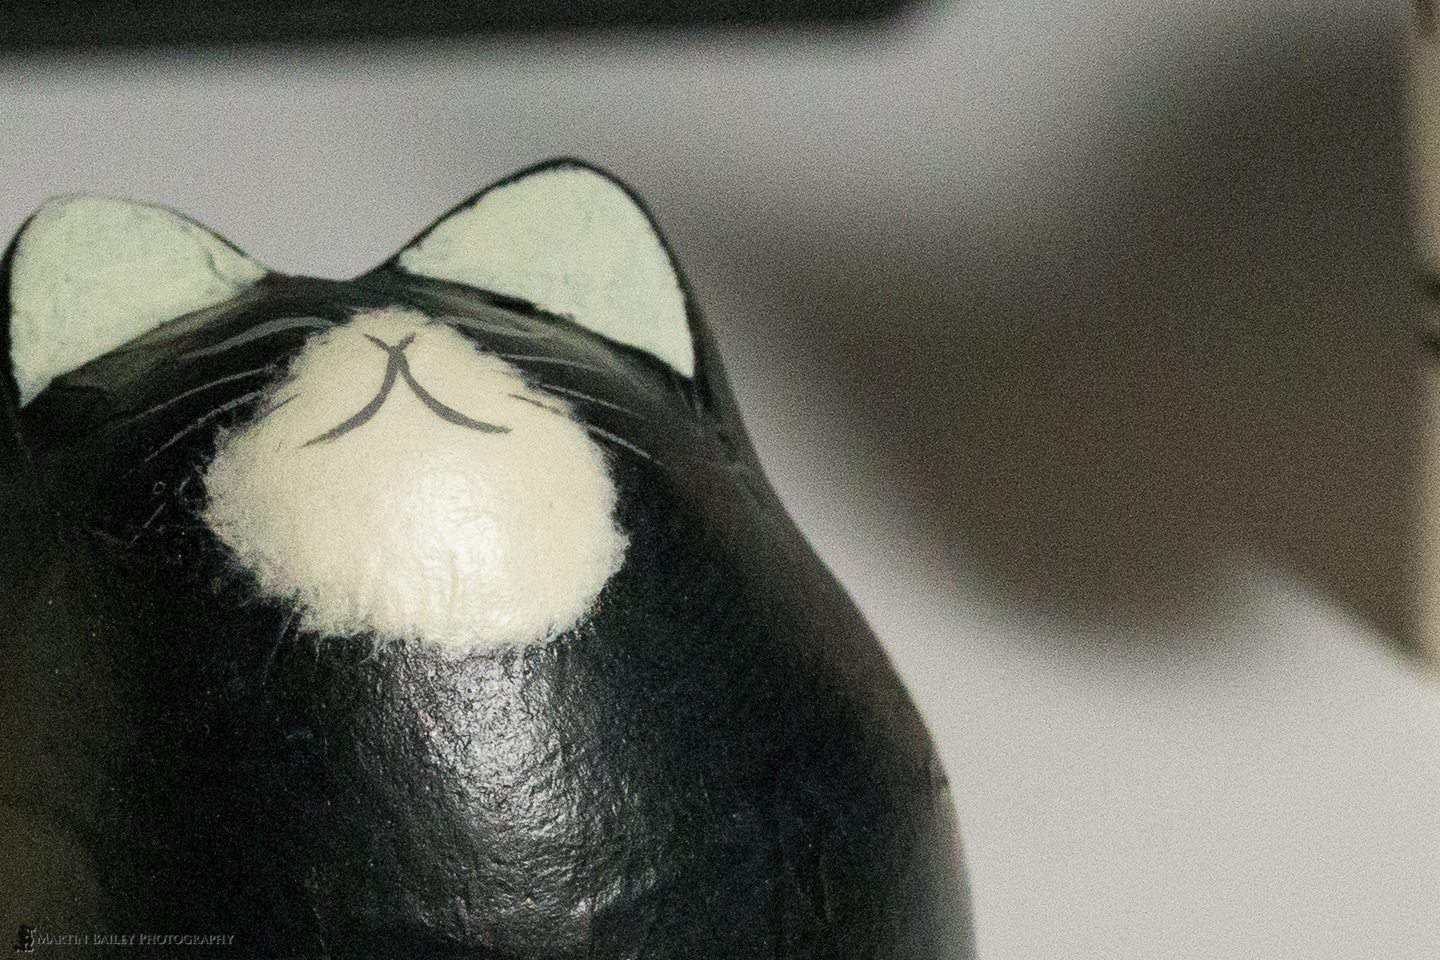
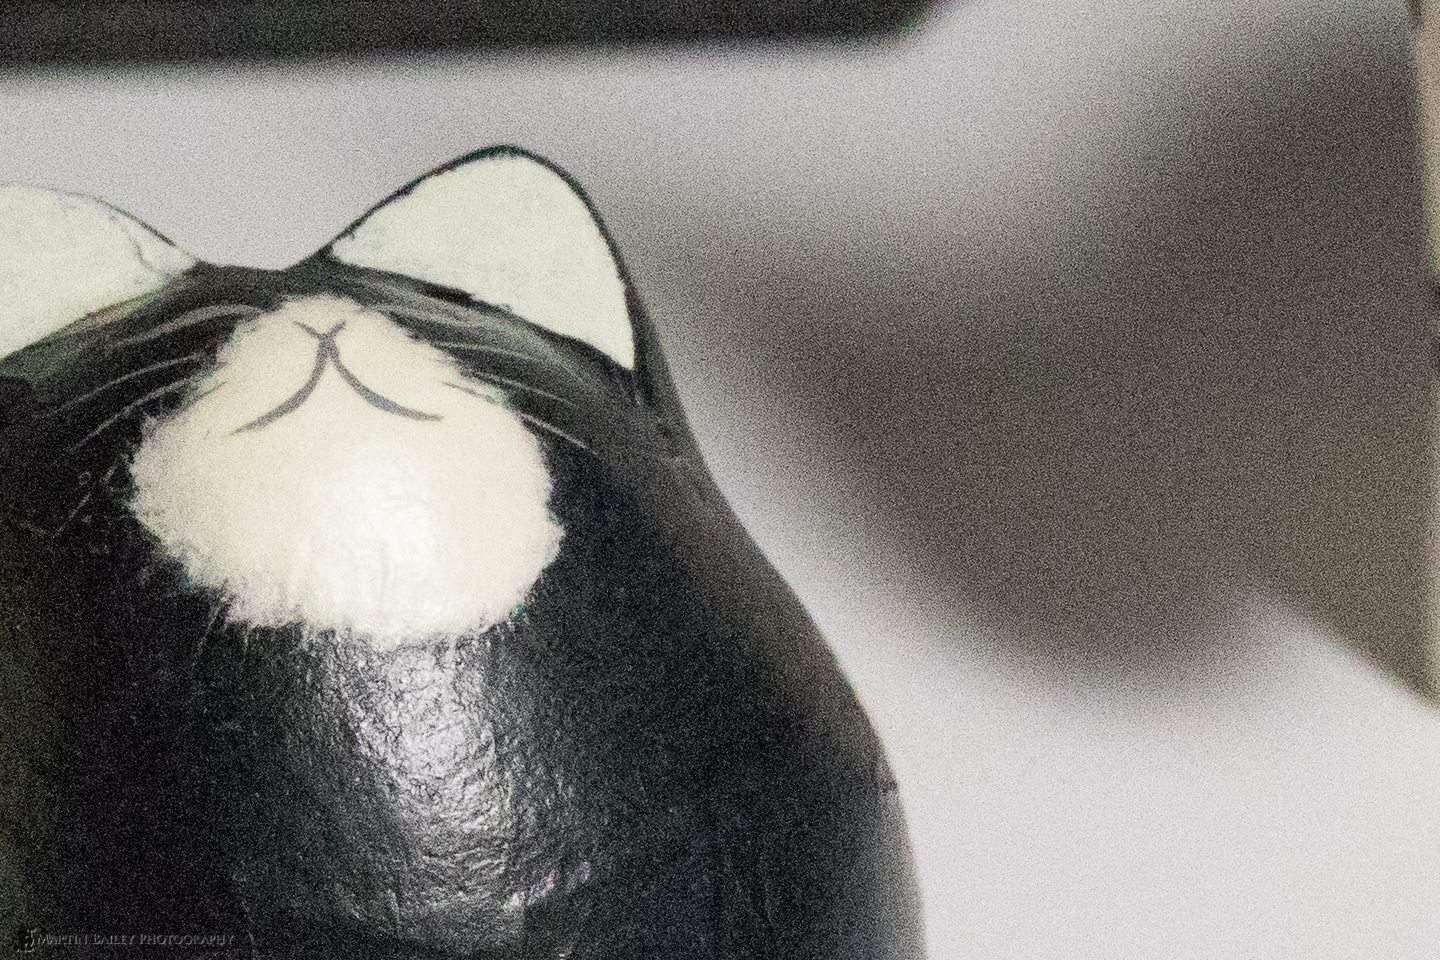

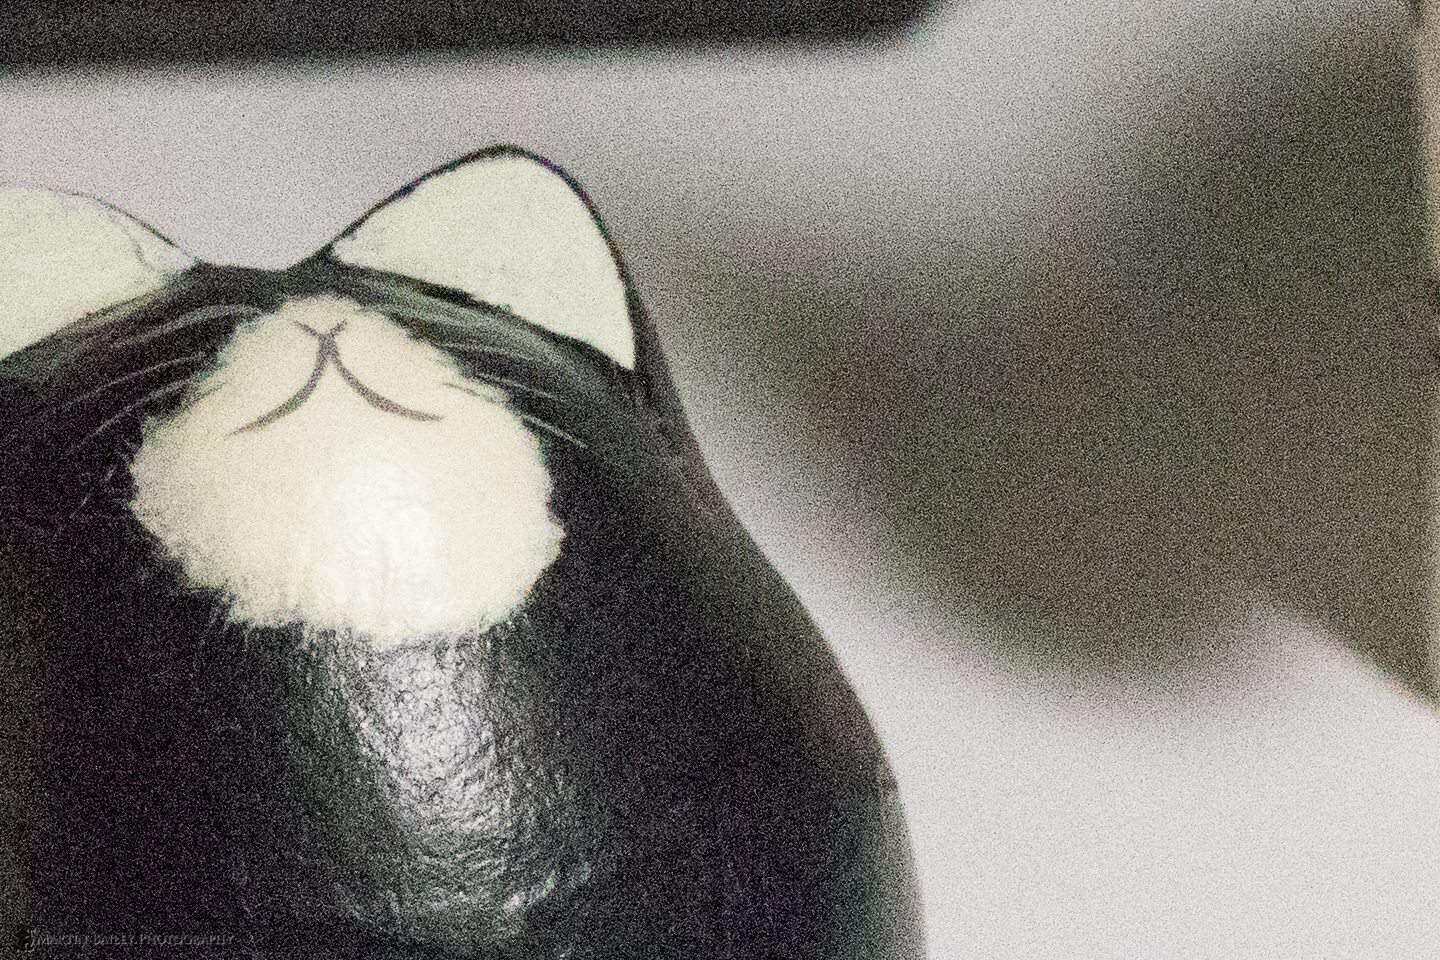
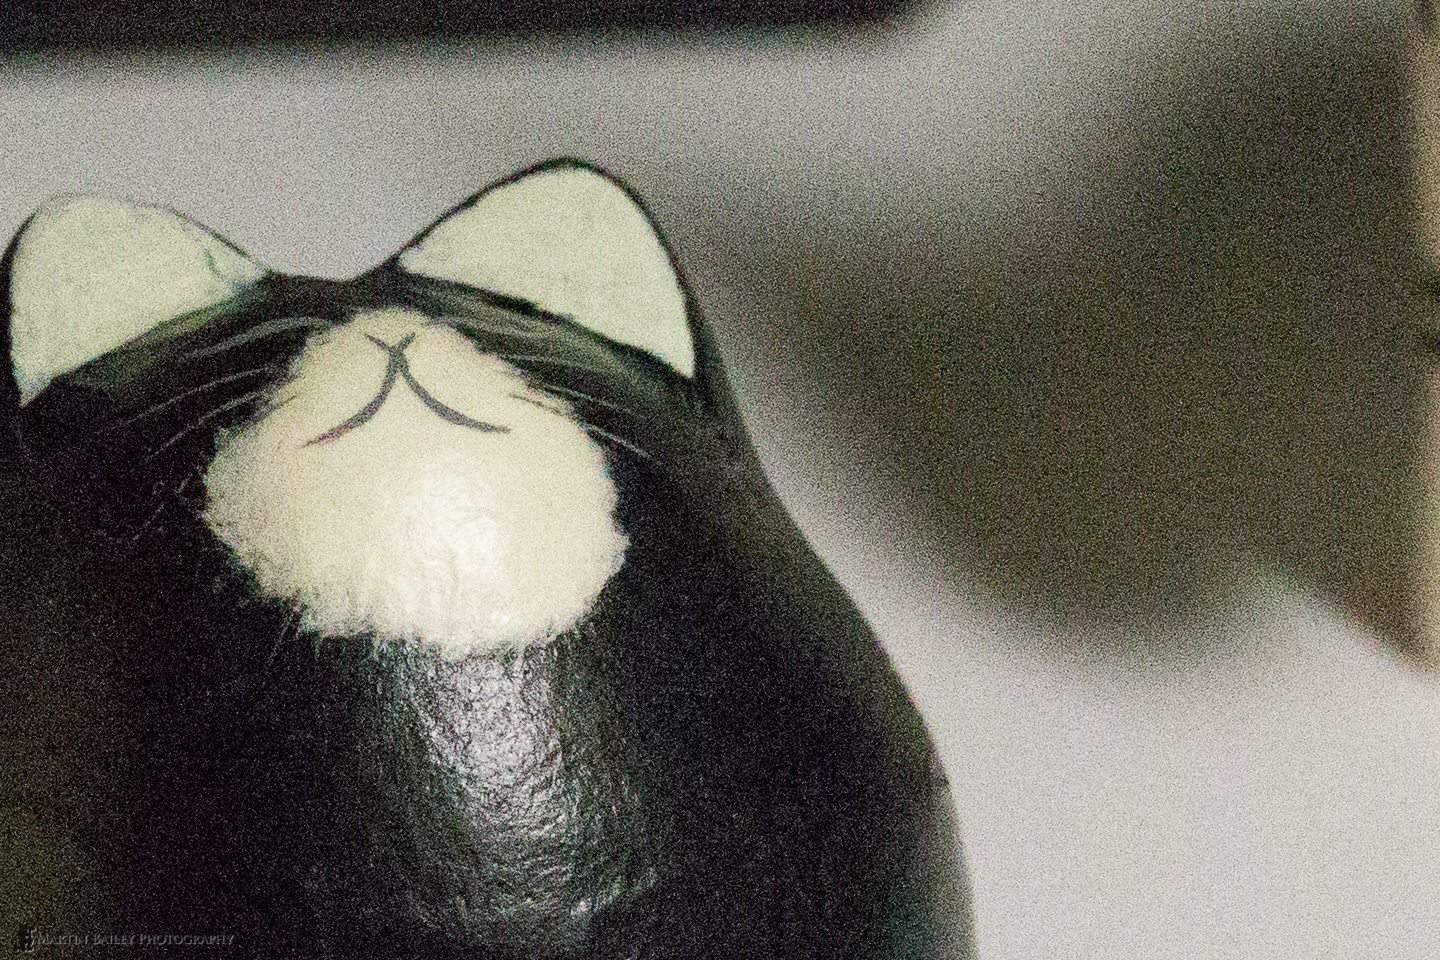
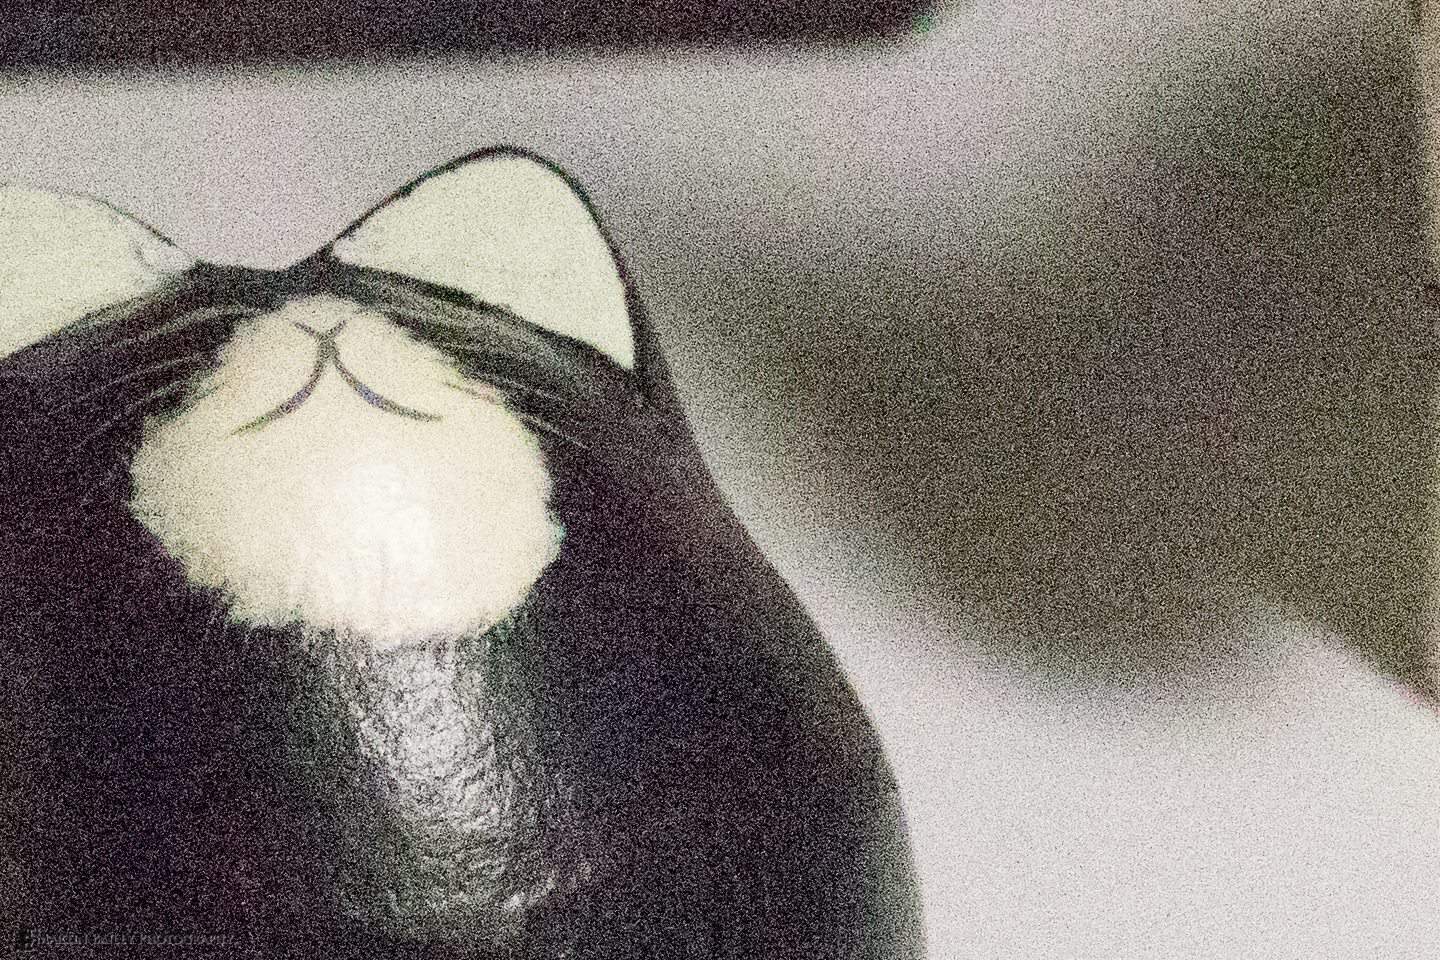


Image Quality Trade-Off
The first thing that I noticed confirmed what I had started to think about the images from the 7D Mark II based on my shooting in the field over the last few months. Basically, the 7D Mark II produces lower quality images than the 1D X, even at the lowest ISO settings. From ISO 100 you can see grain in the 7D Mark II images, although this doesn’t really start to become visible in images from the 1D X until you hit around ISO 400.
Now, let’s not take this information out of context here. We have to keep in mind that the older brother 1D X is 3.5 times the price, and is a full-frame sensor camera. Because of the crop factor and higher resolution, the 7D Mark II’s pixels are smaller at 4.1 µm (micrometer) compared to the almost 1.7 times larger 6.95 µm pixels in the 1D X. (As pointed out below, we probably should have used the area of the photosites here, so the 1D X photosites are 2.87 larger than the 7D Mark II, not 1.7 – thanks Thomas!) There’s no getting around this, as you simply have to cram more pixels onto the sensor to achieve the resolution of the 7D Mark II.
Like everything, it’s a trade-off. Two reasons I’ve been using the 7D Mark II over the 1D X is because of the crop factor which works in our favour for some wildlife photography, and the higher resolution, which is always nice to have if it doesn’t come at too much of a drop in image quality.
And that, is the most important thing to bear in mind here. Yes, the 7D Mark II produces lower quality images than the 1D X, but do I consider that to be a problem? Absolutely not. I’ll continue to use the 7D Mark II for the benefits that it brings to my photography, and at the end of the day, the image quality is still off the charts if you don’t compare it to a much more expensive full frame sensor counterpart. (See some images from the field to back this up in last week’s 100-400mm Mark II lens review.)
ISO Performance Drops Two Stops
Now, back to the ISO performance comparison. To me, it looks like the two stops of performance that starts right down at ISO 100, compared to ISO 400 on the 1D X, holds pretty much through the entire ISO range. Here are the same images as above, but this time I’ve ordered them with ISO 100 on the 7D Mark II next to two stops higher ISO from the 1D X, so we start at ISO 100 vs. 400, then 200 vs. 800 and so on. As we get into the higher ISOs, the shadow noise from the 1D X increases compared to two stops lower ISO on the 7D Mark II, but the brighter areas such as the cat’s face hold out much better on the 1D X.
If we bear this all in mind, as I say, I’m thinking that the 1D X has about two stops better ISO performance than the 7D Mark II. If you recall back to my 5D Mark III review, I found that the 5D Mark III had about one stop lower ISO performance than the 1D X, so it’s right in the middle of these two cameras.
My 7D Mark II ISO Ceiling
With all of my cameras, I like to decide on a ceiling to which I’ll take the ISO, based on tests like these and real-world use cases in the field. With my 1D X, this has in practice been ISO 12800. I have images from the field at this ISO that I am very happy to have been able to shoot, and the image quality is there. With the 7D Mark II, I’ve happily gone up to ISO 3200, and based on these tests will probably go up to 6400 if I need to.
ETTR for Best ISO Performance
Before you jump on your keyboard and start to write me that I’m crazy, or that you don’t see this level of performance from your camera, take a moment to consider that I always Expose to the Right, a technique known as ETTR. I’m not going to delve into this today, but basically, because I expose my images so that the information on the histogram is just about touching the right shoulder, I get better ISO performance from my camera than you will say, if you trust the camera’s meter, and you have a large gap on the right side of your histogram. There’s simply less noise if you expose to the right, even if that means increasing your ISO by a few stops to achieve the brighter exposure. See episode 381 if you’d like to learn more about this.
The Final Verdict
OK, so let’s wrap this up now, with my final verdict on the Canon EOS 7D Mark II. The autofocus doesn’t feel quite as snappy as the 1D X for subjects advancing towards me, although it’s now very acceptable, and the image quality is not quite as good by comparison, but still exceptionally good. These two things are the only even slightly negative aspects. When you consider all the great points about this camera, that we’ve covered in this and my First Impressions review, and then think of the price, at almost a quarter of the cost of the 1D X, I think Canon are on to a winner here.
For many, the 1D X is out of reach, but I honestly don’t think you need to be too concerned about that if this is the case for you. If you need a wildlife or sports camera, don’t want to break the bank, you won’t go far wrong with the 7D Mark II. I have both but I’m sure I’ll continue to reach for the 7D Mark II over the 1D X moving forward, unless I need to literally be able to shoot in the dark, which is where the 1D X still has the ultimate edge. Honestly, the extra reach you get from the crop factor and the higher resolution among other things all make the 7D Mark II in many ways, the better camera.
Either way, I hope you found these reviews useful, and remember, if you buy from our friends at B&H, you can help to support our Podcast and Blog by buying with our links below. And if you feel like splurging, I also mentioned in last week’s podcast, the 7D Mark II and Canon’s new 100-400mm lens are a match made in heaven, so I’ll just go ahead and reuse last week’s widget just in case.
New Fine Art Print Giveaway!
Before we finish, I also wanted to let you know that we have started a new fine art print giveaway draw to win a print of a photo from January’s Hokkaido Landscape Photography tour. Just visit the page https://mbp.ac/giveaway and enter your name and email address to subscribe to our newsletter, and enter for a chance to win. I’ll be drawing the winner on June 14, 2015, and remember that you can enter this draw even if you’ve entered previous draws.
Boat Graveyard #2
Show Notes
Canon EOS 7D Mark II on B&H: Canon EOS 7D Mark II
Subscribe in iTunes for Enhanced Podcasts delivered automatically to your computer.
Download this Podcast in MP3 format (Audio Only).
Download this Podcast in Enhanced Podcast M4A format. This requires Apple iTunes or Quicktime to view/listen.


One small typographical mistake here (which makes a big difference in the ISO performance section). You say the 7D-II can go to ISO 512000 (“Five hundred twelve thousand”). I think you meant 51200 (“Fifty-one thousand two hundred”).
Whoops! Thanks Elliot. I’ll get that fixed.
Hi Martin,
you wrote “pixels are smaller at 4.1 µm (micrometer) compared to the almost 1.7 times larger 6.95 µm pixels”.
Please consider that for collecting the photons the size of surface of the pixels is the important parameter.
The factor in the size of the surface is (6.95 * 6.95)/(4.1 * 4.1)=2.87
Thomas
Yes, I guess that should have been stated in area as opposed to a simple width calculation. Thanks Thomas!
Thanks for the review….enjoyed it. For the price seems like a mighty machine!
You’re welcome Eamon.
You know, I think this camera would still be worth picking up if it was double the price. I’m pleased it isn’t of course, but it’s a lot more than a <$2K camera, for sure.
Thanks for a great review Martin! I am a 1DX shooter as well, and am very close to pulling the trigger on a 7D II, mainly for the tighter framing that it produces with its crop sensor in reach limited scenarios. I would be very interested to see a comparison of say 800, 1600 and 3200 ISO, where the 1DX shots where cropped to match the framing of the 7D II. From an IQ standpoint I would be very interested to know how the two cameras compares in that situation, with the 7D II having the MP advantage (more pixels per area), and the 1D X having better per pixel quality, but at the cost of lower resolution as well as lower effective reach. Is this something you have been looking at and could comment on?
Best
Kasper
Hi Kasper,
I see what you mean. I personally wouldn’t crop that much, essentially cropping an 18 megapixel file down to 10.5 megapixels to get the framing of the 7D2. I can certainly do that test though. I’ve made a note and will get to this soon. Thanks for the suggestion!
Thanks, I will look forward to read your findings. For me, the real question is if the 7D II will offer better overall IQ than a cropped 1DX image in moderate to high ISO shooting conditions. I would speculate that at some point, the better noise capability of the larger pixels in the 1DX would make it the preferable tool, even if that means cropping deeply…
Hi Martin,
Thank you for your practical hands on review. I’m wondering what your experience has been when printing 7Dii files, say to 17×25 or 20×30. How do prints made from the 7Dii compare to prints made from the 5Diii? Are the prints of good enough quality to exhibit and sell?
Thanks.
Mark
Hi Mark,
I haven’t printed any images from the 7D Mark II yet, but I can tell you already that they’ll be fine, as long as your base image is good quality. There are times when the focus isn’t as good as it needs to be, but as long as you check your images before printing and select sharp shots, they’ll print beautifully. Even the slightly higher grain will not be an issue, as grain seems to show up less in prints than it does on the screen.
BTW, even for a 5D Mark III image, if I am going to print at 20×30″ I use onOne Software’s Perfect Resize to upsize the image first. Images start to get a bit soft at 20×30″ if you don’t give them a bit of a hand, and that will be the same for the 7D Mark II of course.
I hope this helps some.
Thanks, Martin. I still rely on LR to upsize for me but at some point I guess I will take a look at specialized upsiing software.
If you turn on the Dimensions under Guides in the Print module, and then uncheck Print Resolution under the Print Job panel, you’ll see how much resolution you really have for print in the top left corner of the image. If this drops below 200 ppi, start to think about resizing in something like Perfect Resize. If it drops down to 150 ppi, you really need to do something rather than letting LR upsize for you. I did some tests a few years ago, and at 20 x 30″ 21 megapixel files were quite a bit softer. They were still OK, but much better if you upsize before printing. The cool thing is though, you can still print up to 24 x 36″ etc. with just a 10 megapixel file if you have to, as long as you upsize first.
I’ve never looked at this before, so thank you for the information. I ran a few tests and found that with a file that LR Metadata shows at 18.7 meg, at 20×30 the ppi is only 160. With my full frame Canon and an image that metatdata reports as 35.3 meg, the ppi is 194. I’ve never printed 20×30 with the smaller camera but the larger files have been acceptable to me. Perhaps because at 20×30 the normal viewing distance is 3 feet or more? Anyway, you’ve made me curious so I will now take a look at this specialized software.
Thanks again.
If your image is reporting that it’s 35.3mp then you’ve already done some upsizing. No Canon cameras at this point in time have that much resolution natively, unless it’s a stitched image of course. If you upsized in Adobe Camera Raw, then you are not really increasing the quality of the image, so it’s kind of a false economy. You’d really need to go back to your original file and upsize specifically for print to get a sharper final print. If you are happy with the results with your current workflow though, then there really isn’t anything to worry about. 🙂
Martin,
Thanks for the great 7D II review, especially the AF parameter details. What AF area selection modes do you use in various situations? Maybe overall AF on 1DX, 7D II, and 5D III would make a good podcast?
thanks also for your many years of podcasts,
Alan Lillich
Thanks Alan!
When using AI Servo I generally use the [AF] mode, or the ring of fire, rather than a [SEL] mode. I thought I included this above, but I can’t find it so obviously didn’t. 🙂
I’ll certainly consider doing an episode all about AF. It would be useful.
Great review. I have a 1dx for sports photography but it is too darn heavy for recreational shooting. Think about the 7d mkii for this and to use as a second camera on sports shoots.
Thanks James!
The 7D Mark II would certainly fit the bill, especially with the crop factor. I actually sold myself 1D X to put the money towards a second 5Ds R. I’ve kept the 7D Mark II as a backup, in case the 5Ds Rs that I now mainly shoot with can’t quite handle the wildlife work that I do. The 7D2 is an amazing camera for its size and price.
Hi Martin, just bought a 7d Mk ii, do you have any recommendations or suggestions as to how I should set up the camera initially?
Love all your photos you ve posted on your workshops in Japan.
Hi Denise,
I usually make the following changes with all cameras that I buy, by default. These are in the order that they appear on the settings screens.
Change the Release shutter without card option to OFF.
Change the Color space to Adobe RGB
Grid display = 3×3+diag
Expo. simulation = Enable
AI Servo 1st image priority to Focus (right side)
AI Servo 2nd image priority to Focus (right side)
One-Shot AF release prior. to Focus (right side)
Highlight Alert = Enable
AF point disp. = Enable
Histogram disp = RGB
Auto rotate = On for Computer only (second option)
Viewfinder display – Viewfinder level = Show
Viewfinder display – VF grid display = Enable
Viewfinder display – Show/hide in viewfinder = All ON
Copyright information = fill in your details, or do this on the computer via the EOS Utility
Multi function lock – Main Dial = ON, Quick Control Dial = ON, Multi-controller = OFF, AF area select level = ON
Under Custom Controls, I stop the shutter button from focusing, so that only the back AF-ON button will activate focusing, but this is a bit of an advanced technique that you might want to steer clear of unless you know what it means.
Also under the Custom Controls, I change the Multi-function button so that it Cycles between various settings (the right-most option).
And I change the Set Button to Mag/Reduce (press SET, Turn main dial).
Finally, as I mention above in the post, I add the Tracking sensitivity, Accel./decel. tracking and AF pt auto switching to My Menu, and set the first two as above. For AF pt auto switching I’m now generally setting that to zero.
I hope this helps, and thanks for the kind words about my Japan workshop photos. 🙂
Martin.
Hi Martin, I bought this camera recently, I am a not a professional (I previously worked with the 450 D) and have been trying to focus on my cat running towards me in the garden using the AI Servo of the 7d mark II in combination with the 100-400 II lens. Even by using high shutter speed I am not able to freeze the action and do not get sharp pictures for this kind of action. I have tried different focus points settings. Should I exactly copy the settings you used for the monkeys or would you have other suggestions ? Thanks
Hi Lieve,
The lack of sharpness could be caused by a number of things. To freeze a cat running at speed you’d probably need around 1/1000 of a second shutter speed. Are you setting it that high?
Also, are you using a very wide aperture? You might need to stop down to f/8 or f/10 if you are zoomed in a little. The more you zoom, the shallower your depth of field gets.
The settings I show above should be good, but set AF pt auto switching to zero instead.
Also, ensure that you have the focus mode set to [ ] AF and not a SEL [ ] mode, when looking through the viewfinder or on the top LCD. First press the button on the top right of the back of the camera, next to the AF-ON and * buttons, and then toggle through the AF modes using the M-fn button until you see [ ] AF. You should then be able to start to focus with the center focus point, but the camera will then automatically track using all of the focus points as you track your cat around.
I hope this helps.
Martin.
Thanks Martin, yes I had previously taken pics at even 1/2000 shutter, when the animal is not running straight to the camera I have much more good shots, I took some quick shots today and adapted to your settings, it was not a bright day today so had to increase ISO quite a lot if wanting to come to f/8 in M but same, I have the impression the focus system is strangely enough not quick enough in focusing, the cat quickly coming closer quite fast. Still photos are OK, very strange. May give it another go on a bright sunny day but it is quite worrying.
Lieve
Hi Lieve,
For sure, an animal running straight towards the camera will be the most challenging to capture. You’ll probably find that you need an even small aperture, so increasing the ISO and waiting for more light is probably the way to go. Also consider some off-camera flash as it sounds like you are in a relatively controlled environment. Flash will freeze motion much better than a fast shutter speed, although you’ll need to keep it natural looking.
Regards,
Martin.
Ok will give it another try on a bright sunny day,thanks Martin
Great detailed review…loved it…
I have 60D + 400f5.6L…using for almost 4 years…I’m considering to upgrade to 7D M2…I do a lot of bird photography and most of the time the light is challanging…
I want to know your view on 7D M2+ 400f5.6L USM combination…as you know it’s a lens without IS but otherwise an amazing glass…please comment…It will surely help me to improve my photography…
Thanks.
Regards.
Hi Swapnodeep,
I’m pleased you enjoyed the review.
I can’t really comment on the 7D2 with the 400/f5.6L as I’ve never used that lens. The 7D2 is only 2 megapixels higher than the 7D though, so I can’t imagine the quality of images dropping much, if at all, from using the lens on the 7D2. If you are happy with it now, you’ll probably be equally happy with it on the 7D2.
Regards,
Martin.
Thanks a lot Martin for your prompt response. I’m upgrading my 60D and I’m now more confident that 7D2 will give me an edge in low light situations over 60D where I could not use over ISO 800 for a decent photograph.
Regards,
Swapnodeep