I was thinking about hyperfocal distance recently, and wondered how long ago it was that I did my original podcast on this subject. I checked this morning, it was almost eight years ago now, so I decided to cover this subject again today. Much of what I said back then holds true of course, but I also recalled making a diagram last year that really helps to understand hyperfocal distance, so we’ll take a look at that as well today.
Although I love to use shallow depth-of-field, with the foreground and background out of focus, often for landscape work it’s nice to get everything in focus. This is what’s known as pan-focus, and can be achieved by setting your focus to what’s called the hyperfocal distance, as I’ll explain.
Avoid Diffraction
It’s tempting of course to just stop your aperture down as far as it will go, and try to increase your depth-of-field so much that you think everything will be in focus, but that’s not really the case. Diffraction will get in the way. Diffraction is what happens to light when it travels through a small hole. As the light comes out the other side, it spreads out, and the result is that if you stop your lens aperture down too much, the entire image starts to get soft and slightly out of focus. This, of course, defeats the object of stopping down to make everything sharp.
The aperture from which you will start to see diffraction kick in varies from lens to lens, but generally, it will start from around f/16, and by f/22 really start to become a problem. If you are a Canon shooter and need to remove diffraction from an image, there is a tool in Canon’s Digital Photo Professional called the Digital Lens Optimizer. As much as I dislike Digital Photo Professional, this can be a very powerful tool if you simply must stop down to f/16 and beyond to achieve the depth-of-field necessary for your image.
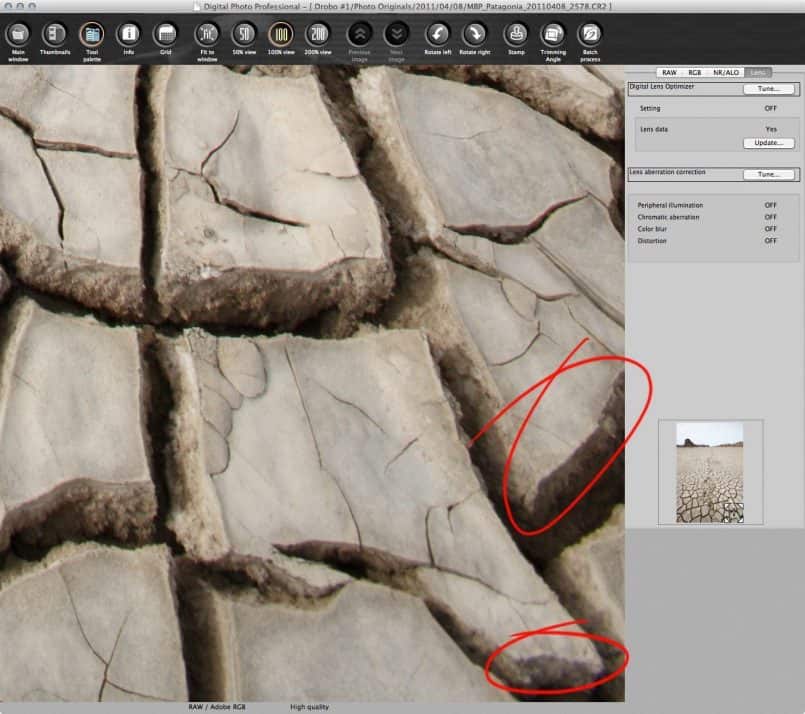
The Digital Lens Optimizer basically takes all of the information available from the computer design processes as Canon develops their lenses, and reverse engineers things like diffraction and chromatic aberration, basically realigning the image data to form a much cleaner image. As an example, here is a closeup of the bottom right-hand corner of a photo that I shot at f/16, but at f/16 my 16-35mm lens starts to get a little soft from diffraction and suffers a little from chromatic aberration in the corners.
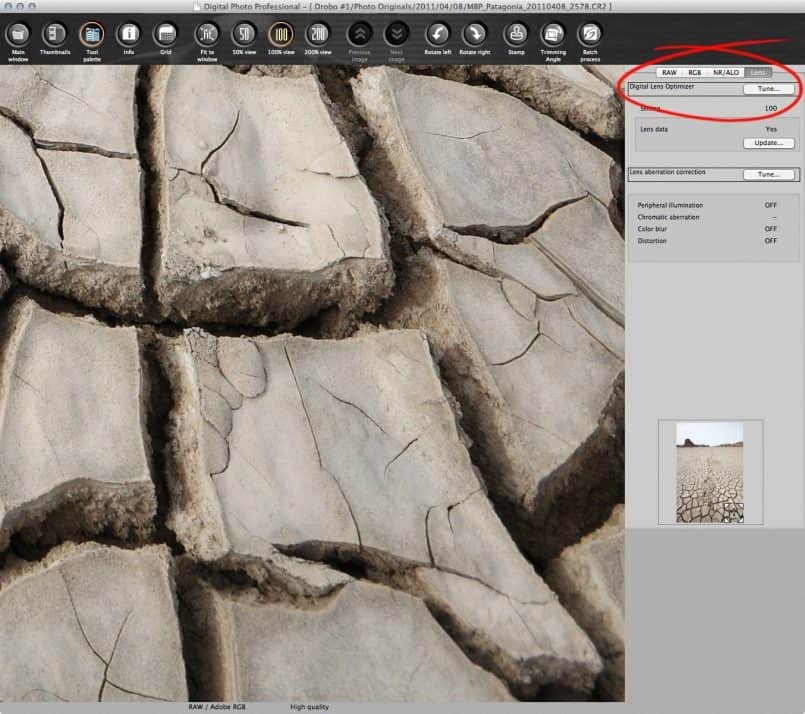
Click on the images to view larger, but you can see that once the Digital Lens Optimizer is applied (below), it sharpens up a lot, almost completely removing the affects of diffraction, and the chromatic aberration that I circled in the left image disappears.
You can remove chromatic aberration in Lightroom’s Lens Corrections panel too, but the ability to remove the affects of diffraction when you have to stop down to a small aperture is worth noting if you’re a Canon user. In reality, I dislike Digital Photo Professional so much, that I rarely use this tool, but it can save you if you absolutely must stop down to f/16 and below, to achieve pan focus, even when you are focussing at the hyperfocal distance, which I’ll explain now.
Hyperfocal Distance
There are exceptions to the guidelines I’m about to explain, based on focal length and how close you are focusing, but in general, when you focus your lens on something a reasonable distance from the camera, the depth-of-field, which is the area of the scene that will be in focus, extends approximately one third in front of the point at which you focus your lens, towards the camera. It also extends approximately two thirds into the scene, away from the camera, after the point at which you focussed your lens.
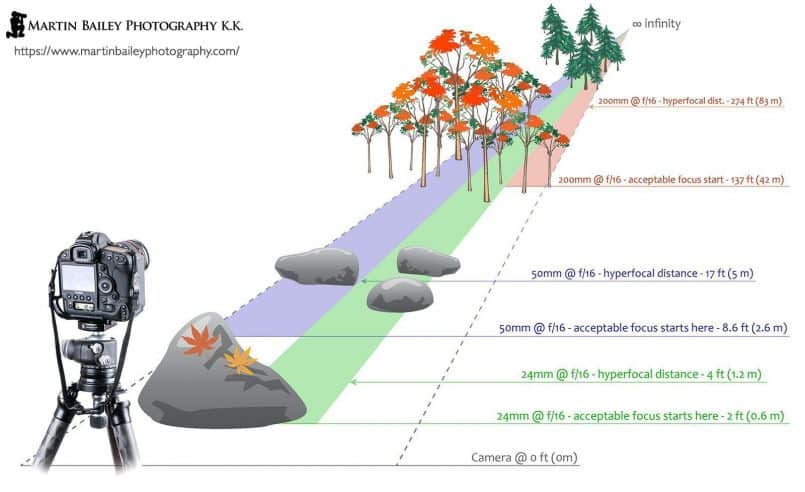
Depth-of-field is of course affected by the focal length of your lens, and the distance to the subject as well as your aperture. Basically the longer the focal length, the shallower the depth-of-field, and the more difficult it becomes to achieve pan-focus. Here’s the diagram that I used to explain this in my Sharp Shooter ebook from Craft & Vision. (Click the diagram to view larger.)
Let’s walk through the examples given. For example if we shoot with a 50mm lens at f/16, the hyperfocal distance is just over 17 feet (5m). That means that if we focus at 17 feet, the depth-of-field, or the area of the image that will be acceptably sharp starts at 8.6 feet (2.6m) and extends to infinity. Some lenses have a distance scale on them in a small window, which you can reference to set an approximate focus distance.
If you use a wider focal length though, such as 24mm, again at f/16, the hyper-focal distance is just 4 feet (1.2m) from the lens, and if we focus at this point, everything from 2 feet (0.6m) to infinity will be in focus. This is literally right in front of the lens, so you can see how much more depth-of-field you can get with wide-angle lenses.
Conversely of course, this means that long telephoto lenses are not really suited for shooting using the hyperfocal distance. As we see in the diagram, at 200mm with an aperture of f/16, the hyper-focal distance is 274 feet (83m) with acceptable focus starting at 137 feet (42m), which is obviously not going to cut it if we want the foreground to be sharp.
Of course, you might not be shooting at f/16, and as I said, I generally try not to stop down below f/14, which I consider my soft ceiling, and f/16 is pretty much my hard ceiling for aperture settings. I only use a smaller aperture than that when I really have to, such as to achieve a longer shutter speed. I never go smaller than f/16 for depth-of-field, unless I commit myself to using Canon’s Digital Lens Optimizer.
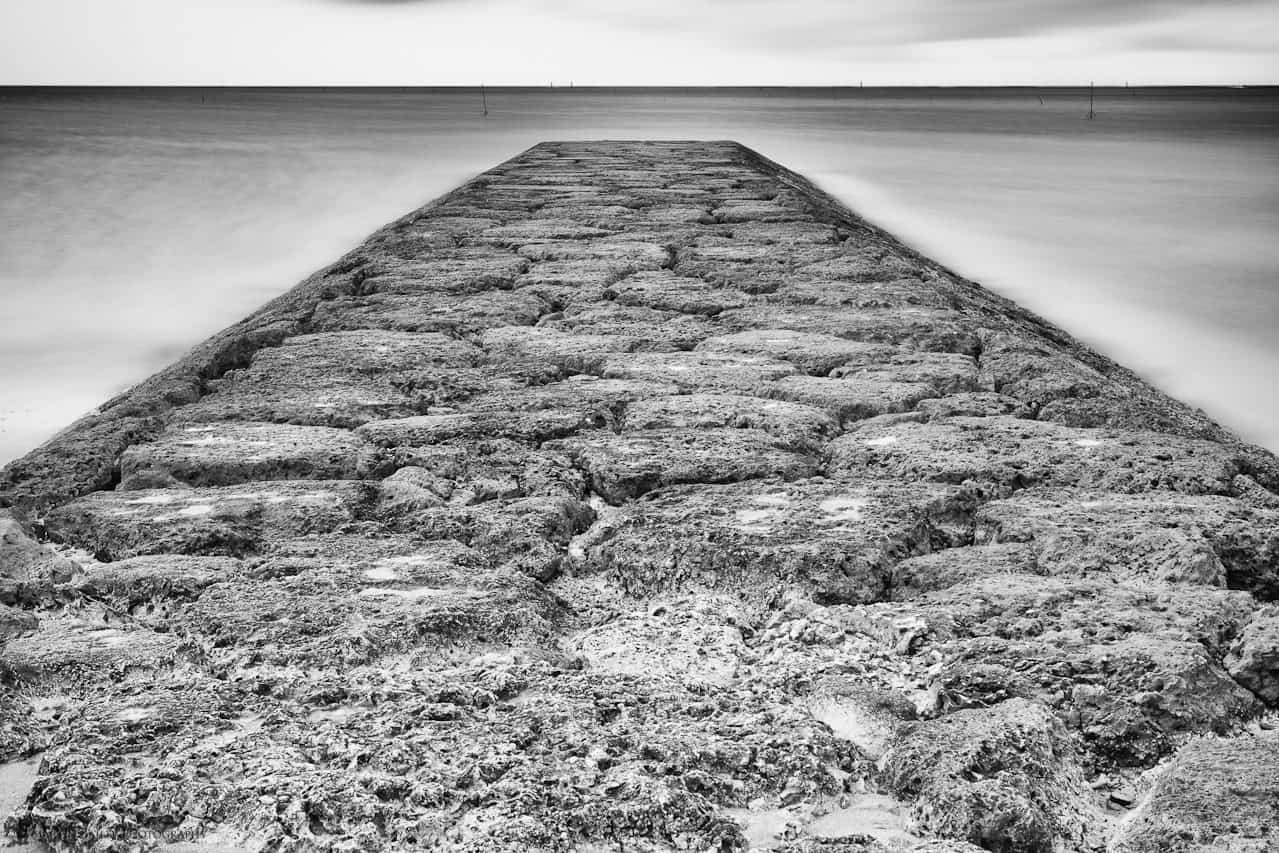
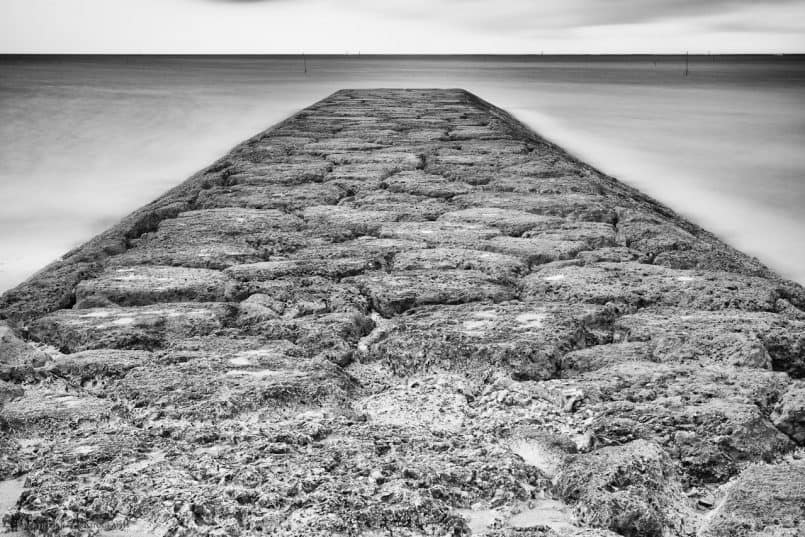
For example, for this photo (above) shot in Okinawa a couple of years ago, because I was shooting at 50mm, I needed to stop down to f/22 to get everything in focus from three or four feet out to infinity. If I recall, I bit the bullet, and made a mental note to clean this up with the Digital Lens Optimizer later, and it worked out pretty good. As I’ve mentioned before, most rules are really just guidelines. The trick is knowing what tools you have in your toolbox and using the right ones at the right time.
Calculating Hyperfocal Distance
OK, so we’re going to geek out a little bit here, as I explain how to calculate the hyperfocal distance. Don’t worry though. You don’t need to remember this. There are calculators for that, but let’s just walk through this to be thorough.
So, to calculate hyperfocal distance we have to first know the size of the circle of confusion, and this is often based on an image being printed out at 8×10 and viewed from 2 to 3 feet. Confused? OK, so the Circle of Confusion is basically the smallest recognizable dot that a lens can create. This is literally the tiniest little dot that can be created when the lens is perfectly focussed.
Once the focus shifts in front or behind the dot, or if diffraction kicks in, the dot starts to spread out and become blurred. What this means is for an image to be in focus, the light cannot spread out any more than the size of the circle of confusion. Once that happens, it appears blurred. This is also how we get that beautiful bokeh in our images.
So, how big is the circle of confusion for a DSLR camera? Well, for a 35mm full frame camera, it’s generally 0.03mm, and for crop factor cameras is generally around 0.02mm. You can probably find your camera in the list over at the Dofmaster web site where they have a great online hyperfocal distance calculator.
OK, so here’s the really geeky bit. Once you know the size of your circle of confusion, to calculate the hyperfocal distance, you divide the focal length to the power of two, by the aperture, multiplied by the diameter of the circle of confusion.
Let’s say we’re going to be shooting at 35mm, 35 to the power of two is 1,225. If we are working with a circle of confusion of 0.03mm, and an aperture of f/16, we need to multiply 16 by 0.03, which gives us 0.48. Then divide 1,225 by 0.48 to get 2,552. As this is currently millimeters, if we divide that by 1000 we get 2.552 meters, or 8.37 feet, which is the hyper-focal distance.
Now, if you intend to print out your images larger than 8 x 10 which is used to calculate the circle of confusion, you would actually need to calculate your hyper-focal distances differently, but as a general guide these calculations are fine, and this is what most hyperfocal distance and depth-of-field calculators use as a base.
On that, I know this is going to sound like a blatant plug, but when I’m out in the field, and need to calculate hyperfocal distance, I generally use the calculator built into the MBP iPhone app. I need to get a few things updated in the app, but the depth-of-field and hyperfocal distance calculator are the easiest to use and understand that I’ve used. You literally just have to select your camera, focal length and aperture, then tap the Hyperfocal Distance panel in the bottom left of the screen, and the Subject panel will show you the hyperfocal distance. It’s as easy as that.
Hyperfocal Distance Rule of Thumb
Although I use my app in the field quite often, and it’s great to learn about hyperfocal distance, once you have an idea of how your lenses work at various focal lengths, you don’t have to get the calculator out every time you want to shoot at the hyperfocal distance.
For wider focal lengths, I often just stop the lens down to between f/11 and f/14 and focus about a third of the way into the scene. For very wide-angle lenses I literally just focus on the foreground, and this is usually enough to give me good depth-of-field in my images.
Of course, even when we use a calculator and get the exact distance to focus on for pan focus, you aren’t going to pace out the distance and focus exactly at that point. I do use the scale on the barrel of the lens for the lenses I own that have this scale, but many zoom lenses don’t even have this, so you have to just estimate roughly how far into the scene you need to focus anyway.
As I said though, I do try to avoid stopping my lenses down past f/16 to avoid diffraction when possible. It seems counter intuitive, but although stopping down to say f/22 will give you a deeper depth-of-field, the entire image gets a little softer, so you defeat the object of stopping down. At the end of the day though, the effect is not that great, and can be removed anyway if you’re a Canon shooter, so if you really need to stop down, it’s not such a big deal.
I hope this has helped some. I do tend not to talk about some of these photography techniques because I’ve already covered them, but I know that there are a lot of new listeners that subscribe all the time, and don’t necessarily go back to through the archives, so I’ll cover some areas like this again in the future.
Note though that we have covered many, many areas of photography over the years, and we have avery powerful search function on the blog too, and now that all episodes ever released are all on the blog, you can easily find topics that I’ve covered that you might not be aware of, by going to any blog page, and searching with the search field at the top of the sidebar. As you type a list of posts in which I mention your keyword will display and be refined as you continue to type. Give it a try the next time you’re trying to find information on something.
The Podcast is 9 Years Old Today!
Before we finish, I’d like to give myself a pat on the back, and thank you all for continuing to listen to this Podcast. I realized as I was sitting down to record this episode, that it was exactly nine years ago today, September 1, 2005, when I released episode one of the Martin Bailey Photography Podcast. I’ll stick some candles in a cup cake or something later, but I thought I’d mention this before we wrap up for today.
As you can see from the episode number, I’ve missed a few weeks here and there, usually when traveling with my tours, and through a spot of illness a few years ago, but in general, I’ve been able to create an episode every week for these nine years, and I reckon that’s a bit of an achievement. I know that many of you have listened from episode one too, which is another incredible achievement, so thank you!
Show Notes
Pick up my Sharp Shooter eBook from Craft & Vision: https://mbp.ac/cvss
The MBP iPhone App with DoF Calculator: https://mbp.ac/app
Dofmaster Hyperfocal Distance Calculator: http://dofmaster.com/dofjs.html
 Subscribe in iTunes for Enhanced Podcasts delivered automatically to your computer.
Download this Podcast in MP3 format (Audio Only).
Download this Podcast in Enhanced Podcast M4A format. This requires Apple iTunes or Quicktime to view/listen.


Congrats on 9 years of podcasts, Martin! I’m a new listener and certainly appreciate all that you share. You’re very inspiring!
Thanks for listening Anna, and for the kind words. I hope you continue to enjoy the Podcast!
In the past with my 35mm cameras, 2 marks on the lens opposite the distance scale indicated the focus range for each (or some) f/stop. Choosing the hyperfocal distance just meant putting the infinity sign on the f/stop you were using. I usually used the mark for a wider f/stop since I anticipated big enlargements. How times change 🙁
You do seem to assume all listeners are locked into SLRs of 35mm or slightly smaller sensors with always parallel lenses. Not so! Some listeners use view cameras (or tilt lenses) and almost all use cellphones or P&S as well.
The f/64 group of photographers used 4×5″ or bigger formats. P&S & cellphone users use tiny sensors. Diffraction does not depend on the f/stop ratio. It depends on the size of the aperture and the degree of enlargement.
So with big format cameras, you can stop down to f/32,or f/64 and still get a sharp image because the hole is bigger and the image is bigger.
With small sensors, better to keep to the widest apertures for the sharpest image. My Galaxy S3 phone is made to stay at f/2.6 for its 3.7mm lens, and I keep my P&S Canon 710IS 5.8-> 34.8mm at maximum aperture for greatest sharpness.
And with tilting lenses, you can change the plane of sharpness so it matches the plane you want in focus, e.g. the ground. See https://en.wikipedia.org/wiki/Scheimpflug_principle This allows you to use wider aperture, avoiding diffraction, and still have wide depth of focus.
I also find that pix usually look better – and sharper – if there is fuzzy stuff to compare with in the photo – even many landscapes. Viva soft corners!
Hi Tom,
Thanks for the comment!
Yes, I miss those scales on lenses. They’re getting less and less common.
I do concentrate on SLR users, because my Podcasts are created from personal experience, and I don’t use any other cameras except an iPhone, but as you can’t change the aperture, that’s kind of irrelevant. The DOFMaster calculator does contain mirrorless and some medium format cameras though, and most of what I cover here is relevant to all formats.
The f/stop ratio controls the size of the aperture, and as I said, when diffraction kicks in depends on the lens. It’s up to each person to figure out the exact aperture at which diffraction starts to kick in depending on the lens in use. I also mention that this calculation is based on an 8 x 10″ print, but that as a general guideline it’s fine.
In this respect though, I agree that f/16 is the SLR guideline, but it’s still up to the user to figure out their ceiling aperture to avoid diffraction.
People that use tilt/shift lenses already understand what can be done with them. I sold mine, but understand the principles, and chose not to include this.
I don’t use pan focus in all of my images either, but this is something I get asked about a lot, and hence the podcast.
Cheers,
Martin.
I usually try to get the maximum sharpness rather than the maximum area of almost sharp. There is a nice discussion of resolution at http://photo.blogoverflow.com/2012/06/the-realities-of-resolution/ – but it does all depend on the lens and the subject matter.
I would guess that aberrations will be better corrected in software than diffraction will be – and might easily be applied to photos from the far past….
That’s exactly what I do Tom, and what much of my advice here is talking about.
Chromatic aberration is fixable with Lightroom alone, which is good. I don’t like Canon’s Digital Photo Professional so try not to rely on it as much as possible. I too would prefer to just shoot with a wider aperture for a sharper image when possible.
Hi Martin, I too am a recent subscriber having only owned a dslr for about a year. I heard your original episode on the subject as I’ve been working through the back episodes but appreciate the recap nevertheless, it all helps my learning process. You didn’t mention macro photography in this episode, do the same issues apply in this field?
Great podcasts, love ’em. Well done on nine years!
Thanks for listening and for the comment Martin!
Diffraction does affect macro photography too, which is why people often tend to use focus stacking to get very deep depth of field in macro photography. You basically shoot a series of images moving the focus a little with each frame, and then stack them in Photoshop. I covered this in my Sharp Shooter eBook, but I could probably do an episode here too if that would help.
I have got your Sharp Shooter eBook which is great and having a go at focus stacking is on my photographic learning to do list, once I get photoshop or some other software that can do the job, hopefully very soon. I would love to see one of your excellent video podcasts dedicated to the subject
Hi Martin,
Thanks for picking up Sharp Shooter. OK, I’ll definitely try to cover this as a video, or at the very least, an illustrated Podcast. I’ve just made a note to do it as a video as first preference. 🙂
Cheers,
Martin.
Hyperfocus cheat: If you don’t know your hyperfocal distance, just focus on infinity, and bring the focus back a little bit. Because if you focus anywhere behind the HF distance, it’s always from the HF distance to infinity that’s gonna be in focus.
On my 18mm kit lens for example, I get 3.1m from the camera as hyperfocal, at f5.6 aperture.
But that doesn’t mean a bit is blurred from my image! When I raise my camera on a tripod, the blurred bit close to me gets cut out anyway :p xD
Hee hee, that will work with wide angle lenses Oosman, but for longer focal lengths you really need to be a bit more careful.