
Today we follow up on the portrait shoot that I did at the end of March, with an episode on how I fulfilled the first print order, including creating various print sizes on roll paper, and we’ll also touch on trimming and decurling the prints, and a little reflection on how incredibly happy this kind of work makes me, and thankfully, the customer.
A month ago, in episode 415, I walked you through a portrait shoot that I did with two families, using a portable studio that I set up at one of their houses. For a few days after the shoot I had a lot of other time critical things that I needed to do, so it took me five days after the shoot to work on their images and sent both families a USB memory stick with their images on.
I used to send portrait images on DVDs, but as I have USB memory sticks made to give my tour and workshop customers, I figured I’d use these this time instead. On a business side of course, although these cost more than a DVD to create, they are of course good marketing if the person that receives them actually uses them in front of other people. We use them on my tours for people to bring images to critique sessions, but of course there’s a bit of subliminal marketing going on there too. 🙂
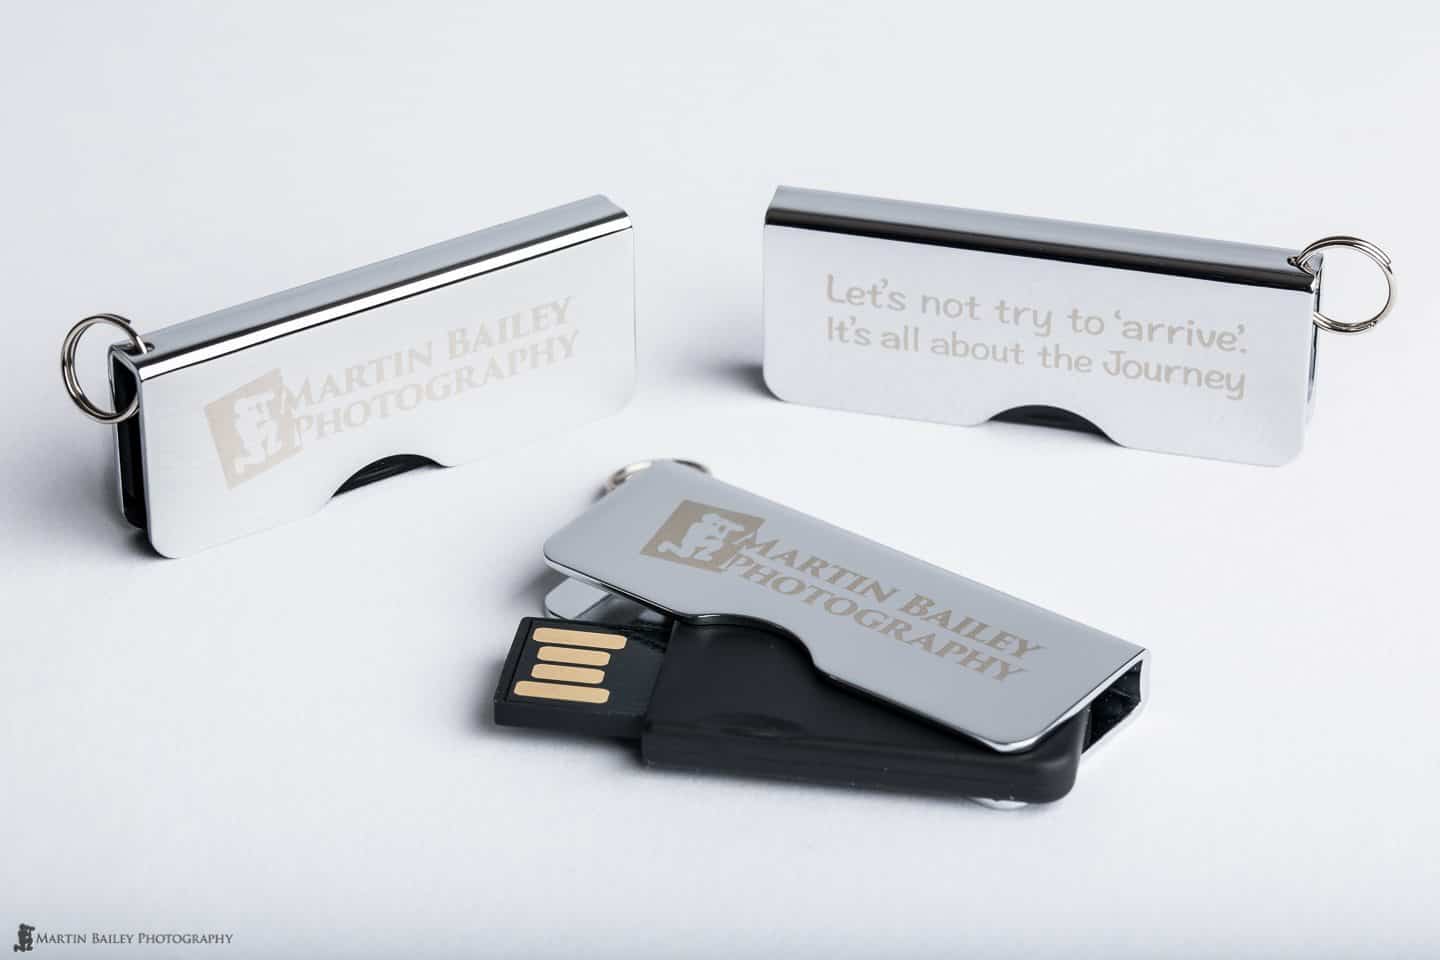
MBP USB Memory Sticks
I downsize the images to 2560 x 1440 pixels before I give them to the clients. These are for them to browse to select images for print, and to use as their desktop background if they want to, as this is the same resolution as an iMac screen, so they look great on Retina and iPad screens, as well as high resolution Windows machines. At this resolution, they can be printed up to 5×7″ should the customer want to, although I make it known that this is not what they are for.
If you recall from episode 415, I also created a Sepia version of each image, and later a black and white version of each image. Once I have my final selection of images to show the customer, I rename them in Lightroom to assign a sequential three digit number at the start of the filename, which gives them all a uinique number. This means that the number for the color version will be different to the number for the sepia version of the same file.
I also include a small 1440 pixels wide version of all of the images that are watermarked, and let the customer know that they can share these on Facebook etc. That again is good marketing for me, and may lead to additional work from their friends should they like the images.
I also include a print order form in the USB memory stick in Excel format, so the customer can select the size and finish for their prints. They just select the size and finish from a pulldown, and enter the number of their photo, and how many they want, and the spreadsheet fetches the price and multiplies it by the number of images required.
Because I include a certain amount of money for prints in my portraiture packages, I add the amount that they have to spend on prints to the Excel spreadsheet, so they can track how they are doing. Of course, should they be happy to go over, the spreadsheet also calculates any additional payment that they’ll need to make to cover the cost of any additional prints.
Adding to the Long-Tail
This is all really about the business side of the deal of course, and before we move on, I’m sure some of you are wondering why I don’t just give the customer the full sized images and have them print their own and be done with it. That is one way to work of course, but I don’t want my customers to display images that they print themselves, because I want to control the quality.
Plus of course, by building in print sales into the portrait session and enabling the customer to buy more prints at any point after the session, I am increasing my profit from the shoot and adding to my product long-tail. Income that could potentially come in after the initial job is done. I also promise the customer that their images will be available indefinitely, so they can come back to me for prints as long after the shoot as they like.
Mutual Appreciation
OK, so my customer has their images, and the first thing that both families did was mail me to let me know how happy they were with the photos. They also mentioned how much they enjoyed the experience. What I provide makes people feel special. Sure, I charge accordingly, but unlike many studio on the high-street here in Japan, where the customers are wheeled in, posed, have a handful of images shot then wheeled out again, with my shoot the we have much more interaction and spend much more time getting them what they want.
We create a pose list before the shoot and then add anything that we think might work as we go along. I talk as I shoot, sometimes making them laugh, and other times getting candid moments that remind them of the day. Because there were two families to shoot during this session, we planned for 2.5 hours, and shot as much as we could in that time. That does not include time to set up the studio of course.
And on that note, the cool thing about taking the studio to the customer is that they get to see how much work setting it all up involves, and that makes them feel happier about the price tag. Of course, they wouldn’t have hired me in the first place if they weren’t happy with that, but I have been told after some shoots that the customer now feels they are even underpaying me, which proves to me that they are happy, and I am happy, because I’m not working for peanuts.
Remember, one of my business mantras is that I never want to work for an amount that doesn’t make me feel happy about doing the job. There may be times when I work for less or provide a service for free, because I want the photos, but that’s fine too. Compensation doesn’t always have to be financial, but you must be happy with your cut, no matter what form that cut comes in.
In this shoot you might remember, I didn’t charge the customers to photograph the kitsuke sessions, which is when the professional kimono fitter came to dress the young girls and two men in the families. I shot that for more than two hours for free, and still provided the families with the images, and I did this because I wanted to. It also gave the customers added value, so it’s a win win situation.
Creating the Prints
Anyway, the customers spend a week or so looking through their images and selecting what they would have me print. In Japan, people generally don’t have enough wall space for large prints, so the order that came through was for four 8 x 10 inch, 21 5 x 7 inch and four 4 x 6 inch prints, all on Pura Smooth, which is a beautiful OBA free fine art matte paper from Breathing Color. Remember, OBAs or Optical Brightening Agents aren’t always bad, but using fine art paper that does not contain them generally increases the longevity of the prints. I actually take an ultraviolet light and shine it onto some paper samples to show the customers that the paper is OBA free. Media that contains OBAs reflects the purple light, and OBA free media does not.
Laying Out Multiple Prints in Lightroom
Let’s talk a little now about how I actually lay out the prints in Lightroom for efficient printing. If you recall that I print with an imagePROGRAF iPF6350 24″ wide roll printer from Canon, it stands to reason that I am not going to be feeding in individual 4 x 6 or 5 x 7 inch sheets of paper. If for no other reason that the printer won’t even handle sheets this small, and you can’t buy this size pre-cut from Breathing Color.
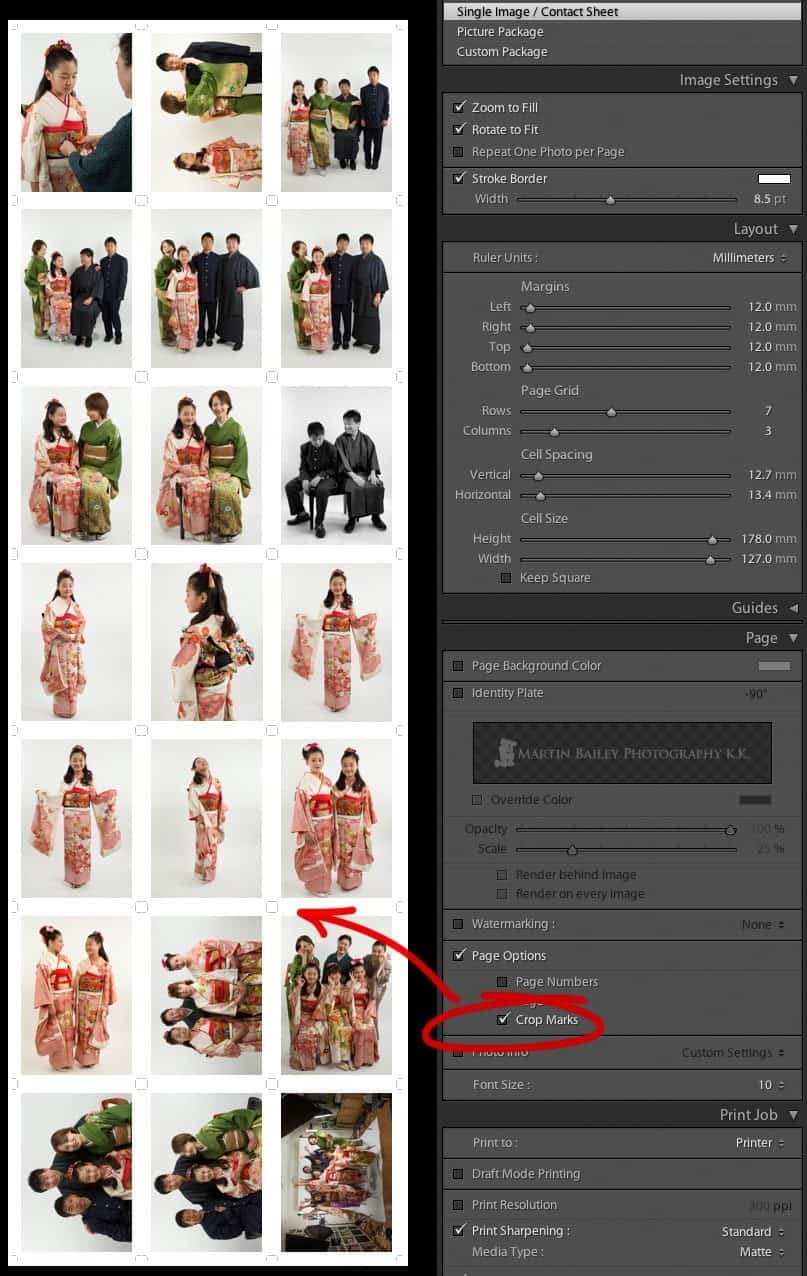
21 5 x 7 inch prints on 17 inch Roll Media
To start my printing process, using the order form from the customer I locate and put all of the images that the customer wants prints of into Lightroom Collections, according to the size required. That means for this order I created three collections, one for the 8 x 10s, one for the 5 x 7s and one for the 4 x 6 prints. The customer wanted two of a particular 5 x 7 inch print, so I created a virtual copy, so that I could easily add both to a single sheet of roll paper that I’d print all the 5 x 7s on.
To lay the prints out I had to create a custom page size. As I would be adding a border, I calculated that it would be best to use 17″ roll media, and layout 3 columns of 7 images to create my 21 prints.
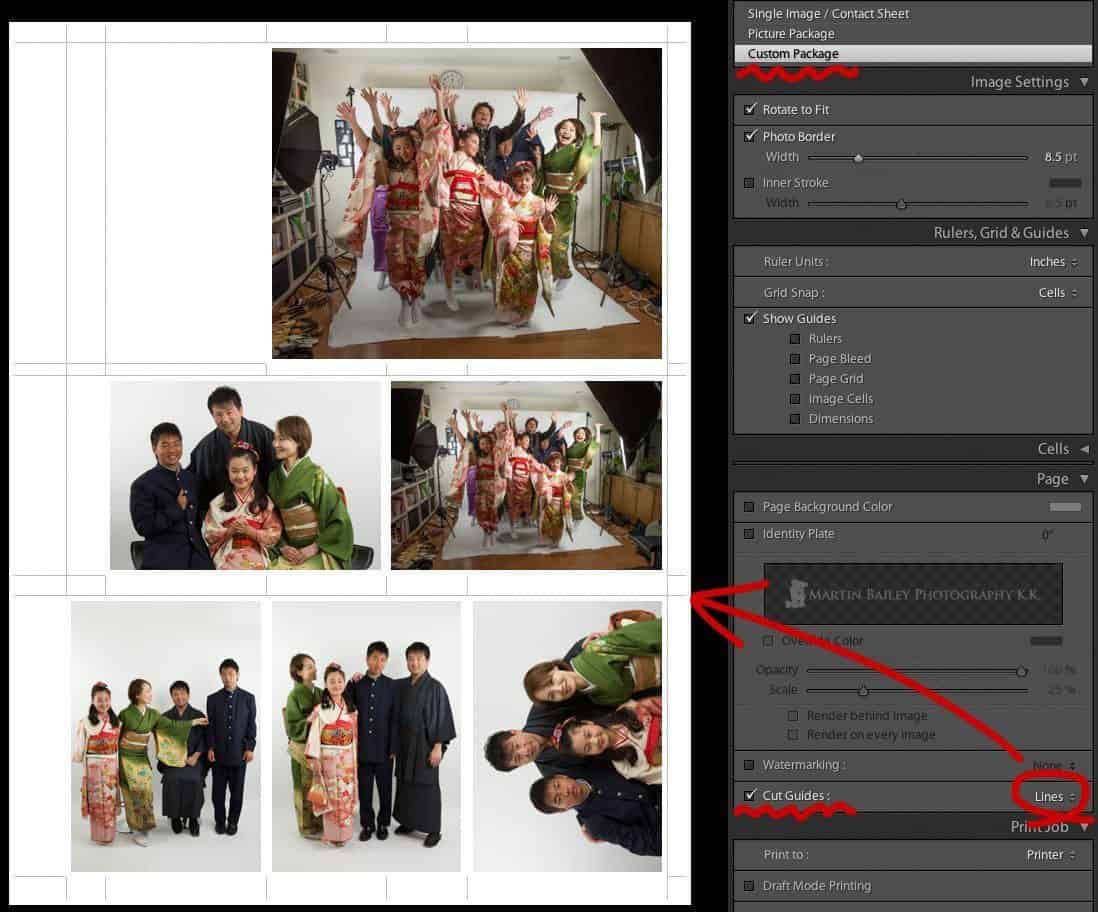
So, in the Print Module in Lightroom, I created my custom page size using the Page Setup button, and for the first batch 21 5 x 7 inch prints, I selected the Single Image / Contact Sheet option, and by specifying 7 rows and 3 columns under Page Grid in the Layout panel I pretty much automatically laid out my 21 prints, as you can see in this screenshot (right – Click on the image to view it large and see the text etc.).
Note too that I wanted to add a 3mm border around each image, as the customer would be framing many of these in small wooden frames that they have, and this helps to drop the prints into the frame without loosing too much of the print behind the matte.
The problem here though, is that Lightroom only gives me the option to specify a Stroke Border in points. Luckily, Wikipedia came to the rescue telling me that one point is 0.3527777778mm, which enabled me to create a conversion with PCalc, a calculator app that I use on my Mac and iPhone, and create a conversion between Points and Millimeters. I now know that 1mm is 2.8346456691 and could calculate that 8.5pt is as close to 3mm as I need it to be for this purpose, so that’s what I used.
Making 21 5 x 7 inch Prints on 17 inch Media
Now, there is one other problem with the Lightroom print module when printing in Contact Sheet mode, with many images in columns and rows like this, and that is that you can not add Lines as cut guides. You can only add Crop Marks, as I have circled in red on the screenshot (above).
This may seem enough, but as you start to trim your images down, you actually cut away the crop marks, leaving nothing to guide your last cut, so you have to put a little nick in one direction before making your third cut on some images.
This isn’t difficult, as long as you keep this in mind, so I don’t find it worth actually going into Photoshop and adding a 3 mm border and stroke line etc. but I did want to mention it as something to watch out for.
Actually, another option is to use the side guide that comes with the Rotary Trimmer that we’ll take a look at shortly. If you just set this to the required depth, you don’t need to worry about loosing this last crop mark either, but the way I work doesn’t always make it easy or necessary to use that method.
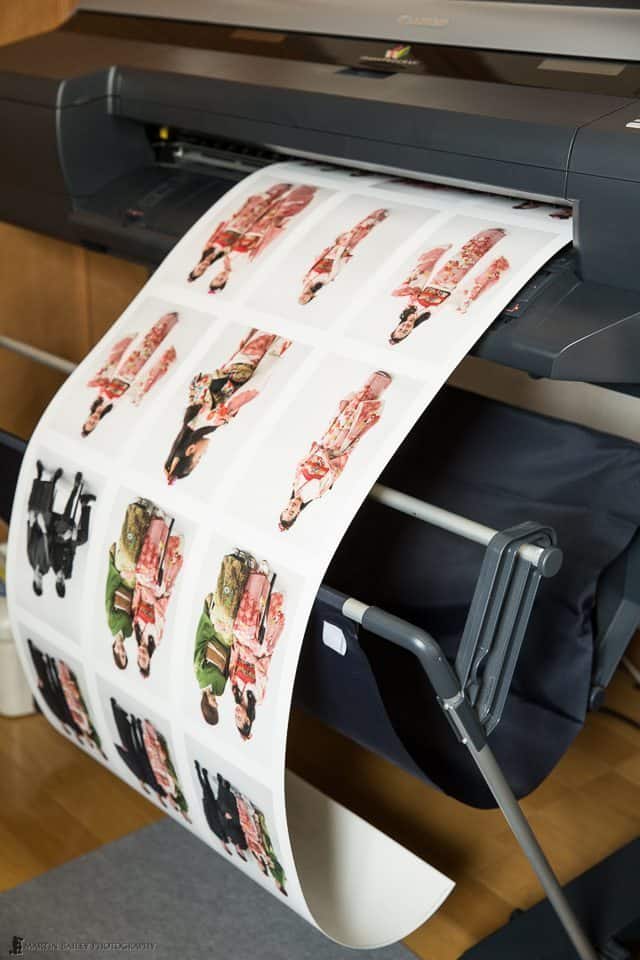
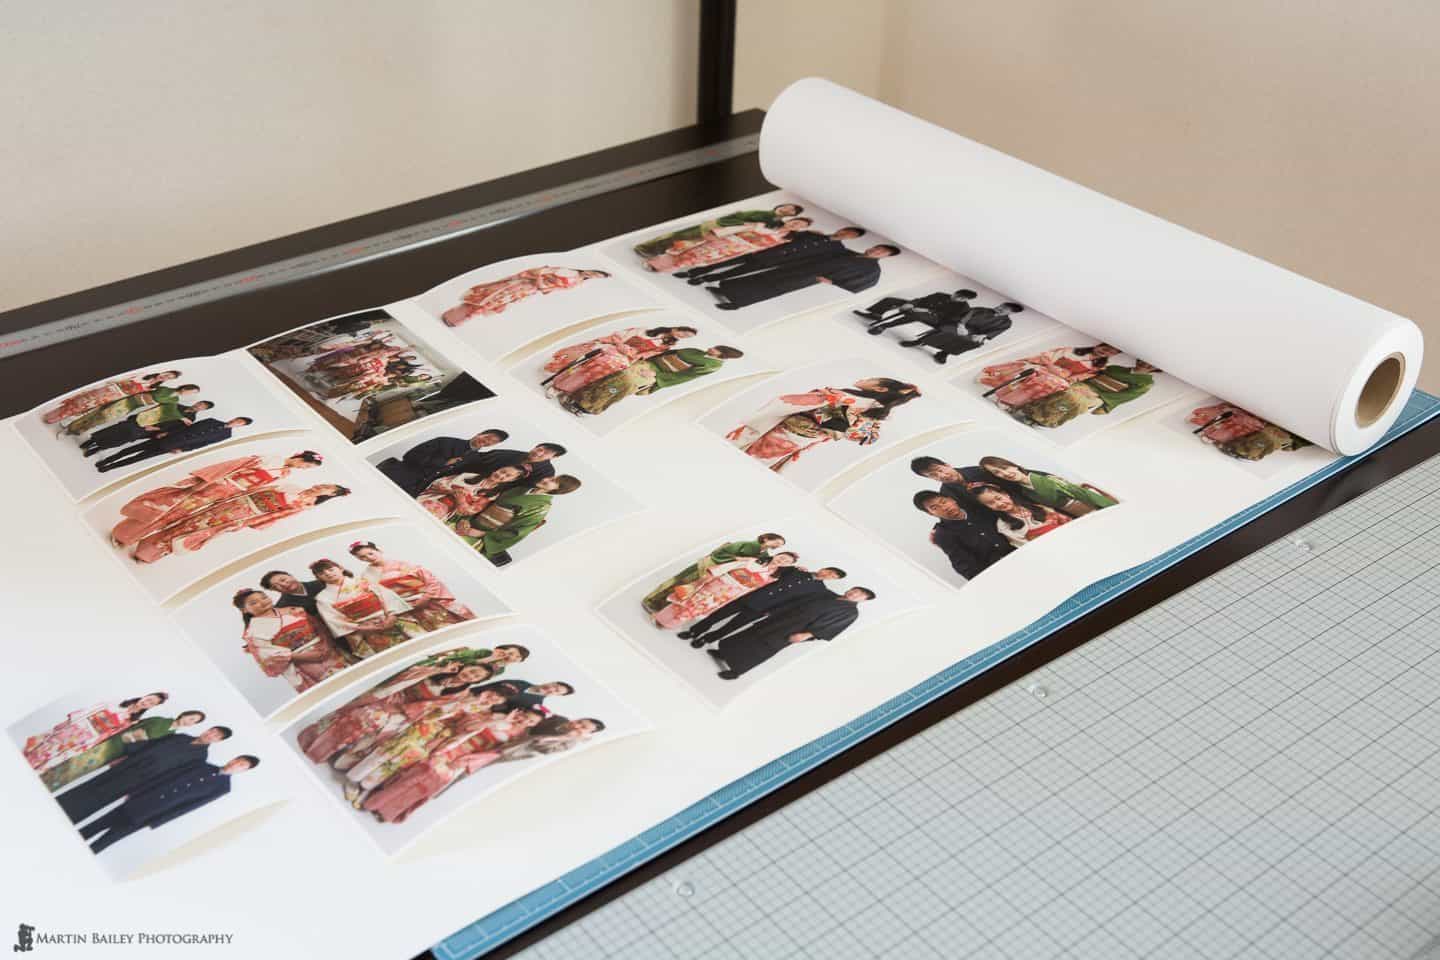
Having tweaked the Cell Spacing and Cell Size in Lightroom to ensure that my images would all be exactly 5 x 7 inches, I send the job to the printer, and enjoyed watching all 21 images print out on a 53 inch long piece of 17″ roll media (right). Note that if you’re wondering why I don’t let the paper feed into the paper catcher on the printer, this is because I don’t want anything to touch the face of the prints. It would probably be fine to let smaller prints just drop into that cloth, but I generally catch my prints as they are automatically cut, and lay them straight onto my work table.
This is fine too, because I really do love watching prints come out of the printer like this. This is another reason why I build printing for my customer into my portrait sessions. I just get a huge kick out of printing, and watching these images come out like this, with the smiling faces of the family I photographed is incredibly fulfilling.
I guess that’s MBP Business Mantra number two for today – build your business around doing things that you love doing. Just like only doing jobs that I’m happy with the compensation for. If you are happy with what you are getting paid, and you are doing what you love, your products will reflect that. Your customers can feel the care and quality in what you produce, and that is priceless.
Trimming the Prints
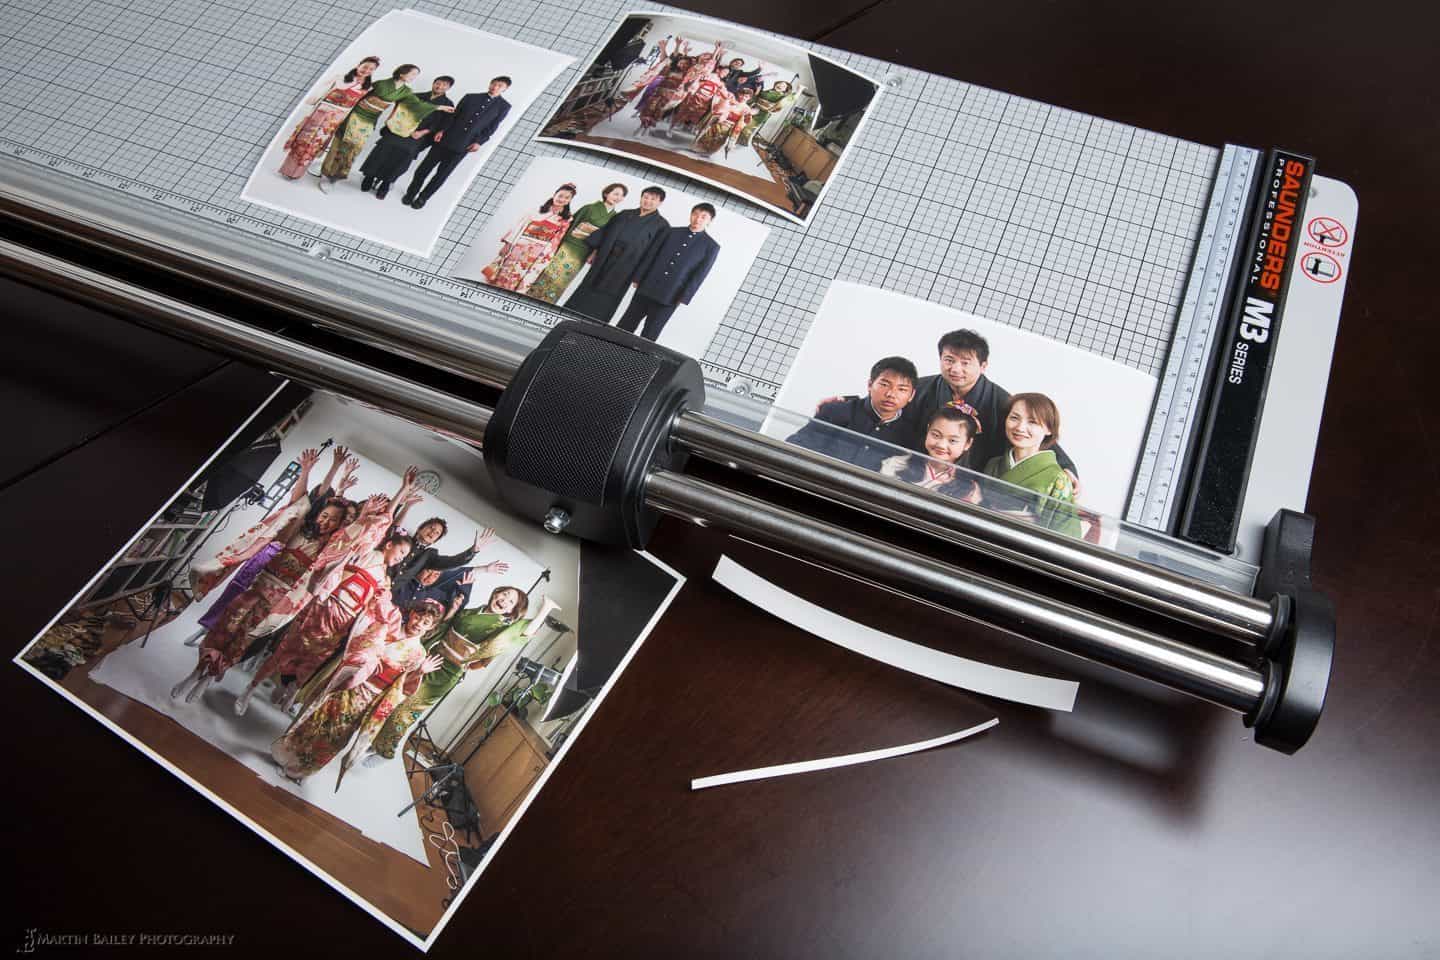
OK, so now that we have our sheet of 5 x 7 inch prints, we need to trim them, which I do with a 36″ wide Saunders Professional M3 Rotary Trimmer (below). I’ve had this about four years now, and although I found the edges it left a little rough to begin with, after a few uses it settled down, maybe helped by the self-sharpening mechanism, and I now find it an invaluable tool.
Because my prints were initially on a 53 inch long sheet, I first trimmed it down into three more manageable sizes, then started to trim down a row at a time until I had just my 21 5 x 7 inch prints. As I said earlier, if you use the Single Image / Contact Sheet printing mode, you have to be careful of the order in which you crop so that you keep your crop marks long enough, or use the side guide for the last cut, so that you get the sizes exactly right.
Saunders Professional Rotary Trimmer 36″
There’d be nothing worse in my mind than holding a stack of prints that were supposed to be the same size, and finding that they are all slightly different. This is (above) actually shows some examples of all three sizes that I was creating for this customer.
Note too that when I’m only quickly trimming one or two images, I sometimes just use a rubber craft cutting mat, a steel rule and a sharp cutter knife. I use a steel rule, as I’ve heard that plastic rules can sometime cause the knife to ride up the edge as you cut, leading the knife blade towards your fingers, which isn’t good, so if you choose this method, do get a steel rule, not plastic.
Printing the Other Sizes
Four 8 x 10 Inch Prints on 17 Inch Media
I’m taking things out of sequence a little to explain all of this in logical order, but to put things into perspective, I actually did all of the printing on one day, and allowed the prints to fully dry overnight before I trimmed them.
Let’s go back now and take a quick look at how I printed my other two sizes. First, here’s the four 8 x 10 inch prints, again on 17″ media (right), because two eights is 16, so it leaves me a half inch either size to trim.
And for the last four 4 x 6 inch prints, I just laid them all out on a single row, because again, 4 x 4 is 16, leaving me just a little bit of leeway for trimming.
Reprints
As careful as I am with the printing and trimming process, with this many prints to create, something almost always goes wrong. One thing I find with fine art matte media is that quite often, once you have printed the photograph, a flake of the coating on the media can come away, leaving a white spot. Sometimes I can use a pigment ink felt pen to spot this, if it’s a dark area of the photo, but generally it means a reprint.
And although I wear my white cotton gloves when handling the prints, occasionally I’ll scuff one against the other and leave a bit of a line on the surface. The customer would probably never notice, but I know it’s there, so I do a reprint. Also, as carefully as I checked the originals, I found a solitary dust spot on the group photo 8 x 10 inch print that I did, so that had to be done again, along with the 5 x 7, although it was hardly visible on the smaller print.
Anyway, for the reprint layout, I kept my 17″ roll media in the printer, and used the Custom Package option in Lightroom instead of a Contact Sheet. Contact sheets of course can only lay out images of the same size. To create various sized prints, it has to be a Custom Package. One of the good things about a Custom Package is that instead of just the Crop Marks on the corners of the image, we now have the option to change the Cut Guides to Lines, as you can see in this screenshot (below).
Various Sizes with Crop Lines for Reprint
This means that the line extends almost all the way to the edge of the paper, so you can actually trim the edge away a little, ensuring that you get it straight, and then you have a guide to look down on to ensure that it’s perfectly in line with the blade of the Rotary Trimmer.
Decurling
Now that we have all of our print sizes created, there is an extra step to go through because we printed on roll media. Pretty much all heavy roll media that I’ve worked with curls, especially after it’s cut, because it’s stored rolled up of course, and wants to stay that way. To do this, you can buy over priced Decurlers, or you can make one with the remnants of media left on old rolls that you use up. If you leave a meter or two on the end of a roll you can use that.
Or, as I do, use an old roll of canvas. I actually have a roll that had some defects, and being the amazing company that they are, Breathing Color immediately replaced the roll for me, which means I have one lying around. As we can see in this photo (below) all you have to do roll out the media a way, then lay out your prints so that the curl is facing upwards, and then roll the media up, taking the prints inside. An old roll of canvas is especially useful for this because it’s heavy, and once rolled up with the prints inside, you can just put it aside for a while to decurl them.
You can of course do this before your trim your prints too, and I sometimes do that, but in my experience you still have to do it again once you’ve trimmed your images down, as they start to curl all over again once they’re trimmed down to this size. Also note that sometimes rotating them 90° and curling them sideways, and not directly against their curl, can help to decurl them too.
Laying Out Prints for Decurling
I generally leave the prints rolled against their curl for 12 hours to a full day, before packaging and shipping the prints. They generally still curl again later, but it’s not as bad as it would be if I didn’t do this at all.
Presentation
One of the beautiful things about working with small prints for a customer, is that it enables me to use my die-cast and embossed folio covers when I send the prints. The addition of a single page with the words Thank You written on it add a nice surprise for the customer when they open the folio of prints.

Folio Presentation
Here you can see that I also printed one of the images that the family selected on gloss paper, and used that in the window of the folio, so they know exactly what is inside. This is all just added value that makes the entire experience more pleasurable and memorable, hopefully even remarkable for the customer.

Folio Cover
That of course is a Seth Godin style “remarkable”, meaning that people feel strongly enough about something to remark upon it to others, and that’s how word of mouth works.
To finish the presentation, we package the folio in bubble wrap to protect it, and put it into a white box, and seal it with pure white tape, that gets scuffed and dusty and messed up in as the courier transports it across Tokyo, but I think they get the idea when it turns up at the customer’s door.
To finish, I’m going to share a photo that the husband of the family sent me on the night that the prints arrived. I just love this photo. We can see the lady of the house surrounded not only by photographs from this session, but I recognize a number of photos from our previous sessions too. Some of the photos that had just arrived are already in frames, on the counter behind her. As much as I like the photos from the shoot itself, this one will probably be the one I’ll come back to and look at the most, because it says it all to me.
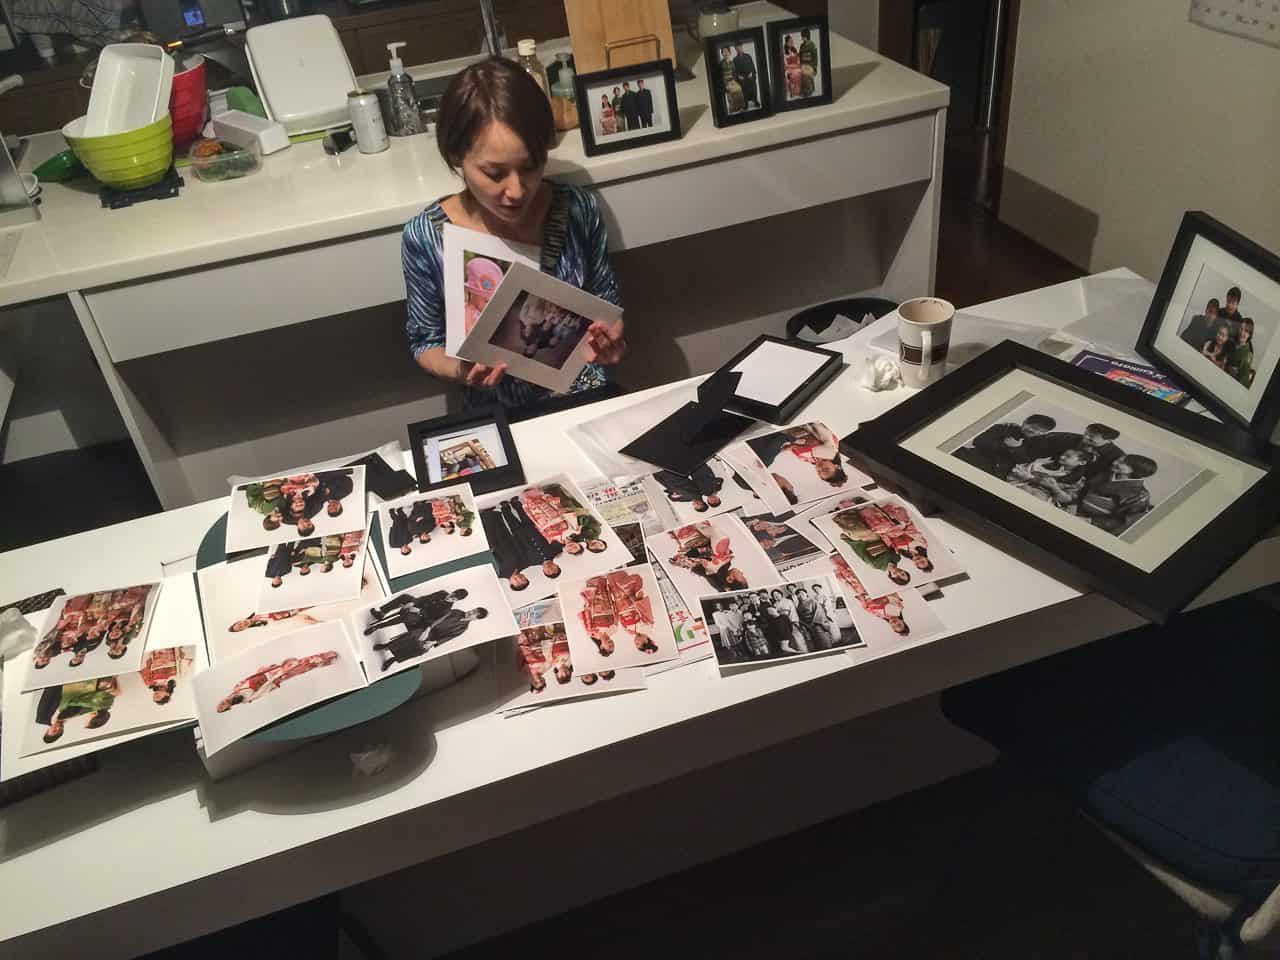
Surrounded by Memories New and Old
So, we’ll wrap it up there. I’ve touched on many aspects of my process today, both the craft side and the business side, but wanted to bring this shoot full circle. I’m looking forward to receiving the print order from the second family and fulfilling that, and I just heard that this family is already putting together a second order, which is good to hear. I love creating happy customers.
Craft & Vision PHOTOGRAPH No. 7 Just Released!
Straight after I released this episode, the latest issue of the Craft & Vision PHOTOGRAPH digital magazine was released. This publications just goes from strength to strength, and I’m proud to be a part of it. Check it out here.
Show Notes
Saunders Professional M3 Rotary Trimmer (Thank you for supporting the Podcast by using this affiliate link!)
Music by UniqueTracks
Subscribe in iTunes for Enhanced Podcasts delivered automatically to your computer.
Download this Podcast in MP3 format (Audio Only).
Download this Podcast in Enhanced Podcast M4A format. This requires Apple iTunes or Quicktime to view/listen.


0 Comments