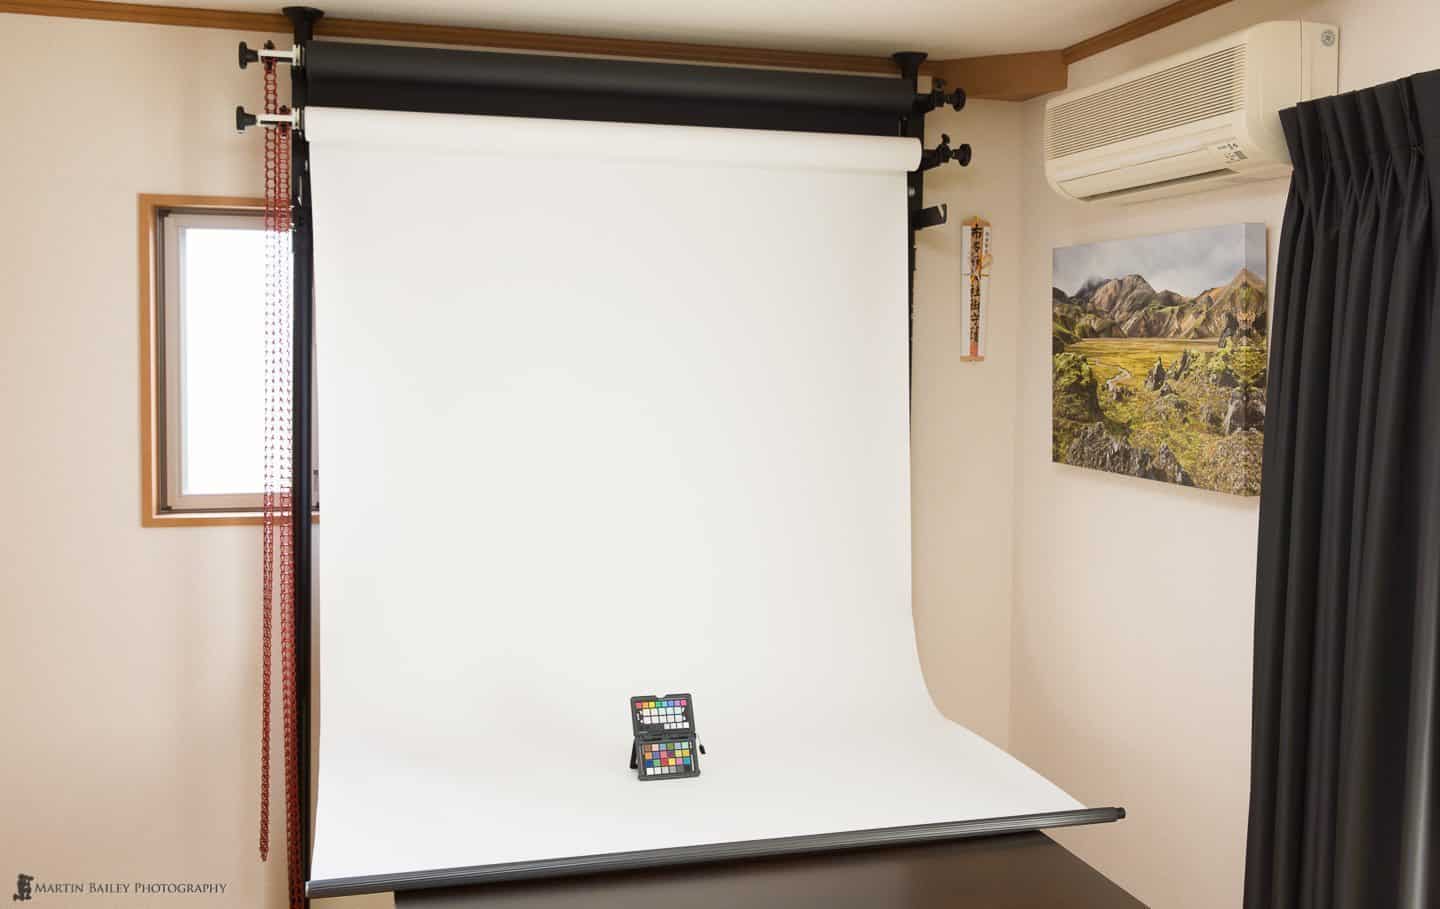
This week we’re going to take a look at the very simple but incredibly functional Manfrotto Expan Drive Background Support system, that enables you to set up to three rolls of seamless background paper simultaneously, then raise and lower them as necessary using a chain and pulley system.
This episode is brought to you by lynda.com. Learn lighting, portraiture, Photoshop skills, and more from expert-taught video courses. To start your 7-day free trial, visit lynda.com/mbp.
The Manfrotto Expan Drive Background Support system has been on my radar for a while, but as it is quite a big ticket item, I had been keeping my eye out for a good deal, and then a few weeks ago, the price for the various items that make up the system dropped on two of my favorite suppliers here in Japan, amazon.co.jp and yodobashi.com. I selected the cheaper site for each part for a good deal and set up my support system, so today I’m going to walk you through what it’s comprised of and why I love having this system in place.
In fact, if I take a step back from that, there was another reason that made me take another look at the pricing at this point in time, and that was because I needed a projector screen for my May 17-18 In-Studio Pixels 2 Pigment workshop, and I was looking at screens that I could just attach to the wall and forget about.
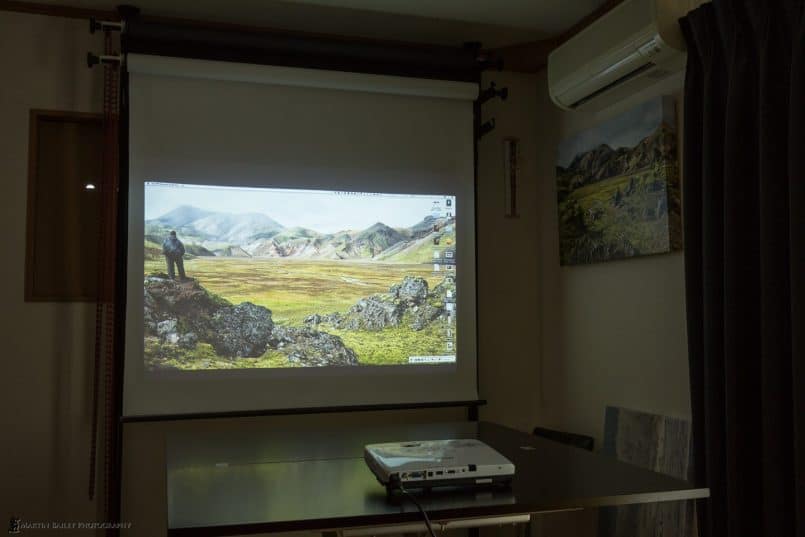
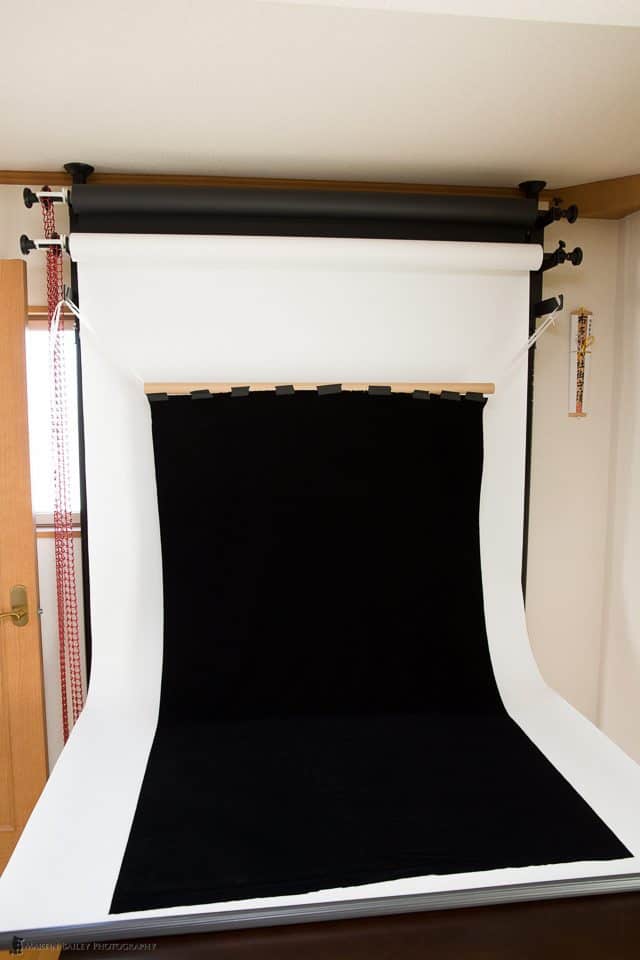
The problem with that though is because I rent our apartment, I can’t make big holes in the wall, so I came back to the Manfrotto system which doesn’t require me to make any holes. In this image (below) you can see that a great secondary benefit of having this system in place is that it doubles as a relatively good projector screen. I can almost hear any home-theatre buffs sniggering as I speak (type) but hey, this is good enough for my needs, and it’s a hell of a lot better than a bed-sheet pinned to the wall, which we have to use on some of my workshops.
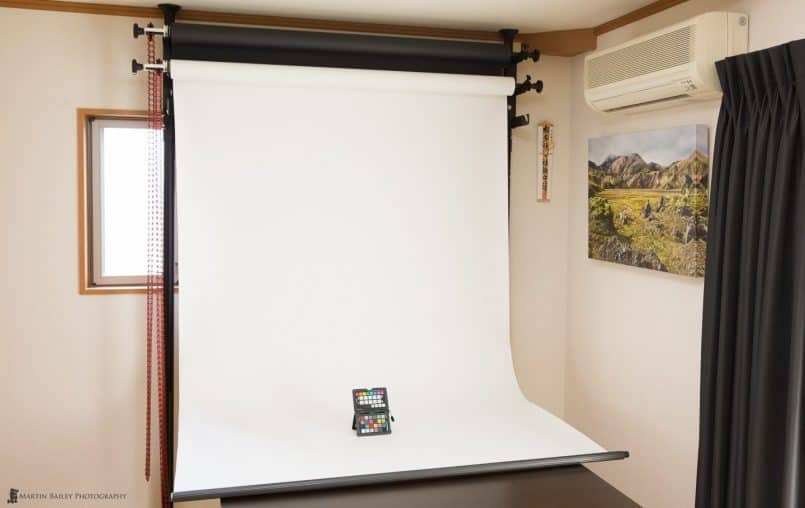
As a background support though, as you can see in this next image (below) the system enables me to set rolls of seamless background paper into place, and then roll down the required color quickly and easily when I need it using the chains on the left side.
Now, you would probably use this system with wider rolls of seamless more often, like the 2.7m (9ft) wide roll that I used in the portrait shoot that we looked at in episode 415, but here in my small office/studio on the 3rd floor, I don’t realistically have room for much wider than this, without it obstructing the door that opens from the left in this photo.
Plus, although I can shoot one or two people in this studio, the majority of the work I do here is shooting products as illustrations for this Podcast or my eBooks, and being able to just roll down a background in a few seconds saves a lot of time.
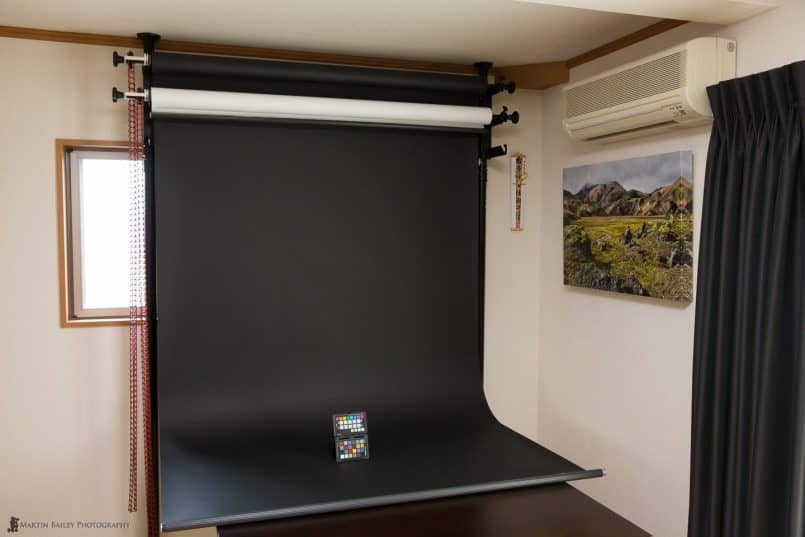
Until now, I’ve had to get my background stand out and set it up, then feed the poles through the core of the seamless, then clamp it after I rolled the paper down, and unclamp it every time I have to adjust it, and of course, if I need to change from white to black, I have to pack the white away first and start again with the black seamless. Now it’s literally a 10 second job, and I’m rolling with another color, as we can see in this photo (below). Another great benefit as well is that unlike my stands, which always get in the way of the door, this system is away from the door, and so can be left in place permanently.
It’s difficult to see in these photos, but as I mentioned, the beauty of this system is that it doesn’t require you to make holes in your walls, and because it’s basically just clamped into place, if needs be, I can easily unclamp the system to break it down, or adjust the width for easy use with different roll lengths, or to take to a client’s premises for a shoot if needs be.
The main supports are Manfrotto Auto-Poles 032B, which you can buy from B&H currently for $211, and I’ll put some affiliate links in the blog post in case you think of picking any of this stuff up yourself. The price stays the same to you when you buy with our links, but you help to support the podcast buy using these links.
The Auto Poles are 2.1m (82.7″) tall, and extend up to 3.7m (145.7″), which is a good range, and you can buy extensions if you need taller. If you know you’ll never need this tall though, there are shorter and thinner poles available, and that’s a good way to save some money, as these are a not cheap.
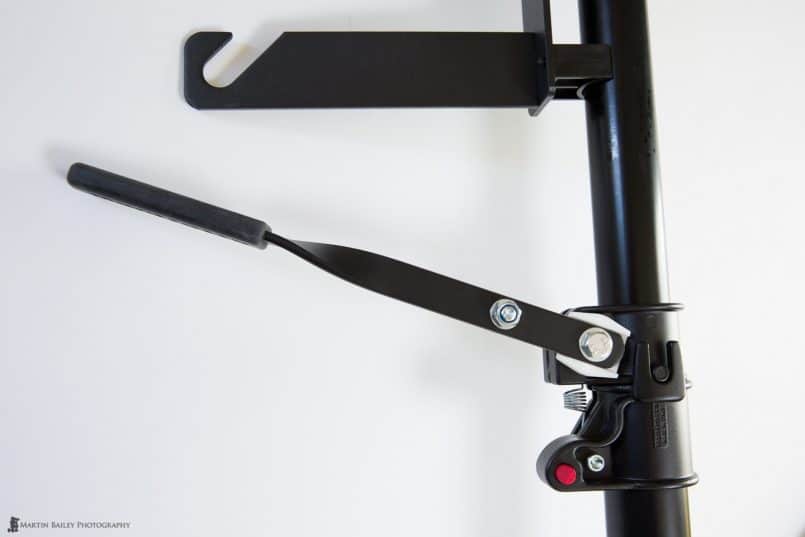
To adjust the height, you literally just slide the top section out of the pole, until it touches the roof, then you lower the handle that you can see in this image (below) and once you get past that little red button that you can see, the top section is extended a little more locking the pole into place. The red button then ratchets out locking the arm in place. To release the handle to loosen the pole you have to push that red button in, so there’s no chance of this lever coming lose buy itself.
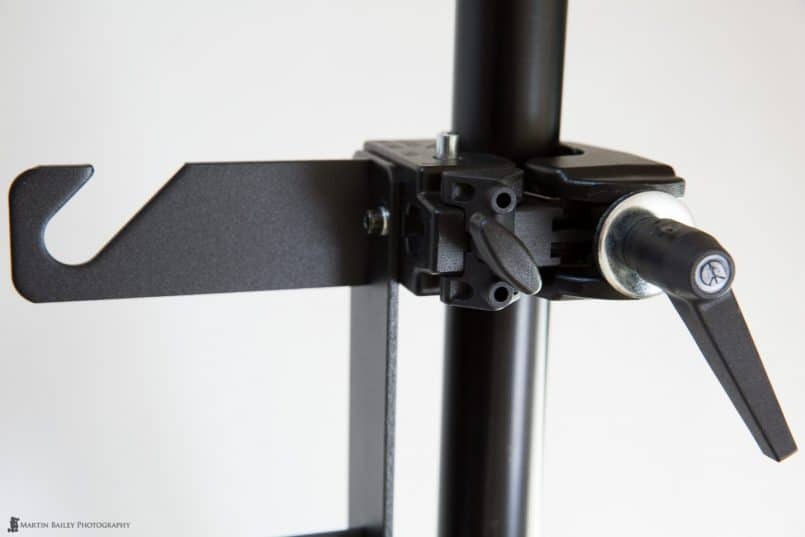
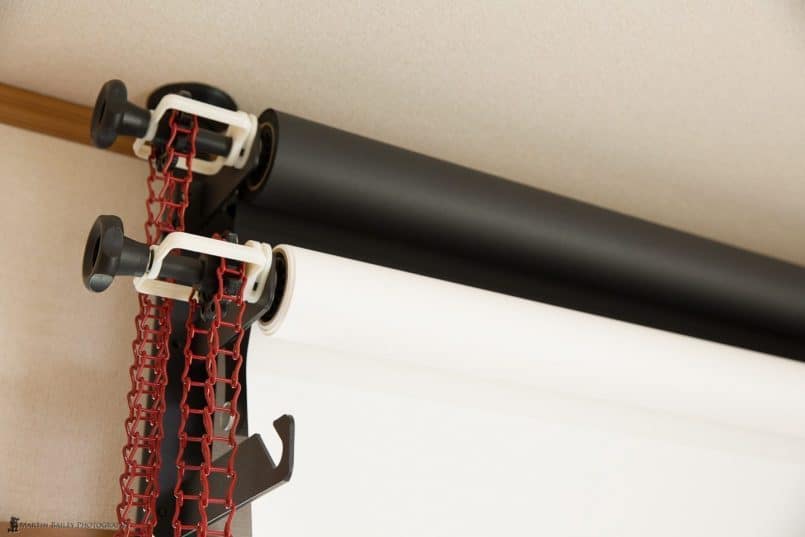
The part to attach the seamless rolls to the auto poles is the Manfrotto 044 Background Holder Hooks and Super Clamps for 3 Backgrounds, which is currently $95 on B&H. As you can see in the other photos, this enables you to set up to three rolls of seamless in place simultaneously. In this image (bel0w) we can see that the hooks are attached to the auto pole with the Super Clamps, which lock it in place solidly.
Now, the entire system is incredibly well made, and worth the money in my opinion, but there is one thing that bugs me about the system and that is that the tightening lever on these Super Clamps isn’t adjustable. You know how on some clamps you can pull the handle outwards, then rotate it and let it drop back down into place at a different angle? Well, you can’t do that with these.
This means that if like me you want to tighten these right against a wall, you have to adjust them before you put the pole in place, and also, I had to over tighten one of my pair so that it didn’t stick out backwards. This is a small detail, but those kind of adjustable levers are common on lighting gear, and I wish they were included. It just makes life easier for the user and would have been a nice touch.
Something else to note here too is that if you have permanent studio space and you know that you will always use the same width rolls of seamless, you can actually just buy these hooks, and drill holes in your walls and screw them into place. You’d need to ensure that you have strong enough walls etc. but this is definitely an option and would save you a lot of money.
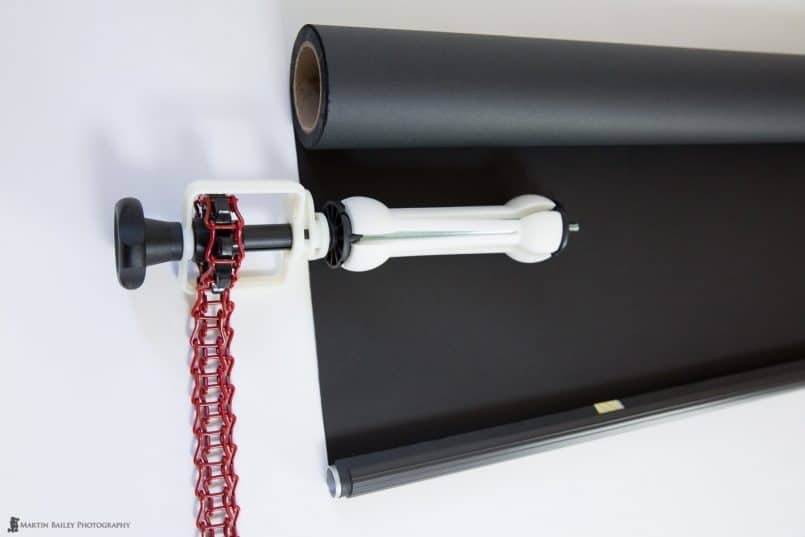
Once you have your hooks in place, you’re ready to assemble your seamless rolls, and for this you’ll need the Manfrotto 046MCG Expan Drive Set with Metal Chains. As you see here (above) these basically just screw into the core of the seamless roll and open up as you rotate the knob, tightening themselves into place inside the core. You just have to align the end of the black plastic part with the edge of the core, and adjust as you tighten, then once you put the other end in place, you’re ready to drop the seamless into place in the hooks.
Another thing to note is that I also bought a Manfrotto 062-2 Background Paper Counterweight to attach to the bottom of the paper. This in my opinion is an essential edition to the system. Without the counter weight fitted the paper curls and fights you as you unroll it, and you need to pull it into place and then clamp or tape it down once in place to stop it from rolling back up. You would also probably need to clamp the paper roll as well, to stop it from unrolling further. This all kind of defeats the object of the system to a degree.
Although the Counterweight at $33 is comes in two pieces, and can be fitted together for 9 foot seamless rolls, because I’m using 1.36m (3.4′) rolls, I was able to use one of the two halves of the counterweight for each roll, which was perfect for me.
You will of course have to adjust the gap between your Auto Poles so that the Expan Drive holders drop into the hooks properly, but once it’s set up, you can place up to three rolls of seamless in place. Note that if you do use the counterweight as I’ve done, you can adjust the width between the hooks with the torsion and locking nut of the other part of the Expan Drive. If you undo the locking nut, it slides along the pole a little, and that can give you enough play so that you can roll the seamless totally up, and the counterweight will go in between the hooks OK. By default my counterweights hit the hooks, so I had to make this adjustment.
Also note that it’s best to not over-tighten the torsion nut, as it then becomes more difficult to freely unroll the seamless and roll it back up again with the chains. These are meant to be left a little free unless your seamless is so heavy that it starts to unroll by itself, then you can use this nut to lock it into place, or increase the torsion until it can be unrolled, but not so freely that it unrolls by itself.
The Expan Drive Sets are currently $89 on B&H, and you need a set for each roll of seamless that you want to set up simultaneously. I only bought two sets for now, though I might buy another set later if necessary. Of course, if you run a high volume studio using many different color backgrounds, you may end up setting up more than three rolls of seamless, using more Expan Drive kits, so that you can switch them out easily. Because the rolls just slide into place it takes literally just a couple of seconds to switch these out, so the investment may well pay off in time saved.
One other thing to note here too is that you have to set the seamless so that it unrolls from the back. When using a single roll of seamless on my portable stands, I usually set them up so that the paper unrolls from the front, because then the seamless doesn’t fight you around the bend if you’re going to have it run under your subject. When you roll as we see in these pictures, the paper doesn’t want to take that corner as freely. This is something you have to live with of course, otherwise the higher rolls will unroll into the lower rolls as you lower them, and the system isn’t as effective.
I also saw reviews on B&H that made me think there are Expan Drives available with plastic chains, but everyone seemed to agree that the one’s with metal chains are better, so watch out for that if you build this system for yourself. The metal chains are nice and heavy and probably help to keep the action smooth and well balance, so this is probably not the place to try and save a few dollars.
Of course, I don’t only use seamless for my backgrounds. I sometimes use a beautiful black velvet background that just sucks up light, and I’ll continue to use that, though now what I’ve done is taped the end of the velvet to it’s core, and threaded a long loop of nylon string through the core, so that I can hook it up onto the support’s hooks, as we see here (right).
When I place another order for some stuff, I might pick up another counterweight set, and then I can use one length of that as a new core for this velvet, which would be neater than this taping, but this works, although it’s not so pretty.
I also tied a few knots in the left side of the nylon string so that I could easily adjust the height in stages as necessary.
I haven’t included any details on lighting today, although I will of course generally be using this set up with my Profoto Monolights and soft boxes and other lighting modifiers.
This is my play studio too, where I sometimes just for example buy a bunch of flower and have a few hours of fun shooting them, so I’m looking forward to getting a little free time or my next project to really start to benefit from this new system.
With regards to lighting though, I wanted to finish with one note about a new ceiling light that I also just installed. It’s basically an LED ceiling light replacing my old circular florescent tube light, partly to conserve energy, but more because I can easily change the brightness and color of the light. I can make the light warmer or cooler with a remote control, and on it’s bluest setting it’s about 4750K, which is not too far from Daylight, which is generally considered to be around 5500K.
Now, this isn’t studio lighting, but when turned up full, with a small light balance adjustment, I can shoot hand-held without setting up my studio lighting. Of course, for professional results, the studio lighting is going to be worth setting up, especially as I can’t control the angle of the light and the shadows with my ceiling light, but for a quick product shot, such as the one’s I’ve embedded in this episode, the ceiling light is going to be a big time saver.
I did have a look on B&H and Amazon.com for something similar, but I couldn’t find it, so I can’t include a link, but it is a Toshiba LEDH95040-LC ceiling light with remote control, if you want to check availability near you. I’m all for putting little time savers like this in place, especially when we’re all trying to get so much done with so little time.
Anyway, I hope this has been somewhat useful. I’m really pleased that I finally took the plunge and built my Manfrotto Expan Drive Background Support system. This is going to be a huge time saver moving forward. Remember too, as I mentioned earlier, if you like this idea too, and set up your own system at some point, please do use the B&H links at the bottom of the post. It doesn’t cost you anything, but it really helps with the costs involved in producing this podcast each week, and that is always very much appreciated.
Namibia Full Circle Tour – Aug 10-26, 2015
I also wanted to quickly mention before we finish that I have just finalized details of an Aug 2015 Namibia tour with my friend Jeremy Woodhouse. It’s called the Namibia Full Circle Tour as we are covering pretty much the entire country, except for the Etosha National park, although we come close. We are considering doing an extension into Etosha after the main tour though, so if you are interested in that, do let me know. Click the graphic below to see full details of the tour on Jeremy’s Web site, and please make sure that if you book, you tell Jeremy that you heard about the tour from me.
Sponsored by Lynda.com
We are proud to have Lynda.com on board as our current sponsors lynda.com. Learn lighting, portraiture, Photoshop skills, and more from expert-taught video courses. To start your 7-day free trial, visit lynda.com/mbp.
Show Notes
All B&H product links are above. Please support the Podcast by using our affiliate links when you buy from B&H.
See details of the Namibia Full Circle Tour here: https://mbp.ac/namibia2015
Music from UniqueTracks.
Subscribe in iTunes for Enhanced Podcasts delivered automatically to your computer.
Download this Podcast in MP3 format (Audio Only).
Download this Podcast in Enhanced Podcast M4A format. This requires Apple iTunes or Quicktime to view/listen.



0 Comments