
Today I’m going to go into detail on why I expose to the right, as I get asked about this a lot. Exposing to the right means adjusting your exposure so that the image data we see in the histogram falls as close to the right shoulder as possible. I’ve touched on this a number of times, but never really gone into detail about the reason, so here we go.
Actually, before we jump into this, I found out last week that images in this Enhanced Podcast not being displayed in iTunes 11 is not a bug, but the way Apple have decided it’s going to be. You have to hold down the Command key on a Mac or CTRL key on a Windows machine, then click the artwork in the little window at the top of iTunes. This will open the Enhanced Podcast viewer, so you can follow along with the images. I’ve also put a page together to help you understand this at mbp.ac/ituneshelp, so do take a look if you’ve been missing the images.
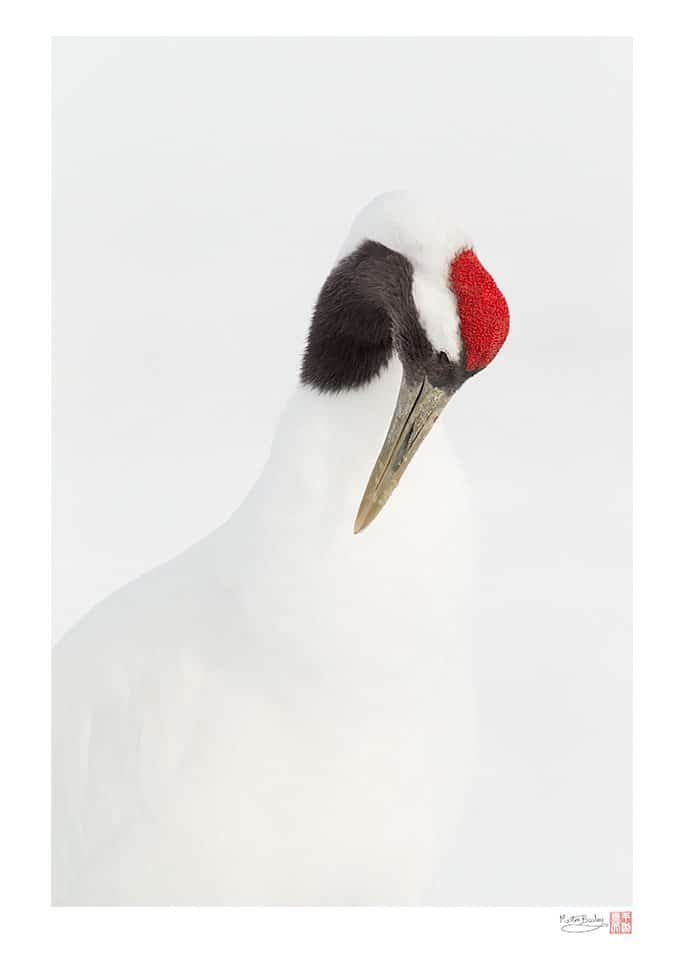
Tanchou Study #7
Firstly, let’s look at why this helps you to create cleaner images, starting with a little background. When I first started shooting with a Digital SLR camera, some 12 years ago now, it was common for people to slightly underexpose the images to give them a little punch. It seemed to make the colors more vibrant. The problem with that, as we’ll see, is that we were inadvertently introducing more noise to the images.
After a few years I started to travel to Hokkaido where I now run my Winter Wonderland tours, and before very long I started to shoot in Manual mode to ensure that I was getting well exposed snow. As you know, camera’s meters still try to expose everything as an 18% or neutral grey, which means if you shoot a snow scene, the camera will under-expose the photo by around two stops of exposure, making the snow look like a muddy grey.
You can use exposure compensation, adding two stops to counter this, but then if the predominantly white Red-Crowned Cranes that I shoot up there move from their white background to a dark background, you’d have to change your exposure compensation from plus two stop to minus two stops to compensate for the now dark background.
For example, one moment I could be photographing something like this photo (right) of a white crane on a white background, and the next moment I could spot another crane flying into the area, on a dark background.
These next two images are screenshots from Lighroom, to show you the histogram as well. You can see that this first image (below left) of a crane on a dark background is predominantly dark, but with a small spike to the right of the histogram representing the white bird. You can also see a gap between the bird and the right shoulder of the histogram, but this is Lightroom giving me an extra stop of exposure to play with. In the camera, this will have been just touching the right side of the histogram. (Click on the images to enlarge for a closer look.)
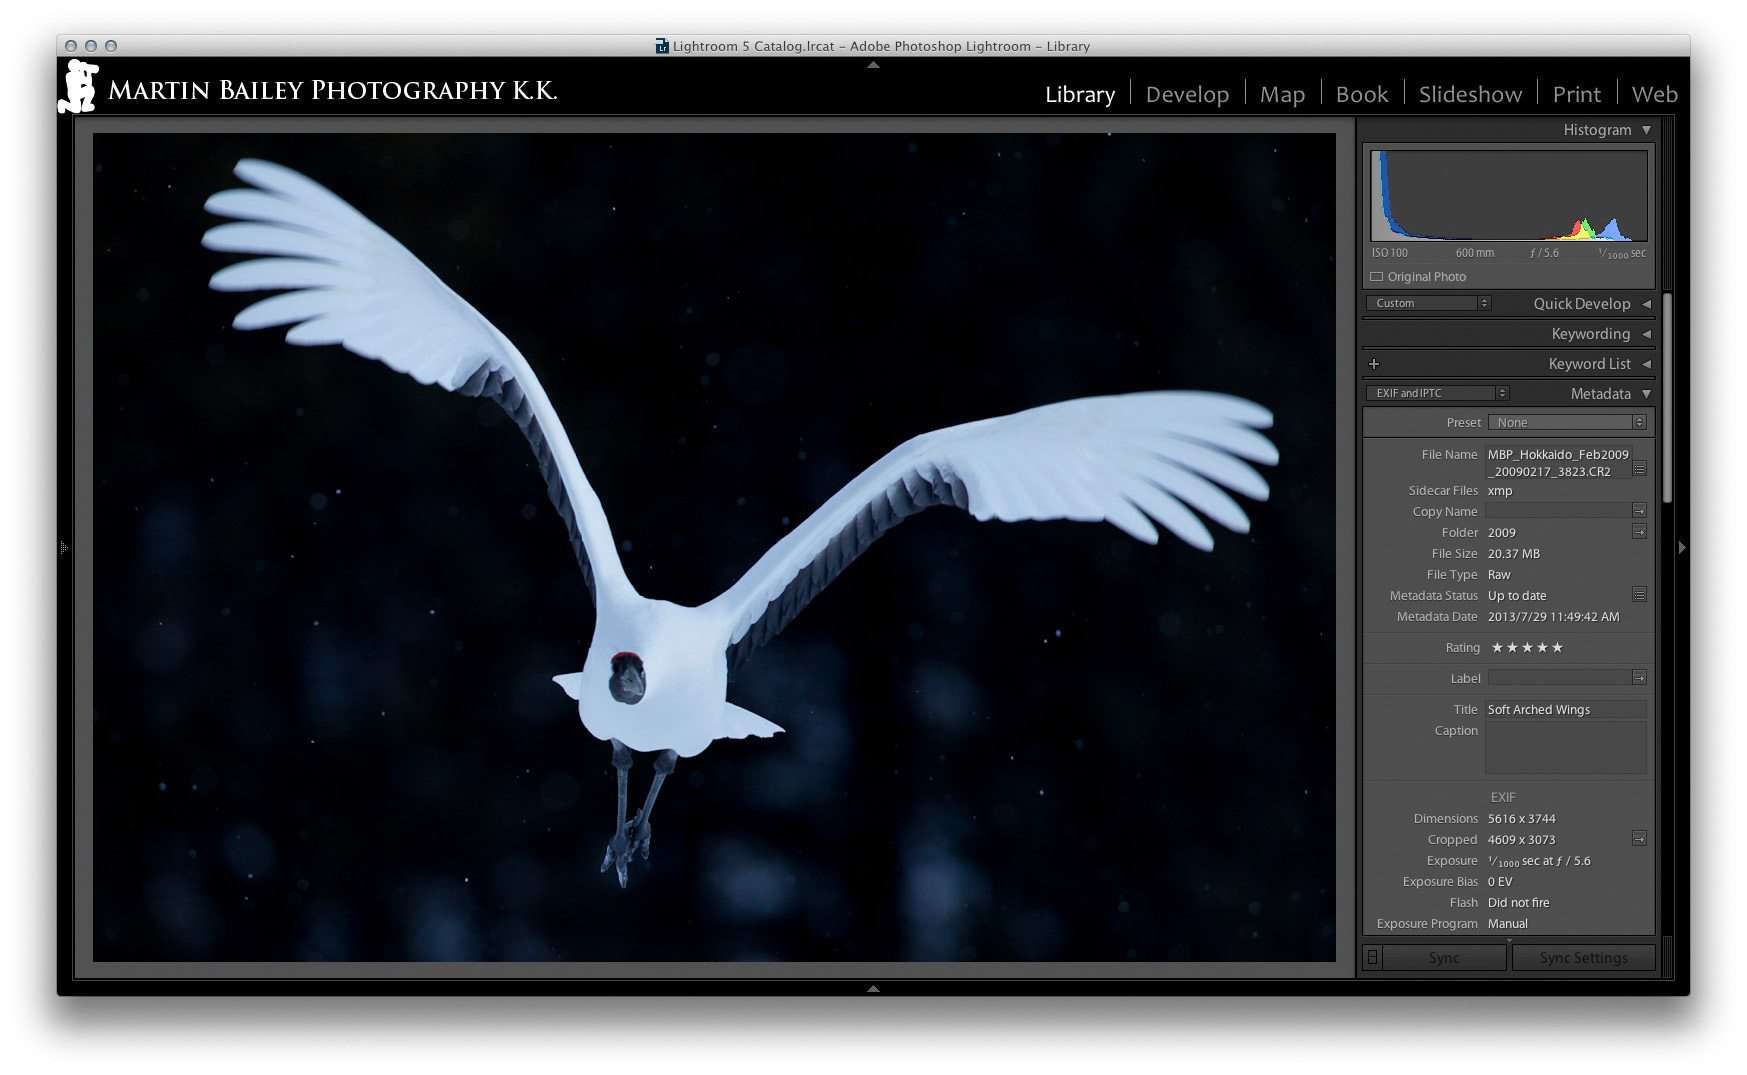 “Soft Arched Wings” in Lightroom |
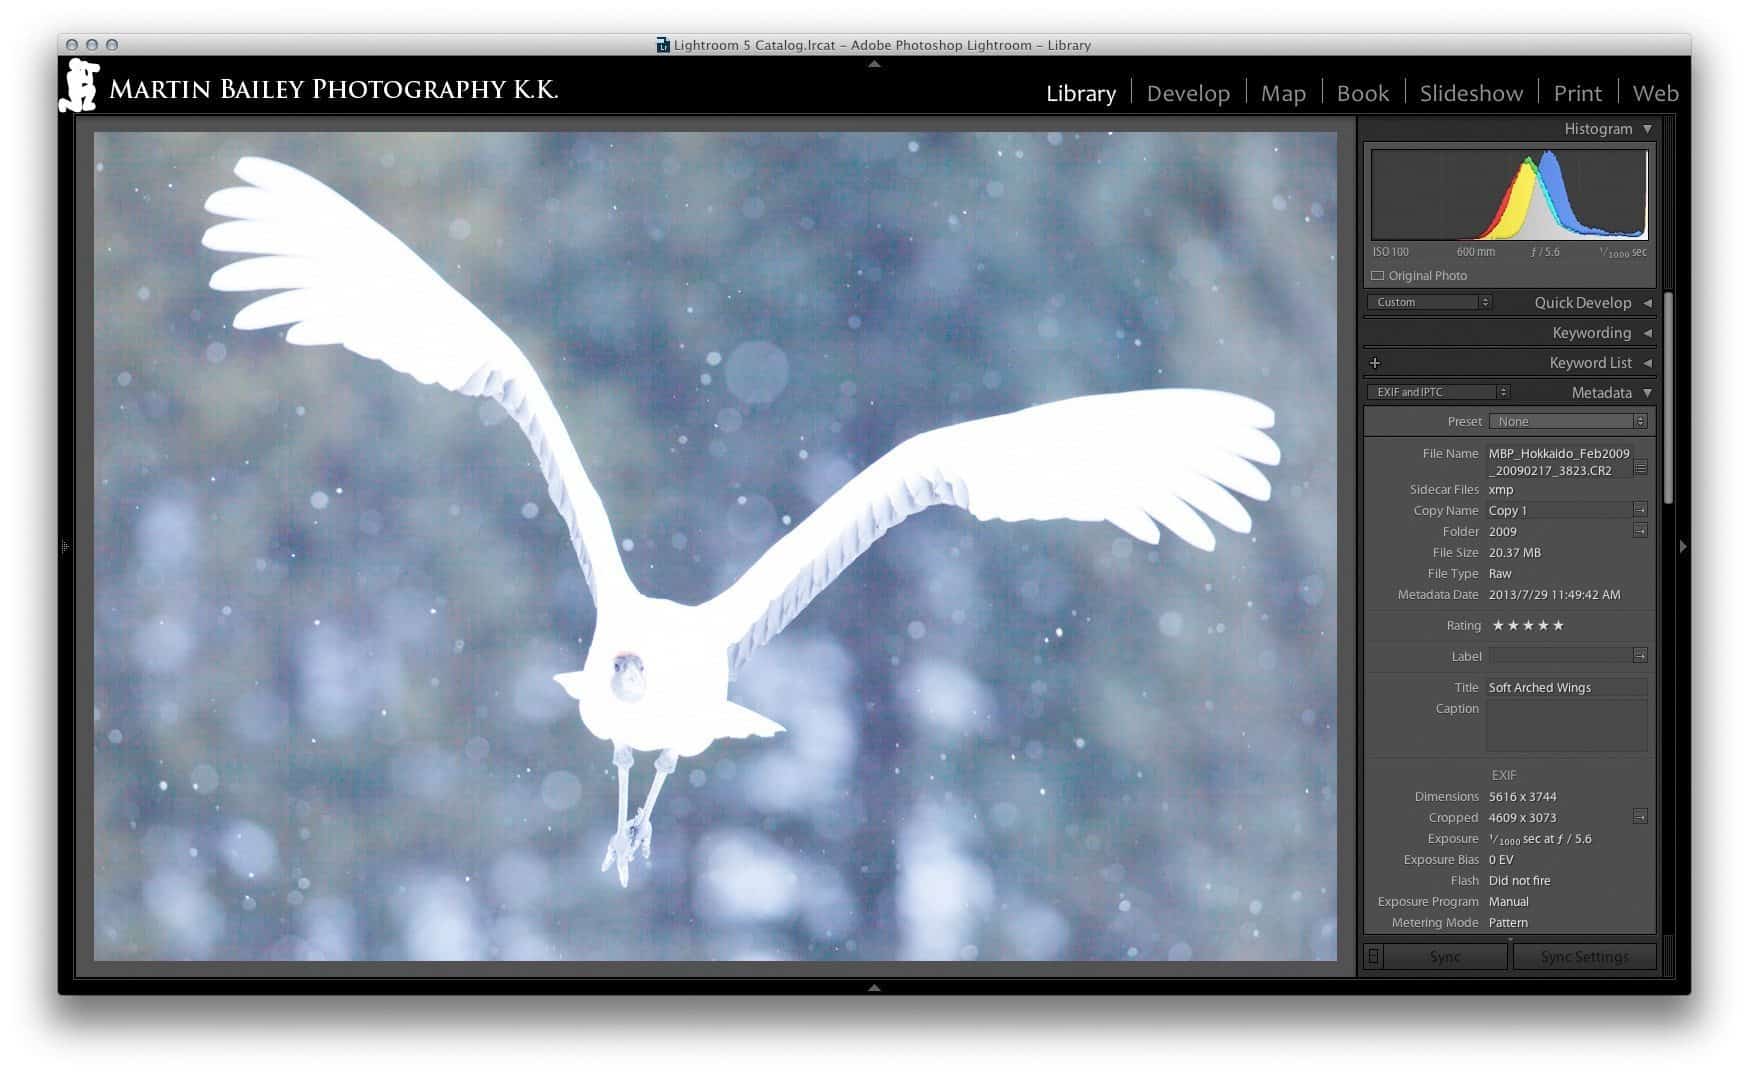 “Soft Arched Wings” 4 Stops Overexposed |
Had I simply raised the camera from the shot of the white crane on a white background though, still with plus two stops of exposure compensation dialed-in, the camera would have seen the dark background and brightened it up to a mid-grey, probably to the tune of around 4 stops, because you need to add 2 stops for white, or reduce by around 2 stops for black. I simulated this in Lightroom by increasing the Exposure by 4 stops, as we can see in this shot (above right).
See here too how the data on the histogram is mainly in the middle, but with the white bird spiking up the right side of the histogram? The data in the middle is what should be the black background, and that should be way over on the left, with the white crane on the right, but not touching the right side of the histogram. If you see this in the field, without knowing what you are overexposing, it’s time to pull your exposure back until the histogram is just before or just touching the right side.
Of course, a crane against a blue sky would be a different setting again, and the size of the crane in the shot changes how much exposure compensation we need too, so you end up fighting a losing battle, or bracketing. Unless you are shooting for HDRs, bracketing just shows a lack of understanding on exposure. I was initially told this by one of my mentors, a Japanese photographer called Hiroshi Yokoyama, a wonderful elderly gentlemen that used to be an Olympic winter sports photographer, and now lives in Hokkaido fulfilling his life’s work. I also heard Ansel Adams say this on a documentary too, so it’s not just me being outspoken here. Well, maybe not…
Why is this Important?
Exposing for whites aside, you probably are still wondering why I’m such a stickler for exposing to the right, even for scenes of average brightness and tonality. You’d be forgiven for thinking that if the scene is similar to a mid-grey, you could leave the exposure up to the camera, but that is not the case. I started exposing to the right intuitively, but after a few years, someone pointed out a great article on Michael Reichmann’s Luminous Landscape web site about Optimizing Exposure. This was actually a follow up from a 2003 essay called Expose Right, and both are well worth a read. The biggest take-away is how cameras distribute the image data when the image is saved to your memory card, which we’ll look at here.
Camera sensors have to convert the light that is captured by the photo-diodes on your sensor to a digital value. Most cameras these days save this data for each pixel with 14 bits of data, meaning we can have up to 65,536 tonal values per pixel. Many cameras at the moment record about 12 stops of dynamic range, some more, some less, and this is the range between a true black and a true white, and with a 14bit sensor, this means we’d have 65,536 tonal values between the two extremes.
Think of this as gradually filling a bucket with water, or even filling a photo-diode on your sensor with light. A totally empty bucket would be zero, or totally black, and then as you pour water into the bucket, or light into the photo-diode, you gradually fill it until you hit the maximum it can hold, which would represent a pure white. Anything after that is just overflow. The white can’t get any whiter, and that pixel is now over-exposed.
Because digital sensors are linear devices, if you double the amount of light that hits the photo-diode, you double the voltage generated by the sensor, or the amount of water that we pour into the bucket. The result is that data is literally halved with each stop or EV (Exposure Value) that is recorded, so the brightest stop of light the sensor can record has to be double that of the second brightest. This means that to use the full 65,536 tonal values across the entire image, we have to half the amount of data that can be used for each exposure value from pure black to pure white. For a 12 stop dynamic range sensor, this means your data is broken up into 12 steps, as follows…
| Darkest | — | — | — | — | Mid | Tones | — | — | — | — | Brightest | |
| EV | 1 | 2 | 3 | 4 | 5 | 6 | 7 | 8 | 9 | 10 | 11 | 12 |
| # Tones | 16 | 32 | 64 | 128 | 256 | 512 | 1,028 | 2,048 | 4,096 | 8,192 | 16,384 | 32,768 |
This is why the darker parts of the image are noisier than the brighter parts. The noise is always there, but because we have less data to record the darker areas of our image, the noise is much more visible. I’m sure you’ve noticed that even a nicely exposed image often has a bit of noise in the shadows. This is why.
Exposing an Average Scene
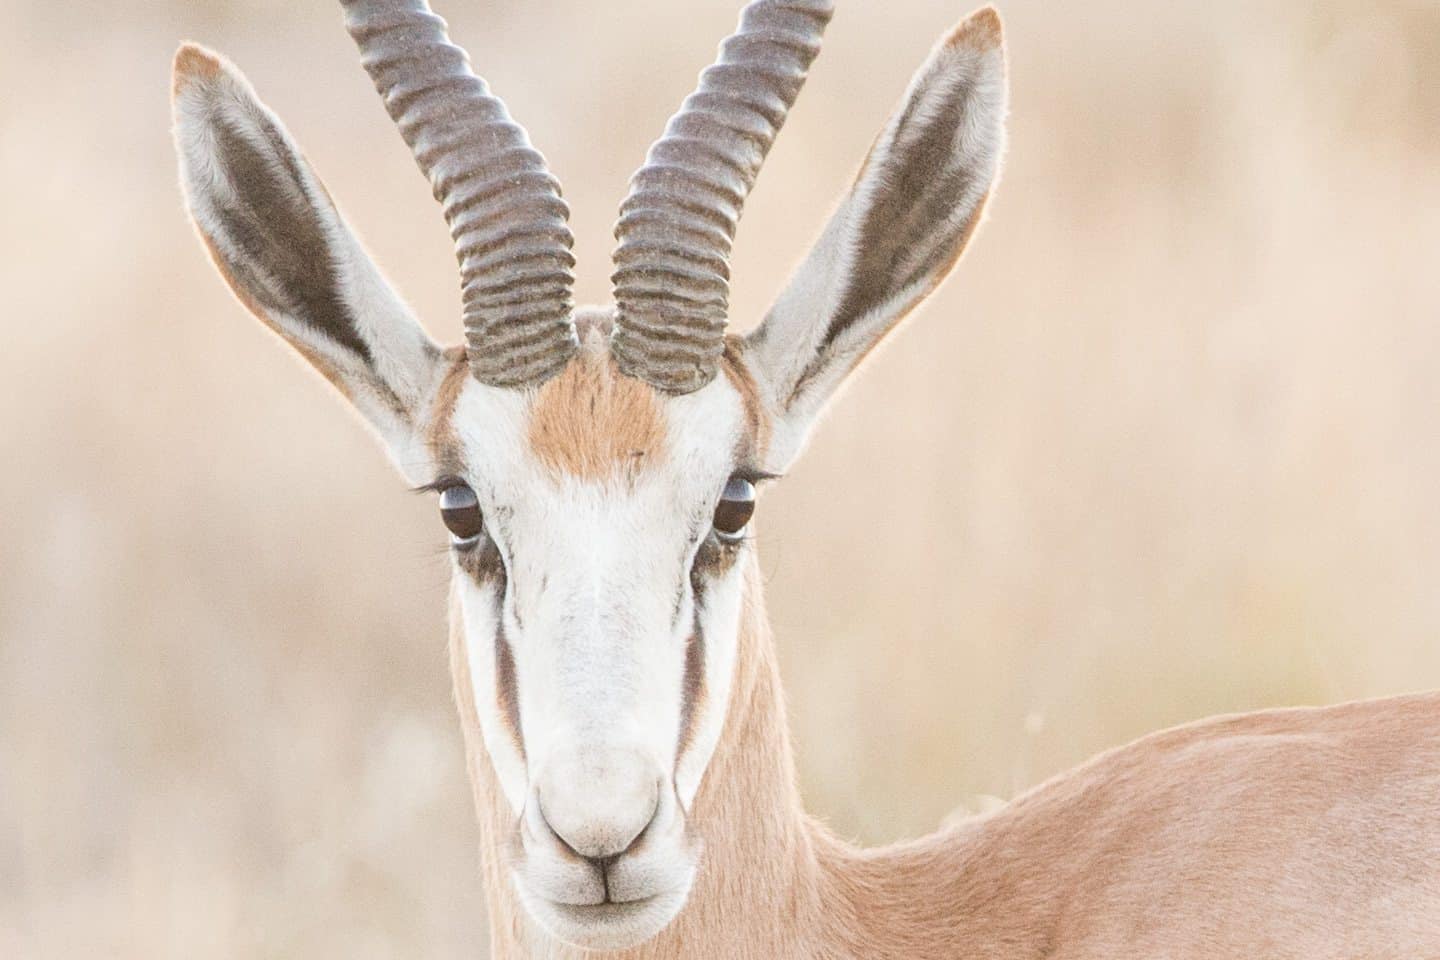
We’ve looked at a white scene, or a dark background with a white subject, and for those scenes, it’s easy to understand why I set the exposure as I did. But what if you shoot a mid-tonal scene? Of course, if you leave the exposure up to the camera, it will record the scene in the middle of the histogram, so you will essentially recording your image with between say 256 and 2,048 tonal values per stop as opposed to between 4,096 and a massive 32,768 tonal values per stop in the brightest four stops of the image, and for a 12 stop dynamic range camera, this would be what is represented by the right-most third of the histogram. Here’s an example of such a histogram, from this shot of a Springbok in Namibia earlier this year (below).
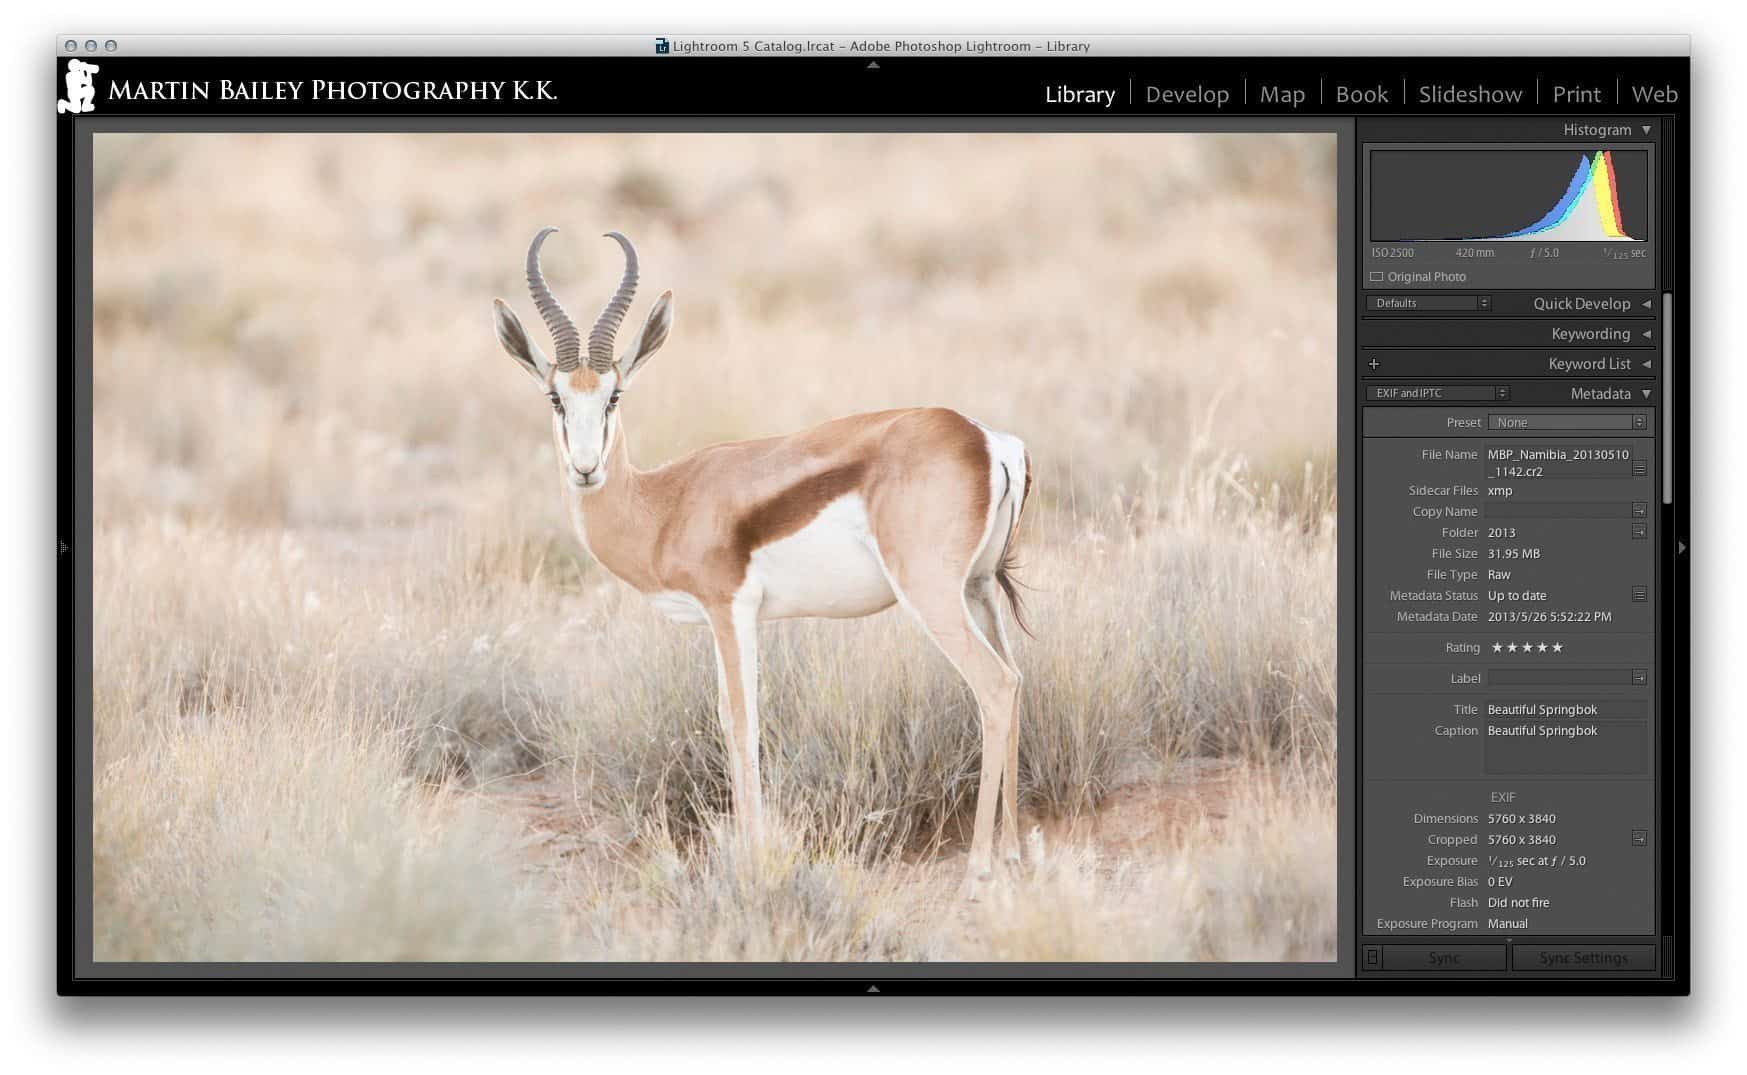
Springbok Shot in Lightroom
See how the histogram data is over in the right third, again though noting that Lightroom is giving me an extra stop here. In the camera, the histogram was right up to the right shoulder. This of course means that despite me shooting this image at ISO 2500, even when viewed at 100% there is very little noise, as we see here (below).
ISO 2500 Springbok photo at 100%
In an extreme case, you might find yourself shooting a very dark subject against a dark background. In the film days, you’d have dialed in maybe a stop or even two stops of negative exposure compensation, to ensure that the scene was recorded naturally dark, remembering that the camera wants to brighten it up to an 18% grey.
Darken Down in Post
To ensure that we record our images with as wide a range of tonal values and as little noise as possible, you would even expose a very dark scene to the right, and then reduce the Exposure of your image in your post processing workflow. I don’t have any examples this extreme, although many of the sand-dune photos from Namibia this year have had the exposure dialed down to some degree. My favorite shot of the camel thorn trees against the sunlit sand dunes at Deadvlei for example was dialed back by half a stop of exposure in Lightroom, to what we see here (below).
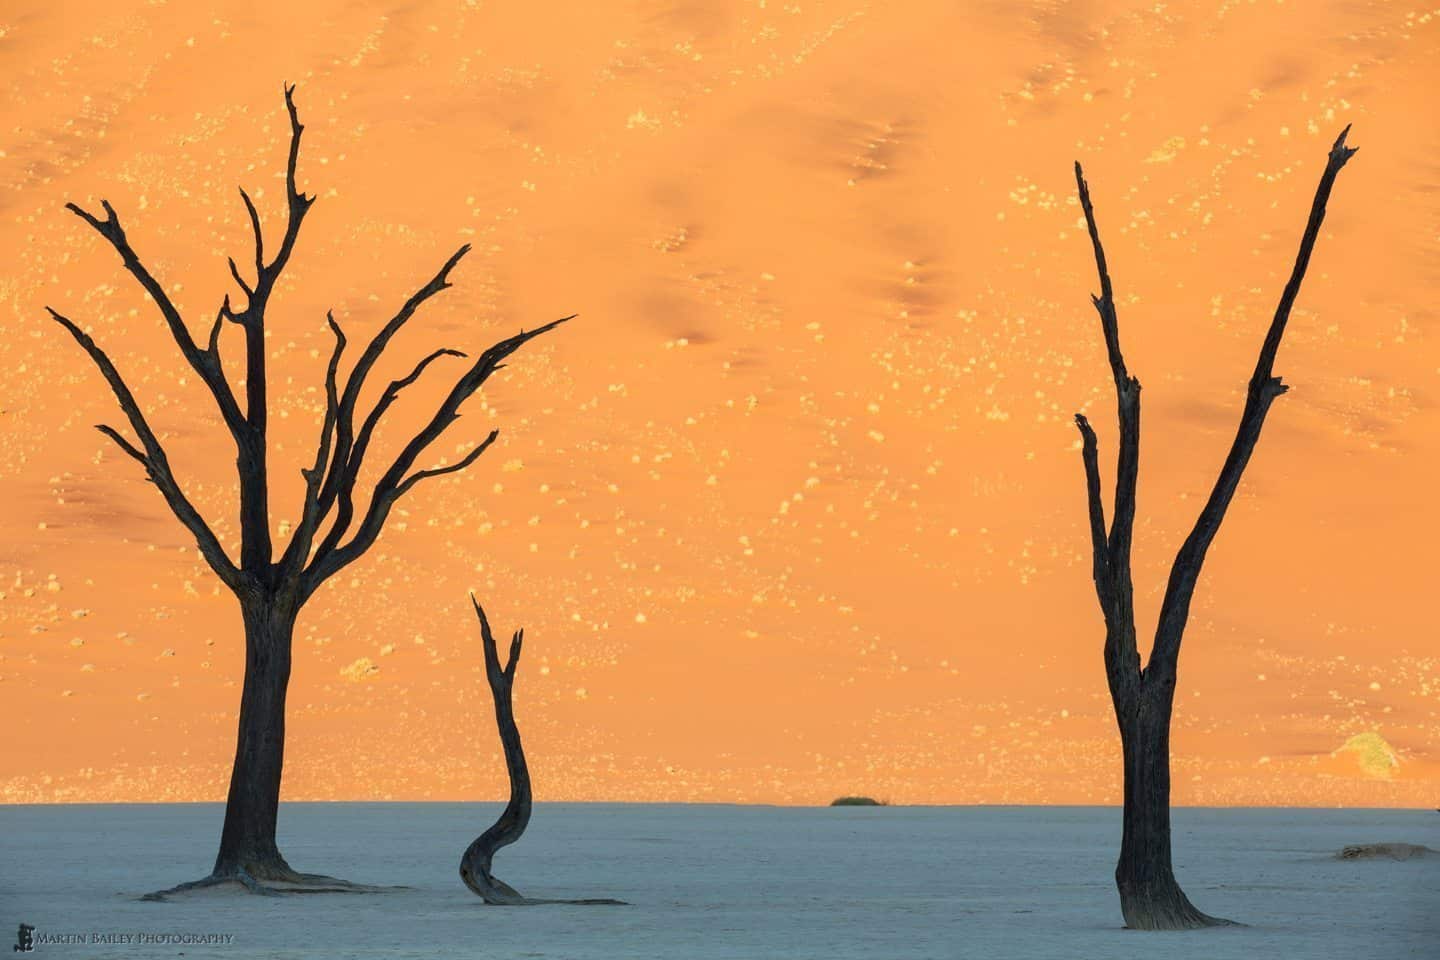
Deadvlei Silhouettes
This was according to plan of course. I get the highest quality image possible by exposing to the right, then darken it down in post as much as necessary. Of course, I’m aware that many people think my images are high-key anyway, but that’s because I have my monitor brightness set very low, as part of the calibration process. Many people don’t do this, and that’s why my images seem bright.
The sad fact is though that most people’s images are actually under-exposed because they trust the camera too much, but they never know because they view them on a monitor with the brightness turned up full. Then they print and wonder why the prints are too dark. If this sounds familiar to you, I hope a few pieces of the puzzle are starting to drop into place here.
A New Exposure Mode
Part of the reason I decided to talk about this today was because of a conversation on This Week in Photo a few weeks ago. I’d mentioned shooting to the right, which raised some listener questions. After talking a little about shooting to the right though, we went on to talk about new features that we’d like to see in cameras, and I said that I’d love to see a setting on the camera that allowed you to just keep exposing the image until it starts to blow out, or over-expose.
Ideally we’d be able to set a parameter to tell the camera how much of the scene gets over exposed. For example we might want to stop at 0%, so there are no specular highlights overexposed at all. Or we could set it to say 1%, 3% or 5% etc. as we can now start to blow out the image in the JPEG preview on the camera, but Lightroom gets more detail from the RAW file, so you can go over a little without worrying about it too much.
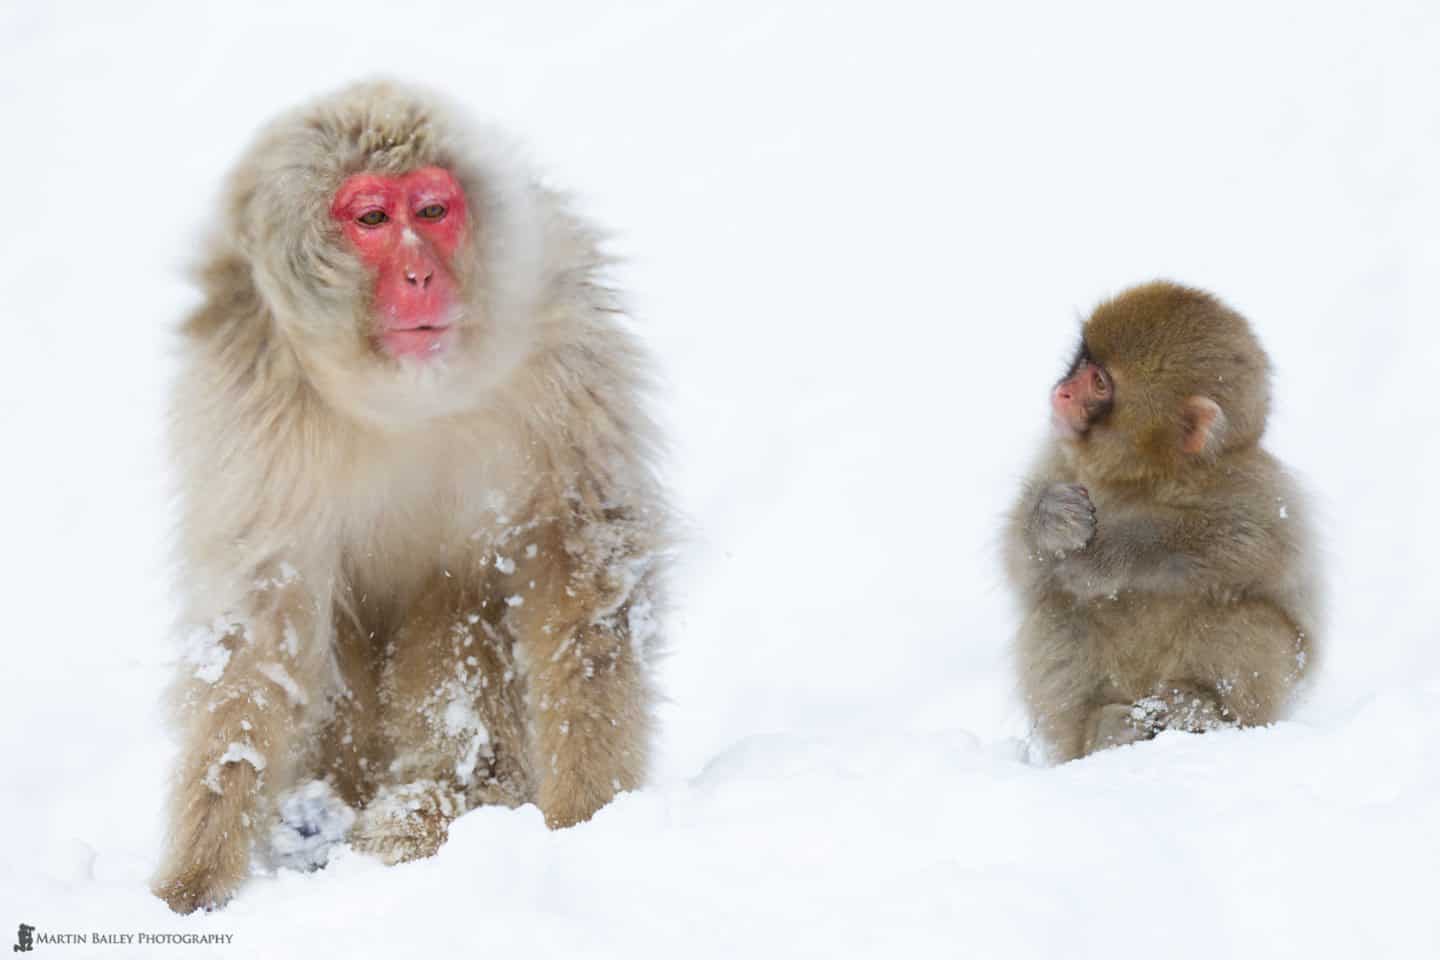
There are times such as when I’m shooting the snow monkeys, when I actually blow out probably up to 30% or 40% of the scene, because I’m looking for a well exposed monkey, and don’t care too much about the background. It’s often out of focus anyway, and the slice of snow on the same focus plane as the monkeys has a bit of texture, which reduces it’s luminosity to the point that is doesn’t overexpose anyway.
You have to be careful doing this of course, as too much over-exposure can bleed or bloom into the darker areas, messing them up a bit, but for the snow monkeys this doesn’t really happen due to their fur, kind of protecting the highlights around them.
Reverence
What I could see happening is a kind of hybrid Aperture Priority mode, where I tell the camera what aperture I want to use, as that’s my most important setting, but then I also want to control how slow the shutter speed gets, so Auto-ISO would also need to be turned on. I’m already doing this for some of my photography, although I still shoot in Manual mode more than 99% of the time, because I lose too much control in Aperture Priority and exposure compensation drives me crazy.
When using Auto-ISO the camera bases the shutter speed on the focal length, but you can set a minimum shutter speed as well, which is necessary with wildlife as the animals can move around so much that you need a fast enough shutter speed to avoid subject blur. This needs to be opened up a bit though. On my 5D Mark III 1/250 of a second if the fastest shutter speed I can select. This would be fine for the snow monkeys most of the time, but I need faster shutter speed for birds in flight. Ideally I’d like to be able to set this to any shutter speed the camera can use, though I’d probably set it to between 1/500 and 1/1000 of a second for birds in flight, depending on the size of the bird and how much wing movement I want.
All of this though is only relevant if I had the ability to tell the camera to keep on exposing until a certain percentage of the scene got blown out, so I imagine the algorithms would be somewhat complicated, but we already have the ability to create a live histogram in Live View, so the camera could adjust the Shutter Speed, ISO or even Aperture, depending on our settings, to achieve the optimal exposure, which we can already see in the histogram.
This would of course become more difficult for TTL or Through The Lens photography, because there’s no light hitting the sensor like there is in Live View. Once you start to expose the image though, light is hitting the sensor, so assuming I was in Aperture Priority mode, I imagine the camera would need to change the ISO as well as the shutter speed dynamically as it exposed the image, all in as fast a time as 1/1000 of a second.
Stopping the exposure as the image starts to over-expose is already possible with some flash photography though, and that is working at similar speeds, so I know it’s not impossible to do. It’s really just a case of the camera manufacturers spending the R&D dollars or more likely yen, to figure this out for regular exposure and get it implemented. I see a time though when we will expose all scenes to the right for the best quality image, and then the camera might even include a bit of information on the actual tonal values in the scene, and normalize it in post, or even in the camera, but without throwing away all the tonal values that it gained by exposing the image to the right.
Use the RGB Histogram
So, if you don’t already expose to the right, but I’ve convinced you to give it a try, there are a few things that you’ll need to bear in mind as you work. Firstly, if your camera has the ability to display an RGB histogram, turn it on. The standard grey histograms are displaying an average of the Red, Green and Blue channels, and this can give you a false sense of security. Depending on your subject, one of the channels can start to blow out before the others, and it’s sometimes only possible to see this with an RGB histogram.
Don’t Fear High ISOs
Also, if you are going to shoot dark scenes with up to three or four stops brighter exposure, do keep your eye on your shutter speeds. You may need to increase your ISO to achieve a fast enough shutter speed for the scene in front of you.
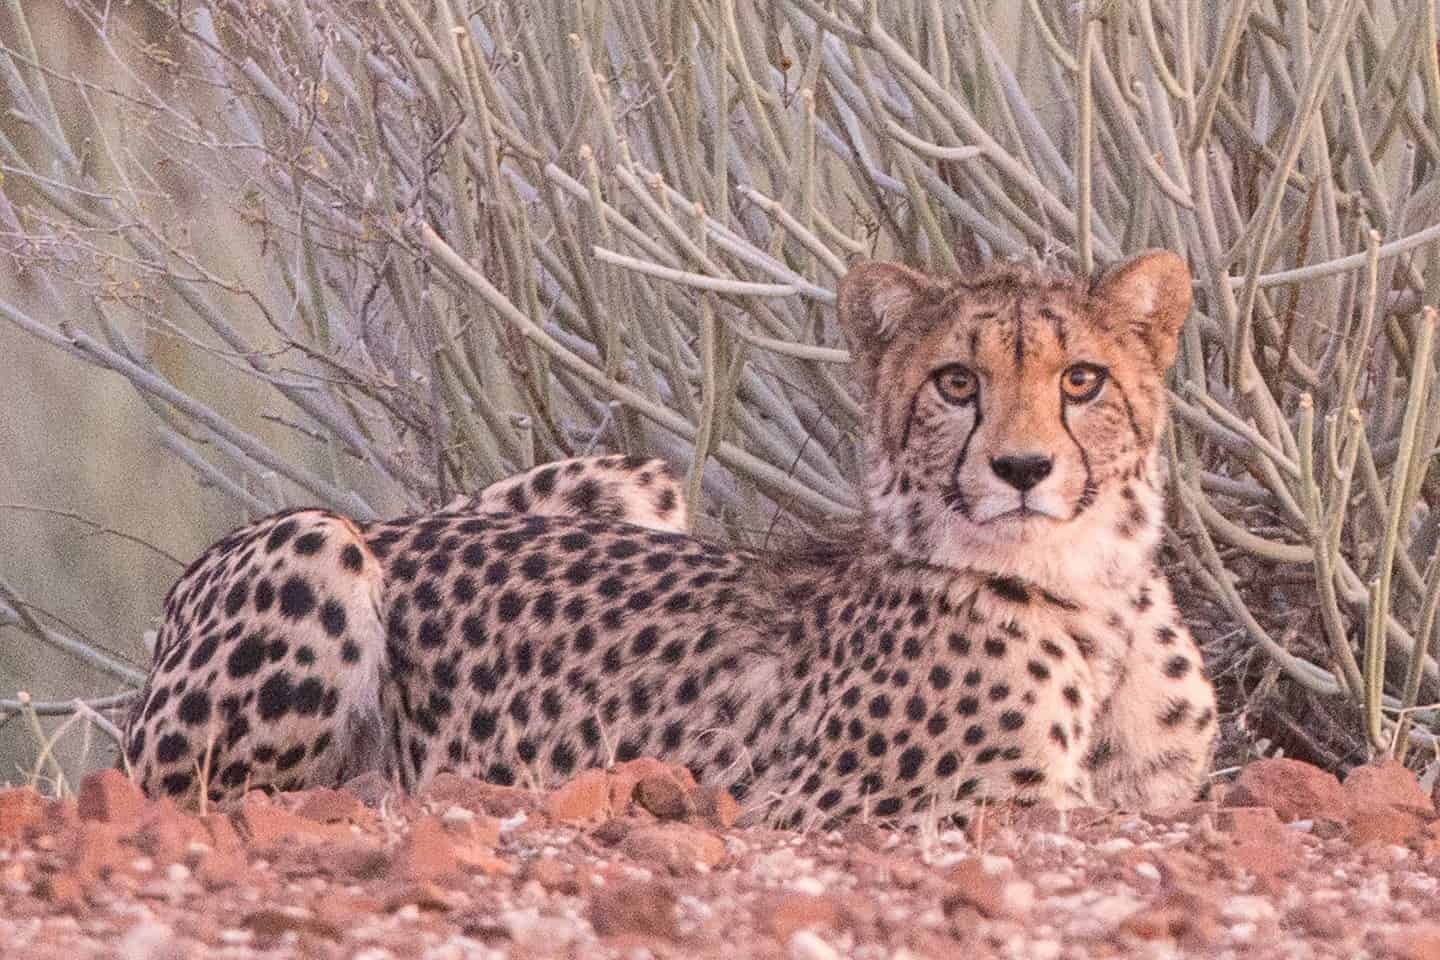
This shot of a cheetah for example is not a dark scene as such, but it was dark when I shot this. Just minutes before we could only see this cheetah with the lights of our safari vehicle, and there was just enough light from the sun, still below the horizon, for me to be able to get this shot by cranking up my ISO to 12800.

Cheetah at ISO 12800
This gave me a 1/125 of a second exposure, which was as low as I dare go, but I was standing on my seat with my 300mm and 2X extender fitted for a 600mm focal length, but the lens was resting on my hand, and so relatively stable. The cheetah wasn’t moving either, so I got away with this shutter speed. As we can see from this 100% crop though, sure, there’s noise, but it’s totally acceptable in my opinion. What most people instinctively do though in low light, is to be too afraid to increase the ISO and shoot the scene darker, expecting to brighten it up in post.
Cheetah at ISO 12800 100% Crop
The irony here of course is that if you shot this at say ISO 3200, two stops darker, you’d record the image with fewer tonal values per stop of light, making it much noisier, then when you increase the exposure in post, you amplify the noise, giving you a total piece of crap of an image. So, the long and short of it is, if you want to capture the best quality images that you can, shoot to the right, even if you then dial the exposure down in software later.
Show Notes
Luminous Landscape Essay:
Optimizing Exposure: http://www.luminous-landscape.com/tutorials/optimizing_exposure.shtml
Expose Right: http://www.luminous-landscape.com/tutorials/expose-right.shtml
Music by UniqueTracks
 Subscribe in iTunes for Enhanced Podcasts delivered automatically to your computer.
Download this Podcast in MP3 format (Audio Only).
Download this Podcast in Enhanced Podcast M4A format. This requires Apple iTunes or Quicktime to view/listen.

Excellent post Martin, as always.
It’s funny that you’ve written a post about ETTR, I was having a conversation with someone on a Private Facebook group only last week about this technique.
Since I started doing it’s certainly given me better results (less noise).
Thanks for sharing
Thanks Michael! I’ve been touching on this long enough, I thought it was about time I put something together.
i like your photo style too much…………………….
Thank you Angappan!
Actually, the linear quantization of the light by the AtoD is not why the image is noisier in the darker regions. If the AtoD has enough bit depth (so that it’s quantization is less that the read noise) noise in the darker regions (read noise predominates here), then the noise in the darker regions is the limiting factor, not the quantization of the AtoD. ETTR is good in so much as it exposes the shadows brightly enough so as to reduce read noise. The performance improvements are not due to using more of the AtoD range. Because it’s wasteful (in power requirements and complexity/expense) to have better AtoD performance than your sensor noise, the AtoD will be “just” good enough that it’s not the limiting factor in the design of the system. In that respect it may “look” like the recorded amount of code values per stop tracks directly relates to noise in the image and thus is causal, but as you can see, the relationship is actually the other way around, with sensor noise being the factor at work and the AtoD just doing enough that it doesn’t make image noise worse.
Ha haa! I thought about you this afternoon as I wrote this out Graeme! Nice to hear from you. I almost knew you’d post this if you were still following the Podcast.
The result of my explanation is “good enough” too, so I’m not too worried about the discrepancy. Thanks for the clarification though!
Thanks Martin!
So yes, the reason we do this is to reduce noise, and the way we do that is to ETTR. That is all absolutely correct and valid.
How do test images shot at 2 iso stops apart compare if you use the same aperture and shutter settings and keep both exposures within the recording capability of the camera? Also, what happens to the hues if you overexpose by more than half a stop?
Si, if you want to test, you can shoot one image in dark conditions shooting to the right, then decrease the ISO by two or three stops, then increase the Exposure of the darker image to match the right exposed image in Lightroom or Adobe Camera RAW. Depending on your camera and the scene itself, you may not see a lot of difference, but quite often it’s better to shoot to the right with a higher ISO, until of course you reach ISOs that are simply unusable on your camera.
If you actually overexpose, i.e. go to pure white, then there is no color detail left. If you mean what happens when you increase the exposure by shooting to the right, the hues can look a little lighter or even washed out, but as long as you don’t overexpose them, they will come back as you reduce the exposure in post.
Hi Martin, great article and clear arguments for this practice. I have always understood it in simple terms than you are capturing digital data and the more light you allow in (up to clipping point) the more data you record. When I do on occasion bracket I often select images based on file size with largest file size assuming no clipping as it has the most data therefore least noise. Once thing you mentioned was regarding turning down brightness on your monitor for calibration, is this in relation to self-printing calibration or something recommended for lab printing as well to get best results?
Thanks for reading/listening Dan!
With regards to the brightness, if you turn on the option to adjust brightness of the monitor when calibrating a monitor, it will generally turn (or ask you to turn) the monitor brightness down to around 50% or less. My MacBookPro is always around 50% and my external Eizo monitor around 18% of their full brightness. This is regardless of whether you print or not, but if you do print, they come out of the printer looking very close to the screen.
Thanks for the reply Martin. One thing I’ve never thought of before but is the Histogram a good indicator of exposure for print brightness i.e. a balanced histogram = ‘s good print brightness or does the histogram only reflect data on that particular sensor ?
I don’t use the histogram as a tool for good prints as such. Most of the time I just shoot to the right, and leave the images there. I reduced exposure of some of my Namibia shots, such as the sand dunes and Deadvlei, as I showed here, but that’s not that common. Because I have full control of my calibration and monitor brightness, and expose to the right, it all just works. I don’t use the histogram again with regards to printing, and I don’t really try to attain a balanced histogram.
I think the idea of a histogram with all the data nicely in the middle, if that’s what you mean by a balanced histogram, is one of the main reasons peoples’ images and prints are often too dark. It was how we were told to do it by the manufacturers etc in the early days of digital, and they still support this with their 18% grey metering that is so outdated now it just ain’t funny.
I might be a bit of a lone-wolf on this, or at least in the minority, but I just know how easy my digital workflow is, from capture to print, and how beautifully clean my images are, so I would just love to see more people working this way.
Hi Martin,
Just a quick question and forgive me if I’m not understanding ETTR correctly! As I don’t shoot nature and rarely shoot in snow, most of my shots contain a mixture of tones. As such, they often tend to lie in the middle of the histogram.
My question is whether ETTR makes a substantial difference if tested under controlled conditions where you shoot two shots:
1. Exposed to the middle of the histogram
2. ETTR and then reduce exposure in Lightroom until the histogram resembles that in 1)
These two shots should now have a similar level of exposure, but, according to your podcast, 2) should contain more information as you have originally exposed to the right (where there are more ‘bits’ of information).
Will this therefore result in a higher quality image with less noise in 2), and will this difference be noticeable?
Many thanks and keep up the great work!
That’s exactly what will happen Steve. Unless you hit your ISO performance ceiling, which would have to be really noisy, 2 above will produce better quality images. The difference will be noticeable more as you get into the higher ISO, because lower ISOs are less noisy to start with. I literally use this method all the time though, and actually rarely reduce the exposure of my images. Everyone thinks I shoot high-key of course, but they look fine on my calibrated (and darkened down to calibrated levels) monitor.
Great, thanks for the clarification Martin! I think step one is to reduce my monitor brightness down to 30/40% or so, as you have suggested in the past.
I’m still not convinced by this method. Have you got any test data to back up the claim? I did a bit of preliminary testing myself, comparing 1 shot ETTR and darkened versus 1 shot ETTMiddle and couldn’t see any difference, even at higher ISOs.
I don’t have any test shots as such, but I’ve been shooting like this for almost ten years. I see how clear my shots are every day, so I’ve never felt the need to test this. Note though that I don’t do this just for high ISO performance. It’s a way of shooting that makes your work cleaner and your entire workflow easier.
I don’t have time to set up any specific tests right now, but in the meantime, how about sending me your test photos, just web size is fine. I want to see the sort of scene you are testing etc. I might be able to comment just based on that. If you mail me via the contact button above, I’ll mail you my address.
Thanks for sending the photos Steve. First of all, you only separated the exposure by 1.3 stops, and the ISO was not extremely high by todays standards, so I wouldn’t expect to see a difference grain wise. They both look great.
What you did gain though, is more detail in your shadows. Go to the Develop model in Lightroom, zoom in on the pens, and click on the little triangle in the top left of the histogram. This will make your plugged up shadows show blue. Unless this is down to the JPEG conversion, which I doubt very much, you’ll see that you have more detail in the shadows in the higher ISO shot. You can also see this without the blue-highlighting.
You’ll benefit more from this particular trick when shooting in lower light, but again, I don’t shoot like this just for the high-ISO benefits. You can see from your quick test that you have more detail in the shadows. It’s totally up to you, but if you try this in your work for a while, I guarantee you will start to appreciate the benefits.
Hi Martin,
Thanks a lot for taking the time to look at my test pictures. I agree with you that there is a clear and noticeable difference. I have just done a second test, at ISO 6400 and there is a startling difference between the two shots – I will post them up on my blog later today and provide a link, if you have the time pop on over and see what you think!
Thanks again,
Steve
Test results here:
http://stevesayskanpai.wordpress.com/2013/08/01/exposing-to-the-right-ettr-the-test/
Thanks again Martin, I’ll stop spamming your comments section now! 🙂
Good stuff. Thanks for sharing your results. I’m pleased you took the time to understand this.
Hi Martin, long time no chat, this would make a great video podcast have you thought about doing something like that?
Hi Zoran,
Sorry, but I can’t really think of how a video podcast would help to explain this. Which part do you think would benefit from video?
Cheers,
Martin.
Thank you so much for your detailed explanation. Your examples provided great visual verification. Always enjoy your podcasts, now I have to listen to twice with the enhanced versions since much of my podcast consumption is in the car and not a good idea to share attention 3 ways:)
Cheers
Terry
Thanks for listening Terry! I’m pleased you found this useful too.
Yeah, be careful when driving. Some people listen, and look at images at stop lights etc. but any more than that is definitely not advisable.
Martin, thanks for another great podcast, I’ve been listening to them for some time now, usually on the way to or from work. I had to read this one from the blog though to give it my full attention.
Thanks,
Justin
You’re welcome Justin! Thanks for listening/reading! I’m pleased this was useful.
Thank you for sharing your knowledge, I have always expose to the left and never too happy with my images, will try exposing to the right.
Martin,
Thanks so much for such a clear and concise explanation of a complex topic. The little extra bit of info on what the histogram looks like in LR was really useful too. I thought that I may have been under-exposing slightly based on the LR histogram and it turns out that this is not the case. My understanding is that PS gives you even more wiggle room than LR – is that your experience?
Cathy
I’m pleased this was useful Cathy!
LR and Photoshop both use the same Adobe Camera RAW engine, making them identical. The only difference is a slightly different user interface layout.
Thanks for stopping by!
funny thing about the features that you want to see in cameras, seems the MagicLantern community has build that, or something very similar http://www.magiclantern.fm/forum/index.php?topic=5693.0
Just thought you may be interested to know about it.
Keep up the good work, amazing podcast as always
Yeah, I’m aware of MagicLantern Alin, and might give it a try one day. There are a few features that I think would be useful. I wish Canon would just add them to their products from the start though! 🙂
Hi Martin,
I just started with podcasts and where listening to this on my way to a shooting. I’m a self taught photographer and started to realize some years ago, that shooting to the right gives me more quality when I stop it down post. I did not think much about it and because the quality got better, I started shooting to the right. I explained to others to rather use high iso and stop it down, but most people are so scared to use high iso and thought I was crazy….I do big print sometimes and with them I could proof to others that I’m right with my thesis.
And now after your podcast, I was like “I’m not the only one how works like that” 😉
(I n ever read something about overexposing before…)
I really enjoyed listening to your podcast and looking forward to the next ones.
Thanks so much.
Markus
Ps: Now I have a link, to link to if somebody is scared to shoot with high iso 🙂
Glad to have been of help Markus. 🙂
ETTR is very well handled by Magic Lantern (firmware “upgrade” for Canon cameras). You can further bracket the ettr-ed shot.
And many other useful features for landscape photos.
That’s one more reason that I should finally try Magic Lantern. Thanks for letting me know Daniel! 🙂
Hi Martin, really enjoying your podcasts, and shooting to the right has really clicked with me…never considered it before. Now I’m shooting at iso 6400 all over the place! Thank you so much, the noise difference is really noticeable. Great stuff 🙂
That’s great! Thanks for letting me know, and for listening to the podcasts Fraser!
Hi Martin. Awesome article! I think your reference to 14 bit as a 65536 tonal range is wrong though. I think it should be 16384 tones (2^14 tones). Just being a bit picky, I know 😀
Picky? Maybe, but correct you are. 🙂
I don’t recall why or how I got to that number, but that is 16 bit, and 14 bit is as you 16384 as you point out.
Thanks for bringing that to my attention Rui!
Love your images and the podcast/blog! Just got myself into printing and quickly finding out what a great resource you are on the topic. Just bought Making the print as well, looking forward to dig in.
Regarding this topic, does it make any difference if you shoot with a camera with iso invariance (which I think is the correct term for it). I’m shooting with Fuji cameras, mainly X-T2 and X70. If I understand it correctly, with a camera turning up the ISO in camera has the exact same effect as brighting the image with the exposure slider in e.g. Lightroom?
Hi Petter,
Thanks for the kind words. I’m pleased you are enjoying your printing and that my content is helping with that.
You are correct about ISO Invariance. I covered this here: https://mbp.ac/520
In practice, you can bump up the ISO after the event, but there are a number of things to keep in mind, and I do recommend that you do some tests similar to those that I did, so that you can get a good idea of the limits of ISO Invariance with your camera.
Having said that, I have found that I have continued to shoot to the right, and I’m still enjoying the results more this way. I find it a pain to think about the cutoff point, and you would have to modify exposure on almost every photo anyway, so the benefits of not using ETTR are tiny in my opinion.
How it has changed my photography though, is that when there simply isn’t enough light to get a fast enough shutter speed, I am now not worrying about that as much as I used to, and am more comfortable with falling back on increasing Exposure in post than I was. That’s about it though.
I hope that helps.
Happy New Year!
Regards,
Martin.