It’s pretty much common knowledge that the copyright of a photograph comes into being the moment you release the shutter and the image is saved to your memory card. It’s fine to put a copyright notice on your images when you post them to the Web, and you have the right to try to litigate against anyone that uses your images without licensing the image or receiving permission from you.
You’ve probably also heard through various Podcasts though, that although you have the right to try to get some sort of retribution for unlawful use of your images, without registering the copyright of your images, you would probably not even find a lawyer that would take on your case, unless you shot something very special, and there was a chance of a very big pay check for your lawyer on winning the case.
Before I go on, I will just clarify that I’m not a lawyer and I have no training in this area at all. I’m just a photographer with a task to do in registering my images, and I imagine that most of you reading or listening to this will be in exactly the same boat. So today I’m just going to walk you through the process of registering your images with the United States Copyright Office, which is a section of the Library of Congress. I put this off for years, because it seems like such a daunting task, but really, it’s very easy, and I wish I’d done it sooner.
Some of you will probably also be wondering why someone living in Japan would register their images with the US Copyright Office. Well, this is simply because I believe the system to register online in the US to be very simple, and because pretty much every country that you can think of has some kind of treaty or convention with which they bought into the US Copyright laws, so it’s probably the best single place to register. You can see details of which countries are signed in the Circular 38a which is available from the US Copyright Office Web site at www.copyright.gov.
What to Copyright?
Before we hop over to the US Copyright Office to take a look at the process, let’s first consider what we will copyright. Now that you can do this online, you could literally zip up your entire image library, and register the whole thing for just US$35. Consider though that you will probably never use some of the multiple shots of a scene or subject that you made while drilling down to the final shots that you were very happy with. In last week’s Podcast I spoke about how I keep all of my final selects in a separate folder. There are just short of 2,500 images in this folder and this is all that I registered. I don’t intend to publish any of my other RAW files, and if I do, I’ll have to register them later, but that’s not a big deal now that I’ve finally taken the time to understand the system.
Published, or Unpublished Work?
It’s also pretty important before you register to consider whether or not your work is Published, or Unpublished, because the process is different based on this. If you have a library of images that you’ve never posted to the Web, or displayed in public in any way, then you could register them all in one go, regardless of the year that you shot the images. If you have been putting your images on the Web though, and the Web site had no way of stopping the general public from looking at the images, then they are Published, and should be registered as such.
The problem that I found because of this was that you have to register the date that the work was first published, and then the year that the work was completed. And, the year that the work was completed has to be the same year that the work was started.
I originally intended to register all 2,500 of my images in one batch for $35 but this wasn’t possible because I’ve been putting my images on my Web site since 2003. In 2003 I published images from as early as 1991, but because I didn’t display these until 2003, I did register this batch together. For the following years after that, I had to split my registration into yearly batches. Because of this, I had 9 batches of images, at $35 each, so in total it cost me $315.
UPDATE: Note that I have since found that there is a big difference between the rights you have if you register your images more than three months after publication. Please check this article on The Copryight Zone, brought to my attention by Paul Kelly.
Prepare Your Images
I also suggest that you prepare your images before you start the registration process. If you are going to upload by year, as I did, and you don’t have your images in separate folders per year, use a program such as Lightroom to display your images by Capture date. Once you have your list of images for each year, ensure that you have all images selected, and then fill in the Copyright field in the IPTC data. You can find the IPTC data towards the bottom of the right panel in the Lightroom Library Module, though you may have to select IPTC from the pull down in the Metadata panel. I always have EXIF and IPTC selected here.
First ensure that you add your name to the Creator field in the Contact information. This should already be filled out if you add your name to each image in the camera.
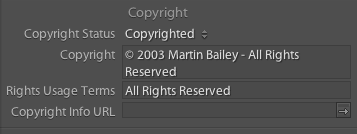
Then make sure that you select the Copyright Status as Copyrighted, and enter at least the year that you made the image and your name in the Copyright field. I enter “© 2003 Martin Bailey – All Rights Reserved”. This is also because this is displayed by some Web sites, so I like to have all information displayed from this field. I also then add All Rights Reserved to the Rights Usage Terms field below the Copyright field, for good measure.
As long as you select all the images for that year in Lightroom, this information will be added to all images. Then, with them all still selected, export the batch for this particular year. If you are going to export all of your images in one batch, then you just need to select by year to add your copyright information, and then you can export the entire batch later. Unless that is, you intend to export an insane number of images. If that’s the case, you would probably end up with a single zip file that’s way too big to upload after registration, and so you might want to consider exporting per year anyway.
You will want to resize your images, because they become public information once registered. Of course, the chances of someone trying to steel you images from the Library of Congress are pretty slim, so this is less of a worry than final size of your zip file, and the time taken to upload your files at the end of the registration process.
Image Size
I re-size my images to 900 pixels in width, and a maximum of 700 pixels high. Of course, if the image was a landscape aspect, then 9oopx wide is going to result in a 540px high image but for portrait images, there’s really no need for them to be much bigger than 700 pixels high. I also export at compression 7 on a scale of 10, though you could reduce this to around 5 to save on size if you have a lot of images to package up. 7 has virtually no visible signs of the image having been compressed, and the file size is pretty small for images of this size. I exported each year into a folder named with a number, such as 2003, 2004 etc. and then zipped these by right clicking each folder and selecting Compress “2003” etc.
Registering
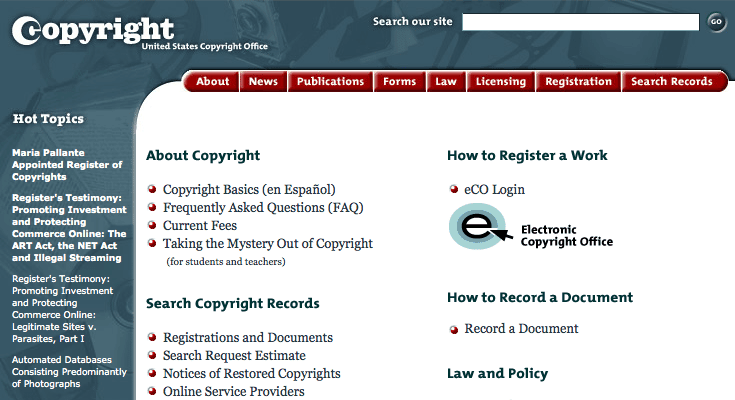
Once you have your images prepared, we’re now ready to start the registration process. First let’s head over to http://www.copyright.gov. The screen will look like this. I hope I’m not infringing any copyright laws by using this screenshot. This certainly would be the wrong people to mess with on copyright issues.
There’s lots of great information on this page, so do take a look around, but once you are ready to start the process, we can go ahead and click on the eCO Login link, marked Electronic Copyright Office.
If this is the first time you are doing this, then you’ll first need to create an account. It’s just like signing up for pretty much any web site, but you do need to provide a pretty strong password. I think it had to be eight or more characters long, and contain at least one number and one symbol, in addition to alphabetic characters.
Once you have your account successfully created, let’s go ahead and login. Once you are in, look for the Start Registration button towards the top of the page, and give that a click.
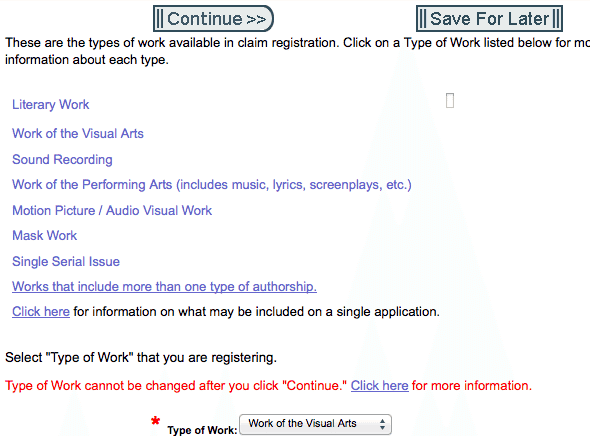
The first screen is to select the type of work that you are registering. For photographs, you’ll want to select “Work of the Visual Arts” from the pull down menu.
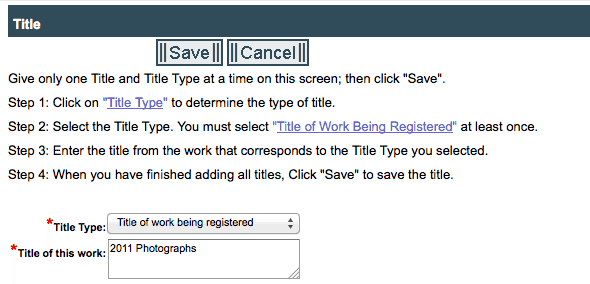
Once selected, click the Continue button. From this screen you’ll need to click the New button, to provide a Title for this body of work. Under the Title Type, select “Title of work being registered”, and then type something that describes the work. This doesn’t need to the be actual title that you gave your images, just a generic title for the body of work, such as “2011 Photographs”. For my 2011 registration I actually used “2011 Photographs to Aug 14”, so that I know where I left off. Unless I shoot something very special between now and the end of the year, I’ll probably wait and do one more registration at the end of 2011, to top this up.
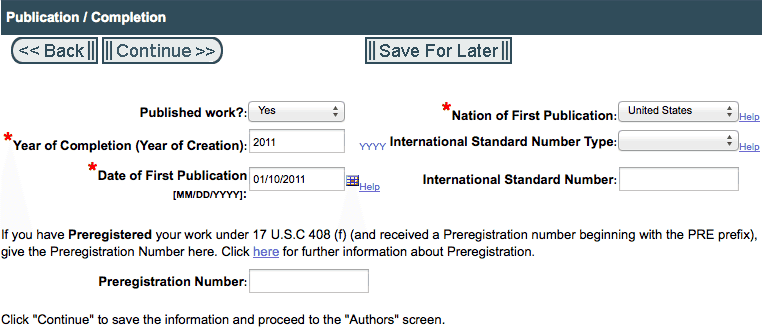
Once you’ve provided a title, click the Save button, and you’ll return to the last screen, and click Continue again. On the next screen you are asked if the work has been published or not. If you have not publicly shared your work, then select No, and then select the year that the work was completed. This is a little ambiguous, because if you are talking about an entire body of work, theoretically you could have started working on the photos years ago, but only completed your body of work this year. In this case, I’m assuming that 2011 would be fine, but if you don’t trust me on this, get help from a lawyer.
If you have publicly shown your work, then you’ll need to select Yes, and then provide a bit more information. Again there’s a year of Completion, and Date of First Publication. Now, here, I put the date that I created the first image of the year, thinking of the year as the start of the body of work, and then entered the actual year in the Year of Completion field. These have to be the same year for Published work, and this is why I had to split up my registrations into batches for each year.
For the Nation of First Publication, I chose the United States, because my Web servers are based in the US. By the way, for larger screenshots that get resized in the blog post, go to the bottom of this post and click on the images in the gallery to see in more detail.
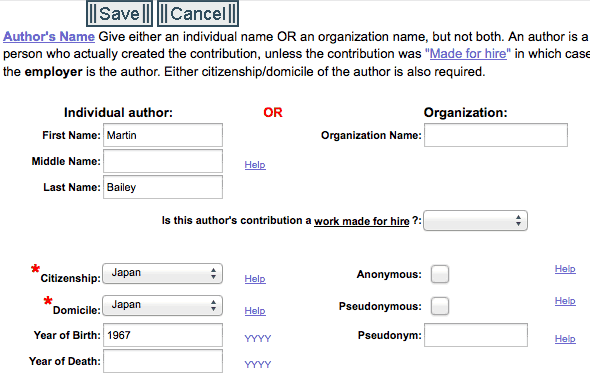
On the next screen, you are asked who the author of the work is. Assuming that this is you, all you need to do is click the Add Me button, then fill out the additional data, such as your Citizenship and where you live, and date of birth if you want to. There’s also a date of death, but hopefully we can all steer clear of that field for a while.
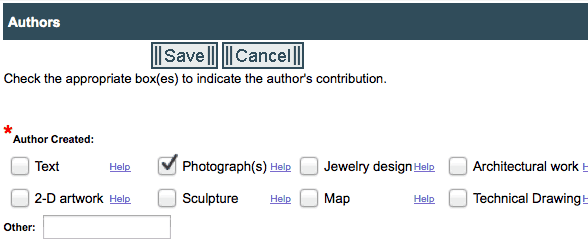
Note here that you will probably want to ignore the Organization field. Even if you work as an organization, you’ll want to keep your copyrights in your own name. Once done, click Save and you’ll be asked what you created, so select Photograph(s), and click Save and then click Continue.
On the next screen you’ll be entering the Claimants name, and this is you again, so click Add Me and fill in your address and select your State. If you are not based in the US like me, then do select Non-U.S. from the State pull down menu. I’m not going to include a screenshot here, as much as I’d love for you guys to come around for a coffee and a chat, but one thing to note on this screen is that you will ignore the Transfer Statement fields. If you are registering our own work this is not necessary, and if you’re not, you’ll need help from someone other than me to complete this. 🙂
Having clicked Save, once again click Continue and on the Limitations of Claim screen, just click Continue again. There’s no reason to limit what you could claim against, as your photographs can pretty much be used in any of these ways and many more.
On the next screen, Rights & Permissions, you’ll click Add Me again, and this time add any phone numbers etc. as well as ensuring your address is fully filled out. Another tip here for non-U.S. applicants is that when you first register with the system, the number checks for phone numbers make you add your number is a totally whacked out way, with the first three numbers in parenthesis, then a gap, then three digits followed by four digits with a hyphen in between.
This is not how Japan writes down phone numbers, and it also gives you no way of adding a country number etc. I found though, that although these fields are populated by what you provided when you registered, you can change the format here to something closer to home and the system will let you continue. You can also now add an Organization name if you work as a registered company. Having checked the State pull down again, click Continue.
Same drill again on the Correspondent screen. Click Add Me, and ensure that all the details are filled out, then click Continue.
And once again, click Add Me on the Mail Certificate screen and this time you have to provide an Organization name, then click Continue.
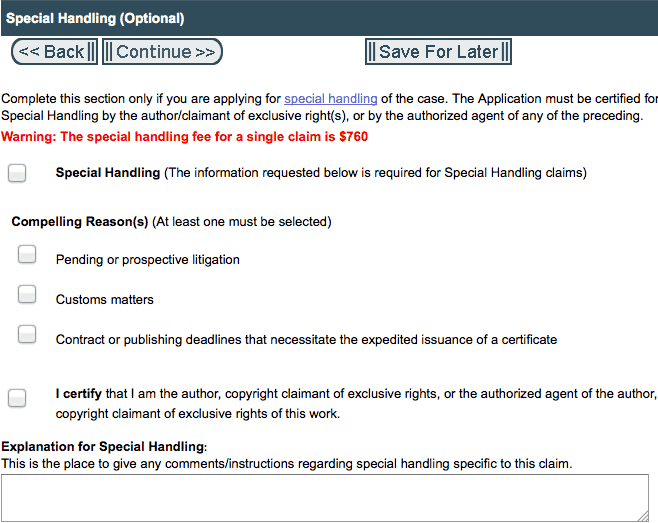
Almost there now. Bear with me a little while longer. The next screen is to select whether or not you need Special Handling of your copyright registration. Unless you have just photographed someone very famous doing something very bad, and you need your copyright registered and documentation mailed to you straight away, or unless you just want to pay the extra $760 to see how fast they can expedite your claim, just click Continue.
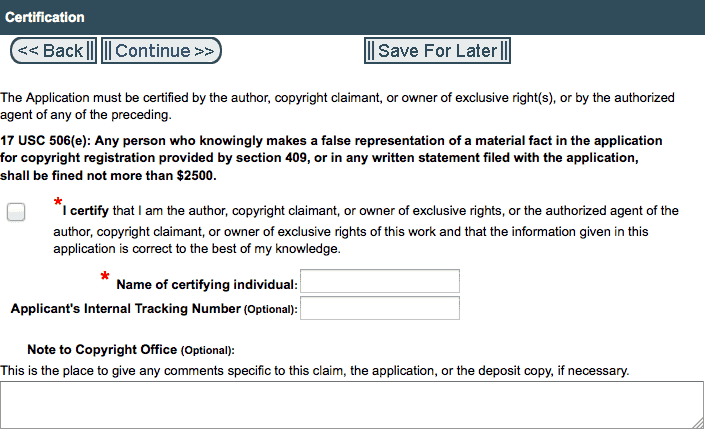
On the next screen, Certification, you need to check the check box and type your name to certify that you are the author of the work and own the copyright that you are about to register. Of course, it would be against the law to grab someone else’s work and try to register it, and there’s a hefty fine of up to $2,500 for doing so. Assuming that you are registering your own work here, check the check box, type your name and click Continue.
Now, we’re finally on the last screen, the Review Submission part of the application process, and here you’ll find all the details that you entered so far. Now, before we jump to the next part of the process, if you intend to register images again in the future, you might want to click the little blue link next to the Save For Later button, that says “Save As Template”. If you save a template now, all of the data that you just entered will be saved, and you can create future claims in less than a minute, just needing to update the title and dates that the images were shot etc. It makes future registrations very, very quick.
Once you’ve created a template, click Add to Cart. You can put in multiple claims and add them all to the cart before you checkout, but once you have all of your claims input and ready to go, click the Checkout button. You’ll be asked if you want to pay via a Deposit Account or Credit Card. I don’t have a US deposit account, but even if I did, I’d probably use a credit card to leave a nice record of the payment on my credit card statement.
When you select your payment method, at least when you select credit card, but I assume both, you are taken to a U.S. Treasury site to make your payment. This is as simple as any online credit card payment.
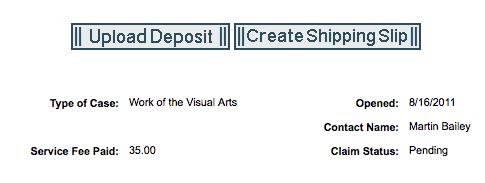
Once completed, you will go back to the U.S. Copyright Office site, and see your open case, or cases in a table. From here you need to click the blue linked Case number, and there you’ll see an Upload Deposit button. Click this to upload your images that you prepared earlier.
The upload screen is actually too narrow when it first opens, so you will need to grab the right side of the browser window and make it a little wider so that you can see both the upload fields and a title field to give each uploaded file a title. Just browse to the zip files that you prepared earlier, and select the ones for this particular claim, then add something descriptive in the Brief Title field. I just called each of my uploads the number for the year of the images I was registering my copyright for.
OK, so once you’ve uploaded your images or zip file, congratulations, you’re done!
I assume if there are any problems with your claim, you will be contacted by someone for additional information, but you should be careful to do everything necessary to make the process as smooth as possible.
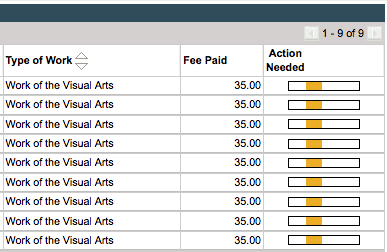
Note that if you go to your Open Cases list to check the progress, you might get a bit of a shock when you see the orange indicators in the Action Needed column. As long as this is not a bug, when you roll your mouse over these orange indicators, you should see a yellow tool tip pop-up that says “No Action Needed”.
Once you have done, you’ll receive an email politely thanking you for registering your claim, and stating that “The effective date of registration is established when the application, fee AND the material being registered have been received”. After you have everything filled out, your fees paid and your images uploaded, it apparently takes around three months for the claim to be processed and the certificate of registration mailed out to you.
So, I hope that has helped in some way. I know that this was one of those things that I put off for a long time because I thought it was going to be a big task with lots of red tape, but it really wasn’t like that. Hopefully you’ll have seen here that although the first time has a few screens to go through, the information you need to provide is simple, and once you have a template made, future or multiple registrations really do take a matter of minutes each.
Housekeeping
Just a couple of quick bits of housekeeping before we finish today. Firstly, I was interviewed by Chris Marquardt recently, and although we had no plans for what we’d talk about before we started recording, we touched on quite a few interesting topics, so do listen to Tips From the Top Floor episode 515.
Also note that I have released information on my 2012 Snow Monkey and Hokkaido Photography Tours and Workshops. We’ll be heading out to Nagano from February 13 to photograph the adorable Snow Monkeys and then on to Hokkaido to photograph the majestic Red-Crowned Cranes, Steller’s Sea Eagles, White Tailed Eagles, as well as Whooper Swans, Ezo Deer and the beautiful landscapes of the Hokkaido Winter Wonderland. We return to Tokyo on February 24, so we have 12 full days of photography, including in the field tuition from me, and a few classroom sessions and critique sessions that the entire group agreed in the past adds so much value to what was already an amazing photographic experience. Seats are filling fast, but if you are interested in joining us, please take a look at our workshops page or drop me a line via our Contact Form if you have any questions.
Show Notes
Chris Marquardt’s Interview with Martin on TFTTF 515: https://mbp.ac/nw
Snow Monkey and Hokkaido Photography Tour and Workshops Info: https://mbp.ac/workshops
Music from Music Alley: http://www.musicalley.com/
Audio
 Subscribe in iTunes for Enhanced Podcasts delivered automatically to your computer.
Download this Podcast in MP3 format (Audio Only).
Download this Podcast in Enhanced Podcast M4A format. This requires Apple iTunes or Quicktime to view/listen.



Hi Martin!
Thanks so much for this valuable podcast about how to copyright your creative work. I`ve been thinking of how to do this for a time now but as you yourself said, it has seemed to be a to daunting task… but not anymore after listening to your podcast.
Thanks again for giving us this valuable resource, much appreciated;) Katarina
Martin-
I enjoyed your description of the Copyright registration process. I had always wondered what it would take and the benefit of it when technically we automatically hod the copyright, wether registered or not.
I wanted to point out a resource in case you were not aware of it, in the Photo Attorney blog by Carolyn E. Wright. She has a great collection of posts on copyright and other photographic issues.
-Dan
Hi Katarina,
You’re very welcome. Things like this always seem a little scary, but I figured it shouldn’t be. Once I knew how easy it was I thought I’d share this while it was still fresh in my mind.
Hi Dan,
Thanks for visiting. I’m pleased this was useful.
I’ve heard of Carolyn E. Wright, but never remembered long enough to check out her site. Thanks for the link!
Martin.
I remembered listening to this when you first released it, but just got around to completing the process tonight. The government website is not user-friendly, so your tutorial truly helped me feel confident about completing the process! Frankly, I just put all the images from my website/blog into one zip file and called it 2012. There are maybe a dozen shots from 2010, maybe 25 from 2011, and let’s say 250 from 2012. Will this come back to haunt me later if someone actually uses one of my images without permission? The way I understand it, I’m protected from this day forward, but not if someone illegally used one of my images prior to today, is that correct?
I’m pleased this helped Byron.
I’d say it is better than not having them copyrighted at all, but I don’t know the laws around older images. I would imagine you have every right to fight against copyright infringements even if they happened before you registered the images, and you would certainly have a better chance of winning if they are registered, but here too, I don’t know the full legal aspects.
Cheers,
Martin.