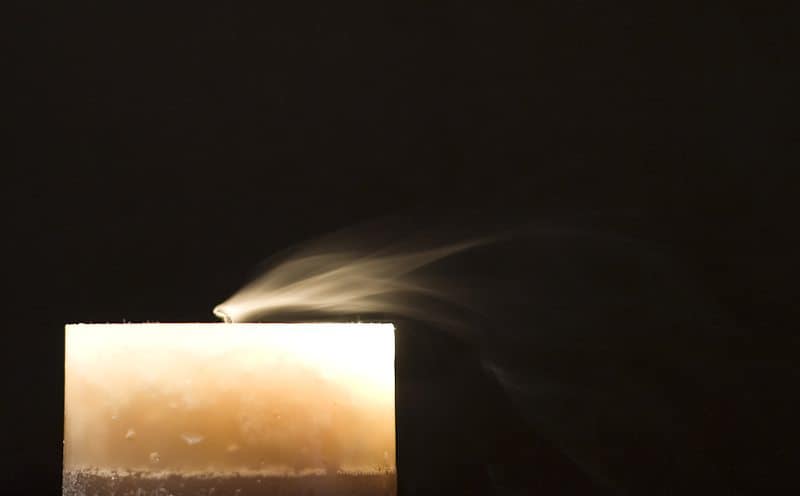
Let’s get right into it now though, and take a look at the third place winner’s image. In third place is David Peacham, from Perth, Australia, with “Lights Out”. As I have back-stories from each artist, I’m going to read the back-story first, and then add my own thoughts on each image.
Lights Out (© Copyright David Peacham)
David Peacham’s Back-story:
Brainstorming a couple of ideas I was thinking of using candlelight in some way. I was thinking how I could incorporate it in a shot somehow and looking for candles around the house to use. We have a couple of large funky candlesticks given to us by friends and we haven’t lit the candles on these before so I was a little hesitant to do so right away. I had to setup in the darkest room in the house as I was shooting during the day. I used our black suitcase as a backdrop and had the blinds down blocking as much light as I could. In the first couple of shots I did away with using the burning candle as it seemed too bright for quiet light. My thoughts turned to the smoke and the glowing wick just after the candle has been blown out.
I tried a number of exposure times to try and capture the smoke billowing away from the blown out wick, but wasn’t capturing the smoke clearly enough or with enough drama for my liking. Thinking on how I could capture this better I grabbed a torch and had a look to see how I could place light into the shot to highlight the smoke. This took a bit of contorting to get right as I had to get my placement right to enable me to hold the light, press the shutter and blow out the candle. I was using the self timer on the camera so I had 10 seconds to get in position and blow out the candle at the right moment. I took around 30 shots trying to get the right combination of light and smoke, and used most of a box of matches relighting the candle. In the end the shot with the more dramatic smoke and light combination surprisingly, to me, occurred when the light was pointed directly at the top of the candle.
Ideally I would have liked a little bit more smoke floating back up to the top right of the image and to have just the lingering glow of the burning wick, but I was pretty happy with the resulting image.
I am sure you are happy with the resulting image David this is great! For a start, you had me fooled that this light was residual light from the candle, but of course, as the candle was not lit by the time you tripped the shutter, there would have been no light without you shining the torch down onto the candle head, but it looks so natural I didn’t even question this until I read your back-story. I see that you used almost a one second exposure to help capture the smoke, and the light from the torch certainly helped to highlight this. I like the composition with the candle over to the left, with the right edge of the candle almost in the center-line of the image. This also of course gives the smoke room to flow into.
I think it’s great that you’d taken the time to visualize and set up a shot like this, and really do think the results were worth your trouble, but I thank you for going to that trouble anyway. Great photograph David, and congratulations on a well earned third place.
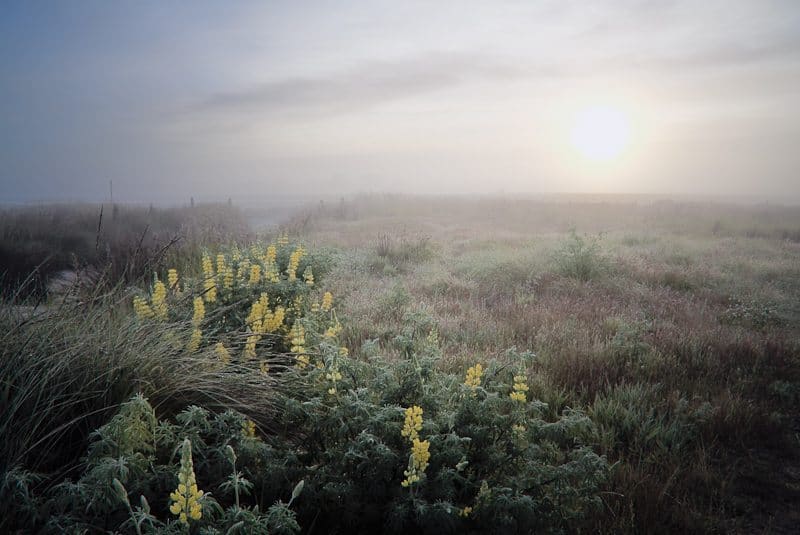
Next up, in second place, we have Thysje from New Zealand’s beautiful image “Lupins at sunrise”, and another great Backstory to go with it.
Lupins at Sunrise (© Copyright Thysje Arthur)
Thysje’s Back-story:
This shot is one of a series taken on the morning of the 6th of December, at a place I fondly call My Back Yard. My website and blog feature a lot of images taken in My Back Yard and the reason is simple – I am fortunate enough to live within walking distance of this place – a wetland reserve and tidal lagoon.
Early mornings and late evenings I love to wander in the area. So does the dog! This particular morning was very wet and dewy and extremely calm with a light patchy fog clinging to huge areas of the landscape. Nowadays I always have in the back of my mind the current assignment and so I made haste to Barker’s Brook – a drainage ditch running into the lagoon – where I knew there was a lovely patch of wild lupins, as I couldn’t help but think about the light.
In the scene, Barker’s Brook is to the left of the lupins and enters the lagoon in between the posts near the horizon. The tide was out and the lagoon, barely seen near the horizon was mostly mud. A narrow path can be discerned (just) leading from the bottom right of the image towards the horizon. It’s a path I walk often at high tide as the ‘S’ shape of the brook going into the lagoon is a key compositional element in many of my shots.
I set up the scene so it looked pleasing to my eye, the main subjects being the lupins, and the sun. I set the camera to manual mode with an f stop of 9. I’ve found f9 to be a sweet spot on my EF-S 17 – 85mm lens. Focal length was 17mm, the widest the lens would go. My camera has a crop sensor so effective focal length was 28mm (easily calculated using the little PhotoBuddy app on my iPod Touch). You can tell the image was taken using a wide angle setting as there is a curve in the horizon.
The base shot was taken in 1/13th second shutter speed, but I took shots both faster and slower (using mirror lock-up and a cable release) to get a choice of different exposures for combining in Photoshop using layers and masks. The reason was of course the very bright sky shooting into the sun. I did have a graduated neutral density filter on the camera which cut down a lot of the brightness, but even with this and mist the sun was too bright to get the exposure I wanted.
Before bringing the shots into Photoshop, I used Lightroom to correct the white balance as the camera had rendered the scene a little warmer than the actual scene. Once I was happy with the result in Photoshop, the psd file was imported back into Lightroom, where I did a very small touch up job with the brush here and there to smooth the masking, before finally exporting the image.
I thoroughly enjoy the assignments even when I don’t manage to participate. This assignment saw quite a range of interpretations and the standard is high. Thanks for your votes that placed me 2nd. Thanks most of all to Martin for making this all possible. And because I don’t Twitter, may I say here a special thanks to the sponsors Webspy.
Thanks so much for the detailed back-story Thysje! It’s great to take a morning walk with you into your Back Yard, a far cry from the balcony on my 4th floor Tokyo apartment. I totally love this image, with the fresh morning dew and congratulations on recalling that the lupins were there and linking that to the quiet light. You did a great job merging the two exposures together in Photoshop too. You really have managed to capture a feeling of quiet light here. I feel as though I can almost hear the silence, if that makes sense, and I almost feel the cool still air, and the occasional wave of warmth of the morning sun. I perhaps would have been tempted to run a gradient filter down the sky in Lightroom to darken it down just a tad more than this, but if you had, I’m sure it would have reduced the quiet mood of the shot, so I probably would have resisted the urge too.
Thysje’s Second Image (© Copyright Thysje Arthur)
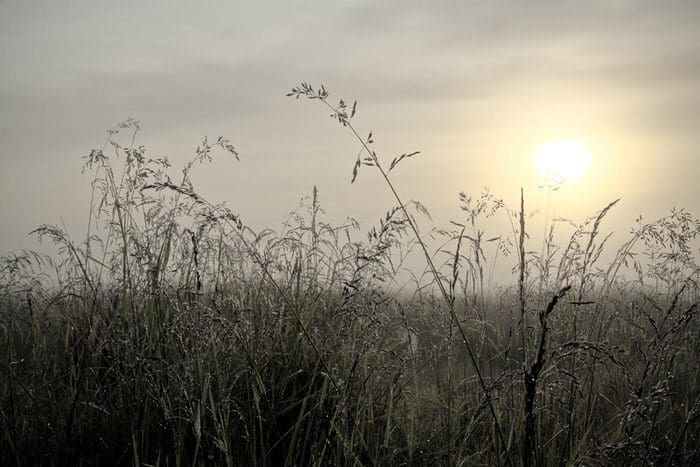
Thysje also provided a few other images from this morning shoot, and I wanted to look at a second here as well (above). The image is more a close up of some of the seeding grasses, looking along the grasses at eye-level rather than down on to the scene. I really love this image, and have to say that I personally would have been more likely to have uploaded this one for the Quiet Light assignment than the one that Thysje chose. Whether this one would have gotten more votes will never be known, but the simplicity of this shot, and the freshness is breathtaking. The sky has more detail and the sun better defined and warmer, at least to my eye. I like how the area of ground take up the bottom third, and the sky takes up the top two thirds, but with the grasses protruding upwards into the sky area. The colour palette is pretty selective, going from the warm yellow surrounding the sun, then paler yellow to white in the sky then various shades of green in the grasses. Excellent work Thysje in both this and your winning image, so congratulations on second place, and thanks for getting involved.
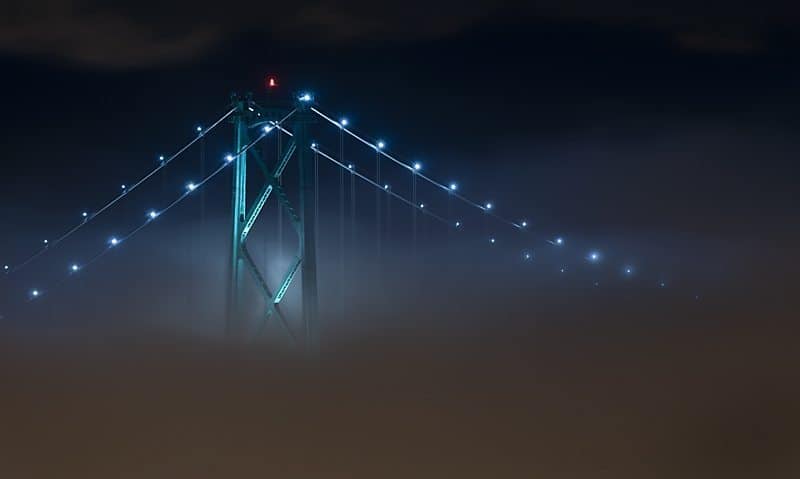
So, last up, steaming into the lead from the first month of this second six month batch of assignments once again sponsored by WebSpy, we have another amazing shot from Dan Newcomb of Vancouver, Canada, called “Bridge”.
Bridge (© Copyright Dan Newcomb)
Dan’s Back-story:
I spent that day tracking down bald eagles in Squamish until it was too dark to shoot. When I returned to the city the fog was rolling in. The fog occasionally creeps in this time of year when the temperature drops and the ocean is still relatively warm. It’s a rare enough occurrence that I knew I had to take advantage of this blanket covering the city. My brother was out the night before shooting time-lapses of the fog but I wasn’t able to go. I was counting on the fog to show up so I could shoot for this assignment and if it didn’t happen I wasn’t sure what I was going to do. I was glad it showed up, I was lucky to be in town and I was thankful I was able to go out to shoot it.
I ended up shooting time-lapse scenes from various locations until 5am. These were the 7500 photos I referred to in the roundtable podcast. The Lions Gate bridge shot was taken from a location in West Vancouver at around 1am. It’s just one of the frames of that time-lapse sequence. Unfortunately I was shooting over a house that had a heating vent. The dark smoke/steam kept blowing into the shot so as these things turn out I think the still shot looks better than the video.
Thanks for the back-story Dan! I have to say that I totally envy you having witnessed this fog, and the way you capture it here is not only beautiful, but the epitome of the Quiet Light assignment. I see that you used a 3 second exposure for this image, which was probably perfect for getting the fog to move just enough to make it smooth, and give a dreamy look to the parts of the bridge that are surrounded by the fog, but also a fast enough exposure to not mess up those same parts of the bridge that it engulfs. This is simply beautiful light, mostly of course, being provided from the lights on bridge itself. The fact that the lights are all blue except for the single red light on the highest part of the bridge adds a lot to the image as well. In fact, the lines made by the blue light, remind me a lot of the iconic Mount Fuji here in Japan, and I can almost imagine the red light to be the tip of the sun as it rises perfectly in line with the peak of the volcano.
I think most people will agree that your dedication to shooting the images that it takes to make your time lapse videos is something that not many of us possess. Dan also provided a link to a Vancouver Fog time lapse video that he put together from the images shot at this location, which I’ll link to in the blog and show-notes, and I can tell you this place is amazing, as is Dan’s ability to capture it as he does. Please do check that out.
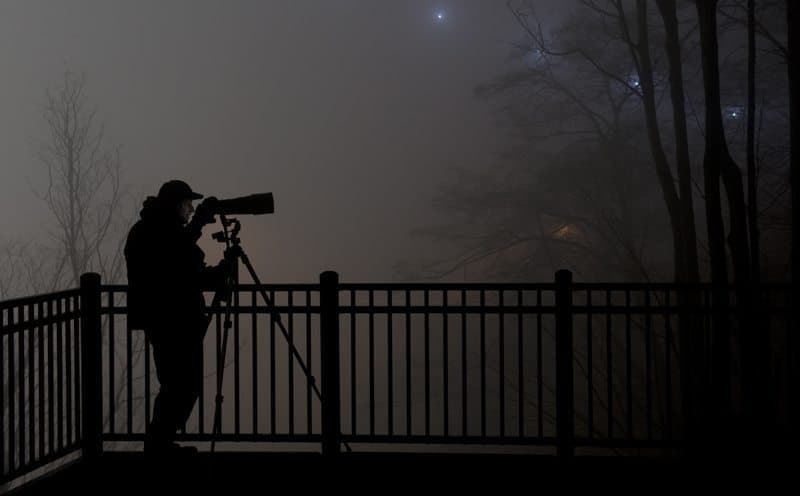
Self Portrait (© Copyright Dan Newcomb)
Dan also provided this self portrait of himself (above) shooting another sequence that is included in the video, and we can see how wrapped up Dan is to protect him from the obvious cold, and also again, we can see that wonderful quiet light in the fog against which he is almost silhouetted. This is all wonderful work Dan, as usual. Congratulations on yet another very well earned first place.
So, a quick reminder before we finish that this was the first of a six month batch of assignments from which we will accumulate all votes to find five winners that will receive prizes made available by our kind sponsors WebSpy. The first prize is an amazing HyperDrive COLORSPACE UDMA portable storage unit. I have actually just bought one of these myself, and will be bringing you a review in the coming weeks. The second prize is once again, a Lensbaby Composer, which opens all kinds of creative doors for the photographer, and then the following three winners will each receive an X-Rite ColorChecker Passport, which I have also just bought recently, and I’m incredibly impressed with. I’ll also be providing a review of this product very soon, so stay tuned for that.
Podcast show-notes:
Dan Newcomb’s Vancouver Fog Time Lapse Video: http://www.youtube.com/watch?v=vqWTV8rzz3s
Music from Music Alley: http://www.musicalley.com/
Audio
Download the Enhanced Podcast M4A files directly.


0 Comments